
"2024 Approved Discord Broadcasting Step-by-Step Techniques for Seamless Sessions"
Discord Broadcasting: Step-by-Step Techniques for Seamless Sessions
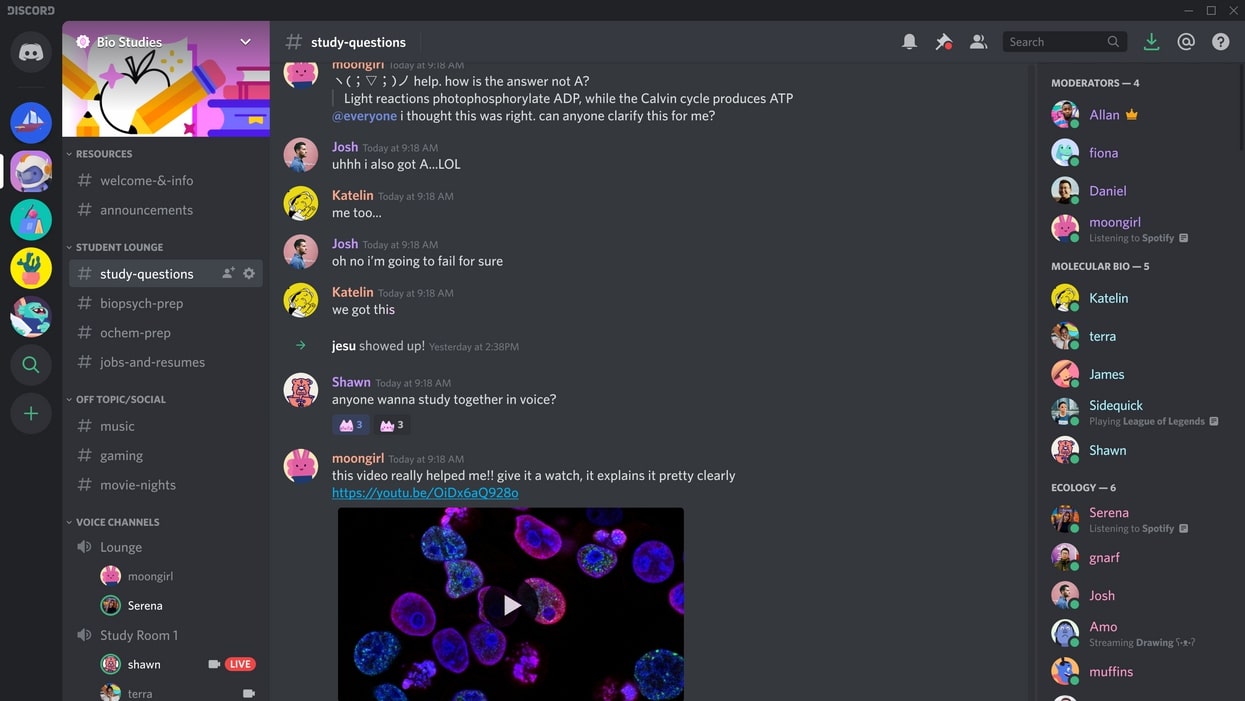
Discord is a great communication tool that also offers live streaming services. You can use this platform to engage and connect to your audience by conducting a live session. Through its “Voice Chat” feature, you can directly interact with your audience in a comfortable environment. If you are unaware of how to go live on Discord, this article can help you.
For your assistance, this article will instantly address how to live stream on Discord. Let’s dig into the details.
- How to Stream Videos on Discord
- How to Stream your Webcam on Discord
- How to Change the Shared Screen on Discord
- How to Stream Discord on my Mobile Phone?
- FAQs about the live stream on Discord
- Bonus Tip: Easily Record and Edit your Stream with Filmora
Part 1: What is Discord?
Discord is a popular platform created to offer a better communication experience between game players. The major reason for the massive recognition of Discord is its ability to generate servers instantly. Game players and other users can instantly create voice or text servers for enhanced communication.
Discord provides excellent flexibility to users by providing high-quality audio services with no background noise. Even if your friends are in different parts of the world, you can chat with them smoothly. You can create private and public servers in Discord to communicate with people having similar interests.
Along with using Discord Voice and Text chat features, you can live stream your gameplays. The live streaming on Discord won’t be a public show, as it will only be confined to your selected server. Through this, you can ask your friends for assistance while playing games. Moreover, Discord is also capable of capturing other screens. Hence, it’s a great platform for professionals, game lovers, and other individuals to communicate efficiently.
Part 2: Prerequisites for Stream on Discord
Many social media platforms put restrictions on users for live streaming. Some platforms require you to have a specific number of followers in order to conduct live streaming. However, in Discord, you don’t have to worry about such restrictions. By creating a server and channel on Discord, you can easily go for live streaming. Check the below prerequisites for performing a live stream on Discord:
1. Create your Discord Server
Step1 Open your Discord and hit the “Plus” icon given on the left side. It will open a small menu where you can select a template to start or create your own server.
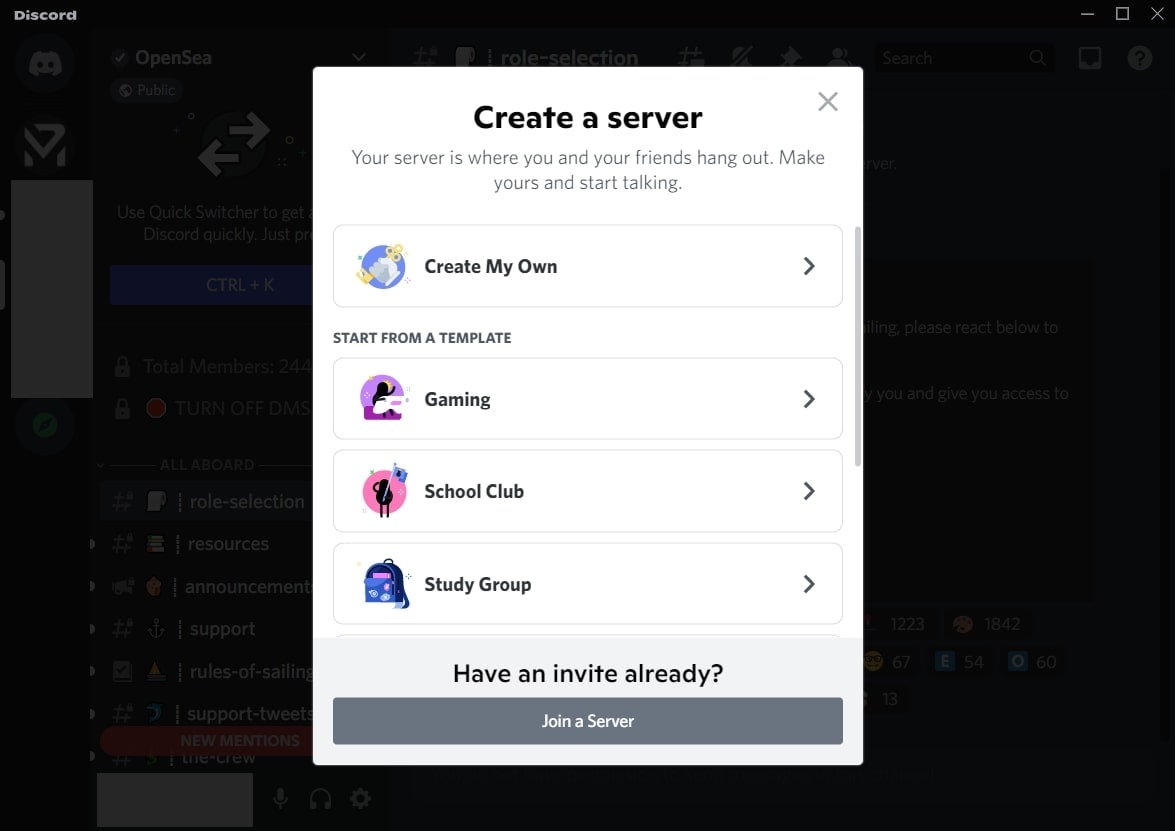
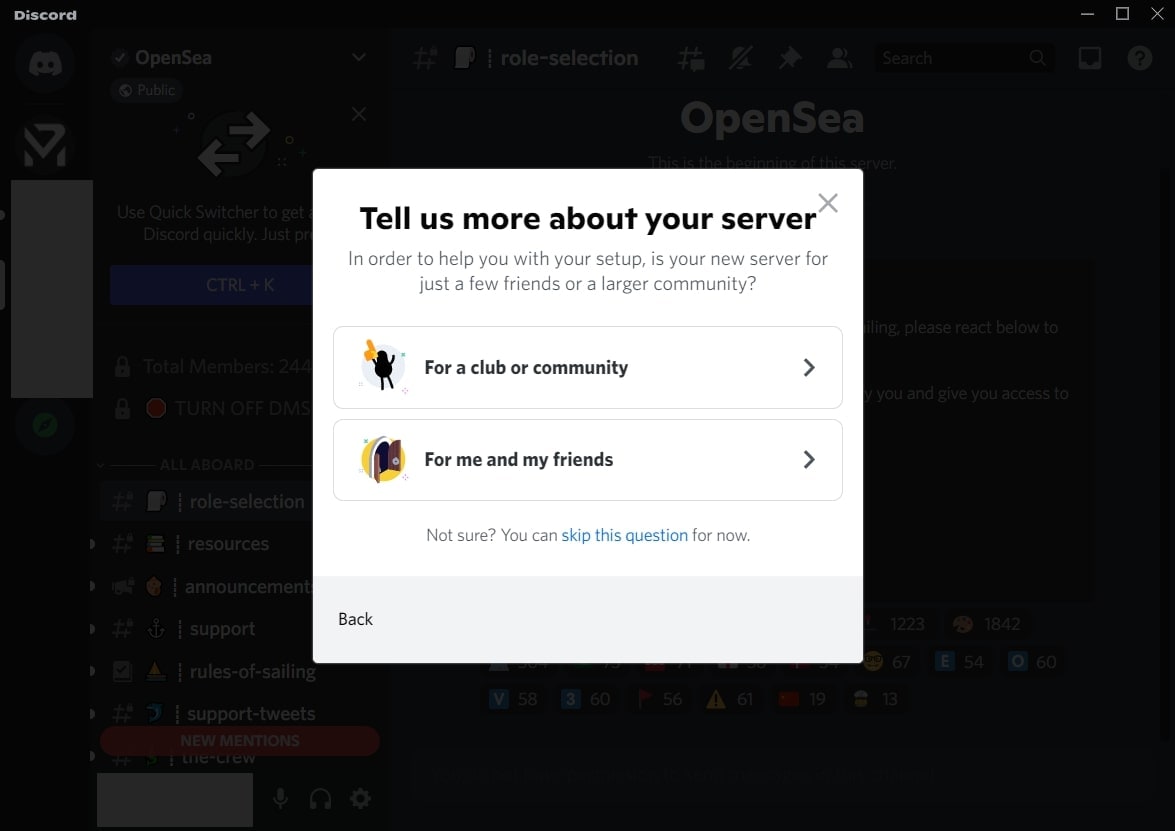
Step2 If you want to create your server, click “Create My Own.” Now select the type of server you want to create. Once done, create the server name and click the “Create” button.
2. Create your Discord Channel
Step1 To create a Discord channel, open any of your servers from the left side. Now tap on the “Plus” icon adjacent to “Voice Channels.”
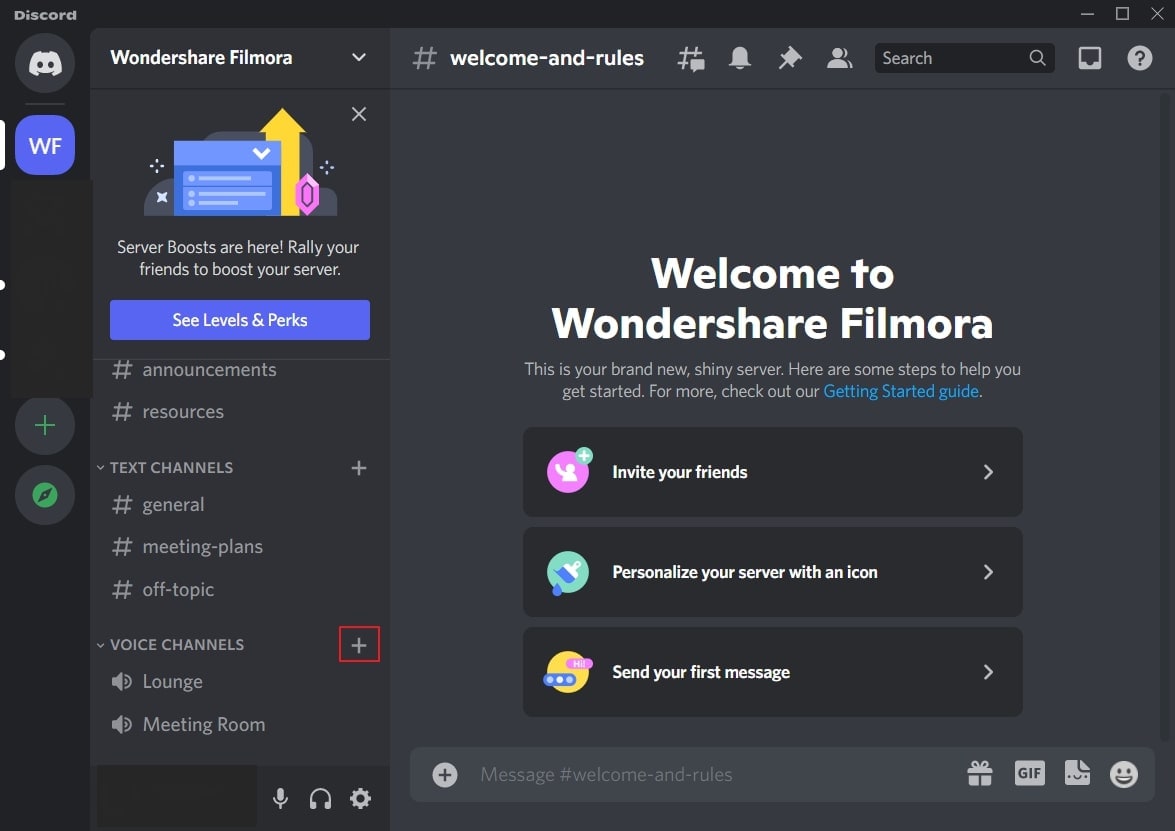
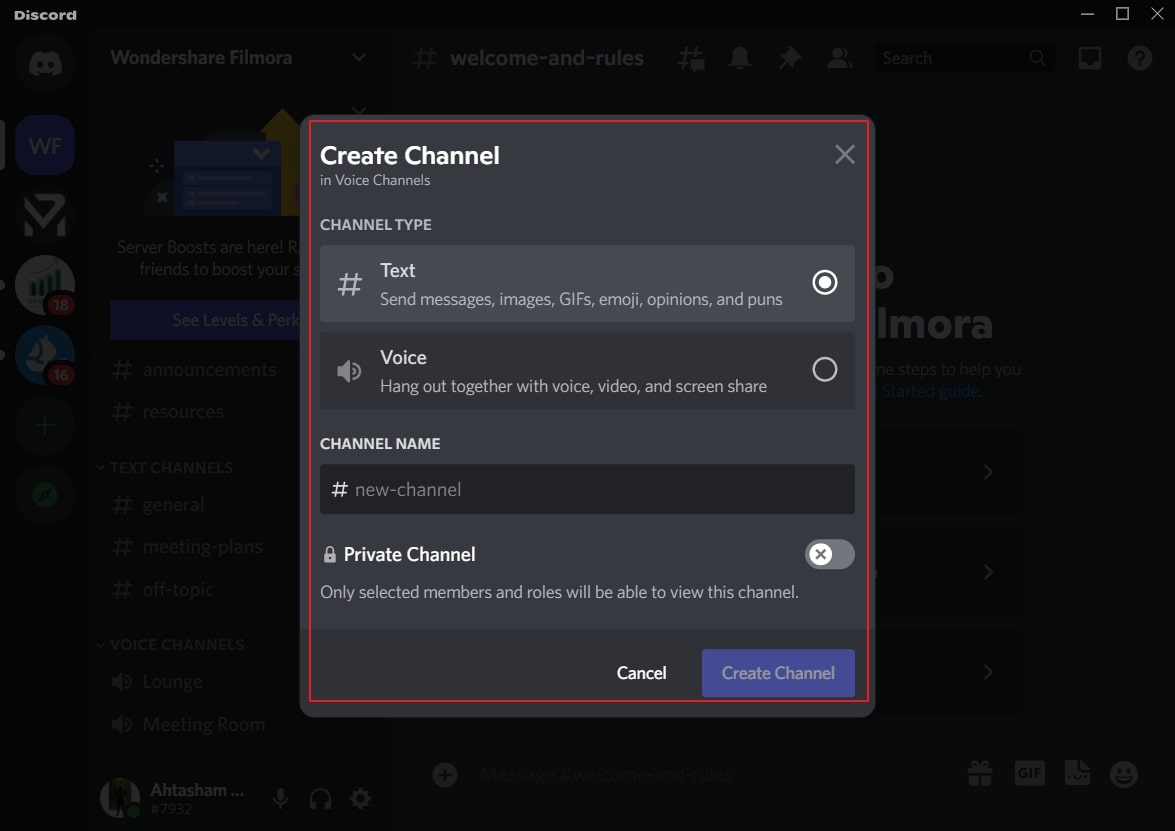
Step2 You can either create a “Text” channel or a “Voice” channel. After choosing the channel type, create a channel name. You can also enable the “Private Channel” option to create a private channel. Once done, click on the “Create Channel” button.
Part 3: How to Stream Videos on Discord
Once you have created a server and channel, you can begin your live streaming. Discord provides you with an option through which you can stream your videos instantly. To know the process, check the below steps:
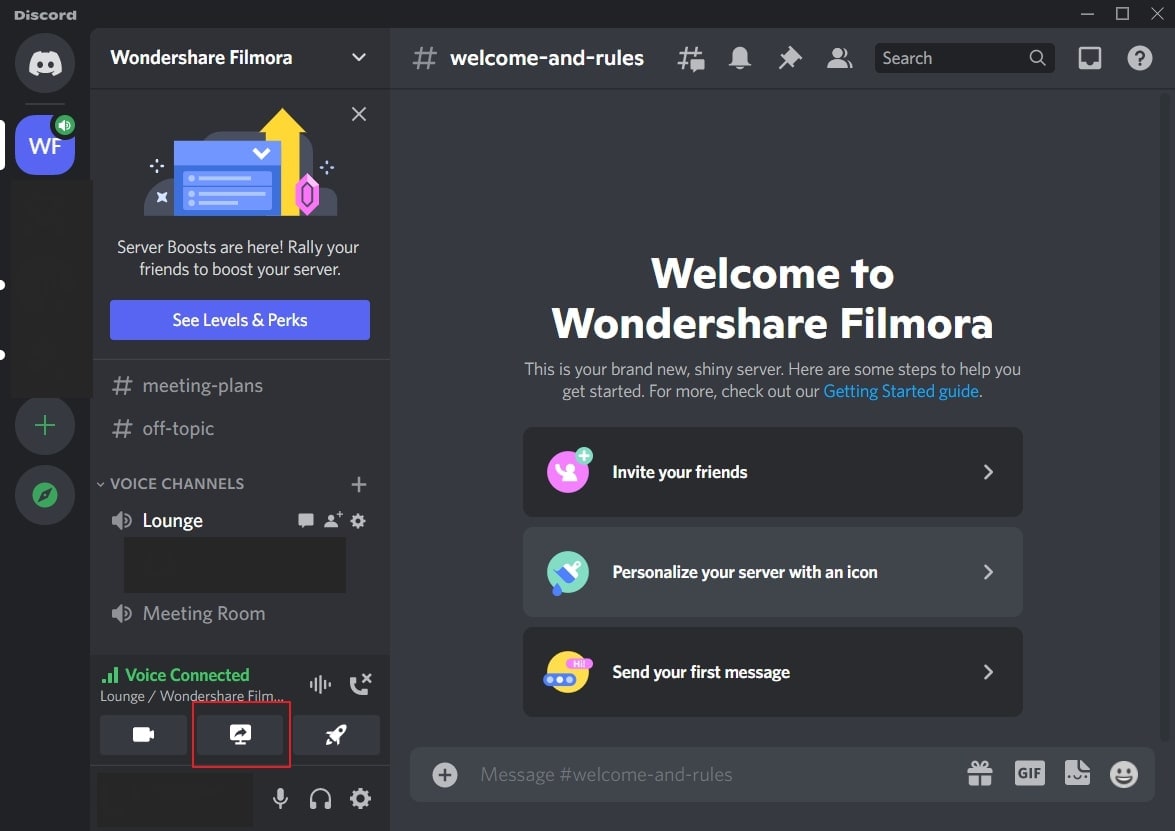
Step1 Open Discord and navigate to your desired server. Now proceed to your voice channel and click on the “Share Your Screen” button given below.
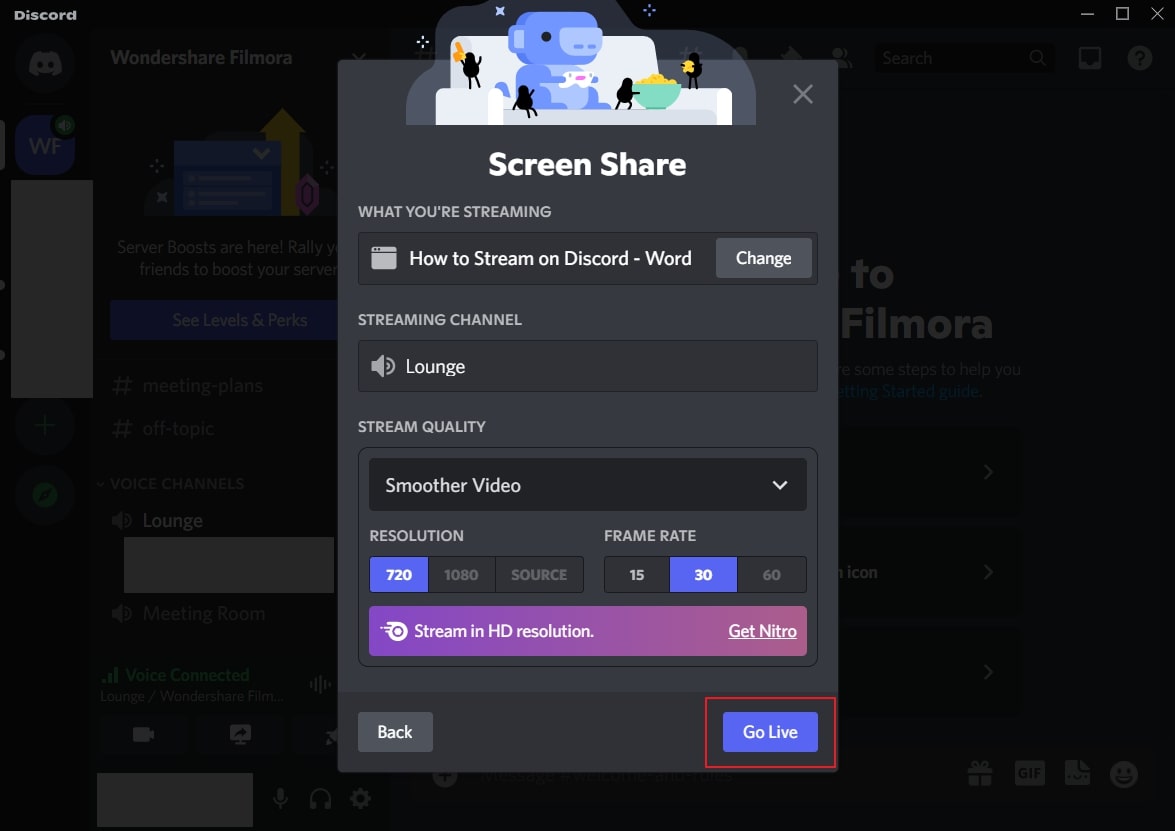
Step2 Select the screen you want to stream in the “Applications” tab. From the new menu, you can adjust the stream quality, such as resolution and frame rate. After adjusting the live streaming settings, click on the “Go Live” button.
Part 4: How to Stream your Webcam on Discord
Do you want to give a tutorial session through your webcam? Through live webcam streaming, you can demonstrate a particular product while giving facial expressions. Using Discord, you can stream your webcam with a single click.
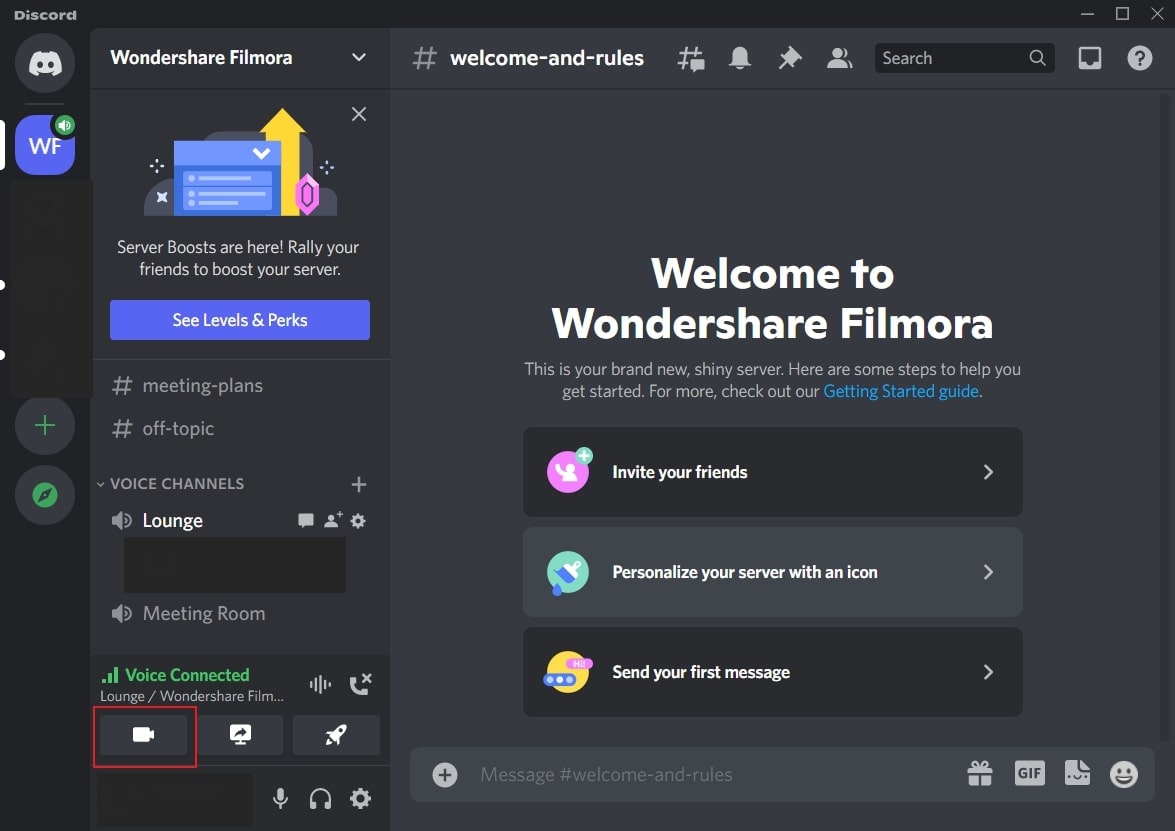
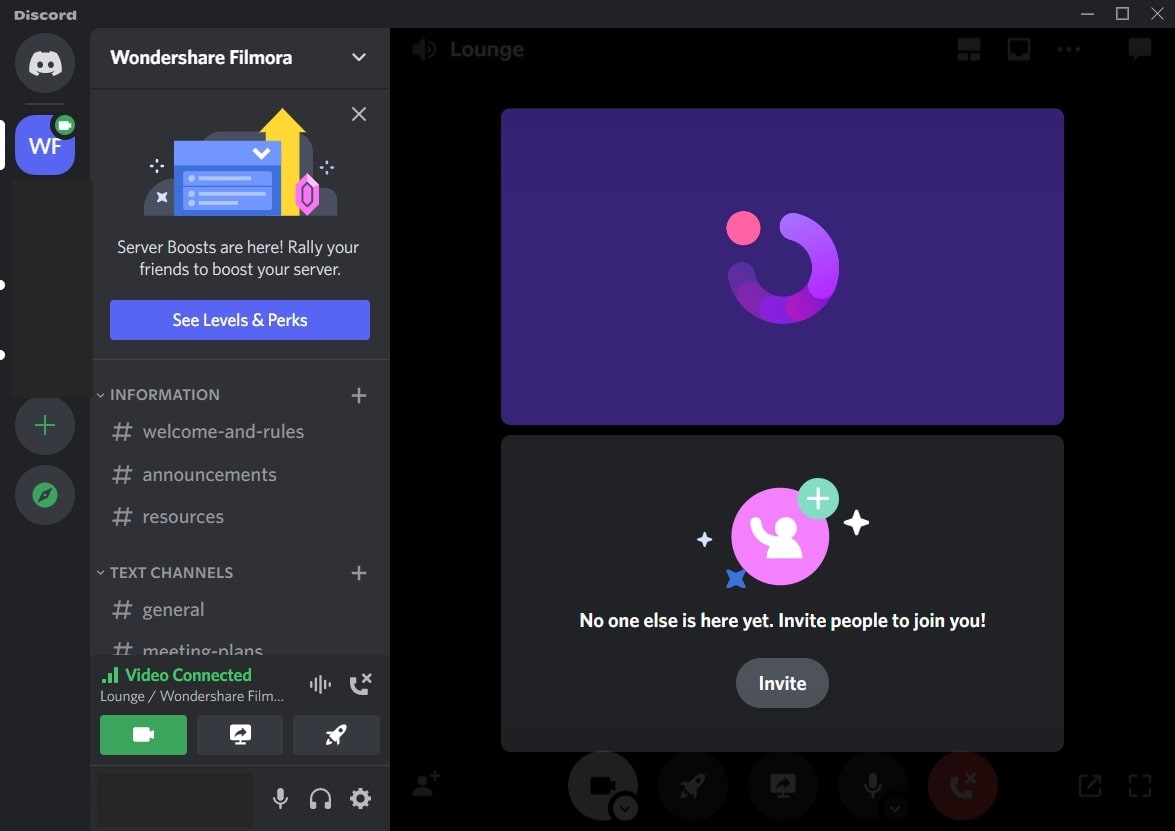
Step1 Once you have opened a server on Discord, go to your Voice channel. From there, tap on the “Camera” icon above your username.
Step2 It will open a new screen through which you can start an activity or share your screen. Moreover, you can also invite others to join your webcam streaming. Once done with your activities, click on the “Red” button to disconnect.
Part 5: How to Change the Shared Screen on Discord
Do you want to change a shared screen on Discord? If you want to open a presentation, web browser, or any other application, Discord can easily change the shared screen. Through this facility, you can quickly shift between multiple screens without hassle.
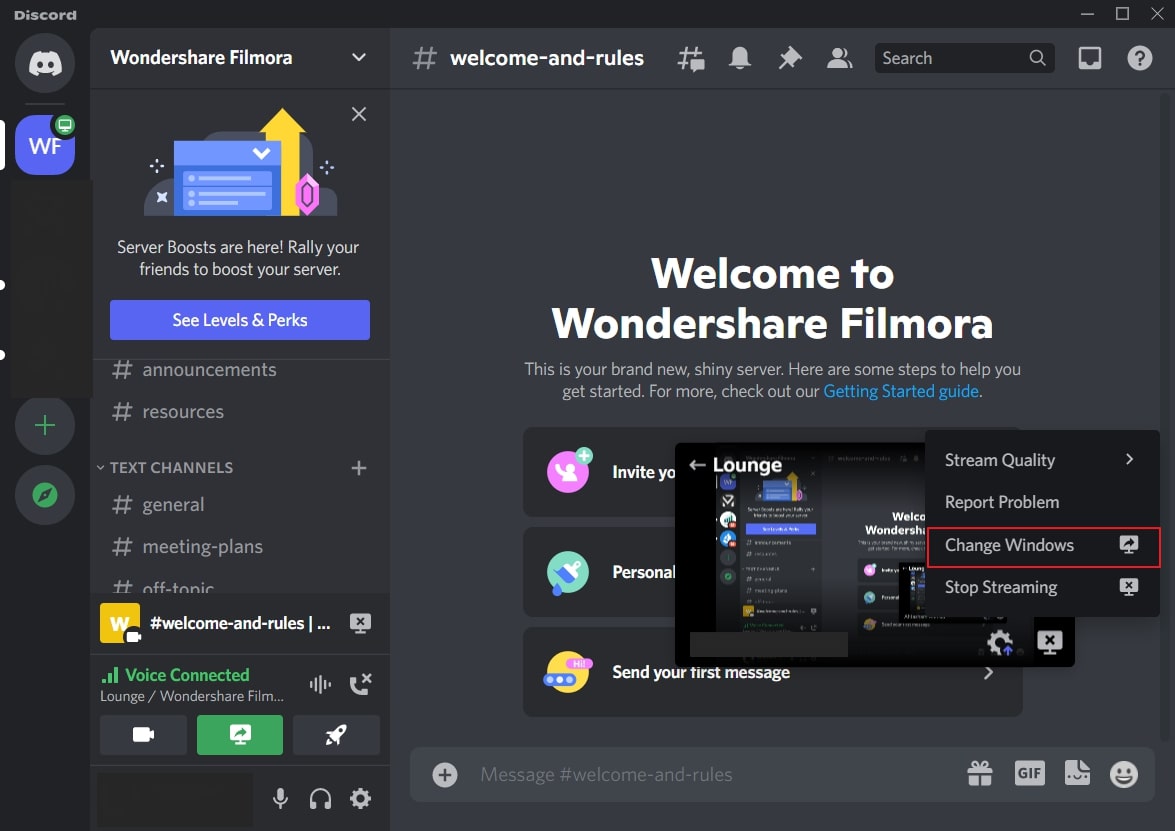
Step1 If you are live streaming your shared screen, you can instantly change windows on Discord. For this, click on the “Gear” icon on your live streaming screen to open settings.

Step2 From the settings menu, click on “Change Windows.” Now select the screen that you want to change. After choosing the required screen, hit on the “Go Live” button.
Part 6: How to Stream Discord on my Mobile Phone?
Discord has the same operating systems on Android and iOS devices. That’s why the steps to stream on Discord on both these devices are the same.
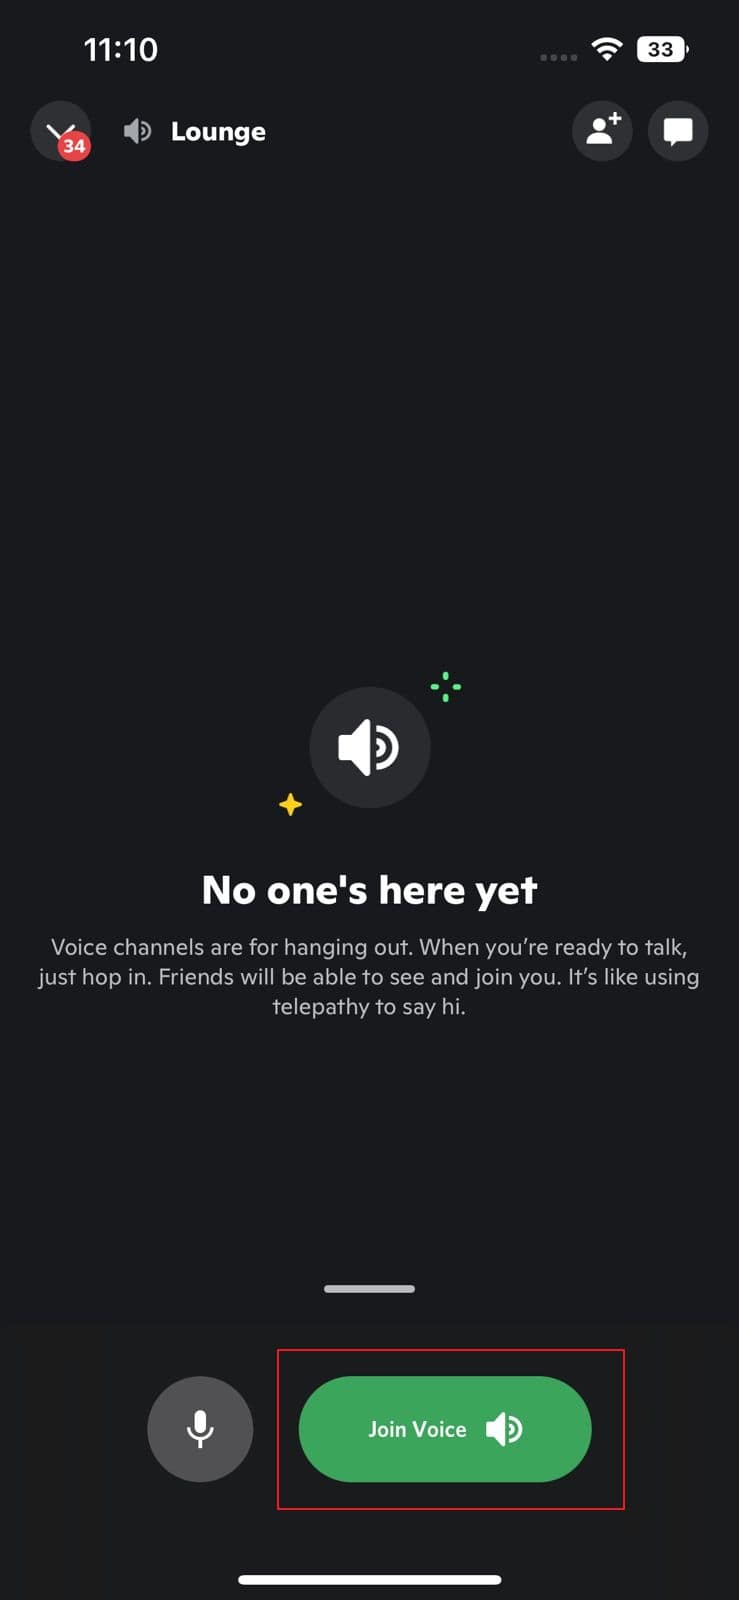
Step1 Open Discord on your mobile and select the desired server. Now choose the voice channel through which you want to live stream Discord.

Step2 Now tap “Join Voice” to initiate live streaming. Here, you can turn on your camera and share the screen. You can also mute your voice from the given options. Once done with live streaming, tap on the “Red” button.
Part 7: FAQs about the live stream on Discord
1. How many people can watch my Discord live simultaneously?
During the pandemic, up to 50 people were able to join live streaming on Discord. Normally, 25 people can watch live streaming on Discord simultaneously.

2. How to add the game types on Discord?
Open Discord and navigate to the “User Settings” given at the bottom of the screen. Select the “Game Activity” section and activate the option “Display currently running game as a status message.” Now click on the “Add it” button and choose the type of games you want to play. Once done, Discord would be able to detect the type of game automatically.
3. How to share a video on Discord?
On your computer, launch Discord and go to your desired channel. On the chat box space, click on the “Plus” icon. Now browse the video from your system that you want to share. Click on the “Open” button and select the “Upload” option. By doing so, you can easily share videos.
For mobile users, go to your Discord app and choose the preferred channel. On the left side of the typing area, you can see the “Image” icon. Tap on this option and choose the video you want to share from your phone. Now hit the “Arrow” button to send the selected video.
Bonus Tip: Easily Record and Edit your Stream with Filmora
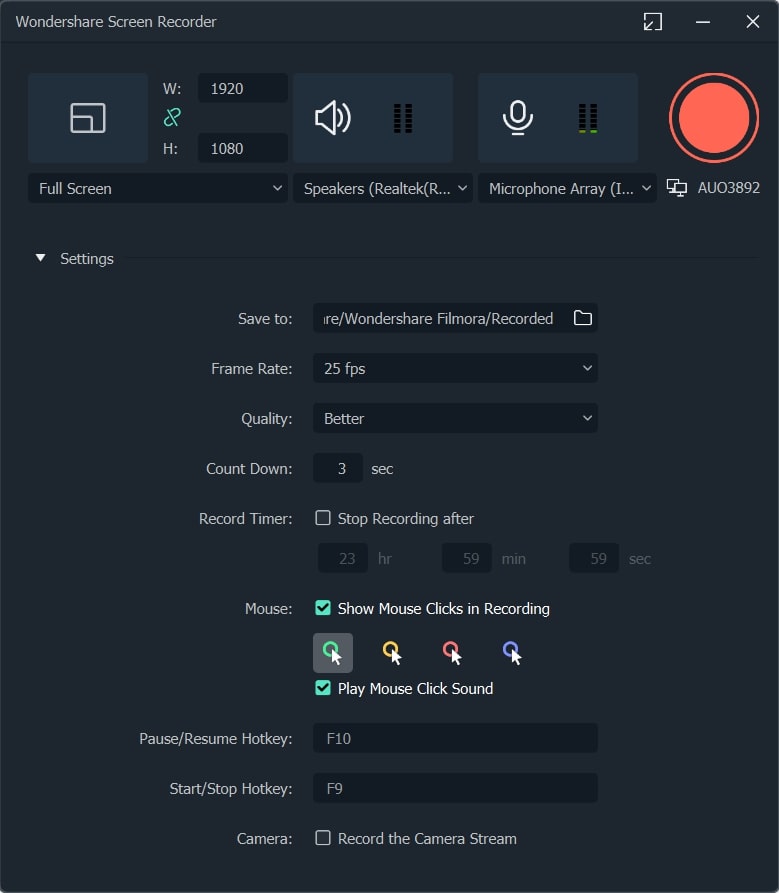
To save and edit your live stream sessions, we will highly recommend you the screen recorder of Wondershare Filmora . Through this screen recorder, you can capture your live-streaming session on Discord in the best possible quality.
Using this screen recorder, you can capture your desired area during live streaming. Once you capture your live-streaming session, you can edit it on this platform. Using the editing tool of Filmora, you can cut, crop, resize, and modify your screen recording efficiently.
Conclusion
Have you ever streamed on Discord before? Discord is a great communication platform that provides advanced features. With its vast flexibility, you can create private servers and channels. This article can guide you to learn how to go live on Discord. We have also suggested Wondershare Filmora, which can help you to screen record and edit your live streaming sessions on Discord.
Free Download For Win 7 or later(64-bit)
Free Download For macOS 10.14 or later
Part 1: What is Discord?
Discord is a popular platform created to offer a better communication experience between game players. The major reason for the massive recognition of Discord is its ability to generate servers instantly. Game players and other users can instantly create voice or text servers for enhanced communication.
Discord provides excellent flexibility to users by providing high-quality audio services with no background noise. Even if your friends are in different parts of the world, you can chat with them smoothly. You can create private and public servers in Discord to communicate with people having similar interests.
Along with using Discord Voice and Text chat features, you can live stream your gameplays. The live streaming on Discord won’t be a public show, as it will only be confined to your selected server. Through this, you can ask your friends for assistance while playing games. Moreover, Discord is also capable of capturing other screens. Hence, it’s a great platform for professionals, game lovers, and other individuals to communicate efficiently.
Part 2: Prerequisites for Stream on Discord
Many social media platforms put restrictions on users for live streaming. Some platforms require you to have a specific number of followers in order to conduct live streaming. However, in Discord, you don’t have to worry about such restrictions. By creating a server and channel on Discord, you can easily go for live streaming. Check the below prerequisites for performing a live stream on Discord:
1. Create your Discord Server
Step1 Open your Discord and hit the “Plus” icon given on the left side. It will open a small menu where you can select a template to start or create your own server.
Step2 If you want to create your server, click “Create My Own.” Now select the type of server you want to create. Once done, create the server name and click the “Create” button.
2. Create your Discord Channel
Step1 To create a Discord channel, open any of your servers from the left side. Now tap on the “Plus” icon adjacent to “Voice Channels.”
Step2 You can either create a “Text” channel or a “Voice” channel. After choosing the channel type, create a channel name. You can also enable the “Private Channel” option to create a private channel. Once done, click on the “Create Channel” button.
Part 3: How to Stream Videos on Discord
Once you have created a server and channel, you can begin your live streaming. Discord provides you with an option through which you can stream your videos instantly. To know the process, check the below steps:
Step1 Open Discord and navigate to your desired server. Now proceed to your voice channel and click on the “Share Your Screen” button given below.
Step2 Select the screen you want to stream in the “Applications” tab. From the new menu, you can adjust the stream quality, such as resolution and frame rate. After adjusting the live streaming settings, click on the “Go Live” button.
Part 4: How to Stream your Webcam on Discord
Do you want to give a tutorial session through your webcam? Through live webcam streaming, you can demonstrate a particular product while giving facial expressions. Using Discord, you can stream your webcam with a single click.
Step1 Once you have opened a server on Discord, go to your Voice channel. From there, tap on the “Camera” icon above your username.
Step2 It will open a new screen through which you can start an activity or share your screen. Moreover, you can also invite others to join your webcam streaming. Once done with your activities, click on the “Red” button to disconnect.
Part 5: How to Change the Shared Screen on Discord
Do you want to change a shared screen on Discord? If you want to open a presentation, web browser, or any other application, Discord can easily change the shared screen. Through this facility, you can quickly shift between multiple screens without hassle.
Step1 If you are live streaming your shared screen, you can instantly change windows on Discord. For this, click on the “Gear” icon on your live streaming screen to open settings.
Step2 From the settings menu, click on “Change Windows.” Now select the screen that you want to change. After choosing the required screen, hit on the “Go Live” button.
Part 6: How to Stream Discord on my Mobile Phone?
Discord has the same operating systems on Android and iOS devices. That’s why the steps to stream on Discord on both these devices are the same.
Step1 Open Discord on your mobile and select the desired server. Now choose the voice channel through which you want to live stream Discord.
Step2 Now tap “Join Voice” to initiate live streaming. Here, you can turn on your camera and share the screen. You can also mute your voice from the given options. Once done with live streaming, tap on the “Red” button.
Part 7: FAQs about the live stream on Discord
1. How many people can watch my Discord live simultaneously?
During the pandemic, up to 50 people were able to join live streaming on Discord. Normally, 25 people can watch live streaming on Discord simultaneously.
2. How to add the game types on Discord?
Open Discord and navigate to the “User Settings” given at the bottom of the screen. Select the “Game Activity” section and activate the option “Display currently running game as a status message.” Now click on the “Add it” button and choose the type of games you want to play. Once done, Discord would be able to detect the type of game automatically.
3. How to share a video on Discord?
On your computer, launch Discord and go to your desired channel. On the chat box space, click on the “Plus” icon. Now browse the video from your system that you want to share. Click on the “Open” button and select the “Upload” option. By doing so, you can easily share videos.
For mobile users, go to your Discord app and choose the preferred channel. On the left side of the typing area, you can see the “Image” icon. Tap on this option and choose the video you want to share from your phone. Now hit the “Arrow” button to send the selected video.
Bonus Tip: Easily Record and Edit your Stream with Filmora
To save and edit your live stream sessions, we will highly recommend you the screen recorder of Wondershare Filmora . Through this screen recorder, you can capture your live-streaming session on Discord in the best possible quality.
Using this screen recorder, you can capture your desired area during live streaming. Once you capture your live-streaming session, you can edit it on this platform. Using the editing tool of Filmora, you can cut, crop, resize, and modify your screen recording efficiently.
Conclusion
Have you ever streamed on Discord before? Discord is a great communication platform that provides advanced features. With its vast flexibility, you can create private servers and channels. This article can guide you to learn how to go live on Discord. We have also suggested Wondershare Filmora, which can help you to screen record and edit your live streaming sessions on Discord.
Free Download For Win 7 or later(64-bit)
Free Download For macOS 10.14 or later
How to Speak Clearly on Discord via TTS
How to Use Discord Text-To-Speech?

Richard Bennett
Mar 27, 2024• Proven solutions
While most users of the popular online messaging and content sharing site Discord rely on simple text to communicate, there are numerous situations when using the text-to-speech feature would be quite advantageous. This includes instances when there are language barriers or disabilities to overcome, but also spontaneous moments when users just enjoy hearing each other’s words. Discord supports the use of a text-to-speech (TTS) function and in fact, has a built-in setting for it, but this option only works for desktop users with Windows or Mac devices.
In this article, we will discuss the specifics of activating the TTS function in Discord and using it effectively to improve your communication with other users. By following the detailed instructions provided here, you will be able to learn how to activate text-to-speech on Discord and manage your voice messages on selected servers in the most practical manner.
- Part 1: Enable Text-To-Speech Feature in Discord
- Part 2: How to Set Up Text-To-Speech Notifications on Discord?
- Part 3: How to Use Text-To-Speech in Discord Chatting?
- Part 4: How to Mute All Text-To-Speech Messages on Discord?
- Part 5: Best Text-To-Speech Bots on Discord
Part 1: How to Enable Text-To-Speech Feature in Discord?
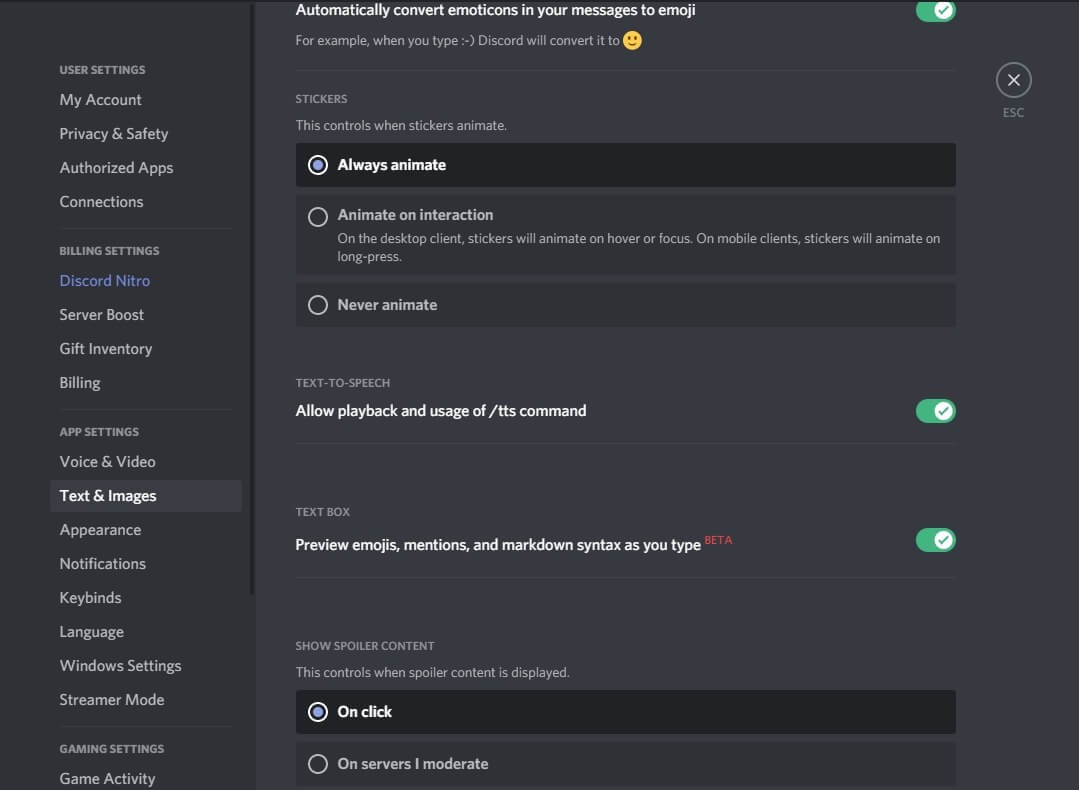
Before you can deploy TTS in your chats, you need to change the settings of your profile to enable this option. This isn’t hard to do – just go to the Discord app and select ‘Settings’ from the menu, which will trigger a pop-up window to appear on your screen. Next, you need to find the Text & Images section in the App Settings window, then scroll down to find the Text-to-Speech option, and finally tick the boxes next to Allow playback and Usage of TTS items. After you do this, your Discord will be ready to process your text messages in voice format.
To test whether you successfully activated Text-to-Speech, open any chats on your personal server and try typing out a message, followed immediately by the tag /tts. If everything is working correctly, your message should appear on the screen in the text form, accompanied by its voice rendering delivered by an automated module. The timing of the two should be perfectly synchronized so that you hear the message and see the text at exactly the same instance. Otherwise, go back to settings and make sure you activated the TTS option properly or restart your Discord app.
Part 2: How to Set Up Text-To-Speech Notifications on Discord?
Another practical possibility that can improve your Discord experience is to set up TTS notifications and be immediately informed whenever a fresh message arrives. This can also be done after you change the app parameters from the ‘Settings’ menu. After you see all options, choose ‘App Settings’ and search for the section named ‘Notifications’. By scrolling down, you will reach the item ‘Text-to-Speech notifications’ and after clicking on it you will be given a choice between three options.
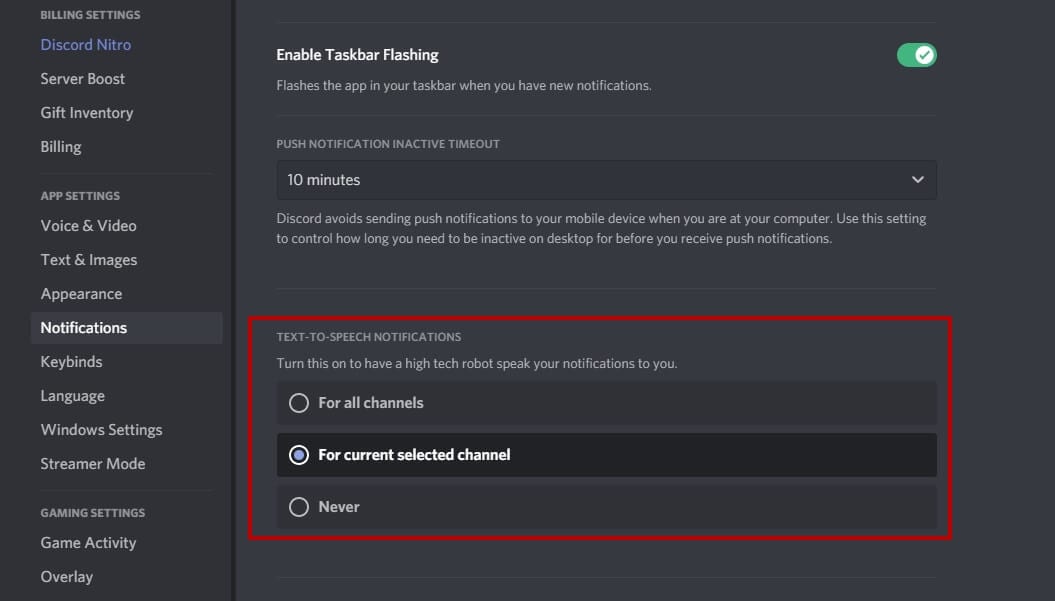
The first option For all channels is to enable notifications on all channels on Discord; choosing it will result in a robotic voice reading all messages from all chats, regardless of whether they have a /tts tag. This option can be useful when you want to maximize your accessibility and receive important information instantly.
By picking the second option, For current selected channel, you can enable TTS notifications only on the current channel. This action will instruct Discord to have an automated voice read all the incoming messages on the active chat aloud, allowing you to stay in the loop at all times. This possibility works well for people who occasionally do multiple things at once, for example, gamers or streamers who use Discord to stay connected with their fans and friends while they are busy.
Finally, you can choose Never to hear any voice messages from your Discord chats never. If you pick this setting, even those messages that were sent with the /tts tag will only be displayed in the text format. This option provides you with peace of mind and prevents spammers from saturating you with voice messages you have no interest in hearing.
Part 3: How to Use Text-To-Speech in Discord Chatting?
It’s not very hard to learn how to effectively use the TTS option in your chats on the Discord platform. This communication format is available on all channels that have an activated Text-to-Speech setting, so you can freely add a few messages to be read aloud or completely switch to automated voice format if you so desire. Doing this in practice is very simple – just start your message by typing the tag /tts and then enter your text as you normally would.

Your TTS message will be reproduced in a voice format by a Discord bot to all participants in the chat who didn’t mute incoming Text-to-Speech chats. An automated voice will say the entire message, and then also pronounce your username to identify the author. At the same time, the message will appear in the chat feed as plain text, so that even those recipients unable to hear it will be able to see the contents.
Part 4: How to Mute All Text-To-Speech Messages on Discord?
You can also decide to prevent any messages from being played to you in a voice format and receive them as text only. This option is available even if you are not the administrator of the chat server and simply want to customize your own experience. To do this, you need to open the Discord app and enter the Settings menu, before selecting the Text & Images section from App Settings. After this, you need to find the Text-to-Speech sub-menu and open it to find the Allow Playback feature. If you disable this feature, you will effectively mute all incoming TTS messages across all Discord servers you are active on.
Please keep in mind that deactivating the aforementioned feature won’t block TTS messages from reaching you, but you will see them as text only. On the other hand, you can’t use the /tts tag to send your own Text-to-Speech while the playback setting is disabled. Nothing is preventing you from turning it back on when you want to have a TTS capacity on Discord again.
Part 5: Best Text-To-Speech Bots on Discord
One of the reasons why Discord is so popular is that it allows extensive customization through user-made Bots or modules that automatically perform a certain task. There are several great Bots that can be used for Text-to-Speech, so you might consider utilizing one of them.
1. Text to Speech (TTS)
With many languages supported and a wide range of cool commands, this bot could be the best choice for people who use TTS just for fun.
2. KD Bot
A very popular option for Text-to-Speech on Discord that lets you choose from more than 100 voices and supports upwards of 100 languages, making it a powerful translation tool.
3. Fergun
This multi-language tool responds to more than 100 different commands, so it can be used for a wide variety of purposes with stunning effectiveness.
Frequently asked questions about TTS on Discord
- Can I use the Text-to-Speech feature on Discord from a mobile phone?
Unfortunately, you can’t. Discord works quite well as a text messaging app on mobile platforms, but at this time Text-to-Speech functionality is limited to desktop users.
- Why can’t I use Text-to-Speech on a Discord server?
If you are unable to send or receive TTS messages on Discord, you need to change your settings. Please see Part 1 of this article for detailed instructions.
Richard Bennett
Richard Bennett is a writer and a lover of all things video.
Follow @Richard Bennett
Richard Bennett
Mar 27, 2024• Proven solutions
While most users of the popular online messaging and content sharing site Discord rely on simple text to communicate, there are numerous situations when using the text-to-speech feature would be quite advantageous. This includes instances when there are language barriers or disabilities to overcome, but also spontaneous moments when users just enjoy hearing each other’s words. Discord supports the use of a text-to-speech (TTS) function and in fact, has a built-in setting for it, but this option only works for desktop users with Windows or Mac devices.
In this article, we will discuss the specifics of activating the TTS function in Discord and using it effectively to improve your communication with other users. By following the detailed instructions provided here, you will be able to learn how to activate text-to-speech on Discord and manage your voice messages on selected servers in the most practical manner.
- Part 1: Enable Text-To-Speech Feature in Discord
- Part 2: How to Set Up Text-To-Speech Notifications on Discord?
- Part 3: How to Use Text-To-Speech in Discord Chatting?
- Part 4: How to Mute All Text-To-Speech Messages on Discord?
- Part 5: Best Text-To-Speech Bots on Discord
Part 1: How to Enable Text-To-Speech Feature in Discord?
Before you can deploy TTS in your chats, you need to change the settings of your profile to enable this option. This isn’t hard to do – just go to the Discord app and select ‘Settings’ from the menu, which will trigger a pop-up window to appear on your screen. Next, you need to find the Text & Images section in the App Settings window, then scroll down to find the Text-to-Speech option, and finally tick the boxes next to Allow playback and Usage of TTS items. After you do this, your Discord will be ready to process your text messages in voice format.
To test whether you successfully activated Text-to-Speech, open any chats on your personal server and try typing out a message, followed immediately by the tag /tts. If everything is working correctly, your message should appear on the screen in the text form, accompanied by its voice rendering delivered by an automated module. The timing of the two should be perfectly synchronized so that you hear the message and see the text at exactly the same instance. Otherwise, go back to settings and make sure you activated the TTS option properly or restart your Discord app.
Part 2: How to Set Up Text-To-Speech Notifications on Discord?
Another practical possibility that can improve your Discord experience is to set up TTS notifications and be immediately informed whenever a fresh message arrives. This can also be done after you change the app parameters from the ‘Settings’ menu. After you see all options, choose ‘App Settings’ and search for the section named ‘Notifications’. By scrolling down, you will reach the item ‘Text-to-Speech notifications’ and after clicking on it you will be given a choice between three options.
The first option For all channels is to enable notifications on all channels on Discord; choosing it will result in a robotic voice reading all messages from all chats, regardless of whether they have a /tts tag. This option can be useful when you want to maximize your accessibility and receive important information instantly.
By picking the second option, For current selected channel, you can enable TTS notifications only on the current channel. This action will instruct Discord to have an automated voice read all the incoming messages on the active chat aloud, allowing you to stay in the loop at all times. This possibility works well for people who occasionally do multiple things at once, for example, gamers or streamers who use Discord to stay connected with their fans and friends while they are busy.
Finally, you can choose Never to hear any voice messages from your Discord chats never. If you pick this setting, even those messages that were sent with the /tts tag will only be displayed in the text format. This option provides you with peace of mind and prevents spammers from saturating you with voice messages you have no interest in hearing.
Part 3: How to Use Text-To-Speech in Discord Chatting?
It’s not very hard to learn how to effectively use the TTS option in your chats on the Discord platform. This communication format is available on all channels that have an activated Text-to-Speech setting, so you can freely add a few messages to be read aloud or completely switch to automated voice format if you so desire. Doing this in practice is very simple – just start your message by typing the tag /tts and then enter your text as you normally would.
Your TTS message will be reproduced in a voice format by a Discord bot to all participants in the chat who didn’t mute incoming Text-to-Speech chats. An automated voice will say the entire message, and then also pronounce your username to identify the author. At the same time, the message will appear in the chat feed as plain text, so that even those recipients unable to hear it will be able to see the contents.
Part 4: How to Mute All Text-To-Speech Messages on Discord?
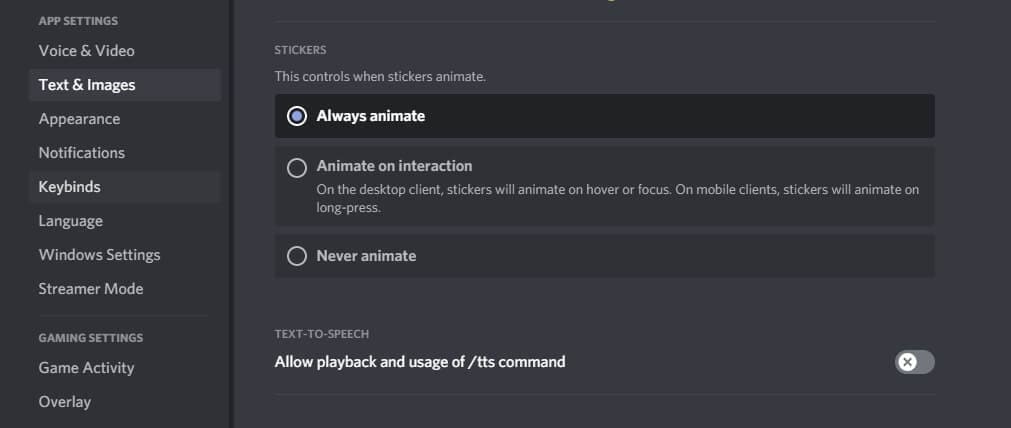
You can also decide to prevent any messages from being played to you in a voice format and receive them as text only. This option is available even if you are not the administrator of the chat server and simply want to customize your own experience. To do this, you need to open the Discord app and enter the Settings menu, before selecting the Text & Images section from App Settings. After this, you need to find the Text-to-Speech sub-menu and open it to find the Allow Playback feature. If you disable this feature, you will effectively mute all incoming TTS messages across all Discord servers you are active on.
Please keep in mind that deactivating the aforementioned feature won’t block TTS messages from reaching you, but you will see them as text only. On the other hand, you can’t use the /tts tag to send your own Text-to-Speech while the playback setting is disabled. Nothing is preventing you from turning it back on when you want to have a TTS capacity on Discord again.
Part 5: Best Text-To-Speech Bots on Discord
One of the reasons why Discord is so popular is that it allows extensive customization through user-made Bots or modules that automatically perform a certain task. There are several great Bots that can be used for Text-to-Speech, so you might consider utilizing one of them.
1. Text to Speech (TTS)
With many languages supported and a wide range of cool commands, this bot could be the best choice for people who use TTS just for fun.
2. KD Bot
A very popular option for Text-to-Speech on Discord that lets you choose from more than 100 voices and supports upwards of 100 languages, making it a powerful translation tool.
3. Fergun
This multi-language tool responds to more than 100 different commands, so it can be used for a wide variety of purposes with stunning effectiveness.
Frequently asked questions about TTS on Discord
- Can I use the Text-to-Speech feature on Discord from a mobile phone?
Unfortunately, you can’t. Discord works quite well as a text messaging app on mobile platforms, but at this time Text-to-Speech functionality is limited to desktop users.
- Why can’t I use Text-to-Speech on a Discord server?
If you are unable to send or receive TTS messages on Discord, you need to change your settings. Please see Part 1 of this article for detailed instructions.
Richard Bennett
Richard Bennett is a writer and a lover of all things video.
Follow @Richard Bennett
Also read:
- [New] 2024 Approved 1St Place Video Saver - Download Anywhere, Anytime
- [New] 2024 Approved Effective Communication in Live Discovers with Our Guide
- [New] Discord Etiquette 101 Responding with Confidence for 2024
- [New] Discord's Ultimate Selection of Professional Emoji Makers
- [New] Gradual Volume Lessening in Music Creation (Garageband)
- [New] In 2024, Discord Channel Management Made Simple Step-by-Step Tutorial
- [New] In 2024, Step-by-Step Backdrop Be Gone Guide for Images
- [Updated] 2024 Approved How to Stream on Discord [Step-by-Step Guide]
- [Updated] 2024 Approved Unleash the Power of Professionalism in Instagram Imagery
- [Updated] A Comprehensive Look at Dispatching Media on Discord Platform
- [Updated] Essential Steps for Starting a Channel on Discord for 2024
- [Updated] In 2024, Cutting-Edge Community Emblems Motion Showcase
- Comprehensively Reviewing the Ricoh Theta S System for 2024
- In 2024, 2023'S Ultimate Toolwiz Photo Suite Analysis
- Plotting Your Path in the Realm of Visual Arts
- Quick Troubleshooting: Stop YouTube Lagging on Chrome
- Thriving Despite Cyberbullying and Scathing Feedback for 2024
- Title: 2024 Approved Discord Broadcasting Step-by-Step Techniques for Seamless Sessions
- Author: Timothy
- Created at : 2024-11-11 22:00:02
- Updated at : 2024-11-13 17:46:16
- Link: https://discord-videos.techidaily.com/2024-approved-discord-broadcasting-step-by-step-techniques-for-seamless-sessions/
- License: This work is licensed under CC BY-NC-SA 4.0.