
:max_bytes(150000):strip_icc():format(webp)/inside-impero-cinema--central-region--asmara--eritrea----1174900385-f49e10d112a6451c89a8310bdb0ecc4e.jpg)
"2024 Approved Top 10 Costless Apps for High-Quality Discord Audio Recordings"
Top 10 Costless Apps for High-Quality Discord Audio Recordings
10 Best Free Software to Record Discord Audio [+How-tos]

Richard Bennett
Mar 27, 2024• Proven solutions
If you are looking for the best Discord audio recording software, then you are at the right place! Here’s a solution to the difficulty you face in finding suitable software compatible with your platform.
For this article, I have selected 10 highly useful software programs that will make it easy for you to record Discord audio both on PC and phone.
You will learn:
- Part I: 10 Best Record Discord Audio software and How to Use
- Part II: Roundup of Best Discord Audio Software
- Part III: FAQs about Discord Audio Recording
10 Best Record Discord Audio software and How to Use It?
Below are the top 10 programs which can be used to record Discord audio. All of these are very easy to use and do not require any technical knowledge to get the work done.
1.Wondershare Filmora – Editor Recommend
It is a powerful tool for screen recording , offering high-quality audio recording and streaming. Although it can be used to record both, audio and video. So if you are an avid gamer and need to record audio calls from any of the communicating parties then this software offers you a solution.
Platform Compatibility
- Windows OS
- MAC OS
Features
- Allows simultaneous use of webcam and computer
- Immaculate for recording fast-speed games
- Diverse editing suite
- Supports several file formats
- Customize recording settings
- Facilitate tutorial features
Pros
- Supported by both desktop platforms, Windows and Mac OS
- A free trial is also available despite the paid ones
- Offers 15-120 FPS for windows OS
- Around 60 FPS for Mac OS
- Advanced customization options for high-quality audio.
- Friendly user interface
Cons
- Watermark on free trials.
- Paid licensing


2.AUDACITY
When you need to record both the ends of a conversation being held then AUDACITY may not be your best option. You are facilitated with the ease of availability of this software since it is open source and most importantly, free of cost. But, on the contrary, it only facilitates the users with the single audio-in recording system. That means only the audio from one side can be recorded at a time.
Platform Compatibility
- Windows OS
- MAC OS
Features
- An open-source application
- Free of cost
- Allowing post-editing of the audio after being recorded.
Pros
- Supported by both desktop platforms, windows
- Free software
Cons
- Single audio-in logic
How to Use Audacity Recorder to Record Discord Audio?
The steps in this regard are as follows:
Step 1: Right-click the volume control to access the “Recording Devices“.

Step 2: Set the microphone to default and click the record button that is the big red one in the center.

Step 3: You can then see the audio tracks of the Audacity that have started recording your Discord.

3.OBS
This software will provide you with an easy and user interface-friendly interaction platform for gamers. People belonging to the same interests now have software perfect for their communication. The text-to-speech conversion facilities the transformation of any chat into audio.
Therefore, if one sends a message in a written form while you are playing, then this software allows you to read out the chat. Therefore, this facilitates a user to not care about what a person on the other side is sending. It lets you listen to the conversation without distracting you from your game.
Platform compatibility
- Windows OS
Features
- Text-to-speech conversion
- Facilitate integration of stream element tools and chats
- Offers Media Reques t integration in OBS
- Easy broadcasting to multiple domains
- Facilitate high-quality audio streaming
- Desktop application
Pros
- Supported by both desktop platforms, Windows & Mac
- Free software
- Open-source platform
- Rapidly enhance stream engagement
- Fans’ loyalty
Cons
- Not supported for Mac OS
- It is a web app, which does not support mobile operating systems.
How to Use OBS Recorder to Record Discord Audio ?
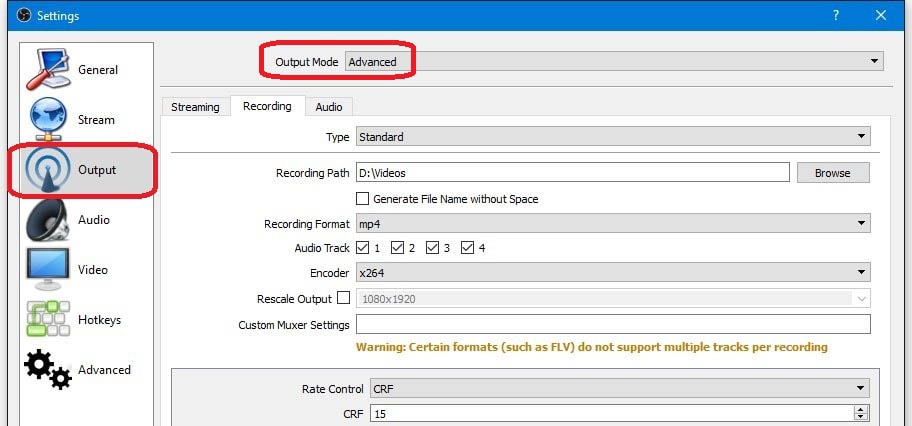
Step 1: Go to “Settings”; “Output” of the OBS to set the output mode to simple.
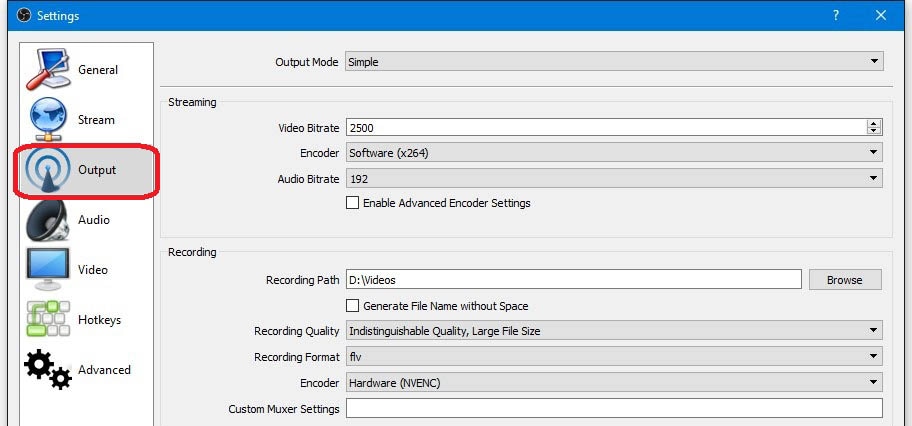
Step 2: Now set the “Recording Quality” to make sure that the best audio output is generated.

Step 3: Select the “Encoder”:

Step 4: By selecting the “Advanced“ option you can make sure that the multiple tracks are recorded at the same time but in Discord, it is not required:
Now when the Discord is launched the OBS will auto-capture the audio which can then be extracted with ease.
4.LEAWO
This software also allows a user to communicate with other peers involved with you in the gaming world. It is a communication that not only offers low latency communication among peers but also allows secure communication at both ends. It is compatible with the desktop platforms like Windows and Mac OS.
Moreover, it also facilitates its usability on phones as well. You can record your audio from any audio source and can save it accordingly with one of the many formats that it offers.
Platform Compatibility
- Windows OS
- Mac OS
- iOS
- Android
Features
- Allows multiple audio-in sources
- The result can be saved in several formats, allowing WAV or
- High audio recording capability
- The dedicated infrastructure of servers.
- Facilitate high-quality audio streaming
- Promises security
- Free of cost chat servers
Pros
- Supported by both desktop and mobile platforms, Windows, Mac, Android, and iOS.
- Free Software
- High-Quality Outcome
- Multi-purpose application with chat, audio, and image transfer features
Cons
- It offers limited features, as it is free software.
How to use Leawo Recorder to Record Discord Audio ?
Step 1: Once the program is launched click the “Settings” tab at the top right corner.

Step 2: Set the audio source to “Record Computer Audio”.

Step 3: Click the “Format“ button to change the audio settings as described in the picture:

Step 4: Once the red “Start“ button is pressed the program will start recording what is to be integrated into Discord.

5.Bandicam
Though this software is paid it is recommended to the naïve users as it is easy to use and captures the parts of the screen as you desire. It is one of the most used programs that are highly in demand in contrast to Discord audio recording.
Compatibility
The program at the time of this writing is only compatible with windows.
Features
- The program has a built-in function of PIP and video in video.
- It supports AVI 2.0 and there is no output length defined.
- The real-time highlighting of the mouse cursor is offered by this program.
Pros
- It has an intuitive interface that is GUI-based and easy to use.
- The program is fast and therefore the best option for Discord audio recording.
Cons
- Since it is only compatible with windows so users of other operating systems cannot use it.
- The program does not compress the audio as well as video and therefore uses more power.
How to Use Bandicam Recorder to Record Discord Audio ?
Below are the steps which are to be followed to get the Discord audio recorded using Bandicam.
Step 1: Once the program is started, select the default recording device as a primary sound device:

Step 2: Plugin the “Speakers” and if they are disabled then please enable them. Set the Speakers as the default device as well.

Step 3: Open the volume mixture tray and set the voice to whatever level you love.

Step 4: Now whenever the Discord is run on your system you will get to know the recording sound by the fluctuating bar.

6.Camtasia
It is one of the programs that have the best interface. The integrated GUI makes it possible for the users to overcome the problems which the other programs present. With the best and the most advanced controls, it makes the process very easy.
Compatibility
The program is compatible with both Mac and Windows.
Features
- The program integrates sound with the on-screen activities using state-of-the-art functionalities.
- The HD surround sound option is also available in the paid version.
Pros
- The program has a GUI which makes it easy for the users to operate it.
- The one-step process for audio recording is something that no other program presents.
Cons
- It is a paid program so not everyone can use it.
- The free version is very much limited and therefore practically of no use.
How to Use Camtasia Recorder to Record Discord Audio ?
The program has only one step that needs to be followed to get the work done. Under recorded inputs click on the down arrow beside the “Audio On” function and select the highlighted elements to record the audio of Discord.

7.Movavi
If you are looking for a program that provides the full value for the money spent then it is the one that you should be using. It is all because of the interface that has been embedded and the speed that is incredible.
Compatibility
This program is compatible with Windows and Mac.
Features
- Movavi has a built-in database of several sound effects that can be applied to the recorded audio.
- The live broadcast is also supported by the program it is the best for Discord use.
Pros
- The program is fast as compared to the other ones on the list as it uses flash programming for development.
- Movavi is a complete suite that will allow users to perform a range of functions.
Cons
- The program is high priced so it is not recommended to individual users
- As it uses flash sometimes the screen capture is frozen for no reason
How to Use Movavi Recorder to Record Discord Audio ?
Step 1: Turn on the “System Audio” capture and specify the area from where the audio is to be captured. The button will be highlighted in green if the audio capture is on.
Step 2: Use F9 and F10 keys to pause and stop the audio recording respectively. Once the recording is on you will see the duration at the top of the capture along with the size of the audio that is being captured.
8.Free Sound Recorder
As the name suggests it is free and unlimited to use. The program is light as it is flash-based and is compatible with the most used operating systems in the world. It does not consume the system resources and therefore a top pick for every gamer.
Compatibility
The program is compatible with both Windows and Mac.
Features:
- The program uses the 3-step process to make sure that the audio is recorded with ease.
- The online music recording function is also available in the program which enhances its capability.
Pros
- The program captures both internal and external audio for free.
- You can also schedule the audio recording for a very long time and a hands-free recording option is also available.
Cons
- The program is not as frequently updated as it should be.
- The enhancement of the audio function is not as good as it should be.
How to Use Free Sound Recorder to Record Discord Audio ?
Step 1: On the lower half of the interface of the program, there is a “Recording Mixer“ which should be used to select the audio source. The same panel can also be used to make sure that the audio settings are changed as required.
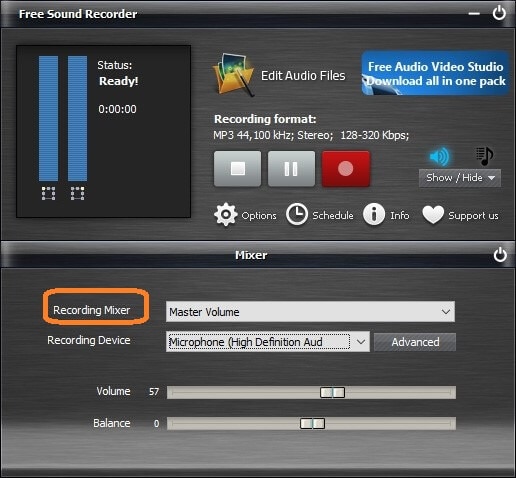
Step 2: Click the circular button and the program will start recording. On the lower half, you can also see the duration of the audio recorded.

9.Record My Desktop
This Linux-based program is something that every gamer needs. It is highly in demand due to the fact that it does the desired work within no time as the speed is incredible.
Compatibility
The program is compatible with BSD and Linux.
Features
- The configuration of ALSA and OSS is possible with this program.
- The program also supports the output in different formats.
Pros
- It is very easy to operate as the interface is self-explanatory.
- The program captures the audio in the highest definition and is therefore highly recommended.
Cons
- The audio saving process is a bit hassle when it comes to this program.
- It interferes with the computer audio and therefore the quality of the recording can be degraded.
How to Use Record My Desktop to Record Discord Audio ?
Step 1: To record Discord audio, first of all, you need to make sure that the sound recording is enabled.

Step 2: Use the “Wave”, “Mic” and “Capture” buttons to set the pace until you get satisfied. The program is automatically recorded the Discord audio from this point onward.

10.CRAIG
CRAIG is an open-source platform introduced by Yahweasel for Discord that allows easy multi-channel or multi-track recording. If the data to be recorded is already available, then it easily records the audio for multiple audio tracks.
Craig is essentially a bot that enables audio recording from both the communicating ends and makes up a separate file for each. This facilitates the extent of variations or editing required for each side of audio files for better quality.
Moreover, Craig also enables the user to download the audio while recording. The potential users of Craig are either the ones managing the Craig server or the ones who are granted permission by a created “Craig” role.
Platform Compatibility
- Windows OS
- Mac OS
Features
- Open-source platform
- Allows recording in/from multiple tracks or channel
- Enables two-way communication recording
- Allow two types of users the Craig server manager and Craig’s role assigned to the person
- Facilitate high-quality audio streaming
- Promises security
- Free of cost chat servers
- Offers enhanced reliability
- Can download the file in several modern file formats
- 7 days file download
- 6 hours recording duration
- Auto tracks synchronization
Pros
- Supported by both desktop and mobile platforms, Windows, Mac, Android, and iOS.
- Free software
- High-quality outcome
- Multiple tracks recording
- Allow several speakers
- Decent recording time
Cons
- Doesn’t support phones OS
How to Record Discord Audio Using CRAIG?
Step 1: Make a free of cost Discord account
Step 2: Craig initiates recording automatically once you call it by connecting the Discord voice server with the communication peers.
Step 3: When you open the music recorder , click on the arrow button at the top right corner, this will open the dropdown list.
Step 4: While recording, Craig will send the download links.
Step 5: You can record the audio at any instance with any file format of your choice.
Step 6: A separate file for all the people involved in communication will be saved.
Step 7: You can then import these files for post-editing by pushing them directly into digital audio workstation (DAW) software.
A roundup of the Best Discord Audio Software
| No. | Tools | Review Stars | Price | Compatibility | Best For | Trial Version Limitations |
|---|---|---|---|---|---|---|
| 1 | Wondershare Filmora | 4.5 | Free, $49.99 | Mac, Windows | Screencasting, technical documentation. | One usage restriction |
| 2 | Leawo Music Recorder | 4.0 | $19.99 | Mac, Windows | Gaming, streaming, and instructional videos. | 30 Days |
| 3 | Audacity | 3.0 | Free | Mac, Windows, Linux | Tutorial, promotional videos and streaming. | Unlimited |
| 4 | OBS | 4.0 | Free | Mac, Windows, Linux | Presentations, tutorials, and screencasting. | Unlimited |
| 5 | Bandicam | 4.0 | $39 | Windows | Presentation recordings and interactive quizzes | 14 Days |
| 6 | Camtasia | 4.4 | $249 | Mac, Windows | Game recording, webcams, and all types of screencasting | 30 Days |
| 7 | Movavi | 4.0 | $39.95 | Mac, Windows | Streaming, presentations, digitization of VHS Tapes, and Screencasting. | 7 Days |
| 8 | Free Sound Recorder | 2.5 | Free | Windows | Basic screen copying. | Unlimited |
| 9 | Record My Desktop | 3.0 | Free | Linux, BSD | Webinars and online tutorials. | Unlimited |
| 10 | CRAIG | 3.5 | Free | Windows, macOS | Screencasting | Unlimited |
Frequently Ask Questions about How to Record Discord Audio
1. What is Discord?
Discord is a platform exclusively designed for gamers. The platform not only supports voice but also specializes in text and imagery. The best part of the platform is that it has been developed for gamers so that at low latencies they can communicate with each other in a better manner.
2. Why Do You Need Software for Discord Recording?
If you are a gamer and want to communicate with your peers efficiently then there is some dedicated software for it. This will not only connect the gamers together but will also help you make friends at the same time.
This will help you record any incoming calls from any selected number of gamers’ communities. You may also save it or share any incoming/outgoing calls further on.
3. How to Select a Best Discord Audio Recorder?
The program is considered to be the best to record Discord audio if it has the following qualities. There are many programs on the market that are completely aligned with these qualities.
- The program should be easy to use and must not present any issues to novice users.
- The recording quality should be high so that the output becomes presentable.
- The program should be such that the integration with Discord does not pose any issues.
- It should have all the necessary options to share the audio to the social media platforms or with friends if the owner requires it.
4. How to Record Discord audio on PC Windows?
Discord audio recording software like OBS, AUDACITY, CRAIG, FILMORA, and LEAWO is open-source software. They allow recording Discord audio by first having the software downloaded.
Then you have to configure the audio sources and other parameters accordingly. After the recording is done, you can then save the file in any of the available file formats. Further editing may boost the audio quality as well.
5. How to Record Discord audio on PC Mac?
Software like FILMORA and LEAWO supports Mac OS. Firstly, we have to install the exe file and then download it. To get started, you have to select the appropriate recording options and audio sources respectively, and start recording!
6. How to record Discord audio on phones (iOS/Android)?
LEAWO is the only software that’s been mentioned above that supports phones OS as well. All you need to do is download LEAWO Music Recorder, which will initiate the recording process once the Discord is played.
Conclusion
Want to know how to record Discord audios? All the above software are very great to help you out. Most of the aforementioned software is open sources, which entails easy accessibility.
Select and download your favorite, and following the guide step by step, you are very comfortable making your recording easy and fun.
One thing is for sure, in the end, reliability and quality always matter. Software that is free of cost but offers less quality output will always go under the radar in the industry where competition is rife.
Rather invest in good software that will ensure you not a good quality Discord audio recording but also has a user-friendly interface, such as Wondershare Filmora .
![]()

The All-in-One Screen Recorder & Video Editor
- Record desktop screen, voiceover, and webcam simultaneously
- Edit recorded clips quickly with a wide range of professional tools
- Built-in plentiful templates and effects
- Export to MP4, MOV, MKV, GIF and multiple formats
For Win 7 or later (64-bit)
For macOS 10.12 or later
 Secure Download
Richard Bennett
Richard Bennett is a writer and a lover of all things video.
Follow @Richard Bennett
Richard Bennett
Mar 27, 2024• Proven solutions
If you are looking for the best Discord audio recording software, then you are at the right place! Here’s a solution to the difficulty you face in finding suitable software compatible with your platform.
For this article, I have selected 10 highly useful software programs that will make it easy for you to record Discord audio both on PC and phone.
You will learn:
- Part I: 10 Best Record Discord Audio software and How to Use
- Part II: Roundup of Best Discord Audio Software
- Part III: FAQs about Discord Audio Recording
10 Best Record Discord Audio software and How to Use It?
Below are the top 10 programs which can be used to record Discord audio. All of these are very easy to use and do not require any technical knowledge to get the work done.
1.Wondershare Filmora – Editor Recommend
It is a powerful tool for screen recording , offering high-quality audio recording and streaming. Although it can be used to record both, audio and video. So if you are an avid gamer and need to record audio calls from any of the communicating parties then this software offers you a solution.
Platform Compatibility
- Windows OS
- MAC OS
Features
- Allows simultaneous use of webcam and computer
- Immaculate for recording fast-speed games
- Diverse editing suite
- Supports several file formats
- Customize recording settings
- Facilitate tutorial features
Pros
- Supported by both desktop platforms, Windows and Mac OS
- A free trial is also available despite the paid ones
- Offers 15-120 FPS for windows OS
- Around 60 FPS for Mac OS
- Advanced customization options for high-quality audio.
- Friendly user interface
Cons
- Watermark on free trials.
- Paid licensing
2.AUDACITY
When you need to record both the ends of a conversation being held then AUDACITY may not be your best option. You are facilitated with the ease of availability of this software since it is open source and most importantly, free of cost. But, on the contrary, it only facilitates the users with the single audio-in recording system. That means only the audio from one side can be recorded at a time.
Platform Compatibility
- Windows OS
- MAC OS
Features
- An open-source application
- Free of cost
- Allowing post-editing of the audio after being recorded.
Pros
- Supported by both desktop platforms, windows
- Free software
Cons
- Single audio-in logic
How to Use Audacity Recorder to Record Discord Audio?
The steps in this regard are as follows:
Step 1: Right-click the volume control to access the “Recording Devices“.
Step 2: Set the microphone to default and click the record button that is the big red one in the center.
Step 3: You can then see the audio tracks of the Audacity that have started recording your Discord.
3.OBS
This software will provide you with an easy and user interface-friendly interaction platform for gamers. People belonging to the same interests now have software perfect for their communication. The text-to-speech conversion facilities the transformation of any chat into audio.
Therefore, if one sends a message in a written form while you are playing, then this software allows you to read out the chat. Therefore, this facilitates a user to not care about what a person on the other side is sending. It lets you listen to the conversation without distracting you from your game.
Platform compatibility
- Windows OS
Features
- Text-to-speech conversion
- Facilitate integration of stream element tools and chats
- Offers Media Reques t integration in OBS
- Easy broadcasting to multiple domains
- Facilitate high-quality audio streaming
- Desktop application
Pros
- Supported by both desktop platforms, Windows & Mac
- Free software
- Open-source platform
- Rapidly enhance stream engagement
- Fans’ loyalty
Cons
- Not supported for Mac OS
- It is a web app, which does not support mobile operating systems.
How to Use OBS Recorder to Record Discord Audio ?
Step 1: Go to “Settings”; “Output” of the OBS to set the output mode to simple.
Step 2: Now set the “Recording Quality” to make sure that the best audio output is generated.
Step 3: Select the “Encoder”:
Step 4: By selecting the “Advanced“ option you can make sure that the multiple tracks are recorded at the same time but in Discord, it is not required:
Now when the Discord is launched the OBS will auto-capture the audio which can then be extracted with ease.
4.LEAWO
This software also allows a user to communicate with other peers involved with you in the gaming world. It is a communication that not only offers low latency communication among peers but also allows secure communication at both ends. It is compatible with the desktop platforms like Windows and Mac OS.
Moreover, it also facilitates its usability on phones as well. You can record your audio from any audio source and can save it accordingly with one of the many formats that it offers.
Platform Compatibility
- Windows OS
- Mac OS
- iOS
- Android
Features
- Allows multiple audio-in sources
- The result can be saved in several formats, allowing WAV or
- High audio recording capability
- The dedicated infrastructure of servers.
- Facilitate high-quality audio streaming
- Promises security
- Free of cost chat servers
Pros
- Supported by both desktop and mobile platforms, Windows, Mac, Android, and iOS.
- Free Software
- High-Quality Outcome
- Multi-purpose application with chat, audio, and image transfer features
Cons
- It offers limited features, as it is free software.
How to use Leawo Recorder to Record Discord Audio ?
Step 1: Once the program is launched click the “Settings” tab at the top right corner.

Step 2: Set the audio source to “Record Computer Audio”.

Step 3: Click the “Format“ button to change the audio settings as described in the picture:

Step 4: Once the red “Start“ button is pressed the program will start recording what is to be integrated into Discord.

5.Bandicam
Though this software is paid it is recommended to the naïve users as it is easy to use and captures the parts of the screen as you desire. It is one of the most used programs that are highly in demand in contrast to Discord audio recording.
Compatibility
The program at the time of this writing is only compatible with windows.
Features
- The program has a built-in function of PIP and video in video.
- It supports AVI 2.0 and there is no output length defined.
- The real-time highlighting of the mouse cursor is offered by this program.
Pros
- It has an intuitive interface that is GUI-based and easy to use.
- The program is fast and therefore the best option for Discord audio recording.
Cons
- Since it is only compatible with windows so users of other operating systems cannot use it.
- The program does not compress the audio as well as video and therefore uses more power.
How to Use Bandicam Recorder to Record Discord Audio ?
Below are the steps which are to be followed to get the Discord audio recorded using Bandicam.
Step 1: Once the program is started, select the default recording device as a primary sound device:

Step 2: Plugin the “Speakers” and if they are disabled then please enable them. Set the Speakers as the default device as well.

Step 3: Open the volume mixture tray and set the voice to whatever level you love.

Step 4: Now whenever the Discord is run on your system you will get to know the recording sound by the fluctuating bar.

6.Camtasia
It is one of the programs that have the best interface. The integrated GUI makes it possible for the users to overcome the problems which the other programs present. With the best and the most advanced controls, it makes the process very easy.
Compatibility
The program is compatible with both Mac and Windows.
Features
- The program integrates sound with the on-screen activities using state-of-the-art functionalities.
- The HD surround sound option is also available in the paid version.
Pros
- The program has a GUI which makes it easy for the users to operate it.
- The one-step process for audio recording is something that no other program presents.
Cons
- It is a paid program so not everyone can use it.
- The free version is very much limited and therefore practically of no use.
How to Use Camtasia Recorder to Record Discord Audio ?
The program has only one step that needs to be followed to get the work done. Under recorded inputs click on the down arrow beside the “Audio On” function and select the highlighted elements to record the audio of Discord.
7.Movavi
If you are looking for a program that provides the full value for the money spent then it is the one that you should be using. It is all because of the interface that has been embedded and the speed that is incredible.
Compatibility
This program is compatible with Windows and Mac.
Features
- Movavi has a built-in database of several sound effects that can be applied to the recorded audio.
- The live broadcast is also supported by the program it is the best for Discord use.
Pros
- The program is fast as compared to the other ones on the list as it uses flash programming for development.
- Movavi is a complete suite that will allow users to perform a range of functions.
Cons
- The program is high priced so it is not recommended to individual users
- As it uses flash sometimes the screen capture is frozen for no reason
How to Use Movavi Recorder to Record Discord Audio ?
Step 1: Turn on the “System Audio” capture and specify the area from where the audio is to be captured. The button will be highlighted in green if the audio capture is on.
Step 2: Use F9 and F10 keys to pause and stop the audio recording respectively. Once the recording is on you will see the duration at the top of the capture along with the size of the audio that is being captured.
8.Free Sound Recorder
As the name suggests it is free and unlimited to use. The program is light as it is flash-based and is compatible with the most used operating systems in the world. It does not consume the system resources and therefore a top pick for every gamer.
Compatibility
The program is compatible with both Windows and Mac.
Features:
- The program uses the 3-step process to make sure that the audio is recorded with ease.
- The online music recording function is also available in the program which enhances its capability.
Pros
- The program captures both internal and external audio for free.
- You can also schedule the audio recording for a very long time and a hands-free recording option is also available.
Cons
- The program is not as frequently updated as it should be.
- The enhancement of the audio function is not as good as it should be.
How to Use Free Sound Recorder to Record Discord Audio ?
Step 1: On the lower half of the interface of the program, there is a “Recording Mixer“ which should be used to select the audio source. The same panel can also be used to make sure that the audio settings are changed as required.
Step 2: Click the circular button and the program will start recording. On the lower half, you can also see the duration of the audio recorded.
9.Record My Desktop
This Linux-based program is something that every gamer needs. It is highly in demand due to the fact that it does the desired work within no time as the speed is incredible.
Compatibility
The program is compatible with BSD and Linux.
Features
- The configuration of ALSA and OSS is possible with this program.
- The program also supports the output in different formats.
Pros
- It is very easy to operate as the interface is self-explanatory.
- The program captures the audio in the highest definition and is therefore highly recommended.
Cons
- The audio saving process is a bit hassle when it comes to this program.
- It interferes with the computer audio and therefore the quality of the recording can be degraded.
How to Use Record My Desktop to Record Discord Audio ?
Step 1: To record Discord audio, first of all, you need to make sure that the sound recording is enabled.
Step 2: Use the “Wave”, “Mic” and “Capture” buttons to set the pace until you get satisfied. The program is automatically recorded the Discord audio from this point onward.
10.CRAIG
CRAIG is an open-source platform introduced by Yahweasel for Discord that allows easy multi-channel or multi-track recording. If the data to be recorded is already available, then it easily records the audio for multiple audio tracks.
Craig is essentially a bot that enables audio recording from both the communicating ends and makes up a separate file for each. This facilitates the extent of variations or editing required for each side of audio files for better quality.
Moreover, Craig also enables the user to download the audio while recording. The potential users of Craig are either the ones managing the Craig server or the ones who are granted permission by a created “Craig” role.
Platform Compatibility
- Windows OS
- Mac OS
Features
- Open-source platform
- Allows recording in/from multiple tracks or channel
- Enables two-way communication recording
- Allow two types of users the Craig server manager and Craig’s role assigned to the person
- Facilitate high-quality audio streaming
- Promises security
- Free of cost chat servers
- Offers enhanced reliability
- Can download the file in several modern file formats
- 7 days file download
- 6 hours recording duration
- Auto tracks synchronization
Pros
- Supported by both desktop and mobile platforms, Windows, Mac, Android, and iOS.
- Free software
- High-quality outcome
- Multiple tracks recording
- Allow several speakers
- Decent recording time
Cons
- Doesn’t support phones OS
How to Record Discord Audio Using CRAIG?
Step 1: Make a free of cost Discord account
Step 2: Craig initiates recording automatically once you call it by connecting the Discord voice server with the communication peers.
Step 3: When you open the music recorder , click on the arrow button at the top right corner, this will open the dropdown list.
Step 4: While recording, Craig will send the download links.
Step 5: You can record the audio at any instance with any file format of your choice.
Step 6: A separate file for all the people involved in communication will be saved.
Step 7: You can then import these files for post-editing by pushing them directly into digital audio workstation (DAW) software.
A roundup of the Best Discord Audio Software
| No. | Tools | Review Stars | Price | Compatibility | Best For | Trial Version Limitations |
|---|---|---|---|---|---|---|
| 1 | Wondershare Filmora | 4.5 | Free, $49.99 | Mac, Windows | Screencasting, technical documentation. | One usage restriction |
| 2 | Leawo Music Recorder | 4.0 | $19.99 | Mac, Windows | Gaming, streaming, and instructional videos. | 30 Days |
| 3 | Audacity | 3.0 | Free | Mac, Windows, Linux | Tutorial, promotional videos and streaming. | Unlimited |
| 4 | OBS | 4.0 | Free | Mac, Windows, Linux | Presentations, tutorials, and screencasting. | Unlimited |
| 5 | Bandicam | 4.0 | $39 | Windows | Presentation recordings and interactive quizzes | 14 Days |
| 6 | Camtasia | 4.4 | $249 | Mac, Windows | Game recording, webcams, and all types of screencasting | 30 Days |
| 7 | Movavi | 4.0 | $39.95 | Mac, Windows | Streaming, presentations, digitization of VHS Tapes, and Screencasting. | 7 Days |
| 8 | Free Sound Recorder | 2.5 | Free | Windows | Basic screen copying. | Unlimited |
| 9 | Record My Desktop | 3.0 | Free | Linux, BSD | Webinars and online tutorials. | Unlimited |
| 10 | CRAIG | 3.5 | Free | Windows, macOS | Screencasting | Unlimited |
Frequently Ask Questions about How to Record Discord Audio
1. What is Discord?
Discord is a platform exclusively designed for gamers. The platform not only supports voice but also specializes in text and imagery. The best part of the platform is that it has been developed for gamers so that at low latencies they can communicate with each other in a better manner.
2. Why Do You Need Software for Discord Recording?
If you are a gamer and want to communicate with your peers efficiently then there is some dedicated software for it. This will not only connect the gamers together but will also help you make friends at the same time.
This will help you record any incoming calls from any selected number of gamers’ communities. You may also save it or share any incoming/outgoing calls further on.
3. How to Select a Best Discord Audio Recorder?
The program is considered to be the best to record Discord audio if it has the following qualities. There are many programs on the market that are completely aligned with these qualities.
- The program should be easy to use and must not present any issues to novice users.
- The recording quality should be high so that the output becomes presentable.
- The program should be such that the integration with Discord does not pose any issues.
- It should have all the necessary options to share the audio to the social media platforms or with friends if the owner requires it.
4. How to Record Discord audio on PC Windows?
Discord audio recording software like OBS, AUDACITY, CRAIG, FILMORA, and LEAWO is open-source software. They allow recording Discord audio by first having the software downloaded.
Then you have to configure the audio sources and other parameters accordingly. After the recording is done, you can then save the file in any of the available file formats. Further editing may boost the audio quality as well.
5. How to Record Discord audio on PC Mac?
Software like FILMORA and LEAWO supports Mac OS. Firstly, we have to install the exe file and then download it. To get started, you have to select the appropriate recording options and audio sources respectively, and start recording!
6. How to record Discord audio on phones (iOS/Android)?
LEAWO is the only software that’s been mentioned above that supports phones OS as well. All you need to do is download LEAWO Music Recorder, which will initiate the recording process once the Discord is played.
Conclusion
Want to know how to record Discord audios? All the above software are very great to help you out. Most of the aforementioned software is open sources, which entails easy accessibility.
Select and download your favorite, and following the guide step by step, you are very comfortable making your recording easy and fun.
One thing is for sure, in the end, reliability and quality always matter. Software that is free of cost but offers less quality output will always go under the radar in the industry where competition is rife.
Rather invest in good software that will ensure you not a good quality Discord audio recording but also has a user-friendly interface, such as Wondershare Filmora .
![]()
The All-in-One Screen Recorder & Video Editor
- Record desktop screen, voiceover, and webcam simultaneously
- Edit recorded clips quickly with a wide range of professional tools
- Built-in plentiful templates and effects
- Export to MP4, MOV, MKV, GIF and multiple formats
For Win 7 or later (64-bit)
For macOS 10.12 or later
Secure Download
Richard Bennett
Richard Bennett is a writer and a lover of all things video.
Follow @Richard Bennett
Elevate Your Server Control: Add Roles Instruction
How to Add Roles in Discord?
Richard Bennett
Mar 27, 2024• Proven solutions
Having a Discord server for you and your friends is a fun experience. And for gamers, Discord is a necessity. You can customize it with bots, connect real-time over voice channels, and even add rooms for chat forums.
Obviously, creating and managing a Discord server can get difficult. Especially when the server gets crammed with members, it is no longer a one-person show. You need help with monitoring and moderation. And let’s face it – you cannot watch your server round the clock.
So, let us learn the art of delegation on Discord! This guide will help you with – How to add roles in Discord and how to assign them to members. This includes creating roles, deleting them, and granting appropriate permissions.
- Part 1: Discord Server Permissions Introduction
- Part 2: How to Make and Add Roles in Discord on Computer
- Part 3: How to Manage Roles in Discord?
- Part 4: How to Delete Roles in Discord?
- Part 5: How to Add Roles on Discord Mobile?
- Part 6: Adding Roles to Discord FAQs
Part 1: Discord Server Permissions You Can Set Up
To give you a heads-up, there are around 29 permissions that you can adjust over a Discord server. More specifically, there are 7 voice permissions, 9 permissions related to texts, and about 13 permissions dealing with the server.
1. General server permission
Administrator – this is the highest permission that you can grant to a user. Think twice before giving this authority to anyone.
View Audit Log – with this permission, a user can read the server’s audits.
Manage Server – this permission enables a user to change the server’s name or shift it to another region.
Manage Roles – a user with this authority can make new roles or modify the roles without this permission.
Manage Channels – with this; a user can make, edit, or remove channels on a server.
Manage emojis – users with this authority can manage emotes.
Manage Webhooks – if you have this authority, you can add, modify, and remove webhooks.
Read Text Channels & See Voice Channels – a user with this permission can read text channels.
2. Membership permissions
Ban Members – a member with permission, can ban members from the server.
Create Instant Invite – users with this permission can invite people to the server.
Change Nickname – you can change your nickname anytime if this permission is enabled.
Manage Nicknames – if enabled, a user can change other’s nicknames.
Kick Members – a user with this authority can remove members from the server.
3. Text channel permissions
Send Messages – with this; users can send texts on chats.
Send TTS Messages – this enables users to send text-to-speech texts.
Manage Messages – with this; a user can remove or pin texts of other users.
Embed Links – enables users to embed hyperlinks in texts.
Attach Files – with this; users can attach files in the texts.
Read Message History – enables users to access earlier texts.
Mention Everyone – you can send push notifications on the channel if this permission is enabled.
Use External Emojis – if enabled, users can send emojis from other servers.
Add Reactions – with this; users can add new reactions to a text.
4. Voice channel permissions
Connect – enables users to connect themselves over the voice channel.
Speak – users can talk over the voice channel.
Mute Members – turn off other user’s speech.
Deafen Members – turn off hearing on the channel for a user.
Move Members – enables a user to shift members from one channel to a different channel.
Use Voice Activity – a member can talk without using Push-to-Talk, with this permission.
Priority Speaker – when this permission is turned on for a user, other’s
this permission allows the user to reduce the volume of other users when this user is speaking so that their words are louder on the channel.
5. Advanced permissions
Includes the ‘Administrator’ permission, which by default enables all the permissions to the assigned user.
Part 2: How to Make and Add Roles in Discord on Computer
The desktop app and Browser resemble the mobile apple a lot. The process of assigning roles and configuring members is more or less the same across devices. First, you need to create roles and define their authority before assigning these roles to some members.
How to create roles in Discord?
Before you can assign roles, you need a server. Once you have created your Discord server, start crafting the structure.
- Open your server and right-click on it.
- From the menu that appears, tap server settings.
- Name the role suitably. It should be descriptive of the authority.
- Tap on the plus sign that appears on the top right of the page.
- Here, you can change the title off the roll and even choose the color.
- Now comes the time to grant some permissions. These are basically the authority that you gave to every profile.
- When you are done, save the changes.
How to Assign Roles to Members in Discord?
To be able to assign roles, you should first create them
- Once again, hit that right button on your server and go to server settings.
- From the menu that appears to the left, ‘choose members’ under user management.
- Here, you will see the list of all the members on your server, tap the Plus sign that is right beside the username.
- From the drop-down menu that appears, select a role you want to assign to that member.
- You will notice that the color changes as per your settings. And this is how you assign roles to a server.
Part 3: How to Manage Roles in Discord?
After you learn how to make roles in Discord, you might want to manage them.
If you have got the hang of creating roles, then managing them is no different. Whenever the server gets crowded, you can create more roles or modify the existing ones. A smaller server can run smoothly with just an admin and an ‘everyone’ role.
The quickest and easiest way to manage your bloating server is to let all members be ‘everyone’ and adjust permissions accordingly. So, whenever members enter your server, they will automatically be assigned the common role.
Further, you can easily figure out what roles you have assigned to whom. Due to these colors, the other members can identify moderators, admins, or other roles.
Part 4: How to Delete Roles in Discord?
Honestly, removing Discord roles easier than setting them up. There are hardly a few steps that you need to follow for role removal.
- place the cursor on the server, and hit the right-click.
- From the list, choose server settings. Then click on roles.
- From the roles window, tap on the role that you wish to delete.
- Towards the bottom, you will see the option to delete the role.
- Press ok to confirm.
Part 5: How to Add Roles on Discord Mobile?
Like we mentioned earlier, the user interface of Discord is similar across devices. So, there is little difference between the process of creating and managing roles. But it can be baffling for beginners, so here’s a brief!
1. How to create roles in Discord mobile app?
Before you can assign roles, you have to create them.
- Open your server.
- Tap on the arrow beside the server’s title. A drop-down menu will appear. Select ‘server settings’ from that.
- Tap on ‘Roles.’ A common role, ‘everyone’ is assigned to all the members who have basic permissions enabled for everyone.
- Tap the plus sign and add a role.
- Give the role a color and describe it in a few words.
- Go through the permissions and enable the ones that fit the role.
- Save the changes.
You can repeat this multiple times to create more roles.
2. How to Assign Roles in Discord mobile app?
- Head over to settings and select ‘Members.’
- Select the members you want to assign roles to.
- Tick the boxes beside each member’s name for the roles you are assigning them.
Save the changes, and you are good to go! You can assign multiple roles to a member.
Part 6: FAQs about Discord Server Roles
Just some obvious things you might wonder about.
- How to make someone admin on Discord?
Making someone admin is the same as assigning other roles. Open your server and go to server settings.
- From there, select ‘roles’ from the left pane.
- Create a new role.
- Name the role ‘admin’ or an equivalent title.
- Adjust the setting related to sorting out role members with other members.
- Go to general permissions and tick the ‘Administrator’ option.
- Hit the ‘save changes’ button at the bottom.
- Now it’s time to assign the role to someone. Right-click on the user that you want to assign the role.
- Choose ‘roles’ from the drop-down list and select ‘Admin.’
And now your server has an admin!
- How can I assign roles to new users in Discord automatically?
By default, every member gets the role of ‘everyone’ on the server. However, you can customize this and add the MEE6 bot for automatic role allocation.
- Why can’t I manage the server even I am an admin on the server?
This is likely to happen if the server owner gave you the role of admin, but the permissions are disabled. You can ask the owner to enable the permissions for your user ID.
Richard Bennett
Richard Bennett is a writer and a lover of all things video.
Follow @Richard Bennett
Richard Bennett
Mar 27, 2024• Proven solutions
Having a Discord server for you and your friends is a fun experience. And for gamers, Discord is a necessity. You can customize it with bots, connect real-time over voice channels, and even add rooms for chat forums.
Obviously, creating and managing a Discord server can get difficult. Especially when the server gets crammed with members, it is no longer a one-person show. You need help with monitoring and moderation. And let’s face it – you cannot watch your server round the clock.
So, let us learn the art of delegation on Discord! This guide will help you with – How to add roles in Discord and how to assign them to members. This includes creating roles, deleting them, and granting appropriate permissions.
- Part 1: Discord Server Permissions Introduction
- Part 2: How to Make and Add Roles in Discord on Computer
- Part 3: How to Manage Roles in Discord?
- Part 4: How to Delete Roles in Discord?
- Part 5: How to Add Roles on Discord Mobile?
- Part 6: Adding Roles to Discord FAQs
Part 1: Discord Server Permissions You Can Set Up
To give you a heads-up, there are around 29 permissions that you can adjust over a Discord server. More specifically, there are 7 voice permissions, 9 permissions related to texts, and about 13 permissions dealing with the server.
1. General server permission
Administrator – this is the highest permission that you can grant to a user. Think twice before giving this authority to anyone.
View Audit Log – with this permission, a user can read the server’s audits.
Manage Server – this permission enables a user to change the server’s name or shift it to another region.
Manage Roles – a user with this authority can make new roles or modify the roles without this permission.
Manage Channels – with this; a user can make, edit, or remove channels on a server.
Manage emojis – users with this authority can manage emotes.
Manage Webhooks – if you have this authority, you can add, modify, and remove webhooks.
Read Text Channels & See Voice Channels – a user with this permission can read text channels.
2. Membership permissions
Ban Members – a member with permission, can ban members from the server.
Create Instant Invite – users with this permission can invite people to the server.
Change Nickname – you can change your nickname anytime if this permission is enabled.
Manage Nicknames – if enabled, a user can change other’s nicknames.
Kick Members – a user with this authority can remove members from the server.
3. Text channel permissions
Send Messages – with this; users can send texts on chats.
Send TTS Messages – this enables users to send text-to-speech texts.
Manage Messages – with this; a user can remove or pin texts of other users.
Embed Links – enables users to embed hyperlinks in texts.
Attach Files – with this; users can attach files in the texts.
Read Message History – enables users to access earlier texts.
Mention Everyone – you can send push notifications on the channel if this permission is enabled.
Use External Emojis – if enabled, users can send emojis from other servers.
Add Reactions – with this; users can add new reactions to a text.
4. Voice channel permissions
Connect – enables users to connect themselves over the voice channel.
Speak – users can talk over the voice channel.
Mute Members – turn off other user’s speech.
Deafen Members – turn off hearing on the channel for a user.
Move Members – enables a user to shift members from one channel to a different channel.
Use Voice Activity – a member can talk without using Push-to-Talk, with this permission.
Priority Speaker – when this permission is turned on for a user, other’s
this permission allows the user to reduce the volume of other users when this user is speaking so that their words are louder on the channel.
5. Advanced permissions
Includes the ‘Administrator’ permission, which by default enables all the permissions to the assigned user.
Part 2: How to Make and Add Roles in Discord on Computer
The desktop app and Browser resemble the mobile apple a lot. The process of assigning roles and configuring members is more or less the same across devices. First, you need to create roles and define their authority before assigning these roles to some members.
How to create roles in Discord?
Before you can assign roles, you need a server. Once you have created your Discord server, start crafting the structure.
- Open your server and right-click on it.
- From the menu that appears, tap server settings.
- Name the role suitably. It should be descriptive of the authority.
- Tap on the plus sign that appears on the top right of the page.
- Here, you can change the title off the roll and even choose the color.
- Now comes the time to grant some permissions. These are basically the authority that you gave to every profile.
- When you are done, save the changes.
How to Assign Roles to Members in Discord?
To be able to assign roles, you should first create them
- Once again, hit that right button on your server and go to server settings.
- From the menu that appears to the left, ‘choose members’ under user management.
- Here, you will see the list of all the members on your server, tap the Plus sign that is right beside the username.
- From the drop-down menu that appears, select a role you want to assign to that member.
- You will notice that the color changes as per your settings. And this is how you assign roles to a server.
Part 3: How to Manage Roles in Discord?
After you learn how to make roles in Discord, you might want to manage them.
If you have got the hang of creating roles, then managing them is no different. Whenever the server gets crowded, you can create more roles or modify the existing ones. A smaller server can run smoothly with just an admin and an ‘everyone’ role.
The quickest and easiest way to manage your bloating server is to let all members be ‘everyone’ and adjust permissions accordingly. So, whenever members enter your server, they will automatically be assigned the common role.
Further, you can easily figure out what roles you have assigned to whom. Due to these colors, the other members can identify moderators, admins, or other roles.
Part 4: How to Delete Roles in Discord?
Honestly, removing Discord roles easier than setting them up. There are hardly a few steps that you need to follow for role removal.
- place the cursor on the server, and hit the right-click.
- From the list, choose server settings. Then click on roles.
- From the roles window, tap on the role that you wish to delete.
- Towards the bottom, you will see the option to delete the role.
- Press ok to confirm.
Part 5: How to Add Roles on Discord Mobile?
Like we mentioned earlier, the user interface of Discord is similar across devices. So, there is little difference between the process of creating and managing roles. But it can be baffling for beginners, so here’s a brief!
1. How to create roles in Discord mobile app?
Before you can assign roles, you have to create them.
- Open your server.
- Tap on the arrow beside the server’s title. A drop-down menu will appear. Select ‘server settings’ from that.
- Tap on ‘Roles.’ A common role, ‘everyone’ is assigned to all the members who have basic permissions enabled for everyone.
- Tap the plus sign and add a role.
- Give the role a color and describe it in a few words.
- Go through the permissions and enable the ones that fit the role.
- Save the changes.
You can repeat this multiple times to create more roles.
2. How to Assign Roles in Discord mobile app?
- Head over to settings and select ‘Members.’
- Select the members you want to assign roles to.
- Tick the boxes beside each member’s name for the roles you are assigning them.
Save the changes, and you are good to go! You can assign multiple roles to a member.
Part 6: FAQs about Discord Server Roles
Just some obvious things you might wonder about.
- How to make someone admin on Discord?
Making someone admin is the same as assigning other roles. Open your server and go to server settings.
- From there, select ‘roles’ from the left pane.
- Create a new role.
- Name the role ‘admin’ or an equivalent title.
- Adjust the setting related to sorting out role members with other members.
- Go to general permissions and tick the ‘Administrator’ option.
- Hit the ‘save changes’ button at the bottom.
- Now it’s time to assign the role to someone. Right-click on the user that you want to assign the role.
- Choose ‘roles’ from the drop-down list and select ‘Admin.’
And now your server has an admin!
- How can I assign roles to new users in Discord automatically?
By default, every member gets the role of ‘everyone’ on the server. However, you can customize this and add the MEE6 bot for automatic role allocation.
- Why can’t I manage the server even I am an admin on the server?
This is likely to happen if the server owner gave you the role of admin, but the permissions are disabled. You can ask the owner to enable the permissions for your user ID.
Richard Bennett
Richard Bennett is a writer and a lover of all things video.
Follow @Richard Bennett
Also read:
- [New] In 2024, Finding Heartfelt Connections in Discord Chats
- [New] In 2024, Foremost Innovative Logos for Social Platforms' Animations
- 2024 Approved How to Get and Add Animated Emojis on Discord
- [New] Decoding A Systematic Approach to Finding Specific Discords for 2024
- [Updated] Discord's Top 10 Where to Date and Love for 2024
- 2024 Approved Your Complete Handbook on Discord Usage
- [New] In 2024, An In-Depth Exploration of Discord Features
- [New] Simplified Understanding of Discord Spoilers
- [Updated] 2024 Approved Decoding Nitro Unveiling Its Premium Status in the Realm of Discord
- [Updated] In 2024, Unlock Your Potential Designing Captivating Discord Photos
- [Updated] In 2024, Unveiling the Trailblazers Shaping Discord's Visual Language
- Social Expansion The Desktop & Mobile Guide for 2024
- [Updated] Mastering Visual Communication on Discord An Essential Guide to Using GIFs Effectively for 2024
- [New] Unlock the Potential of Your Profile Picture on Discord
- [New] 2024 Approved Ensuring Smooth Operations in Your Discord Channels with These Steps
- 2024 Approved Best Multiplayer Game Chat Options
- [New] Unbeatable Deal Get Top-Quality Discord Icons FREE
- [Updated] 2024 Approved Ultimate Guide to Choosing Premium Emoji Makers on Discord
- [Updated] In 2024, Disengage From Discord Services
- 2024 Approved Unveiling All About Discord Stickers
- [Updated] 2024 Approved Navigating New Territories Link Up on PC/Mobile
- [New] The Ultimate 2023 Guide to Enhancing Audio on Discord - Top Plugins Reviewed for 2024
- [Updated] 2024 Approved How to Execute a Swift and Silent Chat Purge on Discord Platform
- In 2024, DIY Approach for Animated Emoji Addition on Nitro-Free Discord
- Uncovering All About Discord Stickers for 2024
- [Updated] Exploring Advanced Strategies for Sending Videos in Discord
- [New] 2024 Approved Mastering Discord Stickers Your Ultimate Resource
- Discord Video Downloading Guide Free iOS, Android, PC, Mac Methods for 2024
- [Updated] Transforming Conversations with Discord's Powerful Graphics Library for 2024
- [New] In 2024, Essential Tips for Navigating Discord Spoilers
- [Updated] Discovering the Secrets Seamless Video Sharing on Discord for 2024
- [New] 2024 Approved Advanced Font Designers Focused on Discord Channels
- [New] Proven Tactics for an Intuitive Journey Into Uncharted Discord Landscapes
- [New] 2024 Approved Step-by-Step Guide to Thriving in Discord
- In 2024, Step-by-Step Process for Crafting a Unique Discord Avatar (PC/Mobile)
- [New] Avoiding Consequences When Quitting Discord Spaces for 2024
- [New] 2024 Approved Harmonizing with the Best 15 Premier Sound Assistants to Enhance Your Discord Audio
- [Updated] Enhancing Discord Status with Bespoke Emojis on PC & Mobile for 2024
- [Updated] In 2024, Techniques for Swiftly Removing Multiple Messages in Discord
- In 2024, Analyzing Networking Services Discord Meets Skype
- [Updated] In 2024, The Top 10 Must-Have Disco Upgrades for Seamless Use
- Immediate Notoriety Coolest Channel Nicknames Uncovered
- [New] Exclusive Communication Apps Post-Discord
- [Updated] 2024 Approved Best Font Generators Enhance Your Discord Experience (Android/iOS)
- [Updated] 10 Best Discord Banner Creators & Tips for Personal Branding for 2024
- In 2024, Game On, Recording Off! - NVIDIA Magic
- 2024 Approved Mastering the Art of Optimal Audio Format Selection
- [Updated] Turning Pre-Recorded Videos Into a Captivating Live Experience on FB for 2024
- NVIDIA Screen Recorder - Record Games with Ease
- In 2024, Exclusive Guide to the Best Chrome Extensions for FB Videos
- The Contemporary Guide to Achieving Perfect Audio Gradual Decline for 2024
- [New] Spotting Success Stories 2023’S Most Shared Tweets for 2024
- New In 2024, Slow Motion and Fast Motion Effects in Camtasia
- In 2024, AddROM Bypass An Android Tool to Unlock FRP Lock Screen For your Honor X7b
- Free Video Editing Apps for Android No Watermark, No Hassle
- Unveiling FB's Topest Latest Perks for 2024
- Hassle-Free Ways to Remove FRP Lock on Xiaomi Redmi Note 12 5Gwith/without a PC
- How to Bypass FRP from Samsung Galaxy A15 4G?
- New In 2024, Silent Interludes, Harmonious Sounds Expert Techniques for Audio Ducking in Adobe Premiere Pro on a Mac Computer
- In 2024, Interactive Television Integrating FB Vids
- In 2024, How to Delete iCloud Account From Apple iPhone 15 Plus without Password?
- 5 Best Apps for Voice Translation From English to Bangla
- [New] Pros & Cons for the Leading Free Screencast Apps for 2024
- Chasing Charm Innovative Photo Techniques to Ignite Insta for 2024
- How to Cast Honor Magic 6 Lite to Computer for iPhone and Android? | Dr.fone
- In 2024, Looking for Exciting Methods to Create Alluring GIFs Worthy of Making a Mass Appeal? Heres All About GIF Design You Will Ever Want to Know and Learn
- [New] 2024 Approved A Viral Strategy for Impressive Instagram Stories
- New Elevating Your Sound Experience The Top 10 Alternatives to Audacity Across Computers and Tablets
- Updated Adobe Audio Editor Adobe Audition Features, Reviews & Tutorial
- 2024 Approved Overcoming Screen Blackouts in Recording Tools
- How to Come up With the Best Pokemon Team On Oppo Reno 8T 5G? | Dr.fone
- Updated 2024 Approved Your Number 1 Tip to Resize Social Media Vertical Video Ratio
- Sonic Resource Hub A Curated List of Premium Websites with a Stockpile of Free Sound Scores for 2024
- [New] 2024 Approved Bridge Between Platforms Sharing Facebook Videos on WhatsApp
- Updated Initiating Your Journey with Wave Editors Tips and Tricks for Aspiring Audio Editors
- The 9 Premier Artificial Intelligence Vocal Tools Reimagining Tomorrows Daily Routine for 2024
- [New] Insider's Look at Instagram Viewership Metrics
- Rhythm Renders Infusing Sound Into Your Visual Storytelling (FB) for 2024
- [Updated] 2024 Approved Crafting High-Quality Game Stream Videos with Artificial Intelligence
- Title: "2024 Approved Top 10 Costless Apps for High-Quality Discord Audio Recordings"
- Author: Timothy
- Created at : 2024-05-23 22:47:56
- Updated at : 2024-05-24 22:47:56
- Link: https://discord-videos.techidaily.com/2024-approved-top-10-costless-apps-for-high-quality-discord-audio-recordings/
- License: This work is licensed under CC BY-NC-SA 4.0.
