
:max_bytes(150000):strip_icc()/ComputersLaptops_MoMoProductions_GettyImages-1305309014_CROPPED-73522b11cda24bcdb21a9dc3b34adc76.jpg)
"2024 Approved Voice Your Message on Discord TTS Essentials"
Voice Your Message on Discord: TTS Essentials
How to Use Discord Text-To-Speech?

Richard Bennett
Mar 27, 2024• Proven solutions
While most users of the popular online messaging and content sharing site Discord rely on simple text to communicate, there are numerous situations when using the text-to-speech feature would be quite advantageous. This includes instances when there are language barriers or disabilities to overcome, but also spontaneous moments when users just enjoy hearing each other’s words. Discord supports the use of a text-to-speech (TTS) function and in fact, has a built-in setting for it, but this option only works for desktop users with Windows or Mac devices.
In this article, we will discuss the specifics of activating the TTS function in Discord and using it effectively to improve your communication with other users. By following the detailed instructions provided here, you will be able to learn how to activate text-to-speech on Discord and manage your voice messages on selected servers in the most practical manner.
- Part 1: Enable Text-To-Speech Feature in Discord
- Part 2: How to Set Up Text-To-Speech Notifications on Discord?
- Part 3: How to Use Text-To-Speech in Discord Chatting?
- Part 4: How to Mute All Text-To-Speech Messages on Discord?
- Part 5: Best Text-To-Speech Bots on Discord
Part 1: How to Enable Text-To-Speech Feature in Discord?
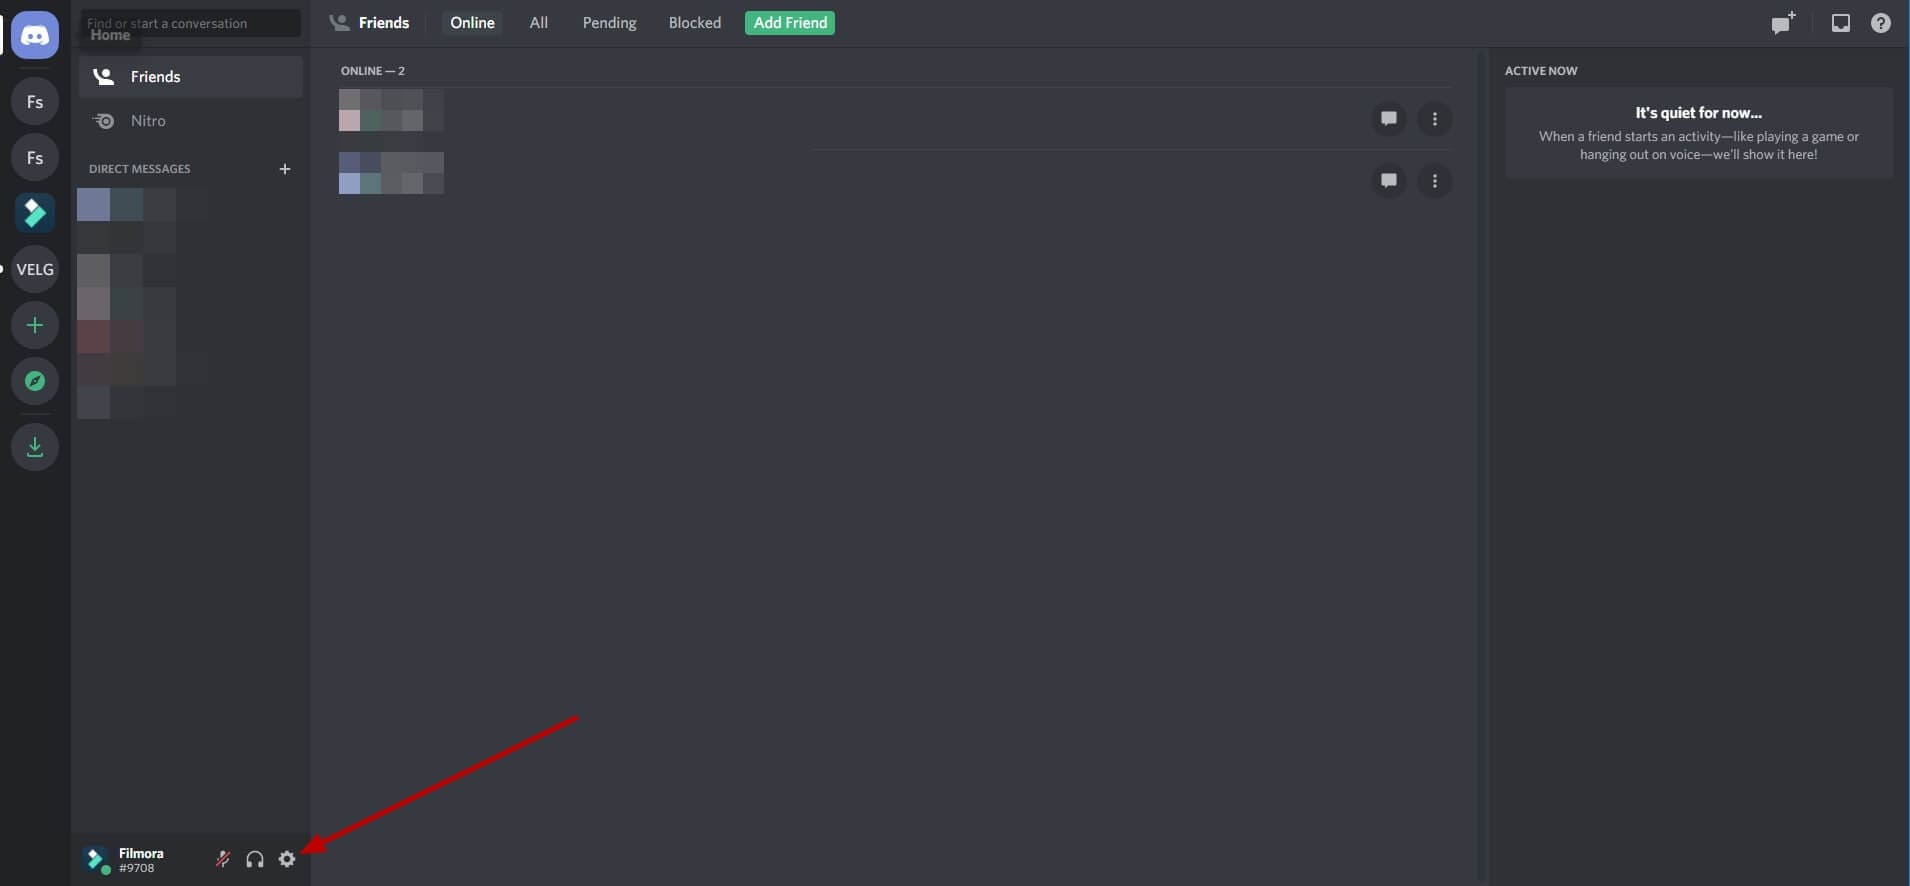
Before you can deploy TTS in your chats, you need to change the settings of your profile to enable this option. This isn’t hard to do – just go to the Discord app and select ‘Settings’ from the menu, which will trigger a pop-up window to appear on your screen. Next, you need to find the Text & Images section in the App Settings window, then scroll down to find the Text-to-Speech option, and finally tick the boxes next to Allow playback and Usage of TTS items. After you do this, your Discord will be ready to process your text messages in voice format.
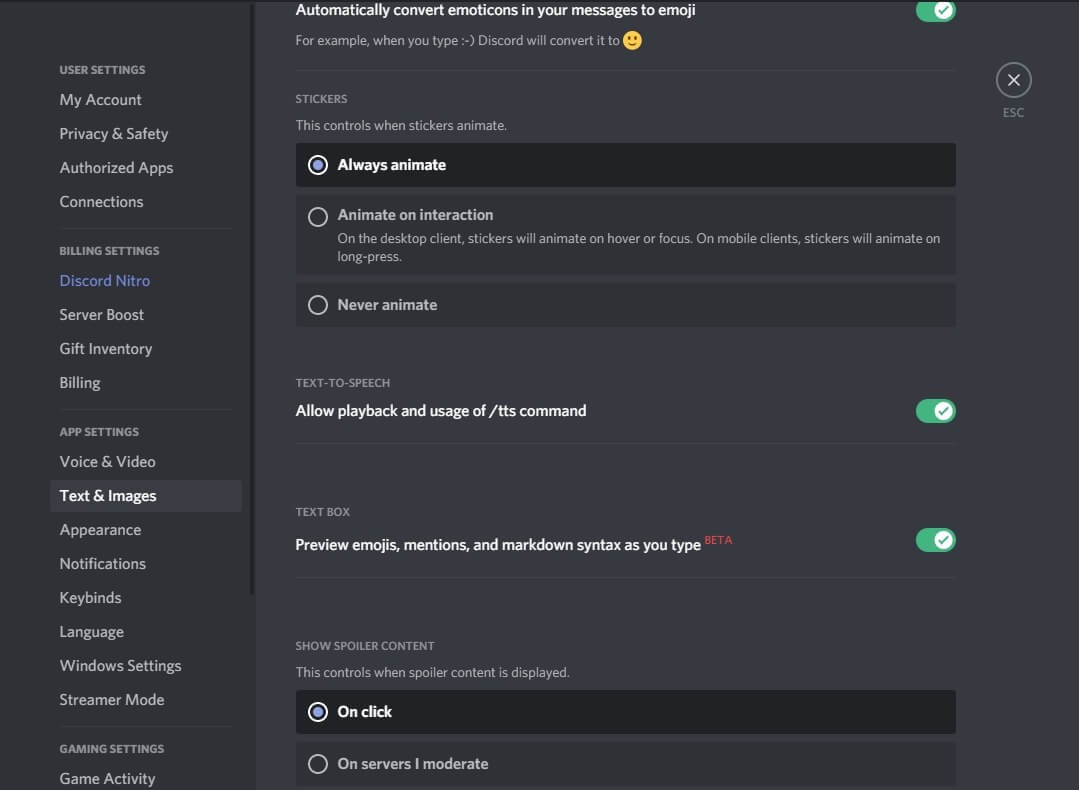
To test whether you successfully activated Text-to-Speech, open any chats on your personal server and try typing out a message, followed immediately by the tag /tts. If everything is working correctly, your message should appear on the screen in the text form, accompanied by its voice rendering delivered by an automated module. The timing of the two should be perfectly synchronized so that you hear the message and see the text at exactly the same instance. Otherwise, go back to settings and make sure you activated the TTS option properly or restart your Discord app.
Part 2: How to Set Up Text-To-Speech Notifications on Discord?
Another practical possibility that can improve your Discord experience is to set up TTS notifications and be immediately informed whenever a fresh message arrives. This can also be done after you change the app parameters from the ‘Settings’ menu. After you see all options, choose ‘App Settings’ and search for the section named ‘Notifications’. By scrolling down, you will reach the item ‘Text-to-Speech notifications’ and after clicking on it you will be given a choice between three options.
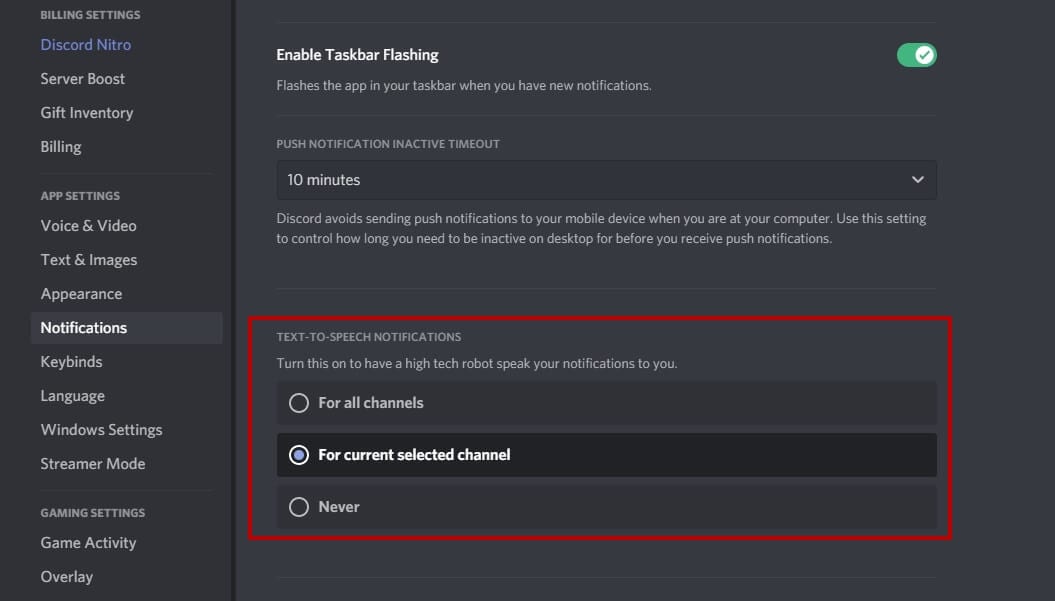
The first option For all channels is to enable notifications on all channels on Discord; choosing it will result in a robotic voice reading all messages from all chats, regardless of whether they have a /tts tag. This option can be useful when you want to maximize your accessibility and receive important information instantly.
By picking the second option, For current selected channel, you can enable TTS notifications only on the current channel. This action will instruct Discord to have an automated voice read all the incoming messages on the active chat aloud, allowing you to stay in the loop at all times. This possibility works well for people who occasionally do multiple things at once, for example, gamers or streamers who use Discord to stay connected with their fans and friends while they are busy.
Finally, you can choose Never to hear any voice messages from your Discord chats never. If you pick this setting, even those messages that were sent with the /tts tag will only be displayed in the text format. This option provides you with peace of mind and prevents spammers from saturating you with voice messages you have no interest in hearing.
Part 3: How to Use Text-To-Speech in Discord Chatting?
It’s not very hard to learn how to effectively use the TTS option in your chats on the Discord platform. This communication format is available on all channels that have an activated Text-to-Speech setting, so you can freely add a few messages to be read aloud or completely switch to automated voice format if you so desire. Doing this in practice is very simple – just start your message by typing the tag /tts and then enter your text as you normally would.

Your TTS message will be reproduced in a voice format by a Discord bot to all participants in the chat who didn’t mute incoming Text-to-Speech chats. An automated voice will say the entire message, and then also pronounce your username to identify the author. At the same time, the message will appear in the chat feed as plain text, so that even those recipients unable to hear it will be able to see the contents.
Part 4: How to Mute All Text-To-Speech Messages on Discord?
You can also decide to prevent any messages from being played to you in a voice format and receive them as text only. This option is available even if you are not the administrator of the chat server and simply want to customize your own experience. To do this, you need to open the Discord app and enter the Settings menu, before selecting the Text & Images section from App Settings. After this, you need to find the Text-to-Speech sub-menu and open it to find the Allow Playback feature. If you disable this feature, you will effectively mute all incoming TTS messages across all Discord servers you are active on.
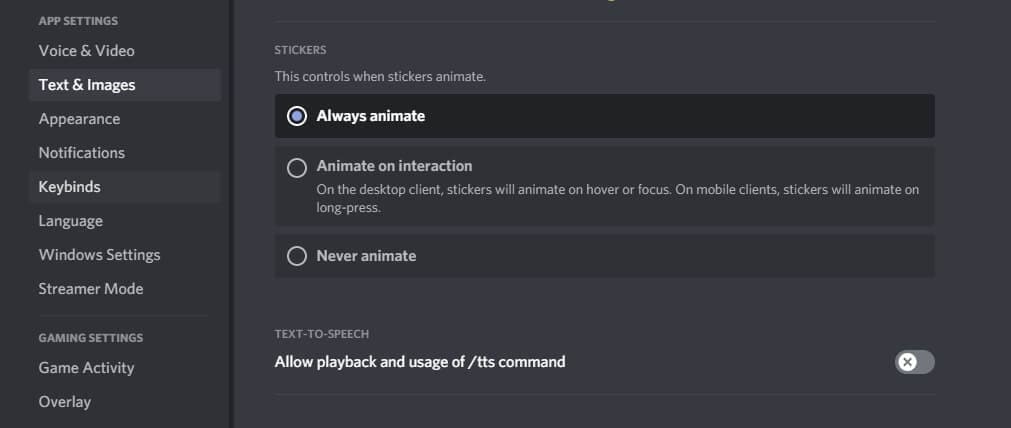
Please keep in mind that deactivating the aforementioned feature won’t block TTS messages from reaching you, but you will see them as text only. On the other hand, you can’t use the /tts tag to send your own Text-to-Speech while the playback setting is disabled. Nothing is preventing you from turning it back on when you want to have a TTS capacity on Discord again.
Part 5: Best Text-To-Speech Bots on Discord
One of the reasons why Discord is so popular is that it allows extensive customization through user-made Bots or modules that automatically perform a certain task. There are several great Bots that can be used for Text-to-Speech, so you might consider utilizing one of them.
1. Text to Speech (TTS)
With many languages supported and a wide range of cool commands, this bot could be the best choice for people who use TTS just for fun.
2. KD Bot
A very popular option for Text-to-Speech on Discord that lets you choose from more than 100 voices and supports upwards of 100 languages, making it a powerful translation tool.
3. Fergun
This multi-language tool responds to more than 100 different commands, so it can be used for a wide variety of purposes with stunning effectiveness.
Frequently asked questions about TTS on Discord
- Can I use the Text-to-Speech feature on Discord from a mobile phone?
Unfortunately, you can’t. Discord works quite well as a text messaging app on mobile platforms, but at this time Text-to-Speech functionality is limited to desktop users.
- Why can’t I use Text-to-Speech on a Discord server?
If you are unable to send or receive TTS messages on Discord, you need to change your settings. Please see Part 1 of this article for detailed instructions.
Richard Bennett
Richard Bennett is a writer and a lover of all things video.
Follow @Richard Bennett
Richard Bennett
Mar 27, 2024• Proven solutions
While most users of the popular online messaging and content sharing site Discord rely on simple text to communicate, there are numerous situations when using the text-to-speech feature would be quite advantageous. This includes instances when there are language barriers or disabilities to overcome, but also spontaneous moments when users just enjoy hearing each other’s words. Discord supports the use of a text-to-speech (TTS) function and in fact, has a built-in setting for it, but this option only works for desktop users with Windows or Mac devices.
In this article, we will discuss the specifics of activating the TTS function in Discord and using it effectively to improve your communication with other users. By following the detailed instructions provided here, you will be able to learn how to activate text-to-speech on Discord and manage your voice messages on selected servers in the most practical manner.
- Part 1: Enable Text-To-Speech Feature in Discord
- Part 2: How to Set Up Text-To-Speech Notifications on Discord?
- Part 3: How to Use Text-To-Speech in Discord Chatting?
- Part 4: How to Mute All Text-To-Speech Messages on Discord?
- Part 5: Best Text-To-Speech Bots on Discord
Part 1: How to Enable Text-To-Speech Feature in Discord?
Before you can deploy TTS in your chats, you need to change the settings of your profile to enable this option. This isn’t hard to do – just go to the Discord app and select ‘Settings’ from the menu, which will trigger a pop-up window to appear on your screen. Next, you need to find the Text & Images section in the App Settings window, then scroll down to find the Text-to-Speech option, and finally tick the boxes next to Allow playback and Usage of TTS items. After you do this, your Discord will be ready to process your text messages in voice format.
To test whether you successfully activated Text-to-Speech, open any chats on your personal server and try typing out a message, followed immediately by the tag /tts. If everything is working correctly, your message should appear on the screen in the text form, accompanied by its voice rendering delivered by an automated module. The timing of the two should be perfectly synchronized so that you hear the message and see the text at exactly the same instance. Otherwise, go back to settings and make sure you activated the TTS option properly or restart your Discord app.
Part 2: How to Set Up Text-To-Speech Notifications on Discord?
Another practical possibility that can improve your Discord experience is to set up TTS notifications and be immediately informed whenever a fresh message arrives. This can also be done after you change the app parameters from the ‘Settings’ menu. After you see all options, choose ‘App Settings’ and search for the section named ‘Notifications’. By scrolling down, you will reach the item ‘Text-to-Speech notifications’ and after clicking on it you will be given a choice between three options.
The first option For all channels is to enable notifications on all channels on Discord; choosing it will result in a robotic voice reading all messages from all chats, regardless of whether they have a /tts tag. This option can be useful when you want to maximize your accessibility and receive important information instantly.
By picking the second option, For current selected channel, you can enable TTS notifications only on the current channel. This action will instruct Discord to have an automated voice read all the incoming messages on the active chat aloud, allowing you to stay in the loop at all times. This possibility works well for people who occasionally do multiple things at once, for example, gamers or streamers who use Discord to stay connected with their fans and friends while they are busy.
Finally, you can choose Never to hear any voice messages from your Discord chats never. If you pick this setting, even those messages that were sent with the /tts tag will only be displayed in the text format. This option provides you with peace of mind and prevents spammers from saturating you with voice messages you have no interest in hearing.
Part 3: How to Use Text-To-Speech in Discord Chatting?
It’s not very hard to learn how to effectively use the TTS option in your chats on the Discord platform. This communication format is available on all channels that have an activated Text-to-Speech setting, so you can freely add a few messages to be read aloud or completely switch to automated voice format if you so desire. Doing this in practice is very simple – just start your message by typing the tag /tts and then enter your text as you normally would.
Your TTS message will be reproduced in a voice format by a Discord bot to all participants in the chat who didn’t mute incoming Text-to-Speech chats. An automated voice will say the entire message, and then also pronounce your username to identify the author. At the same time, the message will appear in the chat feed as plain text, so that even those recipients unable to hear it will be able to see the contents.
Part 4: How to Mute All Text-To-Speech Messages on Discord?
You can also decide to prevent any messages from being played to you in a voice format and receive them as text only. This option is available even if you are not the administrator of the chat server and simply want to customize your own experience. To do this, you need to open the Discord app and enter the Settings menu, before selecting the Text & Images section from App Settings. After this, you need to find the Text-to-Speech sub-menu and open it to find the Allow Playback feature. If you disable this feature, you will effectively mute all incoming TTS messages across all Discord servers you are active on.
Please keep in mind that deactivating the aforementioned feature won’t block TTS messages from reaching you, but you will see them as text only. On the other hand, you can’t use the /tts tag to send your own Text-to-Speech while the playback setting is disabled. Nothing is preventing you from turning it back on when you want to have a TTS capacity on Discord again.
Part 5: Best Text-To-Speech Bots on Discord
One of the reasons why Discord is so popular is that it allows extensive customization through user-made Bots or modules that automatically perform a certain task. There are several great Bots that can be used for Text-to-Speech, so you might consider utilizing one of them.
1. Text to Speech (TTS)
With many languages supported and a wide range of cool commands, this bot could be the best choice for people who use TTS just for fun.
2. KD Bot
A very popular option for Text-to-Speech on Discord that lets you choose from more than 100 voices and supports upwards of 100 languages, making it a powerful translation tool.
3. Fergun
This multi-language tool responds to more than 100 different commands, so it can be used for a wide variety of purposes with stunning effectiveness.
Frequently asked questions about TTS on Discord
- Can I use the Text-to-Speech feature on Discord from a mobile phone?
Unfortunately, you can’t. Discord works quite well as a text messaging app on mobile platforms, but at this time Text-to-Speech functionality is limited to desktop users.
- Why can’t I use Text-to-Speech on a Discord server?
If you are unable to send or receive TTS messages on Discord, you need to change your settings. Please see Part 1 of this article for detailed instructions.
Richard Bennett
Richard Bennett is a writer and a lover of all things video.
Follow @Richard Bennett
Forfeit Your Discord Presence
How to Delete Discord Account [Step-by-Step]
Richard Bennett
Mar 27, 2024• Proven solutions
Discord is a voice and text chat service to bring like-minded people together, especially e-sports professionals.
The goal was to provide users with an improved communications platform that could streamline the way people speak in real-time and over the internet.
Originally designed for gamers, the app allowed users to communicate with others who share interests on a given topic.
After a while, the Discord app expanded its reach and included non-gamers as well. Today, it is one of the most popular chatting apps out there.
However, if, for any reason, you want to delete or disable your account for good, you can. In the following articles, you will learn about how to delete your account step by step.
- Part 1: Deleting A Discord Account Permanently on Desktop Computer
- Part 2: Deleting Discord Account from Mobile Devices
- Part 3: How to Disable Discord Account On Desktop Computer
- Part 4: How To Disable Discord Account On Mobile?
Part 1: How To Delete A Discord Account Permanently?
Are you done with a game, scared about your data, or just bored with the app? No problem! If you want to learn how to delete your discord account, look no further.
But before doing so, you’ll have to do two quick things:
- Reassign ‘administrative rights’ of the servers
- Completely delete them
The only reason you will have to think about these things is if you assumed responsibility for any server.
Without further ado, here are some easy to follow steps to delete a Discord account permanently:
- Open the Discord app
- Sign in to your Discord account and open the user settings option (Cog icon)
- Click the “My Account” option in the user setting menu. At the very bottom of the screen, you’ll see the “delete account” option
- Click the delete account button to make your Discord account disappear!
However, if you’ve activated 2FA, you may also be asked to put your password and 2FA code.
Also, if you want to delete your account permanently, there are some things you need to do before completing the process.
As mentioned before, if you’re the server’s owner, you’ll have to either delete your server or transfer its ownership to a trusted source.
For transferring ownership on Discord, follow these steps:
- Open the Discord app
- Click the “server name,” and a range of options will open; then click “server setting”
- At the bottom-left of the screen, click the ‘members’ option below “User Management”
- Here you’ll make the critical decision of who gets the keys to your kingdom. Once you decide who to transfer the ownership to, click the “3 vertical dots”
- As the “dialog menu” opens, click “Transfer Ownership”
Once it’s completed, you’ll become a regular server member. Your access to the server will be limited and as per the set position.
On the other hand, if you don’t want to transfer its ownership to someone else, you can also delete it.
Here’s how you can delete the server to complete the process of deleting your Discord account:
- Click the “Server Name” again
- Within the several options, click the “Server Settings.”
- At the bottom-left of your window, click the “Delete Server” option in the “User Management” section.

- Once clicked, the system will ask you to enter the account password to delete your server (or servers) from existence altogether
Like the primary Discord account deletion process, if you have enabled 2FA on this account, you’ll have to put in the code to get things completed.
After this, you’ll be asked one more time to click the “delete server” button before it is completely deleted. Keep in mind that you’ll have 14 days time to recover your Discord account. Once the two-week time passes, you won’t be able to retrieve or sign in to your account.
Once the account is deleted, the username will show up as “deleteduser 0000” or something similar to this. However, users you have texted via your account will still see your texts.
Part 2: How to Delete Discord Account From iPhone And Android?
Yes, you can delete the discord account from iPhone and Android. And if you’re wondering how to delete a Discord account, Here’s a quick way to do it:
- Open your updated discord app and tap the “hamburger” menu located at the top-left
- Tap the gear icon so you can go to the “user settings.”
- Select “My Account”
- Below the “Account Management” option, choose “Delete Account” and put your password and 2FA (if you have set it up)
Part 3: How To Disable Discord Account On Desktop Computer?
Deleting the account means you won’t be able to use it further, whereas disabling the account normally means you’re taking a little break.
So, if you don’t want to remove or delete your account entirely but only want it gone for some time, choose the disable option.
Here’s how you can disable a Discord account on a desktop computer:
- Open the app on your window PC/Mac and then log in to your Discord account
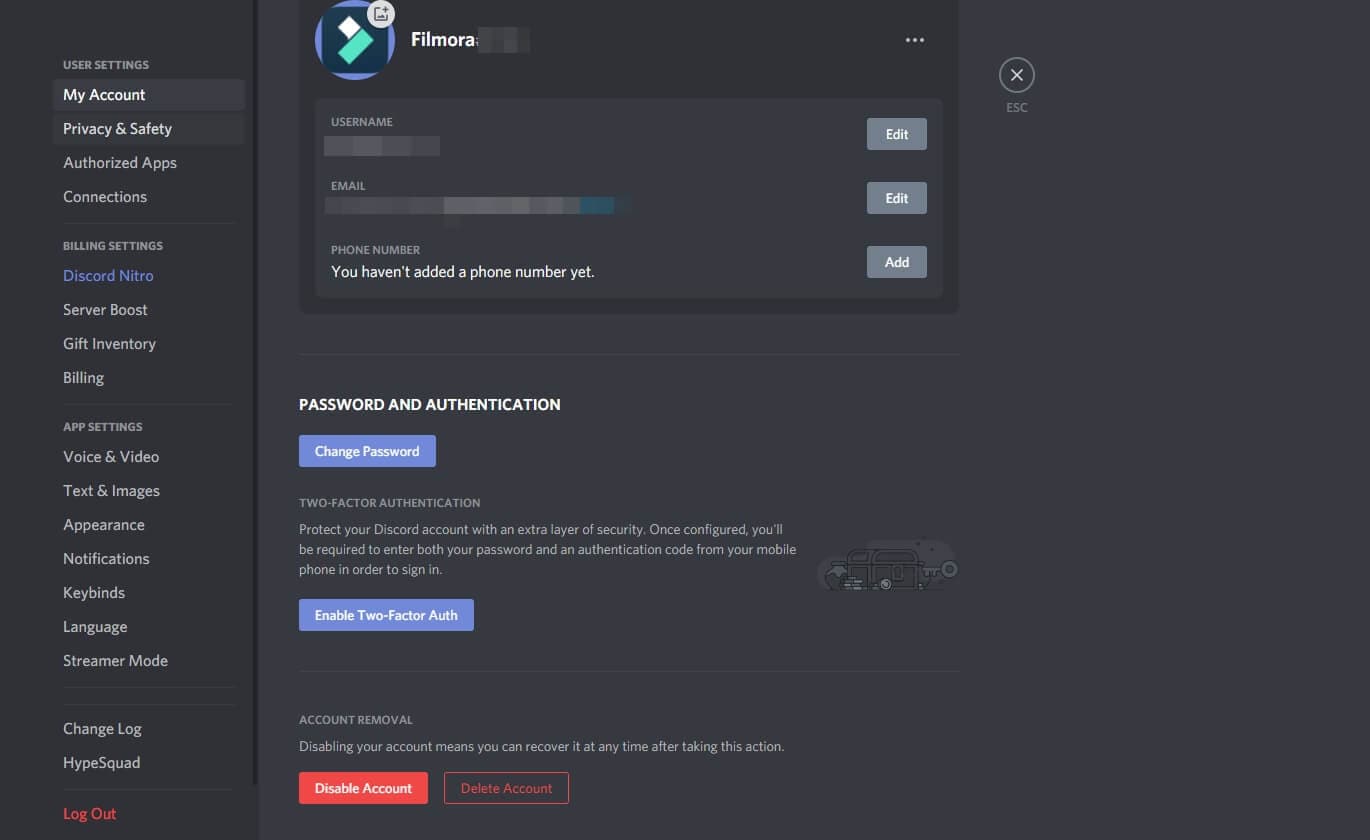
- Click the “User Settings” option and then go to the “My Account” option within the user settings
- In the lower corner of your Mac/PC screen, you’ll see the “Disable Account” button next to the “Delete Account” button
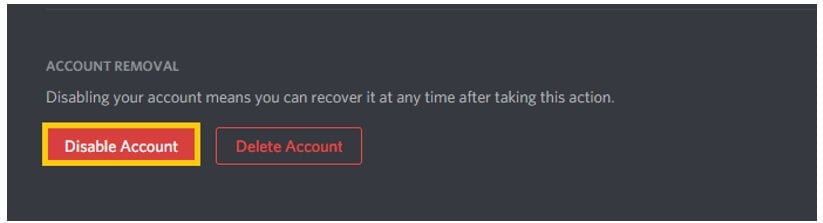
- Click the “Disable Account” option, and it will be disabled.
What’s The Difference Between Disabling And Deleting A Discord Account?
Disabling the account means you can recover it anytime you want, unlike deleting the account where you only have a 14-day restoration window. Additionally, when the account is disabled, you won’t receive notifications, but you will still get “friend requests.”
Part 4: How To Disable Discord Account On Mobile?
Disabling your Discord account for Android and iOS isn’t as simple as it is on a Desktop Windows/Mac PC.
Currently, there is no direct way to either delete or disable your Discord account through a mobile device.
Nevertheless, follow the steps below to disable your Discord account on mobile:
- Open the Discord application on your smartphone
- Tap the cog icon on the lower right corner of the phone
- Tap on the “My Account” option in the “User Settings” menu
- You’ll have the choice to either “Delete Account” or “Disable Account.” However, whatever you choose, you’ll be prompted to the support page explaining ways to disable or delete your account
- To complete disabling process from a mobile device, you’ll have to send a request to the support team, as it’s the only way to disable your account via your smartphone
FAQs About Deleting Discord Account
1. How Long Does Discord Take To Delete Account?
Typically, once you have completed the entire deletion process, Discord takes approximately 14 to 30 days to process it.
2. What Happens When You Delete Discord Account?
Deleting your discord account won’t delete the information you have on the account. It will delete your profile and rename the account to “deleteduser.” However, all your data and messages will remain on the server or servers.
3. Can I Re-Use The Deleted Discord Account?
You can re-use your deleted discord account only if the account is in a “pending deletion state,” which is 14 days. If the time is passed, you won’t be able to re-use it.
Richard Bennett
Richard Bennett is a writer and a lover of all things video.
Follow @Richard Bennett
Richard Bennett
Mar 27, 2024• Proven solutions
Discord is a voice and text chat service to bring like-minded people together, especially e-sports professionals.
The goal was to provide users with an improved communications platform that could streamline the way people speak in real-time and over the internet.
Originally designed for gamers, the app allowed users to communicate with others who share interests on a given topic.
After a while, the Discord app expanded its reach and included non-gamers as well. Today, it is one of the most popular chatting apps out there.
However, if, for any reason, you want to delete or disable your account for good, you can. In the following articles, you will learn about how to delete your account step by step.
- Part 1: Deleting A Discord Account Permanently on Desktop Computer
- Part 2: Deleting Discord Account from Mobile Devices
- Part 3: How to Disable Discord Account On Desktop Computer
- Part 4: How To Disable Discord Account On Mobile?
Part 1: How To Delete A Discord Account Permanently?
Are you done with a game, scared about your data, or just bored with the app? No problem! If you want to learn how to delete your discord account, look no further.
But before doing so, you’ll have to do two quick things:
- Reassign ‘administrative rights’ of the servers
- Completely delete them
The only reason you will have to think about these things is if you assumed responsibility for any server.
Without further ado, here are some easy to follow steps to delete a Discord account permanently:
- Open the Discord app
- Sign in to your Discord account and open the user settings option (Cog icon)
- Click the “My Account” option in the user setting menu. At the very bottom of the screen, you’ll see the “delete account” option
- Click the delete account button to make your Discord account disappear!
However, if you’ve activated 2FA, you may also be asked to put your password and 2FA code.
Also, if you want to delete your account permanently, there are some things you need to do before completing the process.
As mentioned before, if you’re the server’s owner, you’ll have to either delete your server or transfer its ownership to a trusted source.
For transferring ownership on Discord, follow these steps:
- Open the Discord app
- Click the “server name,” and a range of options will open; then click “server setting”
- At the bottom-left of the screen, click the ‘members’ option below “User Management”
- Here you’ll make the critical decision of who gets the keys to your kingdom. Once you decide who to transfer the ownership to, click the “3 vertical dots”
- As the “dialog menu” opens, click “Transfer Ownership”
Once it’s completed, you’ll become a regular server member. Your access to the server will be limited and as per the set position.
On the other hand, if you don’t want to transfer its ownership to someone else, you can also delete it.
Here’s how you can delete the server to complete the process of deleting your Discord account:
- Click the “Server Name” again
- Within the several options, click the “Server Settings.”
- At the bottom-left of your window, click the “Delete Server” option in the “User Management” section.
- Once clicked, the system will ask you to enter the account password to delete your server (or servers) from existence altogether
Like the primary Discord account deletion process, if you have enabled 2FA on this account, you’ll have to put in the code to get things completed.
After this, you’ll be asked one more time to click the “delete server” button before it is completely deleted. Keep in mind that you’ll have 14 days time to recover your Discord account. Once the two-week time passes, you won’t be able to retrieve or sign in to your account.
Once the account is deleted, the username will show up as “deleteduser 0000” or something similar to this. However, users you have texted via your account will still see your texts.
Part 2: How to Delete Discord Account From iPhone And Android?
Yes, you can delete the discord account from iPhone and Android. And if you’re wondering how to delete a Discord account, Here’s a quick way to do it:
- Open your updated discord app and tap the “hamburger” menu located at the top-left
- Tap the gear icon so you can go to the “user settings.”
- Select “My Account”
- Below the “Account Management” option, choose “Delete Account” and put your password and 2FA (if you have set it up)
Part 3: How To Disable Discord Account On Desktop Computer?
Deleting the account means you won’t be able to use it further, whereas disabling the account normally means you’re taking a little break.
So, if you don’t want to remove or delete your account entirely but only want it gone for some time, choose the disable option.
Here’s how you can disable a Discord account on a desktop computer:
- Open the app on your window PC/Mac and then log in to your Discord account
- Click the “User Settings” option and then go to the “My Account” option within the user settings
- In the lower corner of your Mac/PC screen, you’ll see the “Disable Account” button next to the “Delete Account” button
- Click the “Disable Account” option, and it will be disabled.
What’s The Difference Between Disabling And Deleting A Discord Account?
Disabling the account means you can recover it anytime you want, unlike deleting the account where you only have a 14-day restoration window. Additionally, when the account is disabled, you won’t receive notifications, but you will still get “friend requests.”
Part 4: How To Disable Discord Account On Mobile?
Disabling your Discord account for Android and iOS isn’t as simple as it is on a Desktop Windows/Mac PC.
Currently, there is no direct way to either delete or disable your Discord account through a mobile device.
Nevertheless, follow the steps below to disable your Discord account on mobile:
- Open the Discord application on your smartphone
- Tap the cog icon on the lower right corner of the phone
- Tap on the “My Account” option in the “User Settings” menu
- You’ll have the choice to either “Delete Account” or “Disable Account.” However, whatever you choose, you’ll be prompted to the support page explaining ways to disable or delete your account
- To complete disabling process from a mobile device, you’ll have to send a request to the support team, as it’s the only way to disable your account via your smartphone
FAQs About Deleting Discord Account
1. How Long Does Discord Take To Delete Account?
Typically, once you have completed the entire deletion process, Discord takes approximately 14 to 30 days to process it.
2. What Happens When You Delete Discord Account?
Deleting your discord account won’t delete the information you have on the account. It will delete your profile and rename the account to “deleteduser.” However, all your data and messages will remain on the server or servers.
3. Can I Re-Use The Deleted Discord Account?
You can re-use your deleted discord account only if the account is in a “pending deletion state,” which is 14 days. If the time is passed, you won’t be able to re-use it.
Richard Bennett
Richard Bennett is a writer and a lover of all things video.
Follow @Richard Bennett
Also read:
- Your Complete Discord Companion Manual
- [New] In 2024, Master the Art of Message Interaction on Desktop/Mobile
- [New] Immediate Notoriety Coolest Channel Nicknames Uncovered for 2024
- [New] 2024 Approved Sonic Surge in Discord 20+ High-Quality Music Bots You Must Explore
- [New] 10 Affordable, Open-Source Devices for Discord Chat Capture
- 2024 Approved Premiere Platform Pictographs Enthralling Artwork
- [Updated] 2024 Approved Optimal Online Discord Screen Recorders (Android/iOS)
- [New] In 2024, Unlock Partner Status A Step-by-Step Guide to Discord Verification
- [Updated] In 2024, Uncluttering Chats How to Erase Thousands of Discord Messages at Once
- [Updated] 2024 Approved Disengage From Discord Services
- 2024 Approved Transforming Text to Speech on Discord
- In 2024, The Logical Path to Exit a Discord Platform
- [Updated] The Ultimate Path to Charming Your Digital Self-Portrait
- [Updated] Essential Tips for Replying on Discord Desktop/Mobile
- 2024 Approved Unlock a Trove of Free Emojis on These Innovative Websites
- [Updated] In 2024, Uncovering Steps to Pinpoint Perfect Discord Communities
- In 2024, The Ultimate Discord User Manual
- Top-Tier Discord Automations
- [Updated] 2024 Approved What Is Discord - All Things You Need to Know
- [New] 2024 Approved Sever Disconnect From Discord
- Step-by-Step How to Delete a Discord Server
- In 2024, Discord's Prime Locations to Date or Fall in Love
- Unlock Discord Networking on PC/Android & iOS
- [Updated] In 2024, Exploring Workplace Messaging Platforms Ranking Slack & Discord for Efficiency
- [New] Discord Vs. Skype Which One Should You Choose?
- [New] Unlocking Elite Status Navigating the Premium World of DiscoNitro for 2024
- In 2024, Easiest Guide How to Clone Nokia C210 Phone? | Dr.fone
- OBS Camera Not Working Problem [Solved]
- In 2024, What Does Enter PUK Code Mean And Why Did The Sim Get PUK Blocked On Vivo V29 Pro Device
- New Expert Tips for Gradually Diminishing Audio Volume
- 2024 Approved Mastering PS4 Captures with OBS Studio - Your Complete Guide
- Updated Chroma Keying Mastery Advanced FCP X Tutorials for Professionals for 2024
- In 2024, Mastering AVI File Editing Easy Ways to Trim, Cut, and Split Videos (2023 Update)
- Expert Round-Up The Most Effective 9 Digital Recorders
- Are You Looking to Remove Echo in Premiere Pro? Please Look at Our Guide for Advice and Suggestions on Getting the Best Possible Outcomes for 2024
- New Exploring the Wave Editor Fundamental Aspects, Perceived Value, and Educational Pathways for 2024
- [New] Mastering Zoom's Filters for Clear, Premium Calls for 2024
- [New] Unleash the Power of Memes with Twitter Video-to-GIF Transformation
- Title: "2024 Approved Voice Your Message on Discord TTS Essentials"
- Author: Timothy
- Created at : 2024-05-23 22:47:59
- Updated at : 2024-05-24 22:47:59
- Link: https://discord-videos.techidaily.com/2024-approved-voice-your-message-on-discord-tts-essentials/
- License: This work is licensed under CC BY-NC-SA 4.0.
