
:max_bytes(150000):strip_icc()/Screenshot2024-01-17at12.08.28PM-45f8005316274053872dbaa7c76fd474.png)
Demystifying the World of Discord Stickers for 2024
Demystifying the World of Discord Stickers
Stickers for Discord: Everything You Need to Know

Richard Bennett
Mar 27, 2024• Proven solutions
From Facebook to even WhatsApp and Telegram, plain texts have become boring. Sticker fights on WhatsApp will give you an idea of how popular stickers are. Stickers are the new trend, and Discord just cannot lag behind in the race. Considering this, Discord is about to launch some lively, animated stickers.
In this article
- Part 1: What’s Discord Sticker?
- Part 2: How to Find Sticker Shop and Get Discord Stickers for Free?
- Part 3: How to Buy Discord Stickers?
- Part 4: How to Buy or Redeem a Discord Sticker Pack
- Part 5: How to Use Stickers on Discord?
Part 1: What’s Discord Sticker?
Discord Sticker supports sending emojis and GIFs on chats. The stickers have been soft-launched in Japan, Canada, and Brazil. After testing and feedback, they will be available across the globe.
Luckily, if you are a Nitro user, you can access the stickers for free. These stickers are bundled in the Nitro subscription, and you can claim the cool new stickers for free. Just go to the sticker shop, and tap on the “Free” button to start using them.
For those of you who have a $4.99 subscription, you can get the What’s Up Wumpus sticker pack for free. $9.99 subscription holders can unlock the What’s Up Wumpus sticker pack and can use the Wumpus Nitro Elite pack as long as their subscription is active.
The $9.99 subscribers can also avail of a 33% discount on other Discord sticker packs. Once you purchase these stickers, they are a permanent part of your Discord inventory. Other than these, the shop has Doggo Replies, Nelly At Work, and Hello Wumpus stickers as default sticker packs.
After the soft launch, the Sticker Shop is available for the users across all the platforms – Android, iOS, and even on the desktop app and browser.
Part 2: How to Find Sticker Shop and Get Discord Stickers for Free?
- On Phone
If you are lucky enough to be in Brazil, Japan, or Canada, you can access the Sticker Shop. You can tap on the emoji icon (the one that appears on the text box). The box that opens shows the emoji, and GIF tabs along with the sticker tab.
Tap on the sticker tab. A ‘shop’ symbol pops up towards the bottom (right hand). Tap on the symbol to open the sticker gallery. Here, you will see all the available sticker packs.
- Desktop (Browser)
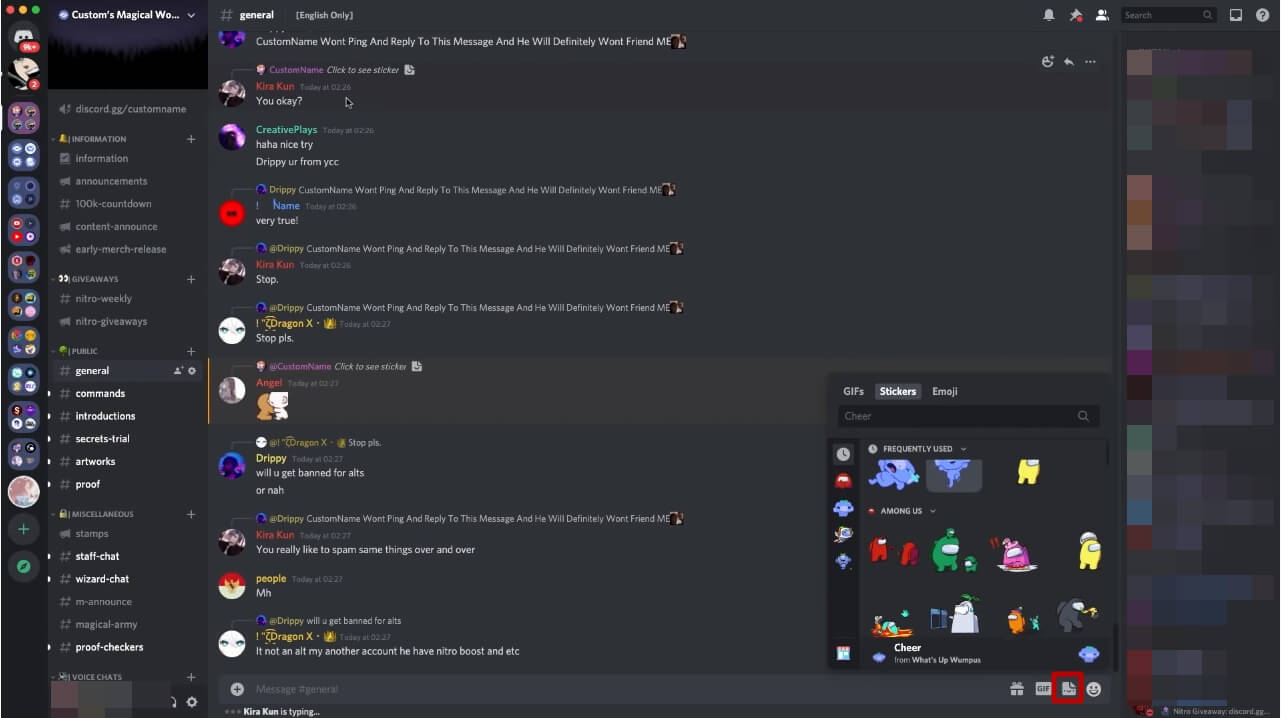
If you use Discord on your desktop or browser, you can see the sticker icon right on the text bar. Tap on it, and then click on the shopping icon that appears towards the bottom (left corner). In the shop, you can browse through the sticker packs.
Nitro users will get the What’s Up Wumpus stickers for free. However, they will have to buy other packs. The $9.99 Nitro users will get a 33% discount on sticker packs.
For now, the stickers can be used only by users in Japan, Brazil, and Canada. These users can send stickers to users in other countries. However, the receivers can see the stickers but cannot buy or send them.
However, you can try and use a VPN proxy to gain early access to it.
Part 3: How to Buy Discord Stickers?
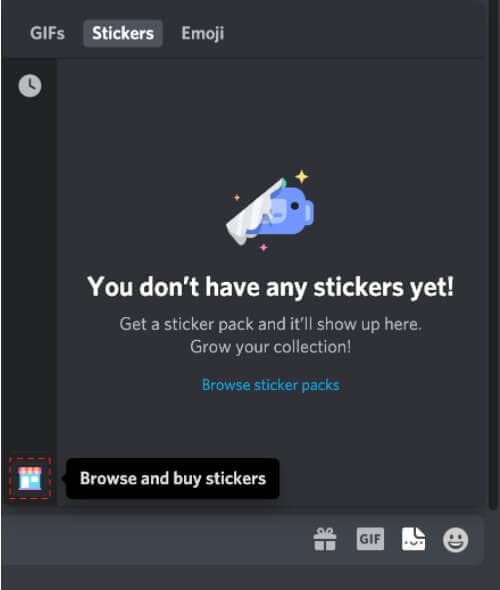
As we described above, you can access the sticker shop on your phone as well as desktop. Once in the shop, you can browse and pick the stickers to buy.
Before buying, you can view the stickers in the sticker pack. As a sample, you will be shown a few stickers. You can view the entire pack by tapping on the ‘View All’ tab.
Part 4: How to Buy or Redeem a Discord Sticker Pack
Here is a brief rundown of the steps to follow if you want to buy a sticker pack.
- Choose a sticker pack that you like. View all the stickers to see what the pack looks like.
- Tap on the purchase button that is located right beside the name of the pack.
- You will be prompted to input your payment details. If you have saved a payment option on Discord, you can choose the relevant option.
- Agree to the Terms and Services of Discord.
- Finally, hit the purchase tab.
- The sticker pack is added to the inventory instantly.
- You can start sending them in the texts.
Note that Discord does not refund the money that is once paid. So, you cannot return the stickers to get a refund.
Another interesting thing to note is that the Sticker Shop refreshes and offers new sticker packs. Due to this rotation, a pack that is available in the shop today may be replaced by a new one tomorrow.
But don’t worry. A timer displayed at the top left corner (besides the title) lets you know for how long the pack is available in the shop. You can grab it before the time runs out.

Part 5: How to Use Stickers on Discord?
Buying stickers is useless if you don’t send them over texts. So, once you purchase stickers, you can immediately start sending them to your servers and texts.
1. Sending Stickers on Discord Mobile App
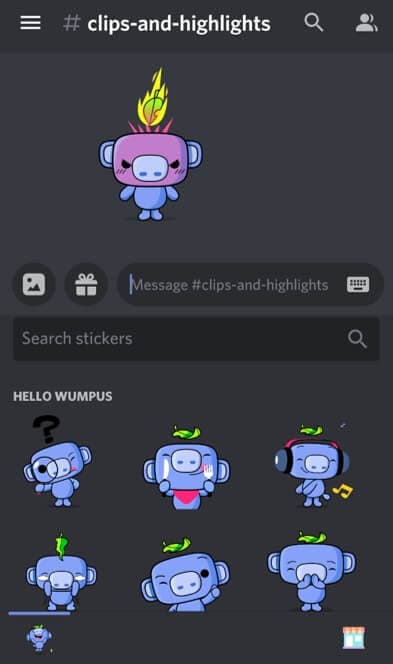
If you have the Discord app on your phone, tap on the emoji button. The Stickers tab appears, and this menu enables you to send the most-used stickers quickly, view all the purchased stickers, and search for appropriate stickers.
You can type an expression or emoji in the ‘Find the perfect sticker’ bar to find the right sticker. Hit the send button once you find the apt sticker.
2. Sending Stickers from Discord Desktop (and over Browser)
Sending stickers on a desktop or browser is quite similar to the mobile process. On the chatbox, you will find the sticker icon. Tap on it to view your purchased sticker packs.
Once opened, the menu will show you the most-used stickers. You can view other packs and switch between them. You can also search for particular stickers by typing the terms on the search bar.
You can tap on a sticker to send it on chats and servers.
Bonus: Adding Face-tracking AR Stickers to Video with Wondershare Filmora
In the latest version of Wondershare Filmora (V10.5 and later version), you can add face-tracking AR stickers to people in the video, and light up the celebration with flashy and cute characters and elements. Here are some brief steps to add AR stickers to your video in Filmora.
Step 1. Download and install the latest version of Filmora
Click the button below to download and install the latest version of Filmora. If you have installed Filmora already, click the About option under the Help menu to check the version of Filmora.


Note: You need to run Filmora 10.5 and later versions to add the AR stickers.
Step 2. Drag and drop your video footage to timeline
After launching Filmora, you need to import the video footage to the video editor. You can drag and drop the video footage to the timeline directly if you are working on a simple video project.
However, if you are working on a video project with many footages, it is recommended to upload them to the media library in order.
Step 3. Add AR Stickers to the video
After trimming or cutting out unnecessary frames from the video, you can now add the AR stickers to the footage. Go to the Effects tab and then scroll down to the AR Sticker directory.
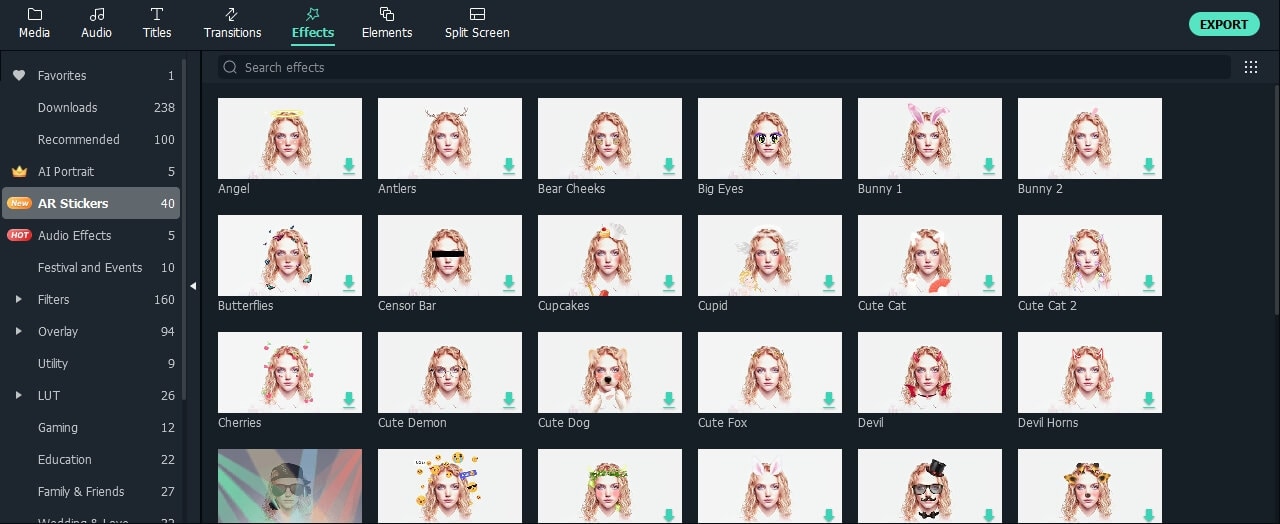
Currently, there are 40 stickers available in Filmora. You can click each one to preview and download. To add a sticker to the video, you can drag and drop it to the video track above or to the video clip directly. You can add several stickers at the same time by placing them in the tracks accordingly.
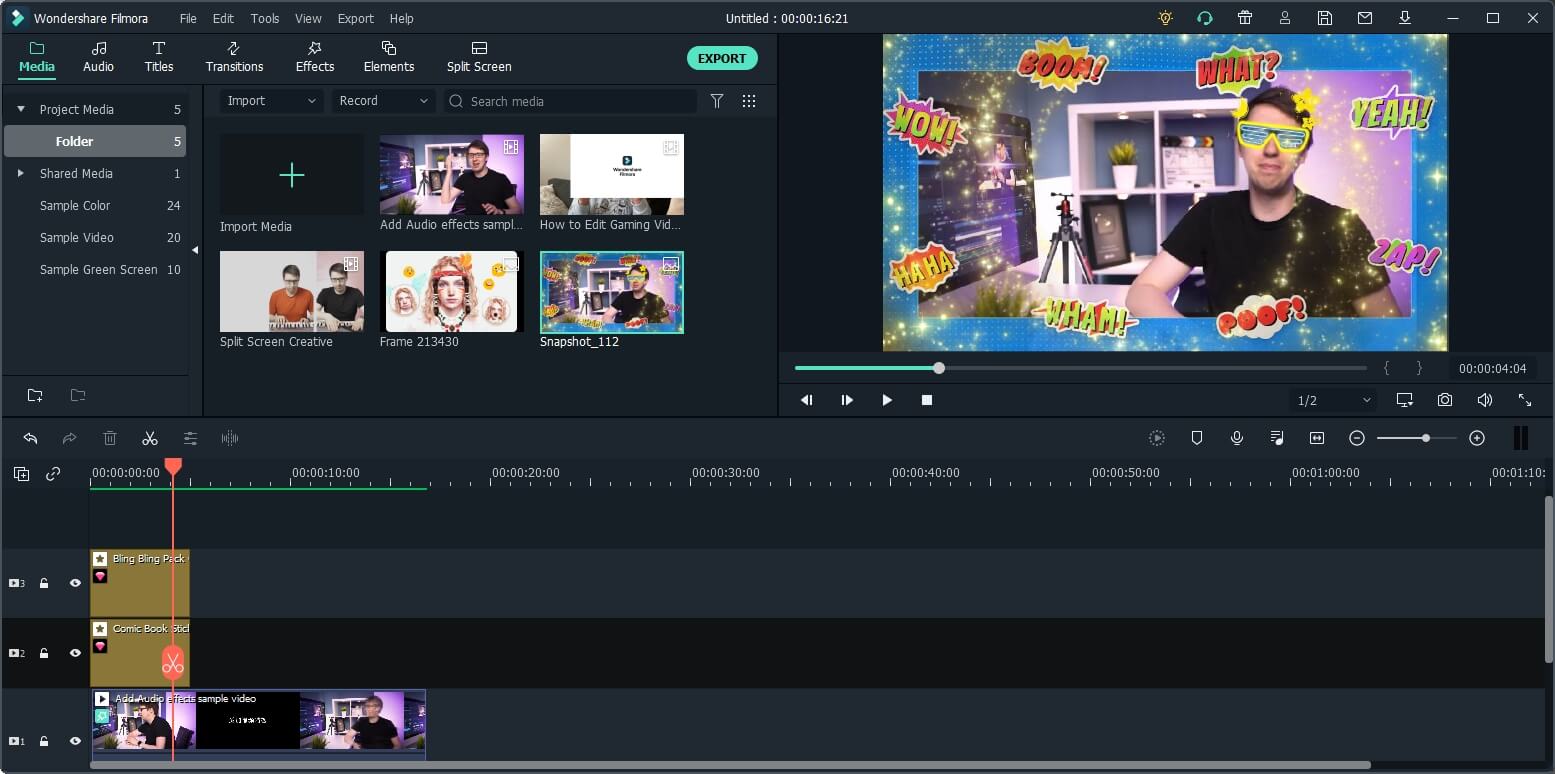
Step 4. Preview and Export
After finishing the editing, you can click the play button in the preview window to preview, and then click the Export button to save the video.
FAQs about Discord Sticker
And here we will answer some stuff that you might wonder about.
- What’s the difference between Discord Sticker and Discord Emoji ?
Well, emojis are emojis, and they are even in-built into your Android (or Google) and other keyboards on your phone. Emojis are not animated, and you can send basic Smiley or Sad faces (of course, there are animals and flowers, too). On the other hand, stickers are animated, and there can be specific sticker characters like What’s Up Wumpus.
- Why can’t I see the Sticker option on my Discord app?
You cannot access the stickers on Discord probably because the feature has not been launched in your country yet. Stickers are only available for users in Brazil, Japan, and Canada. They will be launched in other countries after testing and feedback.
- Is Discord sticker free?
If you are a Nitro subscriber, you will get the What’s Up Wumpus sticker pack for free. You will have to buy the other packs. As a $9.99 Nitro subscriber, you can get other packs at a 33% discount.
- Can I keep the purchased sticker pack forever in my account?
Yes, once you buy a pack, you will have lifetime access to it. However, if you delete your Discord account, you will not get your stickers back. Further, packs like ‘Wumpus Nitro Elite’ can be accessed only on an active $9.99 subscription.
- Can people who are outside of Brazil, Canada, and Japan receive the stickers I sent?
Yes, users from countries other than Japan, Canada, and Brazil can see the stickers in the chat sent to them. However, they could not buy or send them.
- Why my Discord sticker is not moving/animating?
The stickers should move by default when sent. You can check if your sticker inventory is set to the smallest size. You can also go to User Settings, tap on Text & Images, and select Stickers. Adjust the settings appropriately. You can contact the Discord support team should you need further assistance.
Be patient until the cool update rolls out worldwide!
Richard Bennett
Richard Bennett is a writer and a lover of all things video.
Follow @Richard Bennett
Richard Bennett
Mar 27, 2024• Proven solutions
From Facebook to even WhatsApp and Telegram, plain texts have become boring. Sticker fights on WhatsApp will give you an idea of how popular stickers are. Stickers are the new trend, and Discord just cannot lag behind in the race. Considering this, Discord is about to launch some lively, animated stickers.
In this article
- Part 1: What’s Discord Sticker?
- Part 2: How to Find Sticker Shop and Get Discord Stickers for Free?
- Part 3: How to Buy Discord Stickers?
- Part 4: How to Buy or Redeem a Discord Sticker Pack
- Part 5: How to Use Stickers on Discord?
Part 1: What’s Discord Sticker?
Discord Sticker supports sending emojis and GIFs on chats. The stickers have been soft-launched in Japan, Canada, and Brazil. After testing and feedback, they will be available across the globe.
Luckily, if you are a Nitro user, you can access the stickers for free. These stickers are bundled in the Nitro subscription, and you can claim the cool new stickers for free. Just go to the sticker shop, and tap on the “Free” button to start using them.
For those of you who have a $4.99 subscription, you can get the What’s Up Wumpus sticker pack for free. $9.99 subscription holders can unlock the What’s Up Wumpus sticker pack and can use the Wumpus Nitro Elite pack as long as their subscription is active.
The $9.99 subscribers can also avail of a 33% discount on other Discord sticker packs. Once you purchase these stickers, they are a permanent part of your Discord inventory. Other than these, the shop has Doggo Replies, Nelly At Work, and Hello Wumpus stickers as default sticker packs.
After the soft launch, the Sticker Shop is available for the users across all the platforms – Android, iOS, and even on the desktop app and browser.
Part 2: How to Find Sticker Shop and Get Discord Stickers for Free?
- On Phone
If you are lucky enough to be in Brazil, Japan, or Canada, you can access the Sticker Shop. You can tap on the emoji icon (the one that appears on the text box). The box that opens shows the emoji, and GIF tabs along with the sticker tab.
Tap on the sticker tab. A ‘shop’ symbol pops up towards the bottom (right hand). Tap on the symbol to open the sticker gallery. Here, you will see all the available sticker packs.
- Desktop (Browser)
If you use Discord on your desktop or browser, you can see the sticker icon right on the text bar. Tap on it, and then click on the shopping icon that appears towards the bottom (left corner). In the shop, you can browse through the sticker packs.
Nitro users will get the What’s Up Wumpus stickers for free. However, they will have to buy other packs. The $9.99 Nitro users will get a 33% discount on sticker packs.
For now, the stickers can be used only by users in Japan, Brazil, and Canada. These users can send stickers to users in other countries. However, the receivers can see the stickers but cannot buy or send them.
However, you can try and use a VPN proxy to gain early access to it.
Part 3: How to Buy Discord Stickers?
As we described above, you can access the sticker shop on your phone as well as desktop. Once in the shop, you can browse and pick the stickers to buy.
Before buying, you can view the stickers in the sticker pack. As a sample, you will be shown a few stickers. You can view the entire pack by tapping on the ‘View All’ tab.
Part 4: How to Buy or Redeem a Discord Sticker Pack
Here is a brief rundown of the steps to follow if you want to buy a sticker pack.
- Choose a sticker pack that you like. View all the stickers to see what the pack looks like.
- Tap on the purchase button that is located right beside the name of the pack.
- You will be prompted to input your payment details. If you have saved a payment option on Discord, you can choose the relevant option.
- Agree to the Terms and Services of Discord.
- Finally, hit the purchase tab.
- The sticker pack is added to the inventory instantly.
- You can start sending them in the texts.
Note that Discord does not refund the money that is once paid. So, you cannot return the stickers to get a refund.
Another interesting thing to note is that the Sticker Shop refreshes and offers new sticker packs. Due to this rotation, a pack that is available in the shop today may be replaced by a new one tomorrow.
But don’t worry. A timer displayed at the top left corner (besides the title) lets you know for how long the pack is available in the shop. You can grab it before the time runs out.
Part 5: How to Use Stickers on Discord?
Buying stickers is useless if you don’t send them over texts. So, once you purchase stickers, you can immediately start sending them to your servers and texts.
1. Sending Stickers on Discord Mobile App
If you have the Discord app on your phone, tap on the emoji button. The Stickers tab appears, and this menu enables you to send the most-used stickers quickly, view all the purchased stickers, and search for appropriate stickers.
You can type an expression or emoji in the ‘Find the perfect sticker’ bar to find the right sticker. Hit the send button once you find the apt sticker.
2. Sending Stickers from Discord Desktop (and over Browser)
Sending stickers on a desktop or browser is quite similar to the mobile process. On the chatbox, you will find the sticker icon. Tap on it to view your purchased sticker packs.
Once opened, the menu will show you the most-used stickers. You can view other packs and switch between them. You can also search for particular stickers by typing the terms on the search bar.
You can tap on a sticker to send it on chats and servers.
Bonus: Adding Face-tracking AR Stickers to Video with Wondershare Filmora
In the latest version of Wondershare Filmora (V10.5 and later version), you can add face-tracking AR stickers to people in the video, and light up the celebration with flashy and cute characters and elements. Here are some brief steps to add AR stickers to your video in Filmora.
Step 1. Download and install the latest version of Filmora
Click the button below to download and install the latest version of Filmora. If you have installed Filmora already, click the About option under the Help menu to check the version of Filmora.
Note: You need to run Filmora 10.5 and later versions to add the AR stickers.
Step 2. Drag and drop your video footage to timeline
After launching Filmora, you need to import the video footage to the video editor. You can drag and drop the video footage to the timeline directly if you are working on a simple video project.
However, if you are working on a video project with many footages, it is recommended to upload them to the media library in order.
Step 3. Add AR Stickers to the video
After trimming or cutting out unnecessary frames from the video, you can now add the AR stickers to the footage. Go to the Effects tab and then scroll down to the AR Sticker directory.
Currently, there are 40 stickers available in Filmora. You can click each one to preview and download. To add a sticker to the video, you can drag and drop it to the video track above or to the video clip directly. You can add several stickers at the same time by placing them in the tracks accordingly.
Step 4. Preview and Export
After finishing the editing, you can click the play button in the preview window to preview, and then click the Export button to save the video.
FAQs about Discord Sticker
And here we will answer some stuff that you might wonder about.
- What’s the difference between Discord Sticker and Discord Emoji ?
Well, emojis are emojis, and they are even in-built into your Android (or Google) and other keyboards on your phone. Emojis are not animated, and you can send basic Smiley or Sad faces (of course, there are animals and flowers, too). On the other hand, stickers are animated, and there can be specific sticker characters like What’s Up Wumpus.
- Why can’t I see the Sticker option on my Discord app?
You cannot access the stickers on Discord probably because the feature has not been launched in your country yet. Stickers are only available for users in Brazil, Japan, and Canada. They will be launched in other countries after testing and feedback.
- Is Discord sticker free?
If you are a Nitro subscriber, you will get the What’s Up Wumpus sticker pack for free. You will have to buy the other packs. As a $9.99 Nitro subscriber, you can get other packs at a 33% discount.
- Can I keep the purchased sticker pack forever in my account?
Yes, once you buy a pack, you will have lifetime access to it. However, if you delete your Discord account, you will not get your stickers back. Further, packs like ‘Wumpus Nitro Elite’ can be accessed only on an active $9.99 subscription.
- Can people who are outside of Brazil, Canada, and Japan receive the stickers I sent?
Yes, users from countries other than Japan, Canada, and Brazil can see the stickers in the chat sent to them. However, they could not buy or send them.
- Why my Discord sticker is not moving/animating?
The stickers should move by default when sent. You can check if your sticker inventory is set to the smallest size. You can also go to User Settings, tap on Text & Images, and select Stickers. Adjust the settings appropriately. You can contact the Discord support team should you need further assistance.
Be patient until the cool update rolls out worldwide!
Richard Bennett
Richard Bennett is a writer and a lover of all things video.
Follow @Richard Bennett
Avoiding Distractions: Implementing VoiceMod on Desktop & Mobile Discord
How To Use Voicemod On Discord
Richard Bennett
Mar 27, 2024• Proven solutions
A voice changer will allow you to prank friends, create content, and most of all, secure your presence by maintaining anonymity. With it, you can turn your voice into several unique and exciting voices to serve any purpose you deem fit.
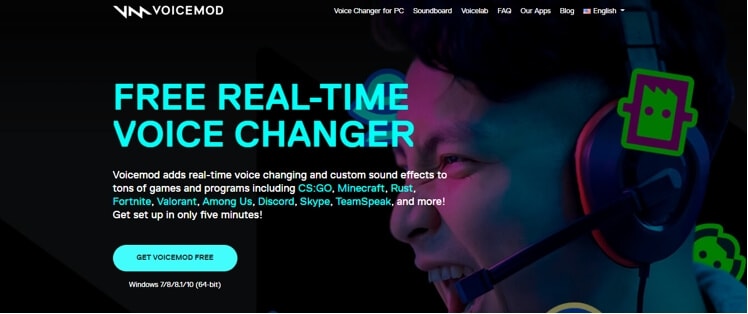
And when it comes to voice changers, none is as easy to operate as the Voicemod in Discord. Its claim to fame is that it features numerous voice options to choose from.
With Vociemod, you have to simply run the program in the background and select your desired voice!
Read on as we discuss how to use Voicemod on Discord in detail:
In this article
Part 1: How To Use Voice Changer Voicemod For Discord On Desktop Computer
Part 2: How To Fix Voicemod Not Working Discord?
Part 3: How To Change Voice For Discord On Mobile?
Part 1: How To Use Voice Changer Voicemod For Discord On Desktop Computer
Voicemod is arguably one of the best voice changer tools available on the internet for its excellent features.
But before we jump straight into using Voicemod for Discord, you must know how to install one on your desktop Mac/PC.
Here’s how to install Voicemod
- Visit the Voicemod website to begin the download process.
- You’ll see the button “Get Voicemod Free” on the screen. Click it!
- Upon clicking, the site will ask you to sign in to your account from Discord, Twitch, to Google. Use your Discord login details to sign in.
- After you’re signed in, the “.exe” file will be downloaded to your PC/Mac’s download folder. Open the “.exe” file the moment it’s downloaded.
- An install wizard will open up. Navigate through the wizard’s installation process to install the program on your PC/Mac.
- After installation is complete, the installation wizard will ask to restart your windows’ Mac or PC.
You can skip it, but it’s best to restart it for smooth operations.
Once your Mac/PC restarts, you’ll see the Voicemod app icon on your desktop screen.
Now that you have successfully installed the voice changer Voicemod app into your desktop computer, let’s dive into knowing how to use Voicemod on Discord!
Here’s how to use voice changer on Discord
- Click the Vociemod icon on the desktop to open the app. If you can’t find it there, click the “windows icon” located at the screen’s bottom-left. Just type “Voicemod,” and the program will show up. Double click it to get it opened.
- When the app opens up, you’ll have to choose the output and input it will use. If you’re wondering, why the output? This is to give you an insight into what your voice will sound like on each filter.
Once it’s done, you can play around with different filters!
Every day, you’ll get new free filters to use; however, to unlock and access all filters, you need to upgrade to the “pro-version” of voice changer Voicemod.
On the other hand, if you only need a few filters, the “basic-version” should suffice.
Apart from that, you can unlock an additional free filter in your app by sharing it on your social media accounts.

Step 1
To set up Voicemod with Discord, open your discord account and go to the settings (gear icon) placed at the screen’s bottom-left corner.
Step 2
Click the “Voice and Video” option right under the app settings.
Step 3
To make Voicemod usable, you’ll have to change Voice settings. Within the “Input Device” option, select the option that says “Microphone Voicemod Virtual Audio.”
Step 4
After you have changed settings, you can easily change the voice within the program. Not only this, but other users can also hear your audio alteration.
Step 5
With the “basic version,” you’ll have seven free voice choices that will change each day. On the contrary, with the “pro-version,” you’ll gain access to more than 80 different voice options.
So, if you’re searching for an easy and simple voice-changing app to use, look no further than Voicemod!
Part 2: How To Fix Voicemod Not Working Discord?
Is your voice changer Voicemod not working on Discord? No worries, you can troubleshoot the issues with a few basic steps.
Here are some ways you can use to fix Voicemod not working in Discord:
Method 1: Restart Your Windows PC/Mac
Though it’s not a technical solution, restarting your desktop computer fixes incorrect settings by rebooting them and solves many problems connected with your computer system, programs, and hardware.
So, when your Voicemod suddenly ceases to work in Discord, make sure to restart your Windows PC/Mac before going any further, as it’s the first step in fixing voice issues.
If restarting doesn’t help, slide to the next step!
Method 2: Make Sure The Mic Is Properly Set
The next step is to check if the mic works correctly. This is because faulty settings may stop voice changer Voicemod from operating correctly.
Just follow the steps below to resolve it:
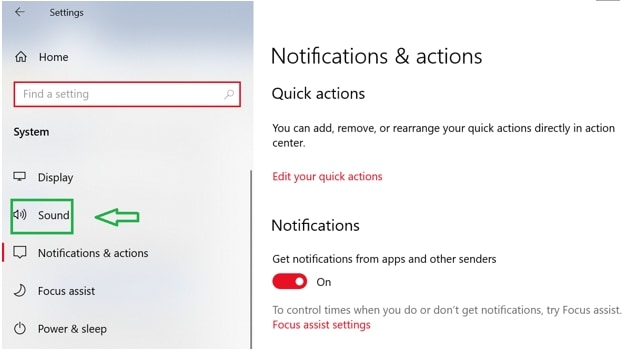
- On the keyboard, press the “Win” logo and the “I” key simultaneously to open Windows settings. Click “System.”
- On the left, you’ll see the option “Sound.” Click it.
- First, you have to test the microphone! To do so, choose the “Headset” option rather than the Voicemod microphone under the “Input” section
- Click “Device properties & test microphone”
- Make sure to uncheck the “disable” box and keep the volume section 100
- Click the “Start test” button and speak into the microphone
- After that, click “Stop test.” If the greatest value it shows is above “0”, then your microphone works correctly
Now, restart your Voicemod app to see if it’s working properly or not! If the issue still persists, jump to the next solution.
Method 3: Install Windows Updates
If you use Windows 10, it has two kinds of updates that offer performance boost and security patches. Sometimes, an update can fix a few driver and software conflicts automatically.
You can quickly solve the voice chat problem by simply updating the system settings. Here’s how to update your Windows 10:
- Open your windows setting by pressing the “Windows button” and the “I” key together.
- Click on “Update and Security”
- Click the “Check for Updates” button. If an update is found, it will install automatically on the system
Make sure to repeat this process until it says you’re up-to-date. Then, restart the PC. Check whether the Vociemod is properly working or not!
If not, try our next option!
Method 4:Re-Install Voice Changer Voicemod Drivers
In many instances, the issue signifies that you’re using outdated or faulty drivers. To troubleshoot this, simply re-install your Voicemod driver, and you’ll be good to go!
First, uninstall your Voicemod driver from the windows PC/Mac. Here’s how to do it:
- On the keyboard, press the “Windows button” as well as the “I” key to bring up the “Run box”
- Paste or type “devmgmt.msc” and click “OK.” This will open the “Device Manager”
- Click the “expand” option of “Audio Inputs & Outputs.”
- Click the “Microphone WMD” and choose the “Uninstall device” option
- A pop-up window will appear. Click the “Uninstall” button
- Restart the PC
Install the voice changer Voicemod again, whether automatically or manually, and see if it works!
Part 3: How To Change Voice For Discord On Mobile?
“Voicemod clips” is the version for both Apple and Android devices. The app will help you make high-quality content using its wide selection of one-of-a-kind effects, which will change your voice so much that you won’t recognize yourself!
In addition to that, you can add filters, which are connected to your cell phone’s camera to create funny, interesting videos.
Additionally, you’ll have the option to choose from 10 different voices. Plus, you can also make unlimited videos and audio from the humorous to the terrifying.
Some of the Voicemod voices on mobile include male-to-female, different robot effects, famous celebrities, scary voices, and much more. In short, everything is based on how you would like to modify your voice!
Not just that, you can also cross-share creative videos and audio to popular social networking platforms such as Facebook, Twitter, Instagram, TikTok, and Snapchat using your smartphone.
Curious to know how to change your voice for Discord on mobile? Here are step-by-step instructions:
- Make sure the Voicemod app is downloaded on your Apple or Android device and appropriately configured
- Open Discord
- Tap the “cogwheel icon” near your name and avatar
- You’ll see the “settings” page
- Within it, tap the “Voice & Video” option
- Tap Voicemod under the “Input Device” option and the headset under the “Output Device” option and tap escape. You’ll have access to numerous exciting sounds
Richard Bennett
Richard Bennett is a writer and a lover of all things video.
Follow @Richard Bennett
Richard Bennett
Mar 27, 2024• Proven solutions
A voice changer will allow you to prank friends, create content, and most of all, secure your presence by maintaining anonymity. With it, you can turn your voice into several unique and exciting voices to serve any purpose you deem fit.
And when it comes to voice changers, none is as easy to operate as the Voicemod in Discord. Its claim to fame is that it features numerous voice options to choose from.
With Vociemod, you have to simply run the program in the background and select your desired voice!
Read on as we discuss how to use Voicemod on Discord in detail:
In this article
Part 1: How To Use Voice Changer Voicemod For Discord On Desktop Computer
Part 2: How To Fix Voicemod Not Working Discord?
Part 3: How To Change Voice For Discord On Mobile?
Part 1: How To Use Voice Changer Voicemod For Discord On Desktop Computer
Voicemod is arguably one of the best voice changer tools available on the internet for its excellent features.
But before we jump straight into using Voicemod for Discord, you must know how to install one on your desktop Mac/PC.
Here’s how to install Voicemod
- Visit the Voicemod website to begin the download process.
- You’ll see the button “Get Voicemod Free” on the screen. Click it!
- Upon clicking, the site will ask you to sign in to your account from Discord, Twitch, to Google. Use your Discord login details to sign in.
- After you’re signed in, the “.exe” file will be downloaded to your PC/Mac’s download folder. Open the “.exe” file the moment it’s downloaded.
- An install wizard will open up. Navigate through the wizard’s installation process to install the program on your PC/Mac.
- After installation is complete, the installation wizard will ask to restart your windows’ Mac or PC.
You can skip it, but it’s best to restart it for smooth operations.
Once your Mac/PC restarts, you’ll see the Voicemod app icon on your desktop screen.
Now that you have successfully installed the voice changer Voicemod app into your desktop computer, let’s dive into knowing how to use Voicemod on Discord!
Here’s how to use voice changer on Discord
- Click the Vociemod icon on the desktop to open the app. If you can’t find it there, click the “windows icon” located at the screen’s bottom-left. Just type “Voicemod,” and the program will show up. Double click it to get it opened.
- When the app opens up, you’ll have to choose the output and input it will use. If you’re wondering, why the output? This is to give you an insight into what your voice will sound like on each filter.
Once it’s done, you can play around with different filters!
Every day, you’ll get new free filters to use; however, to unlock and access all filters, you need to upgrade to the “pro-version” of voice changer Voicemod.
On the other hand, if you only need a few filters, the “basic-version” should suffice.
Apart from that, you can unlock an additional free filter in your app by sharing it on your social media accounts.
Step 1
To set up Voicemod with Discord, open your discord account and go to the settings (gear icon) placed at the screen’s bottom-left corner.
Step 2
Click the “Voice and Video” option right under the app settings.
Step 3
To make Voicemod usable, you’ll have to change Voice settings. Within the “Input Device” option, select the option that says “Microphone Voicemod Virtual Audio.”
Step 4
After you have changed settings, you can easily change the voice within the program. Not only this, but other users can also hear your audio alteration.
Step 5
With the “basic version,” you’ll have seven free voice choices that will change each day. On the contrary, with the “pro-version,” you’ll gain access to more than 80 different voice options.
So, if you’re searching for an easy and simple voice-changing app to use, look no further than Voicemod!
Part 2: How To Fix Voicemod Not Working Discord?
Is your voice changer Voicemod not working on Discord? No worries, you can troubleshoot the issues with a few basic steps.
Here are some ways you can use to fix Voicemod not working in Discord:
Method 1: Restart Your Windows PC/Mac
Though it’s not a technical solution, restarting your desktop computer fixes incorrect settings by rebooting them and solves many problems connected with your computer system, programs, and hardware.
So, when your Voicemod suddenly ceases to work in Discord, make sure to restart your Windows PC/Mac before going any further, as it’s the first step in fixing voice issues.
If restarting doesn’t help, slide to the next step!
Method 2: Make Sure The Mic Is Properly Set
The next step is to check if the mic works correctly. This is because faulty settings may stop voice changer Voicemod from operating correctly.
Just follow the steps below to resolve it:
- On the keyboard, press the “Win” logo and the “I” key simultaneously to open Windows settings. Click “System.”
- On the left, you’ll see the option “Sound.” Click it.
- First, you have to test the microphone! To do so, choose the “Headset” option rather than the Voicemod microphone under the “Input” section
- Click “Device properties & test microphone”
- Make sure to uncheck the “disable” box and keep the volume section 100
- Click the “Start test” button and speak into the microphone
- After that, click “Stop test.” If the greatest value it shows is above “0”, then your microphone works correctly
Now, restart your Voicemod app to see if it’s working properly or not! If the issue still persists, jump to the next solution.
Method 3: Install Windows Updates
If you use Windows 10, it has two kinds of updates that offer performance boost and security patches. Sometimes, an update can fix a few driver and software conflicts automatically.
You can quickly solve the voice chat problem by simply updating the system settings. Here’s how to update your Windows 10:
- Open your windows setting by pressing the “Windows button” and the “I” key together.
- Click on “Update and Security”
- Click the “Check for Updates” button. If an update is found, it will install automatically on the system
Make sure to repeat this process until it says you’re up-to-date. Then, restart the PC. Check whether the Vociemod is properly working or not!
If not, try our next option!
Method 4:Re-Install Voice Changer Voicemod Drivers
In many instances, the issue signifies that you’re using outdated or faulty drivers. To troubleshoot this, simply re-install your Voicemod driver, and you’ll be good to go!
First, uninstall your Voicemod driver from the windows PC/Mac. Here’s how to do it:
- On the keyboard, press the “Windows button” as well as the “I” key to bring up the “Run box”
- Paste or type “devmgmt.msc” and click “OK.” This will open the “Device Manager”
- Click the “expand” option of “Audio Inputs & Outputs.”
- Click the “Microphone WMD” and choose the “Uninstall device” option
- A pop-up window will appear. Click the “Uninstall” button
- Restart the PC
Install the voice changer Voicemod again, whether automatically or manually, and see if it works!
Part 3: How To Change Voice For Discord On Mobile?
“Voicemod clips” is the version for both Apple and Android devices. The app will help you make high-quality content using its wide selection of one-of-a-kind effects, which will change your voice so much that you won’t recognize yourself!
In addition to that, you can add filters, which are connected to your cell phone’s camera to create funny, interesting videos.
Additionally, you’ll have the option to choose from 10 different voices. Plus, you can also make unlimited videos and audio from the humorous to the terrifying.
Some of the Voicemod voices on mobile include male-to-female, different robot effects, famous celebrities, scary voices, and much more. In short, everything is based on how you would like to modify your voice!
Not just that, you can also cross-share creative videos and audio to popular social networking platforms such as Facebook, Twitter, Instagram, TikTok, and Snapchat using your smartphone.
Curious to know how to change your voice for Discord on mobile? Here are step-by-step instructions:
- Make sure the Voicemod app is downloaded on your Apple or Android device and appropriately configured
- Open Discord
- Tap the “cogwheel icon” near your name and avatar
- You’ll see the “settings” page
- Within it, tap the “Voice & Video” option
- Tap Voicemod under the “Input Device” option and the headset under the “Output Device” option and tap escape. You’ll have access to numerous exciting sounds
Richard Bennett
Richard Bennett is a writer and a lover of all things video.
Follow @Richard Bennett
Also read:
- Navigating and Mastering Discord's Text-to-Speech Tools for 2024
- [Updated] In 2024, Master the Art of Chatting with Discord's Speaking Function
- [New] In 2024, The Ultimate Blueprint for Successful Discord Live Streams
- In 2024, Mastering Discord Color Coding Techniques
- [Updated] Mastering Screen Sharing on Discord
- [New] Exploring the World of Virtual Identities with Discord Avatars
- [New] How to Remove a Desktop Discord Server
- In 2024, Mastering Status Update in Discord Chat
- [New] BestDiscord's Ultimate Guide to Popular Themes
- [New] Expert Font Design Services for Discord App (Android/iOS) for 2024
- Mastering Device-Specific Discord Deletion Techniques
- [New] Elevate Your Profile Cool Discord Monikers Ranked
- 2024 Approved Take Control of Discord Dialogues Advanced Techniques for Pins
- [New] In 2024, Unlocking Discord's Full Capabilities Through Role Addition
- [Updated] Premium Icon Crafting Services, All at NO Cost for 2024
- In 2024, Simplifying Your Life with Discord Call Setup Guide
- [Updated] 2024 Approved Optimal Online Communication Picking Between Discord and Skype
- In 2024, Vital 5 Creative Social Network Animation Examples
- [New] Perfecting Your Status with Emojis in Discord Chat for 2024
- [New] 2024 Approved Simple Steps to Sever Desktop & Mobile Connection to Discord
- [New] Essential Techniques for Video Posts on Discord for 2024
- [Updated] Elevate Your Discord Presence Mobile & Desktop Streaming for 2024
- [Updated] In 2024, Key Steps to Successfully Infiltrating Your Dream Discord Server
- In 2024, Unleashing the Power of Visual Identity Mastering Discord Pfp's
- [New] 2024 Approved Free Voice-Overhaul Techniques for Discord Users - Top Picks 2023
- [Updated] How to Keep the Conversation Flowing on Discord for 2024
- [Updated] Enhancing Mobile & Desktop Streaming Experience on Discord for 2024
- [New] Add Color to Your Digital Dialogue with These Free Emoji Sites
- Full Guide on Mirroring Your Lava Blaze 2 5G to Your PC/Mac | Dr.fone
- A Detailed VPNa Fake GPS Location Free Review On Xiaomi 14 | Dr.fone
- Updated In 2024, Transform Your Videos with These 12 Innovative Online Animation Makers
- Trouble with iPhone 13 mini Swipe-Up? Try These 11 Solutions | Dr.fone
- [New] The Ultimate List of Twitter Sensations
- New In 2024, How to Perfectly Use Canva Color Match?
- 2024 Approved Seamless Audio Conversion Turning MP3 Files Into MP4s
- How to unlock iPhone 15 screen lock without Passcode?
- How to Change Lock Screen Wallpaper on Asus ROG Phone 7
- In 2024, Is pgsharp legal when you are playing pokemon On Itel P55? | Dr.fone
- [Updated] 2024 Approved Secrets of Excellence How Zoom Can Transform Your Podcast Recordings
- In 2024, 2 Ways to Transfer Text Messages from OnePlus Nord CE 3 5G to iPhone 15/14/13/12/11/X/8/ | Dr.fone
- New In 2024, How Can I Control Speed of a Video
- Updated In This Article Ill Share to You some of the Skin Care Vlog Ideas for You to Start Doing a Skin Care Review on Your YouTube Channel. But Before that Ill Share with You How Important Is Skin Care?
- Title: Demystifying the World of Discord Stickers for 2024
- Author: Timothy
- Created at : 2024-05-23 22:47:37
- Updated at : 2024-05-24 22:47:37
- Link: https://discord-videos.techidaily.com/demystifying-the-world-of-discord-stickers-for-2024/
- License: This work is licensed under CC BY-NC-SA 4.0.
