Erase Discord Server Settings (Desktop/Smartphones) for 2024
Erase Discord Server Settings (Desktop/Smartphones)
How to Delete Discord Server?

Richard Bennett
Mar 27, 2024• Proven solutions
Discord servers are made and designed to help gamers – and now work colleagues – communicate and coordinate via private rooms.
As a communication app, it offers permanent servers for people who are working on the same project, playing the same game, or even if they’re part of the same family!
However, you may have to someday delete a server you own.
Today we will discuss how to delete Discord server or deleting the Discord server of someone who has passed away:
Part 1: How to Delete Discord Server Permanently on A Desktop?
If you’re familiar with Discord, you will know that there will come a time that you no longer need a server: it may be because you’ve resigned from your workplace or stopped playing a game.
If you are looking into how to delete your Discord server, you came to the right place. Even though Discord makes communication easier, you may need a break from around-the-clock connectivity for various reasons.
Discord works on desktop platforms and smartphones, with a blend of a VoIP chat system, a chat lobby, and a message board in a single app. Therefore, you can attempt to delete a server off on any device that you may have Discord downloaded and active on.
Most server owners choose to delete their Discord server when too many extra, strange, or ill-meaning visitors are visiting.
Servers are more like chat rooms inside the application. Deleting them is a relatively simple process – as you will learn from our how to delete server on Discord tips – however, their retrieval is impossible.
Once the server has been removed, you can not “undo the process” or recreate it. Therefore, be absolutely sure and proceed with caution.
It is also advised to skim through any essential files that you might have on the server. Back them up before letting it go forever.
And lastly, ensure that this is what you intend on doing because deleting a Discord server is permanent. Here are the simple steps to follow on how to delete a server on Discord:
- Open the Discord desktop app and click on the server you want to delete
- Once you select the server, there will be an options list under the server’s name
- Click the “server setting” button from the menu (This will be the second option on the list)

- At the end of the sidebar, you will find the option “delete the server on the left side.” Click it

Image: The image shows the screen that pops up after clicking “Server settings,” here, the delete button can be seen in red.
- After clicking, a pop-up window will appear, asking for confirmation
- Confirm by entering the server’s name and authentication code; this is only required when two-factor authentication is enabled
- Click on “delete server” to confirm
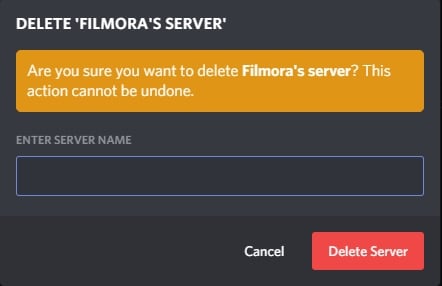
Image: As mentioned, you must be sure you want to permanently lose a server and all of its content before deleting it; this prompt serves the same purpose
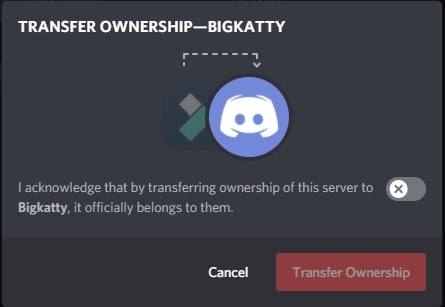
You can also transfer your server’s ownership to another individual if you do not want to delete it. To do this:
- Open server settings and then select “Members” in the left sidebar
- A list of every server member will open, hover over the person’s name that you want to transfer ownership to, and then click the three dots appearing on the right
transfer-ownership-on-discord-server.jpg
- Select “Transfer Ownership” and then confirm the transfer.
How to Delete A Server On Discord Via The Mobile App?
Suppose you do not want to go through the hassle of logging on to the desktop app. In that case, you have the option of deleting your Discord server via the mobile app quickly.
Here are some easy to follow steps on how to delete Discord server using the mobile app:
- Open the Discord app on your Android device or iPhone and then tap the hamburger settings icon on the top-left
- Search for the server you wish to delete, and then long-press the icon of the server you chose
- A mini option bar will pop up; here, you must click on “More Options” and then the server options will slide up on your screen; click on “Settings” to continue.
- This will take you to the control panel; here, click on the three-dotted settings on the top right
- Now you will be provided only one option: “Delete (server name).” Click on it
At this point, in the how to delete server on Discord process, Discord will ask you why you chose to delete the server as part of their customer experience surveys.
It is nothing but a formality; choosing to ignore it or answer it will not affect the process’s outcome.
You can choose from pre-decided answers as well, and to give you an example, one of the options is: “I couldn’t get people to join.”
How Do I Delete A Discord Server Without Ownership?
Previously you could delete your Discord server using a BOT. Anyone who had permission to use the command/action within BOT could also delete the server. However, now only the server owner and the Discord trust and safety team can delete a server.
Richard Bennett
Richard Bennett is a writer and a lover of all things video.
Follow @Richard Bennett
Richard Bennett
Mar 27, 2024• Proven solutions
Discord servers are made and designed to help gamers – and now work colleagues – communicate and coordinate via private rooms.
As a communication app, it offers permanent servers for people who are working on the same project, playing the same game, or even if they’re part of the same family!
However, you may have to someday delete a server you own.
Today we will discuss how to delete Discord server or deleting the Discord server of someone who has passed away:

Part 1: How to Delete Discord Server Permanently on A Desktop?
If you’re familiar with Discord, you will know that there will come a time that you no longer need a server: it may be because you’ve resigned from your workplace or stopped playing a game.
If you are looking into how to delete your Discord server, you came to the right place. Even though Discord makes communication easier, you may need a break from around-the-clock connectivity for various reasons.
Discord works on desktop platforms and smartphones, with a blend of a VoIP chat system, a chat lobby, and a message board in a single app. Therefore, you can attempt to delete a server off on any device that you may have Discord downloaded and active on.
Most server owners choose to delete their Discord server when too many extra, strange, or ill-meaning visitors are visiting.
Servers are more like chat rooms inside the application. Deleting them is a relatively simple process – as you will learn from our how to delete server on Discord tips – however, their retrieval is impossible.
Once the server has been removed, you can not “undo the process” or recreate it. Therefore, be absolutely sure and proceed with caution.
It is also advised to skim through any essential files that you might have on the server. Back them up before letting it go forever.
And lastly, ensure that this is what you intend on doing because deleting a Discord server is permanent. Here are the simple steps to follow on how to delete a server on Discord:
- Open the Discord desktop app and click on the server you want to delete
- Once you select the server, there will be an options list under the server’s name
- Click the “server setting” button from the menu (This will be the second option on the list)
- At the end of the sidebar, you will find the option “delete the server on the left side.” Click it
Image: The image shows the screen that pops up after clicking “Server settings,” here, the delete button can be seen in red.
- After clicking, a pop-up window will appear, asking for confirmation
- Confirm by entering the server’s name and authentication code; this is only required when two-factor authentication is enabled
- Click on “delete server” to confirm
Image: As mentioned, you must be sure you want to permanently lose a server and all of its content before deleting it; this prompt serves the same purpose
You can also transfer your server’s ownership to another individual if you do not want to delete it. To do this:
- Open server settings and then select “Members” in the left sidebar
- A list of every server member will open, hover over the person’s name that you want to transfer ownership to, and then click the three dots appearing on the right
transfer-ownership-on-discord-server.jpg
- Select “Transfer Ownership” and then confirm the transfer.
How to Delete A Server On Discord Via The Mobile App?
Suppose you do not want to go through the hassle of logging on to the desktop app. In that case, you have the option of deleting your Discord server via the mobile app quickly.
Here are some easy to follow steps on how to delete Discord server using the mobile app:
- Open the Discord app on your Android device or iPhone and then tap the hamburger settings icon on the top-left
- Search for the server you wish to delete, and then long-press the icon of the server you chose
- A mini option bar will pop up; here, you must click on “More Options” and then the server options will slide up on your screen; click on “Settings” to continue.
- This will take you to the control panel; here, click on the three-dotted settings on the top right
- Now you will be provided only one option: “Delete (server name).” Click on it
At this point, in the how to delete server on Discord process, Discord will ask you why you chose to delete the server as part of their customer experience surveys.
It is nothing but a formality; choosing to ignore it or answer it will not affect the process’s outcome.
You can choose from pre-decided answers as well, and to give you an example, one of the options is: “I couldn’t get people to join.”
How Do I Delete A Discord Server Without Ownership?
Previously you could delete your Discord server using a BOT. Anyone who had permission to use the command/action within BOT could also delete the server. However, now only the server owner and the Discord trust and safety team can delete a server.
Richard Bennett
Richard Bennett is a writer and a lover of all things video.
Follow @Richard Bennett
Richard Bennett
Mar 27, 2024• Proven solutions
Discord servers are made and designed to help gamers – and now work colleagues – communicate and coordinate via private rooms.
As a communication app, it offers permanent servers for people who are working on the same project, playing the same game, or even if they’re part of the same family!
However, you may have to someday delete a server you own.
Today we will discuss how to delete Discord server or deleting the Discord server of someone who has passed away:
Part 1: How to Delete Discord Server Permanently on A Desktop?
If you’re familiar with Discord, you will know that there will come a time that you no longer need a server: it may be because you’ve resigned from your workplace or stopped playing a game.
If you are looking into how to delete your Discord server, you came to the right place. Even though Discord makes communication easier, you may need a break from around-the-clock connectivity for various reasons.
Discord works on desktop platforms and smartphones, with a blend of a VoIP chat system, a chat lobby, and a message board in a single app. Therefore, you can attempt to delete a server off on any device that you may have Discord downloaded and active on.
Most server owners choose to delete their Discord server when too many extra, strange, or ill-meaning visitors are visiting.
Servers are more like chat rooms inside the application. Deleting them is a relatively simple process – as you will learn from our how to delete server on Discord tips – however, their retrieval is impossible.
Once the server has been removed, you can not “undo the process” or recreate it. Therefore, be absolutely sure and proceed with caution.
It is also advised to skim through any essential files that you might have on the server. Back them up before letting it go forever.
And lastly, ensure that this is what you intend on doing because deleting a Discord server is permanent. Here are the simple steps to follow on how to delete a server on Discord:
- Open the Discord desktop app and click on the server you want to delete
- Once you select the server, there will be an options list under the server’s name
- Click the “server setting” button from the menu (This will be the second option on the list)
- At the end of the sidebar, you will find the option “delete the server on the left side.” Click it
Image: The image shows the screen that pops up after clicking “Server settings,” here, the delete button can be seen in red.
- After clicking, a pop-up window will appear, asking for confirmation
- Confirm by entering the server’s name and authentication code; this is only required when two-factor authentication is enabled
- Click on “delete server” to confirm
Image: As mentioned, you must be sure you want to permanently lose a server and all of its content before deleting it; this prompt serves the same purpose
You can also transfer your server’s ownership to another individual if you do not want to delete it. To do this:
- Open server settings and then select “Members” in the left sidebar
- A list of every server member will open, hover over the person’s name that you want to transfer ownership to, and then click the three dots appearing on the right
transfer-ownership-on-discord-server.jpg
- Select “Transfer Ownership” and then confirm the transfer.
How to Delete A Server On Discord Via The Mobile App?
Suppose you do not want to go through the hassle of logging on to the desktop app. In that case, you have the option of deleting your Discord server via the mobile app quickly.
Here are some easy to follow steps on how to delete Discord server using the mobile app:
- Open the Discord app on your Android device or iPhone and then tap the hamburger settings icon on the top-left
- Search for the server you wish to delete, and then long-press the icon of the server you chose
- A mini option bar will pop up; here, you must click on “More Options” and then the server options will slide up on your screen; click on “Settings” to continue.
- This will take you to the control panel; here, click on the three-dotted settings on the top right
- Now you will be provided only one option: “Delete (server name).” Click on it
At this point, in the how to delete server on Discord process, Discord will ask you why you chose to delete the server as part of their customer experience surveys.
It is nothing but a formality; choosing to ignore it or answer it will not affect the process’s outcome.
You can choose from pre-decided answers as well, and to give you an example, one of the options is: “I couldn’t get people to join.”
How Do I Delete A Discord Server Without Ownership?
Previously you could delete your Discord server using a BOT. Anyone who had permission to use the command/action within BOT could also delete the server. However, now only the server owner and the Discord trust and safety team can delete a server.
Richard Bennett
Richard Bennett is a writer and a lover of all things video.
Follow @Richard Bennett
Streamlining Your Discord Chat Experience on Devices
How to Make a Discord Video Call | Desktop & Mobile
Richard Bennett
Mar 27, 2024• Proven solutions
Discord is a great place to hang out with like-minded people and just relax. But sometimes you want to do more than just chat using text messaging, which is where video calling comes in handy.
Discord has video call options built into the desktop app, the web browser and the mobile app, so you don’t need to switch between different software when you want to chat on video with your friends or colleagues. Read on to find out how to make a video call on Discord.
- Part 1: Best Settings for Discord Video Call
- Part 2: How to Make a Private Video Call on Discord?
- Part 3: How to Make a Server Video Call on Discord?
- Part 4: FAQs about Discord Video Call
Part 1: Best Settings for Discord Video Call
Before you start calling everyone, you’ll want to check your settings to make sure you have the best experience. It’s important to make sure you’ve got your best equipment setup to work for the highest quality audio and video possible.

So, start by heading to the User Settings page. You’ll find this at the bottom left of the screen – look for the cog icon next to your name. You won’t see this on mobile, this is only on the desktop app and the web browser version of Discord.
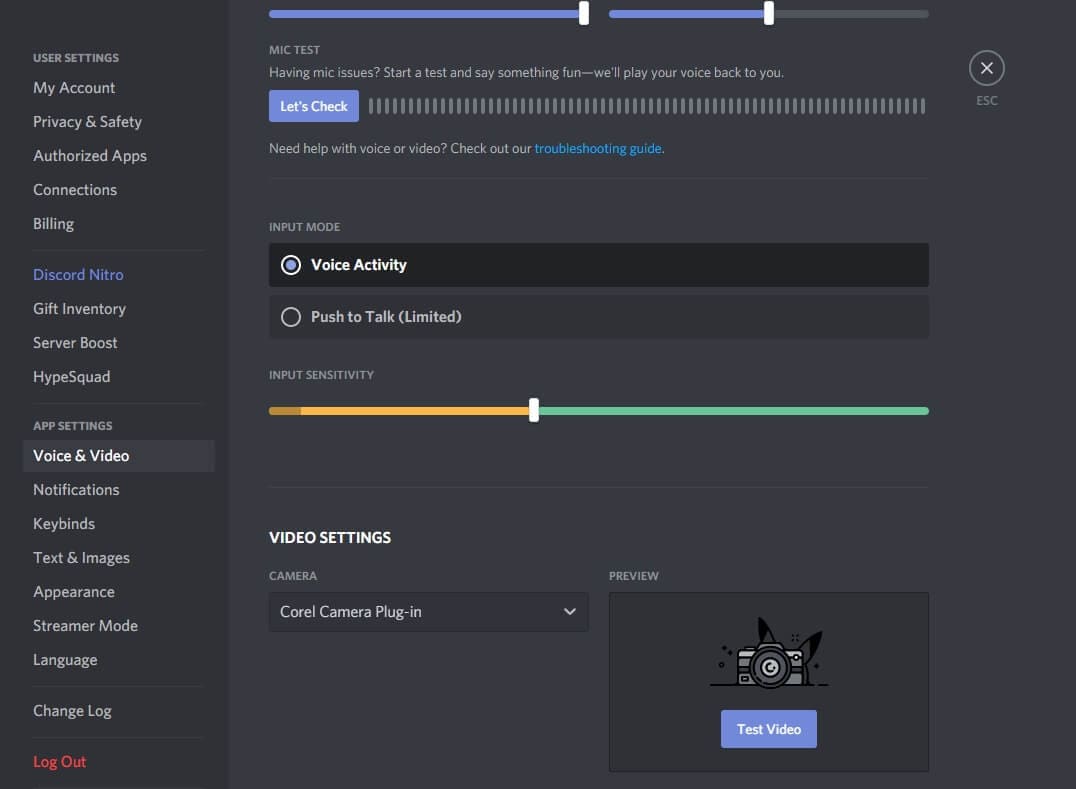
Once you’ve opened settings, you’ll want to click on the Voice & Video tab. Here you can check your microphone settings and adjust the volume, and choose your camera. If you’re using an external camera instead of the built-in option, check that the right one is selected in the dropdown.
You can also use this opportunity to run a test video – so that you know you’re well-lit, properly framed and otherwise good to go. You can adjust the lighting in your room or move the camera if you don’t feel it’s quite right.
One quick note for the web browser version of Discord – you’ll be asked to grant permission to your microphone and camera. Make sure you allow the site to use your equipment otherwise it won’t work on the video call.
Once you are happy, just click the close button at the top right of the settings options.
Part 2: How to Make a Private Video Call on Discord?
Once you’ve got your settings ready, you’re set to make your private Discord video call. If you’re doing it on the web browser or desktop app, you’ll need to first navigate to the inbox you share with the person you want to call. Do this by clicking on the Home button at the top left – you’ll then get a list of all your contacts.
If you’re only calling one person then it’s easy – just click on their name.

If you want to call a private group, you need to click the + button and then create a group DM. Add the names of the users you want to call.
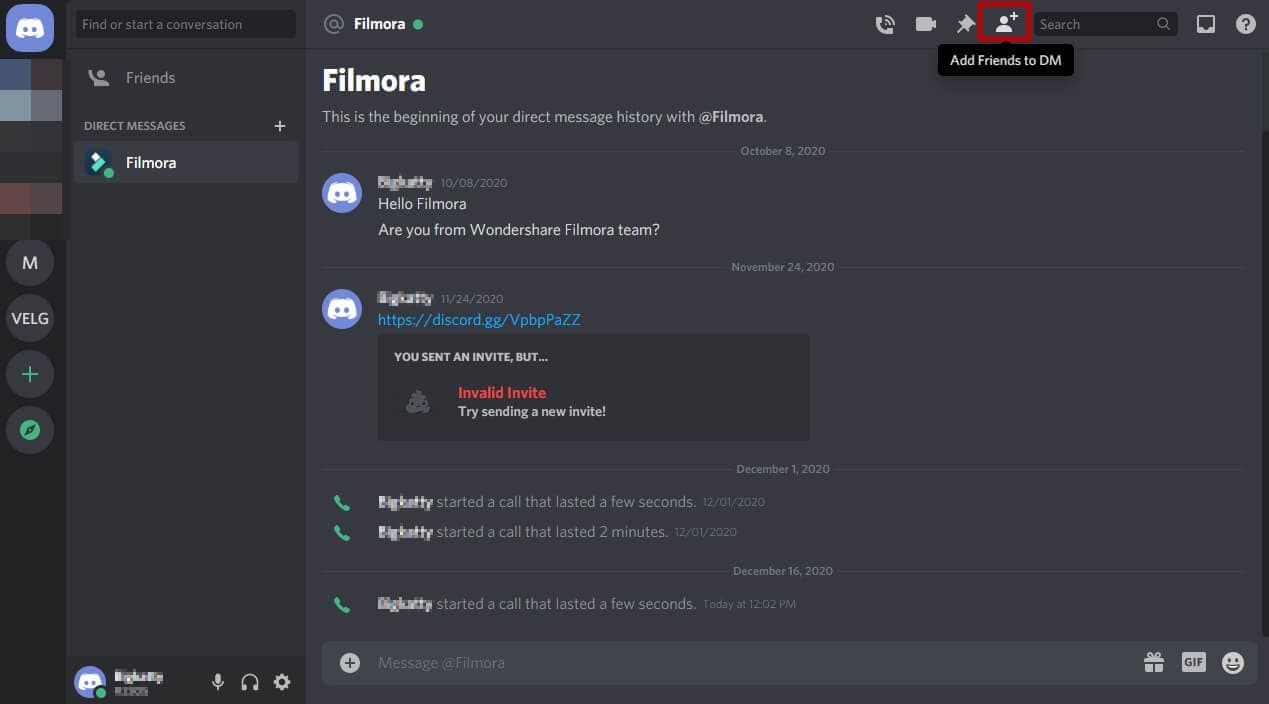
Once you’re in the direct message window of the person or group you want to call, you need to look at the buttons at the top right of the screen. The second icon that looks like a video camera is the one you’re looking for. Click that and you’ll start a video call.
You’ll see yourself on screen at this point, but you’ll need to wait until the other person or group members have joined the call for the chat to properly begin.
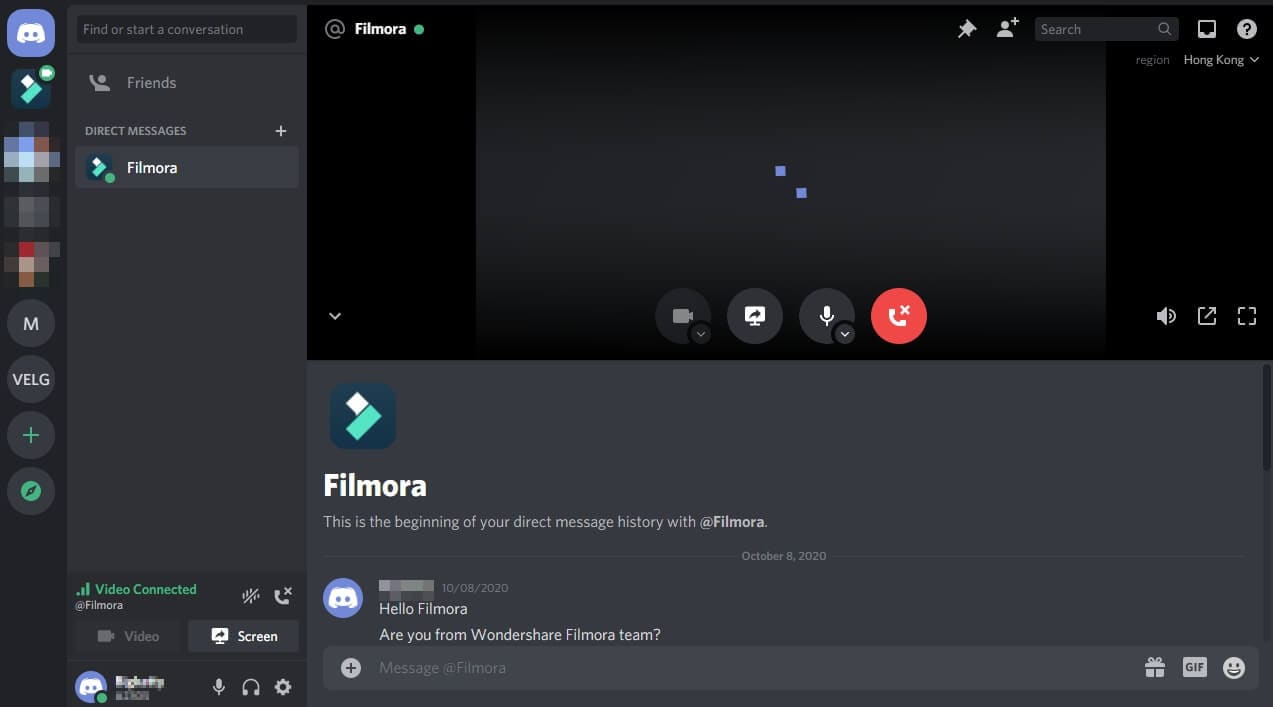
The process of making video call on Discord mobile is essentially identical. You just need to open the direct message group and click on the video call icon, which is still at the top right of your screen.
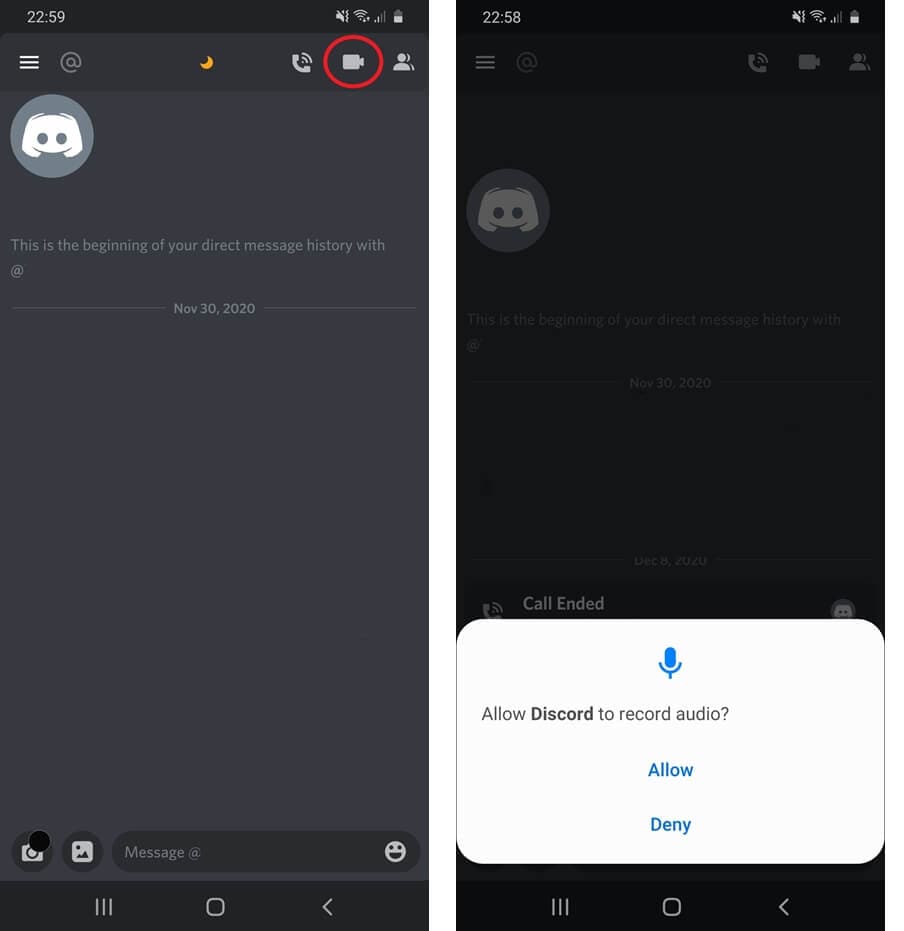
You’ll need to give permissions for the Discord mobile app to use your microphone and camera if you haven’t already.
Once you’ve finished your video call on either desktop or mobile, just hit the red button to end it and switch your camera off again.
Part 3: How to Make a Server Video Call on Discord?
If you want to make a group video call on a public server, you again need to first navigate to the server. Once you’re there, you’ll need to join the voice channel that you should see on the left side of the screen.
Once you’re in the voice channel, click Lounge, Community Hangout or Stream Room, and then switch on your camera by clicking the ‘Video’ button. You’ll find this at the bottom-left of the screen. Again, if you’re on the web browser, you’ll be asked by your browser for permission to use your camera at this stage.
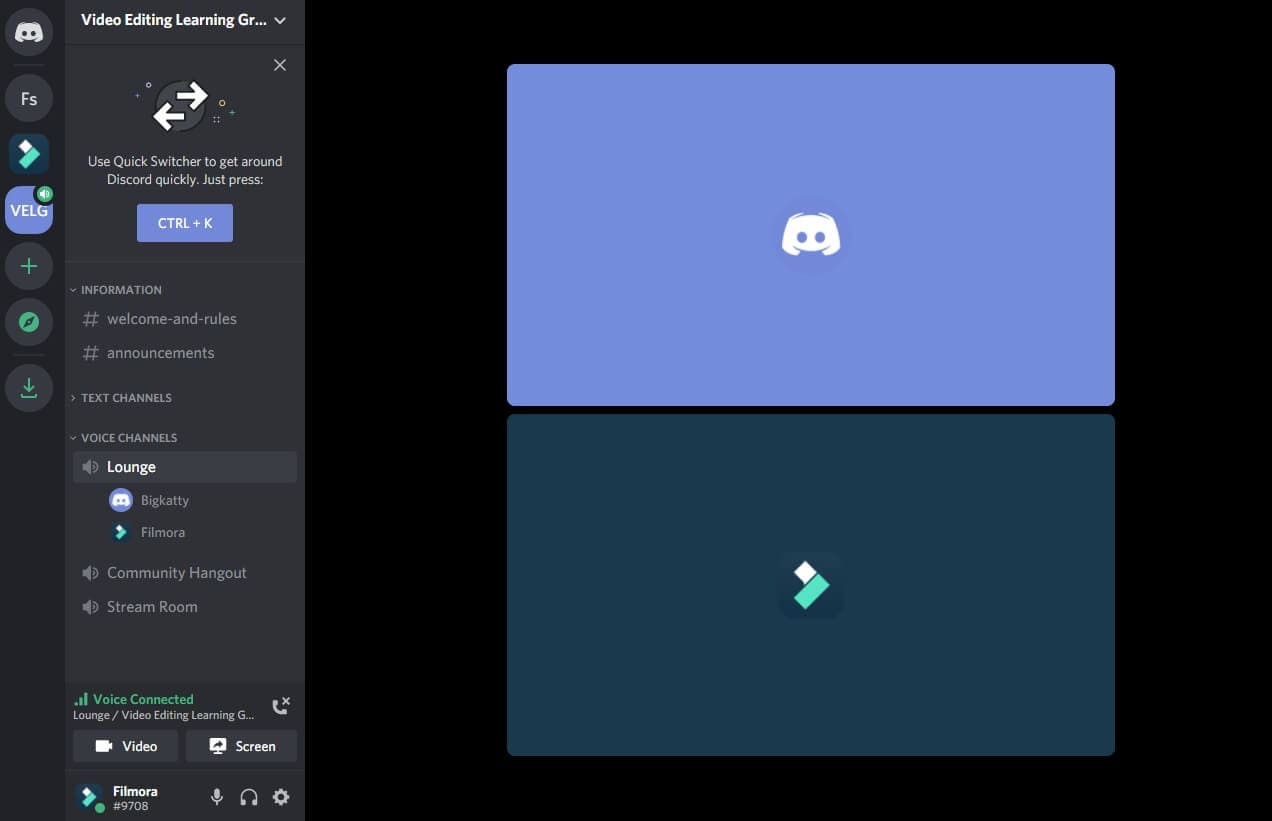
And that’s it – the video call is now live and anyone who joins the voice channel will be able to see you, chat to you and switch on their camera to join the video conference as well.
On mobile, it’s slightly different. You’ll still want to head to the server you want to join and then click on the voice channel to join it. But as soon as you click on the voice channel, you’ll get a pop-up with an icon at the bottom right where you can instantly switch on your camera.
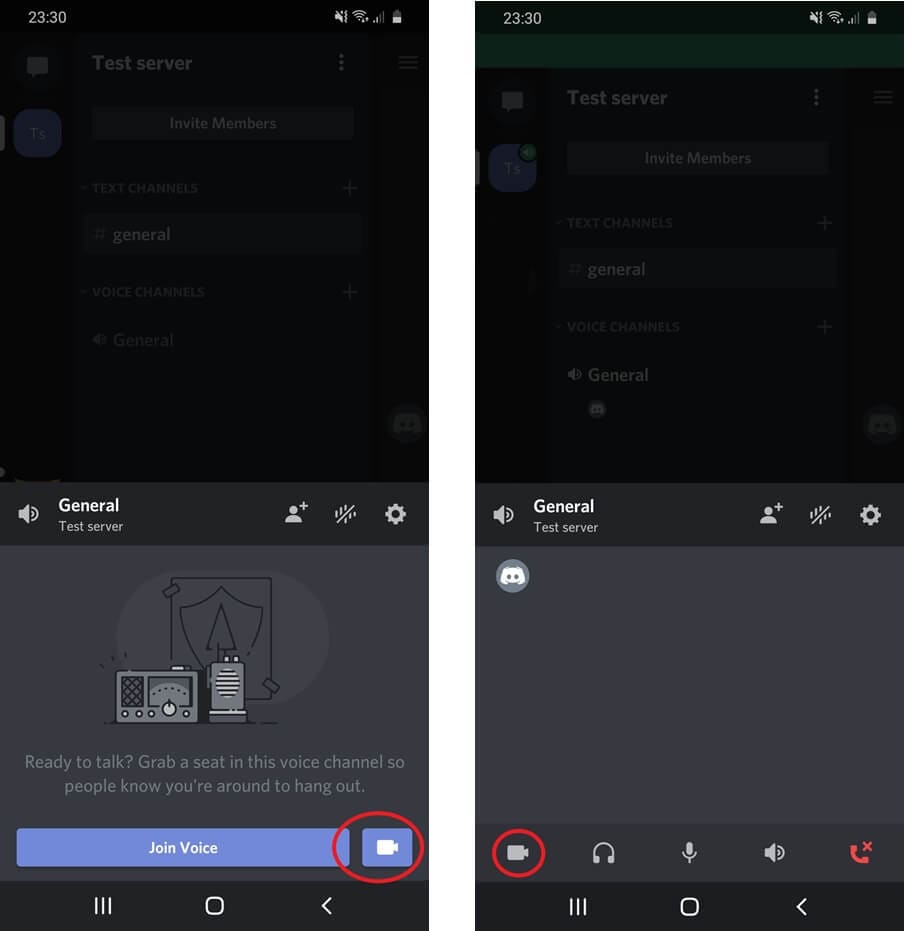
If you prefer, you can still just join as voice, and then at any stage click on your name where you’ll be able to then switch on your camera to turn a voice chat into a video call.
Whenever you want to end the video call, just click on your name again to switch off your camera, or disconnect completely from the voice channel.
FAQs About Discord Video Chat Call
1. How Many People Can Join in the Discord Group Video Call?
Normally, the limit for the number of users on a group video call in Discord is 10. However, during the Coronavirus pandemic, the team behind Discord know that it’s a valuable tool to help people stay connected. So the limit has been increased to 25 users. This may be reduced in the future once the world returns to some sense of normality.
2. How to Join a Video Call on Discord?
Joining an existing video call on Discord is a really easy process.
If it’s a private video call, you’ll get a pop-up in the chat window letting you know that a video call has been started. You have the option of declining the video call, joining it with video, or just joining with voice without your camera switched on.
If instead, it’s a public server where a video call is happening, you just need to join the voice channel by clicking on it on the left side of the screen, and then clicking on the video button next to your name, just as if you were starting the call in the first place.
Richard Bennett
Richard Bennett is a writer and a lover of all things video.
Follow @Richard Bennett
Richard Bennett
Mar 27, 2024• Proven solutions
Discord is a great place to hang out with like-minded people and just relax. But sometimes you want to do more than just chat using text messaging, which is where video calling comes in handy.
Discord has video call options built into the desktop app, the web browser and the mobile app, so you don’t need to switch between different software when you want to chat on video with your friends or colleagues. Read on to find out how to make a video call on Discord.
- Part 1: Best Settings for Discord Video Call
- Part 2: How to Make a Private Video Call on Discord?
- Part 3: How to Make a Server Video Call on Discord?
- Part 4: FAQs about Discord Video Call
Part 1: Best Settings for Discord Video Call
Before you start calling everyone, you’ll want to check your settings to make sure you have the best experience. It’s important to make sure you’ve got your best equipment setup to work for the highest quality audio and video possible.
So, start by heading to the User Settings page. You’ll find this at the bottom left of the screen – look for the cog icon next to your name. You won’t see this on mobile, this is only on the desktop app and the web browser version of Discord.
Once you’ve opened settings, you’ll want to click on the Voice & Video tab. Here you can check your microphone settings and adjust the volume, and choose your camera. If you’re using an external camera instead of the built-in option, check that the right one is selected in the dropdown.
You can also use this opportunity to run a test video – so that you know you’re well-lit, properly framed and otherwise good to go. You can adjust the lighting in your room or move the camera if you don’t feel it’s quite right.
One quick note for the web browser version of Discord – you’ll be asked to grant permission to your microphone and camera. Make sure you allow the site to use your equipment otherwise it won’t work on the video call.
Once you are happy, just click the close button at the top right of the settings options.
Part 2: How to Make a Private Video Call on Discord?
Once you’ve got your settings ready, you’re set to make your private Discord video call. If you’re doing it on the web browser or desktop app, you’ll need to first navigate to the inbox you share with the person you want to call. Do this by clicking on the Home button at the top left – you’ll then get a list of all your contacts.
If you’re only calling one person then it’s easy – just click on their name.
If you want to call a private group, you need to click the + button and then create a group DM. Add the names of the users you want to call.
Once you’re in the direct message window of the person or group you want to call, you need to look at the buttons at the top right of the screen. The second icon that looks like a video camera is the one you’re looking for. Click that and you’ll start a video call.
You’ll see yourself on screen at this point, but you’ll need to wait until the other person or group members have joined the call for the chat to properly begin.
The process of making video call on Discord mobile is essentially identical. You just need to open the direct message group and click on the video call icon, which is still at the top right of your screen.
You’ll need to give permissions for the Discord mobile app to use your microphone and camera if you haven’t already.
Once you’ve finished your video call on either desktop or mobile, just hit the red button to end it and switch your camera off again.
Part 3: How to Make a Server Video Call on Discord?
If you want to make a group video call on a public server, you again need to first navigate to the server. Once you’re there, you’ll need to join the voice channel that you should see on the left side of the screen.
Once you’re in the voice channel, click Lounge, Community Hangout or Stream Room, and then switch on your camera by clicking the ‘Video’ button. You’ll find this at the bottom-left of the screen. Again, if you’re on the web browser, you’ll be asked by your browser for permission to use your camera at this stage.
And that’s it – the video call is now live and anyone who joins the voice channel will be able to see you, chat to you and switch on their camera to join the video conference as well.
On mobile, it’s slightly different. You’ll still want to head to the server you want to join and then click on the voice channel to join it. But as soon as you click on the voice channel, you’ll get a pop-up with an icon at the bottom right where you can instantly switch on your camera.
If you prefer, you can still just join as voice, and then at any stage click on your name where you’ll be able to then switch on your camera to turn a voice chat into a video call.
Whenever you want to end the video call, just click on your name again to switch off your camera, or disconnect completely from the voice channel.
FAQs About Discord Video Chat Call
1. How Many People Can Join in the Discord Group Video Call?
Normally, the limit for the number of users on a group video call in Discord is 10. However, during the Coronavirus pandemic, the team behind Discord know that it’s a valuable tool to help people stay connected. So the limit has been increased to 25 users. This may be reduced in the future once the world returns to some sense of normality.
2. How to Join a Video Call on Discord?
Joining an existing video call on Discord is a really easy process.
If it’s a private video call, you’ll get a pop-up in the chat window letting you know that a video call has been started. You have the option of declining the video call, joining it with video, or just joining with voice without your camera switched on.
If instead, it’s a public server where a video call is happening, you just need to join the voice channel by clicking on it on the left side of the screen, and then clicking on the video button next to your name, just as if you were starting the call in the first place.
Richard Bennett
Richard Bennett is a writer and a lover of all things video.
Follow @Richard Bennett
Also read:
- [New] In 2024, The Ultimate Combo Using Spotify in Discord Channels
- [New] Optimal Zero-Price Logo Maker for Discord Channels for 2024
- [New] Streamline Team Conferencing via Discord's Screen Sharing
- [New] Streamlining Discord's Message Management with Bulk Deletion
- [New] The Ultimate Guide to Integrating Emojis with Discord Statuses
- [New] Unsubscribing Disconnecting Desktop Discords for 2024
- [Updated] Harmonizing Music and Video on TikTok
- [Updated] MelodyRecorder Free An Expert's Evaluation
- [Updated] Navigating the Viral Terrain with Smart Instagram Video Tactics for 2024
- [Updated] The Game-Changer How to Optimize Your FB Giveaway Posts
- Discover the Leading VR Headsets of 2023: Enhancing Your Gaming World on a Computer
- Embracing the Future with VR Mobile or Tethered, What's Right For You?
- Gratis Premium Video-Editoren Für Windows 10, 8 & 7 Und macOS - Entfernen Von Unnötigem Videomaterial
- In 2024, Immersive Devices of Now
- In 2024, Virtual Producer's Showdown
- Learn Quickly Updating Your Discord Avatar Status
- Section 2A: Understanding Crop Resistance to Low Temperatures
- Securing Partner Approval Essential Steps for Discord Identity Confirmation for 2024
- Streamlining Your Discord Chat Experience on Devices
- Title: Erase Discord Server Settings (Desktop/Smartphones) for 2024
- Author: Timothy
- Created at : 2024-11-03 16:07:06
- Updated at : 2024-11-04 19:10:02
- Link: https://discord-videos.techidaily.com/erase-discord-server-settings-desktopsmartphones-for-2024/
- License: This work is licensed under CC BY-NC-SA 4.0.