
:max_bytes(150000):strip_icc()/firetvremoteapp-5c05dd3546e0fb0001924ea6.jpg)
How to Add Roles in Discord for 2024
Streamlined Approach to Role Assignments on Discord Servers
How to Add Roles in Discord?

Richard Bennett
Mar 27, 2024• Proven solutions
Having a Discord server for you and your friends is a fun experience. And for gamers, Discord is a necessity. You can customize it with bots, connect real-time over voice channels, and even add rooms for chat forums.
Obviously, creating and managing a Discord server can get difficult. Especially when the server gets crammed with members, it is no longer a one-person show. You need help with monitoring and moderation. And let’s face it – you cannot watch your server round the clock.
So, let us learn the art of delegation on Discord! This guide will help you with – How to add roles in Discord and how to assign them to members. This includes creating roles, deleting them, and granting appropriate permissions.
- Part 1: Discord Server Permissions Introduction
- Part 2: How to Make and Add Roles in Discord on Computer
- Part 3: How to Manage Roles in Discord?
- Part 4: How to Delete Roles in Discord?
- Part 5: How to Add Roles on Discord Mobile?
- Part 6: Adding Roles to Discord FAQs
Part 1: Discord Server Permissions You Can Set Up
To give you a heads-up, there are around 29 permissions that you can adjust over a Discord server. More specifically, there are 7 voice permissions, 9 permissions related to texts, and about 13 permissions dealing with the server.
1. General server permission
Administrator – this is the highest permission that you can grant to a user. Think twice before giving this authority to anyone.
View Audit Log – with this permission, a user can read the server’s audits.
Manage Server – this permission enables a user to change the server’s name or shift it to another region.
Manage Roles – a user with this authority can make new roles or modify the roles without this permission.
Manage Channels – with this; a user can make, edit, or remove channels on a server.
Manage emojis – users with this authority can manage emotes.
Manage Webhooks – if you have this authority, you can add, modify, and remove webhooks.
Read Text Channels & See Voice Channels – a user with this permission can read text channels.
2. Membership permissions
Ban Members – a member with permission, can ban members from the server.
Create Instant Invite – users with this permission can invite people to the server.
Change Nickname – you can change your nickname anytime if this permission is enabled.
Manage Nicknames – if enabled, a user can change other’s nicknames.
Kick Members – a user with this authority can remove members from the server.
3. Text channel permissions
Send Messages – with this; users can send texts on chats.
Send TTS Messages – this enables users to send text-to-speech texts.
Manage Messages – with this; a user can remove or pin texts of other users.
Embed Links – enables users to embed hyperlinks in texts.
Attach Files – with this; users can attach files in the texts.
Read Message History – enables users to access earlier texts.
Mention Everyone – you can send push notifications on the channel if this permission is enabled.
Use External Emojis – if enabled, users can send emojis from other servers.
Add Reactions – with this; users can add new reactions to a text.
4. Voice channel permissions
Connect – enables users to connect themselves over the voice channel.
Speak – users can talk over the voice channel.
Mute Members – turn off other user’s speech.
Deafen Members – turn off hearing on the channel for a user.
Move Members – enables a user to shift members from one channel to a different channel.
Use Voice Activity – a member can talk without using Push-to-Talk, with this permission.
Priority Speaker – when this permission is turned on for a user, other’s
this permission allows the user to reduce the volume of other users when this user is speaking so that their words are louder on the channel.
5. Advanced permissions
Includes the ‘Administrator’ permission, which by default enables all the permissions to the assigned user.
Part 2: How to Make and Add Roles in Discord on Computer
The desktop app and Browser resemble the mobile apple a lot. The process of assigning roles and configuring members is more or less the same across devices. First, you need to create roles and define their authority before assigning these roles to some members.
How to create roles in Discord?
Before you can assign roles, you need a server. Once you have created your Discord server, start crafting the structure.
- Open your server and right-click on it.
- From the menu that appears, tap server settings.
- Name the role suitably. It should be descriptive of the authority.
- Tap on the plus sign that appears on the top right of the page.
- Here, you can change the title off the roll and even choose the color.
- Now comes the time to grant some permissions. These are basically the authority that you gave to every profile.
- When you are done, save the changes.
How to Assign Roles to Members in Discord?
To be able to assign roles, you should first create them
- Once again, hit that right button on your server and go to server settings.
- From the menu that appears to the left, ‘choose members’ under user management.
- Here, you will see the list of all the members on your server, tap the Plus sign that is right beside the username.
- From the drop-down menu that appears, select a role you want to assign to that member.
- You will notice that the color changes as per your settings. And this is how you assign roles to a server.
Part 3: How to Manage Roles in Discord?
After you learn how to make roles in Discord, you might want to manage them.
If you have got the hang of creating roles, then managing them is no different. Whenever the server gets crowded, you can create more roles or modify the existing ones. A smaller server can run smoothly with just an admin and an ‘everyone’ role.
The quickest and easiest way to manage your bloating server is to let all members be ‘everyone’ and adjust permissions accordingly. So, whenever members enter your server, they will automatically be assigned the common role.
Further, you can easily figure out what roles you have assigned to whom. Due to these colors, the other members can identify moderators, admins, or other roles.
Part 4: How to Delete Roles in Discord?
Honestly, removing Discord roles easier than setting them up. There are hardly a few steps that you need to follow for role removal.
- place the cursor on the server, and hit the right-click.
- From the list, choose server settings. Then click on roles.
- From the roles window, tap on the role that you wish to delete.
- Towards the bottom, you will see the option to delete the role.
- Press ok to confirm.
Part 5: How to Add Roles on Discord Mobile?
Like we mentioned earlier, the user interface of Discord is similar across devices. So, there is little difference between the process of creating and managing roles. But it can be baffling for beginners, so here’s a brief!
1. How to create roles in Discord mobile app?
Before you can assign roles, you have to create them.
- Open your server.
- Tap on the arrow beside the server’s title. A drop-down menu will appear. Select ‘server settings’ from that.
- Tap on ‘Roles.’ A common role, ‘everyone’ is assigned to all the members who have basic permissions enabled for everyone.
- Tap the plus sign and add a role.
- Give the role a color and describe it in a few words.
- Go through the permissions and enable the ones that fit the role.
- Save the changes.
You can repeat this multiple times to create more roles.
2. How to Assign Roles in Discord mobile app?
- Head over to settings and select ‘Members.’
- Select the members you want to assign roles to.
- Tick the boxes beside each member’s name for the roles you are assigning them.
Save the changes, and you are good to go! You can assign multiple roles to a member.
Part 6: FAQs about Discord Server Roles
Just some obvious things you might wonder about.
- How to make someone admin on Discord?
Making someone admin is the same as assigning other roles. Open your server and go to server settings.
- From there, select ‘roles’ from the left pane.
- Create a new role.
- Name the role ‘admin’ or an equivalent title.
- Adjust the setting related to sorting out role members with other members.
- Go to general permissions and tick the ‘Administrator’ option.
- Hit the ‘save changes’ button at the bottom.
- Now it’s time to assign the role to someone. Right-click on the user that you want to assign the role.
- Choose ‘roles’ from the drop-down list and select ‘Admin.’
And now your server has an admin!
- How can I assign roles to new users in Discord automatically?
By default, every member gets the role of ‘everyone’ on the server. However, you can customize this and add the MEE6 bot for automatic role allocation.
- Why can’t I manage the server even I am an admin on the server?
This is likely to happen if the server owner gave you the role of admin, but the permissions are disabled. You can ask the owner to enable the permissions for your user ID.
Richard Bennett
Richard Bennett is a writer and a lover of all things video.
Follow @Richard Bennett
Richard Bennett
Mar 27, 2024• Proven solutions
Having a Discord server for you and your friends is a fun experience. And for gamers, Discord is a necessity. You can customize it with bots, connect real-time over voice channels, and even add rooms for chat forums.
Obviously, creating and managing a Discord server can get difficult. Especially when the server gets crammed with members, it is no longer a one-person show. You need help with monitoring and moderation. And let’s face it – you cannot watch your server round the clock.
So, let us learn the art of delegation on Discord! This guide will help you with – How to add roles in Discord and how to assign them to members. This includes creating roles, deleting them, and granting appropriate permissions.
- Part 1: Discord Server Permissions Introduction
- Part 2: How to Make and Add Roles in Discord on Computer
- Part 3: How to Manage Roles in Discord?
- Part 4: How to Delete Roles in Discord?
- Part 5: How to Add Roles on Discord Mobile?
- Part 6: Adding Roles to Discord FAQs
Part 1: Discord Server Permissions You Can Set Up
To give you a heads-up, there are around 29 permissions that you can adjust over a Discord server. More specifically, there are 7 voice permissions, 9 permissions related to texts, and about 13 permissions dealing with the server.
1. General server permission
Administrator – this is the highest permission that you can grant to a user. Think twice before giving this authority to anyone.
View Audit Log – with this permission, a user can read the server’s audits.
Manage Server – this permission enables a user to change the server’s name or shift it to another region.
Manage Roles – a user with this authority can make new roles or modify the roles without this permission.
Manage Channels – with this; a user can make, edit, or remove channels on a server.
Manage emojis – users with this authority can manage emotes.
Manage Webhooks – if you have this authority, you can add, modify, and remove webhooks.
Read Text Channels & See Voice Channels – a user with this permission can read text channels.
2. Membership permissions
Ban Members – a member with permission, can ban members from the server.
Create Instant Invite – users with this permission can invite people to the server.
Change Nickname – you can change your nickname anytime if this permission is enabled.
Manage Nicknames – if enabled, a user can change other’s nicknames.
Kick Members – a user with this authority can remove members from the server.
3. Text channel permissions
Send Messages – with this; users can send texts on chats.
Send TTS Messages – this enables users to send text-to-speech texts.
Manage Messages – with this; a user can remove or pin texts of other users.
Embed Links – enables users to embed hyperlinks in texts.
Attach Files – with this; users can attach files in the texts.
Read Message History – enables users to access earlier texts.
Mention Everyone – you can send push notifications on the channel if this permission is enabled.
Use External Emojis – if enabled, users can send emojis from other servers.
Add Reactions – with this; users can add new reactions to a text.
4. Voice channel permissions
Connect – enables users to connect themselves over the voice channel.
Speak – users can talk over the voice channel.
Mute Members – turn off other user’s speech.
Deafen Members – turn off hearing on the channel for a user.
Move Members – enables a user to shift members from one channel to a different channel.
Use Voice Activity – a member can talk without using Push-to-Talk, with this permission.
Priority Speaker – when this permission is turned on for a user, other’s
this permission allows the user to reduce the volume of other users when this user is speaking so that their words are louder on the channel.
5. Advanced permissions
Includes the ‘Administrator’ permission, which by default enables all the permissions to the assigned user.
Part 2: How to Make and Add Roles in Discord on Computer
The desktop app and Browser resemble the mobile apple a lot. The process of assigning roles and configuring members is more or less the same across devices. First, you need to create roles and define their authority before assigning these roles to some members.
How to create roles in Discord?
Before you can assign roles, you need a server. Once you have created your Discord server, start crafting the structure.
- Open your server and right-click on it.
- From the menu that appears, tap server settings.
- Name the role suitably. It should be descriptive of the authority.
- Tap on the plus sign that appears on the top right of the page.
- Here, you can change the title off the roll and even choose the color.
- Now comes the time to grant some permissions. These are basically the authority that you gave to every profile.
- When you are done, save the changes.
How to Assign Roles to Members in Discord?
To be able to assign roles, you should first create them
- Once again, hit that right button on your server and go to server settings.
- From the menu that appears to the left, ‘choose members’ under user management.
- Here, you will see the list of all the members on your server, tap the Plus sign that is right beside the username.
- From the drop-down menu that appears, select a role you want to assign to that member.
- You will notice that the color changes as per your settings. And this is how you assign roles to a server.
Part 3: How to Manage Roles in Discord?
After you learn how to make roles in Discord, you might want to manage them.
If you have got the hang of creating roles, then managing them is no different. Whenever the server gets crowded, you can create more roles or modify the existing ones. A smaller server can run smoothly with just an admin and an ‘everyone’ role.
The quickest and easiest way to manage your bloating server is to let all members be ‘everyone’ and adjust permissions accordingly. So, whenever members enter your server, they will automatically be assigned the common role.
Further, you can easily figure out what roles you have assigned to whom. Due to these colors, the other members can identify moderators, admins, or other roles.
Part 4: How to Delete Roles in Discord?
Honestly, removing Discord roles easier than setting them up. There are hardly a few steps that you need to follow for role removal.
- place the cursor on the server, and hit the right-click.
- From the list, choose server settings. Then click on roles.
- From the roles window, tap on the role that you wish to delete.
- Towards the bottom, you will see the option to delete the role.
- Press ok to confirm.
Part 5: How to Add Roles on Discord Mobile?
Like we mentioned earlier, the user interface of Discord is similar across devices. So, there is little difference between the process of creating and managing roles. But it can be baffling for beginners, so here’s a brief!
1. How to create roles in Discord mobile app?
Before you can assign roles, you have to create them.
- Open your server.
- Tap on the arrow beside the server’s title. A drop-down menu will appear. Select ‘server settings’ from that.
- Tap on ‘Roles.’ A common role, ‘everyone’ is assigned to all the members who have basic permissions enabled for everyone.
- Tap the plus sign and add a role.
- Give the role a color and describe it in a few words.
- Go through the permissions and enable the ones that fit the role.
- Save the changes.
You can repeat this multiple times to create more roles.
2. How to Assign Roles in Discord mobile app?
- Head over to settings and select ‘Members.’
- Select the members you want to assign roles to.
- Tick the boxes beside each member’s name for the roles you are assigning them.
Save the changes, and you are good to go! You can assign multiple roles to a member.
Part 6: FAQs about Discord Server Roles
Just some obvious things you might wonder about.
- How to make someone admin on Discord?
Making someone admin is the same as assigning other roles. Open your server and go to server settings.
- From there, select ‘roles’ from the left pane.
- Create a new role.
- Name the role ‘admin’ or an equivalent title.
- Adjust the setting related to sorting out role members with other members.
- Go to general permissions and tick the ‘Administrator’ option.
- Hit the ‘save changes’ button at the bottom.
- Now it’s time to assign the role to someone. Right-click on the user that you want to assign the role.
- Choose ‘roles’ from the drop-down list and select ‘Admin.’
And now your server has an admin!
- How can I assign roles to new users in Discord automatically?
By default, every member gets the role of ‘everyone’ on the server. However, you can customize this and add the MEE6 bot for automatic role allocation.
- Why can’t I manage the server even I am an admin on the server?
This is likely to happen if the server owner gave you the role of admin, but the permissions are disabled. You can ask the owner to enable the permissions for your user ID.
Richard Bennett
Richard Bennett is a writer and a lover of all things video.
Follow @Richard Bennett
Text-To-Speech Excellence on Discord - Your Ultimate Manual
How to Use Discord Text-To-Speech?
Richard Bennett
Mar 27, 2024• Proven solutions
While most users of the popular online messaging and content sharing site Discord rely on simple text to communicate, there are numerous situations when using the text-to-speech feature would be quite advantageous. This includes instances when there are language barriers or disabilities to overcome, but also spontaneous moments when users just enjoy hearing each other’s words. Discord supports the use of a text-to-speech (TTS) function and in fact, has a built-in setting for it, but this option only works for desktop users with Windows or Mac devices.
In this article, we will discuss the specifics of activating the TTS function in Discord and using it effectively to improve your communication with other users. By following the detailed instructions provided here, you will be able to learn how to activate text-to-speech on Discord and manage your voice messages on selected servers in the most practical manner.
- Part 1: Enable Text-To-Speech Feature in Discord
- Part 2: How to Set Up Text-To-Speech Notifications on Discord?
- Part 3: How to Use Text-To-Speech in Discord Chatting?
- Part 4: How to Mute All Text-To-Speech Messages on Discord?
- Part 5: Best Text-To-Speech Bots on Discord
Part 1: How to Enable Text-To-Speech Feature in Discord?
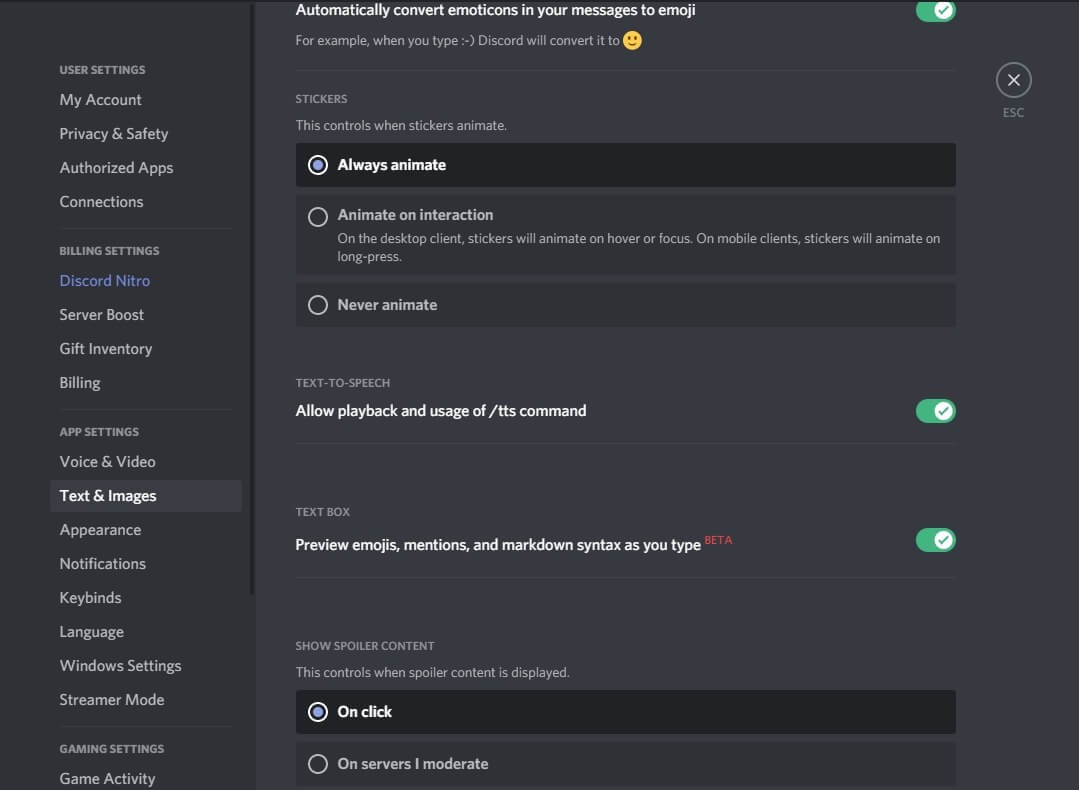
Before you can deploy TTS in your chats, you need to change the settings of your profile to enable this option. This isn’t hard to do – just go to the Discord app and select ‘Settings’ from the menu, which will trigger a pop-up window to appear on your screen. Next, you need to find the Text & Images section in the App Settings window, then scroll down to find the Text-to-Speech option, and finally tick the boxes next to Allow playback and Usage of TTS items. After you do this, your Discord will be ready to process your text messages in voice format.
To test whether you successfully activated Text-to-Speech, open any chats on your personal server and try typing out a message, followed immediately by the tag /tts. If everything is working correctly, your message should appear on the screen in the text form, accompanied by its voice rendering delivered by an automated module. The timing of the two should be perfectly synchronized so that you hear the message and see the text at exactly the same instance. Otherwise, go back to settings and make sure you activated the TTS option properly or restart your Discord app.
Part 2: How to Set Up Text-To-Speech Notifications on Discord?
Another practical possibility that can improve your Discord experience is to set up TTS notifications and be immediately informed whenever a fresh message arrives. This can also be done after you change the app parameters from the ‘Settings’ menu. After you see all options, choose ‘App Settings’ and search for the section named ‘Notifications’. By scrolling down, you will reach the item ‘Text-to-Speech notifications’ and after clicking on it you will be given a choice between three options.
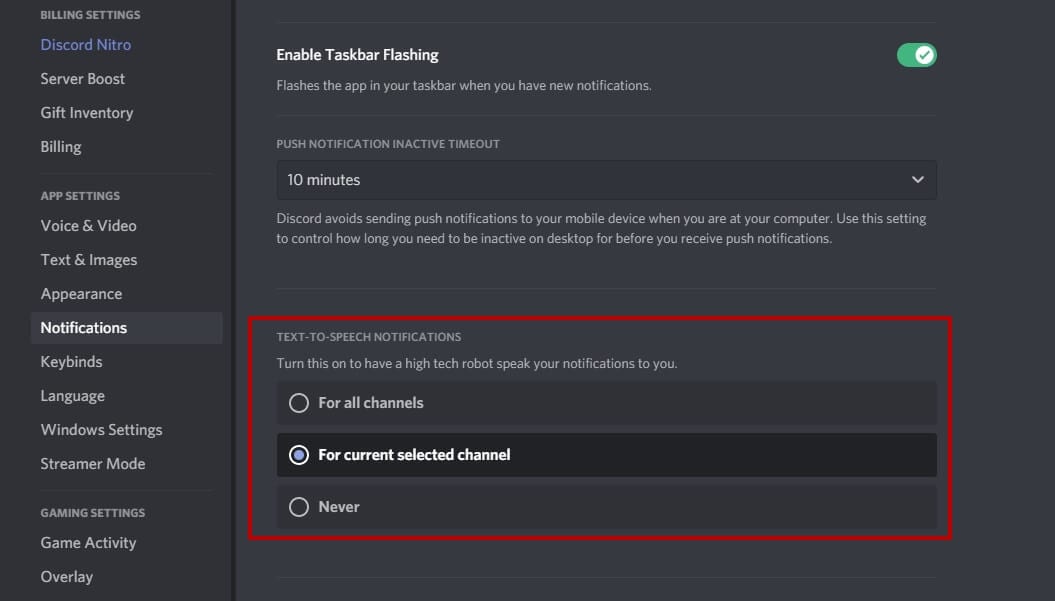
The first option For all channels is to enable notifications on all channels on Discord; choosing it will result in a robotic voice reading all messages from all chats, regardless of whether they have a /tts tag. This option can be useful when you want to maximize your accessibility and receive important information instantly.
By picking the second option, For current selected channel, you can enable TTS notifications only on the current channel. This action will instruct Discord to have an automated voice read all the incoming messages on the active chat aloud, allowing you to stay in the loop at all times. This possibility works well for people who occasionally do multiple things at once, for example, gamers or streamers who use Discord to stay connected with their fans and friends while they are busy.
Finally, you can choose Never to hear any voice messages from your Discord chats never. If you pick this setting, even those messages that were sent with the /tts tag will only be displayed in the text format. This option provides you with peace of mind and prevents spammers from saturating you with voice messages you have no interest in hearing.
Part 3: How to Use Text-To-Speech in Discord Chatting?
It’s not very hard to learn how to effectively use the TTS option in your chats on the Discord platform. This communication format is available on all channels that have an activated Text-to-Speech setting, so you can freely add a few messages to be read aloud or completely switch to automated voice format if you so desire. Doing this in practice is very simple – just start your message by typing the tag /tts and then enter your text as you normally would.

Your TTS message will be reproduced in a voice format by a Discord bot to all participants in the chat who didn’t mute incoming Text-to-Speech chats. An automated voice will say the entire message, and then also pronounce your username to identify the author. At the same time, the message will appear in the chat feed as plain text, so that even those recipients unable to hear it will be able to see the contents.
Part 4: How to Mute All Text-To-Speech Messages on Discord?
You can also decide to prevent any messages from being played to you in a voice format and receive them as text only. This option is available even if you are not the administrator of the chat server and simply want to customize your own experience. To do this, you need to open the Discord app and enter the Settings menu, before selecting the Text & Images section from App Settings. After this, you need to find the Text-to-Speech sub-menu and open it to find the Allow Playback feature. If you disable this feature, you will effectively mute all incoming TTS messages across all Discord servers you are active on.
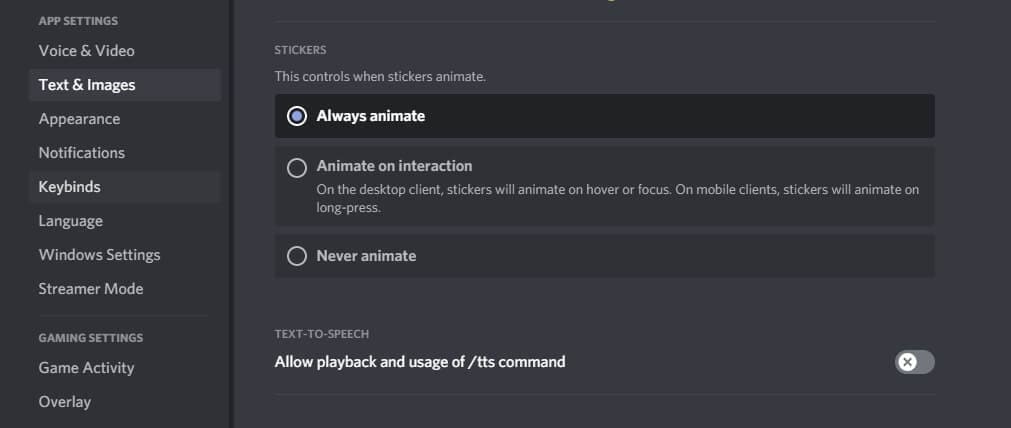
Please keep in mind that deactivating the aforementioned feature won’t block TTS messages from reaching you, but you will see them as text only. On the other hand, you can’t use the /tts tag to send your own Text-to-Speech while the playback setting is disabled. Nothing is preventing you from turning it back on when you want to have a TTS capacity on Discord again.
Part 5: Best Text-To-Speech Bots on Discord
One of the reasons why Discord is so popular is that it allows extensive customization through user-made Bots or modules that automatically perform a certain task. There are several great Bots that can be used for Text-to-Speech, so you might consider utilizing one of them.
1. Text to Speech (TTS)
With many languages supported and a wide range of cool commands, this bot could be the best choice for people who use TTS just for fun.
2. KD Bot
A very popular option for Text-to-Speech on Discord that lets you choose from more than 100 voices and supports upwards of 100 languages, making it a powerful translation tool.
3. Fergun
This multi-language tool responds to more than 100 different commands, so it can be used for a wide variety of purposes with stunning effectiveness.
Frequently asked questions about TTS on Discord
- Can I use the Text-to-Speech feature on Discord from a mobile phone?
Unfortunately, you can’t. Discord works quite well as a text messaging app on mobile platforms, but at this time Text-to-Speech functionality is limited to desktop users.
- Why can’t I use Text-to-Speech on a Discord server?
If you are unable to send or receive TTS messages on Discord, you need to change your settings. Please see Part 1 of this article for detailed instructions.
Richard Bennett
Richard Bennett is a writer and a lover of all things video.
Follow @Richard Bennett
Richard Bennett
Mar 27, 2024• Proven solutions
While most users of the popular online messaging and content sharing site Discord rely on simple text to communicate, there are numerous situations when using the text-to-speech feature would be quite advantageous. This includes instances when there are language barriers or disabilities to overcome, but also spontaneous moments when users just enjoy hearing each other’s words. Discord supports the use of a text-to-speech (TTS) function and in fact, has a built-in setting for it, but this option only works for desktop users with Windows or Mac devices.
In this article, we will discuss the specifics of activating the TTS function in Discord and using it effectively to improve your communication with other users. By following the detailed instructions provided here, you will be able to learn how to activate text-to-speech on Discord and manage your voice messages on selected servers in the most practical manner.
- Part 1: Enable Text-To-Speech Feature in Discord
- Part 2: How to Set Up Text-To-Speech Notifications on Discord?
- Part 3: How to Use Text-To-Speech in Discord Chatting?
- Part 4: How to Mute All Text-To-Speech Messages on Discord?
- Part 5: Best Text-To-Speech Bots on Discord
Part 1: How to Enable Text-To-Speech Feature in Discord?
Before you can deploy TTS in your chats, you need to change the settings of your profile to enable this option. This isn’t hard to do – just go to the Discord app and select ‘Settings’ from the menu, which will trigger a pop-up window to appear on your screen. Next, you need to find the Text & Images section in the App Settings window, then scroll down to find the Text-to-Speech option, and finally tick the boxes next to Allow playback and Usage of TTS items. After you do this, your Discord will be ready to process your text messages in voice format.
To test whether you successfully activated Text-to-Speech, open any chats on your personal server and try typing out a message, followed immediately by the tag /tts. If everything is working correctly, your message should appear on the screen in the text form, accompanied by its voice rendering delivered by an automated module. The timing of the two should be perfectly synchronized so that you hear the message and see the text at exactly the same instance. Otherwise, go back to settings and make sure you activated the TTS option properly or restart your Discord app.
Part 2: How to Set Up Text-To-Speech Notifications on Discord?
Another practical possibility that can improve your Discord experience is to set up TTS notifications and be immediately informed whenever a fresh message arrives. This can also be done after you change the app parameters from the ‘Settings’ menu. After you see all options, choose ‘App Settings’ and search for the section named ‘Notifications’. By scrolling down, you will reach the item ‘Text-to-Speech notifications’ and after clicking on it you will be given a choice between three options.
The first option For all channels is to enable notifications on all channels on Discord; choosing it will result in a robotic voice reading all messages from all chats, regardless of whether they have a /tts tag. This option can be useful when you want to maximize your accessibility and receive important information instantly.
By picking the second option, For current selected channel, you can enable TTS notifications only on the current channel. This action will instruct Discord to have an automated voice read all the incoming messages on the active chat aloud, allowing you to stay in the loop at all times. This possibility works well for people who occasionally do multiple things at once, for example, gamers or streamers who use Discord to stay connected with their fans and friends while they are busy.
Finally, you can choose Never to hear any voice messages from your Discord chats never. If you pick this setting, even those messages that were sent with the /tts tag will only be displayed in the text format. This option provides you with peace of mind and prevents spammers from saturating you with voice messages you have no interest in hearing.
Part 3: How to Use Text-To-Speech in Discord Chatting?
It’s not very hard to learn how to effectively use the TTS option in your chats on the Discord platform. This communication format is available on all channels that have an activated Text-to-Speech setting, so you can freely add a few messages to be read aloud or completely switch to automated voice format if you so desire. Doing this in practice is very simple – just start your message by typing the tag /tts and then enter your text as you normally would.
Your TTS message will be reproduced in a voice format by a Discord bot to all participants in the chat who didn’t mute incoming Text-to-Speech chats. An automated voice will say the entire message, and then also pronounce your username to identify the author. At the same time, the message will appear in the chat feed as plain text, so that even those recipients unable to hear it will be able to see the contents.
Part 4: How to Mute All Text-To-Speech Messages on Discord?
You can also decide to prevent any messages from being played to you in a voice format and receive them as text only. This option is available even if you are not the administrator of the chat server and simply want to customize your own experience. To do this, you need to open the Discord app and enter the Settings menu, before selecting the Text & Images section from App Settings. After this, you need to find the Text-to-Speech sub-menu and open it to find the Allow Playback feature. If you disable this feature, you will effectively mute all incoming TTS messages across all Discord servers you are active on.
Please keep in mind that deactivating the aforementioned feature won’t block TTS messages from reaching you, but you will see them as text only. On the other hand, you can’t use the /tts tag to send your own Text-to-Speech while the playback setting is disabled. Nothing is preventing you from turning it back on when you want to have a TTS capacity on Discord again.
Part 5: Best Text-To-Speech Bots on Discord
One of the reasons why Discord is so popular is that it allows extensive customization through user-made Bots or modules that automatically perform a certain task. There are several great Bots that can be used for Text-to-Speech, so you might consider utilizing one of them.
1. Text to Speech (TTS)
With many languages supported and a wide range of cool commands, this bot could be the best choice for people who use TTS just for fun.
2. KD Bot
A very popular option for Text-to-Speech on Discord that lets you choose from more than 100 voices and supports upwards of 100 languages, making it a powerful translation tool.
3. Fergun
This multi-language tool responds to more than 100 different commands, so it can be used for a wide variety of purposes with stunning effectiveness.
Frequently asked questions about TTS on Discord
- Can I use the Text-to-Speech feature on Discord from a mobile phone?
Unfortunately, you can’t. Discord works quite well as a text messaging app on mobile platforms, but at this time Text-to-Speech functionality is limited to desktop users.
- Why can’t I use Text-to-Speech on a Discord server?
If you are unable to send or receive TTS messages on Discord, you need to change your settings. Please see Part 1 of this article for detailed instructions.
Richard Bennett
Richard Bennett is a writer and a lover of all things video.
Follow @Richard Bennett
Also read:
- [New] How to Make Your Discord Profile Picture a Standout Choice
- [Updated] Dissecting Workplace Messaging Apps Which One Triumphs, Slack or Discord, In 2024
- Streamlined Approach to Role Assignments on Discord Servers
- [Updated] Real-Time Interaction Best Practices for Discord Streamers
- [Updated] 2024 Approved Prime Desktop Applications for Group Conversations
- Streamlining Office Communication Which Favors Teams More, Slack or Discord?
- [Updated] Mastering Desktop & Mobile A Guide to Setting Up Discord Calls for 2024
- [New] 2024 Approved Mastering Privacy Settings A Guide to Discretion in Streaming
- [New] Explore Exceptional Auditory Aids for a Richer Discord Experience
- [Updated] Unlocking the Potential of Video Posting Within Discord's Ecosystem
- [New] In 2024, Best Discord Emoji Makers - Online & Mobile
- [New] In 2024, Crafting Leading Discord Banners A Guide to Profile Customization
- [New] 2024 Approved Unlocking the Full Potential of Discord Avatars
- [New] From Antagonism to Action A Clear Framework for Handling Virtual Harassment on Discord
- [Updated] Elite Discordian Companions Automation for 2024
- [Updated] 2024 Approved The Lowdown on Discord's Nitro - Exclusives and How to Secure Them
- [New] How to Spruce Up Your Discord Status with Emojis
- [New] 10 Top Discoir Dates Love & Fun Unite
- [New] Discord's Best Servers for Finding a Mate for 2024
- [New] 2024 Approved The Ultimate Discord Spoiler Tag Reference
- [Updated] 2024 Approved Discord Profile Picture Ultimate Guide [Download/Create/Change]
- [New] 2024 Approved Discover VoiceMod Magic in Both Desktop & Mobile Spaces
- [Updated] Cutting-Edge Font Creators for Discord on the Go
- 2024 Approved Transforming Chat Sounds on Discord Our Top 10 Free Plugins
- [Updated] Unbeatable Value Free Professional Disco Emblem Artist for 2024
- [Updated] How to Reply Message on Discord Desktop and Mobile App
- [New] 2024 Approved Best Font Generators Enhance Your Discord Experience (Android/iOS)
- [New] A Complete Breakdown of Changing Discord Imagery for 2024
- [New] 2024 Approved Step-By-Step Guide to Fashionable Pfps on Discord Platform
- [New] Mastery of Gaming Understanding and Acquiring Your DiscoNitro Credentials
- [New] Discover Romance in Discord Channels for 2024
- [New] Leading Online Screenshot Services Discord Focus for 2024
- In 2024, How to Change Location on TikTok to See More Content On your Infinix Note 30 Pro | Dr.fone
- How To Activate and Use Life360 Ghost Mode On Vivo S18 | Dr.fone
- Here are Some Pro Tips for Pokemon Go PvP Battles On Oppo Find X7 Ultra | Dr.fone
- In 2024, What is the best Pokemon for pokemon pvp ranking On Realme Narzo 60 5G? | Dr.fone
- In 2024, Maximizing HD Playback on Social Media (FB)
- Tips From Pros Elevating Your Twitch Video Quality
- How to Simulate GPS Movement in AR games On Samsung Galaxy XCover 6 Pro Tactical Edition? | Dr.fone
- [New] In 2024, Unmatched Portable Experience with Top GBA Simulators, Android
- Updated In 2024, Facebook Video Dimensions Decoded A Step-by-Step Guide
- Prime Zero-Dollar Clip Maker Program
- Remove Device Supervision From your iPhone 15
- [Updated] Essential Tools for Documenting Computer Speakers & Mics for 2024
- Title: How to Add Roles in Discord for 2024
- Author: Timothy
- Created at : 2024-05-23 22:47:45
- Updated at : 2024-05-24 22:47:45
- Link: https://discord-videos.techidaily.com/how-to-add-roles-in-discord-for-2024/
- License: This work is licensed under CC BY-NC-SA 4.0.
