
:max_bytes(150000):strip_icc()/han-ede3a766549143e8b4a9856b8128b17b.jpg)
How to Reply Message on Discord Desktop and Mobile App for 2024
How to Reply Message on Discord Desktop and Mobile App
How to Reply Message on Discord

Richard Bennett
Mar 27, 2024• Proven solutions
Discord is a communication app targeted towards gamers. Games such as Fortnite and Among Us – a social deduction game – drove many new users to the platform
It surged in popularity during the pandemic, doubling its active monthly users to 120 million towards the end of 2020.
This popularity comes from the fact that Discord is now also being used by households and workplaces for seamless communication.
Today, we will focus on how the ‘discord reply to message’ feature works. This feature helps when you are trying to pick out a single message to reply to from a list of messages.
You can also include a link back to the message you respond to, making it easier for other people to follow the conversation.
You can even tag the person you are replying to so that they receive a notification whenever they log on to Discord.
In this article, we will cover the following parts on how to reply to messages on Discord:
- Part 1: How to Reply to a Specific Message on Discord on Desktop
- Part 2: Replying to a Certain Message on Discord Mobile
- Part 3: Setting up Auto Reply on Discord with Bots
- Part 4: Replying to Messages with Reactions on Discord
- Part 5: Quoting Messages on Discord?
Part 1: How to Reply to a Specific Message on Discord on Desktop
This technique works for both the browser and the desktop applications; use it when replying in different discord channels or direct messaging a friend.
- Locate the message you wish to reply to

- Hover your cursor on the comment as you see icons on the right of the message
- Now click on the arrow icon
- Alternatively, you might have to click on the ellipsis icon (…) if you are replying to a comment by yourself
- After clicking on the ellipsis icon, choose the “Reply” button
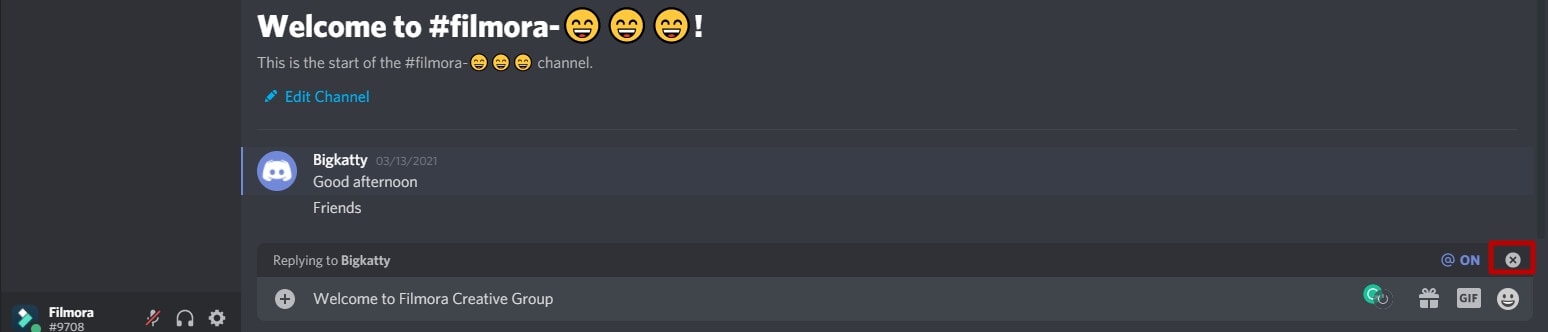
- Write your reply in the text box. You will now see a banner telling you who you are replying to. There will also be a “@” sign over the text box, which will tag the person you respond to (this can be turned off with a click)
- After you are done writing, press Enter to send your message. If you wish to discard the reply, you can click on “X.”
Part 2: How to Reply to a Certain Message on Discord Mobile
Replying on the mobile app is similar to Desktop. Here’s how to do it:
- Locate the message you wish to reply to in the Discord app
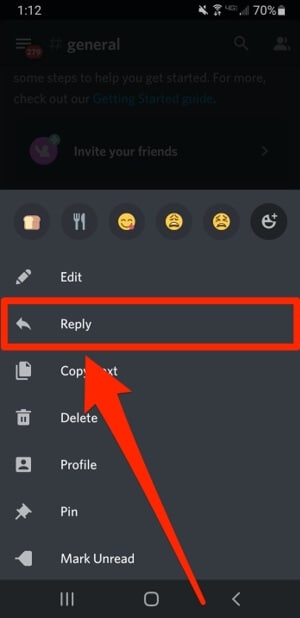
- Hold down on the comment until a list of options appears on the screen
- Choose the “Reply” option
- Write your reply in the text box. Like before, the person will be tagged by default, but you can turn this off by tapping the blue “@” sign
- After you are done writing, send the message using the enter button on your phone or tap “X” to discard the message
After pressing the send button, you should now be able to see your message in the channel.
Part 3: How to Set Auto Reply on Discord
It may be useful to have an auto-reply feature when handling large servers. Do this by integrating a bot into your Discord server.
Here’s an example of how you can implement this feature in your server. In this example, we are going to be using the Dyno bot:
- First, you need to visit Dyno’s website and then click on “Join us on Discord”

- Now you will have to sign in to your Discord account from your browser
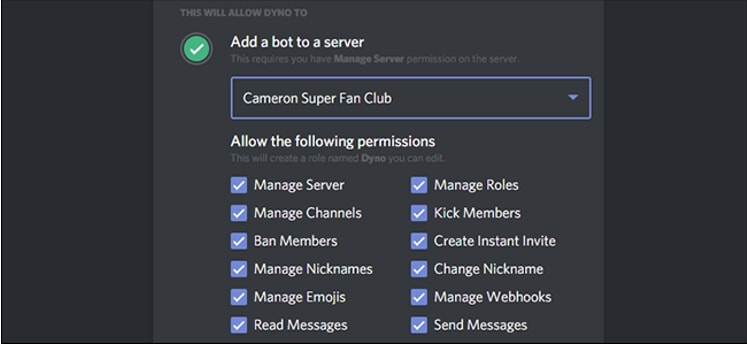
- Next, you will have to pick which server you want to invite the bot to
- From the same screen, you can decide which permissions to assign to the bot. The ones that matter to us are read messages and send messages
- The last step is to verify that you are not a robot yourself and check I’m not a robot.
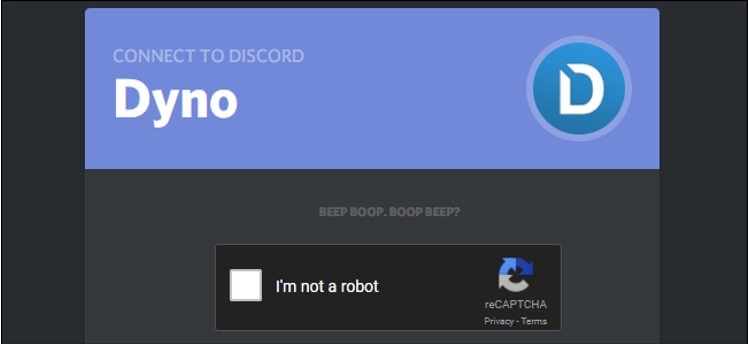
After this, the Dyno bot will be added to your Discord server. To allow the bot to send messages, you need to visit Dyno’s website and turn on the autoresponder, enabling you to set up your auto-reply.
Part 4: How to Reply to Messages with Reactions on Discord
Discord allows you to react to posts with emojis. To respond with an emoji:
- Hover your mouse cursor over the message you wish to react to
- Click the smiley face titled “Add reaction” on the message’s far-right

- After clicking on the “Add reaction” icon, a pop-up will appear, allowing you to choose the emoji you wish to react with.
Furthermore, to react to a message with an emoji that has already been used as a reaction, you can:
- Click on the emoji, and it would increase the total number of responses by 1
- Hovering over the emoji will also let you know the names of the people who reacted to the message
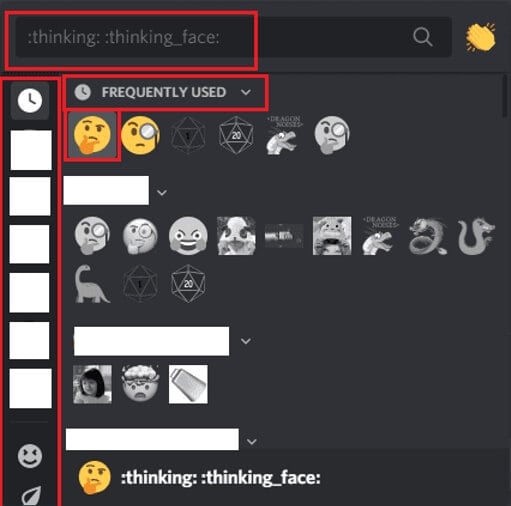
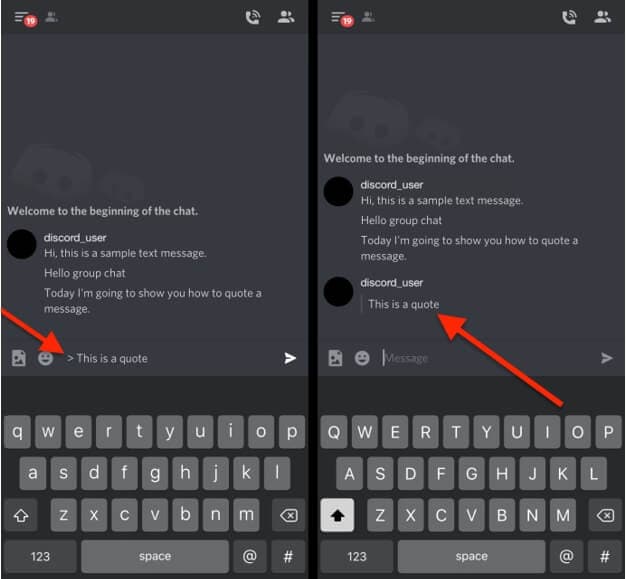
Part 5: How to Quote Messages on Discord?
Quoting messages in Discord is very simple. All you need to do is type > before your quote if it is only a one-liner.
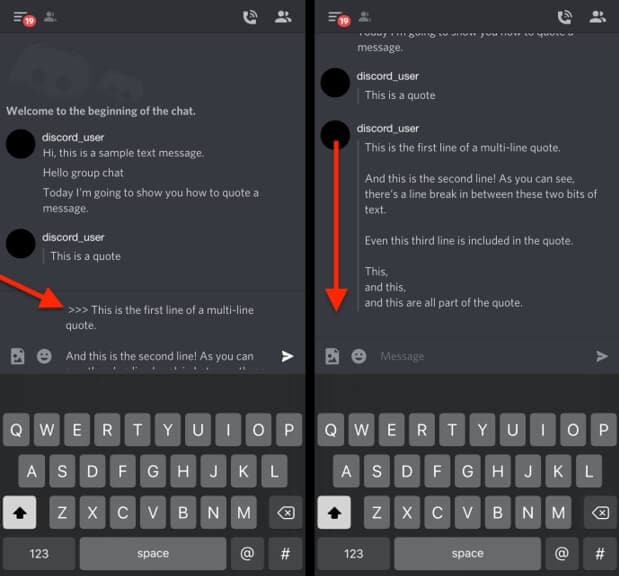
On the other hand, multi-line quoting is when you need to quote a paragraph or break between the lines you want to mention. For this, you can:
- Add > after every line. However, this can become annoying
- Instead, add >>> at the start of the paragraph you wish to quote
Richard Bennett
Richard Bennett is a writer and a lover of all things video.
Follow @Richard Bennett
Richard Bennett
Mar 27, 2024• Proven solutions
Discord is a communication app targeted towards gamers. Games such as Fortnite and Among Us – a social deduction game – drove many new users to the platform
It surged in popularity during the pandemic, doubling its active monthly users to 120 million towards the end of 2020.
This popularity comes from the fact that Discord is now also being used by households and workplaces for seamless communication.
Today, we will focus on how the ‘discord reply to message’ feature works. This feature helps when you are trying to pick out a single message to reply to from a list of messages.
You can also include a link back to the message you respond to, making it easier for other people to follow the conversation.
You can even tag the person you are replying to so that they receive a notification whenever they log on to Discord.
In this article, we will cover the following parts on how to reply to messages on Discord:
- Part 1: How to Reply to a Specific Message on Discord on Desktop
- Part 2: Replying to a Certain Message on Discord Mobile
- Part 3: Setting up Auto Reply on Discord with Bots
- Part 4: Replying to Messages with Reactions on Discord
- Part 5: Quoting Messages on Discord?
Part 1: How to Reply to a Specific Message on Discord on Desktop
This technique works for both the browser and the desktop applications; use it when replying in different discord channels or direct messaging a friend.
- Locate the message you wish to reply to
- Hover your cursor on the comment as you see icons on the right of the message
- Now click on the arrow icon
- Alternatively, you might have to click on the ellipsis icon (…) if you are replying to a comment by yourself
- After clicking on the ellipsis icon, choose the “Reply” button
- Write your reply in the text box. You will now see a banner telling you who you are replying to. There will also be a “@” sign over the text box, which will tag the person you respond to (this can be turned off with a click)
- After you are done writing, press Enter to send your message. If you wish to discard the reply, you can click on “X.”
Part 2: How to Reply to a Certain Message on Discord Mobile
Replying on the mobile app is similar to Desktop. Here’s how to do it:
- Locate the message you wish to reply to in the Discord app
- Hold down on the comment until a list of options appears on the screen
- Choose the “Reply” option
- Write your reply in the text box. Like before, the person will be tagged by default, but you can turn this off by tapping the blue “@” sign
- After you are done writing, send the message using the enter button on your phone or tap “X” to discard the message
After pressing the send button, you should now be able to see your message in the channel.
Part 3: How to Set Auto Reply on Discord
It may be useful to have an auto-reply feature when handling large servers. Do this by integrating a bot into your Discord server.
Here’s an example of how you can implement this feature in your server. In this example, we are going to be using the Dyno bot:
- First, you need to visit Dyno’s website and then click on “Join us on Discord”
- Now you will have to sign in to your Discord account from your browser
- Next, you will have to pick which server you want to invite the bot to
- From the same screen, you can decide which permissions to assign to the bot. The ones that matter to us are read messages and send messages
- The last step is to verify that you are not a robot yourself and check I’m not a robot.
After this, the Dyno bot will be added to your Discord server. To allow the bot to send messages, you need to visit Dyno’s website and turn on the autoresponder, enabling you to set up your auto-reply.
Part 4: How to Reply to Messages with Reactions on Discord
Discord allows you to react to posts with emojis. To respond with an emoji:
- Hover your mouse cursor over the message you wish to react to
- Click the smiley face titled “Add reaction” on the message’s far-right
- After clicking on the “Add reaction” icon, a pop-up will appear, allowing you to choose the emoji you wish to react with.
Furthermore, to react to a message with an emoji that has already been used as a reaction, you can:
- Click on the emoji, and it would increase the total number of responses by 1
- Hovering over the emoji will also let you know the names of the people who reacted to the message
Part 5: How to Quote Messages on Discord?
Quoting messages in Discord is very simple. All you need to do is type > before your quote if it is only a one-liner.
On the other hand, multi-line quoting is when you need to quote a paragraph or break between the lines you want to mention. For this, you can:
- Add > after every line. However, this can become annoying
- Instead, add >>> at the start of the paragraph you wish to quote
Richard Bennett
Richard Bennett is a writer and a lover of all things video.
Follow @Richard Bennett
Acclaimed Discord Screen Capture Apps Reviewed
Best Discord Screen Recorders [Online/Windows/Mac/Phone]

Liza Brown
Mar 27, 2024• Proven solutions
Discord is packed with great features, but one thing it’s missing is a screen recorder. You can chat, enjoy video calls and share your screen with friends or colleagues, but you can’t record these conversations or videos without using a third-party app.
Thankfully, there are plenty of choices for finding the best screen recorder for Discord. So here we’ll take you through the best options for Discord on the browser, on Windows and Mac, and on mobile so that no matter how you use Discord, you can record those epic gaming sessions or study groups for you to revisit later.
One thing to note before we begin – make sure everyone in your chat or server knows they’re being recorded. In some countries, it’s illegal to record someone without their permission, but even where legalities don’t matter, you don’t want to upset people by recording them without them being aware.
In this article
- Part 1: Best Screen Recorder Software for Discord Desktop App
- Part 2: Best Online Screen Recorder for Discord
- Part 3: Best Screen Recorder Apps for Discord on iPhone and Android
- Part 4: How to Record Discord Video Screen with Filmora?
Part 1: Best Windows/Mac Screen Recorder Software for Discord
If you prefer to use the Discord app on Windows or Mac, you’ll want a more robust screen recording tool . Here are four of the best screen recorders for Discord app users.
1. OBS
OBS (Open Broadcaster Software) is a free, open-source tool that many people use to stream live and record their screens. It works on Windows, Mac, and Linux and offers customization tools.
There are no pricing plans, everything is completely free, and it lets you add a range of sources so that you can record your webcam, Discord audio, and everything on the screen, including any overlays. The two main drawbacks to OBS are its complexity – it can be demanding on your computer, and it’s not the easiest to use. So expect to take some time getting a handle on how to set it up first.
2. Bandicam
Bandicam is another option that manages to be more intuitive. It’s easy to use, although it has many options to help you get the perfect recording. But if you’re not interested in spending ages tinkering, Bandicam is more likely to give you a higher quality recording using default settings, and it’s less demanding.
Bandicam isn’t free, but it doesn’t involve a monthly subscription, unlike many suggested tools. A one-off license for Bandicam for one PC is $39.95, or you can get a two-PC license for $59.95. If you want the editing software, Bandicut included, then that’s $60.95 with a single license. It’s also worth noting that Bandicam only works on Windows.
3. Wondershare Filmora
Though Filmora is a specialized video editing software, it also features screen recording , webcam recording, and audio recording tools. One of the biggest advantages of using Filmora to record Discord videos is that it features lots of elements and game video special effects, which will make your video cool. You can head to Part 4 of this article for detailed information about recording Discord video.


4. DemoCreator
If you plan to edit your screen recordings before uploading them, consider Wondershare DemoCreator . Working with both Windows and Mac, it’s a powerful screen recorder with some basic editing features, making it easy to turn your screen records into epic videos.
You can record in up to 120fps using two devices, such as your screen and webcam, and as well as the editing suite, there are effects tools you can utilize as well. Choose an annual subscription for $23.99 or buy a perpetual license for one PC for $47.99.
5. Camtasia
If you’re specifically looking to record your Discord screen to record tutorials, then Camtasia is a specialist tool with various templates that you can use to record professional-quality videos using your Discord app.
However, while Camtasia is fantastic for these videos, it lacks some of the effects options you might want if you’re recording game streams. And the cost is a huge factor, too – it’s around $300 for a one-off license, with an annual fee of $60 if you need ongoing support and an extra $25 for some of the additional capture tools required.
Part 2: Best Online Screen Recorder for Discord
If you’re using the online version of Discord in your web browser, you’ll be best suited to a screen recorded that specialist recorder.
2. Screen Capture
One such option is Screen Capture , which is extremely easy to use. As well as recording what’s happening on the screen, you have the option to record your microphone, audio, and webcam. As soon as your head to the Screen Capture website, you can start recording in one click, although the free version does have a watermark. It’s £4.95 per month to remove this.
There’s no software to download, and your videos will be saved in HD quality. You’ll need to click Start Recording and then, in the pop-up, permit it to record your screen. It works with all the major browsers – Chrome, Firefox, Edge, and Opera.
3. Clipchamp
If you need some more tools at your disposal, you might prefer Clipchamp . Unlike Screen Capture, you’ll need to create an account, and the free version only lets you output in standard definition. However, Clipchamp includes editing tools to record and tweak your footage before exporting it easily.
It works fully with Chrome and Edge and other Chromium-based browsers, with partial support for other browsers. If you want to output at 720p or higher, you’ll need to upgrade to a Creator account at $9 per month, while Full HD is available with a Business account for $19 per month.
3. Screencast-o-matic
The third option we would recommend as one of the best screen recorders for online Discord is Screencast-o-matic . This will record whatever is on the screen in any browser, working on all Windows, Mac, Chrome OS, Android, and iOS systems.
The free option lets you record up to 15 minutes of footage, while the Deluxe removes that limit and includes basic editing for $1.65 per month. However, the difference here is that you’ll need to download an application to record your browser – it’s not just an online tool. Once it’s downloaded, just run the software, and you can record Discord in your browser with a few clicks.
Part 3: Best Screen Recorder Apps for Discord on iPhone and Android
If you prefer to use the Discord mobile app, you’ll need a dedicated smartphone tool to record your screen. It’s important to do your research, as mobile apps are often full of ads or issues that can cause your device to slow down to a crawl. It’s not helped because review scores are so easily manipulated. You should use one of these recommendations for what we feel are the best screen recorders for Discord mobile.
1. AZ Screen Recorder
AZ Screen Recorder is a free tool you can download from the Google Play Store on an Android device. It lets you record in Full HD quality at 60fps, ideal for recording your Discord video calls to share or review later.
It also includes some editing tools, so you can trim your video, add text or music, and compress it to reduce the file size. However, a major drawback is that it cannot record audio from the source – instead, it’ll record through your phone’s microphone. This is great if you want to add commentary, but not so much if you’re dealing with background noise.
2. Screen Recorder for Game, Video Call, Screenshots
Another option for Android is ‘Screen Recorder for Game, Video Call, Screenshots’ . Despite the mouthful of a name, it’s a pretty simple app to use, and again it’s free. It has an advantage over AZ Screen Recorder in that it can record up to 1440p, perfect for then sharing over Discord with users on a gaming monitor.
The main issue with Screen Recorder is that it’s a little unreliable at times, with many people struggling to access the extra video editing tools. But if you were to combine Screen Recorder with editing software like Filmora, you could get a comprehensive solution for Discord mobile recording.
3. Record It
If you’re an iOS user, you’ll want to look at ‘Record It! ’. It’s another free option that works well on both iPhone and iPad, letting you record your apps, including Discord. You can record the entire screen in high quality and add your Face Cam as an overlay.
The included editor doesn’t have amazingly comprehensive tools, but you can trim your video, add a filter or adjust the playback speed. But, again, if you want to do more intensive editing, you’ll need to pair it with dedicated software such as Filmora.
Part 4: How to Record Discord Video Screen with Filmora?
If you want to record your screen with Filmora, create a video tutorial, or show off your gaming skills.
Start by heading to File and then Record Media, and choose the option to Record from PC.
You’ll then get a pop-up that lets you choose how much of your screen you want to capture. Enter a custom resolution, or drag the box that’s appeared on your screen to the size and location you want to record. You can also use this screen to configure whether your microphone and system audio is recorded.
If you click on the Settings cog, you’ll get a dropdown with more options – change the resolution, frame rate, and the location where you’re saving the file. You can also change the settings for showing mouse clicks, which you’ll want to do if you’re making a tutorial.
Once you hit the red record button, the screen will start recording after a countdown of five seconds – ample time to switch browser window to Discord. Then, when you’re done, head back to Filmora and click the Stop button at the top-right of the screen.
The video will save automatically to your chosen file path. You can then drag it into Filmora to trim off the start and end, if necessary, and use all of Filmora’s editing tools to enhance your video.
Liza Brown
Liza Brown is a writer and a lover of all things video.
Follow @Liza Brown
Liza Brown
Mar 27, 2024• Proven solutions
Discord is packed with great features, but one thing it’s missing is a screen recorder. You can chat, enjoy video calls and share your screen with friends or colleagues, but you can’t record these conversations or videos without using a third-party app.
Thankfully, there are plenty of choices for finding the best screen recorder for Discord. So here we’ll take you through the best options for Discord on the browser, on Windows and Mac, and on mobile so that no matter how you use Discord, you can record those epic gaming sessions or study groups for you to revisit later.
One thing to note before we begin – make sure everyone in your chat or server knows they’re being recorded. In some countries, it’s illegal to record someone without their permission, but even where legalities don’t matter, you don’t want to upset people by recording them without them being aware.
In this article
- Part 1: Best Screen Recorder Software for Discord Desktop App
- Part 2: Best Online Screen Recorder for Discord
- Part 3: Best Screen Recorder Apps for Discord on iPhone and Android
- Part 4: How to Record Discord Video Screen with Filmora?
Part 1: Best Windows/Mac Screen Recorder Software for Discord
If you prefer to use the Discord app on Windows or Mac, you’ll want a more robust screen recording tool . Here are four of the best screen recorders for Discord app users.
1. OBS
OBS (Open Broadcaster Software) is a free, open-source tool that many people use to stream live and record their screens. It works on Windows, Mac, and Linux and offers customization tools.
There are no pricing plans, everything is completely free, and it lets you add a range of sources so that you can record your webcam, Discord audio, and everything on the screen, including any overlays. The two main drawbacks to OBS are its complexity – it can be demanding on your computer, and it’s not the easiest to use. So expect to take some time getting a handle on how to set it up first.
2. Bandicam
Bandicam is another option that manages to be more intuitive. It’s easy to use, although it has many options to help you get the perfect recording. But if you’re not interested in spending ages tinkering, Bandicam is more likely to give you a higher quality recording using default settings, and it’s less demanding.
Bandicam isn’t free, but it doesn’t involve a monthly subscription, unlike many suggested tools. A one-off license for Bandicam for one PC is $39.95, or you can get a two-PC license for $59.95. If you want the editing software, Bandicut included, then that’s $60.95 with a single license. It’s also worth noting that Bandicam only works on Windows.
3. Wondershare Filmora
Though Filmora is a specialized video editing software, it also features screen recording , webcam recording, and audio recording tools. One of the biggest advantages of using Filmora to record Discord videos is that it features lots of elements and game video special effects, which will make your video cool. You can head to Part 4 of this article for detailed information about recording Discord video.
4. DemoCreator
If you plan to edit your screen recordings before uploading them, consider Wondershare DemoCreator . Working with both Windows and Mac, it’s a powerful screen recorder with some basic editing features, making it easy to turn your screen records into epic videos.
You can record in up to 120fps using two devices, such as your screen and webcam, and as well as the editing suite, there are effects tools you can utilize as well. Choose an annual subscription for $23.99 or buy a perpetual license for one PC for $47.99.
5. Camtasia
If you’re specifically looking to record your Discord screen to record tutorials, then Camtasia is a specialist tool with various templates that you can use to record professional-quality videos using your Discord app.
However, while Camtasia is fantastic for these videos, it lacks some of the effects options you might want if you’re recording game streams. And the cost is a huge factor, too – it’s around $300 for a one-off license, with an annual fee of $60 if you need ongoing support and an extra $25 for some of the additional capture tools required.
Part 2: Best Online Screen Recorder for Discord
If you’re using the online version of Discord in your web browser, you’ll be best suited to a screen recorded that specialist recorder.
2. Screen Capture
One such option is Screen Capture , which is extremely easy to use. As well as recording what’s happening on the screen, you have the option to record your microphone, audio, and webcam. As soon as your head to the Screen Capture website, you can start recording in one click, although the free version does have a watermark. It’s £4.95 per month to remove this.
There’s no software to download, and your videos will be saved in HD quality. You’ll need to click Start Recording and then, in the pop-up, permit it to record your screen. It works with all the major browsers – Chrome, Firefox, Edge, and Opera.
3. Clipchamp
If you need some more tools at your disposal, you might prefer Clipchamp . Unlike Screen Capture, you’ll need to create an account, and the free version only lets you output in standard definition. However, Clipchamp includes editing tools to record and tweak your footage before exporting it easily.
It works fully with Chrome and Edge and other Chromium-based browsers, with partial support for other browsers. If you want to output at 720p or higher, you’ll need to upgrade to a Creator account at $9 per month, while Full HD is available with a Business account for $19 per month.
3. Screencast-o-matic
The third option we would recommend as one of the best screen recorders for online Discord is Screencast-o-matic . This will record whatever is on the screen in any browser, working on all Windows, Mac, Chrome OS, Android, and iOS systems.
The free option lets you record up to 15 minutes of footage, while the Deluxe removes that limit and includes basic editing for $1.65 per month. However, the difference here is that you’ll need to download an application to record your browser – it’s not just an online tool. Once it’s downloaded, just run the software, and you can record Discord in your browser with a few clicks.
Part 3: Best Screen Recorder Apps for Discord on iPhone and Android
If you prefer to use the Discord mobile app, you’ll need a dedicated smartphone tool to record your screen. It’s important to do your research, as mobile apps are often full of ads or issues that can cause your device to slow down to a crawl. It’s not helped because review scores are so easily manipulated. You should use one of these recommendations for what we feel are the best screen recorders for Discord mobile.
1. AZ Screen Recorder
AZ Screen Recorder is a free tool you can download from the Google Play Store on an Android device. It lets you record in Full HD quality at 60fps, ideal for recording your Discord video calls to share or review later.
It also includes some editing tools, so you can trim your video, add text or music, and compress it to reduce the file size. However, a major drawback is that it cannot record audio from the source – instead, it’ll record through your phone’s microphone. This is great if you want to add commentary, but not so much if you’re dealing with background noise.
2. Screen Recorder for Game, Video Call, Screenshots
Another option for Android is ‘Screen Recorder for Game, Video Call, Screenshots’ . Despite the mouthful of a name, it’s a pretty simple app to use, and again it’s free. It has an advantage over AZ Screen Recorder in that it can record up to 1440p, perfect for then sharing over Discord with users on a gaming monitor.
The main issue with Screen Recorder is that it’s a little unreliable at times, with many people struggling to access the extra video editing tools. But if you were to combine Screen Recorder with editing software like Filmora, you could get a comprehensive solution for Discord mobile recording.
3. Record It
If you’re an iOS user, you’ll want to look at ‘Record It! ’. It’s another free option that works well on both iPhone and iPad, letting you record your apps, including Discord. You can record the entire screen in high quality and add your Face Cam as an overlay.
The included editor doesn’t have amazingly comprehensive tools, but you can trim your video, add a filter or adjust the playback speed. But, again, if you want to do more intensive editing, you’ll need to pair it with dedicated software such as Filmora.
Part 4: How to Record Discord Video Screen with Filmora?
If you want to record your screen with Filmora, create a video tutorial, or show off your gaming skills.
Start by heading to File and then Record Media, and choose the option to Record from PC.
You’ll then get a pop-up that lets you choose how much of your screen you want to capture. Enter a custom resolution, or drag the box that’s appeared on your screen to the size and location you want to record. You can also use this screen to configure whether your microphone and system audio is recorded.
If you click on the Settings cog, you’ll get a dropdown with more options – change the resolution, frame rate, and the location where you’re saving the file. You can also change the settings for showing mouse clicks, which you’ll want to do if you’re making a tutorial.
Once you hit the red record button, the screen will start recording after a countdown of five seconds – ample time to switch browser window to Discord. Then, when you’re done, head back to Filmora and click the Stop button at the top-right of the screen.
The video will save automatically to your chosen file path. You can then drag it into Filmora to trim off the start and end, if necessary, and use all of Filmora’s editing tools to enhance your video.
Liza Brown
Liza Brown is a writer and a lover of all things video.
Follow @Liza Brown
Also read:
- In 2024, Mastering Melodies on Discord Top-Tier Bots for Sonic Enthusiasts
- [Updated] 2024 Approved Boosting Discord's Potential with the Leading 10 Plugins
- 2024 Approved Ultimate Complimentary Discord Icon Creator Tools
- [New] In 2024, The Essential Guide Adding and Editing Discord Roles
- [New] Advanced Strategies for Mass Message Purge on Discord Networks for 2024
- [New] 2024 Approved Navigating Discord Live A User's Blueprint
- Mastering Discord Pics Download & Edit Tutorial
- [New] 2024 Approved The Expert's Path to Masterful Discord Screen Broadcasting
- [New] In 2024, How to Proficiently Use Screen Share in Discord Channels
- [Updated] 2024 Approved Be Heard in Discord Understanding TTS Functions
- [New] Tailoring Your Text The Discord Formatting Handbook for 2024
- [Updated] Premiere Discord Recording Tools - Online, Desktop, Mobile
- 2024 Approved Selective Top 5 Socially Engaging Media Animations
- [New] In 2024, Break Off From Discord Integration (PC/Mobile)
- [New] 2024 Approved Unveiling Premium, Peak-Performance Emoji Makers for Discord
- [Updated] In 2024, Top 10 Discord Dating Communities Unveiled
- [New] 2024 Approved Quick-Win Strategies for Replying on Discord Platforms
- [Updated] How to Remove a Desktop Discord Server for 2024
- In 2024, The Stepwise Pathway to Becoming a Streaming Maestro on Discord
- [Updated] From Silence to Significance Replying in Discord Chats
- [Updated] Premium Collaborative Workspaces Online
- [New] In 2024, Mastery in Locating the Right Discord Server Amidst Thousands
- [Updated] In 2024, Elevate Your Game Top Bot Picks for Servers
- [New] 2024 Approved Discord Streaming Essentials A Comprehensive Beginner's Tutorial
- [New] The Essential Guide Adding and Editing Discord Roles for 2024
- [New] How to Remove a Desktop Discord Server for 2024
- Download Discord Videos for No Charge - Mobile & PC Tips for 2024
- 2024 Approved Elite Font Designers Specializing in Discord Platforms
- Understanding Discord's Report System Procedures and Tips
- [New] Turn Text Into Voice Mastering Discord's Speech Features
- [Updated] 2024 Approved Deciding Between Discord and Skype for Teams
- 2024 Approved Ensuring Online Safety The Stepwise Process of Reporting Unwanted Behavior on Discord
- Quick Guide Applying Discord Spoiler Tags Right
- [Updated] In 2024, The Ultimate Tutorial for Removing Multiple Messages on Discord
- [Updated] In 2024, Pinnacle Graphic Designer Tools for FREE Discord Logos
- [Updated] 2024 Approved Optimizing Discord Stream Quality with These Key Steps
- In 2024, Cutting-Edge AI Companions Discord
- [Updated] Pioneering Platform Pictures with Motion for 2024
- Navigating the Intricacies of Discord Roles Integration for 2024
- 2024 Approved How to Inject Personality Into Your Discord Profile with Custom Emojis
- [Updated] Seamless Emoji Incorporation Into Discord's Status Feature for 2024
- [New] Securing Success Navigating Channels and Encodings in Discord
- [New] DIY Approach for Animated Emoji Addition on Nitro-Free Discord
- [New] Best 5 Animation-Driven Socially Conscious Brands
- [Updated] 2024 Approved Mastering the Art of Adding Unique Emojis to Your Discord Avatar (PC/Mobile)
- [New] In 2024, Demystifying Discord Nitro Comprehensive Understanding and How to Attain It
- [New] Leading Chatrooms That Outperform Discord for 2024
- 2024 Approved Mastering the Art of Profiling A Complete Guide to Pfps in Discord
- In 2024, Life360 Circle Everything You Need to Know On Vivo Y200 | Dr.fone
- In 2024, How to Fake Snapchat Location without Jailbreak On Samsung Galaxy XCover 6 Pro Tactical Edition | Dr.fone
- [New] 2024 Approved Serenity in Gaming 10 Stress Busters
- In 2024, Apple ID Unlock On iPhone 14 Pro? How to Fix it?
- [New] 2024 Approved Understanding the Impact of IGTV Videos Through Analysis
- How to sign Word 2016 free
- [New] 2024 Approved Optimize Your Online Presence with Linked FB Stories
- In 2024, 4 solution to get rid of pokemon fail to detect location On Motorola Moto G04 | Dr.fone
- The Filmmakers Guide to Vocal Impact Deepening Your Sound in Filmora for 2024
- 2024 Approved Advanced Techniques with OBS Studio for Android
- How to Lock Apps on Itel A60 to Protect Your Individual Information
- [Updated] The Best Choice High-Definition Screen Capturing Apps for 2024
- Dose Life360 Notify Me When Someone Checks My Location On Motorola Edge 40? | Dr.fone
- In 2024, Top 10 Audio Capture Utilities for Desktop Computers
- [New] In 2024, Cyber Self-Portraiture Creating a Caricatured Emblem
- Title: How to Reply Message on Discord Desktop and Mobile App for 2024
- Author: Timothy
- Created at : 2024-05-23 22:47:46
- Updated at : 2024-05-24 22:47:46
- Link: https://discord-videos.techidaily.com/how-to-reply-message-on-discord-desktop-and-mobile-app-for-2024/
- License: This work is licensed under CC BY-NC-SA 4.0.
