
:max_bytes(150000):strip_icc()/Roku-vs-f4d192df6a0c4ee3a707521eaa5b8c02.jpg)
"In 2024, Blending Bands & Friends Connecting Spotify to Discord"
Blending Bands & Friends: Connecting Spotify to Discord
How to Connect Spotify to Discord

Richard Bennett
Mar 27, 2024• Proven solutions
Discord is a popular chat app explicitly designed for socializing. You can use it to remain connected, share screen space, and even listen to music along with friends and other users.
While Discord allows you to add a music bot to any server with relative ease, you can also add your Spotify account to it and show friends what you’re listening to via your Discord status.
With this exciting feature, all your friends can discover the music you play, listen along to it, and even see what you’re up to.
So, if you’re wondering how to connect Spotify to Discord, here’s your answer.
- Part 1: Connect Spotify To Discord on Windows PC/Mac Directly
- Part 2: Connect Spotify To Discord With Bot
- Part 3: Connect Spotify To Discord Mobile App
Part 1: How to Link Spotify To Discord on Windows PC/Mac Directly


Linking Spotify to Discord on windows PC/Mac is relatively easy. Just follow the steps below:
- Turn your computer on and launch your discord app, or you can sign into the web-browser version instead
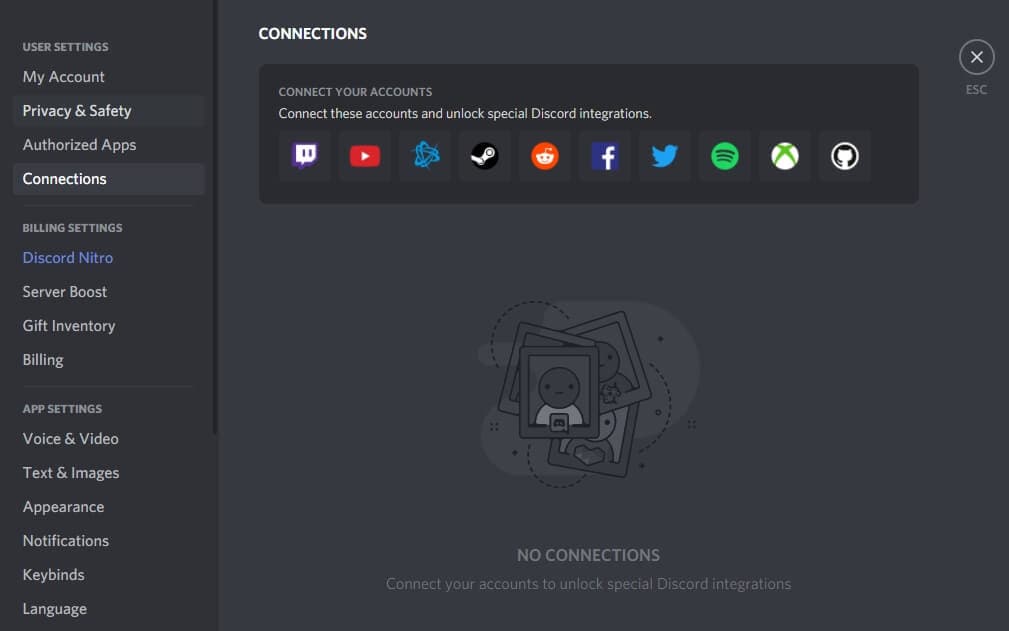
- Click on the User Settings option in your discord app — one with a small gear icon placed at the lower right corner of the screen, alongside your username
- Within the User Settings, you’ll see a Connections section atop the left-sidebar; click it. All accounts that are connected to the discord account are visible here
- Now, click the Spotify icon below the Connect Your Accounts option. A new window will appear in the browser; you can sign in to the Spotify account using your username and password or your Facebook account. Once you log in, connect Spotify to Discord
As you allow your Spotify account to connect to Discord, the connections tab will show Spotify and Discord are connected.
It will also display a badge on your Discord profile, which shows your Spotify username (if you like, you can also turn this off via the connections menu).

By default, whenever you’ll play some music on Spotify using the same PC/Mac you are signed in to your Discord account, the status will suddenly change into “listening to Spotify.”
Users can see what tracks you are playing by simply clicking your name. Not just that, but they can also play the same tracks on their Mac or PC and even “listen along.”
This facility will let your friends tune into and listen to the same thing you’re listening to! If you want to, you can turn off this setting via the Connections menu.
Lastly, you can also click this plus (+) sign near to chat box and choose the option ‘Invite to listen to Spotify.’ This will send users links, allowing them to join you via the “listen along” feature.
Part 2: How to Connect Spotify To Discord With Bot
The bot is a mini-program, which requires to be installed on your main program. So, in this scenario, let’s take the “Groovy” bot and install it on your Discord server to connect Spotify to Discord.
Once installed, it will add additional Spotify functions to the Discord server, allowing members to activate particular functions through typing text commands.

Note: There are several Spotify bots out there for Discord; however, Groovy is one of the best discord music bots available.
Here’s how you can connect Spotify to Discord with a bot:
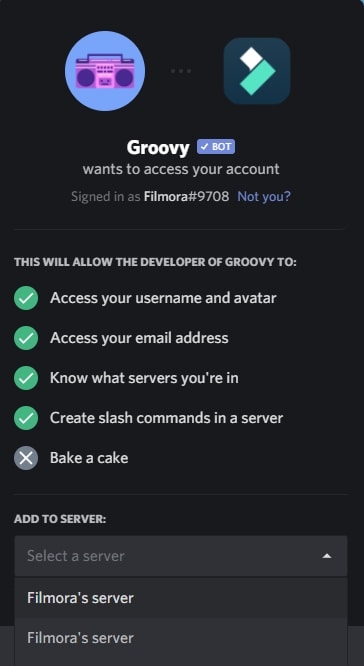
- Visit the Groovy site and click Add to Discord (make sure you’re signed in to your discord account before clicking Add To Discord).
- Click the server you intend to install your Spotify bot on from the ADD TO SERVER menu below and then click Continue.
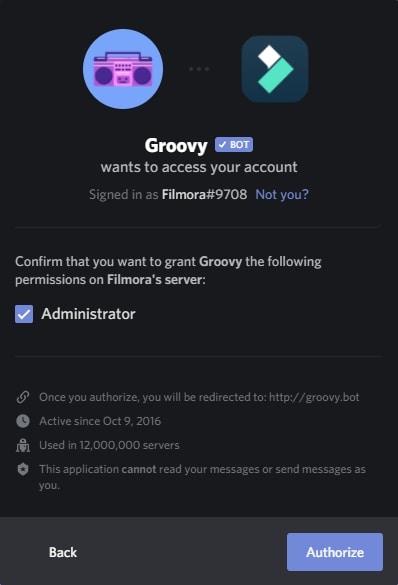
- Click Authorize to grant the Groovy the Administrator permission on the selected server and pass through the “I am human” box
- The Groovy bot will be instantly installed on the chosen Discord server. Now you can use the bot to play tracks or any other type of music you want by simply typing Play and the song name
- If you want to import your complete Spotify tracks into the Discord server, you can do it effortlessly: open your playlist in your Spotify app and click >Share>Copy Playlist Link and then paste copied URL into the chat after -play command.
Part 3: How to Connect Spotify To Discord Mobile App
Here’s how you can connect Spotify to Discord on your mobile app:
- Grab your Android or iPhone and launch your discord app
- Swipe on the right to open the channel or server browser
- Tap on the profile picture at the lower right corner of your mobile screen
- Tap the Connections menu from user settings
- All your current connections will show here, and in case you have not connected your discord account to other services before, tap the Add button right away, located at the top right-hand corner of your mobile screen. A menu will show up from which you have to choose an account you intend to connect.
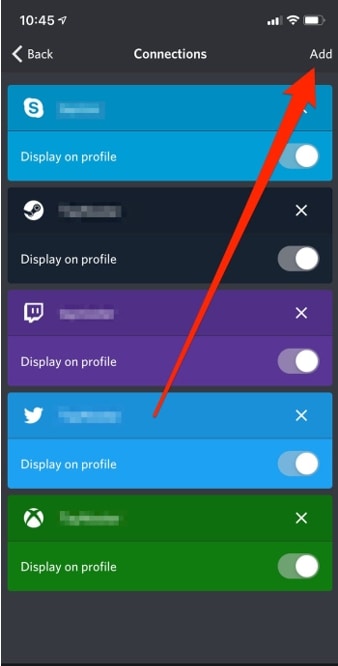
- From the several services that appear, choose Spotify. A new window will appear, asking you to log in to the account and allow authorization to connect.
- Similar to your windows PC/Mac, your Spotify username will appear on the profile page. Like on desktop, you can also remove the username from your profile via the Connections menu
- Though you won’t be able to invite other users to “listen along” on the mobile app, however, users on Windows PC/Mac can click your status and also “listen along”
Bonus: How to Listen Along With Friends on Discord?
Listen, chat, party and game all at the same time with Discord. You can also listen along with users and turn the chatroom into a lively party.
Follow these easy steps to know how to “listen along” with friends on Discord:
- On your windows Mac/ PC, open your Discord app;
- Click on the right-side of someone in your list of friends who are listening to Spotify
- Click the “listen along” icon, and then you can listen along with friends on Discord.
Note: if you’re listening along with friends who have Spotify Free, you will hear no music during advertisements.
FAQs About Connecting Spotify to Discord
1. Why Can’t I See Playing Spotify Music on Discord Mobile?
When you’ve Spotify on your mobile app, you won’t see what songs you’re playing and listening to, despite the fact it’s connected.
The feature is only for premium/free accounts and works for windows Mac/PC; however, it won’t work on mobile as it has a different API.
2. Can I Disconnect Spotify From Discord?
Yes, you can disconnect Spotify from Discord. Here’s how:
- Click the Connections option at the left side of your desktop app;
- Click Spotify and then click X at the top-left of the green box;
- Click disconnect and the connection between Spotify and Discord is disconnected.
Richard Bennett
Richard Bennett is a writer and a lover of all things video.
Follow @Richard Bennett
Richard Bennett
Mar 27, 2024• Proven solutions
Discord is a popular chat app explicitly designed for socializing. You can use it to remain connected, share screen space, and even listen to music along with friends and other users.
While Discord allows you to add a music bot to any server with relative ease, you can also add your Spotify account to it and show friends what you’re listening to via your Discord status.
With this exciting feature, all your friends can discover the music you play, listen along to it, and even see what you’re up to.
So, if you’re wondering how to connect Spotify to Discord, here’s your answer.
- Part 1: Connect Spotify To Discord on Windows PC/Mac Directly
- Part 2: Connect Spotify To Discord With Bot
- Part 3: Connect Spotify To Discord Mobile App
Part 1: How to Link Spotify To Discord on Windows PC/Mac Directly
Linking Spotify to Discord on windows PC/Mac is relatively easy. Just follow the steps below:
- Turn your computer on and launch your discord app, or you can sign into the web-browser version instead
- Click on the User Settings option in your discord app — one with a small gear icon placed at the lower right corner of the screen, alongside your username
- Within the User Settings, you’ll see a Connections section atop the left-sidebar; click it. All accounts that are connected to the discord account are visible here
- Now, click the Spotify icon below the Connect Your Accounts option. A new window will appear in the browser; you can sign in to the Spotify account using your username and password or your Facebook account. Once you log in, connect Spotify to Discord
As you allow your Spotify account to connect to Discord, the connections tab will show Spotify and Discord are connected.
It will also display a badge on your Discord profile, which shows your Spotify username (if you like, you can also turn this off via the connections menu).
By default, whenever you’ll play some music on Spotify using the same PC/Mac you are signed in to your Discord account, the status will suddenly change into “listening to Spotify.”
Users can see what tracks you are playing by simply clicking your name. Not just that, but they can also play the same tracks on their Mac or PC and even “listen along.”
This facility will let your friends tune into and listen to the same thing you’re listening to! If you want to, you can turn off this setting via the Connections menu.
Lastly, you can also click this plus (+) sign near to chat box and choose the option ‘Invite to listen to Spotify.’ This will send users links, allowing them to join you via the “listen along” feature.
Part 2: How to Connect Spotify To Discord With Bot
The bot is a mini-program, which requires to be installed on your main program. So, in this scenario, let’s take the “Groovy” bot and install it on your Discord server to connect Spotify to Discord.
Once installed, it will add additional Spotify functions to the Discord server, allowing members to activate particular functions through typing text commands.
Note: There are several Spotify bots out there for Discord; however, Groovy is one of the best discord music bots available.
Here’s how you can connect Spotify to Discord with a bot:
- Visit the Groovy site and click Add to Discord (make sure you’re signed in to your discord account before clicking Add To Discord).
- Click the server you intend to install your Spotify bot on from the ADD TO SERVER menu below and then click Continue.
- Click Authorize to grant the Groovy the Administrator permission on the selected server and pass through the “I am human” box
- The Groovy bot will be instantly installed on the chosen Discord server. Now you can use the bot to play tracks or any other type of music you want by simply typing Play and the song name
- If you want to import your complete Spotify tracks into the Discord server, you can do it effortlessly: open your playlist in your Spotify app and click >Share>Copy Playlist Link and then paste copied URL into the chat after -play command.
Part 3: How to Connect Spotify To Discord Mobile App
Here’s how you can connect Spotify to Discord on your mobile app:
- Grab your Android or iPhone and launch your discord app
- Swipe on the right to open the channel or server browser
- Tap on the profile picture at the lower right corner of your mobile screen
- Tap the Connections menu from user settings
- All your current connections will show here, and in case you have not connected your discord account to other services before, tap the Add button right away, located at the top right-hand corner of your mobile screen. A menu will show up from which you have to choose an account you intend to connect.
- From the several services that appear, choose Spotify. A new window will appear, asking you to log in to the account and allow authorization to connect.
- Similar to your windows PC/Mac, your Spotify username will appear on the profile page. Like on desktop, you can also remove the username from your profile via the Connections menu
- Though you won’t be able to invite other users to “listen along” on the mobile app, however, users on Windows PC/Mac can click your status and also “listen along”
Bonus: How to Listen Along With Friends on Discord?
Listen, chat, party and game all at the same time with Discord. You can also listen along with users and turn the chatroom into a lively party.
Follow these easy steps to know how to “listen along” with friends on Discord:
- On your windows Mac/ PC, open your Discord app;
- Click on the right-side of someone in your list of friends who are listening to Spotify
- Click the “listen along” icon, and then you can listen along with friends on Discord.
Note: if you’re listening along with friends who have Spotify Free, you will hear no music during advertisements.
FAQs About Connecting Spotify to Discord
1. Why Can’t I See Playing Spotify Music on Discord Mobile?
When you’ve Spotify on your mobile app, you won’t see what songs you’re playing and listening to, despite the fact it’s connected.
The feature is only for premium/free accounts and works for windows Mac/PC; however, it won’t work on mobile as it has a different API.
2. Can I Disconnect Spotify From Discord?
Yes, you can disconnect Spotify from Discord. Here’s how:
- Click the Connections option at the left side of your desktop app;
- Click Spotify and then click X at the top-left of the green box;
- Click disconnect and the connection between Spotify and Discord is disconnected.
Richard Bennett
Richard Bennett is a writer and a lover of all things video.
Follow @Richard Bennett
Boosting Profile Visibility on Discord Using Personalized Emojis
If you have an active Nitro subscription and want to make your Discord status look better, you can put emojis in Discord status. This article will help you walk through the process of using Discord custom status to upload emojis. Custom status is a new feature introduced by Discord. By uploading the emojis, you can keep your Discord status fresh! So, keep reading to find how to put emojis in Discord status through your desktop and mobile app conveniently.
In this article
01 How to Put Custom Emoji in Discord Status on Desktop and Online?
02 How to Add Custom Emoji on Discord Status on Mobile?
03 How to Copy and Paste Emojis in Discord Status?
04 How to Add Animated Emojis to Discord Status?
05 Custom Discord Status Emoji Ideas
Part 1: How to Put Custom Emoji in Discord Status on Desktop and Online?

For those who want to add an emoji on their Discord status on desktop and online, you can do that easily by following the steps that we have listed below:
Step 1: First, you need to go to https://discord.com . Once you visit the site, please log in using your Discord credential.
Step 2: Once your profile is open, please click on the profile picture.
Step 3: On your profile, look at the bottom of the menu. You will see a pop-up menu that says set a custom status.
Step 4: On the emojis bar, you can add an emoji. To do that, you need to click on the emoji status. Next, you will see a list of emojis. Please note that only an active Nitro subscription user can use animated or custom emojis. On the left will be the category of emojis. Choose one category that suits your mood; once the category opens, click on an emoji to add it.
Step 5: After that, you need to click on the Today option. This will open a drop-down menu. You need to choose a time frame for the emoji or status. You can choose today, 4 hours, 1 hour, etc.
Step 6: If you are done with the emoji selection and have chosen the duration for the status, you need to click on the Save option. The Save option will be on the bottom right of the same pop-up window.
And that’s it. The emojis will be successfully added to your status based on the duration that you have chosen. If you want to change the emoji or remove it, you need to undergo the same process.
Related: How to Get Free Animated Emojis on Discord
Part 2: How to Add Custom Emoji on Discord Status on Mobile?

If you are using the Discord app on your mobile phone, you can add a custom emoji on Discord status using your phone too. Follow the step-by-step guide that we have prepared to learn how to do that.
Step 1: Take your smartphone and look for the Discord app. The icon will look like a controller. Click on it to launch Discord.
Step 2: Just like the web steps, you will have to click on your profile. Click on the hamburger icon, which is there in the upper left corner. Then, look at the bottom right corner to find your profile.
Step 3: Now, click on the Set Status option. This will be the first option on your profile. Go on and click on that.
Step 4: After that, click on the option that says set a custom status. On the status bar, you will see an emoji. You need to click on that to open the list of emojis to choose from.
Step 5: Choose a time frame for the emoji, for example, 30 minutes, 1-hour, clear tomorrow, etc. If you are using an Android, you will see the floppy disk option; click on that to save your status. If you are using an iOS device, you will see the save option.
By following these steps, your status with the emoji you have chosen will be saved successfully. If you want to add a new emoji, repeat the same process.
Related: How to Change Discord Status
Part 3: How to Copy and Paste Emojis in Discord Status?
If you don’t want to go through the hassle of adding an emoji manually, you can just copy and paste one to your status. How to do it? Follow these steps:
Step 1: Go to a website that has emojis for Discord status.
Step 2: Scroll down the list of emojis and copy it.
Step 3: Go back to your Discord Nitro page and open the status setting. There, on the emoji section, paste the emoji that you have copied from another site.
Please note that this may not be possible for all types of emojis, though. Also, this will work if only the website has created emojis that can be directly copied and pasted on the status section.
Part 4: How to Add Animated Emojis to Discord Status?
Apart from the basic emojis, you can also add animated emojis to your Discord Status to make your status look even better. Here are the steps to follow to add an animated emoji:
Step 1: First, go to a website called https://betterdiscord.app/ . Once you are there, click on the Download option.
Step 2: You will see a page loaded with codes, right-click on the screen and click on the Save option. When it is downloaded, click on the Better Discord Windows installer. Next, read the license agreement and click on the Next option.
Step 3: Then click install better Discord and hit the next button. Choose the Discord version that you currently have installed.
Step 4: Open Discord and click on the user settings. There, you will see the Better Discord section. Next, click on the Plugin option. Now, close the Discord window and drag the animated status dot plugin into the plugin folder that opened after clicking on the Plugin option.
Step 5: Go to Discord again, and you will see the Animated Status option. Enable it and click on the gear icon. To add an animated emoji, click on the + icon. Next, you will see a Nitro ID field. Then, go to a chat page and click on the emoji option.
Step 6: Look at the emoji that you like and memorize the animated emoji name. Press \ followed by the name of the emoji. Now, copy the whole text and paste it again. You will see a few numbers; that’s the Nitro ID for the emoji. Copy the number only, go back to the Animated plugin and paste it on the Nitro ID field. Go back to the Nitro page again, and you will see the animated emoji on your status.
Part 5: Custom Discord Status Emoji Ideas

If you want to make your Discord Status look really cool, you can get some custom Discord status emoji ideas from us. Read this section to find out a few super cool custom Discord status emojis ideas and get inspired.
Use Kaomoji in Status
Kaomoji is a collection of super cute emojis that can brighten anyone’s day! They are great because they make your status look different and cute at the same time. You can choose from stars, smiley faces, cute polar bears, and much more! And yes, they are different than your usual emojis.
Add Old-school Emoticons
Remember the good old Nokia 1100 days when you used to send emojis using some signs? Well, you can try this idea too to give a vintage look to your status. Everybody uses the same smiley emojis, so why not try something different? Go back to your old 90s school days and display images, such as @}->– which is a rose! You can find old-school emoticons online easily.
Conclusion
And that’s it; now you know how to put emoji in Discord status without sweating much. We hope you have found this article helpful, and you will start using cool emojis on your status to make your Discord status look different than others!
02 How to Add Custom Emoji on Discord Status on Mobile?
03 How to Copy and Paste Emojis in Discord Status?
04 How to Add Animated Emojis to Discord Status?
05 Custom Discord Status Emoji Ideas
Part 1: How to Put Custom Emoji in Discord Status on Desktop and Online?
For those who want to add an emoji on their Discord status on desktop and online, you can do that easily by following the steps that we have listed below:
Step 1: First, you need to go to https://discord.com . Once you visit the site, please log in using your Discord credential.
Step 2: Once your profile is open, please click on the profile picture.
Step 3: On your profile, look at the bottom of the menu. You will see a pop-up menu that says set a custom status.
Step 4: On the emojis bar, you can add an emoji. To do that, you need to click on the emoji status. Next, you will see a list of emojis. Please note that only an active Nitro subscription user can use animated or custom emojis. On the left will be the category of emojis. Choose one category that suits your mood; once the category opens, click on an emoji to add it.
Step 5: After that, you need to click on the Today option. This will open a drop-down menu. You need to choose a time frame for the emoji or status. You can choose today, 4 hours, 1 hour, etc.
Step 6: If you are done with the emoji selection and have chosen the duration for the status, you need to click on the Save option. The Save option will be on the bottom right of the same pop-up window.
And that’s it. The emojis will be successfully added to your status based on the duration that you have chosen. If you want to change the emoji or remove it, you need to undergo the same process.
Related: How to Get Free Animated Emojis on Discord
Part 2: How to Add Custom Emoji on Discord Status on Mobile?
If you are using the Discord app on your mobile phone, you can add a custom emoji on Discord status using your phone too. Follow the step-by-step guide that we have prepared to learn how to do that.
Step 1: Take your smartphone and look for the Discord app. The icon will look like a controller. Click on it to launch Discord.
Step 2: Just like the web steps, you will have to click on your profile. Click on the hamburger icon, which is there in the upper left corner. Then, look at the bottom right corner to find your profile.
Step 3: Now, click on the Set Status option. This will be the first option on your profile. Go on and click on that.
Step 4: After that, click on the option that says set a custom status. On the status bar, you will see an emoji. You need to click on that to open the list of emojis to choose from.
Step 5: Choose a time frame for the emoji, for example, 30 minutes, 1-hour, clear tomorrow, etc. If you are using an Android, you will see the floppy disk option; click on that to save your status. If you are using an iOS device, you will see the save option.
By following these steps, your status with the emoji you have chosen will be saved successfully. If you want to add a new emoji, repeat the same process.
Related: How to Change Discord Status
Part 3: How to Copy and Paste Emojis in Discord Status?
If you don’t want to go through the hassle of adding an emoji manually, you can just copy and paste one to your status. How to do it? Follow these steps:
Step 1: Go to a website that has emojis for Discord status.
Step 2: Scroll down the list of emojis and copy it.
Step 3: Go back to your Discord Nitro page and open the status setting. There, on the emoji section, paste the emoji that you have copied from another site.
Please note that this may not be possible for all types of emojis, though. Also, this will work if only the website has created emojis that can be directly copied and pasted on the status section.
Part 4: How to Add Animated Emojis to Discord Status?
Apart from the basic emojis, you can also add animated emojis to your Discord Status to make your status look even better. Here are the steps to follow to add an animated emoji:
Step 1: First, go to a website called https://betterdiscord.app/ . Once you are there, click on the Download option.
Step 2: You will see a page loaded with codes, right-click on the screen and click on the Save option. When it is downloaded, click on the Better Discord Windows installer. Next, read the license agreement and click on the Next option.
Step 3: Then click install better Discord and hit the next button. Choose the Discord version that you currently have installed.
Step 4: Open Discord and click on the user settings. There, you will see the Better Discord section. Next, click on the Plugin option. Now, close the Discord window and drag the animated status dot plugin into the plugin folder that opened after clicking on the Plugin option.
Step 5: Go to Discord again, and you will see the Animated Status option. Enable it and click on the gear icon. To add an animated emoji, click on the + icon. Next, you will see a Nitro ID field. Then, go to a chat page and click on the emoji option.
Step 6: Look at the emoji that you like and memorize the animated emoji name. Press \ followed by the name of the emoji. Now, copy the whole text and paste it again. You will see a few numbers; that’s the Nitro ID for the emoji. Copy the number only, go back to the Animated plugin and paste it on the Nitro ID field. Go back to the Nitro page again, and you will see the animated emoji on your status.
Part 5: Custom Discord Status Emoji Ideas
If you want to make your Discord Status look really cool, you can get some custom Discord status emoji ideas from us. Read this section to find out a few super cool custom Discord status emojis ideas and get inspired.
Use Kaomoji in Status
Kaomoji is a collection of super cute emojis that can brighten anyone’s day! They are great because they make your status look different and cute at the same time. You can choose from stars, smiley faces, cute polar bears, and much more! And yes, they are different than your usual emojis.
Add Old-school Emoticons
Remember the good old Nokia 1100 days when you used to send emojis using some signs? Well, you can try this idea too to give a vintage look to your status. Everybody uses the same smiley emojis, so why not try something different? Go back to your old 90s school days and display images, such as @}->– which is a rose! You can find old-school emoticons online easily.
Conclusion
And that’s it; now you know how to put emoji in Discord status without sweating much. We hope you have found this article helpful, and you will start using cool emojis on your status to make your Discord status look different than others!
Also read:
- 2024 Approved Deciphering the Code of Conduct Your Practical Guide to Filing Reports in Online Spaces Like Discord
- [Updated] Immerse in Imagination The BestDiscord’s 10 Creations
- [New] Step-by-Step Guide Adjusting Discord Presence for 2024
- 2024 Approved Deciding Between Discord and Skype for Teams
- [Updated] In 2024, Disconnect and Delete Discord Accounts (Devices)
- Tips for Perfecting the Art of Making Memorable Discord Avatars
- [Updated] 2024 Approved Leading Choices Discord's Elite Emoji Generators
- [Updated] 2024 Approved Dive Into Free Emoji Worlds with These Innovative Online Locations
- [New] 2024 Approved Unrivaled Discord Screenshots PC/Mac/Mobile Edition
- [New] Critical List of 5 Striking Social Media Brand Animations
- How to Pin A Message on Discord, In 2024
- [New] In 2024, The Blueprint to Trustworthiness Earning Your Spot as a Discord Partner
- [Updated] Top 10 Budget-Friendly DiscoVoice Alternatives for Discord Users for 2024
- In 2024, The Ultimate Resource for Adding Dynamic GIFs to Discord Conversations
- [Updated] Maximizing Discord Connectivity Through Media Transfer
- [Updated] 2024 Approved Elevate Communication A Comprehensive Guide to Using GIFs on Discord
- [New] Key Steps to Successfully Infiltrating Your Dream Discord Server for 2024
- [Updated] Advanced Strategies for Mass Message Purge on Discord Networks for 2024
- In 2024, Unlocking the Secrets of Text Styling in Discord
- [New] Explore Nitro A Deep Dive Into Discord's Elite Service
- Free Apps to Record and Preserve Your Discord Chats Professionally
- [Updated] In 2024, Pinnacle Alternatives to Discord Voice Groups
- The Ultimate Guide to Premium Discord Bots for Optimal Music Listening
- [Updated] 2024 Approved Foremost 5 Animated Logos for Interactive Channels
- Navigate Discord's Streaming Landscape A Comprehensive Tutorial
- [New] 2024 Approved Superior Voice Communication Services
- [New] In 2024, A Step-by-Step Guide to Erasing Chats on Discord En Masse
- [Updated] Sending Streamed Content to Discord with Finesse and Precision for 2024
- Quick-React Guide Efficiently Answering Discord Messages
- [Updated] Navigating New Territories Link Up on PC/Mobile
- [Updated] In 2024, Inside DiscoNitro Navigating the Premium Experience with Ease
- [New] Exclusive Open Source Logo Generators for Discord Servers for 2024
- 2024 Approved Conversational Courtesies React and Engage on Discord Platforms
- Vibey Vistas Your Guide to the 10 Most Trending DiscoThemes for 2024
- [New] The Ultimate Exploration of Discord Stickers
- [Updated] Effortlessly Express Yourself with Discord TTS for 2024
- [New] Navigating Joining a New Discord Community for 2024
- The Ultimate List of Discord Bots to Amplify Your Server for 2024
- In 2024, Discord Video Calls for Mobile & Desktop Users Unpacked
- [New] A Quick Primer On What Is Discord for 2024
- [New] Top 10 Love-Focused Discord Communities
- In 2024, Effortless Screen Capture in Dota 2 Matches
- New Discover the Top 4K Video Editing Platforms for Professionals
- [New] High-Quality Capture on Mac A Review of Top 10 Software for 2024
- [New] In 2024, From Basics to Brilliance The FB Cover Video Journey
- How to Change Google Play Location On Nokia C12 | Dr.fone
- Updated Troubleshooting FCPX A Step-by-Step Reset Guide for 2024
- Expertise in Clip Blending A Blend Mode Guide
- 11 Ways to Fix it When My Poco C50 Wont Charge | Dr.fone
- Disabling Apple iPhone 15 Plus Parental Restrictions With/Without Password
- [Updated] In 2024, Achieving Verified on Instagram Accelerating Follower Count Through Effective Techniques
- In 2024, How to Transfer Data from Apple iPhone 12 to ZTE Phones | Dr.fone
- [Updated] Prime 7 Film Downloader Tools for 2024
- New In 2024, How Long Does It Take To Edit Videos
- In 2024, How to Hide/Fake Snapchat Location on Your Vivo T2 5G | Dr.fone
- 10 Best Fake GPS Location Spoofers for Tecno Pova 5 | Dr.fone
- Disabled iPhone 13 Pro Max How to Unlock a Disabled iPhone 13 Pro Max? | Dr.fone
- 4 Feasible Ways to Fake Location on Facebook For your Infinix GT 10 Pro | Dr.fone
- The 10 Best Tools to Bypass iCloud Activation Lock From iPhone 6s You Should Try Out
- Title: "In 2024, Blending Bands & Friends Connecting Spotify to Discord"
- Author: Timothy
- Created at : 2024-05-23 22:47:35
- Updated at : 2024-05-24 22:47:35
- Link: https://discord-videos.techidaily.com/in-2024-blending-bands-and-friends-connecting-spotify-to-discord/
- License: This work is licensed under CC BY-NC-SA 4.0.
