:max_bytes(150000):strip_icc()/twitter---illustration-1128061423-eaab82f790914b0ab4ba56e0f1f88026.jpg)
In 2024, How To Prominently Display Messages on Discord
How To Prominently Display Messages on Discord
How to Pin A Message on Discord?

Richard Bennett
Mar 27, 2024• Proven solutions
Like TeamSpeak or Skype, Discord is a chat app aimed at easy mass communication. Although it was made for gamers, it is readily used for communicating in offices, during projects, or for professional collaboration.
Even though it’s straightforward to use, there are several Discord features that you may be unfamiliar with.
One such feature is called pinning messages. It is available to moderators, administrators, server owners, and other users who have permission to “Manage Messages” in various server channels.
This feature helps you find and share vital messages quickly, especially when new users join a specific channel.
It acts like a sticky note for Discord, making sure valuable information such as server rules do not get overshadowed by new messages even months after the pinned messages are first posted.
Today, we will go over how to pin a message on Discord for your desktop app on PC and Mac, as well as on your iPhone and Android mobile devices.
Part 1: How to Pin A Message on Discord Desktop?
If you want to learn how to pin messages on Discord desktop, follow these steps:
- Hover over any message which you wish to pin.
- On the right-hand side of it, there will be a button that would read as More; click it and you will see a screen like below

- Now, click on the “Pin Message” option
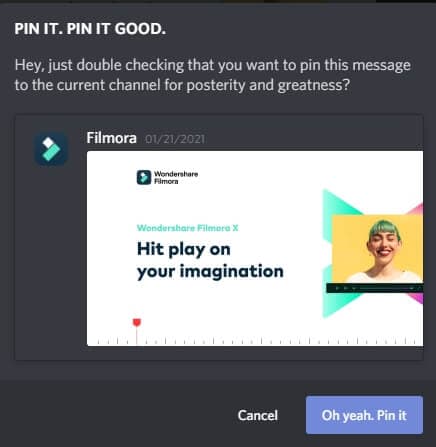
- After which, you will be presented with a prompt asking you to confirm that you want to pin this particular message. Click on “Oh yeah, pin it.”
That’s it! You have now learned how to pin messages on Discord for the desktop application.
But make sure you don’t pin everything that might seem important at a glance — only pin messages that may have utility in the future.
Also, don’t pin messages that are just important for you. In larger channels, prioritize pinning messages that will benefit most participants.

Part 2: How to Pin Messages on Discord Mobile App?
Pinning messages in the mobile app is very similar to how it is done on the desktop application. Do it by:
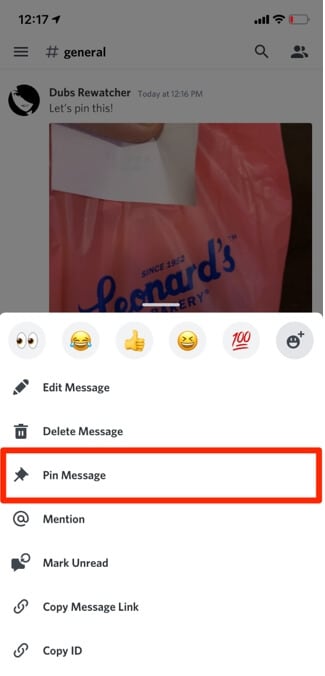
- Just hold down your finger on the message you wish to pin
- A couple of seconds later, you will be presented with a list of options
- From here, click on “Pin Message”
- A pop-up will appear confirming if you want to pin the message. If you are sure you want to pin a particular message, tap the “Yes” button and then your message is pinned
Part 3: How to View Pinned Messages on Discord
Accessing pinned messages is just as easy as pinning them. To access a pinned message on the app’s desktop version:
- Click on the pin icon appearing on the top right-hand side of your screen

- Doing this will present you with a drop-down list of pinned messages. Now, you can tap on the “Jump” button next to the “x” (cross) icon to go directly to the pinned message
- This will allow you to understand the context behind the pinned message. You can also access and share links in the pinned messages from here
Part 4: How to View Pinned Messages on Discord Mobile
View your pins on the mobile version of Discord by:
- Swiping from right to left, which will open up a side menu
- Then click on “Pins,” which is the second option from the left, as shown in the picture below
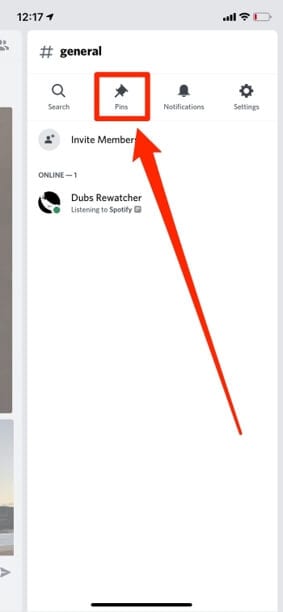
- Now you will be in the pinned messages window
- You can jump to a specific pinned message by clicking on it, allowing you to access any content or links in the message
Part 5: Limit on Pinned Messages
You can only pin 50 messages in the pin box in Discord, meaning if you want to pin new messages, you will have to delete older ones to make space.
This may feel like a disadvantage. However, it makes perfect sense. Pinning messages is only for important information that must be used in the future.
Removing this limit and giving people free rein on the number of messages they can pin will eventually lead to too many pinned messages, defeating the feature’s purpose.
Part 6: How to Delete Pinned Messages on Discord?
If something pinned in the past has become redundant over time, you can remove it from the pinned messages.
This will make sure your pinned messages do not stockpile over time, and there is space to add new messages important to the server.
To remove pinned messages on desktops:
- Go to the pin icon used to access pins
- Next, hover over the message you wish to unpin and click on the “x” (cross) button next to the jump button
- After this, click on the “yeah, remove it please kthx” button
- The message will now stop appearing in the list of pinned messages
To do the same for mobile devices:
- Swipe right to left to access the side menu
- Click on “Pins” to view all the messages pinned by you or other people on the server with permissions to pin
- Then hold down on the message, which will give you an option to unpin it
- Click on “Unpin” to remove the message from the list of pinned messages
Things to keep in mind:
- You can skip the pop-up shown above when trying to remove a pinned message. All you must do is hold shift when clicking on the “x” (cross) button allowing you to go on that spree of unpins
- Another thing to remember is that all these tips on how pin messages apply to both Direct Messages (DM) and Server group chats
All in All
Learning how to pin a message on Discord could be a little tricky at first, mostly if you haven’t done so in the past and someone spontaneously asks you to do so.
However, the feature is pretty intuitive and straightforward once you get the hang of it.
The usefulness of pinning makes it very important for both old and new users as you can relay important information without having to go through tons of old messages.
Richard Bennett
Richard Bennett is a writer and a lover of all things video.
Follow @Richard Bennett
Richard Bennett
Mar 27, 2024• Proven solutions
Like TeamSpeak or Skype, Discord is a chat app aimed at easy mass communication. Although it was made for gamers, it is readily used for communicating in offices, during projects, or for professional collaboration.
Even though it’s straightforward to use, there are several Discord features that you may be unfamiliar with.
One such feature is called pinning messages. It is available to moderators, administrators, server owners, and other users who have permission to “Manage Messages” in various server channels.
This feature helps you find and share vital messages quickly, especially when new users join a specific channel.
It acts like a sticky note for Discord, making sure valuable information such as server rules do not get overshadowed by new messages even months after the pinned messages are first posted.
Today, we will go over how to pin a message on Discord for your desktop app on PC and Mac, as well as on your iPhone and Android mobile devices.
Part 1: How to Pin A Message on Discord Desktop?
If you want to learn how to pin messages on Discord desktop, follow these steps:
- Hover over any message which you wish to pin.
- On the right-hand side of it, there will be a button that would read as More; click it and you will see a screen like below
- Now, click on the “Pin Message” option
- After which, you will be presented with a prompt asking you to confirm that you want to pin this particular message. Click on “Oh yeah, pin it.”
That’s it! You have now learned how to pin messages on Discord for the desktop application.
But make sure you don’t pin everything that might seem important at a glance — only pin messages that may have utility in the future.
Also, don’t pin messages that are just important for you. In larger channels, prioritize pinning messages that will benefit most participants.
Part 2: How to Pin Messages on Discord Mobile App?
Pinning messages in the mobile app is very similar to how it is done on the desktop application. Do it by:
- Just hold down your finger on the message you wish to pin
- A couple of seconds later, you will be presented with a list of options
- From here, click on “Pin Message”
- A pop-up will appear confirming if you want to pin the message. If you are sure you want to pin a particular message, tap the “Yes” button and then your message is pinned
Part 3: How to View Pinned Messages on Discord
Accessing pinned messages is just as easy as pinning them. To access a pinned message on the app’s desktop version:
- Click on the pin icon appearing on the top right-hand side of your screen
- Doing this will present you with a drop-down list of pinned messages. Now, you can tap on the “Jump” button next to the “x” (cross) icon to go directly to the pinned message
- This will allow you to understand the context behind the pinned message. You can also access and share links in the pinned messages from here
Part 4: How to View Pinned Messages on Discord Mobile
View your pins on the mobile version of Discord by:
- Swiping from right to left, which will open up a side menu
- Then click on “Pins,” which is the second option from the left, as shown in the picture below
- Now you will be in the pinned messages window
- You can jump to a specific pinned message by clicking on it, allowing you to access any content or links in the message
Part 5: Limit on Pinned Messages
You can only pin 50 messages in the pin box in Discord, meaning if you want to pin new messages, you will have to delete older ones to make space.
This may feel like a disadvantage. However, it makes perfect sense. Pinning messages is only for important information that must be used in the future.
Removing this limit and giving people free rein on the number of messages they can pin will eventually lead to too many pinned messages, defeating the feature’s purpose.
Part 6: How to Delete Pinned Messages on Discord?
If something pinned in the past has become redundant over time, you can remove it from the pinned messages.
This will make sure your pinned messages do not stockpile over time, and there is space to add new messages important to the server.
To remove pinned messages on desktops:
- Go to the pin icon used to access pins
- Next, hover over the message you wish to unpin and click on the “x” (cross) button next to the jump button
- After this, click on the “yeah, remove it please kthx” button
- The message will now stop appearing in the list of pinned messages
To do the same for mobile devices:
- Swipe right to left to access the side menu
- Click on “Pins” to view all the messages pinned by you or other people on the server with permissions to pin
- Then hold down on the message, which will give you an option to unpin it
- Click on “Unpin” to remove the message from the list of pinned messages
Things to keep in mind:
- You can skip the pop-up shown above when trying to remove a pinned message. All you must do is hold shift when clicking on the “x” (cross) button allowing you to go on that spree of unpins
- Another thing to remember is that all these tips on how pin messages apply to both Direct Messages (DM) and Server group chats
All in All
Learning how to pin a message on Discord could be a little tricky at first, mostly if you haven’t done so in the past and someone spontaneously asks you to do so.
However, the feature is pretty intuitive and straightforward once you get the hang of it.
The usefulness of pinning makes it very important for both old and new users as you can relay important information without having to go through tons of old messages.
Richard Bennett
Richard Bennett is a writer and a lover of all things video.
Follow @Richard Bennett
Integrating Fun Factors: Emojis Within Discord Status Lines
If you have an active Nitro subscription and want to make your Discord status look better, you can put emojis in Discord status. This article will help you walk through the process of using Discord custom status to upload emojis. Custom status is a new feature introduced by Discord. By uploading the emojis, you can keep your Discord status fresh! So, keep reading to find how to put emojis in Discord status through your desktop and mobile app conveniently.
In this article
01 How to Put Custom Emoji in Discord Status on Desktop and Online?
02 How to Add Custom Emoji on Discord Status on Mobile?
03 How to Copy and Paste Emojis in Discord Status?
04 How to Add Animated Emojis to Discord Status?
05 Custom Discord Status Emoji Ideas
Part 1: How to Put Custom Emoji in Discord Status on Desktop and Online?

For those who want to add an emoji on their Discord status on desktop and online, you can do that easily by following the steps that we have listed below:
Step 1: First, you need to go to https://discord.com . Once you visit the site, please log in using your Discord credential.
Step 2: Once your profile is open, please click on the profile picture.
Step 3: On your profile, look at the bottom of the menu. You will see a pop-up menu that says set a custom status.
Step 4: On the emojis bar, you can add an emoji. To do that, you need to click on the emoji status. Next, you will see a list of emojis. Please note that only an active Nitro subscription user can use animated or custom emojis. On the left will be the category of emojis. Choose one category that suits your mood; once the category opens, click on an emoji to add it.
Step 5: After that, you need to click on the Today option. This will open a drop-down menu. You need to choose a time frame for the emoji or status. You can choose today, 4 hours, 1 hour, etc.
Step 6: If you are done with the emoji selection and have chosen the duration for the status, you need to click on the Save option. The Save option will be on the bottom right of the same pop-up window.
And that’s it. The emojis will be successfully added to your status based on the duration that you have chosen. If you want to change the emoji or remove it, you need to undergo the same process.
Related: How to Get Free Animated Emojis on Discord
Part 2: How to Add Custom Emoji on Discord Status on Mobile?

If you are using the Discord app on your mobile phone, you can add a custom emoji on Discord status using your phone too. Follow the step-by-step guide that we have prepared to learn how to do that.
Step 1: Take your smartphone and look for the Discord app. The icon will look like a controller. Click on it to launch Discord.
Step 2: Just like the web steps, you will have to click on your profile. Click on the hamburger icon, which is there in the upper left corner. Then, look at the bottom right corner to find your profile.
Step 3: Now, click on the Set Status option. This will be the first option on your profile. Go on and click on that.
Step 4: After that, click on the option that says set a custom status. On the status bar, you will see an emoji. You need to click on that to open the list of emojis to choose from.
Step 5: Choose a time frame for the emoji, for example, 30 minutes, 1-hour, clear tomorrow, etc. If you are using an Android, you will see the floppy disk option; click on that to save your status. If you are using an iOS device, you will see the save option.
By following these steps, your status with the emoji you have chosen will be saved successfully. If you want to add a new emoji, repeat the same process.
Related: How to Change Discord Status
Part 3: How to Copy and Paste Emojis in Discord Status?
If you don’t want to go through the hassle of adding an emoji manually, you can just copy and paste one to your status. How to do it? Follow these steps:
Step 1: Go to a website that has emojis for Discord status.
Step 2: Scroll down the list of emojis and copy it.
Step 3: Go back to your Discord Nitro page and open the status setting. There, on the emoji section, paste the emoji that you have copied from another site.
Please note that this may not be possible for all types of emojis, though. Also, this will work if only the website has created emojis that can be directly copied and pasted on the status section.
Part 4: How to Add Animated Emojis to Discord Status?
Apart from the basic emojis, you can also add animated emojis to your Discord Status to make your status look even better. Here are the steps to follow to add an animated emoji:
Step 1: First, go to a website called https://betterdiscord.app/ . Once you are there, click on the Download option.
Step 2: You will see a page loaded with codes, right-click on the screen and click on the Save option. When it is downloaded, click on the Better Discord Windows installer. Next, read the license agreement and click on the Next option.
Step 3: Then click install better Discord and hit the next button. Choose the Discord version that you currently have installed.
Step 4: Open Discord and click on the user settings. There, you will see the Better Discord section. Next, click on the Plugin option. Now, close the Discord window and drag the animated status dot plugin into the plugin folder that opened after clicking on the Plugin option.
Step 5: Go to Discord again, and you will see the Animated Status option. Enable it and click on the gear icon. To add an animated emoji, click on the + icon. Next, you will see a Nitro ID field. Then, go to a chat page and click on the emoji option.
Step 6: Look at the emoji that you like and memorize the animated emoji name. Press \ followed by the name of the emoji. Now, copy the whole text and paste it again. You will see a few numbers; that’s the Nitro ID for the emoji. Copy the number only, go back to the Animated plugin and paste it on the Nitro ID field. Go back to the Nitro page again, and you will see the animated emoji on your status.
Part 5: Custom Discord Status Emoji Ideas

If you want to make your Discord Status look really cool, you can get some custom Discord status emoji ideas from us. Read this section to find out a few super cool custom Discord status emojis ideas and get inspired.
Use Kaomoji in Status
Kaomoji is a collection of super cute emojis that can brighten anyone’s day! They are great because they make your status look different and cute at the same time. You can choose from stars, smiley faces, cute polar bears, and much more! And yes, they are different than your usual emojis.
Add Old-school Emoticons
Remember the good old Nokia 1100 days when you used to send emojis using some signs? Well, you can try this idea too to give a vintage look to your status. Everybody uses the same smiley emojis, so why not try something different? Go back to your old 90s school days and display images, such as @}->– which is a rose! You can find old-school emoticons online easily.
Conclusion
And that’s it; now you know how to put emoji in Discord status without sweating much. We hope you have found this article helpful, and you will start using cool emojis on your status to make your Discord status look different than others!
02 How to Add Custom Emoji on Discord Status on Mobile?
03 How to Copy and Paste Emojis in Discord Status?
04 How to Add Animated Emojis to Discord Status?
05 Custom Discord Status Emoji Ideas
Part 1: How to Put Custom Emoji in Discord Status on Desktop and Online?
For those who want to add an emoji on their Discord status on desktop and online, you can do that easily by following the steps that we have listed below:
Step 1: First, you need to go to https://discord.com . Once you visit the site, please log in using your Discord credential.
Step 2: Once your profile is open, please click on the profile picture.
Step 3: On your profile, look at the bottom of the menu. You will see a pop-up menu that says set a custom status.
Step 4: On the emojis bar, you can add an emoji. To do that, you need to click on the emoji status. Next, you will see a list of emojis. Please note that only an active Nitro subscription user can use animated or custom emojis. On the left will be the category of emojis. Choose one category that suits your mood; once the category opens, click on an emoji to add it.
Step 5: After that, you need to click on the Today option. This will open a drop-down menu. You need to choose a time frame for the emoji or status. You can choose today, 4 hours, 1 hour, etc.
Step 6: If you are done with the emoji selection and have chosen the duration for the status, you need to click on the Save option. The Save option will be on the bottom right of the same pop-up window.
And that’s it. The emojis will be successfully added to your status based on the duration that you have chosen. If you want to change the emoji or remove it, you need to undergo the same process.
Related: How to Get Free Animated Emojis on Discord
Part 2: How to Add Custom Emoji on Discord Status on Mobile?
If you are using the Discord app on your mobile phone, you can add a custom emoji on Discord status using your phone too. Follow the step-by-step guide that we have prepared to learn how to do that.
Step 1: Take your smartphone and look for the Discord app. The icon will look like a controller. Click on it to launch Discord.
Step 2: Just like the web steps, you will have to click on your profile. Click on the hamburger icon, which is there in the upper left corner. Then, look at the bottom right corner to find your profile.
Step 3: Now, click on the Set Status option. This will be the first option on your profile. Go on and click on that.
Step 4: After that, click on the option that says set a custom status. On the status bar, you will see an emoji. You need to click on that to open the list of emojis to choose from.
Step 5: Choose a time frame for the emoji, for example, 30 minutes, 1-hour, clear tomorrow, etc. If you are using an Android, you will see the floppy disk option; click on that to save your status. If you are using an iOS device, you will see the save option.
By following these steps, your status with the emoji you have chosen will be saved successfully. If you want to add a new emoji, repeat the same process.
Related: How to Change Discord Status
Part 3: How to Copy and Paste Emojis in Discord Status?
If you don’t want to go through the hassle of adding an emoji manually, you can just copy and paste one to your status. How to do it? Follow these steps:
Step 1: Go to a website that has emojis for Discord status.
Step 2: Scroll down the list of emojis and copy it.
Step 3: Go back to your Discord Nitro page and open the status setting. There, on the emoji section, paste the emoji that you have copied from another site.
Please note that this may not be possible for all types of emojis, though. Also, this will work if only the website has created emojis that can be directly copied and pasted on the status section.
Part 4: How to Add Animated Emojis to Discord Status?
Apart from the basic emojis, you can also add animated emojis to your Discord Status to make your status look even better. Here are the steps to follow to add an animated emoji:
Step 1: First, go to a website called https://betterdiscord.app/ . Once you are there, click on the Download option.
Step 2: You will see a page loaded with codes, right-click on the screen and click on the Save option. When it is downloaded, click on the Better Discord Windows installer. Next, read the license agreement and click on the Next option.
Step 3: Then click install better Discord and hit the next button. Choose the Discord version that you currently have installed.
Step 4: Open Discord and click on the user settings. There, you will see the Better Discord section. Next, click on the Plugin option. Now, close the Discord window and drag the animated status dot plugin into the plugin folder that opened after clicking on the Plugin option.
Step 5: Go to Discord again, and you will see the Animated Status option. Enable it and click on the gear icon. To add an animated emoji, click on the + icon. Next, you will see a Nitro ID field. Then, go to a chat page and click on the emoji option.
Step 6: Look at the emoji that you like and memorize the animated emoji name. Press \ followed by the name of the emoji. Now, copy the whole text and paste it again. You will see a few numbers; that’s the Nitro ID for the emoji. Copy the number only, go back to the Animated plugin and paste it on the Nitro ID field. Go back to the Nitro page again, and you will see the animated emoji on your status.
Part 5: Custom Discord Status Emoji Ideas
If you want to make your Discord Status look really cool, you can get some custom Discord status emoji ideas from us. Read this section to find out a few super cool custom Discord status emojis ideas and get inspired.
Use Kaomoji in Status
Kaomoji is a collection of super cute emojis that can brighten anyone’s day! They are great because they make your status look different and cute at the same time. You can choose from stars, smiley faces, cute polar bears, and much more! And yes, they are different than your usual emojis.
Add Old-school Emoticons
Remember the good old Nokia 1100 days when you used to send emojis using some signs? Well, you can try this idea too to give a vintage look to your status. Everybody uses the same smiley emojis, so why not try something different? Go back to your old 90s school days and display images, such as @}->– which is a rose! You can find old-school emoticons online easily.
Conclusion
And that’s it; now you know how to put emoji in Discord status without sweating much. We hope you have found this article helpful, and you will start using cool emojis on your status to make your Discord status look different than others!
Also read:
- [New] 2024 Approved Ace Discord Conversations with Effective Pinning Tips
- [New] In 2024, Building a Stronger Team Integrating Roles in Discord
- [New] In 2024, From Novice to Expert with Discord
- [New] Strategic Message Management Expert Tips for Discord Pinning for 2024
- [Updated] 2024 Approved The Right Way to Disband From a Discord Community
- [Updated] Sneaky Soundtrack Watching YouTube Unobtrusively
- 2 Ways to Transfer Text Messages from Xiaomi Redmi Note 12R to iPhone 15/14/13/12/11/X/8/ | Dr.fone
- 2024 Approved Navigating Discord's Streaming Features (Desktop/Mobile)
- Effortless Conversion of Videos to MP3s - Download Your Audio for Free Now!
- How to Reset a Vivo Y56 5G Phone that is Locked?
- In 2024, How to Change Lock Screen Wallpaper on Asus ROG Phone 7 Ultimate
- In 2024, The 8 Must-Have Apps for Instagram Schedulers on All Smartphones
- Managing and Fixing Peak CPU Consumption in Windows Speaker Setup
- Possible ways to recover deleted files from Itel
- Useful ways that can help to effectively recover deleted files from Infinix Hot 40i
- Title: In 2024, How To Prominently Display Messages on Discord
- Author: Timothy
- Created at : 2024-10-31 16:37:02
- Updated at : 2024-11-04 19:07:22
- Link: https://discord-videos.techidaily.com/in-2024-how-to-prominently-display-messages-on-discord/
- License: This work is licensed under CC BY-NC-SA 4.0.