
In 2024, Wiping Your Discord Servers From PC and Android Devices
Wiping Your Discord Servers From PC and Android Devices
How to Delete Discord Server?

Richard Bennett
Mar 27, 2024• Proven solutions
Discord servers are made and designed to help gamers – and now work colleagues – communicate and coordinate via private rooms.
As a communication app, it offers permanent servers for people who are working on the same project, playing the same game, or even if they’re part of the same family!
However, you may have to someday delete a server you own.
Today we will discuss how to delete Discord server or deleting the Discord server of someone who has passed away:
Part 1: How to Delete Discord Server Permanently on A Desktop?
If you’re familiar with Discord, you will know that there will come a time that you no longer need a server: it may be because you’ve resigned from your workplace or stopped playing a game.
If you are looking into how to delete your Discord server, you came to the right place. Even though Discord makes communication easier, you may need a break from around-the-clock connectivity for various reasons.
Discord works on desktop platforms and smartphones, with a blend of a VoIP chat system, a chat lobby, and a message board in a single app. Therefore, you can attempt to delete a server off on any device that you may have Discord downloaded and active on.
Most server owners choose to delete their Discord server when too many extra, strange, or ill-meaning visitors are visiting.
Servers are more like chat rooms inside the application. Deleting them is a relatively simple process – as you will learn from our how to delete server on Discord tips – however, their retrieval is impossible.
Once the server has been removed, you can not “undo the process” or recreate it. Therefore, be absolutely sure and proceed with caution.
It is also advised to skim through any essential files that you might have on the server. Back them up before letting it go forever.
And lastly, ensure that this is what you intend on doing because deleting a Discord server is permanent. Here are the simple steps to follow on how to delete a server on Discord:
- Open the Discord desktop app and click on the server you want to delete
- Once you select the server, there will be an options list under the server’s name
- Click the “server setting” button from the menu (This will be the second option on the list)

- At the end of the sidebar, you will find the option “delete the server on the left side.” Click it

Image: The image shows the screen that pops up after clicking “Server settings,” here, the delete button can be seen in red.
- After clicking, a pop-up window will appear, asking for confirmation
- Confirm by entering the server’s name and authentication code; this is only required when two-factor authentication is enabled
- Click on “delete server” to confirm
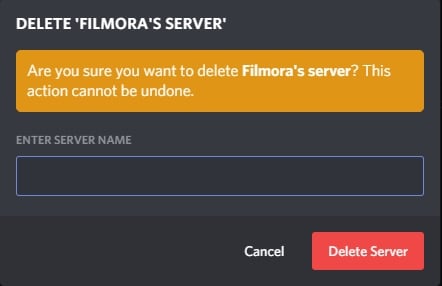
Image: As mentioned, you must be sure you want to permanently lose a server and all of its content before deleting it; this prompt serves the same purpose
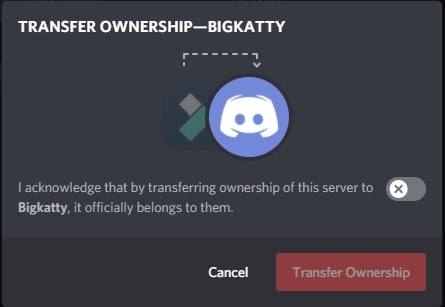
You can also transfer your server’s ownership to another individual if you do not want to delete it. To do this:
- Open server settings and then select “Members” in the left sidebar
- A list of every server member will open, hover over the person’s name that you want to transfer ownership to, and then click the three dots appearing on the right
transfer-ownership-on-discord-server.jpg
- Select “Transfer Ownership” and then confirm the transfer.
How to Delete A Server On Discord Via The Mobile App?
Suppose you do not want to go through the hassle of logging on to the desktop app. In that case, you have the option of deleting your Discord server via the mobile app quickly.
Here are some easy to follow steps on how to delete Discord server using the mobile app:
- Open the Discord app on your Android device or iPhone and then tap the hamburger settings icon on the top-left
- Search for the server you wish to delete, and then long-press the icon of the server you chose
- A mini option bar will pop up; here, you must click on “More Options” and then the server options will slide up on your screen; click on “Settings” to continue.
- This will take you to the control panel; here, click on the three-dotted settings on the top right
- Now you will be provided only one option: “Delete (server name).” Click on it
At this point, in the how to delete server on Discord process, Discord will ask you why you chose to delete the server as part of their customer experience surveys.
It is nothing but a formality; choosing to ignore it or answer it will not affect the process’s outcome.
You can choose from pre-decided answers as well, and to give you an example, one of the options is: “I couldn’t get people to join.”
How Do I Delete A Discord Server Without Ownership?
Previously you could delete your Discord server using a BOT. Anyone who had permission to use the command/action within BOT could also delete the server. However, now only the server owner and the Discord trust and safety team can delete a server.

Richard Bennett
Richard Bennett is a writer and a lover of all things video.
Follow @Richard Bennett
Richard Bennett
Mar 27, 2024• Proven solutions
Discord servers are made and designed to help gamers – and now work colleagues – communicate and coordinate via private rooms.
As a communication app, it offers permanent servers for people who are working on the same project, playing the same game, or even if they’re part of the same family!
However, you may have to someday delete a server you own.
Today we will discuss how to delete Discord server or deleting the Discord server of someone who has passed away:
Part 1: How to Delete Discord Server Permanently on A Desktop?
If you’re familiar with Discord, you will know that there will come a time that you no longer need a server: it may be because you’ve resigned from your workplace or stopped playing a game.
If you are looking into how to delete your Discord server, you came to the right place. Even though Discord makes communication easier, you may need a break from around-the-clock connectivity for various reasons.
Discord works on desktop platforms and smartphones, with a blend of a VoIP chat system, a chat lobby, and a message board in a single app. Therefore, you can attempt to delete a server off on any device that you may have Discord downloaded and active on.
Most server owners choose to delete their Discord server when too many extra, strange, or ill-meaning visitors are visiting.
Servers are more like chat rooms inside the application. Deleting them is a relatively simple process – as you will learn from our how to delete server on Discord tips – however, their retrieval is impossible.
Once the server has been removed, you can not “undo the process” or recreate it. Therefore, be absolutely sure and proceed with caution.
It is also advised to skim through any essential files that you might have on the server. Back them up before letting it go forever.
And lastly, ensure that this is what you intend on doing because deleting a Discord server is permanent. Here are the simple steps to follow on how to delete a server on Discord:
- Open the Discord desktop app and click on the server you want to delete
- Once you select the server, there will be an options list under the server’s name
- Click the “server setting” button from the menu (This will be the second option on the list)
- At the end of the sidebar, you will find the option “delete the server on the left side.” Click it
Image: The image shows the screen that pops up after clicking “Server settings,” here, the delete button can be seen in red.
- After clicking, a pop-up window will appear, asking for confirmation
- Confirm by entering the server’s name and authentication code; this is only required when two-factor authentication is enabled
- Click on “delete server” to confirm
Image: As mentioned, you must be sure you want to permanently lose a server and all of its content before deleting it; this prompt serves the same purpose
You can also transfer your server’s ownership to another individual if you do not want to delete it. To do this:
- Open server settings and then select “Members” in the left sidebar
- A list of every server member will open, hover over the person’s name that you want to transfer ownership to, and then click the three dots appearing on the right
transfer-ownership-on-discord-server.jpg
- Select “Transfer Ownership” and then confirm the transfer.
How to Delete A Server On Discord Via The Mobile App?
Suppose you do not want to go through the hassle of logging on to the desktop app. In that case, you have the option of deleting your Discord server via the mobile app quickly.
Here are some easy to follow steps on how to delete Discord server using the mobile app:
- Open the Discord app on your Android device or iPhone and then tap the hamburger settings icon on the top-left
- Search for the server you wish to delete, and then long-press the icon of the server you chose
- A mini option bar will pop up; here, you must click on “More Options” and then the server options will slide up on your screen; click on “Settings” to continue.
- This will take you to the control panel; here, click on the three-dotted settings on the top right
- Now you will be provided only one option: “Delete (server name).” Click on it
At this point, in the how to delete server on Discord process, Discord will ask you why you chose to delete the server as part of their customer experience surveys.
It is nothing but a formality; choosing to ignore it or answer it will not affect the process’s outcome.
You can choose from pre-decided answers as well, and to give you an example, one of the options is: “I couldn’t get people to join.”
How Do I Delete A Discord Server Without Ownership?
Previously you could delete your Discord server using a BOT. Anyone who had permission to use the command/action within BOT could also delete the server. However, now only the server owner and the Discord trust and safety team can delete a server.
Richard Bennett
Richard Bennett is a writer and a lover of all things video.
Follow @Richard Bennett
The Art of Verbal Communication on Discord (TTS)
How to Use Discord Text-To-Speech?
Richard Bennett
Mar 27, 2024• Proven solutions
While most users of the popular online messaging and content sharing site Discord rely on simple text to communicate, there are numerous situations when using the text-to-speech feature would be quite advantageous. This includes instances when there are language barriers or disabilities to overcome, but also spontaneous moments when users just enjoy hearing each other’s words. Discord supports the use of a text-to-speech (TTS) function and in fact, has a built-in setting for it, but this option only works for desktop users with Windows or Mac devices.
In this article, we will discuss the specifics of activating the TTS function in Discord and using it effectively to improve your communication with other users. By following the detailed instructions provided here, you will be able to learn how to activate text-to-speech on Discord and manage your voice messages on selected servers in the most practical manner.
- Part 1: Enable Text-To-Speech Feature in Discord
- Part 2: How to Set Up Text-To-Speech Notifications on Discord?
- Part 3: How to Use Text-To-Speech in Discord Chatting?
- Part 4: How to Mute All Text-To-Speech Messages on Discord?
- Part 5: Best Text-To-Speech Bots on Discord
Part 1: How to Enable Text-To-Speech Feature in Discord?
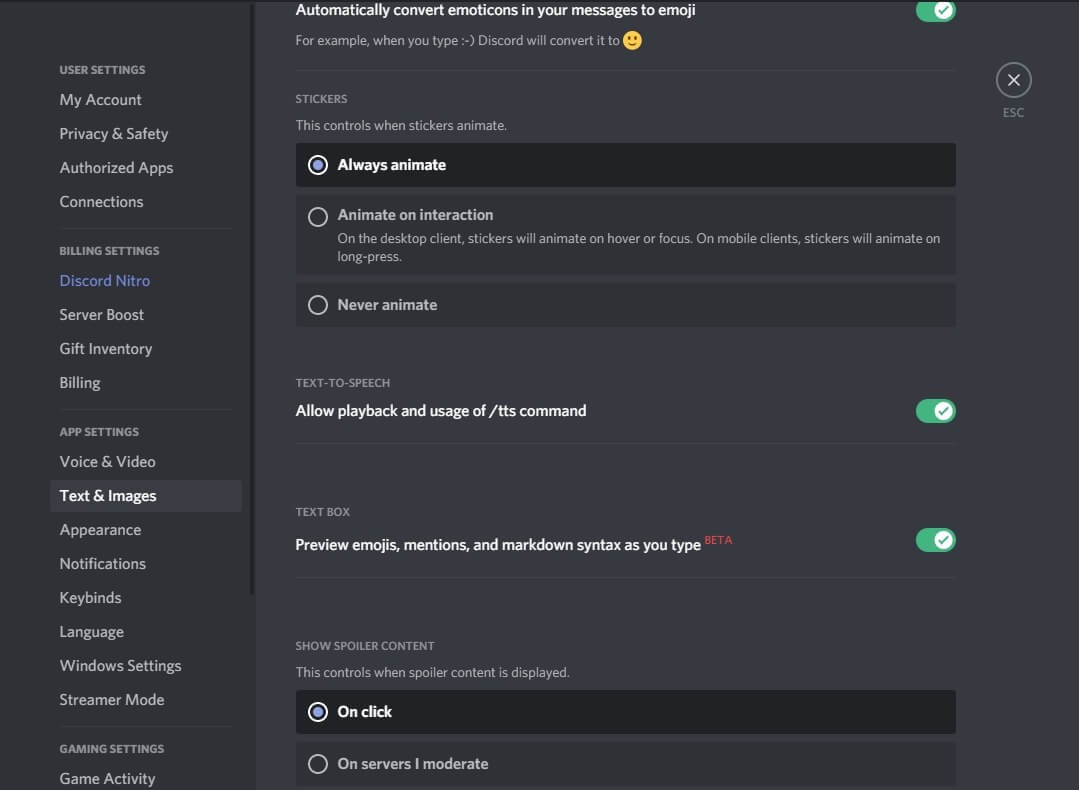
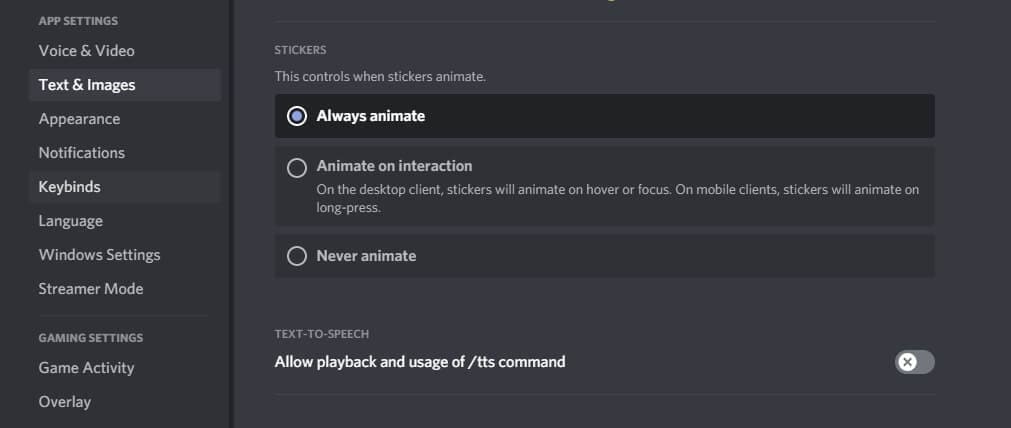
Before you can deploy TTS in your chats, you need to change the settings of your profile to enable this option. This isn’t hard to do – just go to the Discord app and select ‘Settings’ from the menu, which will trigger a pop-up window to appear on your screen. Next, you need to find the Text & Images section in the App Settings window, then scroll down to find the Text-to-Speech option, and finally tick the boxes next to Allow playback and Usage of TTS items. After you do this, your Discord will be ready to process your text messages in voice format.
To test whether you successfully activated Text-to-Speech, open any chats on your personal server and try typing out a message, followed immediately by the tag /tts. If everything is working correctly, your message should appear on the screen in the text form, accompanied by its voice rendering delivered by an automated module. The timing of the two should be perfectly synchronized so that you hear the message and see the text at exactly the same instance. Otherwise, go back to settings and make sure you activated the TTS option properly or restart your Discord app.
Part 2: How to Set Up Text-To-Speech Notifications on Discord?
Another practical possibility that can improve your Discord experience is to set up TTS notifications and be immediately informed whenever a fresh message arrives. This can also be done after you change the app parameters from the ‘Settings’ menu. After you see all options, choose ‘App Settings’ and search for the section named ‘Notifications’. By scrolling down, you will reach the item ‘Text-to-Speech notifications’ and after clicking on it you will be given a choice between three options.
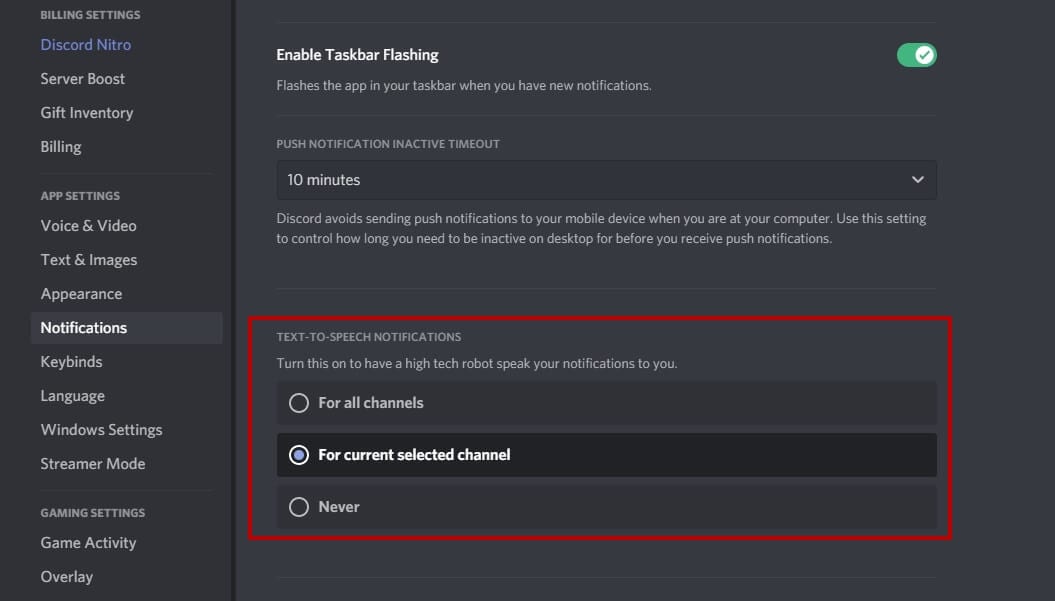
The first option For all channels is to enable notifications on all channels on Discord; choosing it will result in a robotic voice reading all messages from all chats, regardless of whether they have a /tts tag. This option can be useful when you want to maximize your accessibility and receive important information instantly.
By picking the second option, For current selected channel, you can enable TTS notifications only on the current channel. This action will instruct Discord to have an automated voice read all the incoming messages on the active chat aloud, allowing you to stay in the loop at all times. This possibility works well for people who occasionally do multiple things at once, for example, gamers or streamers who use Discord to stay connected with their fans and friends while they are busy.
Finally, you can choose Never to hear any voice messages from your Discord chats never. If you pick this setting, even those messages that were sent with the /tts tag will only be displayed in the text format. This option provides you with peace of mind and prevents spammers from saturating you with voice messages you have no interest in hearing.
Part 3: How to Use Text-To-Speech in Discord Chatting?
It’s not very hard to learn how to effectively use the TTS option in your chats on the Discord platform. This communication format is available on all channels that have an activated Text-to-Speech setting, so you can freely add a few messages to be read aloud or completely switch to automated voice format if you so desire. Doing this in practice is very simple – just start your message by typing the tag /tts and then enter your text as you normally would.

Your TTS message will be reproduced in a voice format by a Discord bot to all participants in the chat who didn’t mute incoming Text-to-Speech chats. An automated voice will say the entire message, and then also pronounce your username to identify the author. At the same time, the message will appear in the chat feed as plain text, so that even those recipients unable to hear it will be able to see the contents.
Part 4: How to Mute All Text-To-Speech Messages on Discord?
You can also decide to prevent any messages from being played to you in a voice format and receive them as text only. This option is available even if you are not the administrator of the chat server and simply want to customize your own experience. To do this, you need to open the Discord app and enter the Settings menu, before selecting the Text & Images section from App Settings. After this, you need to find the Text-to-Speech sub-menu and open it to find the Allow Playback feature. If you disable this feature, you will effectively mute all incoming TTS messages across all Discord servers you are active on.
Please keep in mind that deactivating the aforementioned feature won’t block TTS messages from reaching you, but you will see them as text only. On the other hand, you can’t use the /tts tag to send your own Text-to-Speech while the playback setting is disabled. Nothing is preventing you from turning it back on when you want to have a TTS capacity on Discord again.
Part 5: Best Text-To-Speech Bots on Discord
One of the reasons why Discord is so popular is that it allows extensive customization through user-made Bots or modules that automatically perform a certain task. There are several great Bots that can be used for Text-to-Speech, so you might consider utilizing one of them.
1. Text to Speech (TTS)
With many languages supported and a wide range of cool commands, this bot could be the best choice for people who use TTS just for fun.
2. KD Bot
A very popular option for Text-to-Speech on Discord that lets you choose from more than 100 voices and supports upwards of 100 languages, making it a powerful translation tool.
3. Fergun
This multi-language tool responds to more than 100 different commands, so it can be used for a wide variety of purposes with stunning effectiveness.
Frequently asked questions about TTS on Discord
- Can I use the Text-to-Speech feature on Discord from a mobile phone?
Unfortunately, you can’t. Discord works quite well as a text messaging app on mobile platforms, but at this time Text-to-Speech functionality is limited to desktop users.
- Why can’t I use Text-to-Speech on a Discord server?
If you are unable to send or receive TTS messages on Discord, you need to change your settings. Please see Part 1 of this article for detailed instructions.
Richard Bennett
Richard Bennett is a writer and a lover of all things video.
Follow @Richard Bennett
Richard Bennett
Mar 27, 2024• Proven solutions
While most users of the popular online messaging and content sharing site Discord rely on simple text to communicate, there are numerous situations when using the text-to-speech feature would be quite advantageous. This includes instances when there are language barriers or disabilities to overcome, but also spontaneous moments when users just enjoy hearing each other’s words. Discord supports the use of a text-to-speech (TTS) function and in fact, has a built-in setting for it, but this option only works for desktop users with Windows or Mac devices.
In this article, we will discuss the specifics of activating the TTS function in Discord and using it effectively to improve your communication with other users. By following the detailed instructions provided here, you will be able to learn how to activate text-to-speech on Discord and manage your voice messages on selected servers in the most practical manner.
- Part 1: Enable Text-To-Speech Feature in Discord
- Part 2: How to Set Up Text-To-Speech Notifications on Discord?
- Part 3: How to Use Text-To-Speech in Discord Chatting?
- Part 4: How to Mute All Text-To-Speech Messages on Discord?
- Part 5: Best Text-To-Speech Bots on Discord
Part 1: How to Enable Text-To-Speech Feature in Discord?
Before you can deploy TTS in your chats, you need to change the settings of your profile to enable this option. This isn’t hard to do – just go to the Discord app and select ‘Settings’ from the menu, which will trigger a pop-up window to appear on your screen. Next, you need to find the Text & Images section in the App Settings window, then scroll down to find the Text-to-Speech option, and finally tick the boxes next to Allow playback and Usage of TTS items. After you do this, your Discord will be ready to process your text messages in voice format.
To test whether you successfully activated Text-to-Speech, open any chats on your personal server and try typing out a message, followed immediately by the tag /tts. If everything is working correctly, your message should appear on the screen in the text form, accompanied by its voice rendering delivered by an automated module. The timing of the two should be perfectly synchronized so that you hear the message and see the text at exactly the same instance. Otherwise, go back to settings and make sure you activated the TTS option properly or restart your Discord app.
Part 2: How to Set Up Text-To-Speech Notifications on Discord?
Another practical possibility that can improve your Discord experience is to set up TTS notifications and be immediately informed whenever a fresh message arrives. This can also be done after you change the app parameters from the ‘Settings’ menu. After you see all options, choose ‘App Settings’ and search for the section named ‘Notifications’. By scrolling down, you will reach the item ‘Text-to-Speech notifications’ and after clicking on it you will be given a choice between three options.
The first option For all channels is to enable notifications on all channels on Discord; choosing it will result in a robotic voice reading all messages from all chats, regardless of whether they have a /tts tag. This option can be useful when you want to maximize your accessibility and receive important information instantly.
By picking the second option, For current selected channel, you can enable TTS notifications only on the current channel. This action will instruct Discord to have an automated voice read all the incoming messages on the active chat aloud, allowing you to stay in the loop at all times. This possibility works well for people who occasionally do multiple things at once, for example, gamers or streamers who use Discord to stay connected with their fans and friends while they are busy.
Finally, you can choose Never to hear any voice messages from your Discord chats never. If you pick this setting, even those messages that were sent with the /tts tag will only be displayed in the text format. This option provides you with peace of mind and prevents spammers from saturating you with voice messages you have no interest in hearing.
Part 3: How to Use Text-To-Speech in Discord Chatting?
It’s not very hard to learn how to effectively use the TTS option in your chats on the Discord platform. This communication format is available on all channels that have an activated Text-to-Speech setting, so you can freely add a few messages to be read aloud or completely switch to automated voice format if you so desire. Doing this in practice is very simple – just start your message by typing the tag /tts and then enter your text as you normally would.
Your TTS message will be reproduced in a voice format by a Discord bot to all participants in the chat who didn’t mute incoming Text-to-Speech chats. An automated voice will say the entire message, and then also pronounce your username to identify the author. At the same time, the message will appear in the chat feed as plain text, so that even those recipients unable to hear it will be able to see the contents.
Part 4: How to Mute All Text-To-Speech Messages on Discord?
You can also decide to prevent any messages from being played to you in a voice format and receive them as text only. This option is available even if you are not the administrator of the chat server and simply want to customize your own experience. To do this, you need to open the Discord app and enter the Settings menu, before selecting the Text & Images section from App Settings. After this, you need to find the Text-to-Speech sub-menu and open it to find the Allow Playback feature. If you disable this feature, you will effectively mute all incoming TTS messages across all Discord servers you are active on.
Please keep in mind that deactivating the aforementioned feature won’t block TTS messages from reaching you, but you will see them as text only. On the other hand, you can’t use the /tts tag to send your own Text-to-Speech while the playback setting is disabled. Nothing is preventing you from turning it back on when you want to have a TTS capacity on Discord again.
Part 5: Best Text-To-Speech Bots on Discord
One of the reasons why Discord is so popular is that it allows extensive customization through user-made Bots or modules that automatically perform a certain task. There are several great Bots that can be used for Text-to-Speech, so you might consider utilizing one of them.
1. Text to Speech (TTS)
With many languages supported and a wide range of cool commands, this bot could be the best choice for people who use TTS just for fun.
2. KD Bot
A very popular option for Text-to-Speech on Discord that lets you choose from more than 100 voices and supports upwards of 100 languages, making it a powerful translation tool.
3. Fergun
This multi-language tool responds to more than 100 different commands, so it can be used for a wide variety of purposes with stunning effectiveness.
Frequently asked questions about TTS on Discord
- Can I use the Text-to-Speech feature on Discord from a mobile phone?
Unfortunately, you can’t. Discord works quite well as a text messaging app on mobile platforms, but at this time Text-to-Speech functionality is limited to desktop users.
- Why can’t I use Text-to-Speech on a Discord server?
If you are unable to send or receive TTS messages on Discord, you need to change your settings. Please see Part 1 of this article for detailed instructions.
Richard Bennett
Richard Bennett is a writer and a lover of all things video.
Follow @Richard Bennett
Also read:
- [New] Inside Top 15 Discord Emotes Creator Spotlight
- [New] Powerful Presentations Elevate Your Screen Share on Discord for 2024
- [New] Tech-Savvy Approach to Cutting Out Background Noise in Google Meet
- [New] Top Audio Modification Tools for Discord A Comprehensive 2023 Roundup
- [New] Unsubscribing Disconnecting Desktop Discords for 2024
- [New] Unveiling Premium, Peak-Performance Emoji Makers for Discord
- 2024 Approved Best Performing 8 Recording Software Picks
- 2024 Approved Wirecast Techniques for Captivating Facebook Viewers
- 5 Best Route Generator Apps You Should Try On Apple iPhone 11 | Dr.fone
- A Detailed Guide to Every Release of Apple's iPad Operating System
- Full Guide to Bypass Meizu FRP
- In 2024, How to Reset a Motorola Moto G84 5G Phone that is Locked?
- Streamlining Your Discord Chat Experience on Devices
- Windows 11 Keyboard Latency Issues - Now Fixed
- Title: In 2024, Wiping Your Discord Servers From PC and Android Devices
- Author: Timothy
- Created at : 2024-10-26 17:56:29
- Updated at : 2024-10-30 00:35:44
- Link: https://discord-videos.techidaily.com/in-2024-wiping-your-discord-servers-from-pc-and-android-devices/
- License: This work is licensed under CC BY-NC-SA 4.0.