
!["[New] 2024 Approved Mastering the Certification Journey Becoming a Verified Disco Member"](https://www.lifewire.com/thmb/4UAL0ffhfcefNDTCBRAEWpc6KBE=/400x300/filters:no_upscale():max_bytes(150000):strip_icc()/machine-learning-5aeccc03a474be003618e6d8.jpg)
"[New] 2024 Approved Mastering the Certification Journey Becoming a Verified Disco Member"
Mastering the Certification Journey: Becoming a Verified Disco Member
How To Get Discord Partner And Be Verified

Richard Bennett
Mar 27, 2024• Proven solutions
Since the pandemic, communication-based social media websites have become even more popular; be it Instagram, Twitter, or Discord; they have amassed millions of users.
Some of these users are credible organizations, companies, celebrities, or other revered personalities. And they are usually given verified accounts. The mark of a verified account is the tiny blue tick next to the name.
People strive for this blue tick because it makes their account seem “official”; other users don’t mind sharing from and sharing with these accounts.
Once users know that a specific social media account is a verified one, they would never hesitate to interact with them.
If you want that kind of reverence for your online presence, keep reading as we elaborate on how to get verified on Discord:
In this article
- Part 1: How to Get Verified On Discord
- Part 2: How to Apply For Discord Partnership
- Part 3: Differences Between Discord Verification And Partnership
Part 1: How to Get Verified On Discord
Verification on social media sites is most often used as proving your identity when you are a semi-famous or famous individual.
However, unlike the variety of other social media platforms, Discord does not verify just about anyone with a large following.
Presently, verification on Discord is limited to publishers and game developers, Spotify verified musical artists, and professional e-sports teams with massive followers and monthly listeners.
Suppose you are a content creator on YouTube, Twitch, or Reddit. In that case, you can also apply for Discord Partnership, which is an alternative account identification form.
Therefore, read on as we discuss how to get verified on Discord:
Requirements Of Getting Verified On Discord
If you want to get verified on Discord, here are all the things you need to know about the application and qualification process:
- You must be a server owner and be the official representative of a group, team, or individual applying
- The server being verified must also meet the community guidelines of Discord
- If you do not fall into any of the categories mentioned above, you cannot be verified on Discord
- However, if you do meet the criteria, you would have to go to discordapp.com/verification and click on “Apply Now”
- Applicants are also required to provide an associated email address, along with the supplementary information proving their identity
Suppose you do not fit into the Discord verification criteria, but you are a streamer or a content creator. In that case, you can apply for your server to become a Discord Partner.
Part 2: How to Apply For Discord Partnership
Recently there was a change in the Discord Partner Program, rewarding more active servers instead of the server owners with a large following outside of Discord.
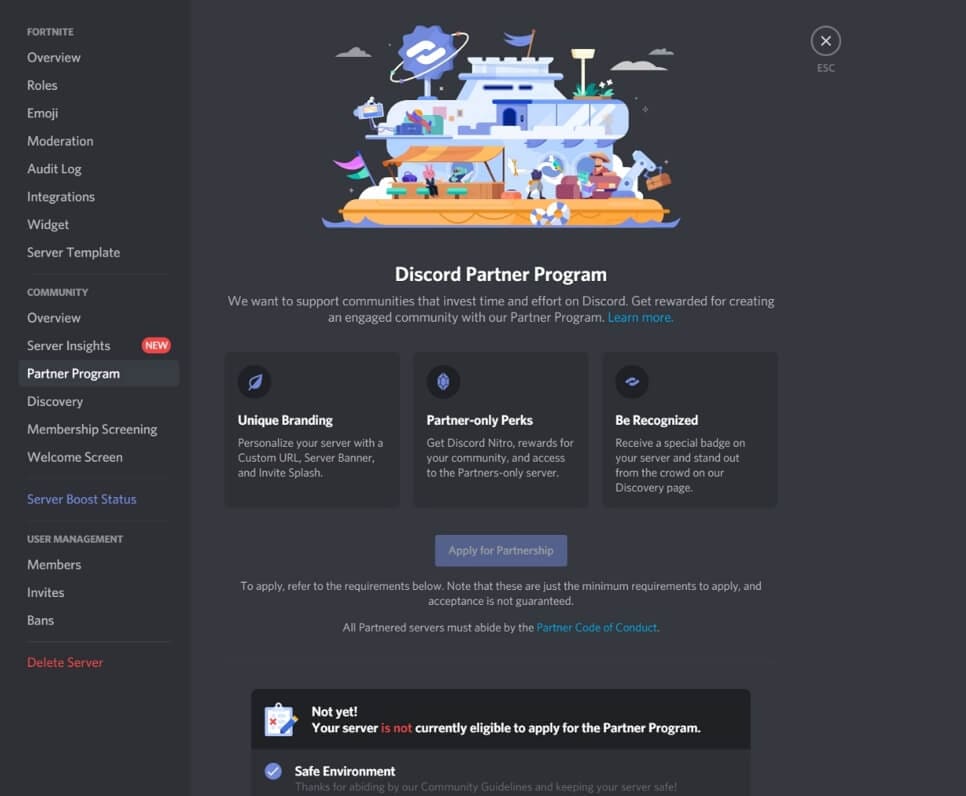
For eligibility in the Discord Partner Program, the server in question must meet the Activity Requirements that are listed in the Partner Program portion of Server Insights.
You must keep in mind that partnership is not automatic, and you must fill out an application. Discord can also remove your partnership at any time if the requirements mentioned above are not met for a prolonged period.
Requirements For Partner Discord Servers
The Discord partner program provides engaged and well-moderated servers with the extra tools and recognition to re-invest in the community. The accepted servers also get additional benefits and perks.
Before submitting your Partner application, you would need to check the server engagement requirements.
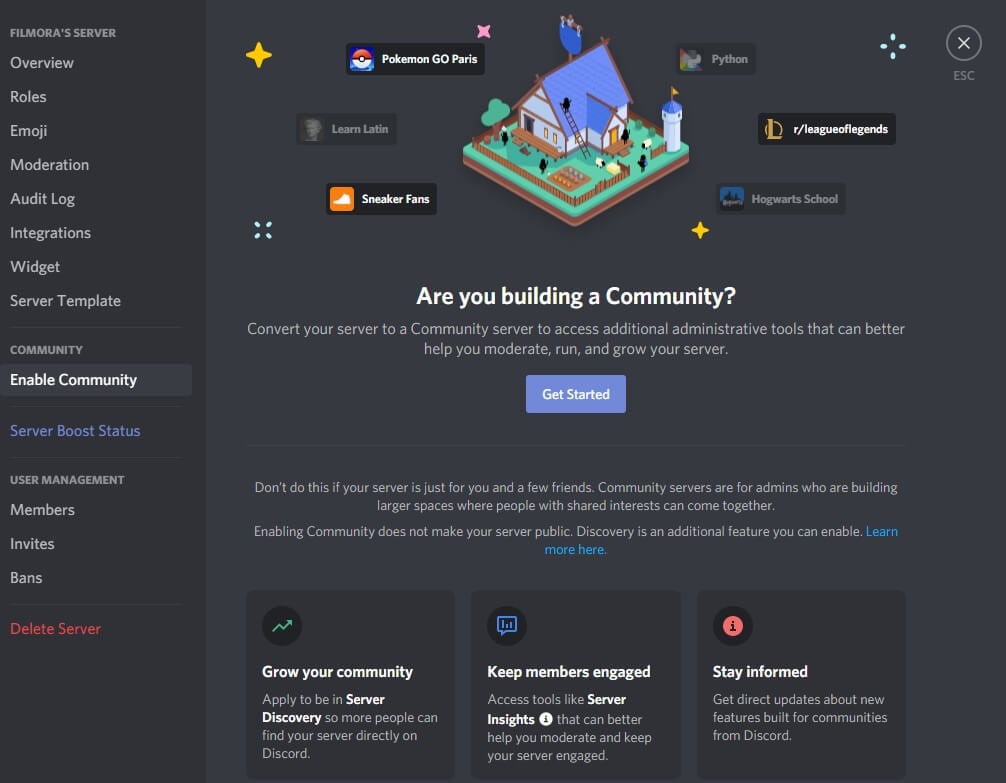
The servers thinking of applying to the Partner program have to be marked as “Community” servers in the Server Settings, allowing access to Server Insights.
The Server Insights will help you look at how close you are to applying to the Discord Partner Program.
You can also track the progress towards unlocking your Partner Program application anytime inside the Server Insights and the in-app Partner page.
Once you attain access to this page, there are specific server requirements that you would have to reach:
- The server must be a minimum of eight weeks old
- You must have a minimum of 500 members on your server
- Have a minimum of fifty communicators, people actively talking on your server per week
- Have a minimum of a hundred participators, people visiting/viewing your server per week
- Have a minimum of 20% Week 1 retention over a period of 8 weeks
- You must have enabled the two-factor authentication requirement for Server Moderation. This can be found in the Server Settings and then going to Moderation
Once you are a Discord Partner, you will get access to the VIP features mentioned below:
- You will receive a banner for your server
- You will receive an animated server icon
- The server and the server owner will receive a Discord Partner badge
- The server owner will receive a subscription to Discord Nitro throughout the partnership
- The partnered server also receives a customizable vanity invite URL
Part 3: Differences Between Discord Verification And Partnership
Discord verification goes to servers that are run by brands, figures of public interest, and businesses. A verified badge shows the official home of that community.
Acceptance into the Discord Verification program only gives you server access to the Vanity URL, Verified Server badge, and the invite splash background.
In contrast, the Partner program provides a server banner, animated server icon, Nitro subscription, and a Discord Partner badge.
Furthermore, the Discord Partner Program aims to reward engaged, quality servers by providing them with extra tools and recognition, helping them invest further into their community.
A partner badge next to a server’s name indicates that it is one of the most engaging and reliable communities on Discord.
You might be thinking, can I be Discord Verified and Discord Partner at the same time? The answer is yes, you can.
If you are qualified for both programs, you can be in them. A Discord Verified server could send its application to the Discord Partner Program when they satisfy Partner Program requirements.
Lastly, if a server is removed from one of the programs, it can still be in the other one. Like, suppose a server is both Verified and Partnered but loses its Partnership. In that case, it can still stay verified and enjoy all the added benefits of Discord Verification.
Frequently Asked Question about Getting Verification on Discord
Question 1: How long will it take to complete verification on Discord?
Answer: Generally, it would take around 5 business day to complete the verfication. However, the time may varies depend on the amount of application.
Soure: Discord Support
Question 2: Will I get charged for getting my server verified?
Answer: No. You won’t be charged for getting your Discord server verified.
Question: Can I apply verification if our server is run by fan?
Answer: No, fan server can not be verified.
Richard Bennett
Richard Bennett is a writer and a lover of all things video.
Follow @Richard Bennett
Richard Bennett
Mar 27, 2024• Proven solutions
Since the pandemic, communication-based social media websites have become even more popular; be it Instagram, Twitter, or Discord; they have amassed millions of users.
Some of these users are credible organizations, companies, celebrities, or other revered personalities. And they are usually given verified accounts. The mark of a verified account is the tiny blue tick next to the name.
People strive for this blue tick because it makes their account seem “official”; other users don’t mind sharing from and sharing with these accounts.
Once users know that a specific social media account is a verified one, they would never hesitate to interact with them.
If you want that kind of reverence for your online presence, keep reading as we elaborate on how to get verified on Discord:
In this article
- Part 1: How to Get Verified On Discord
- Part 2: How to Apply For Discord Partnership
- Part 3: Differences Between Discord Verification And Partnership
Part 1: How to Get Verified On Discord
Verification on social media sites is most often used as proving your identity when you are a semi-famous or famous individual.
However, unlike the variety of other social media platforms, Discord does not verify just about anyone with a large following.
Presently, verification on Discord is limited to publishers and game developers, Spotify verified musical artists, and professional e-sports teams with massive followers and monthly listeners.
Suppose you are a content creator on YouTube, Twitch, or Reddit. In that case, you can also apply for Discord Partnership, which is an alternative account identification form.
Therefore, read on as we discuss how to get verified on Discord:
Requirements Of Getting Verified On Discord
If you want to get verified on Discord, here are all the things you need to know about the application and qualification process:
- You must be a server owner and be the official representative of a group, team, or individual applying
- The server being verified must also meet the community guidelines of Discord
- If you do not fall into any of the categories mentioned above, you cannot be verified on Discord
- However, if you do meet the criteria, you would have to go to discordapp.com/verification and click on “Apply Now”
- Applicants are also required to provide an associated email address, along with the supplementary information proving their identity
Suppose you do not fit into the Discord verification criteria, but you are a streamer or a content creator. In that case, you can apply for your server to become a Discord Partner.
Part 2: How to Apply For Discord Partnership
Recently there was a change in the Discord Partner Program, rewarding more active servers instead of the server owners with a large following outside of Discord.
For eligibility in the Discord Partner Program, the server in question must meet the Activity Requirements that are listed in the Partner Program portion of Server Insights.
You must keep in mind that partnership is not automatic, and you must fill out an application. Discord can also remove your partnership at any time if the requirements mentioned above are not met for a prolonged period.
Requirements For Partner Discord Servers
The Discord partner program provides engaged and well-moderated servers with the extra tools and recognition to re-invest in the community. The accepted servers also get additional benefits and perks.
Before submitting your Partner application, you would need to check the server engagement requirements.
The servers thinking of applying to the Partner program have to be marked as “Community” servers in the Server Settings, allowing access to Server Insights.
The Server Insights will help you look at how close you are to applying to the Discord Partner Program.
You can also track the progress towards unlocking your Partner Program application anytime inside the Server Insights and the in-app Partner page.
Once you attain access to this page, there are specific server requirements that you would have to reach:
- The server must be a minimum of eight weeks old
- You must have a minimum of 500 members on your server
- Have a minimum of fifty communicators, people actively talking on your server per week
- Have a minimum of a hundred participators, people visiting/viewing your server per week
- Have a minimum of 20% Week 1 retention over a period of 8 weeks
- You must have enabled the two-factor authentication requirement for Server Moderation. This can be found in the Server Settings and then going to Moderation
Once you are a Discord Partner, you will get access to the VIP features mentioned below:
- You will receive a banner for your server
- You will receive an animated server icon
- The server and the server owner will receive a Discord Partner badge
- The server owner will receive a subscription to Discord Nitro throughout the partnership
- The partnered server also receives a customizable vanity invite URL
Part 3: Differences Between Discord Verification And Partnership
Discord verification goes to servers that are run by brands, figures of public interest, and businesses. A verified badge shows the official home of that community.
Acceptance into the Discord Verification program only gives you server access to the Vanity URL, Verified Server badge, and the invite splash background.
In contrast, the Partner program provides a server banner, animated server icon, Nitro subscription, and a Discord Partner badge.
Furthermore, the Discord Partner Program aims to reward engaged, quality servers by providing them with extra tools and recognition, helping them invest further into their community.
A partner badge next to a server’s name indicates that it is one of the most engaging and reliable communities on Discord.
You might be thinking, can I be Discord Verified and Discord Partner at the same time? The answer is yes, you can.
If you are qualified for both programs, you can be in them. A Discord Verified server could send its application to the Discord Partner Program when they satisfy Partner Program requirements.
Lastly, if a server is removed from one of the programs, it can still be in the other one. Like, suppose a server is both Verified and Partnered but loses its Partnership. In that case, it can still stay verified and enjoy all the added benefits of Discord Verification.
Frequently Asked Question about Getting Verification on Discord
Question 1: How long will it take to complete verification on Discord?
Answer: Generally, it would take around 5 business day to complete the verfication. However, the time may varies depend on the amount of application.
Soure: Discord Support
Question 2: Will I get charged for getting my server verified?
Answer: No. You won’t be charged for getting your Discord server verified.
Question: Can I apply verification if our server is run by fan?
Answer: No, fan server can not be verified.
Richard Bennett
Richard Bennett is a writer and a lover of all things video.
Follow @Richard Bennett
How to Add Roles in Discord?
How to Add Roles in Discord?
Richard Bennett
Mar 27, 2024• Proven solutions
Having a Discord server for you and your friends is a fun experience. And for gamers, Discord is a necessity. You can customize it with bots, connect real-time over voice channels, and even add rooms for chat forums.
Obviously, creating and managing a Discord server can get difficult. Especially when the server gets crammed with members, it is no longer a one-person show. You need help with monitoring and moderation. And let’s face it – you cannot watch your server round the clock.
So, let us learn the art of delegation on Discord! This guide will help you with – How to add roles in Discord and how to assign them to members. This includes creating roles, deleting them, and granting appropriate permissions.
- Part 1: Discord Server Permissions Introduction
- Part 2: How to Make and Add Roles in Discord on Computer
- Part 3: How to Manage Roles in Discord?
- Part 4: How to Delete Roles in Discord?
- Part 5: How to Add Roles on Discord Mobile?
- Part 6: Adding Roles to Discord FAQs
Part 1: Discord Server Permissions You Can Set Up
To give you a heads-up, there are around 29 permissions that you can adjust over a Discord server. More specifically, there are 7 voice permissions, 9 permissions related to texts, and about 13 permissions dealing with the server.
1. General server permission
Administrator – this is the highest permission that you can grant to a user. Think twice before giving this authority to anyone.
View Audit Log – with this permission, a user can read the server’s audits.
Manage Server – this permission enables a user to change the server’s name or shift it to another region.
Manage Roles – a user with this authority can make new roles or modify the roles without this permission.
Manage Channels – with this; a user can make, edit, or remove channels on a server.
Manage emojis – users with this authority can manage emotes.
Manage Webhooks – if you have this authority, you can add, modify, and remove webhooks.
Read Text Channels & See Voice Channels – a user with this permission can read text channels.
2. Membership permissions
Ban Members – a member with permission, can ban members from the server.
Create Instant Invite – users with this permission can invite people to the server.
Change Nickname – you can change your nickname anytime if this permission is enabled.
Manage Nicknames – if enabled, a user can change other’s nicknames.
Kick Members – a user with this authority can remove members from the server.
3. Text channel permissions
Send Messages – with this; users can send texts on chats.
Send TTS Messages – this enables users to send text-to-speech texts.
Manage Messages – with this; a user can remove or pin texts of other users.
Embed Links – enables users to embed hyperlinks in texts.
Attach Files – with this; users can attach files in the texts.
Read Message History – enables users to access earlier texts.
Mention Everyone – you can send push notifications on the channel if this permission is enabled.
Use External Emojis – if enabled, users can send emojis from other servers.
Add Reactions – with this; users can add new reactions to a text.
4. Voice channel permissions
Connect – enables users to connect themselves over the voice channel.
Speak – users can talk over the voice channel.
Mute Members – turn off other user’s speech.
Deafen Members – turn off hearing on the channel for a user.
Move Members – enables a user to shift members from one channel to a different channel.
Use Voice Activity – a member can talk without using Push-to-Talk, with this permission.
Priority Speaker – when this permission is turned on for a user, other’s
this permission allows the user to reduce the volume of other users when this user is speaking so that their words are louder on the channel.
5. Advanced permissions
Includes the ‘Administrator’ permission, which by default enables all the permissions to the assigned user.
Part 2: How to Make and Add Roles in Discord on Computer
The desktop app and Browser resemble the mobile apple a lot. The process of assigning roles and configuring members is more or less the same across devices. First, you need to create roles and define their authority before assigning these roles to some members.
How to create roles in Discord?
Before you can assign roles, you need a server. Once you have created your Discord server, start crafting the structure.
- Open your server and right-click on it.
- From the menu that appears, tap server settings.
- Name the role suitably. It should be descriptive of the authority.
- Tap on the plus sign that appears on the top right of the page.
- Here, you can change the title off the roll and even choose the color.
- Now comes the time to grant some permissions. These are basically the authority that you gave to every profile.
- When you are done, save the changes.
How to Assign Roles to Members in Discord?
To be able to assign roles, you should first create them
- Once again, hit that right button on your server and go to server settings.
- From the menu that appears to the left, ‘choose members’ under user management.
- Here, you will see the list of all the members on your server, tap the Plus sign that is right beside the username.
- From the drop-down menu that appears, select a role you want to assign to that member.
- You will notice that the color changes as per your settings. And this is how you assign roles to a server.
Part 3: How to Manage Roles in Discord?
After you learn how to make roles in Discord, you might want to manage them.
If you have got the hang of creating roles, then managing them is no different. Whenever the server gets crowded, you can create more roles or modify the existing ones. A smaller server can run smoothly with just an admin and an ‘everyone’ role.
The quickest and easiest way to manage your bloating server is to let all members be ‘everyone’ and adjust permissions accordingly. So, whenever members enter your server, they will automatically be assigned the common role.
Further, you can easily figure out what roles you have assigned to whom. Due to these colors, the other members can identify moderators, admins, or other roles.
Part 4: How to Delete Roles in Discord?
Honestly, removing Discord roles easier than setting them up. There are hardly a few steps that you need to follow for role removal.
- place the cursor on the server, and hit the right-click.
- From the list, choose server settings. Then click on roles.
- From the roles window, tap on the role that you wish to delete.
- Towards the bottom, you will see the option to delete the role.
- Press ok to confirm.
Part 5: How to Add Roles on Discord Mobile?
Like we mentioned earlier, the user interface of Discord is similar across devices. So, there is little difference between the process of creating and managing roles. But it can be baffling for beginners, so here’s a brief!
1. How to create roles in Discord mobile app?
Before you can assign roles, you have to create them.
- Open your server.
- Tap on the arrow beside the server’s title. A drop-down menu will appear. Select ‘server settings’ from that.
- Tap on ‘Roles.’ A common role, ‘everyone’ is assigned to all the members who have basic permissions enabled for everyone.
- Tap the plus sign and add a role.
- Give the role a color and describe it in a few words.
- Go through the permissions and enable the ones that fit the role.
- Save the changes.
You can repeat this multiple times to create more roles.
2. How to Assign Roles in Discord mobile app?
- Head over to settings and select ‘Members.’
- Select the members you want to assign roles to.
- Tick the boxes beside each member’s name for the roles you are assigning them.
Save the changes, and you are good to go! You can assign multiple roles to a member.
Part 6: FAQs about Discord Server Roles
Just some obvious things you might wonder about.
- How to make someone admin on Discord?
Making someone admin is the same as assigning other roles. Open your server and go to server settings.
- From there, select ‘roles’ from the left pane.
- Create a new role.
- Name the role ‘admin’ or an equivalent title.
- Adjust the setting related to sorting out role members with other members.
- Go to general permissions and tick the ‘Administrator’ option.
- Hit the ‘save changes’ button at the bottom.
- Now it’s time to assign the role to someone. Right-click on the user that you want to assign the role.
- Choose ‘roles’ from the drop-down list and select ‘Admin.’
And now your server has an admin!
- How can I assign roles to new users in Discord automatically?
By default, every member gets the role of ‘everyone’ on the server. However, you can customize this and add the MEE6 bot for automatic role allocation.
- Why can’t I manage the server even I am an admin on the server?
This is likely to happen if the server owner gave you the role of admin, but the permissions are disabled. You can ask the owner to enable the permissions for your user ID.
Richard Bennett
Richard Bennett is a writer and a lover of all things video.
Follow @Richard Bennett
Richard Bennett
Mar 27, 2024• Proven solutions
Having a Discord server for you and your friends is a fun experience. And for gamers, Discord is a necessity. You can customize it with bots, connect real-time over voice channels, and even add rooms for chat forums.
Obviously, creating and managing a Discord server can get difficult. Especially when the server gets crammed with members, it is no longer a one-person show. You need help with monitoring and moderation. And let’s face it – you cannot watch your server round the clock.
So, let us learn the art of delegation on Discord! This guide will help you with – How to add roles in Discord and how to assign them to members. This includes creating roles, deleting them, and granting appropriate permissions.
- Part 1: Discord Server Permissions Introduction
- Part 2: How to Make and Add Roles in Discord on Computer
- Part 3: How to Manage Roles in Discord?
- Part 4: How to Delete Roles in Discord?
- Part 5: How to Add Roles on Discord Mobile?
- Part 6: Adding Roles to Discord FAQs
Part 1: Discord Server Permissions You Can Set Up
To give you a heads-up, there are around 29 permissions that you can adjust over a Discord server. More specifically, there are 7 voice permissions, 9 permissions related to texts, and about 13 permissions dealing with the server.
1. General server permission
Administrator – this is the highest permission that you can grant to a user. Think twice before giving this authority to anyone.
View Audit Log – with this permission, a user can read the server’s audits.
Manage Server – this permission enables a user to change the server’s name or shift it to another region.
Manage Roles – a user with this authority can make new roles or modify the roles without this permission.
Manage Channels – with this; a user can make, edit, or remove channels on a server.
Manage emojis – users with this authority can manage emotes.
Manage Webhooks – if you have this authority, you can add, modify, and remove webhooks.
Read Text Channels & See Voice Channels – a user with this permission can read text channels.
2. Membership permissions
Ban Members – a member with permission, can ban members from the server.
Create Instant Invite – users with this permission can invite people to the server.
Change Nickname – you can change your nickname anytime if this permission is enabled.
Manage Nicknames – if enabled, a user can change other’s nicknames.
Kick Members – a user with this authority can remove members from the server.
3. Text channel permissions
Send Messages – with this; users can send texts on chats.
Send TTS Messages – this enables users to send text-to-speech texts.
Manage Messages – with this; a user can remove or pin texts of other users.
Embed Links – enables users to embed hyperlinks in texts.
Attach Files – with this; users can attach files in the texts.
Read Message History – enables users to access earlier texts.
Mention Everyone – you can send push notifications on the channel if this permission is enabled.
Use External Emojis – if enabled, users can send emojis from other servers.
Add Reactions – with this; users can add new reactions to a text.
4. Voice channel permissions
Connect – enables users to connect themselves over the voice channel.
Speak – users can talk over the voice channel.
Mute Members – turn off other user’s speech.
Deafen Members – turn off hearing on the channel for a user.
Move Members – enables a user to shift members from one channel to a different channel.
Use Voice Activity – a member can talk without using Push-to-Talk, with this permission.
Priority Speaker – when this permission is turned on for a user, other’s
this permission allows the user to reduce the volume of other users when this user is speaking so that their words are louder on the channel.
5. Advanced permissions
Includes the ‘Administrator’ permission, which by default enables all the permissions to the assigned user.
Part 2: How to Make and Add Roles in Discord on Computer
The desktop app and Browser resemble the mobile apple a lot. The process of assigning roles and configuring members is more or less the same across devices. First, you need to create roles and define their authority before assigning these roles to some members.
How to create roles in Discord?
Before you can assign roles, you need a server. Once you have created your Discord server, start crafting the structure.
- Open your server and right-click on it.
- From the menu that appears, tap server settings.
- Name the role suitably. It should be descriptive of the authority.
- Tap on the plus sign that appears on the top right of the page.
- Here, you can change the title off the roll and even choose the color.
- Now comes the time to grant some permissions. These are basically the authority that you gave to every profile.
- When you are done, save the changes.
How to Assign Roles to Members in Discord?
To be able to assign roles, you should first create them
- Once again, hit that right button on your server and go to server settings.
- From the menu that appears to the left, ‘choose members’ under user management.
- Here, you will see the list of all the members on your server, tap the Plus sign that is right beside the username.
- From the drop-down menu that appears, select a role you want to assign to that member.
- You will notice that the color changes as per your settings. And this is how you assign roles to a server.
Part 3: How to Manage Roles in Discord?
After you learn how to make roles in Discord, you might want to manage them.
If you have got the hang of creating roles, then managing them is no different. Whenever the server gets crowded, you can create more roles or modify the existing ones. A smaller server can run smoothly with just an admin and an ‘everyone’ role.
The quickest and easiest way to manage your bloating server is to let all members be ‘everyone’ and adjust permissions accordingly. So, whenever members enter your server, they will automatically be assigned the common role.
Further, you can easily figure out what roles you have assigned to whom. Due to these colors, the other members can identify moderators, admins, or other roles.
Part 4: How to Delete Roles in Discord?
Honestly, removing Discord roles easier than setting them up. There are hardly a few steps that you need to follow for role removal.
- place the cursor on the server, and hit the right-click.
- From the list, choose server settings. Then click on roles.
- From the roles window, tap on the role that you wish to delete.
- Towards the bottom, you will see the option to delete the role.
- Press ok to confirm.
Part 5: How to Add Roles on Discord Mobile?
Like we mentioned earlier, the user interface of Discord is similar across devices. So, there is little difference between the process of creating and managing roles. But it can be baffling for beginners, so here’s a brief!
1. How to create roles in Discord mobile app?
Before you can assign roles, you have to create them.
- Open your server.
- Tap on the arrow beside the server’s title. A drop-down menu will appear. Select ‘server settings’ from that.
- Tap on ‘Roles.’ A common role, ‘everyone’ is assigned to all the members who have basic permissions enabled for everyone.
- Tap the plus sign and add a role.
- Give the role a color and describe it in a few words.
- Go through the permissions and enable the ones that fit the role.
- Save the changes.
You can repeat this multiple times to create more roles.
2. How to Assign Roles in Discord mobile app?
- Head over to settings and select ‘Members.’
- Select the members you want to assign roles to.
- Tick the boxes beside each member’s name for the roles you are assigning them.
Save the changes, and you are good to go! You can assign multiple roles to a member.
Part 6: FAQs about Discord Server Roles
Just some obvious things you might wonder about.
- How to make someone admin on Discord?
Making someone admin is the same as assigning other roles. Open your server and go to server settings.
- From there, select ‘roles’ from the left pane.
- Create a new role.
- Name the role ‘admin’ or an equivalent title.
- Adjust the setting related to sorting out role members with other members.
- Go to general permissions and tick the ‘Administrator’ option.
- Hit the ‘save changes’ button at the bottom.
- Now it’s time to assign the role to someone. Right-click on the user that you want to assign the role.
- Choose ‘roles’ from the drop-down list and select ‘Admin.’
And now your server has an admin!
- How can I assign roles to new users in Discord automatically?
By default, every member gets the role of ‘everyone’ on the server. However, you can customize this and add the MEE6 bot for automatic role allocation.
- Why can’t I manage the server even I am an admin on the server?
This is likely to happen if the server owner gave you the role of admin, but the permissions are disabled. You can ask the owner to enable the permissions for your user ID.
Richard Bennett
Richard Bennett is a writer and a lover of all things video.
Follow @Richard Bennett
Also read:
- In 2024, Customizing Your Channel for Optimal Live Broadcasts
- [Updated] The Prime List of Budget-Friendly Discord Voice Recording Tools
- [Updated] 2024 Approved A Compreran's Guide to Finding and Joining Exclusive Discords
- 2024 Approved Mastery in Making Stunning Discord Pfps with Minimal Effort
- [Updated] Deciphering VoIP Prowess Discord Vs. Skype Showdown
- [Updated] Expert Font Design Services for Discord App (Android/iOS)
- [New] 2024 Approved Captivate Conversations Essential Cool Channel Titles
- [Updated] Guide to Pocket-Friendly Discord Video Downloads on Tech Devices for 2024
- [Updated] In 2024, The Ultimate Guide to Customizing Your Discord Avatar
- [New] In 2024, Vivid Vistas The Ultimate Selection of Popular DiscoTheme Sets
- [Updated] High-End Graphics Made Simple Free Discord Symbol Maker
- [Updated] Decoding the Best Workplace Messaging Tool Slack or Discord for 2024
- Quick Guide to DiscoDuty Adding Roles on Discord for 2024
- 2024 Approved Unlink Discord From PC/Mobile
- How to Turn Off a Discord Server Device-Wise for 2024
- [New] 2024 Approved How to Delete Messages On Discord In Bulk
- [Updated] Premiere Discord Recording Tools - Online, Desktop, Mobile
- [New] In 2024, The Ultimate Guide to Mastering Message Pins on Discord
- [Updated] 2024 Approved Discord Video Downloading Guide Free iOS, Android, PC, Mac Methods
- [New] Advanced Font Designers Focused on Discord Channels for 2024
- Discover the Top 10 Cost-Free Audio Recorders for Discord for 2024
- 2024 Approved Unveiling the Finest DiscoVoice Tools A Review & Guide
- 2024 Approved Essential Knowledge on Discord Stickers
- 2024 Approved Mastering Discord PFPs Crafting Impressive Virtual Portraits
- [New] A Complete Guide to Personalizing Your Virtual Space on Discord
- [Updated] Transform Your Messaging Top 8 No-Cost Emoji Sites Revealed
- Voice Overhaul Hacks for Discord Chatters - Top Free Solutions for 2024
- [New] Unlocking Discord's Potential The Art of Pinning for 2024
- [New] In 2024, Your Essential Guide to Discord Stickers
- [New] In 2024, Part Ways with Discord Platform
- Revolutionize Your Discord Experience with These Must-Have Audio Modifiers for 2024
- 2024 Approved The Simplest Way to Understand and Apply Discord Spoilers
- [Updated] 50+ Cool Discord Names to Attract Attention in No Time for 2024
- [New] In 2024, Getting Acquainted with Discord's Innovations
- [Updated] 2024 Approved Enhancing Your Digital Persona Personalize Your Discord Status with Custom Emojis
- [New] In 2024, Inside Secrets Everything About Discord Stickers
- [New] In 2024, Discord's Broadcasting Features Unveiled A Step-by-Step Guide
- [Updated] In 2024, Power up Your Discord Experience with the Art of Adding GIFs
- Reclaim Lost Chatter in Shared Tweeted Films
- [Updated] Prime Flood & Flow Video Game Reviews
- 5 Ways to Restart Realme 12 Pro+ 5G Without Power Button | Dr.fone
- Realme V30 Not Connecting to Wi-Fi? 12 Quick Ways to Fix | Dr.fone
- [Updated] Mastering Online Meetings Best Choices
- [New] Becoming an Influencer Entrepreneur Creating a Business Profile on IG for 2024
- How Tecno Pop 8 Mirror Screen to PC? | Dr.fone
- In 2024, Quick Online MP3 Generator From FB Videos, 2023 Updates
- [Updated] 2024 Approved Rediscovering Retro Gaming Identifying the Most Advanced GB Console Emulation Programs
- Solved Warning Camera Failed on Nubia Red Magic 8S Pro+ | Dr.fone
- Evaluating MAGIX Samplitudes Market Position Against Other Audio Editing Suites
- Crafting Engaging Facebook Videos The Role of Cover Size and Resolution
- Translate Live Video Making It Possible With The Best Tool for 2024
- [New] Decrypt Viewer Counts Unveiling Instagram Audience Numbers for 2024
- In 2024, Full Guide to Catch 100 IV Pokémon Using a Map On Samsung Galaxy M34 5G | Dr.fone
- Title: "[New] 2024 Approved Mastering the Certification Journey Becoming a Verified Disco Member"
- Author: Timothy
- Created at : 2024-05-23 22:48:16
- Updated at : 2024-05-24 22:48:16
- Link: https://discord-videos.techidaily.com/new-2024-approved-mastering-the-certification-journey-becoming-a-verified-disco-member/
- License: This work is licensed under CC BY-NC-SA 4.0.
