
!["[New] 2024 Approved Quick and Easy Methods for Including Emojis Into Discord Statements"](https://www.lifewire.com/thmb/SASg2byCb-BOpkOiBE71CUPEgYY=/400x300/filters:no_upscale():max_bytes(150000):strip_icc()/New-iPad-air-and-iPad-mini-with-Apple-Pencil-03182019-60f2de1f64db4b8dbe4822e18a8e6672.jpg)
"[New] 2024 Approved Quick and Easy Methods for Including Emojis Into Discord Statements"
Quick and Easy Methods for Including Emojis Into Discord Statements
If you have an active Nitro subscription and want to make your Discord status look better, you can put emojis in Discord status. This article will help you walk through the process of using Discord custom status to upload emojis. Custom status is a new feature introduced by Discord. By uploading the emojis, you can keep your Discord status fresh! So, keep reading to find how to put emojis in Discord status through your desktop and mobile app conveniently.
In this article
01 How to Put Custom Emoji in Discord Status on Desktop and Online?
02 How to Add Custom Emoji on Discord Status on Mobile?
03 How to Copy and Paste Emojis in Discord Status?
04 How to Add Animated Emojis to Discord Status?
05 Custom Discord Status Emoji Ideas
Part 1: How to Put Custom Emoji in Discord Status on Desktop and Online?

For those who want to add an emoji on their Discord status on desktop and online, you can do that easily by following the steps that we have listed below:
Step 1: First, you need to go to https://discord.com . Once you visit the site, please log in using your Discord credential.
Step 2: Once your profile is open, please click on the profile picture.
Step 3: On your profile, look at the bottom of the menu. You will see a pop-up menu that says set a custom status.
Step 4: On the emojis bar, you can add an emoji. To do that, you need to click on the emoji status. Next, you will see a list of emojis. Please note that only an active Nitro subscription user can use animated or custom emojis. On the left will be the category of emojis. Choose one category that suits your mood; once the category opens, click on an emoji to add it.
Step 5: After that, you need to click on the Today option. This will open a drop-down menu. You need to choose a time frame for the emoji or status. You can choose today, 4 hours, 1 hour, etc.
Step 6: If you are done with the emoji selection and have chosen the duration for the status, you need to click on the Save option. The Save option will be on the bottom right of the same pop-up window.
And that’s it. The emojis will be successfully added to your status based on the duration that you have chosen. If you want to change the emoji or remove it, you need to undergo the same process.
Related: How to Get Free Animated Emojis on Discord
Part 2: How to Add Custom Emoji on Discord Status on Mobile?

If you are using the Discord app on your mobile phone, you can add a custom emoji on Discord status using your phone too. Follow the step-by-step guide that we have prepared to learn how to do that.
Step 1: Take your smartphone and look for the Discord app. The icon will look like a controller. Click on it to launch Discord.
Step 2: Just like the web steps, you will have to click on your profile. Click on the hamburger icon, which is there in the upper left corner. Then, look at the bottom right corner to find your profile.
Step 3: Now, click on the Set Status option. This will be the first option on your profile. Go on and click on that.
Step 4: After that, click on the option that says set a custom status. On the status bar, you will see an emoji. You need to click on that to open the list of emojis to choose from.
Step 5: Choose a time frame for the emoji, for example, 30 minutes, 1-hour, clear tomorrow, etc. If you are using an Android, you will see the floppy disk option; click on that to save your status. If you are using an iOS device, you will see the save option.
By following these steps, your status with the emoji you have chosen will be saved successfully. If you want to add a new emoji, repeat the same process.
Related: How to Change Discord Status
Part 3: How to Copy and Paste Emojis in Discord Status?
If you don’t want to go through the hassle of adding an emoji manually, you can just copy and paste one to your status. How to do it? Follow these steps:
Step 1: Go to a website that has emojis for Discord status.
Step 2: Scroll down the list of emojis and copy it.
Step 3: Go back to your Discord Nitro page and open the status setting. There, on the emoji section, paste the emoji that you have copied from another site.
Please note that this may not be possible for all types of emojis, though. Also, this will work if only the website has created emojis that can be directly copied and pasted on the status section.
Part 4: How to Add Animated Emojis to Discord Status?
Apart from the basic emojis, you can also add animated emojis to your Discord Status to make your status look even better. Here are the steps to follow to add an animated emoji:
Step 1: First, go to a website called https://betterdiscord.app/ . Once you are there, click on the Download option.
Step 2: You will see a page loaded with codes, right-click on the screen and click on the Save option. When it is downloaded, click on the Better Discord Windows installer. Next, read the license agreement and click on the Next option.
Step 3: Then click install better Discord and hit the next button. Choose the Discord version that you currently have installed.
Step 4: Open Discord and click on the user settings. There, you will see the Better Discord section. Next, click on the Plugin option. Now, close the Discord window and drag the animated status dot plugin into the plugin folder that opened after clicking on the Plugin option.
Step 5: Go to Discord again, and you will see the Animated Status option. Enable it and click on the gear icon. To add an animated emoji, click on the + icon. Next, you will see a Nitro ID field. Then, go to a chat page and click on the emoji option.
Step 6: Look at the emoji that you like and memorize the animated emoji name. Press \ followed by the name of the emoji. Now, copy the whole text and paste it again. You will see a few numbers; that’s the Nitro ID for the emoji. Copy the number only, go back to the Animated plugin and paste it on the Nitro ID field. Go back to the Nitro page again, and you will see the animated emoji on your status.
Part 5: Custom Discord Status Emoji Ideas

If you want to make your Discord Status look really cool, you can get some custom Discord status emoji ideas from us. Read this section to find out a few super cool custom Discord status emojis ideas and get inspired.
Use Kaomoji in Status
Kaomoji is a collection of super cute emojis that can brighten anyone’s day! They are great because they make your status look different and cute at the same time. You can choose from stars, smiley faces, cute polar bears, and much more! And yes, they are different than your usual emojis.
Add Old-school Emoticons
Remember the good old Nokia 1100 days when you used to send emojis using some signs? Well, you can try this idea too to give a vintage look to your status. Everybody uses the same smiley emojis, so why not try something different? Go back to your old 90s school days and display images, such as @}->– which is a rose! You can find old-school emoticons online easily.
Conclusion
And that’s it; now you know how to put emoji in Discord status without sweating much. We hope you have found this article helpful, and you will start using cool emojis on your status to make your Discord status look different than others!
02 How to Add Custom Emoji on Discord Status on Mobile?
03 How to Copy and Paste Emojis in Discord Status?
04 How to Add Animated Emojis to Discord Status?
05 Custom Discord Status Emoji Ideas
Part 1: How to Put Custom Emoji in Discord Status on Desktop and Online?
For those who want to add an emoji on their Discord status on desktop and online, you can do that easily by following the steps that we have listed below:
Step 1: First, you need to go to https://discord.com . Once you visit the site, please log in using your Discord credential.
Step 2: Once your profile is open, please click on the profile picture.
Step 3: On your profile, look at the bottom of the menu. You will see a pop-up menu that says set a custom status.
Step 4: On the emojis bar, you can add an emoji. To do that, you need to click on the emoji status. Next, you will see a list of emojis. Please note that only an active Nitro subscription user can use animated or custom emojis. On the left will be the category of emojis. Choose one category that suits your mood; once the category opens, click on an emoji to add it.
Step 5: After that, you need to click on the Today option. This will open a drop-down menu. You need to choose a time frame for the emoji or status. You can choose today, 4 hours, 1 hour, etc.
Step 6: If you are done with the emoji selection and have chosen the duration for the status, you need to click on the Save option. The Save option will be on the bottom right of the same pop-up window.
And that’s it. The emojis will be successfully added to your status based on the duration that you have chosen. If you want to change the emoji or remove it, you need to undergo the same process.
Related: How to Get Free Animated Emojis on Discord
Part 2: How to Add Custom Emoji on Discord Status on Mobile?
If you are using the Discord app on your mobile phone, you can add a custom emoji on Discord status using your phone too. Follow the step-by-step guide that we have prepared to learn how to do that.
Step 1: Take your smartphone and look for the Discord app. The icon will look like a controller. Click on it to launch Discord.
Step 2: Just like the web steps, you will have to click on your profile. Click on the hamburger icon, which is there in the upper left corner. Then, look at the bottom right corner to find your profile.
Step 3: Now, click on the Set Status option. This will be the first option on your profile. Go on and click on that.
Step 4: After that, click on the option that says set a custom status. On the status bar, you will see an emoji. You need to click on that to open the list of emojis to choose from.
Step 5: Choose a time frame for the emoji, for example, 30 minutes, 1-hour, clear tomorrow, etc. If you are using an Android, you will see the floppy disk option; click on that to save your status. If you are using an iOS device, you will see the save option.
By following these steps, your status with the emoji you have chosen will be saved successfully. If you want to add a new emoji, repeat the same process.
Related: How to Change Discord Status
Part 3: How to Copy and Paste Emojis in Discord Status?
If you don’t want to go through the hassle of adding an emoji manually, you can just copy and paste one to your status. How to do it? Follow these steps:
Step 1: Go to a website that has emojis for Discord status.
Step 2: Scroll down the list of emojis and copy it.
Step 3: Go back to your Discord Nitro page and open the status setting. There, on the emoji section, paste the emoji that you have copied from another site.
Please note that this may not be possible for all types of emojis, though. Also, this will work if only the website has created emojis that can be directly copied and pasted on the status section.
Part 4: How to Add Animated Emojis to Discord Status?
Apart from the basic emojis, you can also add animated emojis to your Discord Status to make your status look even better. Here are the steps to follow to add an animated emoji:
Step 1: First, go to a website called https://betterdiscord.app/ . Once you are there, click on the Download option.
Step 2: You will see a page loaded with codes, right-click on the screen and click on the Save option. When it is downloaded, click on the Better Discord Windows installer. Next, read the license agreement and click on the Next option.
Step 3: Then click install better Discord and hit the next button. Choose the Discord version that you currently have installed.
Step 4: Open Discord and click on the user settings. There, you will see the Better Discord section. Next, click on the Plugin option. Now, close the Discord window and drag the animated status dot plugin into the plugin folder that opened after clicking on the Plugin option.
Step 5: Go to Discord again, and you will see the Animated Status option. Enable it and click on the gear icon. To add an animated emoji, click on the + icon. Next, you will see a Nitro ID field. Then, go to a chat page and click on the emoji option.
Step 6: Look at the emoji that you like and memorize the animated emoji name. Press \ followed by the name of the emoji. Now, copy the whole text and paste it again. You will see a few numbers; that’s the Nitro ID for the emoji. Copy the number only, go back to the Animated plugin and paste it on the Nitro ID field. Go back to the Nitro page again, and you will see the animated emoji on your status.
Part 5: Custom Discord Status Emoji Ideas
If you want to make your Discord Status look really cool, you can get some custom Discord status emoji ideas from us. Read this section to find out a few super cool custom Discord status emojis ideas and get inspired.
Use Kaomoji in Status
Kaomoji is a collection of super cute emojis that can brighten anyone’s day! They are great because they make your status look different and cute at the same time. You can choose from stars, smiley faces, cute polar bears, and much more! And yes, they are different than your usual emojis.
Add Old-school Emoticons
Remember the good old Nokia 1100 days when you used to send emojis using some signs? Well, you can try this idea too to give a vintage look to your status. Everybody uses the same smiley emojis, so why not try something different? Go back to your old 90s school days and display images, such as @}->– which is a rose! You can find old-school emoticons online easily.
Conclusion
And that’s it; now you know how to put emoji in Discord status without sweating much. We hope you have found this article helpful, and you will start using cool emojis on your status to make your Discord status look different than others!
Navigating and Mastering Discord’s Text-to-Speech Tools
How to Use Discord Text-To-Speech?

Richard Bennett
Mar 27, 2024• Proven solutions
While most users of the popular online messaging and content sharing site Discord rely on simple text to communicate, there are numerous situations when using the text-to-speech feature would be quite advantageous. This includes instances when there are language barriers or disabilities to overcome, but also spontaneous moments when users just enjoy hearing each other’s words. Discord supports the use of a text-to-speech (TTS) function and in fact, has a built-in setting for it, but this option only works for desktop users with Windows or Mac devices.
In this article, we will discuss the specifics of activating the TTS function in Discord and using it effectively to improve your communication with other users. By following the detailed instructions provided here, you will be able to learn how to activate text-to-speech on Discord and manage your voice messages on selected servers in the most practical manner.
- Part 1: Enable Text-To-Speech Feature in Discord
- Part 2: How to Set Up Text-To-Speech Notifications on Discord?
- Part 3: How to Use Text-To-Speech in Discord Chatting?
- Part 4: How to Mute All Text-To-Speech Messages on Discord?
- Part 5: Best Text-To-Speech Bots on Discord
Part 1: How to Enable Text-To-Speech Feature in Discord?
Before you can deploy TTS in your chats, you need to change the settings of your profile to enable this option. This isn’t hard to do – just go to the Discord app and select ‘Settings’ from the menu, which will trigger a pop-up window to appear on your screen. Next, you need to find the Text & Images section in the App Settings window, then scroll down to find the Text-to-Speech option, and finally tick the boxes next to Allow playback and Usage of TTS items. After you do this, your Discord will be ready to process your text messages in voice format.
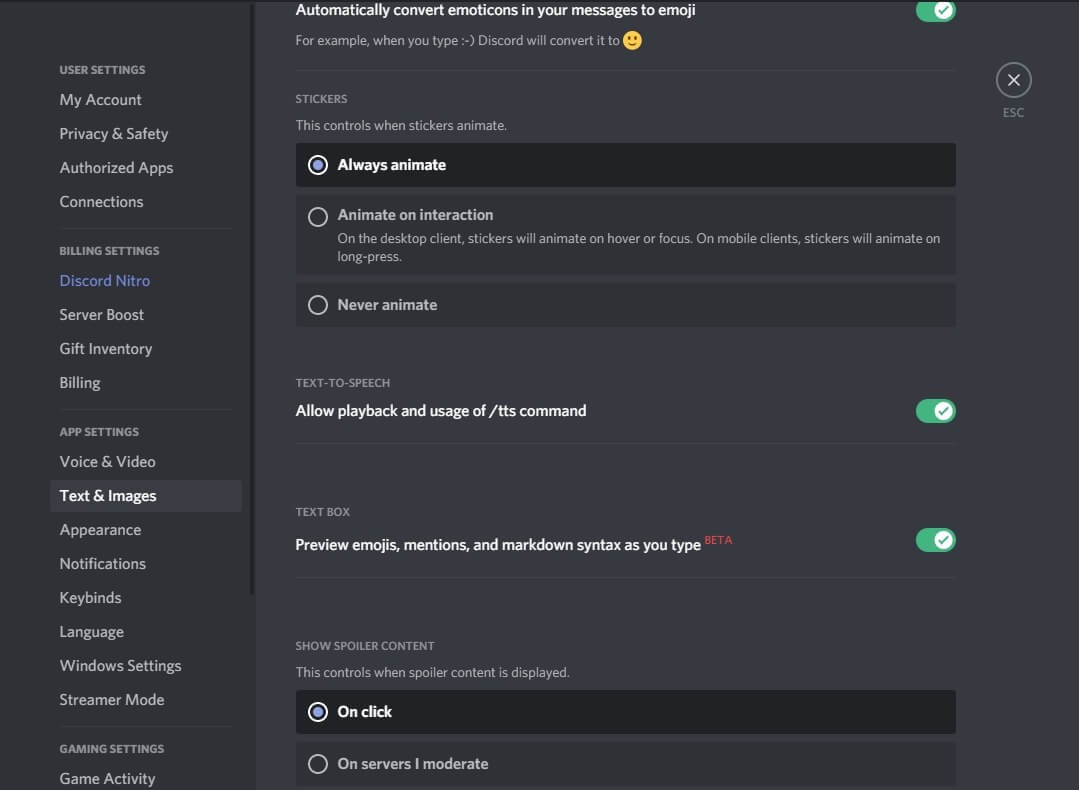
To test whether you successfully activated Text-to-Speech, open any chats on your personal server and try typing out a message, followed immediately by the tag /tts. If everything is working correctly, your message should appear on the screen in the text form, accompanied by its voice rendering delivered by an automated module. The timing of the two should be perfectly synchronized so that you hear the message and see the text at exactly the same instance. Otherwise, go back to settings and make sure you activated the TTS option properly or restart your Discord app.
Part 2: How to Set Up Text-To-Speech Notifications on Discord?
Another practical possibility that can improve your Discord experience is to set up TTS notifications and be immediately informed whenever a fresh message arrives. This can also be done after you change the app parameters from the ‘Settings’ menu. After you see all options, choose ‘App Settings’ and search for the section named ‘Notifications’. By scrolling down, you will reach the item ‘Text-to-Speech notifications’ and after clicking on it you will be given a choice between three options.
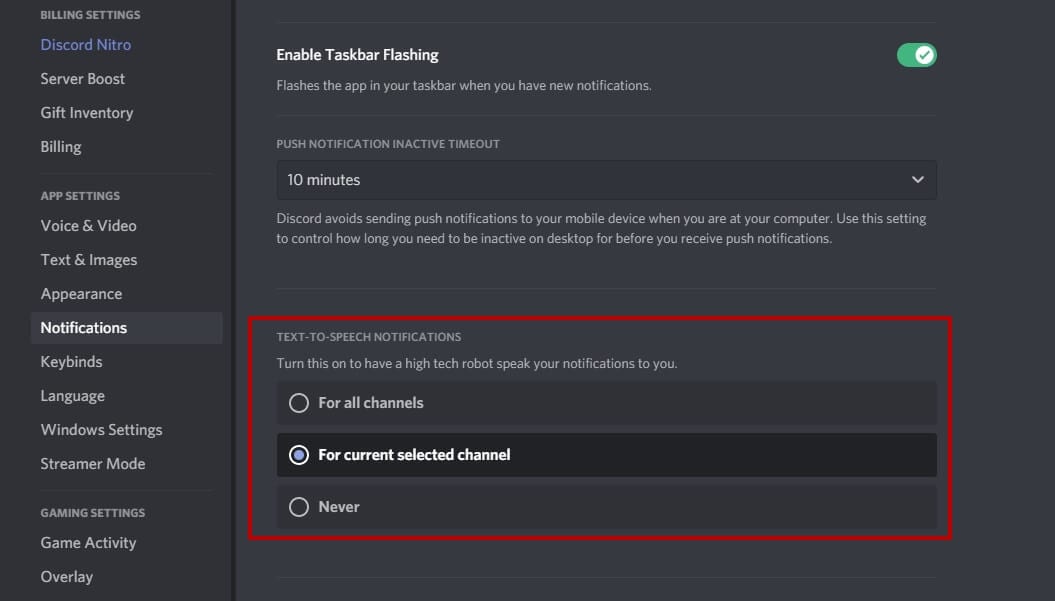
The first option For all channels is to enable notifications on all channels on Discord; choosing it will result in a robotic voice reading all messages from all chats, regardless of whether they have a /tts tag. This option can be useful when you want to maximize your accessibility and receive important information instantly.
By picking the second option, For current selected channel, you can enable TTS notifications only on the current channel. This action will instruct Discord to have an automated voice read all the incoming messages on the active chat aloud, allowing you to stay in the loop at all times. This possibility works well for people who occasionally do multiple things at once, for example, gamers or streamers who use Discord to stay connected with their fans and friends while they are busy.
Finally, you can choose Never to hear any voice messages from your Discord chats never. If you pick this setting, even those messages that were sent with the /tts tag will only be displayed in the text format. This option provides you with peace of mind and prevents spammers from saturating you with voice messages you have no interest in hearing.
Part 3: How to Use Text-To-Speech in Discord Chatting?
It’s not very hard to learn how to effectively use the TTS option in your chats on the Discord platform. This communication format is available on all channels that have an activated Text-to-Speech setting, so you can freely add a few messages to be read aloud or completely switch to automated voice format if you so desire. Doing this in practice is very simple – just start your message by typing the tag /tts and then enter your text as you normally would.

Your TTS message will be reproduced in a voice format by a Discord bot to all participants in the chat who didn’t mute incoming Text-to-Speech chats. An automated voice will say the entire message, and then also pronounce your username to identify the author. At the same time, the message will appear in the chat feed as plain text, so that even those recipients unable to hear it will be able to see the contents.
Part 4: How to Mute All Text-To-Speech Messages on Discord?
You can also decide to prevent any messages from being played to you in a voice format and receive them as text only. This option is available even if you are not the administrator of the chat server and simply want to customize your own experience. To do this, you need to open the Discord app and enter the Settings menu, before selecting the Text & Images section from App Settings. After this, you need to find the Text-to-Speech sub-menu and open it to find the Allow Playback feature. If you disable this feature, you will effectively mute all incoming TTS messages across all Discord servers you are active on.
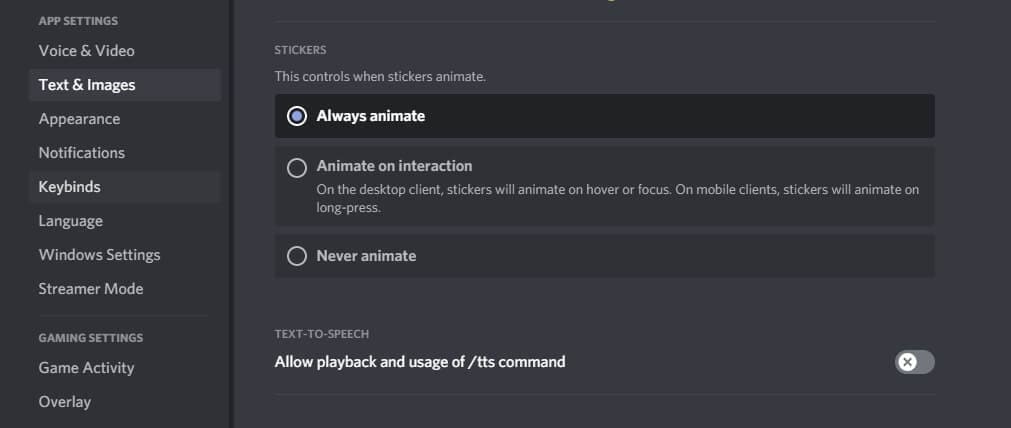
Please keep in mind that deactivating the aforementioned feature won’t block TTS messages from reaching you, but you will see them as text only. On the other hand, you can’t use the /tts tag to send your own Text-to-Speech while the playback setting is disabled. Nothing is preventing you from turning it back on when you want to have a TTS capacity on Discord again.
Part 5: Best Text-To-Speech Bots on Discord
One of the reasons why Discord is so popular is that it allows extensive customization through user-made Bots or modules that automatically perform a certain task. There are several great Bots that can be used for Text-to-Speech, so you might consider utilizing one of them.
1. Text to Speech (TTS)
With many languages supported and a wide range of cool commands, this bot could be the best choice for people who use TTS just for fun.
2. KD Bot
A very popular option for Text-to-Speech on Discord that lets you choose from more than 100 voices and supports upwards of 100 languages, making it a powerful translation tool.
3. Fergun
This multi-language tool responds to more than 100 different commands, so it can be used for a wide variety of purposes with stunning effectiveness.
Frequently asked questions about TTS on Discord
- Can I use the Text-to-Speech feature on Discord from a mobile phone?
Unfortunately, you can’t. Discord works quite well as a text messaging app on mobile platforms, but at this time Text-to-Speech functionality is limited to desktop users.
- Why can’t I use Text-to-Speech on a Discord server?
If you are unable to send or receive TTS messages on Discord, you need to change your settings. Please see Part 1 of this article for detailed instructions.
Richard Bennett
Richard Bennett is a writer and a lover of all things video.
Follow @Richard Bennett
Richard Bennett
Mar 27, 2024• Proven solutions
While most users of the popular online messaging and content sharing site Discord rely on simple text to communicate, there are numerous situations when using the text-to-speech feature would be quite advantageous. This includes instances when there are language barriers or disabilities to overcome, but also spontaneous moments when users just enjoy hearing each other’s words. Discord supports the use of a text-to-speech (TTS) function and in fact, has a built-in setting for it, but this option only works for desktop users with Windows or Mac devices.
In this article, we will discuss the specifics of activating the TTS function in Discord and using it effectively to improve your communication with other users. By following the detailed instructions provided here, you will be able to learn how to activate text-to-speech on Discord and manage your voice messages on selected servers in the most practical manner.
- Part 1: Enable Text-To-Speech Feature in Discord
- Part 2: How to Set Up Text-To-Speech Notifications on Discord?
- Part 3: How to Use Text-To-Speech in Discord Chatting?
- Part 4: How to Mute All Text-To-Speech Messages on Discord?
- Part 5: Best Text-To-Speech Bots on Discord
Part 1: How to Enable Text-To-Speech Feature in Discord?
Before you can deploy TTS in your chats, you need to change the settings of your profile to enable this option. This isn’t hard to do – just go to the Discord app and select ‘Settings’ from the menu, which will trigger a pop-up window to appear on your screen. Next, you need to find the Text & Images section in the App Settings window, then scroll down to find the Text-to-Speech option, and finally tick the boxes next to Allow playback and Usage of TTS items. After you do this, your Discord will be ready to process your text messages in voice format.
To test whether you successfully activated Text-to-Speech, open any chats on your personal server and try typing out a message, followed immediately by the tag /tts. If everything is working correctly, your message should appear on the screen in the text form, accompanied by its voice rendering delivered by an automated module. The timing of the two should be perfectly synchronized so that you hear the message and see the text at exactly the same instance. Otherwise, go back to settings and make sure you activated the TTS option properly or restart your Discord app.
Part 2: How to Set Up Text-To-Speech Notifications on Discord?
Another practical possibility that can improve your Discord experience is to set up TTS notifications and be immediately informed whenever a fresh message arrives. This can also be done after you change the app parameters from the ‘Settings’ menu. After you see all options, choose ‘App Settings’ and search for the section named ‘Notifications’. By scrolling down, you will reach the item ‘Text-to-Speech notifications’ and after clicking on it you will be given a choice between three options.
The first option For all channels is to enable notifications on all channels on Discord; choosing it will result in a robotic voice reading all messages from all chats, regardless of whether they have a /tts tag. This option can be useful when you want to maximize your accessibility and receive important information instantly.
By picking the second option, For current selected channel, you can enable TTS notifications only on the current channel. This action will instruct Discord to have an automated voice read all the incoming messages on the active chat aloud, allowing you to stay in the loop at all times. This possibility works well for people who occasionally do multiple things at once, for example, gamers or streamers who use Discord to stay connected with their fans and friends while they are busy.
Finally, you can choose Never to hear any voice messages from your Discord chats never. If you pick this setting, even those messages that were sent with the /tts tag will only be displayed in the text format. This option provides you with peace of mind and prevents spammers from saturating you with voice messages you have no interest in hearing.
Part 3: How to Use Text-To-Speech in Discord Chatting?
It’s not very hard to learn how to effectively use the TTS option in your chats on the Discord platform. This communication format is available on all channels that have an activated Text-to-Speech setting, so you can freely add a few messages to be read aloud or completely switch to automated voice format if you so desire. Doing this in practice is very simple – just start your message by typing the tag /tts and then enter your text as you normally would.
Your TTS message will be reproduced in a voice format by a Discord bot to all participants in the chat who didn’t mute incoming Text-to-Speech chats. An automated voice will say the entire message, and then also pronounce your username to identify the author. At the same time, the message will appear in the chat feed as plain text, so that even those recipients unable to hear it will be able to see the contents.
Part 4: How to Mute All Text-To-Speech Messages on Discord?
You can also decide to prevent any messages from being played to you in a voice format and receive them as text only. This option is available even if you are not the administrator of the chat server and simply want to customize your own experience. To do this, you need to open the Discord app and enter the Settings menu, before selecting the Text & Images section from App Settings. After this, you need to find the Text-to-Speech sub-menu and open it to find the Allow Playback feature. If you disable this feature, you will effectively mute all incoming TTS messages across all Discord servers you are active on.
Please keep in mind that deactivating the aforementioned feature won’t block TTS messages from reaching you, but you will see them as text only. On the other hand, you can’t use the /tts tag to send your own Text-to-Speech while the playback setting is disabled. Nothing is preventing you from turning it back on when you want to have a TTS capacity on Discord again.
Part 5: Best Text-To-Speech Bots on Discord
One of the reasons why Discord is so popular is that it allows extensive customization through user-made Bots or modules that automatically perform a certain task. There are several great Bots that can be used for Text-to-Speech, so you might consider utilizing one of them.
1. Text to Speech (TTS)
With many languages supported and a wide range of cool commands, this bot could be the best choice for people who use TTS just for fun.
2. KD Bot
A very popular option for Text-to-Speech on Discord that lets you choose from more than 100 voices and supports upwards of 100 languages, making it a powerful translation tool.
3. Fergun
This multi-language tool responds to more than 100 different commands, so it can be used for a wide variety of purposes with stunning effectiveness.
Frequently asked questions about TTS on Discord
- Can I use the Text-to-Speech feature on Discord from a mobile phone?
Unfortunately, you can’t. Discord works quite well as a text messaging app on mobile platforms, but at this time Text-to-Speech functionality is limited to desktop users.
- Why can’t I use Text-to-Speech on a Discord server?
If you are unable to send or receive TTS messages on Discord, you need to change your settings. Please see Part 1 of this article for detailed instructions.
Richard Bennett
Richard Bennett is a writer and a lover of all things video.
Follow @Richard Bennett
Also read:
- [New] Savor a Selection of Free, Flashy Emojis From Online Sites
- Mastery in Locating the Right Discord Server Amidst Thousands for 2024
- 2024 Approved Expert Strategies for Handling Toxic Behavior in Discord Channels
- 2024 Approved Navigating the World of Discord Roles
- [New] In 2024, Get to Know Discord Inside Out
- [New] Seamless Blend Linking Spotify & Discord Directly for 2024
- [New] Streamlining Office Communication Which Favors Teams More, Slack or Discord, In 2024
- [New] In 2024, Step-by-Step Setting up a Channel for Streaming
- [New] In 2024, Leading Edge Bots in Social Chats
- [Updated] Leading 5 Innovative Social Media Logos in Motion for 2024
- [New] Efficiently Utilizing Discord Spoiler Features for 2024
- [New] Expert Tips for Perfecting Your Avatar Image
- [Updated] Advanced Strategies for Mass Message Purge on Discord Networks for 2024
- Elevate Your Chats Discord's Textual Customization Guide for 2024
- [Updated] Slack Vs. Discord Selecting Teams' Ideal Chat Platform for 2024
- [Updated] 2024 Approved A Beginner's Primer to Modifying Your Status on Discord
- [New] How to Change Text Style in Discord | 3 Methods for 2024
- [New] In 2024, Perfecting Your DiscoPic The Ultimate Guide to Eye-Catching Images
- [Updated] In 2024, How to Use Discord Text-To-Speech?
- [New] In 2024, Mastering the Search A Guide to Finding Your Ideal Discord Server
- [New] In 2024, The Lowdown on Discord's Nitro - Exclusives and How to Secure Them
- In Search for Auditory Perfection? Try These Top-Rated Discord Bots for 2024
- [New] Bulk Message Elimination A Complete Handbook for the Discreet Discord User for 2024
- [New] In-Depth Tutorial Effortlessly Posting Videos on Discord for 2024
- [Updated] In 2024, A Guide to Identifying the Right Discord Servers
- [Updated] 2024 Approved Unlocking the Secrets of Discord Stickers
- [Updated] In 2024, Examining Workplace Messaging Platforms Is Team Efficiency Favored by Slack over Discord?
- [New] 10+ Best Free Discord Voice Changers for 2024
- [Updated] In 2024, Social Expansion The Desktop & Mobile Guide
- 10 Best Free Discord Voice Changers [2023 Reviews +Guide] for 2024
- [Updated] Expert Strategies for Handling Toxic Behavior in Discord Channels
- [Updated] In 2024, 2023'S Premier Selection of No-Cost Discord Sound Modifiers
- [New] Dial Down Distractions Mastering VoiceMod Techniques for Discord Chats for 2024
- Best Free Software to Save Your Discord Talks for 2024
- [Updated] In 2024, Unleash Your Inner Conversationalist with Discord Responses
- [New] Embark on an Emoji Quest at These 8 Cost-Free Websites for 2024
- Recommended Best Applications for Mirroring Your Nubia Red Magic 8S Pro+ Screen | Dr.fone
- New Free Home Security Camera Software Top 10 Choices for Protection for 2024
- Top 4 Morgan Freeman Voice Generator Tools for Voice Cloning
- 5 Hassle-Free Solutions to Fake Location on Find My Friends Of Honor 80 Pro Straight Screen Edition | Dr.fone
- Unlocking Instagram's Potential Successful Post Tactics for 2024
- New 2024 Approved Vegas Pro for Mac Not Working? Try These 10 Alternative Video Editors
- Updated In 2024, Free DVD Playback Made Easy Top 10 Windows 10 Players
- In 2024, Ways to stop parent tracking your Vivo S17t | Dr.fone
- [New] FlashStoppage Instant Video Quit Guide
- [Updated] In 2024, Next Level Game Monitoring Software Beyond the FBX Standard
- [New] 2024 Approved Banish Soundless Tweets Live the Sounds
- Hard Resetting an Infinix Hot 40 Pro Device Made Easy | Dr.fone
- [Updated] Reach Optimal Timestamp in Fb Posting for 2024
- Streamlining Call Logs The 4-Step Guide for FB Calls for 2024
- Hassle-Free Ways to Remove FRP Lock from Oppo Phones with/without a PC
- The Ultimate Background Guide for Online Video Calls
- [New] In 2024, Unraveling the Secrets of Recording Hulu Across Computers/Mobile
- How to Fix Locked Apple ID on iPhone 14 Pro
- [New] 2024 Approved Advanced Techniques in FBX Game Filming
- In 2024, Will Pokémon Go Ban the Account if You Use PGSharp On Lava Blaze 2 | Dr.fone
- How to Use Life360 on Windows PC For Nokia 130 Music? | Dr.fone
- How To Remove or Bypass Knox Enrollment Service On Tecno Camon 30 Pro 5G
- New In 2024, Sleek and Powerful The Best Lightweight Video Editing Tools
- New In 2024, The Art of Auditory Transformation Replacing Audio in Videos Step by Step
- How to Transfer Data from Apple iPhone 13 Pro Max to ZTE Phones | Dr.fone
- 7 Fixes to No GPS - Showing Approximate Location on Apple iPhone 7 Waze | Dr.fone
- [New] In 2024, A Critical Look at ITop for Tech Enthusiasts
- How to Successfully Bypass iCloud Activation Lock from Apple iPhone SE (2020)
- How to Unlock Realme V30 PIN Code/Pattern Lock/Password
- Fake Android Location without Rooting For Your Samsung Galaxy S23+ | Dr.fone
- Top 11 Free Apps to Check IMEI on Vivo V29e Phones
- New 2024 Approved 10 Best Movie Trailer Voice Generators Windows, Mac, Android, iPhone & Online
- 2024 Approved Dual Display Documentation Technique
- New In 2024, Easy Steps to Create Intro Video with After Effects
- 5 Hassle-Free Solutions to Fake Location on Find My Friends Of Apple iPhone 7 | Dr.fone
- Title: "[New] 2024 Approved Quick and Easy Methods for Including Emojis Into Discord Statements"
- Author: Timothy
- Created at : 2024-05-23 22:48:21
- Updated at : 2024-05-24 22:48:21
- Link: https://discord-videos.techidaily.com/new-2024-approved-quick-and-easy-methods-for-including-emojis-into-discord-statements/
- License: This work is licensed under CC BY-NC-SA 4.0.
