![[New] 2024 Approved [Step-by-Step Guide]How to Stream on Discord](https://thmb.techidaily.com/ccdf50131a6b9e5675eea00d8176eeb8be6c7d5597ded286e2b977dc206141e5.jpg)
"[New] 2024 Approved [Step-by-Step Guide]How to Stream on Discord"
[Step-by-Step Guide]How to Stream on Discord
Discord is a great communication tool that also offers live streaming services. You can use this platform to engage and connect to your audience by conducting a live session. Through its “Voice Chat” feature, you can directly interact with your audience in a comfortable environment. If you are unaware of how to go live on Discord, this article can help you.
For your assistance, this article will instantly address how to live stream on Discord. Let’s dig into the details.
- How to Stream Videos on Discord
- How to Stream your Webcam on Discord
- How to Change the Shared Screen on Discord
- How to Stream Discord on my Mobile Phone?
- FAQs about the live stream on Discord
- Bonus Tip: Easily Record and Edit your Stream with Filmora
Part 1: What is Discord?
Discord is a popular platform created to offer a better communication experience between game players. The major reason for the massive recognition of Discord is its ability to generate servers instantly. Game players and other users can instantly create voice or text servers for enhanced communication.
Discord provides excellent flexibility to users by providing high-quality audio services with no background noise. Even if your friends are in different parts of the world, you can chat with them smoothly. You can create private and public servers in Discord to communicate with people having similar interests.
Along with using Discord Voice and Text chat features, you can live stream your gameplays. The live streaming on Discord won’t be a public show, as it will only be confined to your selected server. Through this, you can ask your friends for assistance while playing games. Moreover, Discord is also capable of capturing other screens. Hence, it’s a great platform for professionals, game lovers, and other individuals to communicate efficiently.
Part 2: Prerequisites for Stream on Discord
Many social media platforms put restrictions on users for live streaming. Some platforms require you to have a specific number of followers in order to conduct live streaming. However, in Discord, you don’t have to worry about such restrictions. By creating a server and channel on Discord, you can easily go for live streaming. Check the below prerequisites for performing a live stream on Discord:
1. Create your Discord Server
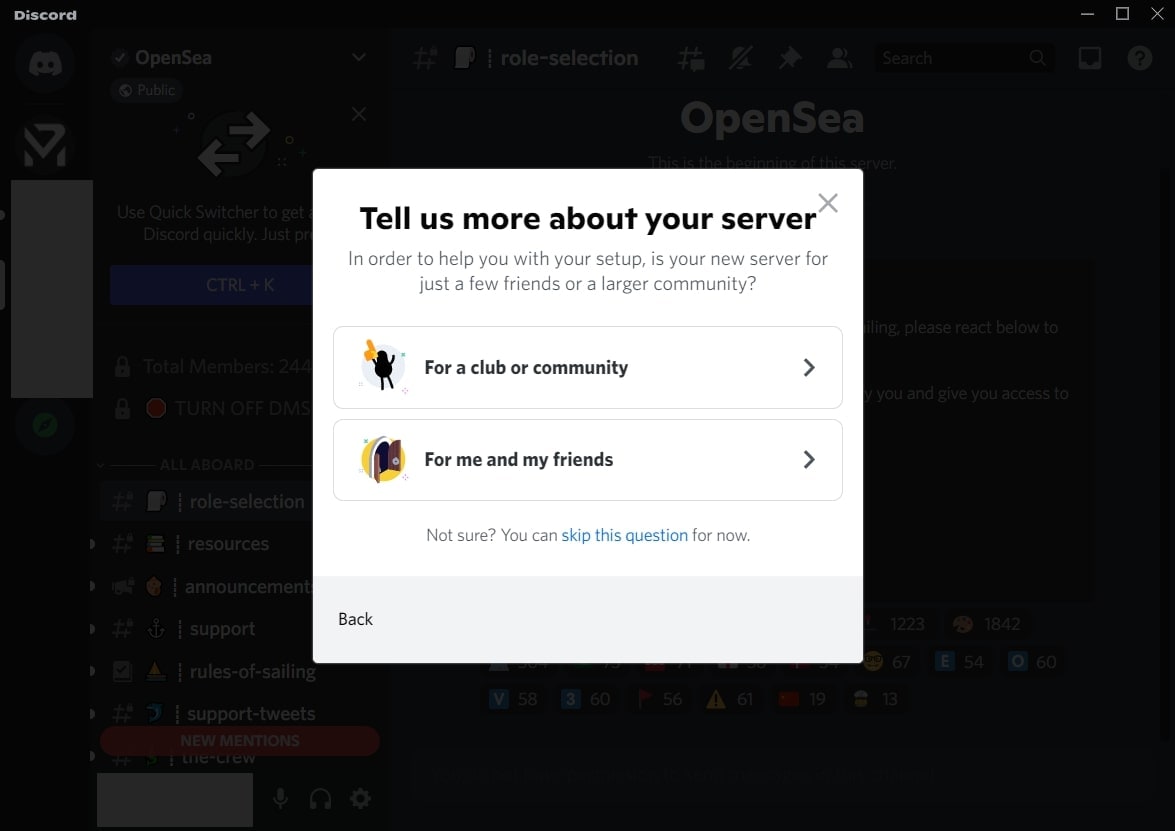
Step1 Open your Discord and hit the “Plus” icon given on the left side. It will open a small menu where you can select a template to start or create your own server.
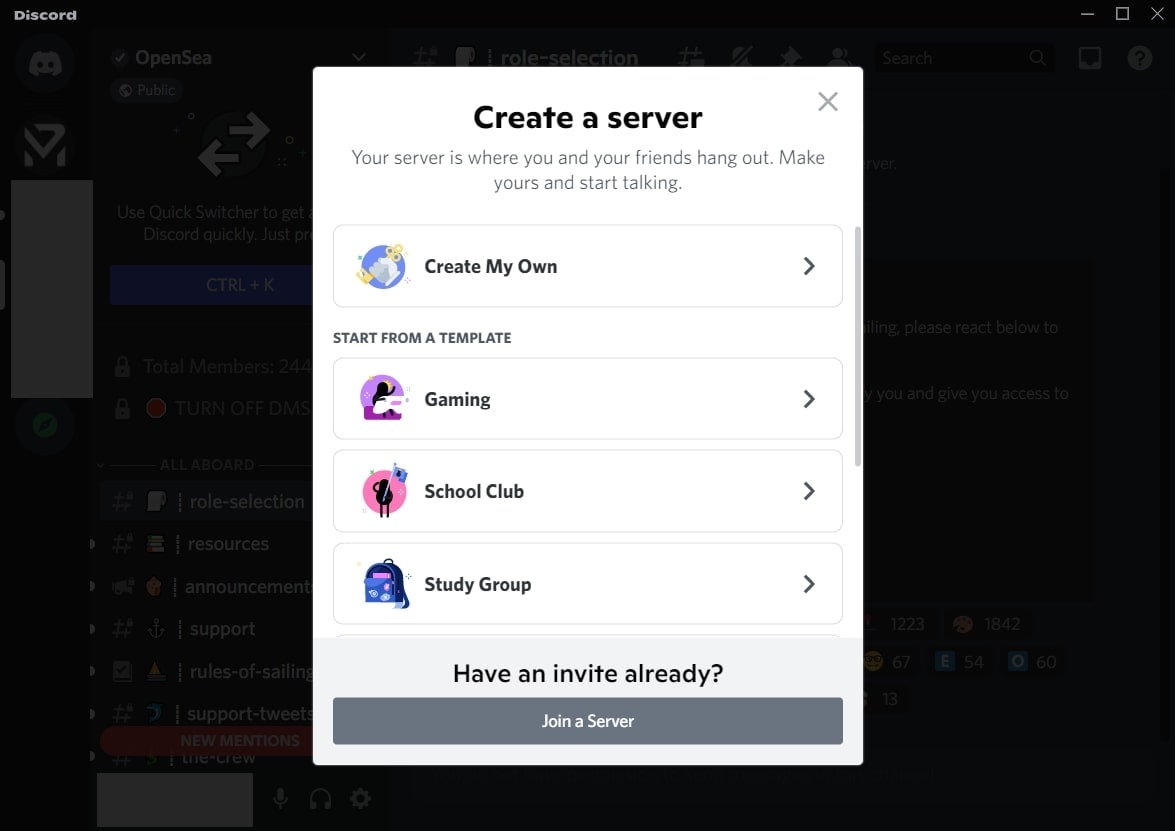
Step2 If you want to create your server, click “Create My Own.” Now select the type of server you want to create. Once done, create the server name and click the “Create” button.
2. Create your Discord Channel
Step1 To create a Discord channel, open any of your servers from the left side. Now tap on the “Plus” icon adjacent to “Voice Channels.”
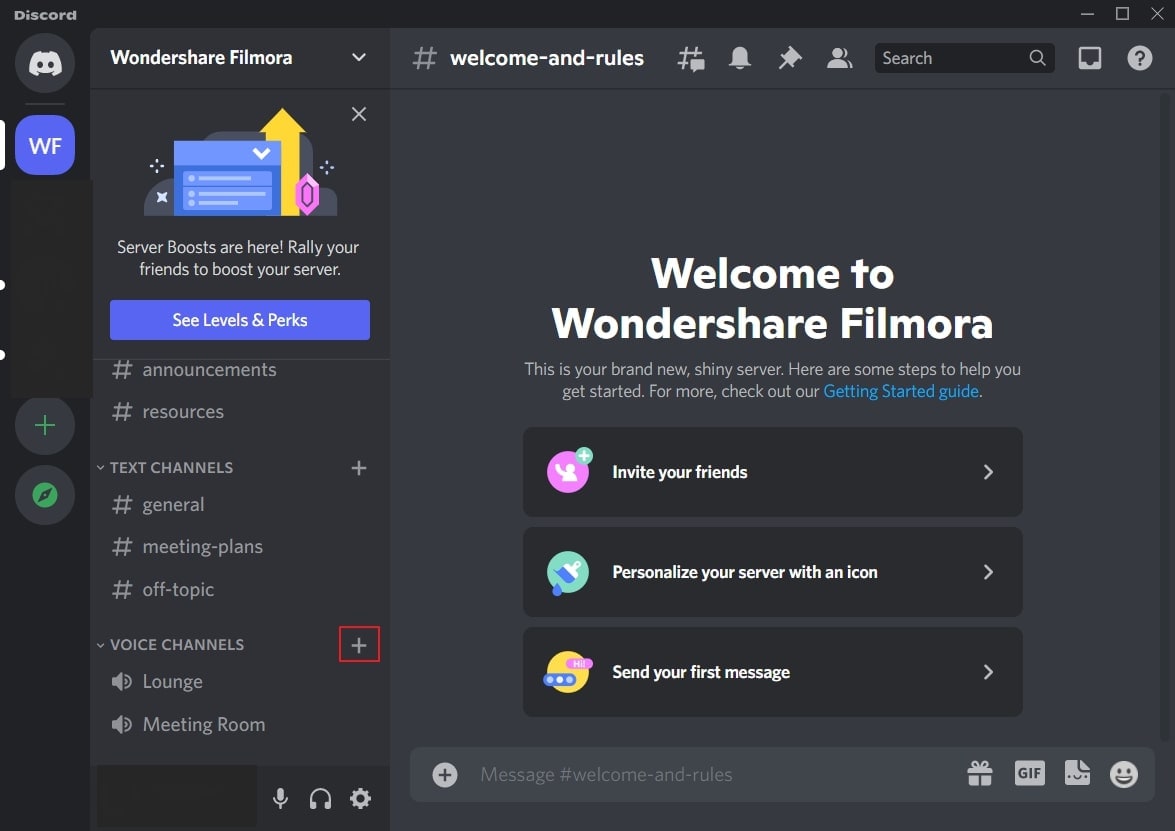
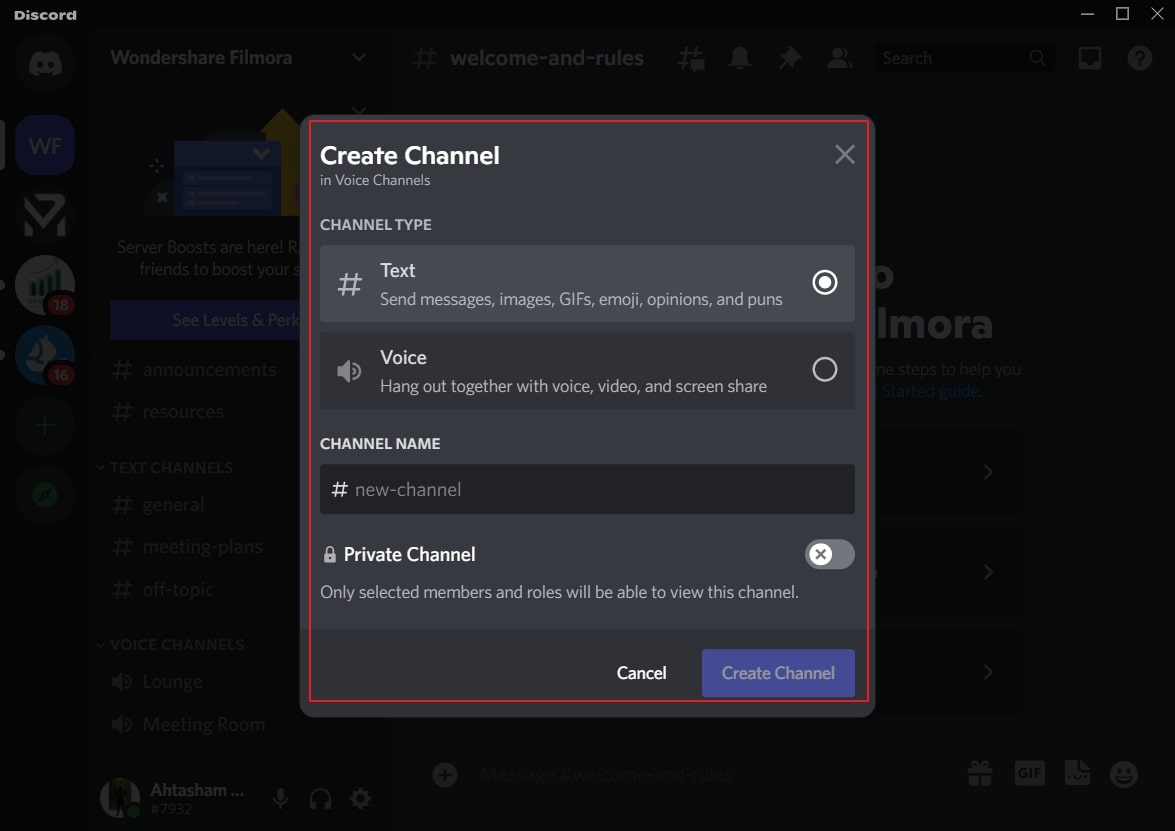
Step2 You can either create a “Text” channel or a “Voice” channel. After choosing the channel type, create a channel name. You can also enable the “Private Channel” option to create a private channel. Once done, click on the “Create Channel” button.
Part 3: How to Stream Videos on Discord
Once you have created a server and channel, you can begin your live streaming. Discord provides you with an option through which you can stream your videos instantly. To know the process, check the below steps:
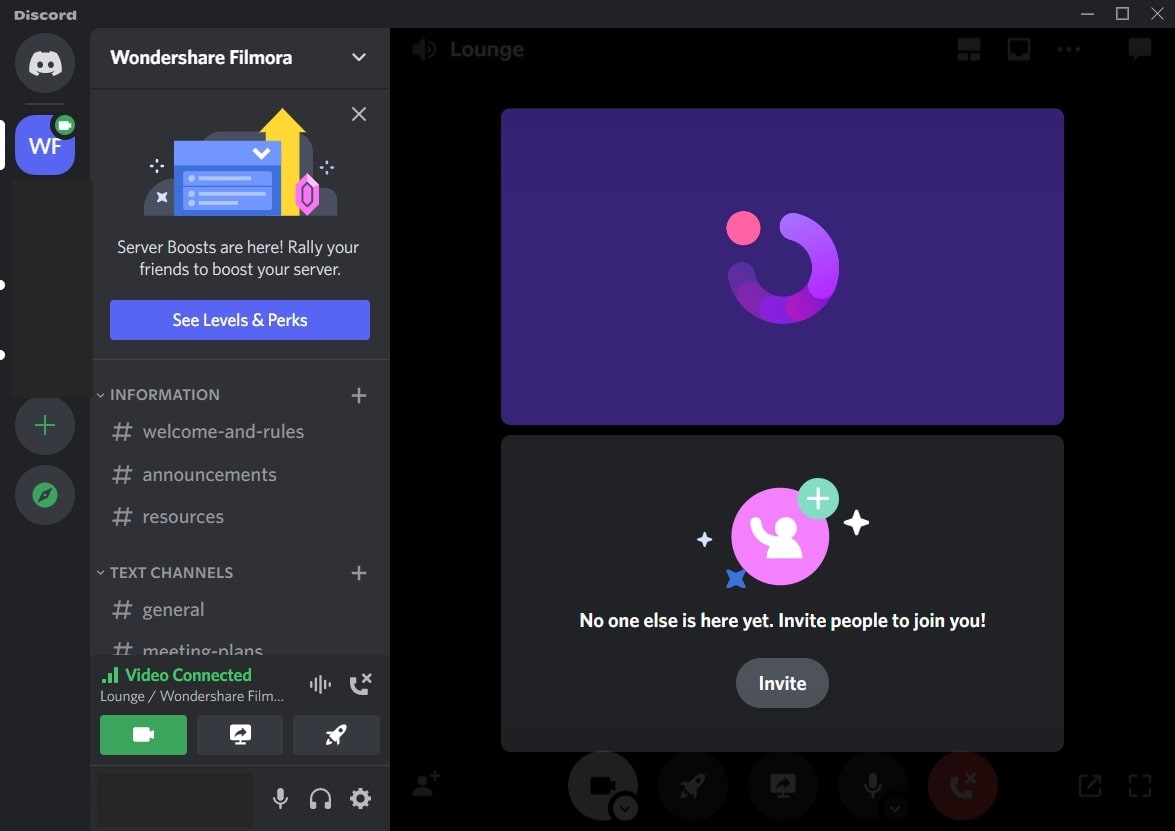
Step1 Open Discord and navigate to your desired server. Now proceed to your voice channel and click on the “Share Your Screen” button given below.
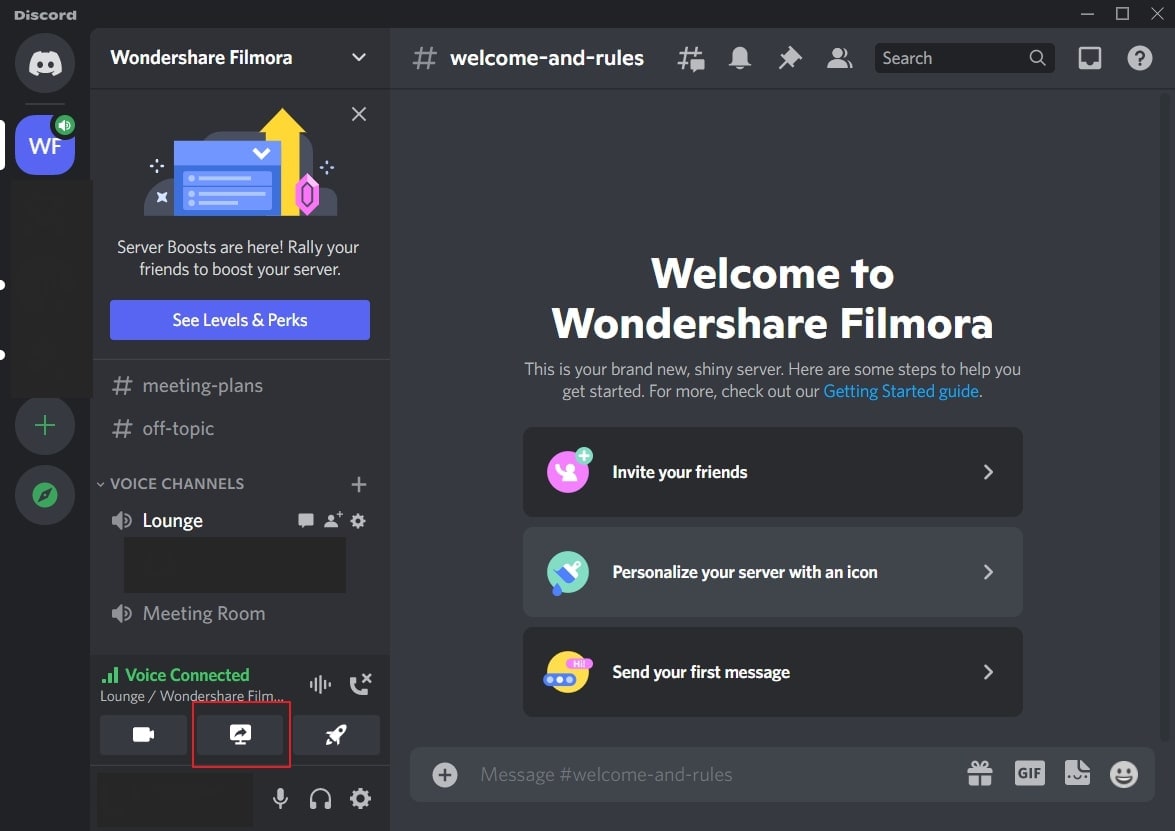
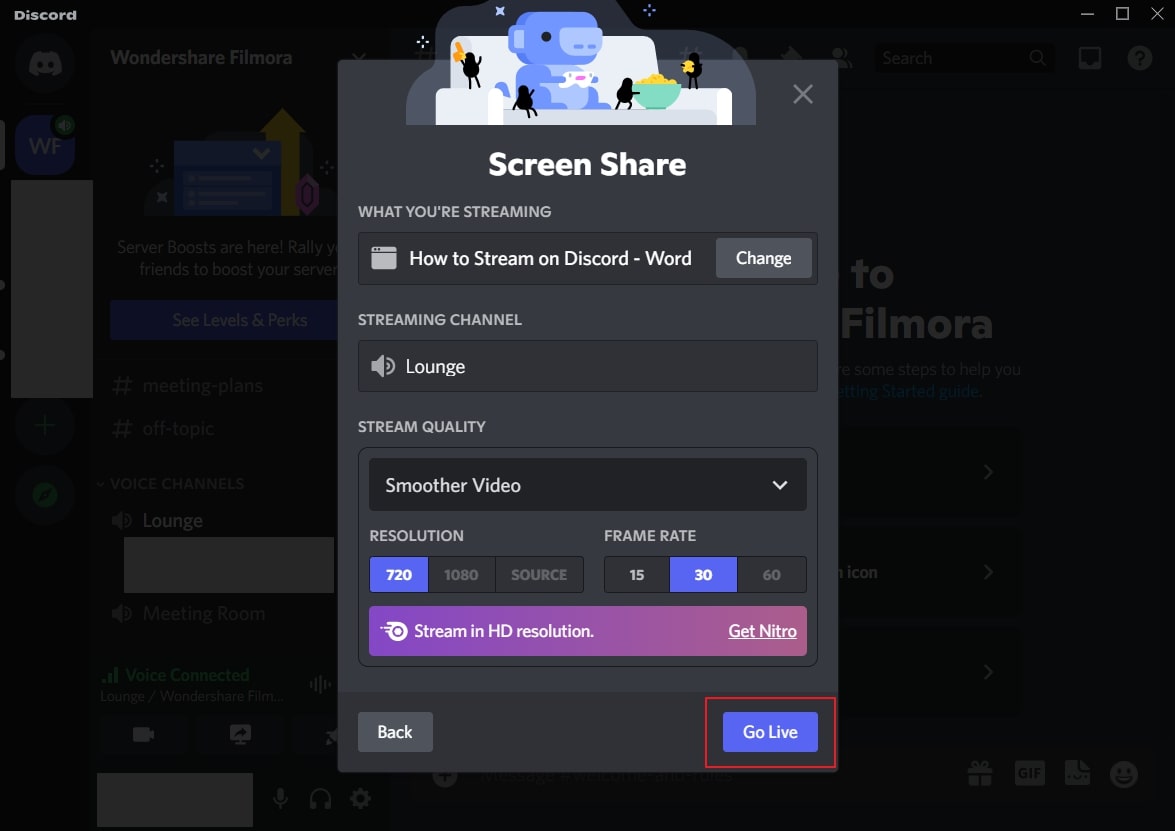
Step2 Select the screen you want to stream in the “Applications” tab. From the new menu, you can adjust the stream quality, such as resolution and frame rate. After adjusting the live streaming settings, click on the “Go Live” button.
Part 4: How to Stream your Webcam on Discord
Do you want to give a tutorial session through your webcam? Through live webcam streaming, you can demonstrate a particular product while giving facial expressions. Using Discord, you can stream your webcam with a single click.
Step1 Once you have opened a server on Discord, go to your Voice channel. From there, tap on the “Camera” icon above your username.
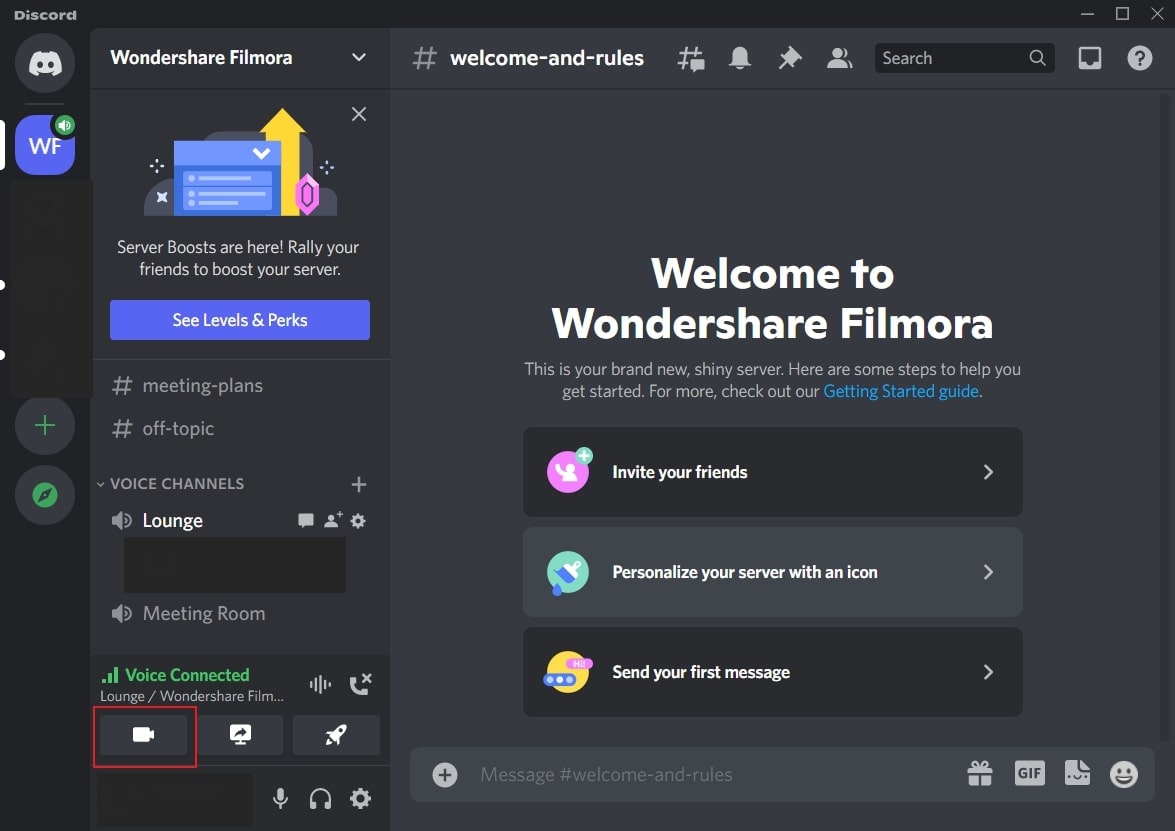
Step2 It will open a new screen through which you can start an activity or share your screen. Moreover, you can also invite others to join your webcam streaming. Once done with your activities, click on the “Red” button to disconnect.
Part 5: How to Change the Shared Screen on Discord
Do you want to change a shared screen on Discord? If you want to open a presentation, web browser, or any other application, Discord can easily change the shared screen. Through this facility, you can quickly shift between multiple screens without hassle.
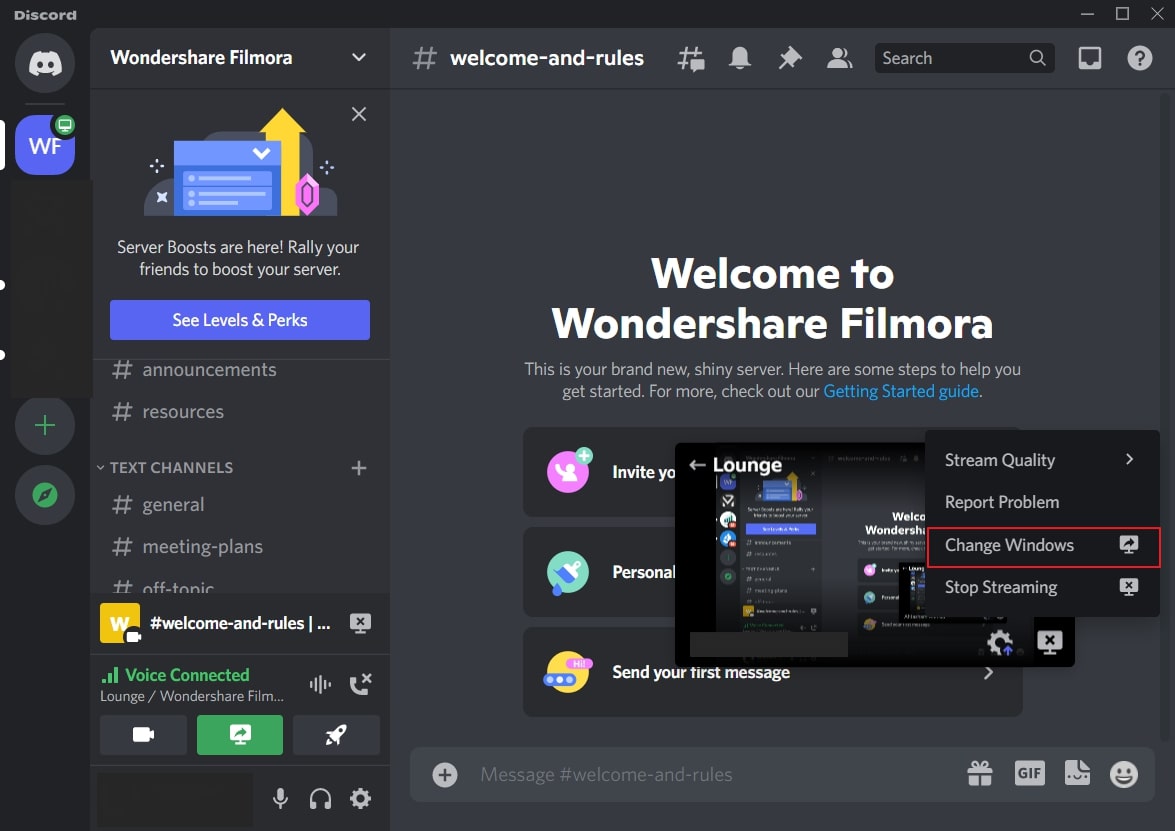
Step1 If you are live streaming your shared screen, you can instantly change windows on Discord. For this, click on the “Gear” icon on your live streaming screen to open settings.

Step2 From the settings menu, click on “Change Windows.” Now select the screen that you want to change. After choosing the required screen, hit on the “Go Live” button.
Part 6: How to Stream Discord on my Mobile Phone?
Discord has the same operating systems on Android and iOS devices. That’s why the steps to stream on Discord on both these devices are the same.
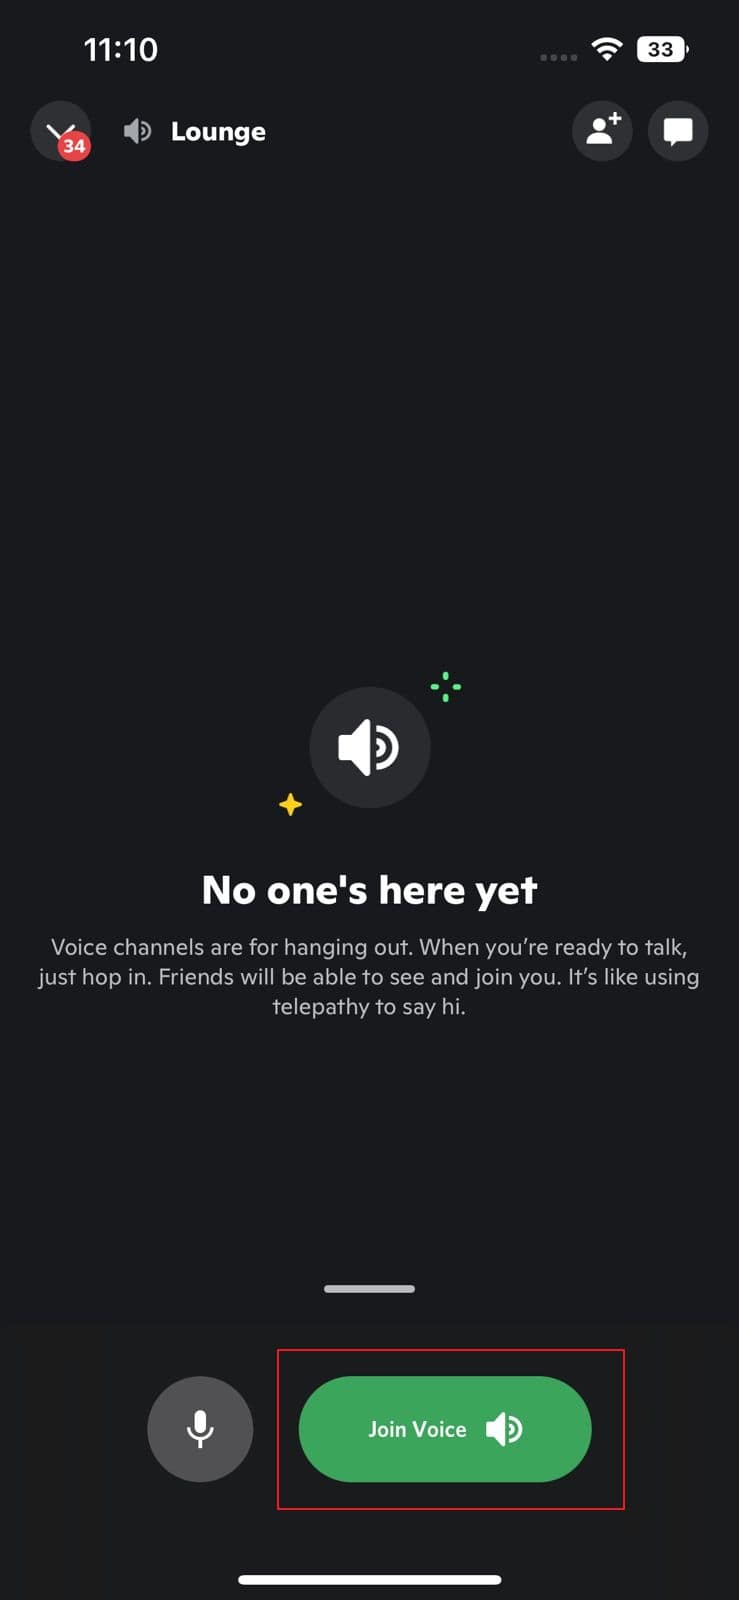
Step1 Open Discord on your mobile and select the desired server. Now choose the voice channel through which you want to live stream Discord.

Step2 Now tap “Join Voice” to initiate live streaming. Here, you can turn on your camera and share the screen. You can also mute your voice from the given options. Once done with live streaming, tap on the “Red” button.
Part 7: FAQs about the live stream on Discord
1. How many people can watch my Discord live simultaneously?
During the pandemic, up to 50 people were able to join live streaming on Discord. Normally, 25 people can watch live streaming on Discord simultaneously.
2. How to add the game types on Discord?
Open Discord and navigate to the “User Settings” given at the bottom of the screen. Select the “Game Activity” section and activate the option “Display currently running game as a status message.” Now click on the “Add it” button and choose the type of games you want to play. Once done, Discord would be able to detect the type of game automatically.
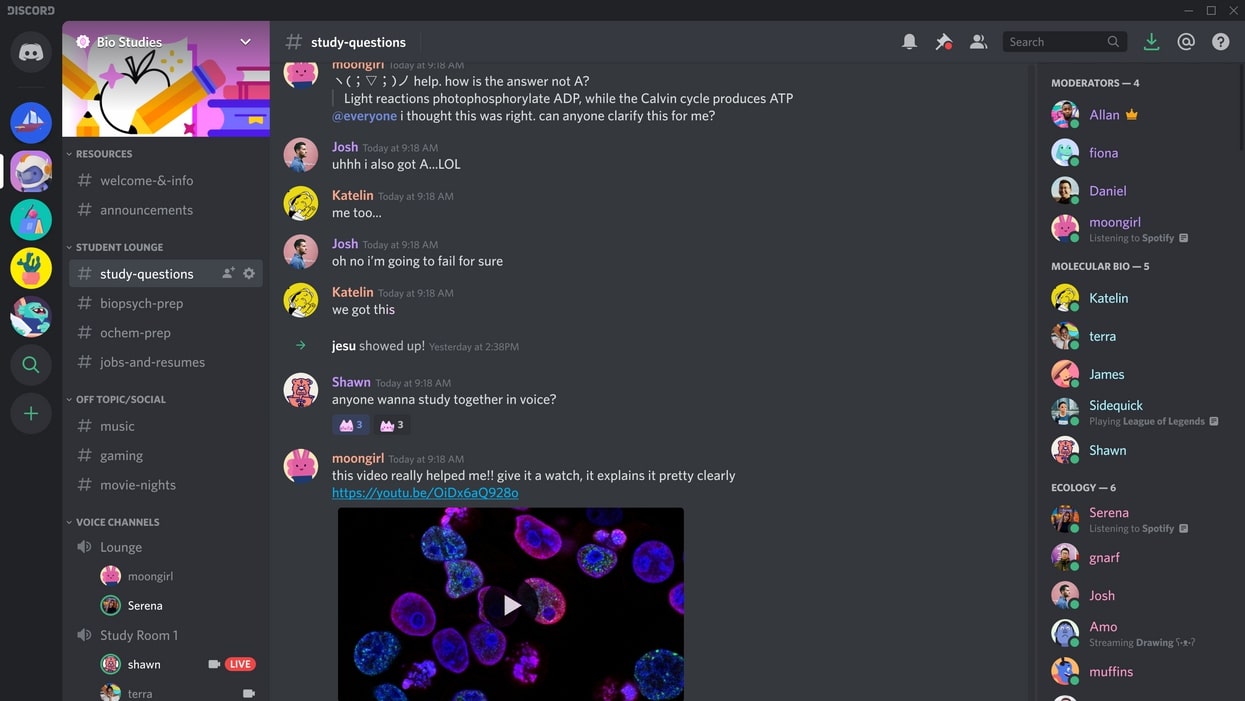
3. How to share a video on Discord?
On your computer, launch Discord and go to your desired channel. On the chat box space, click on the “Plus” icon. Now browse the video from your system that you want to share. Click on the “Open” button and select the “Upload” option. By doing so, you can easily share videos.
For mobile users, go to your Discord app and choose the preferred channel. On the left side of the typing area, you can see the “Image” icon. Tap on this option and choose the video you want to share from your phone. Now hit the “Arrow” button to send the selected video.
Bonus Tip: Easily Record and Edit your Stream with Filmora
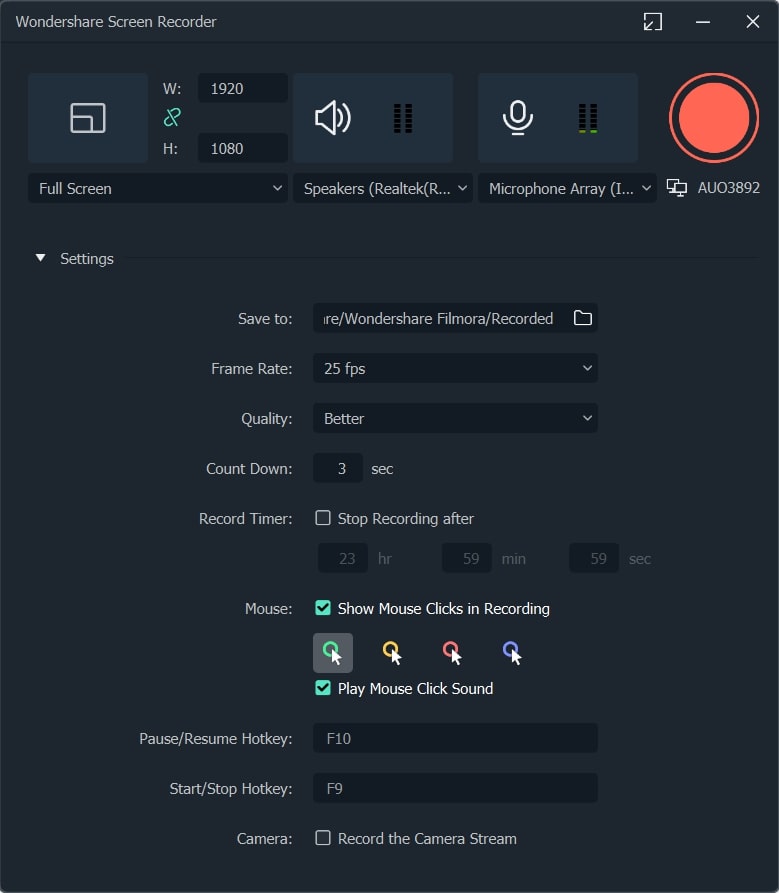
To save and edit your live stream sessions, we will highly recommend you the screen recorder of Wondershare Filmora . Through this screen recorder, you can capture your live-streaming session on Discord in the best possible quality.
Using this screen recorder, you can capture your desired area during live streaming. Once you capture your live-streaming session, you can edit it on this platform. Using the editing tool of Filmora, you can cut, crop, resize, and modify your screen recording efficiently.
Conclusion
Have you ever streamed on Discord before? Discord is a great communication platform that provides advanced features. With its vast flexibility, you can create private servers and channels. This article can guide you to learn how to go live on Discord. We have also suggested Wondershare Filmora, which can help you to screen record and edit your live streaming sessions on Discord.
Free Download For Win 7 or later(64-bit)
Free Download For macOS 10.14 or later
Part 1: What is Discord?
Discord is a popular platform created to offer a better communication experience between game players. The major reason for the massive recognition of Discord is its ability to generate servers instantly. Game players and other users can instantly create voice or text servers for enhanced communication.
Discord provides excellent flexibility to users by providing high-quality audio services with no background noise. Even if your friends are in different parts of the world, you can chat with them smoothly. You can create private and public servers in Discord to communicate with people having similar interests.
Along with using Discord Voice and Text chat features, you can live stream your gameplays. The live streaming on Discord won’t be a public show, as it will only be confined to your selected server. Through this, you can ask your friends for assistance while playing games. Moreover, Discord is also capable of capturing other screens. Hence, it’s a great platform for professionals, game lovers, and other individuals to communicate efficiently.

Part 2: Prerequisites for Stream on Discord
Many social media platforms put restrictions on users for live streaming. Some platforms require you to have a specific number of followers in order to conduct live streaming. However, in Discord, you don’t have to worry about such restrictions. By creating a server and channel on Discord, you can easily go for live streaming. Check the below prerequisites for performing a live stream on Discord:
1. Create your Discord Server
Step1 Open your Discord and hit the “Plus” icon given on the left side. It will open a small menu where you can select a template to start or create your own server.
Step2 If you want to create your server, click “Create My Own.” Now select the type of server you want to create. Once done, create the server name and click the “Create” button.
2. Create your Discord Channel
Step1 To create a Discord channel, open any of your servers from the left side. Now tap on the “Plus” icon adjacent to “Voice Channels.”
Step2 You can either create a “Text” channel or a “Voice” channel. After choosing the channel type, create a channel name. You can also enable the “Private Channel” option to create a private channel. Once done, click on the “Create Channel” button.
Part 3: How to Stream Videos on Discord
Once you have created a server and channel, you can begin your live streaming. Discord provides you with an option through which you can stream your videos instantly. To know the process, check the below steps:
Step1 Open Discord and navigate to your desired server. Now proceed to your voice channel and click on the “Share Your Screen” button given below.
Step2 Select the screen you want to stream in the “Applications” tab. From the new menu, you can adjust the stream quality, such as resolution and frame rate. After adjusting the live streaming settings, click on the “Go Live” button.
Part 4: How to Stream your Webcam on Discord
Do you want to give a tutorial session through your webcam? Through live webcam streaming, you can demonstrate a particular product while giving facial expressions. Using Discord, you can stream your webcam with a single click.
Step1 Once you have opened a server on Discord, go to your Voice channel. From there, tap on the “Camera” icon above your username.
Step2 It will open a new screen through which you can start an activity or share your screen. Moreover, you can also invite others to join your webcam streaming. Once done with your activities, click on the “Red” button to disconnect.
Part 5: How to Change the Shared Screen on Discord
Do you want to change a shared screen on Discord? If you want to open a presentation, web browser, or any other application, Discord can easily change the shared screen. Through this facility, you can quickly shift between multiple screens without hassle.
Step1 If you are live streaming your shared screen, you can instantly change windows on Discord. For this, click on the “Gear” icon on your live streaming screen to open settings.
Step2 From the settings menu, click on “Change Windows.” Now select the screen that you want to change. After choosing the required screen, hit on the “Go Live” button.
Part 6: How to Stream Discord on my Mobile Phone?
Discord has the same operating systems on Android and iOS devices. That’s why the steps to stream on Discord on both these devices are the same.
Step1 Open Discord on your mobile and select the desired server. Now choose the voice channel through which you want to live stream Discord.
Step2 Now tap “Join Voice” to initiate live streaming. Here, you can turn on your camera and share the screen. You can also mute your voice from the given options. Once done with live streaming, tap on the “Red” button.
Part 7: FAQs about the live stream on Discord
1. How many people can watch my Discord live simultaneously?
During the pandemic, up to 50 people were able to join live streaming on Discord. Normally, 25 people can watch live streaming on Discord simultaneously.
2. How to add the game types on Discord?
Open Discord and navigate to the “User Settings” given at the bottom of the screen. Select the “Game Activity” section and activate the option “Display currently running game as a status message.” Now click on the “Add it” button and choose the type of games you want to play. Once done, Discord would be able to detect the type of game automatically.
3. How to share a video on Discord?
On your computer, launch Discord and go to your desired channel. On the chat box space, click on the “Plus” icon. Now browse the video from your system that you want to share. Click on the “Open” button and select the “Upload” option. By doing so, you can easily share videos.
For mobile users, go to your Discord app and choose the preferred channel. On the left side of the typing area, you can see the “Image” icon. Tap on this option and choose the video you want to share from your phone. Now hit the “Arrow” button to send the selected video.
Bonus Tip: Easily Record and Edit your Stream with Filmora
To save and edit your live stream sessions, we will highly recommend you the screen recorder of Wondershare Filmora . Through this screen recorder, you can capture your live-streaming session on Discord in the best possible quality.
Using this screen recorder, you can capture your desired area during live streaming. Once you capture your live-streaming session, you can edit it on this platform. Using the editing tool of Filmora, you can cut, crop, resize, and modify your screen recording efficiently.
Conclusion
Have you ever streamed on Discord before? Discord is a great communication platform that provides advanced features. With its vast flexibility, you can create private servers and channels. This article can guide you to learn how to go live on Discord. We have also suggested Wondershare Filmora, which can help you to screen record and edit your live streaming sessions on Discord.
Free Download For Win 7 or later(64-bit)
Free Download For macOS 10.14 or later
Streamlining the Process of Sending Videos in Discord
How to Send Videos on Discord

Richard Bennett
Mar 27, 2024• Proven solutions
The whole point of Discord is to bring together communities of like-minded people to talk, share ideas and have fun together. And this isn’t just limited to chatting but sometimes you’re going to want to share content, including videos.
So, whether it’s a compilation of your best gaming moments that you’ve carefully edited together, a home movie that you want to share with friends, or just a funny clip that someone’s sent you that you want to pass on, here we’ll take you through how to send videos on Discord both on PC and mobile, and the likely issues you might face.
- Part 1: How to Send Videos on Discord PC
- Part 2: How to Send Videos on Discord Mobile
- Part 3: How to Send Long Videos on Discord That Are More Than 8MB
- Part 4: FAQs About Uploading Videos to Discord
Part 1: How to Send Videos on Discord PC
It’s actually pretty simple to send videos on Discord when using a PC, providing they aren’t too large a file size.
Firstly, you just need to navigate to the channel or private message where you want to send the video. Just find the right option on the list of servers you’re a member of, or head to your message inbox to find the user you want to send it to privately.
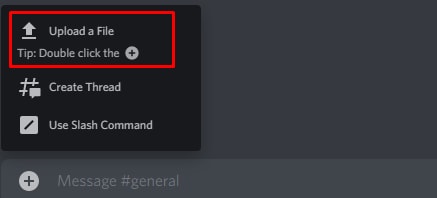
Once you’re in the right place, click on the plus (+) icon that you’ll find to the left of the chatbox at the bottom of the screen where you’d normally type your message.
You’ll then just need to find the file on your computer, and double click on it. It’ll then bring up a pop-up for the video where you can add a comment, which will sit above the video (ideal if you need to give context on why you’re sharing it). You can also mark it as a spoiler – useful if you’re sharing a gaming tip but you don’t want to spoil the story for anyone who’s not reached that point yet.
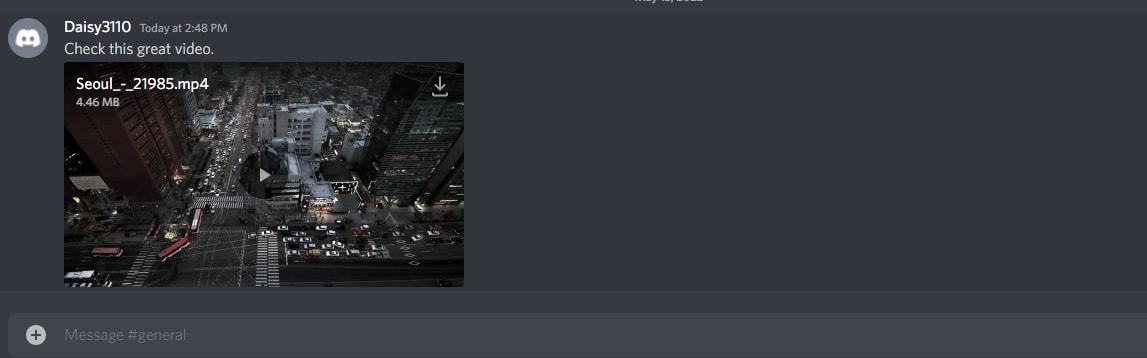
From there, it’s as simple as clicking the upload button. Once it’s ready, the video will be in the chat window for anyone in the server to watch, or for your friend if you’ve sent it privately. And if they want to download it, they’ll just need to click the download button (a downward-facing arrow) at the top right of the video.
It’s worth noting that, while Discord will play most video formats, it can’t manage everything. If you upload a format that Discord isn’t compatible with, then it won’t show a video player – instead, the file will just be uploaded. Other people can still download it to watch on their own devices.
Also, there’s a strict file limit of 8MB. This isn’t huge at all – while there’s no definitive file size for video (as it depends on file type, resolution, compression, etc) it’s unlikely to be more than 60 seconds of footage, and could just be a few seconds. If the video you want to upload is more than 8MB, carry on reading below to find out how.
Part 2: How to Send Videos on Discord Mobile
The process to send video on Discord Mobile is pretty similar both with iOS and Android, but with just a few minor tweaks.
Firstly, you still need to navigate to either the server or inbox where you want to share the video. You can then click the ‘Photo Selector’ button directly to the left of the chatbox.
This will open your phone’s gallery, but it’ll only be searching for photos. You instead want the File Selector, which will be the third icon along – it looks like a text document with a folded-over corner.
Click this and it’ll give you the option to directly upload a video from your phone’s Downloads folder. To send a video that’s stored elsewhere, click on the Expand arrow at the top left of the menu. This will send you to your phone’s file navigation system where you can find the video you want.
Once you’ve selected the video, just hit the blue Send icon to send your video to the chat. Again you can add a message as a caption, but this time it’ll just be in the normal message box rather than a dedicated comment box before you hit upload.
Part 3: How to Send Long Videos on Discord That Are More Than 8MB
So as we’ve said above, there is a file size limit when you’re using a free Discord account of just 8MB, which isn’t much at all. There are a few ways around this, so take your pick from the one that sounds best for you.
1. Update to Discord Nitro to Upload 100MB
The first option is possibly the simplest but it’s definitely not the cheapest, and that’s to pay for an upgrade to Discord Nitro. The paid version of Discord has a number of benefits, one of which is the increased file upload size of 100MB. It costs $4.99 per month or $49.99 per year, so if you’re likely to be regularly uploading videos that are lower than this limit, it might make sense.
2. Cut Unwanted Clips/Compress Video with Filmora Video Editor
The second choice would be to take your video and cut it into pieces, sending them one at a time. This might sound time-consuming but with Filmora’s Instant Cutter Tool, it’s really simple.
All you need to do is open a video in Filmora by clicking the arrow next to Import and then choosing ‘Import with Instant Cutter Tool’.
This will open the Instant Cutter window where you can click Open File to add your video. From here you can trim your files and export them in multiple sections. There are different ways that you can do this, and while each is a simple process, there are still a few steps to follow.


For more detail, check out this post for a step-by-step guide on the different ways you can trim a video in Filmora.
You can also try to compress your video size, which may let you keep the whole video at the expense of some of the quality. Again, using Filmora, this is easy. But also again, there are different ways to go about it.
You could literally crop the video in order to trim some of the data, as the reduced viewing screen won’t be as big a file. You can also reduce the resolution, or convert your video to a format that uses fewer data. You’ll need to test it though, as converting to some video formats might result in blurry footage.
There are advanced settings you can tinker with too, such as lowering the frame rate or the bit rate. Again, rather than go through all of those options in an epic article here, it’s easier to head to a post dedicated to these steps about compress videos with Filmora .
3. Upload to YouTube/Vimeo/Google Drive/Dropbox
The final option is to upload your video to an online player or storage site, and link to it, rather than having Discord host the file. YouTube and Vimeo are the obvious options, but Streamable is another popular choice too with a free membership. YouTube’s maximum video uploads are 128GB, which is huge, while other sites like Streamable cap free accounts to 500MB per video.
So, if you want to upload massive files, you’ll need to decide whether to choose YouTube or pay for an upgraded membership elsewhere. Wherever you host your video, once it’s online just grab the link and paste it into Discord to share your content.
The only drawback to this option is that it stops other users from being able to download the video directly, and you may need to look at a file sharing alternative such as Dropbox if you want to send the actual file.
FAQs About Uploading Videos to Discord
Which Kind of Video Formats Can I Upload to Discord?
You can send any filetype to another user on Discord, so that they can download it and watch it on their own device. But if you want to upload a video so that Discord embeds it, and makes it playable within the chat, you’re limited to only mp4 and WebM filetypes.
You can also use MOV files, but not everyone will be able to play them, and FLAC files are supported on desktop only but not on mobile.
How Can I Upload Saved Videos to Discord?
If you find a video on Discord that you want to share on a different server or in a private DM, you can use the download icon to save it locally. Then, follow the steps above to upload the video to the server or DM chat window where you want to share it.
Richard Bennett
Richard Bennett is a writer and a lover of all things video.
Follow @Richard Bennett
Richard Bennett
Mar 27, 2024• Proven solutions
The whole point of Discord is to bring together communities of like-minded people to talk, share ideas and have fun together. And this isn’t just limited to chatting but sometimes you’re going to want to share content, including videos.
So, whether it’s a compilation of your best gaming moments that you’ve carefully edited together, a home movie that you want to share with friends, or just a funny clip that someone’s sent you that you want to pass on, here we’ll take you through how to send videos on Discord both on PC and mobile, and the likely issues you might face.
- Part 1: How to Send Videos on Discord PC
- Part 2: How to Send Videos on Discord Mobile
- Part 3: How to Send Long Videos on Discord That Are More Than 8MB
- Part 4: FAQs About Uploading Videos to Discord
Part 1: How to Send Videos on Discord PC
It’s actually pretty simple to send videos on Discord when using a PC, providing they aren’t too large a file size.
Firstly, you just need to navigate to the channel or private message where you want to send the video. Just find the right option on the list of servers you’re a member of, or head to your message inbox to find the user you want to send it to privately.
Once you’re in the right place, click on the plus (+) icon that you’ll find to the left of the chatbox at the bottom of the screen where you’d normally type your message.
You’ll then just need to find the file on your computer, and double click on it. It’ll then bring up a pop-up for the video where you can add a comment, which will sit above the video (ideal if you need to give context on why you’re sharing it). You can also mark it as a spoiler – useful if you’re sharing a gaming tip but you don’t want to spoil the story for anyone who’s not reached that point yet.
From there, it’s as simple as clicking the upload button. Once it’s ready, the video will be in the chat window for anyone in the server to watch, or for your friend if you’ve sent it privately. And if they want to download it, they’ll just need to click the download button (a downward-facing arrow) at the top right of the video.
It’s worth noting that, while Discord will play most video formats, it can’t manage everything. If you upload a format that Discord isn’t compatible with, then it won’t show a video player – instead, the file will just be uploaded. Other people can still download it to watch on their own devices.
Also, there’s a strict file limit of 8MB. This isn’t huge at all – while there’s no definitive file size for video (as it depends on file type, resolution, compression, etc) it’s unlikely to be more than 60 seconds of footage, and could just be a few seconds. If the video you want to upload is more than 8MB, carry on reading below to find out how.
Part 2: How to Send Videos on Discord Mobile
The process to send video on Discord Mobile is pretty similar both with iOS and Android, but with just a few minor tweaks.
Firstly, you still need to navigate to either the server or inbox where you want to share the video. You can then click the ‘Photo Selector’ button directly to the left of the chatbox.
This will open your phone’s gallery, but it’ll only be searching for photos. You instead want the File Selector, which will be the third icon along – it looks like a text document with a folded-over corner.
Click this and it’ll give you the option to directly upload a video from your phone’s Downloads folder. To send a video that’s stored elsewhere, click on the Expand arrow at the top left of the menu. This will send you to your phone’s file navigation system where you can find the video you want.
Once you’ve selected the video, just hit the blue Send icon to send your video to the chat. Again you can add a message as a caption, but this time it’ll just be in the normal message box rather than a dedicated comment box before you hit upload.
Part 3: How to Send Long Videos on Discord That Are More Than 8MB
So as we’ve said above, there is a file size limit when you’re using a free Discord account of just 8MB, which isn’t much at all. There are a few ways around this, so take your pick from the one that sounds best for you.
1. Update to Discord Nitro to Upload 100MB
The first option is possibly the simplest but it’s definitely not the cheapest, and that’s to pay for an upgrade to Discord Nitro. The paid version of Discord has a number of benefits, one of which is the increased file upload size of 100MB. It costs $4.99 per month or $49.99 per year, so if you’re likely to be regularly uploading videos that are lower than this limit, it might make sense.
2. Cut Unwanted Clips/Compress Video with Filmora Video Editor
The second choice would be to take your video and cut it into pieces, sending them one at a time. This might sound time-consuming but with Filmora’s Instant Cutter Tool, it’s really simple.
All you need to do is open a video in Filmora by clicking the arrow next to Import and then choosing ‘Import with Instant Cutter Tool’.
This will open the Instant Cutter window where you can click Open File to add your video. From here you can trim your files and export them in multiple sections. There are different ways that you can do this, and while each is a simple process, there are still a few steps to follow.
For more detail, check out this post for a step-by-step guide on the different ways you can trim a video in Filmora.
You can also try to compress your video size, which may let you keep the whole video at the expense of some of the quality. Again, using Filmora, this is easy. But also again, there are different ways to go about it.
You could literally crop the video in order to trim some of the data, as the reduced viewing screen won’t be as big a file. You can also reduce the resolution, or convert your video to a format that uses fewer data. You’ll need to test it though, as converting to some video formats might result in blurry footage.
There are advanced settings you can tinker with too, such as lowering the frame rate or the bit rate. Again, rather than go through all of those options in an epic article here, it’s easier to head to a post dedicated to these steps about compress videos with Filmora .
3. Upload to YouTube/Vimeo/Google Drive/Dropbox
The final option is to upload your video to an online player or storage site, and link to it, rather than having Discord host the file. YouTube and Vimeo are the obvious options, but Streamable is another popular choice too with a free membership. YouTube’s maximum video uploads are 128GB, which is huge, while other sites like Streamable cap free accounts to 500MB per video.
So, if you want to upload massive files, you’ll need to decide whether to choose YouTube or pay for an upgraded membership elsewhere. Wherever you host your video, once it’s online just grab the link and paste it into Discord to share your content.
The only drawback to this option is that it stops other users from being able to download the video directly, and you may need to look at a file sharing alternative such as Dropbox if you want to send the actual file.
FAQs About Uploading Videos to Discord
Which Kind of Video Formats Can I Upload to Discord?
You can send any filetype to another user on Discord, so that they can download it and watch it on their own device. But if you want to upload a video so that Discord embeds it, and makes it playable within the chat, you’re limited to only mp4 and WebM filetypes.
You can also use MOV files, but not everyone will be able to play them, and FLAC files are supported on desktop only but not on mobile.
How Can I Upload Saved Videos to Discord?
If you find a video on Discord that you want to share on a different server or in a private DM, you can use the download icon to save it locally. Then, follow the steps above to upload the video to the server or DM chat window where you want to share it.
Richard Bennett
Richard Bennett is a writer and a lover of all things video.
Follow @Richard Bennett
Also read:
- [New] Rise Above Struggles 10 Empowering Movies for Life
- [Updated] In 2024, 8 Best Video Conferencing Software for Small Business Safely
- 「ダウンロードせずに利用できる有料動画組み込みツール」
- 【無料】オンラインで音声を変換するための最適な5つのサイトがこちら
- 2024 Approved Decoding Facebook's Automatic Video Advancements
- Alternative Tools Comparable to the 4K Video Downloader (#7 Picks)
- Apple Enhances iMessage Security: Protecting Users From Emerging Cyber Threats
- Essential Factors for Buying a Facebook Smart Hub
- How to Unlock Motorola Edge 40 Pro Phone Forgot Password
- Navigate Video Rotations Seamlessly via VLC
- Overcoming Gesture Glitches with Elan Tablet in Win10
- Transitioning From Rgb to Srgb for 2024
- Windows PC上でのビデオ結合手法集 - 最適なツールとテクニック
- Windows PCでイラスト作成中のビデオ収録方法
- ウィンドウズメディアプレイヤーを使用して動画のカット方法
- ダウンロード不可能なVimeo動画を解決する方法
- Title: [New] 2024 Approved [Step-by-Step Guide]How to Stream on Discord
- Author: Timothy
- Created at : 2024-10-16 05:39:56
- Updated at : 2024-10-18 13:15:06
- Link: https://discord-videos.techidaily.com/new-2024-approved-step-by-step-guidehow-to-stream-on-discord/
- License: This work is licensed under CC BY-NC-SA 4.0.