
!["[New] 2024 Approved The Ultimate Tutorial for Adding Discord Server Roles"](https://thmb.techidaily.com/cd3d45b359655445d3a3fddc84f4f42edd47a1ec876e69fbcc20cbbbf17a86ba.png)
"[New] 2024 Approved The Ultimate Tutorial for Adding Discord Server Roles"
The Ultimate Tutorial for Adding Discord Server Roles
How to Add Roles in Discord?

Richard Bennett
Mar 27, 2024• Proven solutions
Having a Discord server for you and your friends is a fun experience. And for gamers, Discord is a necessity. You can customize it with bots, connect real-time over voice channels, and even add rooms for chat forums.
Obviously, creating and managing a Discord server can get difficult. Especially when the server gets crammed with members, it is no longer a one-person show. You need help with monitoring and moderation. And let’s face it – you cannot watch your server round the clock.
So, let us learn the art of delegation on Discord! This guide will help you with – How to add roles in Discord and how to assign them to members. This includes creating roles, deleting them, and granting appropriate permissions.
- Part 1: Discord Server Permissions Introduction
- Part 2: How to Make and Add Roles in Discord on Computer
- Part 3: How to Manage Roles in Discord?
- Part 4: How to Delete Roles in Discord?
- Part 5: How to Add Roles on Discord Mobile?
- Part 6: Adding Roles to Discord FAQs
Part 1: Discord Server Permissions You Can Set Up
To give you a heads-up, there are around 29 permissions that you can adjust over a Discord server. More specifically, there are 7 voice permissions, 9 permissions related to texts, and about 13 permissions dealing with the server.
1. General server permission
Administrator – this is the highest permission that you can grant to a user. Think twice before giving this authority to anyone.
View Audit Log – with this permission, a user can read the server’s audits.
Manage Server – this permission enables a user to change the server’s name or shift it to another region.
Manage Roles – a user with this authority can make new roles or modify the roles without this permission.
Manage Channels – with this; a user can make, edit, or remove channels on a server.
Manage emojis – users with this authority can manage emotes.
Manage Webhooks – if you have this authority, you can add, modify, and remove webhooks.
Read Text Channels & See Voice Channels – a user with this permission can read text channels.
2. Membership permissions
Ban Members – a member with permission, can ban members from the server.
Create Instant Invite – users with this permission can invite people to the server.
Change Nickname – you can change your nickname anytime if this permission is enabled.
Manage Nicknames – if enabled, a user can change other’s nicknames.
Kick Members – a user with this authority can remove members from the server.
3. Text channel permissions
Send Messages – with this; users can send texts on chats.
Send TTS Messages – this enables users to send text-to-speech texts.
Manage Messages – with this; a user can remove or pin texts of other users.
Embed Links – enables users to embed hyperlinks in texts.
Attach Files – with this; users can attach files in the texts.
Read Message History – enables users to access earlier texts.
Mention Everyone – you can send push notifications on the channel if this permission is enabled.
Use External Emojis – if enabled, users can send emojis from other servers.
Add Reactions – with this; users can add new reactions to a text.
4. Voice channel permissions
Connect – enables users to connect themselves over the voice channel.
Speak – users can talk over the voice channel.
Mute Members – turn off other user’s speech.
Deafen Members – turn off hearing on the channel for a user.
Move Members – enables a user to shift members from one channel to a different channel.
Use Voice Activity – a member can talk without using Push-to-Talk, with this permission.
Priority Speaker – when this permission is turned on for a user, other’s
this permission allows the user to reduce the volume of other users when this user is speaking so that their words are louder on the channel.
5. Advanced permissions
Includes the ‘Administrator’ permission, which by default enables all the permissions to the assigned user.
Part 2: How to Make and Add Roles in Discord on Computer
The desktop app and Browser resemble the mobile apple a lot. The process of assigning roles and configuring members is more or less the same across devices. First, you need to create roles and define their authority before assigning these roles to some members.
How to create roles in Discord?
Before you can assign roles, you need a server. Once you have created your Discord server, start crafting the structure.
- Open your server and right-click on it.
- From the menu that appears, tap server settings.
- Name the role suitably. It should be descriptive of the authority.
- Tap on the plus sign that appears on the top right of the page.
- Here, you can change the title off the roll and even choose the color.
- Now comes the time to grant some permissions. These are basically the authority that you gave to every profile.
- When you are done, save the changes.
How to Assign Roles to Members in Discord?
To be able to assign roles, you should first create them
- Once again, hit that right button on your server and go to server settings.
- From the menu that appears to the left, ‘choose members’ under user management.
- Here, you will see the list of all the members on your server, tap the Plus sign that is right beside the username.
- From the drop-down menu that appears, select a role you want to assign to that member.
- You will notice that the color changes as per your settings. And this is how you assign roles to a server.
Part 3: How to Manage Roles in Discord?
After you learn how to make roles in Discord, you might want to manage them.
If you have got the hang of creating roles, then managing them is no different. Whenever the server gets crowded, you can create more roles or modify the existing ones. A smaller server can run smoothly with just an admin and an ‘everyone’ role.
The quickest and easiest way to manage your bloating server is to let all members be ‘everyone’ and adjust permissions accordingly. So, whenever members enter your server, they will automatically be assigned the common role.
Further, you can easily figure out what roles you have assigned to whom. Due to these colors, the other members can identify moderators, admins, or other roles.
Part 4: How to Delete Roles in Discord?
Honestly, removing Discord roles easier than setting them up. There are hardly a few steps that you need to follow for role removal.
- place the cursor on the server, and hit the right-click.
- From the list, choose server settings. Then click on roles.
- From the roles window, tap on the role that you wish to delete.
- Towards the bottom, you will see the option to delete the role.
- Press ok to confirm.
Part 5: How to Add Roles on Discord Mobile?
Like we mentioned earlier, the user interface of Discord is similar across devices. So, there is little difference between the process of creating and managing roles. But it can be baffling for beginners, so here’s a brief!
1. How to create roles in Discord mobile app?
Before you can assign roles, you have to create them.
- Open your server.
- Tap on the arrow beside the server’s title. A drop-down menu will appear. Select ‘server settings’ from that.
- Tap on ‘Roles.’ A common role, ‘everyone’ is assigned to all the members who have basic permissions enabled for everyone.
- Tap the plus sign and add a role.
- Give the role a color and describe it in a few words.
- Go through the permissions and enable the ones that fit the role.
- Save the changes.
You can repeat this multiple times to create more roles.
2. How to Assign Roles in Discord mobile app?
- Head over to settings and select ‘Members.’
- Select the members you want to assign roles to.
- Tick the boxes beside each member’s name for the roles you are assigning them.
Save the changes, and you are good to go! You can assign multiple roles to a member.
Part 6: FAQs about Discord Server Roles
Just some obvious things you might wonder about.
- How to make someone admin on Discord?
Making someone admin is the same as assigning other roles. Open your server and go to server settings.
- From there, select ‘roles’ from the left pane.
- Create a new role.
- Name the role ‘admin’ or an equivalent title.
- Adjust the setting related to sorting out role members with other members.
- Go to general permissions and tick the ‘Administrator’ option.
- Hit the ‘save changes’ button at the bottom.
- Now it’s time to assign the role to someone. Right-click on the user that you want to assign the role.
- Choose ‘roles’ from the drop-down list and select ‘Admin.’
And now your server has an admin!
- How can I assign roles to new users in Discord automatically?
By default, every member gets the role of ‘everyone’ on the server. However, you can customize this and add the MEE6 bot for automatic role allocation.
- Why can’t I manage the server even I am an admin on the server?
This is likely to happen if the server owner gave you the role of admin, but the permissions are disabled. You can ask the owner to enable the permissions for your user ID.
Richard Bennett
Richard Bennett is a writer and a lover of all things video.
Follow @Richard Bennett
Richard Bennett
Mar 27, 2024• Proven solutions
Having a Discord server for you and your friends is a fun experience. And for gamers, Discord is a necessity. You can customize it with bots, connect real-time over voice channels, and even add rooms for chat forums.
Obviously, creating and managing a Discord server can get difficult. Especially when the server gets crammed with members, it is no longer a one-person show. You need help with monitoring and moderation. And let’s face it – you cannot watch your server round the clock.
So, let us learn the art of delegation on Discord! This guide will help you with – How to add roles in Discord and how to assign them to members. This includes creating roles, deleting them, and granting appropriate permissions.
- Part 1: Discord Server Permissions Introduction
- Part 2: How to Make and Add Roles in Discord on Computer
- Part 3: How to Manage Roles in Discord?
- Part 4: How to Delete Roles in Discord?
- Part 5: How to Add Roles on Discord Mobile?
- Part 6: Adding Roles to Discord FAQs
Part 1: Discord Server Permissions You Can Set Up
To give you a heads-up, there are around 29 permissions that you can adjust over a Discord server. More specifically, there are 7 voice permissions, 9 permissions related to texts, and about 13 permissions dealing with the server.
1. General server permission
Administrator – this is the highest permission that you can grant to a user. Think twice before giving this authority to anyone.
View Audit Log – with this permission, a user can read the server’s audits.
Manage Server – this permission enables a user to change the server’s name or shift it to another region.
Manage Roles – a user with this authority can make new roles or modify the roles without this permission.
Manage Channels – with this; a user can make, edit, or remove channels on a server.
Manage emojis – users with this authority can manage emotes.
Manage Webhooks – if you have this authority, you can add, modify, and remove webhooks.
Read Text Channels & See Voice Channels – a user with this permission can read text channels.
2. Membership permissions
Ban Members – a member with permission, can ban members from the server.
Create Instant Invite – users with this permission can invite people to the server.
Change Nickname – you can change your nickname anytime if this permission is enabled.
Manage Nicknames – if enabled, a user can change other’s nicknames.
Kick Members – a user with this authority can remove members from the server.
3. Text channel permissions
Send Messages – with this; users can send texts on chats.
Send TTS Messages – this enables users to send text-to-speech texts.
Manage Messages – with this; a user can remove or pin texts of other users.
Embed Links – enables users to embed hyperlinks in texts.
Attach Files – with this; users can attach files in the texts.
Read Message History – enables users to access earlier texts.
Mention Everyone – you can send push notifications on the channel if this permission is enabled.
Use External Emojis – if enabled, users can send emojis from other servers.
Add Reactions – with this; users can add new reactions to a text.
4. Voice channel permissions
Connect – enables users to connect themselves over the voice channel.
Speak – users can talk over the voice channel.
Mute Members – turn off other user’s speech.
Deafen Members – turn off hearing on the channel for a user.
Move Members – enables a user to shift members from one channel to a different channel.
Use Voice Activity – a member can talk without using Push-to-Talk, with this permission.
Priority Speaker – when this permission is turned on for a user, other’s
this permission allows the user to reduce the volume of other users when this user is speaking so that their words are louder on the channel.
5. Advanced permissions
Includes the ‘Administrator’ permission, which by default enables all the permissions to the assigned user.
Part 2: How to Make and Add Roles in Discord on Computer
The desktop app and Browser resemble the mobile apple a lot. The process of assigning roles and configuring members is more or less the same across devices. First, you need to create roles and define their authority before assigning these roles to some members.
How to create roles in Discord?
Before you can assign roles, you need a server. Once you have created your Discord server, start crafting the structure.
- Open your server and right-click on it.
- From the menu that appears, tap server settings.
- Name the role suitably. It should be descriptive of the authority.
- Tap on the plus sign that appears on the top right of the page.
- Here, you can change the title off the roll and even choose the color.
- Now comes the time to grant some permissions. These are basically the authority that you gave to every profile.
- When you are done, save the changes.
How to Assign Roles to Members in Discord?
To be able to assign roles, you should first create them
- Once again, hit that right button on your server and go to server settings.
- From the menu that appears to the left, ‘choose members’ under user management.
- Here, you will see the list of all the members on your server, tap the Plus sign that is right beside the username.
- From the drop-down menu that appears, select a role you want to assign to that member.
- You will notice that the color changes as per your settings. And this is how you assign roles to a server.
Part 3: How to Manage Roles in Discord?
After you learn how to make roles in Discord, you might want to manage them.
If you have got the hang of creating roles, then managing them is no different. Whenever the server gets crowded, you can create more roles or modify the existing ones. A smaller server can run smoothly with just an admin and an ‘everyone’ role.
The quickest and easiest way to manage your bloating server is to let all members be ‘everyone’ and adjust permissions accordingly. So, whenever members enter your server, they will automatically be assigned the common role.
Further, you can easily figure out what roles you have assigned to whom. Due to these colors, the other members can identify moderators, admins, or other roles.
Part 4: How to Delete Roles in Discord?
Honestly, removing Discord roles easier than setting them up. There are hardly a few steps that you need to follow for role removal.
- place the cursor on the server, and hit the right-click.
- From the list, choose server settings. Then click on roles.
- From the roles window, tap on the role that you wish to delete.
- Towards the bottom, you will see the option to delete the role.
- Press ok to confirm.
Part 5: How to Add Roles on Discord Mobile?
Like we mentioned earlier, the user interface of Discord is similar across devices. So, there is little difference between the process of creating and managing roles. But it can be baffling for beginners, so here’s a brief!
1. How to create roles in Discord mobile app?
Before you can assign roles, you have to create them.
- Open your server.
- Tap on the arrow beside the server’s title. A drop-down menu will appear. Select ‘server settings’ from that.
- Tap on ‘Roles.’ A common role, ‘everyone’ is assigned to all the members who have basic permissions enabled for everyone.
- Tap the plus sign and add a role.
- Give the role a color and describe it in a few words.
- Go through the permissions and enable the ones that fit the role.
- Save the changes.
You can repeat this multiple times to create more roles.
2. How to Assign Roles in Discord mobile app?
- Head over to settings and select ‘Members.’
- Select the members you want to assign roles to.
- Tick the boxes beside each member’s name for the roles you are assigning them.
Save the changes, and you are good to go! You can assign multiple roles to a member.
Part 6: FAQs about Discord Server Roles
Just some obvious things you might wonder about.
- How to make someone admin on Discord?
Making someone admin is the same as assigning other roles. Open your server and go to server settings.
- From there, select ‘roles’ from the left pane.
- Create a new role.
- Name the role ‘admin’ or an equivalent title.
- Adjust the setting related to sorting out role members with other members.
- Go to general permissions and tick the ‘Administrator’ option.
- Hit the ‘save changes’ button at the bottom.
- Now it’s time to assign the role to someone. Right-click on the user that you want to assign the role.
- Choose ‘roles’ from the drop-down list and select ‘Admin.’
And now your server has an admin!
- How can I assign roles to new users in Discord automatically?
By default, every member gets the role of ‘everyone’ on the server. However, you can customize this and add the MEE6 bot for automatic role allocation.
- Why can’t I manage the server even I am an admin on the server?
This is likely to happen if the server owner gave you the role of admin, but the permissions are disabled. You can ask the owner to enable the permissions for your user ID.
Richard Bennett
Richard Bennett is a writer and a lover of all things video.
Follow @Richard Bennett
Unlocking Seamless Discord Conversations on Tablets & Phones
How to Make a Discord Video Call | Desktop & Mobile
Richard Bennett
Mar 27, 2024• Proven solutions
Discord is a great place to hang out with like-minded people and just relax. But sometimes you want to do more than just chat using text messaging, which is where video calling comes in handy.
Discord has video call options built into the desktop app, the web browser and the mobile app, so you don’t need to switch between different software when you want to chat on video with your friends or colleagues. Read on to find out how to make a video call on Discord.
- Part 1: Best Settings for Discord Video Call
- Part 2: How to Make a Private Video Call on Discord?
- Part 3: How to Make a Server Video Call on Discord?
- Part 4: FAQs about Discord Video Call
Part 1: Best Settings for Discord Video Call
Before you start calling everyone, you’ll want to check your settings to make sure you have the best experience. It’s important to make sure you’ve got your best equipment setup to work for the highest quality audio and video possible.

So, start by heading to the User Settings page. You’ll find this at the bottom left of the screen – look for the cog icon next to your name. You won’t see this on mobile, this is only on the desktop app and the web browser version of Discord.
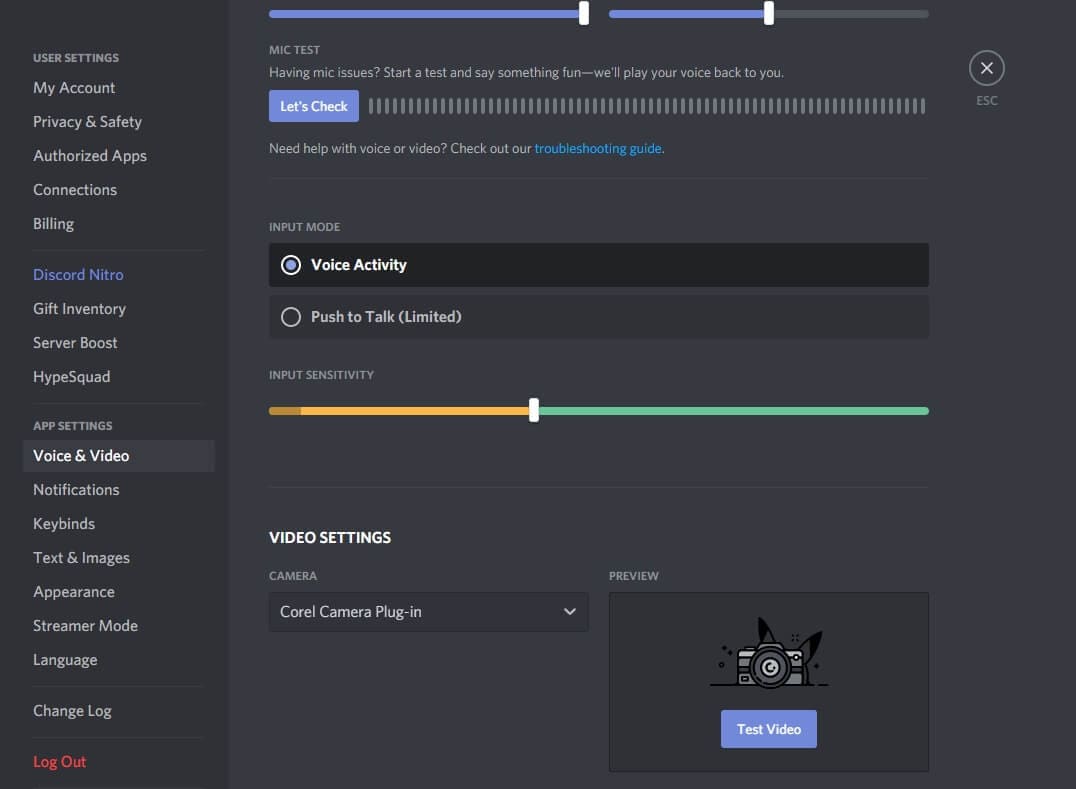
Once you’ve opened settings, you’ll want to click on the Voice & Video tab. Here you can check your microphone settings and adjust the volume, and choose your camera. If you’re using an external camera instead of the built-in option, check that the right one is selected in the dropdown.
You can also use this opportunity to run a test video – so that you know you’re well-lit, properly framed and otherwise good to go. You can adjust the lighting in your room or move the camera if you don’t feel it’s quite right.
One quick note for the web browser version of Discord – you’ll be asked to grant permission to your microphone and camera. Make sure you allow the site to use your equipment otherwise it won’t work on the video call.
Once you are happy, just click the close button at the top right of the settings options.
Part 2: How to Make a Private Video Call on Discord?
Once you’ve got your settings ready, you’re set to make your private Discord video call. If you’re doing it on the web browser or desktop app, you’ll need to first navigate to the inbox you share with the person you want to call. Do this by clicking on the Home button at the top left – you’ll then get a list of all your contacts.
If you’re only calling one person then it’s easy – just click on their name.

If you want to call a private group, you need to click the + button and then create a group DM. Add the names of the users you want to call.
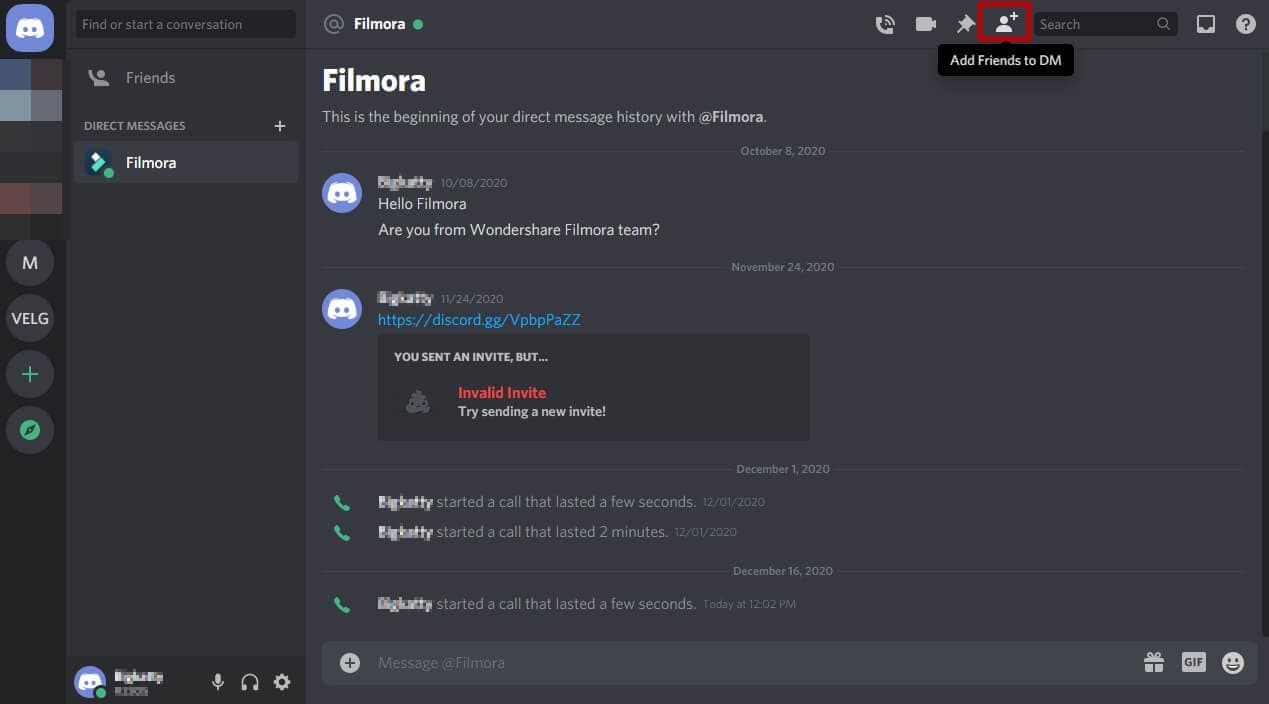
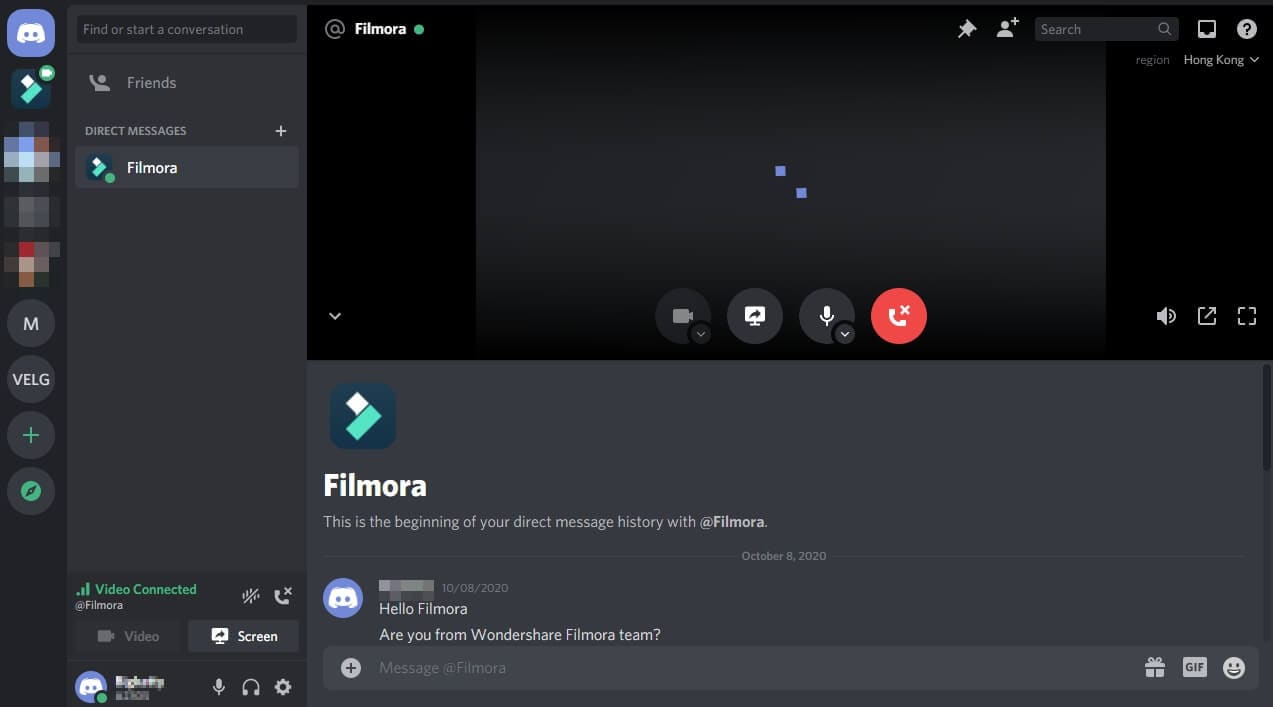
Once you’re in the direct message window of the person or group you want to call, you need to look at the buttons at the top right of the screen. The second icon that looks like a video camera is the one you’re looking for. Click that and you’ll start a video call.
You’ll see yourself on screen at this point, but you’ll need to wait until the other person or group members have joined the call for the chat to properly begin.
The process of making video call on Discord mobile is essentially identical. You just need to open the direct message group and click on the video call icon, which is still at the top right of your screen.
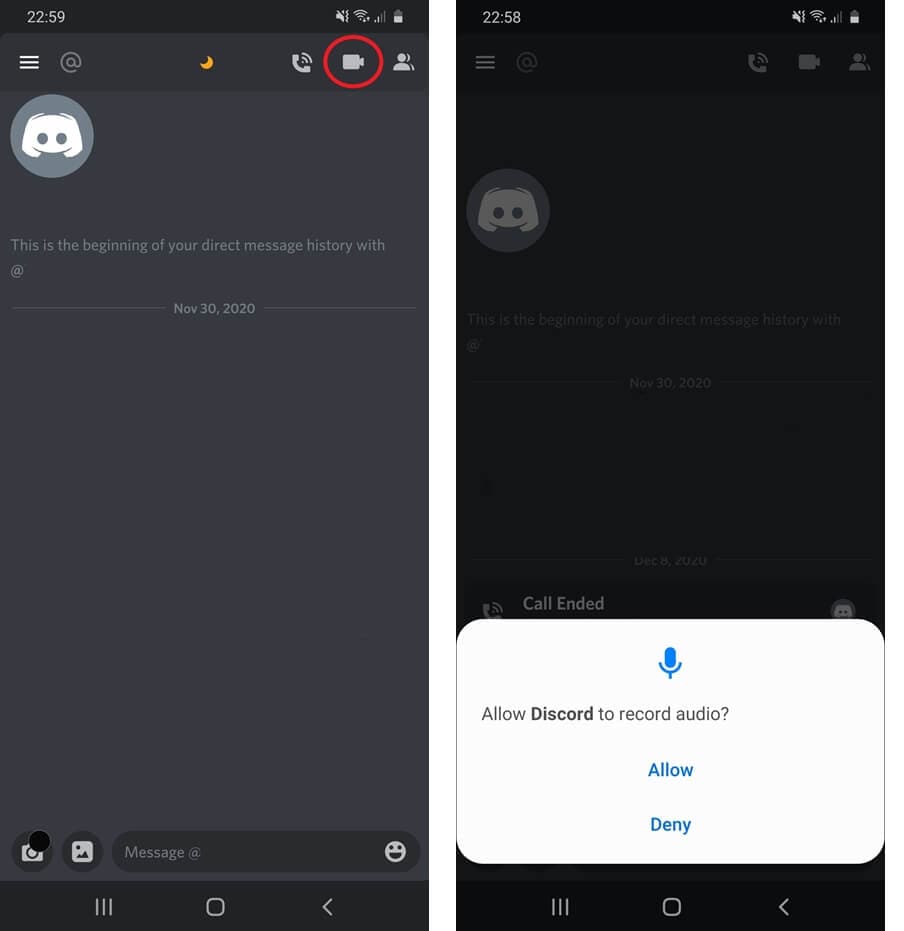
You’ll need to give permissions for the Discord mobile app to use your microphone and camera if you haven’t already.
Once you’ve finished your video call on either desktop or mobile, just hit the red button to end it and switch your camera off again.
Part 3: How to Make a Server Video Call on Discord?
If you want to make a group video call on a public server, you again need to first navigate to the server. Once you’re there, you’ll need to join the voice channel that you should see on the left side of the screen.
Once you’re in the voice channel, click Lounge, Community Hangout or Stream Room, and then switch on your camera by clicking the ‘Video’ button. You’ll find this at the bottom-left of the screen. Again, if you’re on the web browser, you’ll be asked by your browser for permission to use your camera at this stage.
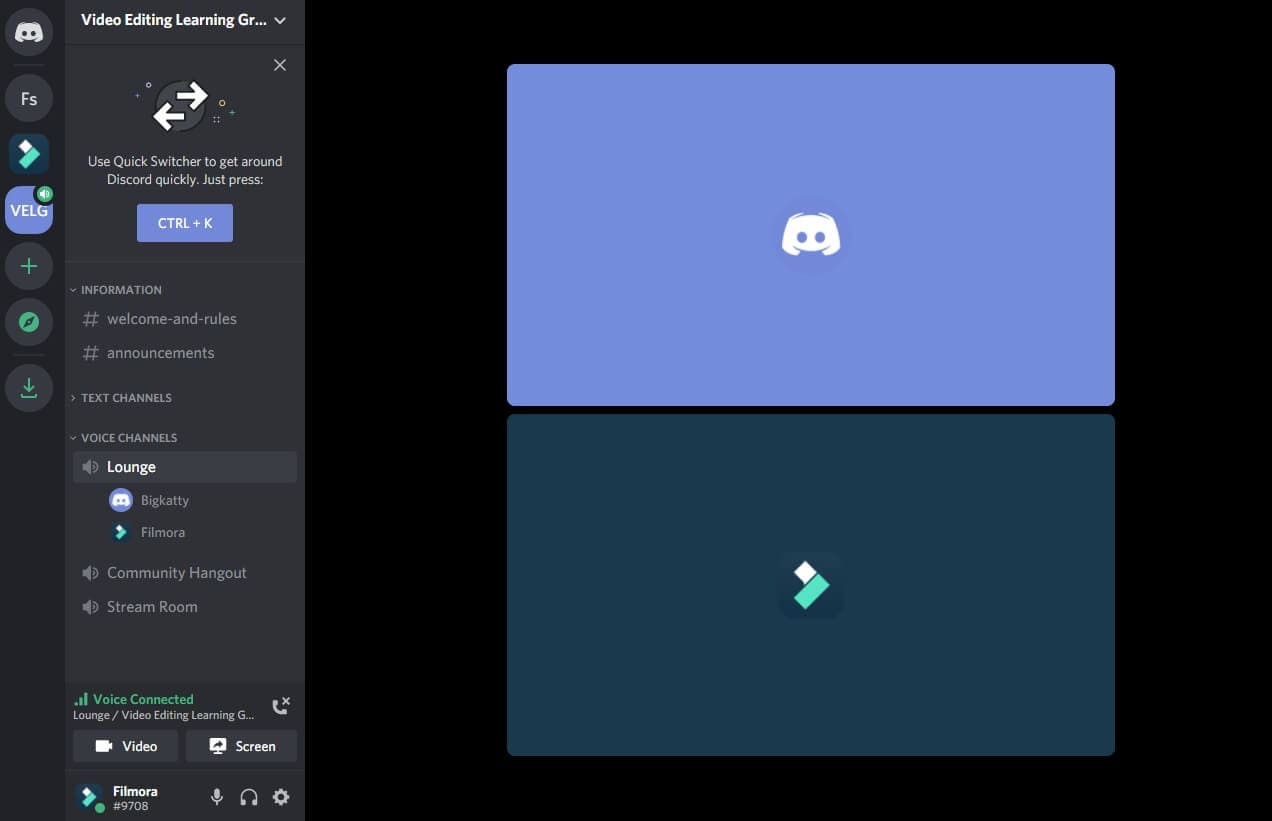
And that’s it – the video call is now live and anyone who joins the voice channel will be able to see you, chat to you and switch on their camera to join the video conference as well.
On mobile, it’s slightly different. You’ll still want to head to the server you want to join and then click on the voice channel to join it. But as soon as you click on the voice channel, you’ll get a pop-up with an icon at the bottom right where you can instantly switch on your camera.
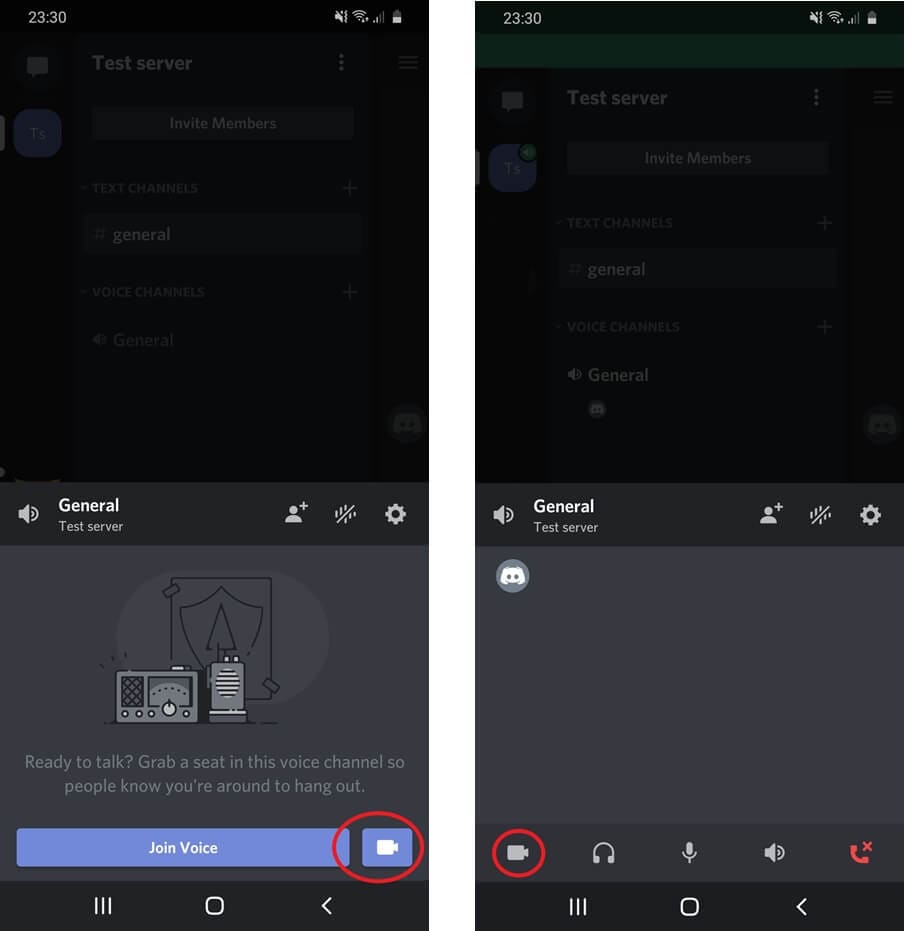
If you prefer, you can still just join as voice, and then at any stage click on your name where you’ll be able to then switch on your camera to turn a voice chat into a video call.
Whenever you want to end the video call, just click on your name again to switch off your camera, or disconnect completely from the voice channel.
FAQs About Discord Video Chat Call
1. How Many People Can Join in the Discord Group Video Call?
Normally, the limit for the number of users on a group video call in Discord is 10. However, during the Coronavirus pandemic, the team behind Discord know that it’s a valuable tool to help people stay connected. So the limit has been increased to 25 users. This may be reduced in the future once the world returns to some sense of normality.
2. How to Join a Video Call on Discord?
Joining an existing video call on Discord is a really easy process.
If it’s a private video call, you’ll get a pop-up in the chat window letting you know that a video call has been started. You have the option of declining the video call, joining it with video, or just joining with voice without your camera switched on.
If instead, it’s a public server where a video call is happening, you just need to join the voice channel by clicking on it on the left side of the screen, and then clicking on the video button next to your name, just as if you were starting the call in the first place.
Richard Bennett
Richard Bennett is a writer and a lover of all things video.
Follow @Richard Bennett
Richard Bennett
Mar 27, 2024• Proven solutions
Discord is a great place to hang out with like-minded people and just relax. But sometimes you want to do more than just chat using text messaging, which is where video calling comes in handy.
Discord has video call options built into the desktop app, the web browser and the mobile app, so you don’t need to switch between different software when you want to chat on video with your friends or colleagues. Read on to find out how to make a video call on Discord.
- Part 1: Best Settings for Discord Video Call
- Part 2: How to Make a Private Video Call on Discord?
- Part 3: How to Make a Server Video Call on Discord?
- Part 4: FAQs about Discord Video Call
Part 1: Best Settings for Discord Video Call
Before you start calling everyone, you’ll want to check your settings to make sure you have the best experience. It’s important to make sure you’ve got your best equipment setup to work for the highest quality audio and video possible.
So, start by heading to the User Settings page. You’ll find this at the bottom left of the screen – look for the cog icon next to your name. You won’t see this on mobile, this is only on the desktop app and the web browser version of Discord.
Once you’ve opened settings, you’ll want to click on the Voice & Video tab. Here you can check your microphone settings and adjust the volume, and choose your camera. If you’re using an external camera instead of the built-in option, check that the right one is selected in the dropdown.
You can also use this opportunity to run a test video – so that you know you’re well-lit, properly framed and otherwise good to go. You can adjust the lighting in your room or move the camera if you don’t feel it’s quite right.
One quick note for the web browser version of Discord – you’ll be asked to grant permission to your microphone and camera. Make sure you allow the site to use your equipment otherwise it won’t work on the video call.
Once you are happy, just click the close button at the top right of the settings options.
Part 2: How to Make a Private Video Call on Discord?
Once you’ve got your settings ready, you’re set to make your private Discord video call. If you’re doing it on the web browser or desktop app, you’ll need to first navigate to the inbox you share with the person you want to call. Do this by clicking on the Home button at the top left – you’ll then get a list of all your contacts.
If you’re only calling one person then it’s easy – just click on their name.
If you want to call a private group, you need to click the + button and then create a group DM. Add the names of the users you want to call.
Once you’re in the direct message window of the person or group you want to call, you need to look at the buttons at the top right of the screen. The second icon that looks like a video camera is the one you’re looking for. Click that and you’ll start a video call.
You’ll see yourself on screen at this point, but you’ll need to wait until the other person or group members have joined the call for the chat to properly begin.
The process of making video call on Discord mobile is essentially identical. You just need to open the direct message group and click on the video call icon, which is still at the top right of your screen.
You’ll need to give permissions for the Discord mobile app to use your microphone and camera if you haven’t already.
Once you’ve finished your video call on either desktop or mobile, just hit the red button to end it and switch your camera off again.
Part 3: How to Make a Server Video Call on Discord?
If you want to make a group video call on a public server, you again need to first navigate to the server. Once you’re there, you’ll need to join the voice channel that you should see on the left side of the screen.
Once you’re in the voice channel, click Lounge, Community Hangout or Stream Room, and then switch on your camera by clicking the ‘Video’ button. You’ll find this at the bottom-left of the screen. Again, if you’re on the web browser, you’ll be asked by your browser for permission to use your camera at this stage.
And that’s it – the video call is now live and anyone who joins the voice channel will be able to see you, chat to you and switch on their camera to join the video conference as well.
On mobile, it’s slightly different. You’ll still want to head to the server you want to join and then click on the voice channel to join it. But as soon as you click on the voice channel, you’ll get a pop-up with an icon at the bottom right where you can instantly switch on your camera.
If you prefer, you can still just join as voice, and then at any stage click on your name where you’ll be able to then switch on your camera to turn a voice chat into a video call.
Whenever you want to end the video call, just click on your name again to switch off your camera, or disconnect completely from the voice channel.
FAQs About Discord Video Chat Call
1. How Many People Can Join in the Discord Group Video Call?
Normally, the limit for the number of users on a group video call in Discord is 10. However, during the Coronavirus pandemic, the team behind Discord know that it’s a valuable tool to help people stay connected. So the limit has been increased to 25 users. This may be reduced in the future once the world returns to some sense of normality.
2. How to Join a Video Call on Discord?
Joining an existing video call on Discord is a really easy process.
If it’s a private video call, you’ll get a pop-up in the chat window letting you know that a video call has been started. You have the option of declining the video call, joining it with video, or just joining with voice without your camera switched on.
If instead, it’s a public server where a video call is happening, you just need to join the voice channel by clicking on it on the left side of the screen, and then clicking on the video button next to your name, just as if you were starting the call in the first place.
Richard Bennett
Richard Bennett is a writer and a lover of all things video.
Follow @Richard Bennett
Also read:
- What Is Discord Nitro And How to Get It? [Free & Paid] for 2024
- [Updated] 2024 Approved Navigating the World of Discord Roles
- The Right Way to Disband From a Discord Community for 2024
- [New] 2024 Approved Unlock Discord Networking on PC/Android & iOS
- [Updated] Create and Showcase Innovative Discord Flags for Profile Spotlight for 2024
- 2024 Approved Unleashing Creativity Making Discord's Profile Pictures Pop
- 2024 Approved The Ultimate Tutorial for Removing Multiple Messages on Discord
- [New] The Gentle Art of Stepping Back From Discords
- [New] In 2024, The Ultimate Tutorial for Adding Discord Server Roles
- [New] Step-by-Step to High-Quality Gaming on Discord Your DiscoNitro Journey for 2024
- 2024 Approved Top Screen Recorder Apps From PC to Mobile, Including Discord
- [New] From Anonymity to Authority The Essential Pathway for Raising Issues on Digital Platforms Like Discord for 2024
- [New] 2024 Approved Your Essential Guide to Discord Stickers
- [New] In 2024, Quickly Quicken Recognition with These Disco Tags
- [New] DiscoFest Unveiled The Top Ten Themes Revealed for 2024
- Unveiling the Secrets of Custom Emoji Integration in Discord
- [Updated] 2024 Approved Demystifying Discord Nitro Comprehensive Understanding and How to Attain It
- In 2024, From Ordinary to Extraordinary Crafting Stunning Pfp for Discord
- [New] In 2024, Delve Into Nitro The Advantages of Discord VIP Service
- Mastering Response Etiquette Discord Messaging Guide for 2024
- 2024 Approved Ultimate Desktop/Mobile Discord Screen Recorders Guide
- In 2024, The Art of Adapting Your Online Presence on Discord Platform
- Permanently Unplug Discord Services for 2024
- [New] 2024 Approved In-Depth Tutorial Effortlessly Posting Videos on Discord
- [Updated] The Direct Route Streaming From Spotify in Discord Platforms
- In 2024, Amplify Your Server Experience with These Select Bots
- [Updated] Optimizing Your Online Presence Sending Visual Media in Discord for 2024
- [New] 2024 Approved Style Spectrum Top 10 DiscoTheme Innovations by Expert Curators
- 2024 Approved Premier 5 Socially Engaging Logo Movements
- [New] In 2024, Mastering Mingle Link Up on PC, Android, iOS
- In 2024, Connecting with Peers Discord Friendning Tips
- [New] 10 Popular Discord Themes [From BetterDiscord] for 2024
- [Updated] In 2024, Dial Down Distractions Mastering VoiceMod Techniques for Discord Chats
- [Updated] 2024 Approved The Step-by-Step Blueprint for Channel Creation on Discord
- [New] In 2024, Transform Your Messaging Top 8 No-Cost Emoji Sites Revealed
- Unraveling Discord's Features for Aspiring Broadc Writers (Streaming)
- In 2024, Mastering Gaming Excellence with DiscoNitro A Step-by-Step Guide
- [New] Dissolve Link to Discord on Devices for 2024
- [New] In 2024, Get Ultimate, Premium-Quality Discord Icons at NO Charge
- [Updated] Music and Chat Unite Your Guide to Integrating Spotify/Discord for 2024
- In 2024, Affordable Audio Capture Software The Best of Discord's Offers
- 2024 Approved Endless Entertainment Building Addictive IG Boomerangs
- Cut, Trim, and Split The Best Free Video Editors for 2024
- Affordable, Easy-to-Use Video Capture Tools for Windows
- New Video Editing on a Budget Free Software for 32-Bit Windows for 2024
- How To Transfer WhatsApp From iPhone 7 Plus to other iPhone 14 Pro devices? | Dr.fone
- Updated Home Movie Magic Creating Professional-Looking DVDs with Ease for 2024
- How to Rescue Lost Videos from A05s
- [Updated] Pair Monitor Logging Process for 2024
- In 2024, Mastering Your Music Production The Best Windows and Mac DAWs of the Year 2023
- [Updated] Sonic Sanctuary The Mac Experience
- [Updated] In 2024, Prime Picks for Effortless Screenshots
- 2024 Approved What Does the Blue Marker on FB Chat Reveal?
- The Most Useful Tips for Pokemon Go Ultra League On Apple iPhone 12 Pro | Dr.fone
- [New] 2024 Approved Amplify Engagement Broadcasting From Twitch to Facebook
- [Updated] Screen Capture Connoisseurs Your Guide to Preserving TwitVid Media
- New From Voice to Written Word The Art of Speech Transcription
- [New] In 2024, Bridging Social Media & Television with Live Streaming
- 2024 Approved Android & iOS Leading Titles Mimicking PlayStation Games
- [New] In 2024, 2023'S Leading Applications for Downloading Facebook Lite Videos
- Updated 2024 Approved Create An AI Avatar Video
- In 2024, How to Transfer Data After Switching From Vivo Y100 5G to Latest Samsung | Dr.fone
- Prevent Freezing of Streamed Videos in Chrome
- Pokémon Go Cooldown Chart On Tecno Spark 10 4G | Dr.fone
- In 2024, The Ultimate Guide How to Bypass Swipe Screen to Unlock on ZTE Blade A73 5G Device
- [Updated] Find What You've Just Watched on FB Quick & Easy
- Fix the Error of Unfortunately the Process.com.android.phone Has Stopped on Oppo Find N3 | Dr.fone
- 2024 Approved Blur Out Distractions Best Free Online Photo Editors
- Updated 2024 Approved Create Epic Gaming Intros 10 Best Tools for Windows and Mac
- [New] The Ultimate Guide to Instagram Video Campaigns Strategy and Execution for 2024
- 9 Mind-Blowing Tricks to Hatch Eggs in Pokemon Go Without Walking On Apple iPhone 6 | Dr.fone
- Unlock android phone if you forget the Spark 20C password or pattern lock
- Title: "[New] 2024 Approved The Ultimate Tutorial for Adding Discord Server Roles"
- Author: Timothy
- Created at : 2024-06-28 03:27:38
- Updated at : 2024-06-29 03:27:38
- Link: https://discord-videos.techidaily.com/new-2024-approved-the-ultimate-tutorial-for-adding-discord-server-roles/
- License: This work is licensed under CC BY-NC-SA 4.0.
