
![[New] Converting Messages Into Speech on Discord](https://www.lifewire.com/thmb/7PylRPR7R3eCbTAmFPkIawl4_mA=/540x405/filters:no_upscale():max_bytes(150000):strip_icc()/Broken-Phone-Blue-Background-2ee3ff783b18494fa0b8916c0d029105.jpg)
[New] Converting Messages Into Speech on Discord
Converting Messages Into Speech on Discord
How to Use Discord Text-To-Speech?

Richard Bennett
Mar 27, 2024• Proven solutions
While most users of the popular online messaging and content sharing site Discord rely on simple text to communicate, there are numerous situations when using the text-to-speech feature would be quite advantageous. This includes instances when there are language barriers or disabilities to overcome, but also spontaneous moments when users just enjoy hearing each other’s words. Discord supports the use of a text-to-speech (TTS) function and in fact, has a built-in setting for it, but this option only works for desktop users with Windows or Mac devices.
In this article, we will discuss the specifics of activating the TTS function in Discord and using it effectively to improve your communication with other users. By following the detailed instructions provided here, you will be able to learn how to activate text-to-speech on Discord and manage your voice messages on selected servers in the most practical manner.
- Part 1: Enable Text-To-Speech Feature in Discord
- Part 2: How to Set Up Text-To-Speech Notifications on Discord?
- Part 3: How to Use Text-To-Speech in Discord Chatting?
- Part 4: How to Mute All Text-To-Speech Messages on Discord?
- Part 5: Best Text-To-Speech Bots on Discord
Part 1: How to Enable Text-To-Speech Feature in Discord?
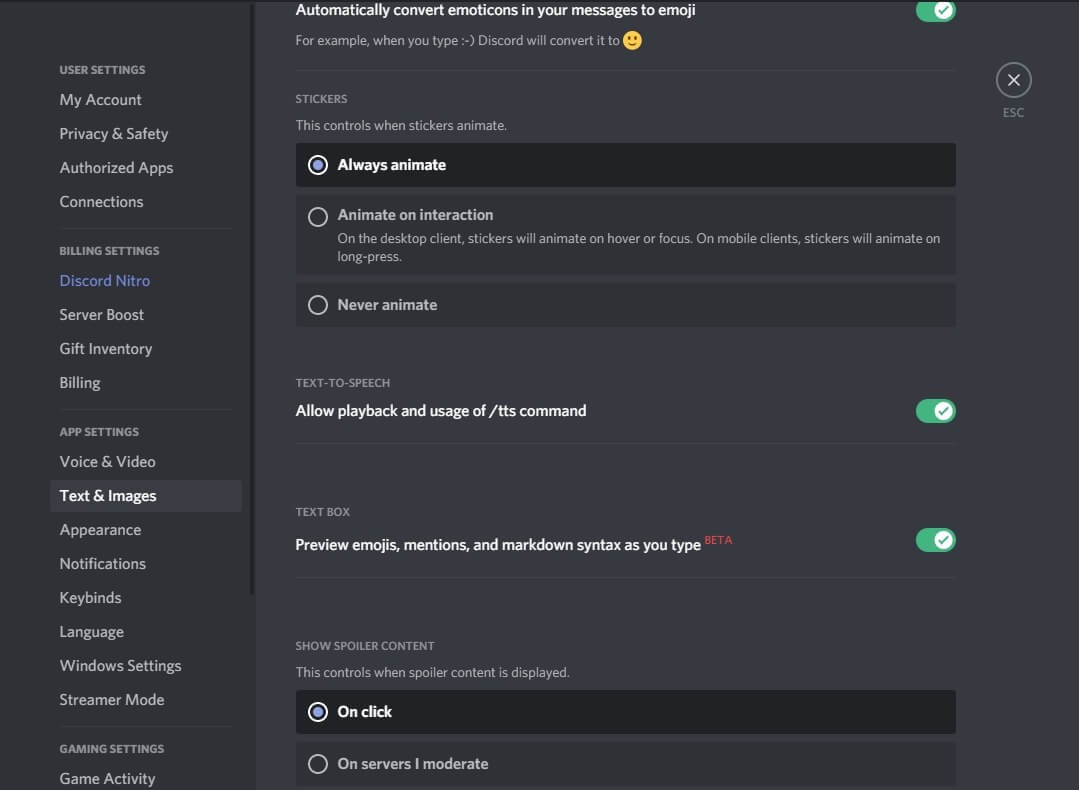
Before you can deploy TTS in your chats, you need to change the settings of your profile to enable this option. This isn’t hard to do – just go to the Discord app and select ‘Settings’ from the menu, which will trigger a pop-up window to appear on your screen. Next, you need to find the Text & Images section in the App Settings window, then scroll down to find the Text-to-Speech option, and finally tick the boxes next to Allow playback and Usage of TTS items. After you do this, your Discord will be ready to process your text messages in voice format.
To test whether you successfully activated Text-to-Speech, open any chats on your personal server and try typing out a message, followed immediately by the tag /tts. If everything is working correctly, your message should appear on the screen in the text form, accompanied by its voice rendering delivered by an automated module. The timing of the two should be perfectly synchronized so that you hear the message and see the text at exactly the same instance. Otherwise, go back to settings and make sure you activated the TTS option properly or restart your Discord app.
Part 2: How to Set Up Text-To-Speech Notifications on Discord?
Another practical possibility that can improve your Discord experience is to set up TTS notifications and be immediately informed whenever a fresh message arrives. This can also be done after you change the app parameters from the ‘Settings’ menu. After you see all options, choose ‘App Settings’ and search for the section named ‘Notifications’. By scrolling down, you will reach the item ‘Text-to-Speech notifications’ and after clicking on it you will be given a choice between three options.
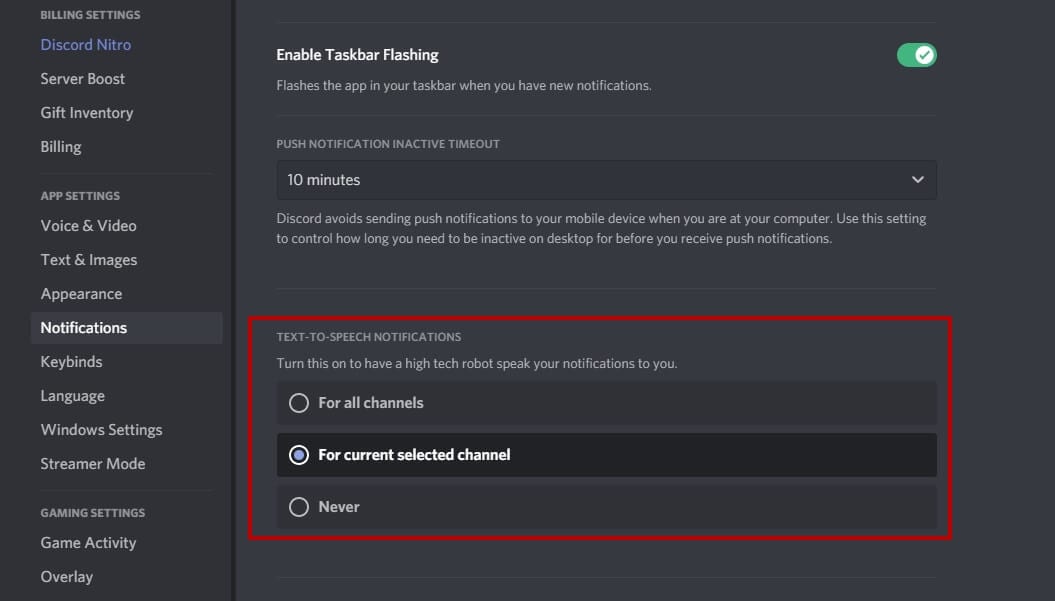
The first option For all channels is to enable notifications on all channels on Discord; choosing it will result in a robotic voice reading all messages from all chats, regardless of whether they have a /tts tag. This option can be useful when you want to maximize your accessibility and receive important information instantly.
By picking the second option, For current selected channel, you can enable TTS notifications only on the current channel. This action will instruct Discord to have an automated voice read all the incoming messages on the active chat aloud, allowing you to stay in the loop at all times. This possibility works well for people who occasionally do multiple things at once, for example, gamers or streamers who use Discord to stay connected with their fans and friends while they are busy.
Finally, you can choose Never to hear any voice messages from your Discord chats never. If you pick this setting, even those messages that were sent with the /tts tag will only be displayed in the text format. This option provides you with peace of mind and prevents spammers from saturating you with voice messages you have no interest in hearing.
Part 3: How to Use Text-To-Speech in Discord Chatting?
It’s not very hard to learn how to effectively use the TTS option in your chats on the Discord platform. This communication format is available on all channels that have an activated Text-to-Speech setting, so you can freely add a few messages to be read aloud or completely switch to automated voice format if you so desire. Doing this in practice is very simple – just start your message by typing the tag /tts and then enter your text as you normally would.

Your TTS message will be reproduced in a voice format by a Discord bot to all participants in the chat who didn’t mute incoming Text-to-Speech chats. An automated voice will say the entire message, and then also pronounce your username to identify the author. At the same time, the message will appear in the chat feed as plain text, so that even those recipients unable to hear it will be able to see the contents.
Part 4: How to Mute All Text-To-Speech Messages on Discord?
You can also decide to prevent any messages from being played to you in a voice format and receive them as text only. This option is available even if you are not the administrator of the chat server and simply want to customize your own experience. To do this, you need to open the Discord app and enter the Settings menu, before selecting the Text & Images section from App Settings. After this, you need to find the Text-to-Speech sub-menu and open it to find the Allow Playback feature. If you disable this feature, you will effectively mute all incoming TTS messages across all Discord servers you are active on.
Please keep in mind that deactivating the aforementioned feature won’t block TTS messages from reaching you, but you will see them as text only. On the other hand, you can’t use the /tts tag to send your own Text-to-Speech while the playback setting is disabled. Nothing is preventing you from turning it back on when you want to have a TTS capacity on Discord again.
Part 5: Best Text-To-Speech Bots on Discord
One of the reasons why Discord is so popular is that it allows extensive customization through user-made Bots or modules that automatically perform a certain task. There are several great Bots that can be used for Text-to-Speech, so you might consider utilizing one of them.
1. Text to Speech (TTS)
With many languages supported and a wide range of cool commands, this bot could be the best choice for people who use TTS just for fun.
2. KD Bot
A very popular option for Text-to-Speech on Discord that lets you choose from more than 100 voices and supports upwards of 100 languages, making it a powerful translation tool.
3. Fergun
This multi-language tool responds to more than 100 different commands, so it can be used for a wide variety of purposes with stunning effectiveness.
Frequently asked questions about TTS on Discord
- Can I use the Text-to-Speech feature on Discord from a mobile phone?
Unfortunately, you can’t. Discord works quite well as a text messaging app on mobile platforms, but at this time Text-to-Speech functionality is limited to desktop users.
- Why can’t I use Text-to-Speech on a Discord server?
If you are unable to send or receive TTS messages on Discord, you need to change your settings. Please see Part 1 of this article for detailed instructions.
Richard Bennett
Richard Bennett is a writer and a lover of all things video.
Follow @Richard Bennett
Richard Bennett
Mar 27, 2024• Proven solutions
While most users of the popular online messaging and content sharing site Discord rely on simple text to communicate, there are numerous situations when using the text-to-speech feature would be quite advantageous. This includes instances when there are language barriers or disabilities to overcome, but also spontaneous moments when users just enjoy hearing each other’s words. Discord supports the use of a text-to-speech (TTS) function and in fact, has a built-in setting for it, but this option only works for desktop users with Windows or Mac devices.
In this article, we will discuss the specifics of activating the TTS function in Discord and using it effectively to improve your communication with other users. By following the detailed instructions provided here, you will be able to learn how to activate text-to-speech on Discord and manage your voice messages on selected servers in the most practical manner.
- Part 1: Enable Text-To-Speech Feature in Discord
- Part 2: How to Set Up Text-To-Speech Notifications on Discord?
- Part 3: How to Use Text-To-Speech in Discord Chatting?
- Part 4: How to Mute All Text-To-Speech Messages on Discord?
- Part 5: Best Text-To-Speech Bots on Discord
Part 1: How to Enable Text-To-Speech Feature in Discord?
Before you can deploy TTS in your chats, you need to change the settings of your profile to enable this option. This isn’t hard to do – just go to the Discord app and select ‘Settings’ from the menu, which will trigger a pop-up window to appear on your screen. Next, you need to find the Text & Images section in the App Settings window, then scroll down to find the Text-to-Speech option, and finally tick the boxes next to Allow playback and Usage of TTS items. After you do this, your Discord will be ready to process your text messages in voice format.
To test whether you successfully activated Text-to-Speech, open any chats on your personal server and try typing out a message, followed immediately by the tag /tts. If everything is working correctly, your message should appear on the screen in the text form, accompanied by its voice rendering delivered by an automated module. The timing of the two should be perfectly synchronized so that you hear the message and see the text at exactly the same instance. Otherwise, go back to settings and make sure you activated the TTS option properly or restart your Discord app.
Part 2: How to Set Up Text-To-Speech Notifications on Discord?
Another practical possibility that can improve your Discord experience is to set up TTS notifications and be immediately informed whenever a fresh message arrives. This can also be done after you change the app parameters from the ‘Settings’ menu. After you see all options, choose ‘App Settings’ and search for the section named ‘Notifications’. By scrolling down, you will reach the item ‘Text-to-Speech notifications’ and after clicking on it you will be given a choice between three options.
The first option For all channels is to enable notifications on all channels on Discord; choosing it will result in a robotic voice reading all messages from all chats, regardless of whether they have a /tts tag. This option can be useful when you want to maximize your accessibility and receive important information instantly.
By picking the second option, For current selected channel, you can enable TTS notifications only on the current channel. This action will instruct Discord to have an automated voice read all the incoming messages on the active chat aloud, allowing you to stay in the loop at all times. This possibility works well for people who occasionally do multiple things at once, for example, gamers or streamers who use Discord to stay connected with their fans and friends while they are busy.
Finally, you can choose Never to hear any voice messages from your Discord chats never. If you pick this setting, even those messages that were sent with the /tts tag will only be displayed in the text format. This option provides you with peace of mind and prevents spammers from saturating you with voice messages you have no interest in hearing.
Part 3: How to Use Text-To-Speech in Discord Chatting?
It’s not very hard to learn how to effectively use the TTS option in your chats on the Discord platform. This communication format is available on all channels that have an activated Text-to-Speech setting, so you can freely add a few messages to be read aloud or completely switch to automated voice format if you so desire. Doing this in practice is very simple – just start your message by typing the tag /tts and then enter your text as you normally would.
Your TTS message will be reproduced in a voice format by a Discord bot to all participants in the chat who didn’t mute incoming Text-to-Speech chats. An automated voice will say the entire message, and then also pronounce your username to identify the author. At the same time, the message will appear in the chat feed as plain text, so that even those recipients unable to hear it will be able to see the contents.
Part 4: How to Mute All Text-To-Speech Messages on Discord?
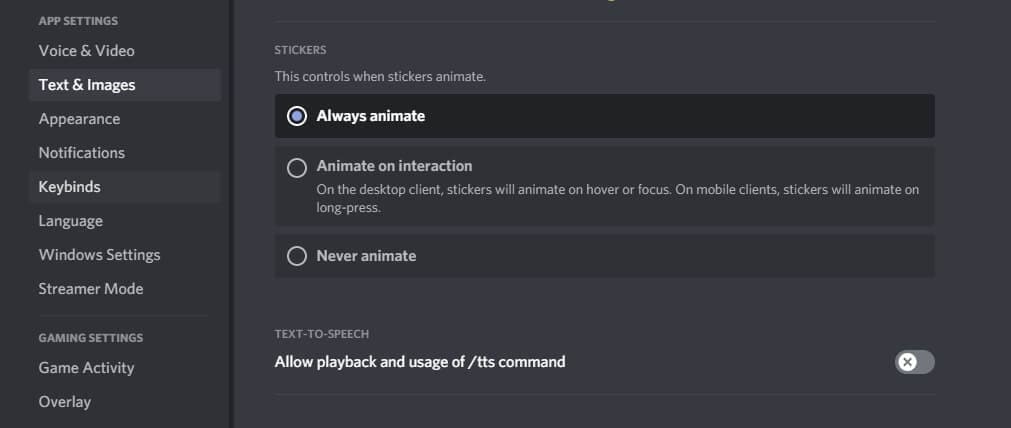
You can also decide to prevent any messages from being played to you in a voice format and receive them as text only. This option is available even if you are not the administrator of the chat server and simply want to customize your own experience. To do this, you need to open the Discord app and enter the Settings menu, before selecting the Text & Images section from App Settings. After this, you need to find the Text-to-Speech sub-menu and open it to find the Allow Playback feature. If you disable this feature, you will effectively mute all incoming TTS messages across all Discord servers you are active on.
Please keep in mind that deactivating the aforementioned feature won’t block TTS messages from reaching you, but you will see them as text only. On the other hand, you can’t use the /tts tag to send your own Text-to-Speech while the playback setting is disabled. Nothing is preventing you from turning it back on when you want to have a TTS capacity on Discord again.
Part 5: Best Text-To-Speech Bots on Discord
One of the reasons why Discord is so popular is that it allows extensive customization through user-made Bots or modules that automatically perform a certain task. There are several great Bots that can be used for Text-to-Speech, so you might consider utilizing one of them.
1. Text to Speech (TTS)
With many languages supported and a wide range of cool commands, this bot could be the best choice for people who use TTS just for fun.
2. KD Bot
A very popular option for Text-to-Speech on Discord that lets you choose from more than 100 voices and supports upwards of 100 languages, making it a powerful translation tool.
3. Fergun
This multi-language tool responds to more than 100 different commands, so it can be used for a wide variety of purposes with stunning effectiveness.
Frequently asked questions about TTS on Discord
- Can I use the Text-to-Speech feature on Discord from a mobile phone?
Unfortunately, you can’t. Discord works quite well as a text messaging app on mobile platforms, but at this time Text-to-Speech functionality is limited to desktop users.
- Why can’t I use Text-to-Speech on a Discord server?
If you are unable to send or receive TTS messages on Discord, you need to change your settings. Please see Part 1 of this article for detailed instructions.
Richard Bennett
Richard Bennett is a writer and a lover of all things video.
Follow @Richard Bennett
Decoding Nitro: Unveiling Its Premium Status in the Realm of Discord
What Is Discord Nitro

Liza Brown
Mar 27, 2024• Proven solutions
If you want to join an online community of like-minded folks, Discord is a perfect platform to do so. Introduced originally for gamers, it now has become a platform for all types of communities who want video calls, voice chats, video streaming, and more.
It’s arguably one of the best and most popular apps among the global gaming community. Though it’s free to use, you need a paid subscription plan to unlock its full potential like almost all other online services available.
The premium subscription service for Discord is known as Discord Nitro! Want to learn more about it? Read on as we elaborate.
- Part 1: What Is Discord Nitro?
- Part 2: Why Should People Use The Discord Nitro?
- Part 3: How Much Does Discord Nitro Cost??
- Part 4: How to Subscribe to Discord Nitro?
- Part 5: How to Get Discord Nitro for Free?
- Part 6: When People should Use Discord Nitro?
Part 1: What Is Discord Nitro And What Does It Do?
Discord is absolutely free, but you may require a Discord Nitro subscription if you want to use its more powerful features! At this point, you may be wondering, what does Discord Nitro do?
Though upgrading is not a requirement as most features do not require a subscription, free users still have certain limitations.
For instance, they can’t use the same emojis on two servers. In addition to that, the streaming quality and account customization features also lack on the free plan. These features and more are strictly for Discord Nitro users only.
Apart from the fact that Discord Nitro offers better additional features, it also lets users help their preferred servers and unlock various features.
Part 2: Why Should People Use The Discord Nitro?
With the discord free version, you can do many things: communicate with your friend outside and inside of games, start your server, and even participate in various channels.
For some, these features are more than adequate; for others, they aren’t! They want more capabilities, and Discord Nitro provides them exactly with that.
However, most of these new features are cosmetic.
For instance, you can make and use your custom emojis if you’re an emoji admirer. Not only this, but you can also use animated emojis, including GIFs.
Without further ado, here are a few key benefits you’ll get with Discord Nitro:
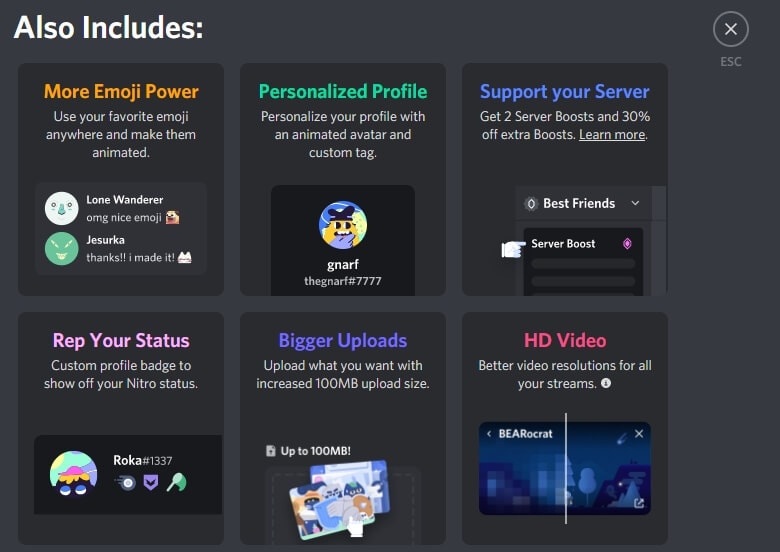
Better Emojis
We all know how vital emojis have become for healthy chitchats, even to the extent that no conversation seems complete if you don’t have an emoji in it.
Discord Nitro allows you to collect and create your customized emojis. Usually, these emojis are animated and easily used while chatting with other Discord users.
Personal Profile
Since your personal profile is your only Discord identity, make sure to customize it with animated avatars and claim custom tags to get going.
Better Animation
With Discord Nitro, you can also unblock various GIF avatars and custom tags.
High-Definition (HD) Screen Sharing
You can share the game screen on the server or with friends and other users with Discord Nitro. Choose from 720p and 1080p at 30fps.
Fancy Badge
One of the better additions for several Discord users is getting the latest, fancy badge. With Discord Nitro, you can earn new badges to display on your personal profile.
Part 3: How Much Does Discord Nitro Cost?
Free Discord users can choose from two variants if they want to switch to Discord Nitro premium services.
You can choose between annual or monthly subscription plans. And if you pick a yearly subscription plan, you’ll get a 16% discount.
The two Discord Nitro variants are Nitro Classic and Nitro!
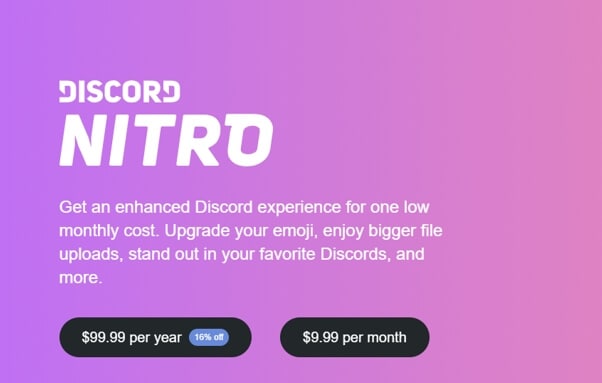
If you choose the Nitro classic subscription service, you’ll have to pay $4.99 on the monthly plan or $49.99 annually. This variant is comparatively cheaper than the Nitro and provides stripped-down features.
On the other hand, if you go for the Nitro subscription service, get ready to pay $99.99 on the yearly plan and $9.99 on the monthly. It offers many features to its users.
Both these variants provide loads of advantages to discord users; here are a handful of benefits the two paid subscription services offer:
- If you choose the free version, your screen share settings typically max out at the 720p resolution (30fps). However, if you select either of the two paid versions, you can share a screen with friends at 720p (60fps) resolution or 1080p resolution (30fps)
- Go-Live provides users with limited streaming; it means you can stream games to users who don’t happen to be your friends, unlike screen-share. So, with a free version, you can stream at 720p (30fps), whereas, Nitro Classic subscription will allow you to stream up to 1080p resolution (60fps), and the Nitro will provide you with 60fps and more quality
- With the free version, you can upload and share only 8MB size files. But with paid variants, you’ll get an increased uploading limit. For example, Nitro Classic allows an upload limit up to 50MB, while the Nitro goes a step further and allows 100MB
- Users of both paid versions will get a badge which will be displayed with their usernames
- You can upgrade your image to an animated GIF!
- With paid subscriptions, you can create customized usernames and emojis to enhance your experience
One significant difference between the Nitro and Nitro Classic versions is the difference between their server boost capability.
Server boost is a user-gifted advantage that paid subscribers can provide to server owners to unlock extra perks for other users. The Nitro service has two server boosts, unlike the Nitro Classic service.
Part 4: How to Subscribe to Discord Nitro?
Looking at the perks you get if you become a paid Discord member, it’s evident that several users will want to avail the opportunity. Especially with the number of streamers and gamers increasing every day!
But how does one upgrade to Discord Nitro?
It’s quite straightforward to get a paid subscription plan with Discord. You can either do it using the mobile app or through your desktop.
Subscribing On MAC Or PC
To get a subscription plan through a desktop app or Discord website, follow the steps below:
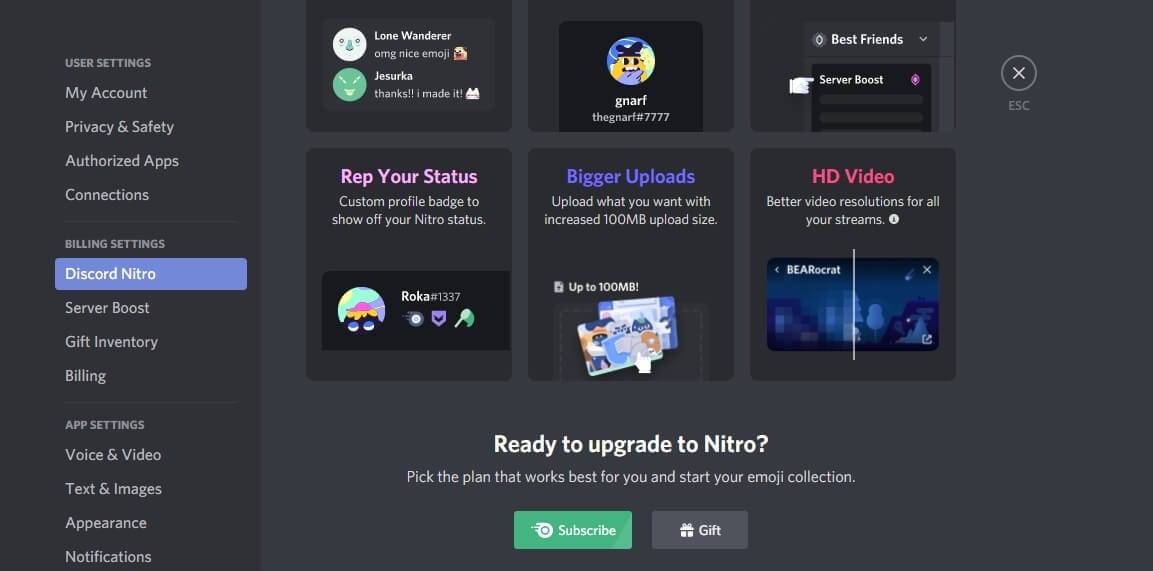
- Click the ‘settings’ icon at the bottom of your screen
- Once your settings menu appear, click Discord Nitro
- Press the subscribe button below Discord Nitro to subscribe to either of the two variants you choose
- If you want to gift a paid subscription plan to some other user on Discord, click gift next to the ‘subscribe’ button
Subscribing Via Mobile Apps
If you want to subscribe through a mobile app, you can tap the hamburger menu on the top-left.
As the menu appears, tap the user icon and then tap Subscribe Today from the various options listed below the settings category.
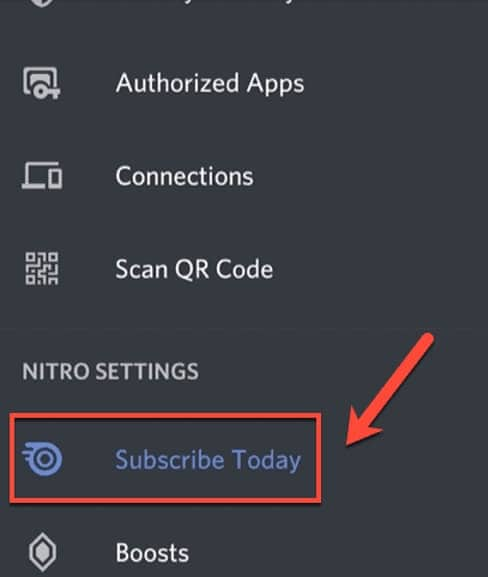
You’ll see brief info on the subscription-plan. Once you read it, tap subscribe button below Discord Nitro Classic or Discord Nitro.
Follow the directions to confirm the payment. The moment it gets approved, your subscription is activated.
Part 5: How to Get Discord Nitro for Free?
If you want to get Discord Nitro for free, you can get it without paying a dime. There are various methods you can follow to get a free subscription plan.
Today, we will tell you two effective ways through which you’ll get your free Discord Nitro subscription plan.
First Method
Here’s how to get free Nitro with your Xbox game-pass:
As the menu appears, tap the user icon and then tap Subscribe Today from the various options listed below the settings category.
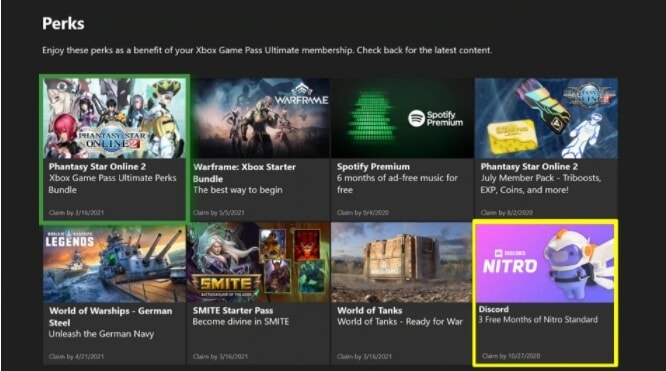
- Download, install, and run your Xbox app for Windows
- Log in to your account; if you don’t have one, create your account using outlook email. After that, place a gamer tag, press Game Pass and then press Get a Game Pass
- Press Join Game Pass and make sure to join through “Xbox game pass ultimate” to qualify for a free subscription plan
- Buy a game pass that will cost you only a dollar to get a free Discord Nitro
- Click the perks button on your Game Pass window tab and scroll down and click the Get Link button
- As the link opens, subscribe for the three-month plan of Nitro
- Now visit Microsoft services to claim it
- Log in to the account through which you bought “game pass ultimate” and cancel the subscription
This way, you can Discord Nitro free of cost!
Second Method
Here’s how you can get free Discord Nitro through your mobile app:
- Create a Discord account using a mobile app
- Join some, if not many, public servers
- Now add some people
- Buy a Discord “Nitro Gift” for one month using your dummy account (make sure to purchase the gift through Apple)
- Then, send the Nitro Gift back to your primary account
- Redeem the gift on the primary account and wait at least a day or two
- Now, contact Apple and say you have no idea what this ten-dollar charge is on the Discord. Make them believe your little brother or kid has been purchasing things using your cell phone
- Apple Inc. will repay you the entire $10 you spent on buying
- Discord will likely ban the dummy account you have created in the first place
Note: Make sure your primary account is safe. If you intend to repeat the process, make a new dummy account and Apple ID and use a different type of payment method.
Part 6: When Should I Use Discord Nitro?
Discord Nitro improves your all in one Discord video, voice, and chats. Here’s when you should use Discord Nitro subscription plans, be it Nitro Classic or Nitro:
- Use the Discord Nitro if you want better, customized, and animated emojis in your chats to make the conversation more lively
- Go for the paid plan if you want a personalized profile with custom tags and an animated avatar
- Use discord Nitro if you want an extra 30% boost and two server boosts
- Lastly, if you want bigger uploads and high-definition videos, you should use Discord Nitro!
Liza Brown
Liza Brown is a writer and a lover of all things video.
Follow @Liza Brown
Liza Brown
Mar 27, 2024• Proven solutions
If you want to join an online community of like-minded folks, Discord is a perfect platform to do so. Introduced originally for gamers, it now has become a platform for all types of communities who want video calls, voice chats, video streaming, and more.
It’s arguably one of the best and most popular apps among the global gaming community. Though it’s free to use, you need a paid subscription plan to unlock its full potential like almost all other online services available.
The premium subscription service for Discord is known as Discord Nitro! Want to learn more about it? Read on as we elaborate.
- Part 1: What Is Discord Nitro?
- Part 2: Why Should People Use The Discord Nitro?
- Part 3: How Much Does Discord Nitro Cost??
- Part 4: How to Subscribe to Discord Nitro?
- Part 5: How to Get Discord Nitro for Free?
- Part 6: When People should Use Discord Nitro?
Part 1: What Is Discord Nitro And What Does It Do?
Discord is absolutely free, but you may require a Discord Nitro subscription if you want to use its more powerful features! At this point, you may be wondering, what does Discord Nitro do?
Though upgrading is not a requirement as most features do not require a subscription, free users still have certain limitations.
For instance, they can’t use the same emojis on two servers. In addition to that, the streaming quality and account customization features also lack on the free plan. These features and more are strictly for Discord Nitro users only.
Apart from the fact that Discord Nitro offers better additional features, it also lets users help their preferred servers and unlock various features.
Part 2: Why Should People Use The Discord Nitro?
With the discord free version, you can do many things: communicate with your friend outside and inside of games, start your server, and even participate in various channels.
For some, these features are more than adequate; for others, they aren’t! They want more capabilities, and Discord Nitro provides them exactly with that.
However, most of these new features are cosmetic.
For instance, you can make and use your custom emojis if you’re an emoji admirer. Not only this, but you can also use animated emojis, including GIFs.
Without further ado, here are a few key benefits you’ll get with Discord Nitro:
Better Emojis
We all know how vital emojis have become for healthy chitchats, even to the extent that no conversation seems complete if you don’t have an emoji in it.
Discord Nitro allows you to collect and create your customized emojis. Usually, these emojis are animated and easily used while chatting with other Discord users.
Personal Profile
Since your personal profile is your only Discord identity, make sure to customize it with animated avatars and claim custom tags to get going.
Better Animation
With Discord Nitro, you can also unblock various GIF avatars and custom tags.
High-Definition (HD) Screen Sharing
You can share the game screen on the server or with friends and other users with Discord Nitro. Choose from 720p and 1080p at 30fps.
Fancy Badge
One of the better additions for several Discord users is getting the latest, fancy badge. With Discord Nitro, you can earn new badges to display on your personal profile.
Part 3: How Much Does Discord Nitro Cost?
Free Discord users can choose from two variants if they want to switch to Discord Nitro premium services.
You can choose between annual or monthly subscription plans. And if you pick a yearly subscription plan, you’ll get a 16% discount.
The two Discord Nitro variants are Nitro Classic and Nitro!
If you choose the Nitro classic subscription service, you’ll have to pay $4.99 on the monthly plan or $49.99 annually. This variant is comparatively cheaper than the Nitro and provides stripped-down features.
On the other hand, if you go for the Nitro subscription service, get ready to pay $99.99 on the yearly plan and $9.99 on the monthly. It offers many features to its users.
Both these variants provide loads of advantages to discord users; here are a handful of benefits the two paid subscription services offer:
- If you choose the free version, your screen share settings typically max out at the 720p resolution (30fps). However, if you select either of the two paid versions, you can share a screen with friends at 720p (60fps) resolution or 1080p resolution (30fps)
- Go-Live provides users with limited streaming; it means you can stream games to users who don’t happen to be your friends, unlike screen-share. So, with a free version, you can stream at 720p (30fps), whereas, Nitro Classic subscription will allow you to stream up to 1080p resolution (60fps), and the Nitro will provide you with 60fps and more quality
- With the free version, you can upload and share only 8MB size files. But with paid variants, you’ll get an increased uploading limit. For example, Nitro Classic allows an upload limit up to 50MB, while the Nitro goes a step further and allows 100MB
- Users of both paid versions will get a badge which will be displayed with their usernames
- You can upgrade your image to an animated GIF!
- With paid subscriptions, you can create customized usernames and emojis to enhance your experience
One significant difference between the Nitro and Nitro Classic versions is the difference between their server boost capability.
Server boost is a user-gifted advantage that paid subscribers can provide to server owners to unlock extra perks for other users. The Nitro service has two server boosts, unlike the Nitro Classic service.
Part 4: How to Subscribe to Discord Nitro?
Looking at the perks you get if you become a paid Discord member, it’s evident that several users will want to avail the opportunity. Especially with the number of streamers and gamers increasing every day!
But how does one upgrade to Discord Nitro?
It’s quite straightforward to get a paid subscription plan with Discord. You can either do it using the mobile app or through your desktop.
Subscribing On MAC Or PC
To get a subscription plan through a desktop app or Discord website, follow the steps below:
- Click the ‘settings’ icon at the bottom of your screen
- Once your settings menu appear, click Discord Nitro
- Press the subscribe button below Discord Nitro to subscribe to either of the two variants you choose
- If you want to gift a paid subscription plan to some other user on Discord, click gift next to the ‘subscribe’ button
Subscribing Via Mobile Apps
If you want to subscribe through a mobile app, you can tap the hamburger menu on the top-left.
As the menu appears, tap the user icon and then tap Subscribe Today from the various options listed below the settings category.
You’ll see brief info on the subscription-plan. Once you read it, tap subscribe button below Discord Nitro Classic or Discord Nitro.
Follow the directions to confirm the payment. The moment it gets approved, your subscription is activated.
Part 5: How to Get Discord Nitro for Free?
If you want to get Discord Nitro for free, you can get it without paying a dime. There are various methods you can follow to get a free subscription plan.
Today, we will tell you two effective ways through which you’ll get your free Discord Nitro subscription plan.
First Method
Here’s how to get free Nitro with your Xbox game-pass:
As the menu appears, tap the user icon and then tap Subscribe Today from the various options listed below the settings category.
- Download, install, and run your Xbox app for Windows
- Log in to your account; if you don’t have one, create your account using outlook email. After that, place a gamer tag, press Game Pass and then press Get a Game Pass
- Press Join Game Pass and make sure to join through “Xbox game pass ultimate” to qualify for a free subscription plan
- Buy a game pass that will cost you only a dollar to get a free Discord Nitro
- Click the perks button on your Game Pass window tab and scroll down and click the Get Link button
- As the link opens, subscribe for the three-month plan of Nitro
- Now visit Microsoft services to claim it
- Log in to the account through which you bought “game pass ultimate” and cancel the subscription
This way, you can Discord Nitro free of cost!
Second Method
Here’s how you can get free Discord Nitro through your mobile app:
- Create a Discord account using a mobile app
- Join some, if not many, public servers
- Now add some people
- Buy a Discord “Nitro Gift” for one month using your dummy account (make sure to purchase the gift through Apple)
- Then, send the Nitro Gift back to your primary account
- Redeem the gift on the primary account and wait at least a day or two
- Now, contact Apple and say you have no idea what this ten-dollar charge is on the Discord. Make them believe your little brother or kid has been purchasing things using your cell phone
- Apple Inc. will repay you the entire $10 you spent on buying
- Discord will likely ban the dummy account you have created in the first place
Note: Make sure your primary account is safe. If you intend to repeat the process, make a new dummy account and Apple ID and use a different type of payment method.
Part 6: When Should I Use Discord Nitro?
Discord Nitro improves your all in one Discord video, voice, and chats. Here’s when you should use Discord Nitro subscription plans, be it Nitro Classic or Nitro:
- Use the Discord Nitro if you want better, customized, and animated emojis in your chats to make the conversation more lively
- Go for the paid plan if you want a personalized profile with custom tags and an animated avatar
- Use discord Nitro if you want an extra 30% boost and two server boosts
- Lastly, if you want bigger uploads and high-definition videos, you should use Discord Nitro!
Liza Brown
Liza Brown is a writer and a lover of all things video.
Follow @Liza Brown
Also read:
- Mastering Discord Stickers Your Ultimate Resource for 2024
- [New] 2024 Approved The Prime List of Budget-Friendly Discord Voice Recording Tools
- In 2024, Mastering Status Update in Discord Chat
- [New] In 2024, Maximizing Discord Fun Select Top 10 Plugins
- [Updated] 2024 Approved How to Spice Up Your Discord Conversations with Interactive Content Like GIFs
- Unlocking Profile Picture Magic on Discord [Download]
- [New] 2024 Approved Exclusive AI Companions for Discorders
- In 2024, Join the Discord Emoji Revolution with Free Resources Here
- [Updated] Revolutionize Your Discord Conversations Learn to Pin Effectively
- [Updated] Unplugging the Servers Deleting Discord on Devices
- 2024 Approved The Ultimate Path to Charming Your Digital Self-Portrait
- [Updated] 2024 Approved How to Connect Spotify to Discord
- In 2024, Ultimate Guide to Discord Screen Capture Tools
- [New] In 2024, Premium Collaborative Workspaces Online
- [Updated] Evaluating Team Communication Tools Does Slack Outshine Discord's Benefits?
- [Updated] Unlocking Respectful Dialogue A Strategy Guide to Reporting Misconduct in Online Communities for 2024
- 2024 Approved Discord's Best Servers for Finding a Mate
- In 2024, Acquiring Animated Emojis for Disco Without a Subscription
- 2024 Approved Pinpointing Your Perfect Match A Discord Server Hunt Guide
- [Updated] All-in-One, High Quality Discord Icon Creation Software (FREE) for 2024
- Top 9 Discord Banner Makers and How to Make One Easily for 2024
- 2024 Approved Discovering the Best Free Voice Transformers - A Detailed Review Guide
- [Updated] Exploring Alternative Pathways for Free Anime Emoji Integration in Discord
- Merging Music and Messages Spotify/Discord Connection
- [New] 2024 Approved Personalized Visuals A Complete User Imagery Guide on Discord
- Pinnacle Font Generating Software for Discord Channels
- [New] A Step-by-Step Guide for Custom Discord Emoji Statuses for 2024
- 2024 Approved VibeRusher’s Top 10 Themes - BetterDiscord Style
- [Updated] In 2024, Creating Engaging Content for Effective Discord Live Streams
- In 2024, Securing Success Navigating Channels and Encodings in Discord
- In 2024, Discovering Free Anime GIFs The No-Nitro Method in Discord
- [Updated] Embark on Effortless Discord Video Chats - Tips & Tricks
- [Updated] 2024 Approved Prime Free Tools to Sketch Unique Discord Icons
- [New] In 2024, The Roadmap for Recognition Becoming a Trusted Disco Voice
- [New] Quick Guide to Styling Chats on Discord
- [New] Demystifying Discord’s Spoiler Functionality
- [Updated] In 2024, Cease Discord Activity on All Screens
- Updated Smartphone Video Editing Made Easy Top Apps for iPhone and Android
- [New] Best Free Call Apps on Android, Ranks Them!
- 2024 Approved Final Cut Pro X Title Tutorial A Step-by-Step Guide
- [Updated] In 2024, Efficient Setup PS4 Streaming and Recording via OBS
- [New] In 2024, Superior Editors for Stellar Webcam Videos
- 7 Solutions to Fix Error Code 963 on Google Play Of Nokia C32 | Dr.fone
- How to Change Spotify Location After Moving to Another Country On Samsung Galaxy S24+ | Dr.fone
- [Updated] Rapid Rise on Insta - Like Mastery + Video Impact
- Which Pokémon can Evolve with a Moon Stone For Oppo A18? | Dr.fone
- [New] In 2024, How to See Group's Shared Photos and Movies on Messenger
- [Updated] Securing Your PC Gaming Memories Best Techniques
- In 2024, Recording Sims 4 Games Professionally
- Updated 2024 Approved How to Create Loop Videos Using Filmora
- [New] In 2024, Immediate Removal Policy for Videos - User Concerns
- Updated Dont Pay a Dime Top 5 Free MPEG Video Splitting Software
- Hacks to do pokemon go trainer battles For Vivo Y56 5G | Dr.fone
- In 2024, The Ultimate Guide to Video Editing on Windows 11 Free & Paid Tools
- Customized OBS Guide for Budget Builds
- Here are Some Pro Tips for Pokemon Go PvP Battles On Vivo S17e | Dr.fone
- [New] How To Access Facebook’s Just-Watched Video List
- How to Flash Dead Vivo S18 Pro Safely | Dr.fone
- In 2024, Make a Heartwarming Slideshow with Pictures and Songs
- In 2024, How to Transfer Contacts from Realme 12 5G to Outlook | Dr.fone
- [Updated] Decibel Documentation System and Speech for 2024
- Updated 2024 Approved The Ultimate List 10 Linux Video Editing Software Like Premiere
- Updated 2024 Approved Unbiased Reviews of YouTube MP3 Converters for Beginners
- 2024 Approved Masterful Media Management Dynamic Video Scaling on Mac
- Title: [New] Converting Messages Into Speech on Discord
- Author: Timothy
- Created at : 2024-06-28 03:27:39
- Updated at : 2024-06-29 03:27:39
- Link: https://discord-videos.techidaily.com/new-converting-messages-into-speech-on-discord/
- License: This work is licensed under CC BY-NC-SA 4.0.
