
![[New] Essential Tips for Stepping Away From a Discord Chat Room](https://thmb.techidaily.com/88bfebb08e4cbb8d0a68e78c0297b8f1e363343f342702915251fd121c5a13e0.jpg)
[New] Essential Tips for Stepping Away From a Discord Chat Room
Essential Tips for Stepping Away From a Discord Chat Room
How to Leave A Discord Server

Richard Bennett
Mar 27, 2024• Proven solutions
Discord is all fun and games if you are a part of a lively server that has a cool community. You can obsess about some game, comic, or song with hundreds of other people without the fear of being called geeky.
However, sometimes you might disagree with other members, which can lead you to hunt for some other server. Other times, the server might be inactive, or you may not mix well with the crowd. Or maybe, you landed there by mistake. So, how do you leave a Discord server?
Whatever your reason, here is a detailed guide on how to leave a server on Discord!
A few things to note before you leave a server –
- After you exit from a server, you will no longer be able to send any texts on it.
- You will not receive any notifications from the server.
- Your username will no longer appear in the member list of the server.
- Whatever role you had in the server will be disabled.
- If you own a server, you will have to transfer the ownership to another member before you quit.
- The person you hand over your server to can do whatever they want with it.
- You can join the server you left again if you change your mind.
Part 1: How to Leave a Discord Server on Computer?
Several peoples and hardcore gamers use Discord over a PC. And you can wave goodbye to the channel in a matter of few seconds. The procedure is the same for Mac and Windows.
- Open Discord on your computer (the desktop app or on the browser).
- Tap on the server name that appears towards the top left.
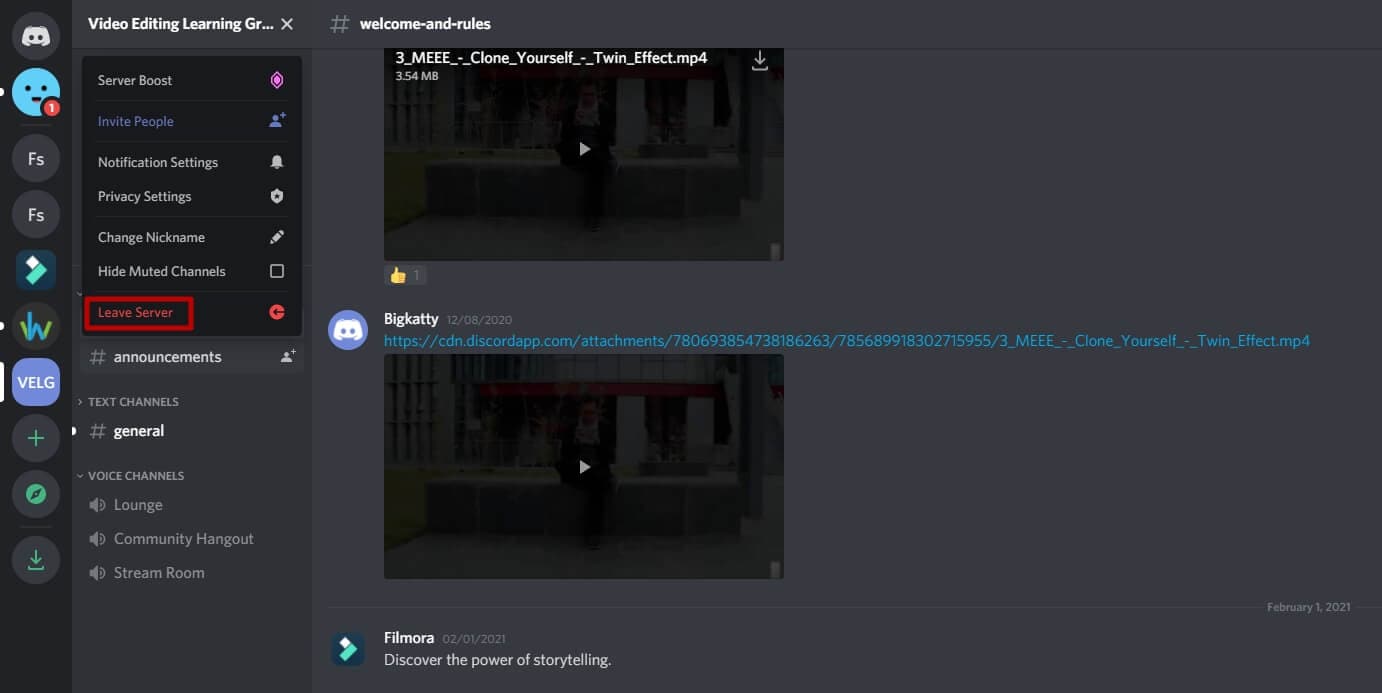
- Right at the bottom of the list, click on the option leave server
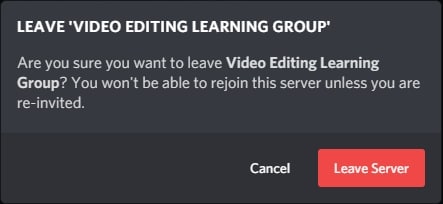
After confirming you won’t be a part of that server anymore. You cannot send any texts or get any notifications. The server name will disappear from the server list in your profile.
Part 2: How to Leave a Discord Server on the Mobile App?
The procedure of leaving the server is more or less the same on the mobile app. The user interface of Discord does not differ much across the devices. To quit a server, follow these steps -
- Click open the Discord app on your mobile.
- Click on the right pane and click on the 3 dots that appear. Click on the name of the server that you want to leave.
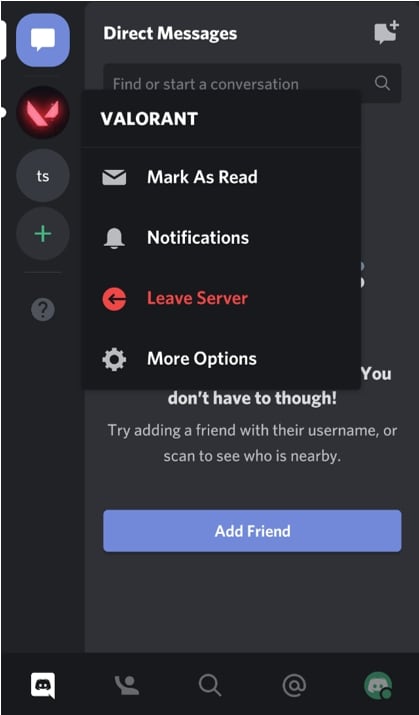
- From the menu that opens, scroll towards the bottom and click on the leave server option.

After confirmation, you will not be a part of the server anymore. The process is the same for ios and Android devices.
If you have decided to take a break from gaming and Discord, you can consider uninstalling the app temporarily. You can also turn off the notifications in the app settings on your device.
Bonus: How to Transfer Discord Server Ownership?
How to leave your own Discord server? If your server has many members in it, it is wiser to transfer the ownership rather than shutting the server completely or abandoning it to fate. Especially if the users are active, then you can handover the ownership to a trustworthy person.
Here is how you can do it -
For desktop
The process is quite simple and only takes a few minutes.
- Open the Discord app or log in using the browser.
- Click on the server that you want to leave.
- With right-click, open up the floating menu.
- From that list, select server settings and then choose members.
- Select the user that You Want To handover your server to. Tap those 3 dots and tap on ‘transfer ownership.’
- Confirm your choice and then click on transfer ownership.
- The chosen member will become the new owner of the server.
On mobile
The transfer procedure is quite similar to the desktop version. However, it has a few extra steps.
- Open your Discord App on your phone.
- Select the server that you want to give away.
- Tap those 3 dots to open up the menu. Under user management, tap on ‘members.’
- Select the member that will be the new owner of your server. Tap the 3 dots that appear next to the name of that user.
- A confirmation box will appear.
- Check off the box to confirm your choice.
Your server is now successfully transferred to the selected member. And the new owner can decide what to do with the server.
FAQs About Leaving A Discord Server
- How can I leave a Discord server without anyone knowing?
Frankly speaking, there is no magic to help conceal your disappearance from a server. There is no way to hide your departure. However, you can take a few measures to make it less noticeable.
- Lay low for a few hours or days. This won’t work if you are the loudest member on the server. But still, it’s worth a shot.
- Try changing your avatar, profile picture, and nickname. This can throw people off the track or confuse them for a while.
- Control yourself and try not to tell anyone that you are leaving.
- And now it’s time for the discreet farewell!
You might still get some texts on personal asking about your exit. This is not a surefire way of making your exit a secret. However, hundreds of members along with bots will make your disappearance less apparent. Another solution would be to create a new user ID and leave the old one inactive.
- Does leaving a Discord server delete your messages?
No, none of the texts that you sent on the server get deleted. Every text remains, even after you leave. The only way you can delete your texts if you delete them all one by one, or someone with sufficient permissions deletes them. If you get banned, then the member who banned you decides whether to keep your messages on the server or remove them. In this case, your texts can be removed if the member deletes them.
This was a guide on ‘how to leave a Discord server’ that provided a detailed how-to on leaving servers and transferring servers.
Richard Bennett
Richard Bennett is a writer and a lover of all things video.
Follow @Richard Bennett
Richard Bennett
Mar 27, 2024• Proven solutions
Discord is all fun and games if you are a part of a lively server that has a cool community. You can obsess about some game, comic, or song with hundreds of other people without the fear of being called geeky.
However, sometimes you might disagree with other members, which can lead you to hunt for some other server. Other times, the server might be inactive, or you may not mix well with the crowd. Or maybe, you landed there by mistake. So, how do you leave a Discord server?
Whatever your reason, here is a detailed guide on how to leave a server on Discord!
A few things to note before you leave a server –
- After you exit from a server, you will no longer be able to send any texts on it.
- You will not receive any notifications from the server.
- Your username will no longer appear in the member list of the server.
- Whatever role you had in the server will be disabled.
- If you own a server, you will have to transfer the ownership to another member before you quit.
- The person you hand over your server to can do whatever they want with it.
- You can join the server you left again if you change your mind.
Part 1: How to Leave a Discord Server on Computer?
Several peoples and hardcore gamers use Discord over a PC. And you can wave goodbye to the channel in a matter of few seconds. The procedure is the same for Mac and Windows.
- Open Discord on your computer (the desktop app or on the browser).
- Tap on the server name that appears towards the top left.
- Right at the bottom of the list, click on the option leave server
After confirming you won’t be a part of that server anymore. You cannot send any texts or get any notifications. The server name will disappear from the server list in your profile.
Part 2: How to Leave a Discord Server on the Mobile App?
The procedure of leaving the server is more or less the same on the mobile app. The user interface of Discord does not differ much across the devices. To quit a server, follow these steps -
- Click open the Discord app on your mobile.
- Click on the right pane and click on the 3 dots that appear. Click on the name of the server that you want to leave.
- From the menu that opens, scroll towards the bottom and click on the leave server option.
After confirmation, you will not be a part of the server anymore. The process is the same for ios and Android devices.
If you have decided to take a break from gaming and Discord, you can consider uninstalling the app temporarily. You can also turn off the notifications in the app settings on your device.
Bonus: How to Transfer Discord Server Ownership?
How to leave your own Discord server? If your server has many members in it, it is wiser to transfer the ownership rather than shutting the server completely or abandoning it to fate. Especially if the users are active, then you can handover the ownership to a trustworthy person.
Here is how you can do it -
For desktop
The process is quite simple and only takes a few minutes.
- Open the Discord app or log in using the browser.
- Click on the server that you want to leave.
- With right-click, open up the floating menu.
- From that list, select server settings and then choose members.
- Select the user that You Want To handover your server to. Tap those 3 dots and tap on ‘transfer ownership.’
- Confirm your choice and then click on transfer ownership.
- The chosen member will become the new owner of the server.
On mobile
The transfer procedure is quite similar to the desktop version. However, it has a few extra steps.
- Open your Discord App on your phone.
- Select the server that you want to give away.
- Tap those 3 dots to open up the menu. Under user management, tap on ‘members.’
- Select the member that will be the new owner of your server. Tap the 3 dots that appear next to the name of that user.
- A confirmation box will appear.
- Check off the box to confirm your choice.
Your server is now successfully transferred to the selected member. And the new owner can decide what to do with the server.
FAQs About Leaving A Discord Server
- How can I leave a Discord server without anyone knowing?
Frankly speaking, there is no magic to help conceal your disappearance from a server. There is no way to hide your departure. However, you can take a few measures to make it less noticeable.
- Lay low for a few hours or days. This won’t work if you are the loudest member on the server. But still, it’s worth a shot.
- Try changing your avatar, profile picture, and nickname. This can throw people off the track or confuse them for a while.
- Control yourself and try not to tell anyone that you are leaving.
- And now it’s time for the discreet farewell!
You might still get some texts on personal asking about your exit. This is not a surefire way of making your exit a secret. However, hundreds of members along with bots will make your disappearance less apparent. Another solution would be to create a new user ID and leave the old one inactive.
- Does leaving a Discord server delete your messages?
No, none of the texts that you sent on the server get deleted. Every text remains, even after you leave. The only way you can delete your texts if you delete them all one by one, or someone with sufficient permissions deletes them. If you get banned, then the member who banned you decides whether to keep your messages on the server or remove them. In this case, your texts can be removed if the member deletes them.
This was a guide on ‘how to leave a Discord server’ that provided a detailed how-to on leaving servers and transferring servers.
Richard Bennett
Richard Bennett is a writer and a lover of all things video.
Follow @Richard Bennett
The Essential Voicemod Playbook: Transform Your Desktop & Mobile Discords
How To Use Voicemod On Discord
Richard Bennett
Mar 27, 2024• Proven solutions
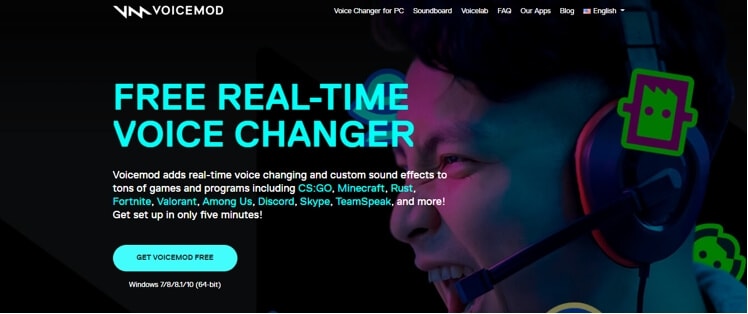
A voice changer will allow you to prank friends, create content, and most of all, secure your presence by maintaining anonymity. With it, you can turn your voice into several unique and exciting voices to serve any purpose you deem fit.
And when it comes to voice changers, none is as easy to operate as the Voicemod in Discord. Its claim to fame is that it features numerous voice options to choose from.
With Vociemod, you have to simply run the program in the background and select your desired voice!
Read on as we discuss how to use Voicemod on Discord in detail:
In this article
Part 1: How To Use Voice Changer Voicemod For Discord On Desktop Computer
Part 2: How To Fix Voicemod Not Working Discord?
Part 3: How To Change Voice For Discord On Mobile?
Part 1: How To Use Voice Changer Voicemod For Discord On Desktop Computer
Voicemod is arguably one of the best voice changer tools available on the internet for its excellent features.
But before we jump straight into using Voicemod for Discord, you must know how to install one on your desktop Mac/PC.
Here’s how to install Voicemod
- Visit the Voicemod website to begin the download process.
- You’ll see the button “Get Voicemod Free” on the screen. Click it!
- Upon clicking, the site will ask you to sign in to your account from Discord, Twitch, to Google. Use your Discord login details to sign in.
- After you’re signed in, the “.exe” file will be downloaded to your PC/Mac’s download folder. Open the “.exe” file the moment it’s downloaded.
- An install wizard will open up. Navigate through the wizard’s installation process to install the program on your PC/Mac.
- After installation is complete, the installation wizard will ask to restart your windows’ Mac or PC.
You can skip it, but it’s best to restart it for smooth operations.
Once your Mac/PC restarts, you’ll see the Voicemod app icon on your desktop screen.
Now that you have successfully installed the voice changer Voicemod app into your desktop computer, let’s dive into knowing how to use Voicemod on Discord!
Here’s how to use voice changer on Discord
- Click the Vociemod icon on the desktop to open the app. If you can’t find it there, click the “windows icon” located at the screen’s bottom-left. Just type “Voicemod,” and the program will show up. Double click it to get it opened.
- When the app opens up, you’ll have to choose the output and input it will use. If you’re wondering, why the output? This is to give you an insight into what your voice will sound like on each filter.
Once it’s done, you can play around with different filters!
Every day, you’ll get new free filters to use; however, to unlock and access all filters, you need to upgrade to the “pro-version” of voice changer Voicemod.
On the other hand, if you only need a few filters, the “basic-version” should suffice.
Apart from that, you can unlock an additional free filter in your app by sharing it on your social media accounts.

Step 1
To set up Voicemod with Discord, open your discord account and go to the settings (gear icon) placed at the screen’s bottom-left corner.
Step 2
Click the “Voice and Video” option right under the app settings.
Step 3
To make Voicemod usable, you’ll have to change Voice settings. Within the “Input Device” option, select the option that says “Microphone Voicemod Virtual Audio.”
Step 4
After you have changed settings, you can easily change the voice within the program. Not only this, but other users can also hear your audio alteration.
Step 5
With the “basic version,” you’ll have seven free voice choices that will change each day. On the contrary, with the “pro-version,” you’ll gain access to more than 80 different voice options.
So, if you’re searching for an easy and simple voice-changing app to use, look no further than Voicemod!
Part 2: How To Fix Voicemod Not Working Discord?
Is your voice changer Voicemod not working on Discord? No worries, you can troubleshoot the issues with a few basic steps.
Here are some ways you can use to fix Voicemod not working in Discord:
Method 1: Restart Your Windows PC/Mac
Though it’s not a technical solution, restarting your desktop computer fixes incorrect settings by rebooting them and solves many problems connected with your computer system, programs, and hardware.
So, when your Voicemod suddenly ceases to work in Discord, make sure to restart your Windows PC/Mac before going any further, as it’s the first step in fixing voice issues.
If restarting doesn’t help, slide to the next step!
Method 2: Make Sure The Mic Is Properly Set
The next step is to check if the mic works correctly. This is because faulty settings may stop voice changer Voicemod from operating correctly.
Just follow the steps below to resolve it:
- On the keyboard, press the “Win” logo and the “I” key simultaneously to open Windows settings. Click “System.”
- On the left, you’ll see the option “Sound.” Click it.
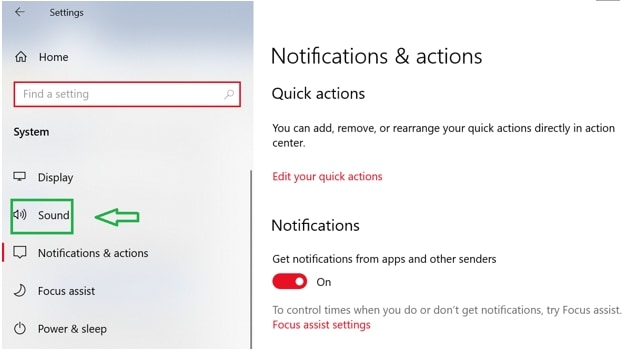
- First, you have to test the microphone! To do so, choose the “Headset” option rather than the Voicemod microphone under the “Input” section
- Click “Device properties & test microphone”
- Make sure to uncheck the “disable” box and keep the volume section 100
- Click the “Start test” button and speak into the microphone
- After that, click “Stop test.” If the greatest value it shows is above “0”, then your microphone works correctly
Now, restart your Voicemod app to see if it’s working properly or not! If the issue still persists, jump to the next solution.
Method 3: Install Windows Updates
If you use Windows 10, it has two kinds of updates that offer performance boost and security patches. Sometimes, an update can fix a few driver and software conflicts automatically.
You can quickly solve the voice chat problem by simply updating the system settings. Here’s how to update your Windows 10:
- Open your windows setting by pressing the “Windows button” and the “I” key together.
- Click on “Update and Security”
- Click the “Check for Updates” button. If an update is found, it will install automatically on the system
Make sure to repeat this process until it says you’re up-to-date. Then, restart the PC. Check whether the Vociemod is properly working or not!
If not, try our next option!
Method 4:Re-Install Voice Changer Voicemod Drivers
In many instances, the issue signifies that you’re using outdated or faulty drivers. To troubleshoot this, simply re-install your Voicemod driver, and you’ll be good to go!
First, uninstall your Voicemod driver from the windows PC/Mac. Here’s how to do it:
- On the keyboard, press the “Windows button” as well as the “I” key to bring up the “Run box”
- Paste or type “devmgmt.msc” and click “OK.” This will open the “Device Manager”
- Click the “expand” option of “Audio Inputs & Outputs.”
- Click the “Microphone WMD” and choose the “Uninstall device” option
- A pop-up window will appear. Click the “Uninstall” button
- Restart the PC
Install the voice changer Voicemod again, whether automatically or manually, and see if it works!
Part 3: How To Change Voice For Discord On Mobile?
“Voicemod clips” is the version for both Apple and Android devices. The app will help you make high-quality content using its wide selection of one-of-a-kind effects, which will change your voice so much that you won’t recognize yourself!
In addition to that, you can add filters, which are connected to your cell phone’s camera to create funny, interesting videos.
Additionally, you’ll have the option to choose from 10 different voices. Plus, you can also make unlimited videos and audio from the humorous to the terrifying.
Some of the Voicemod voices on mobile include male-to-female, different robot effects, famous celebrities, scary voices, and much more. In short, everything is based on how you would like to modify your voice!
Not just that, you can also cross-share creative videos and audio to popular social networking platforms such as Facebook, Twitter, Instagram, TikTok, and Snapchat using your smartphone.
Curious to know how to change your voice for Discord on mobile? Here are step-by-step instructions:
- Make sure the Voicemod app is downloaded on your Apple or Android device and appropriately configured
- Open Discord
- Tap the “cogwheel icon” near your name and avatar
- You’ll see the “settings” page
- Within it, tap the “Voice & Video” option
- Tap Voicemod under the “Input Device” option and the headset under the “Output Device” option and tap escape. You’ll have access to numerous exciting sounds
Richard Bennett
Richard Bennett is a writer and a lover of all things video.
Follow @Richard Bennett
Richard Bennett
Mar 27, 2024• Proven solutions
A voice changer will allow you to prank friends, create content, and most of all, secure your presence by maintaining anonymity. With it, you can turn your voice into several unique and exciting voices to serve any purpose you deem fit.
And when it comes to voice changers, none is as easy to operate as the Voicemod in Discord. Its claim to fame is that it features numerous voice options to choose from.
With Vociemod, you have to simply run the program in the background and select your desired voice!
Read on as we discuss how to use Voicemod on Discord in detail:
In this article
Part 1: How To Use Voice Changer Voicemod For Discord On Desktop Computer
Part 2: How To Fix Voicemod Not Working Discord?
Part 3: How To Change Voice For Discord On Mobile?
Part 1: How To Use Voice Changer Voicemod For Discord On Desktop Computer
Voicemod is arguably one of the best voice changer tools available on the internet for its excellent features.
But before we jump straight into using Voicemod for Discord, you must know how to install one on your desktop Mac/PC.
Here’s how to install Voicemod
- Visit the Voicemod website to begin the download process.
- You’ll see the button “Get Voicemod Free” on the screen. Click it!
- Upon clicking, the site will ask you to sign in to your account from Discord, Twitch, to Google. Use your Discord login details to sign in.
- After you’re signed in, the “.exe” file will be downloaded to your PC/Mac’s download folder. Open the “.exe” file the moment it’s downloaded.
- An install wizard will open up. Navigate through the wizard’s installation process to install the program on your PC/Mac.
- After installation is complete, the installation wizard will ask to restart your windows’ Mac or PC.
You can skip it, but it’s best to restart it for smooth operations.
Once your Mac/PC restarts, you’ll see the Voicemod app icon on your desktop screen.
Now that you have successfully installed the voice changer Voicemod app into your desktop computer, let’s dive into knowing how to use Voicemod on Discord!
Here’s how to use voice changer on Discord
- Click the Vociemod icon on the desktop to open the app. If you can’t find it there, click the “windows icon” located at the screen’s bottom-left. Just type “Voicemod,” and the program will show up. Double click it to get it opened.
- When the app opens up, you’ll have to choose the output and input it will use. If you’re wondering, why the output? This is to give you an insight into what your voice will sound like on each filter.
Once it’s done, you can play around with different filters!
Every day, you’ll get new free filters to use; however, to unlock and access all filters, you need to upgrade to the “pro-version” of voice changer Voicemod.
On the other hand, if you only need a few filters, the “basic-version” should suffice.
Apart from that, you can unlock an additional free filter in your app by sharing it on your social media accounts.
Step 1
To set up Voicemod with Discord, open your discord account and go to the settings (gear icon) placed at the screen’s bottom-left corner.
Step 2
Click the “Voice and Video” option right under the app settings.
Step 3
To make Voicemod usable, you’ll have to change Voice settings. Within the “Input Device” option, select the option that says “Microphone Voicemod Virtual Audio.”
Step 4
After you have changed settings, you can easily change the voice within the program. Not only this, but other users can also hear your audio alteration.
Step 5
With the “basic version,” you’ll have seven free voice choices that will change each day. On the contrary, with the “pro-version,” you’ll gain access to more than 80 different voice options.
So, if you’re searching for an easy and simple voice-changing app to use, look no further than Voicemod!
Part 2: How To Fix Voicemod Not Working Discord?
Is your voice changer Voicemod not working on Discord? No worries, you can troubleshoot the issues with a few basic steps.
Here are some ways you can use to fix Voicemod not working in Discord:
Method 1: Restart Your Windows PC/Mac
Though it’s not a technical solution, restarting your desktop computer fixes incorrect settings by rebooting them and solves many problems connected with your computer system, programs, and hardware.
So, when your Voicemod suddenly ceases to work in Discord, make sure to restart your Windows PC/Mac before going any further, as it’s the first step in fixing voice issues.
If restarting doesn’t help, slide to the next step!
Method 2: Make Sure The Mic Is Properly Set
The next step is to check if the mic works correctly. This is because faulty settings may stop voice changer Voicemod from operating correctly.
Just follow the steps below to resolve it:
- On the keyboard, press the “Win” logo and the “I” key simultaneously to open Windows settings. Click “System.”
- On the left, you’ll see the option “Sound.” Click it.
- First, you have to test the microphone! To do so, choose the “Headset” option rather than the Voicemod microphone under the “Input” section
- Click “Device properties & test microphone”
- Make sure to uncheck the “disable” box and keep the volume section 100
- Click the “Start test” button and speak into the microphone
- After that, click “Stop test.” If the greatest value it shows is above “0”, then your microphone works correctly
Now, restart your Voicemod app to see if it’s working properly or not! If the issue still persists, jump to the next solution.
Method 3: Install Windows Updates
If you use Windows 10, it has two kinds of updates that offer performance boost and security patches. Sometimes, an update can fix a few driver and software conflicts automatically.
You can quickly solve the voice chat problem by simply updating the system settings. Here’s how to update your Windows 10:
- Open your windows setting by pressing the “Windows button” and the “I” key together.
- Click on “Update and Security”
- Click the “Check for Updates” button. If an update is found, it will install automatically on the system
Make sure to repeat this process until it says you’re up-to-date. Then, restart the PC. Check whether the Vociemod is properly working or not!
If not, try our next option!
Method 4:Re-Install Voice Changer Voicemod Drivers
In many instances, the issue signifies that you’re using outdated or faulty drivers. To troubleshoot this, simply re-install your Voicemod driver, and you’ll be good to go!
First, uninstall your Voicemod driver from the windows PC/Mac. Here’s how to do it:
- On the keyboard, press the “Windows button” as well as the “I” key to bring up the “Run box”
- Paste or type “devmgmt.msc” and click “OK.” This will open the “Device Manager”
- Click the “expand” option of “Audio Inputs & Outputs.”
- Click the “Microphone WMD” and choose the “Uninstall device” option
- A pop-up window will appear. Click the “Uninstall” button
- Restart the PC
Install the voice changer Voicemod again, whether automatically or manually, and see if it works!
Part 3: How To Change Voice For Discord On Mobile?
“Voicemod clips” is the version for both Apple and Android devices. The app will help you make high-quality content using its wide selection of one-of-a-kind effects, which will change your voice so much that you won’t recognize yourself!
In addition to that, you can add filters, which are connected to your cell phone’s camera to create funny, interesting videos.
Additionally, you’ll have the option to choose from 10 different voices. Plus, you can also make unlimited videos and audio from the humorous to the terrifying.
Some of the Voicemod voices on mobile include male-to-female, different robot effects, famous celebrities, scary voices, and much more. In short, everything is based on how you would like to modify your voice!
Not just that, you can also cross-share creative videos and audio to popular social networking platforms such as Facebook, Twitter, Instagram, TikTok, and Snapchat using your smartphone.
Curious to know how to change your voice for Discord on mobile? Here are step-by-step instructions:
- Make sure the Voicemod app is downloaded on your Apple or Android device and appropriately configured
- Open Discord
- Tap the “cogwheel icon” near your name and avatar
- You’ll see the “settings” page
- Within it, tap the “Voice & Video” option
- Tap Voicemod under the “Input Device” option and the headset under the “Output Device” option and tap escape. You’ll have access to numerous exciting sounds
Richard Bennett
Richard Bennett is a writer and a lover of all things video.
Follow @Richard Bennett
Also read:
- In 2024, Discovering the Best Free Voice Transformers - A Detailed Review Guide
- [New] Uncover the Power of Discord's Spoiler System
- [Updated] 2024 Approved Innovative AI for Discord Enthusiasts
- [Updated] 2024 Approved Navigating Through Discord Sticker Landscape
- Sync Up Soundtracks Connecting Spotify to Discord Effortlessly for 2024
- [Updated] In 2024, Effortless Connectivity Friend up with Discord
- In 2024, Uncovering Steps to Pinpoint Perfect Discord Communities
- 2024 Approved Mastering Gaming Excellence with DiscoNitro A Step-by-Step Guide
- [Updated] Excellent AI Bots for Social Spheres
- [New] Streamlining Your Discord Experience Bulk Deletion Made Simple for 2024
- [New] From Ordinary to Outstanding Making Unique Discord Pfps for 2024
- [Updated] Discord's Best Fixed Character Emoji Crafting Apps for 2024
- [New] Exploring Alternative Pathways for Free Anime Emoji Integration in Discord for 2024
- [New] 2024 Approved Unveiling Stunning Discord Pfps A Comprehensive Tutorial
- [New] Elevate Your Online Presence Discord Picture Perfection for 2024
- [Updated] 2024 Approved Cutting-Edge Emoji Makers Revolutionizing Discord
- [New] In 2024, Real-Time Interaction Best Practices for Discord Streamers
- [Updated] Unsubscribing Disconnecting Desktop Discords for 2024
- [New] What Exactly Is DiscoNitro? Insider Info for Free/Paid Users for 2024
- Premiered 5 Dynamic Visual Identities for Social Networks for 2024
- [New] 2024 Approved Discovering Accessing Desired Discord Servers Quickly
- [Updated] In 2024, Effortless Socializing Adding Friends Across Platforms
- Direct Linking Spotify's Journey Into Discord for 2024
- Top Free Designer for Discord Emblems - Download Links Included for 2024
- [New] 2023'S Premier Selection of No-Cost Discord Sound Modifiers for 2024
- 2024 Approved Premier Sonic Selection High-Grade Discord Bots for Auditory Bliss
- [Updated] In 2024, Mastering VoiceMod on Desktop & Mobile for Clear Sound Chat
- Your Ultimate Strategy for Engaging Streams on Discord for 2024
- [Updated] 2024 Approved Discord Dating Sites Worth Exploring
- [Updated] Platform Comparison Discord Versus Skype for Professionals for 2024
- [Updated] 2024 Approved Transforming the Sound Landscape The Finest DiscoBot Applications You Must Use
- [New] Expertly Engineered Font Generators for Discord (Android/iOS)
- In 2024, Understanding Discord The Ultimate Resource
- 2024 Approved Crafting the Perfect Online Persona with Discord Pics
- [Updated] In 2024, Masterful Moderation with New Discord Roles
- [New] Mastering Visual Communication A Comprehensive Guide to Using GIFs on the Discord Platform
- Updated In 2024, How to Brighten a Video in Windows 10 Easily
- Updated In 2024, Get Started with Cartoon Videos Top 10 Beginner-Friendly Tools
- Shielding the Sound Comprehensive Guide to Dismissing Wind Turbulence in Recordings
- [Updated] The Ultimate Guide to Stunning IG Video Creation for 2024
- 3 Things You Must Know about Fake Snapchat Location On Nokia C02 | Dr.fone
- 2024 Approved Harnessing the Power of PS4 Capture for Gamers Everywhere
- How to Remove Forgotten PIN Of Your Vivo Y36
- In 2024, What Pokémon Evolve with A Dawn Stone For Oppo Reno 10 Pro+ 5G? | Dr.fone
- 9 Solutions to Fix Process System Isnt Responding Error on Xiaomi Redmi K70 | Dr.fone
- 9 Solutions to Fix Process System Isnt Responding Error on Xiaomi Redmi A2+ | Dr.fone
- [Updated] 2024 Approved Uncover the Best 8 Open-Source Video Conferencing Tools of Now
- [New] 2024 Approved Elevate Your Gaming Experience with FBX Recording Tips
- Catch or Beat Sleeping Snorlax on Pokemon Go For Apple iPhone SE (2020) | Dr.fone
- The Viral Verdict Twitter's Top 10 Threads
- [Updated] Pro Mic Tech Review Best 9 Online Recorders Uncovered for 2024
- New Get the Concept of the Splice Editing App and the Things You Can Utilize It For. Also, Find the Best Alternative to the Splice Desktop Version for 2024
- [Updated] Guiding You to Enable Auto-Video Feature on Facebook for 2024
- Updated In 2024, Beyond the Box The Creative Impact of Different Aspect Ratios on YouTube
- Updated A Detailed Walkthrough to Preserve Your iPhones Audio Recordings
- Title: [New] Essential Tips for Stepping Away From a Discord Chat Room
- Author: Timothy
- Created at : 2024-06-10 22:51:18
- Updated at : 2024-06-11 22:51:18
- Link: https://discord-videos.techidaily.com/new-essential-tips-for-stepping-away-from-a-discord-chat-room/
- License: This work is licensed under CC BY-NC-SA 4.0.
