
!["[New] Excellence Unveiled Discord's Finest Emoji Designers and Software"](https://www.lifewire.com/thmb/gkHTDPF5tRElmHvxvKCu-VDPyhI=/400x300/filters:no_upscale():max_bytes(150000):strip_icc():format(webp)/should-you-buy-an-apple-tv-5248431-f35331ef36b749b9895a2c1e3705cf22.jpg)
"[New] Excellence Unveiled Discord's Finest Emoji Designers and Software"
Excellence Unveiled: Discord’s Finest Emoji Designers and Software
Best Discord Emoji Makers - Online & Mobile

Richard Bennett
Mar 27, 2024• Proven solutions
Emojis have been trending for quite some time now, especially on Discord . They’ve become an integral part of our communication because they can make our messages more expressive and less dull.
The popularity of emojis over Discord has grown so much that many users now want to make their own. Hundreds of online websites and mobile applications have surfaced for this purpose.
While making an emoji may seem daunting at first, this blog is here to guide you to the best tools to help you do it just the way you want it.
Best Free Online Discord Emoji Makers
Is there anything better than a free website that allows you to create an emoji to express your true feelings in your own style?
Here are three free Discord emoji maker online tools you might want to try out:
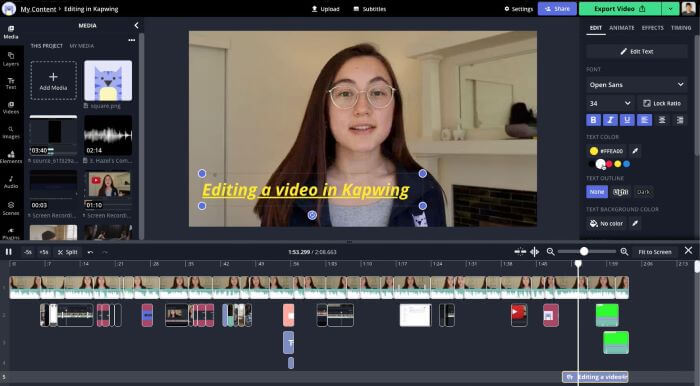
1. Kapwing
Kapwing is a custom Discord emote maker that provides you with all the necessary tools and features required to make an emoji.
Remember, Discord has a strict image size policy, so set your image to 128x128 pixels when building your emoji.
The layout allows you to edit your picture and turn it into a Discord emote easily, ensuring that it’s the right size and dimensions. The tool also provides you with various options to make your emoji just the way you want it.
Once you’ve made your emoji all that is left is to upload it to your Discord server. Here’s how to do that:
- Head up to your server where you want to upload the emoji,
- Select the down-arrow next to the server’s name in the Discord screen’s top-left corner.
- You’ll find an option of server settings; choosing would lead you to a list of other options.
- Select the Emojis options in the left sidebar
- Click on the “Upload Emoji” bar.
To know more about getting and adding emojis to your Discord server, read this .
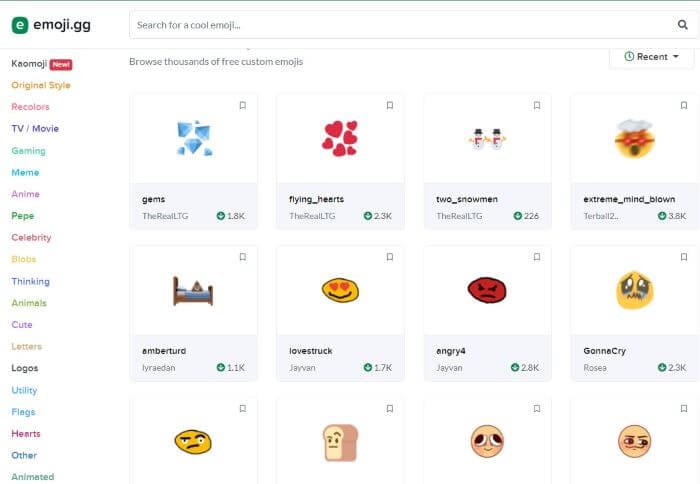
2. Emoji.gg
In case you’ve been searching for a way to create customized emojis, emoji.gg is the ideal Discord emote creator application for you.
It offers you full control over each aspect of the creation process, with many cool tools at your disposal, from different shapes to colors and much more.
Here you can create any emoji you wish with the toolbox available. The interface is quite user-friendly, and you will get the hang of it in minutes.
All that’s left now is to let your creativity run wild and make a genuinely expressive emote to entertain your Discord friends.
Once done, download the emoji from the tool with a single click, and upload it to your Discord server, as explained above.
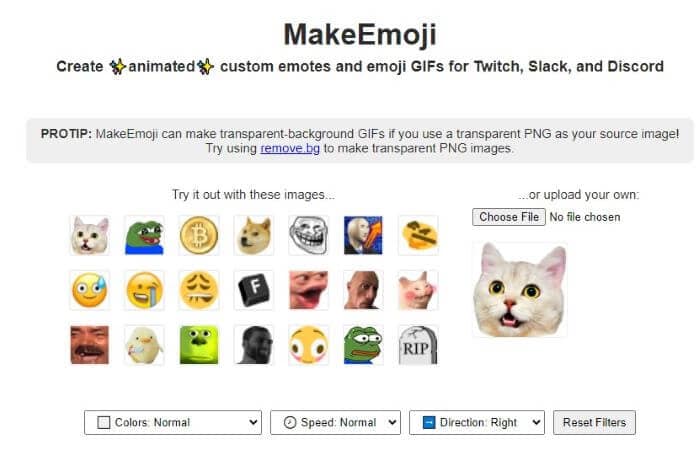
3. MakeEmoji
Another online Discord emote creator tool that lets you make your emojis is MakeEmoji .
It’s straightforward and easy to use, offering you various options to help you make your emoji.
The site’s simplicity stands out since you understand all the functions and tools available from the minute you visit it.
You have the option of downloading custom-built emojis or making an emoji that you would like to use on Discord.
Or you could animate them for all the more fun. All you have to do is upload an image. MakeEmoji will generate animated emojis that you can use in conversations on Discord to make them exciting and refreshing.
Best Discord Emoji Making Apps for iPhone and Android
The good thing about Discord is that it’s for everyone, regardless of the platform, device, or OS they may be using.
These Discord emoji maker applications are easy to use, intelligently designed, and, best of all, can be used on both iPhone and Android devices:
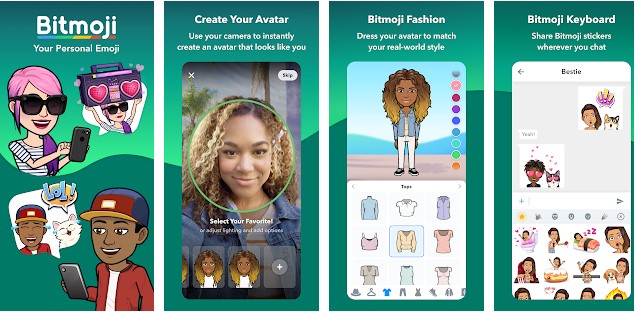
1. BITMOJI
With over 3 million downloads, Bitmoji is a top-rated application that’s also linked with Snapchat.
It is the go-to app for teenagers and is considered one of the best and most popular third-party applications over the last year.
The highly-customizable emojis created via this app could be your alter-egos because you can make them look just like you, making conversing highly interactive and fun.
Using Bitmoji is easy and straightforward. While the application earlier required you to create an avatar or an emoji from scratch, it now offers the option of selecting a picture and generating emojis and stickers.
You can make changes or adjustments to your emoji if it’s not what you imagined it to be. You may do this by directly customizing the appearance of your avatar. That includes changing hair, color, size or shape, and much more.
Furthermore, with Bitmoji you can:
- Create an expressive avatar
- Choose from a vast library of emojis
2. ZMOJI
This application is the perfect fit for you if you want to create and easily share customizable emojis with your friends. This is also used as a Discord emoji maker, but it may remind old users of the Bitmoji application, where you had no automated guidance.
You were left clear to experiment and use your creativity to start in and make emojis for yourself from scratch.
There is almost nothing in the application that you are not able to adjust.
This includes changing or adjusting the avatar features such as eyebrows and hairstyle to face type and clothing.
Once you’ve created ZMoji emojis for yourself, you can download them and send them over to your Discord server for upload.
ZMoji keyboard, an extension of the ZMoji application, is a must if you love animated emojis. It offers an extensive range of stickers, and you won’t run out of options anytime soon.
However, some users might find that the biggest drawback of ZMoji is the number of ads on the platform and that the cost of a premium subscription is a touch more expensive.
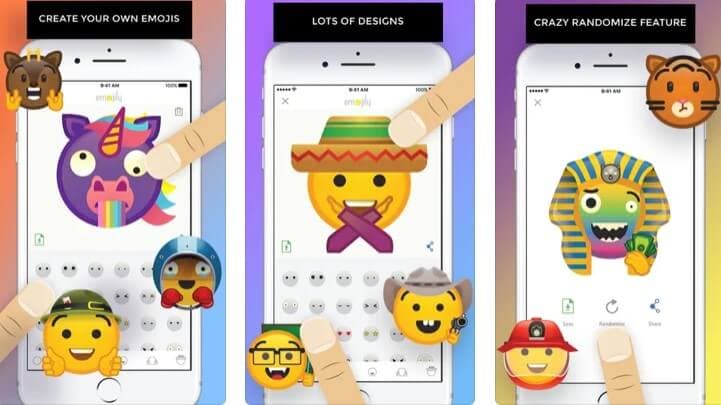
3. EMOJILY
Another exciting Discord emote maker application that works as an emoji maker is Emojily.
The application offers several different designs to make your unique emoji and emoticon. You can label your emojis in many categories and find the perfect features such as eyes, eyebrows, mouths, hands, clothes, and even hats.
Users also appreciate the ability to directly share it to other platforms like Facebook, Instagram, Snapchat, Kik, or upload it to your Discord server is appreciated by users.
The standout feature of Emojly is a feature that they term a super feature called the randomize feature. It is designed to act as an automated super crazy creator and maker! This feature generates random emojis based on the labels decided by you. Pretty cool, right?
With Emojily, you have all the tools available to run your creativity wild and make the best emoji present.
While The Create Emoji is a free, customized extension of Emojily, you can only access limited elements in the free version. You may wish to subscribe to the paid version to establish more control over the design. Doing this will allow you to enjoy the more extensive experience Emojily has to offer.
Conclusion
Making your emojis might sound like a difficult task, especially for Discord, but Discord emoji maker applications make the process fun and straightforward.
Popular apps like Bitmoji or MakeEmoji can create stickers or avatars. In contrast, Emojily and similar apps can be used to quickly make some detailed emotes.
All of these are incredibly well designed online tools and apps to make your experience of building your emoji a pleasant and worthwhile experience.
Richard Bennett
Richard Bennett is a writer and a lover of all things video.
Follow @Richard Bennett
Richard Bennett
Mar 27, 2024• Proven solutions
Emojis have been trending for quite some time now, especially on Discord . They’ve become an integral part of our communication because they can make our messages more expressive and less dull.
The popularity of emojis over Discord has grown so much that many users now want to make their own. Hundreds of online websites and mobile applications have surfaced for this purpose.
While making an emoji may seem daunting at first, this blog is here to guide you to the best tools to help you do it just the way you want it.
Best Free Online Discord Emoji Makers
Is there anything better than a free website that allows you to create an emoji to express your true feelings in your own style?
Here are three free Discord emoji maker online tools you might want to try out:
1. Kapwing
Kapwing is a custom Discord emote maker that provides you with all the necessary tools and features required to make an emoji.
Remember, Discord has a strict image size policy, so set your image to 128x128 pixels when building your emoji.
The layout allows you to edit your picture and turn it into a Discord emote easily, ensuring that it’s the right size and dimensions. The tool also provides you with various options to make your emoji just the way you want it.
Once you’ve made your emoji all that is left is to upload it to your Discord server. Here’s how to do that:
- Head up to your server where you want to upload the emoji,
- Select the down-arrow next to the server’s name in the Discord screen’s top-left corner.
- You’ll find an option of server settings; choosing would lead you to a list of other options.
- Select the Emojis options in the left sidebar
- Click on the “Upload Emoji” bar.
To know more about getting and adding emojis to your Discord server, read this .
2. Emoji.gg
In case you’ve been searching for a way to create customized emojis, emoji.gg is the ideal Discord emote creator application for you.
It offers you full control over each aspect of the creation process, with many cool tools at your disposal, from different shapes to colors and much more.
Here you can create any emoji you wish with the toolbox available. The interface is quite user-friendly, and you will get the hang of it in minutes.
All that’s left now is to let your creativity run wild and make a genuinely expressive emote to entertain your Discord friends.
Once done, download the emoji from the tool with a single click, and upload it to your Discord server, as explained above.
3. MakeEmoji
Another online Discord emote creator tool that lets you make your emojis is MakeEmoji .
It’s straightforward and easy to use, offering you various options to help you make your emoji.
The site’s simplicity stands out since you understand all the functions and tools available from the minute you visit it.
You have the option of downloading custom-built emojis or making an emoji that you would like to use on Discord.
Or you could animate them for all the more fun. All you have to do is upload an image. MakeEmoji will generate animated emojis that you can use in conversations on Discord to make them exciting and refreshing.
Best Discord Emoji Making Apps for iPhone and Android
The good thing about Discord is that it’s for everyone, regardless of the platform, device, or OS they may be using.
These Discord emoji maker applications are easy to use, intelligently designed, and, best of all, can be used on both iPhone and Android devices:
1. BITMOJI
With over 3 million downloads, Bitmoji is a top-rated application that’s also linked with Snapchat.
It is the go-to app for teenagers and is considered one of the best and most popular third-party applications over the last year.
The highly-customizable emojis created via this app could be your alter-egos because you can make them look just like you, making conversing highly interactive and fun.
Using Bitmoji is easy and straightforward. While the application earlier required you to create an avatar or an emoji from scratch, it now offers the option of selecting a picture and generating emojis and stickers.
You can make changes or adjustments to your emoji if it’s not what you imagined it to be. You may do this by directly customizing the appearance of your avatar. That includes changing hair, color, size or shape, and much more.
Furthermore, with Bitmoji you can:
- Create an expressive avatar
- Choose from a vast library of emojis
2. ZMOJI
This application is the perfect fit for you if you want to create and easily share customizable emojis with your friends. This is also used as a Discord emoji maker, but it may remind old users of the Bitmoji application, where you had no automated guidance.
You were left clear to experiment and use your creativity to start in and make emojis for yourself from scratch.
There is almost nothing in the application that you are not able to adjust.
This includes changing or adjusting the avatar features such as eyebrows and hairstyle to face type and clothing.
Once you’ve created ZMoji emojis for yourself, you can download them and send them over to your Discord server for upload.
ZMoji keyboard, an extension of the ZMoji application, is a must if you love animated emojis. It offers an extensive range of stickers, and you won’t run out of options anytime soon.
However, some users might find that the biggest drawback of ZMoji is the number of ads on the platform and that the cost of a premium subscription is a touch more expensive.
3. EMOJILY
Another exciting Discord emote maker application that works as an emoji maker is Emojily.
The application offers several different designs to make your unique emoji and emoticon. You can label your emojis in many categories and find the perfect features such as eyes, eyebrows, mouths, hands, clothes, and even hats.
Users also appreciate the ability to directly share it to other platforms like Facebook, Instagram, Snapchat, Kik, or upload it to your Discord server is appreciated by users.
The standout feature of Emojly is a feature that they term a super feature called the randomize feature. It is designed to act as an automated super crazy creator and maker! This feature generates random emojis based on the labels decided by you. Pretty cool, right?
With Emojily, you have all the tools available to run your creativity wild and make the best emoji present.
While The Create Emoji is a free, customized extension of Emojily, you can only access limited elements in the free version. You may wish to subscribe to the paid version to establish more control over the design. Doing this will allow you to enjoy the more extensive experience Emojily has to offer.
Conclusion
Making your emojis might sound like a difficult task, especially for Discord, but Discord emoji maker applications make the process fun and straightforward.
Popular apps like Bitmoji or MakeEmoji can create stickers or avatars. In contrast, Emojily and similar apps can be used to quickly make some detailed emotes.
All of these are incredibly well designed online tools and apps to make your experience of building your emoji a pleasant and worthwhile experience.
Richard Bennett
Richard Bennett is a writer and a lover of all things video.
Follow @Richard Bennett
Step-by-Step: Incorporating Roles Into Your Discord Server
How to Add Roles in Discord?
Richard Bennett
Mar 27, 2024• Proven solutions
Having a Discord server for you and your friends is a fun experience. And for gamers, Discord is a necessity. You can customize it with bots, connect real-time over voice channels, and even add rooms for chat forums.
Obviously, creating and managing a Discord server can get difficult. Especially when the server gets crammed with members, it is no longer a one-person show. You need help with monitoring and moderation. And let’s face it – you cannot watch your server round the clock.
So, let us learn the art of delegation on Discord! This guide will help you with – How to add roles in Discord and how to assign them to members. This includes creating roles, deleting them, and granting appropriate permissions.
- Part 1: Discord Server Permissions Introduction
- Part 2: How to Make and Add Roles in Discord on Computer
- Part 3: How to Manage Roles in Discord?
- Part 4: How to Delete Roles in Discord?
- Part 5: How to Add Roles on Discord Mobile?
- Part 6: Adding Roles to Discord FAQs
Part 1: Discord Server Permissions You Can Set Up
To give you a heads-up, there are around 29 permissions that you can adjust over a Discord server. More specifically, there are 7 voice permissions, 9 permissions related to texts, and about 13 permissions dealing with the server.
1. General server permission
Administrator – this is the highest permission that you can grant to a user. Think twice before giving this authority to anyone.
View Audit Log – with this permission, a user can read the server’s audits.
Manage Server – this permission enables a user to change the server’s name or shift it to another region.
Manage Roles – a user with this authority can make new roles or modify the roles without this permission.
Manage Channels – with this; a user can make, edit, or remove channels on a server.
Manage emojis – users with this authority can manage emotes.
Manage Webhooks – if you have this authority, you can add, modify, and remove webhooks.
Read Text Channels & See Voice Channels – a user with this permission can read text channels.
2. Membership permissions
Ban Members – a member with permission, can ban members from the server.
Create Instant Invite – users with this permission can invite people to the server.
Change Nickname – you can change your nickname anytime if this permission is enabled.
Manage Nicknames – if enabled, a user can change other’s nicknames.
Kick Members – a user with this authority can remove members from the server.
3. Text channel permissions
Send Messages – with this; users can send texts on chats.
Send TTS Messages – this enables users to send text-to-speech texts.
Manage Messages – with this; a user can remove or pin texts of other users.
Embed Links – enables users to embed hyperlinks in texts.
Attach Files – with this; users can attach files in the texts.
Read Message History – enables users to access earlier texts.
Mention Everyone – you can send push notifications on the channel if this permission is enabled.
Use External Emojis – if enabled, users can send emojis from other servers.
Add Reactions – with this; users can add new reactions to a text.
4. Voice channel permissions
Connect – enables users to connect themselves over the voice channel.
Speak – users can talk over the voice channel.
Mute Members – turn off other user’s speech.
Deafen Members – turn off hearing on the channel for a user.
Move Members – enables a user to shift members from one channel to a different channel.
Use Voice Activity – a member can talk without using Push-to-Talk, with this permission.
Priority Speaker – when this permission is turned on for a user, other’s
this permission allows the user to reduce the volume of other users when this user is speaking so that their words are louder on the channel.
5. Advanced permissions
Includes the ‘Administrator’ permission, which by default enables all the permissions to the assigned user.
Part 2: How to Make and Add Roles in Discord on Computer
The desktop app and Browser resemble the mobile apple a lot. The process of assigning roles and configuring members is more or less the same across devices. First, you need to create roles and define their authority before assigning these roles to some members.
How to create roles in Discord?
Before you can assign roles, you need a server. Once you have created your Discord server, start crafting the structure.
- Open your server and right-click on it.
- From the menu that appears, tap server settings.
- Name the role suitably. It should be descriptive of the authority.
- Tap on the plus sign that appears on the top right of the page.
- Here, you can change the title off the roll and even choose the color.
- Now comes the time to grant some permissions. These are basically the authority that you gave to every profile.
- When you are done, save the changes.
How to Assign Roles to Members in Discord?
To be able to assign roles, you should first create them
- Once again, hit that right button on your server and go to server settings.
- From the menu that appears to the left, ‘choose members’ under user management.
- Here, you will see the list of all the members on your server, tap the Plus sign that is right beside the username.
- From the drop-down menu that appears, select a role you want to assign to that member.
- You will notice that the color changes as per your settings. And this is how you assign roles to a server.
Part 3: How to Manage Roles in Discord?
After you learn how to make roles in Discord, you might want to manage them.
If you have got the hang of creating roles, then managing them is no different. Whenever the server gets crowded, you can create more roles or modify the existing ones. A smaller server can run smoothly with just an admin and an ‘everyone’ role.
The quickest and easiest way to manage your bloating server is to let all members be ‘everyone’ and adjust permissions accordingly. So, whenever members enter your server, they will automatically be assigned the common role.
Further, you can easily figure out what roles you have assigned to whom. Due to these colors, the other members can identify moderators, admins, or other roles.
Part 4: How to Delete Roles in Discord?
Honestly, removing Discord roles easier than setting them up. There are hardly a few steps that you need to follow for role removal.
- place the cursor on the server, and hit the right-click.
- From the list, choose server settings. Then click on roles.
- From the roles window, tap on the role that you wish to delete.
- Towards the bottom, you will see the option to delete the role.
- Press ok to confirm.
Part 5: How to Add Roles on Discord Mobile?
Like we mentioned earlier, the user interface of Discord is similar across devices. So, there is little difference between the process of creating and managing roles. But it can be baffling for beginners, so here’s a brief!
1. How to create roles in Discord mobile app?
Before you can assign roles, you have to create them.
- Open your server.
- Tap on the arrow beside the server’s title. A drop-down menu will appear. Select ‘server settings’ from that.
- Tap on ‘Roles.’ A common role, ‘everyone’ is assigned to all the members who have basic permissions enabled for everyone.
- Tap the plus sign and add a role.
- Give the role a color and describe it in a few words.
- Go through the permissions and enable the ones that fit the role.
- Save the changes.
You can repeat this multiple times to create more roles.
2. How to Assign Roles in Discord mobile app?
- Head over to settings and select ‘Members.’
- Select the members you want to assign roles to.
- Tick the boxes beside each member’s name for the roles you are assigning them.
Save the changes, and you are good to go! You can assign multiple roles to a member.
Part 6: FAQs about Discord Server Roles
Just some obvious things you might wonder about.
- How to make someone admin on Discord?
Making someone admin is the same as assigning other roles. Open your server and go to server settings.
- From there, select ‘roles’ from the left pane.
- Create a new role.
- Name the role ‘admin’ or an equivalent title.
- Adjust the setting related to sorting out role members with other members.
- Go to general permissions and tick the ‘Administrator’ option.
- Hit the ‘save changes’ button at the bottom.
- Now it’s time to assign the role to someone. Right-click on the user that you want to assign the role.
- Choose ‘roles’ from the drop-down list and select ‘Admin.’
And now your server has an admin!
- How can I assign roles to new users in Discord automatically?
By default, every member gets the role of ‘everyone’ on the server. However, you can customize this and add the MEE6 bot for automatic role allocation.
- Why can’t I manage the server even I am an admin on the server?
This is likely to happen if the server owner gave you the role of admin, but the permissions are disabled. You can ask the owner to enable the permissions for your user ID.
Richard Bennett
Richard Bennett is a writer and a lover of all things video.
Follow @Richard Bennett
Richard Bennett
Mar 27, 2024• Proven solutions
Having a Discord server for you and your friends is a fun experience. And for gamers, Discord is a necessity. You can customize it with bots, connect real-time over voice channels, and even add rooms for chat forums.
Obviously, creating and managing a Discord server can get difficult. Especially when the server gets crammed with members, it is no longer a one-person show. You need help with monitoring and moderation. And let’s face it – you cannot watch your server round the clock.
So, let us learn the art of delegation on Discord! This guide will help you with – How to add roles in Discord and how to assign them to members. This includes creating roles, deleting them, and granting appropriate permissions.
- Part 1: Discord Server Permissions Introduction
- Part 2: How to Make and Add Roles in Discord on Computer
- Part 3: How to Manage Roles in Discord?
- Part 4: How to Delete Roles in Discord?
- Part 5: How to Add Roles on Discord Mobile?
- Part 6: Adding Roles to Discord FAQs
Part 1: Discord Server Permissions You Can Set Up
To give you a heads-up, there are around 29 permissions that you can adjust over a Discord server. More specifically, there are 7 voice permissions, 9 permissions related to texts, and about 13 permissions dealing with the server.
1. General server permission
Administrator – this is the highest permission that you can grant to a user. Think twice before giving this authority to anyone.
View Audit Log – with this permission, a user can read the server’s audits.
Manage Server – this permission enables a user to change the server’s name or shift it to another region.
Manage Roles – a user with this authority can make new roles or modify the roles without this permission.
Manage Channels – with this; a user can make, edit, or remove channels on a server.
Manage emojis – users with this authority can manage emotes.
Manage Webhooks – if you have this authority, you can add, modify, and remove webhooks.
Read Text Channels & See Voice Channels – a user with this permission can read text channels.
2. Membership permissions
Ban Members – a member with permission, can ban members from the server.
Create Instant Invite – users with this permission can invite people to the server.
Change Nickname – you can change your nickname anytime if this permission is enabled.
Manage Nicknames – if enabled, a user can change other’s nicknames.
Kick Members – a user with this authority can remove members from the server.
3. Text channel permissions
Send Messages – with this; users can send texts on chats.
Send TTS Messages – this enables users to send text-to-speech texts.
Manage Messages – with this; a user can remove or pin texts of other users.
Embed Links – enables users to embed hyperlinks in texts.
Attach Files – with this; users can attach files in the texts.
Read Message History – enables users to access earlier texts.
Mention Everyone – you can send push notifications on the channel if this permission is enabled.
Use External Emojis – if enabled, users can send emojis from other servers.
Add Reactions – with this; users can add new reactions to a text.
4. Voice channel permissions
Connect – enables users to connect themselves over the voice channel.
Speak – users can talk over the voice channel.
Mute Members – turn off other user’s speech.
Deafen Members – turn off hearing on the channel for a user.
Move Members – enables a user to shift members from one channel to a different channel.
Use Voice Activity – a member can talk without using Push-to-Talk, with this permission.
Priority Speaker – when this permission is turned on for a user, other’s
this permission allows the user to reduce the volume of other users when this user is speaking so that their words are louder on the channel.
5. Advanced permissions
Includes the ‘Administrator’ permission, which by default enables all the permissions to the assigned user.
Part 2: How to Make and Add Roles in Discord on Computer
The desktop app and Browser resemble the mobile apple a lot. The process of assigning roles and configuring members is more or less the same across devices. First, you need to create roles and define their authority before assigning these roles to some members.
How to create roles in Discord?
Before you can assign roles, you need a server. Once you have created your Discord server, start crafting the structure.
- Open your server and right-click on it.
- From the menu that appears, tap server settings.
- Name the role suitably. It should be descriptive of the authority.
- Tap on the plus sign that appears on the top right of the page.
- Here, you can change the title off the roll and even choose the color.
- Now comes the time to grant some permissions. These are basically the authority that you gave to every profile.
- When you are done, save the changes.
How to Assign Roles to Members in Discord?
To be able to assign roles, you should first create them
- Once again, hit that right button on your server and go to server settings.
- From the menu that appears to the left, ‘choose members’ under user management.
- Here, you will see the list of all the members on your server, tap the Plus sign that is right beside the username.
- From the drop-down menu that appears, select a role you want to assign to that member.
- You will notice that the color changes as per your settings. And this is how you assign roles to a server.
Part 3: How to Manage Roles in Discord?
After you learn how to make roles in Discord, you might want to manage them.
If you have got the hang of creating roles, then managing them is no different. Whenever the server gets crowded, you can create more roles or modify the existing ones. A smaller server can run smoothly with just an admin and an ‘everyone’ role.
The quickest and easiest way to manage your bloating server is to let all members be ‘everyone’ and adjust permissions accordingly. So, whenever members enter your server, they will automatically be assigned the common role.
Further, you can easily figure out what roles you have assigned to whom. Due to these colors, the other members can identify moderators, admins, or other roles.
Part 4: How to Delete Roles in Discord?
Honestly, removing Discord roles easier than setting them up. There are hardly a few steps that you need to follow for role removal.
- place the cursor on the server, and hit the right-click.
- From the list, choose server settings. Then click on roles.
- From the roles window, tap on the role that you wish to delete.
- Towards the bottom, you will see the option to delete the role.
- Press ok to confirm.
Part 5: How to Add Roles on Discord Mobile?
Like we mentioned earlier, the user interface of Discord is similar across devices. So, there is little difference between the process of creating and managing roles. But it can be baffling for beginners, so here’s a brief!
1. How to create roles in Discord mobile app?
Before you can assign roles, you have to create them.
- Open your server.
- Tap on the arrow beside the server’s title. A drop-down menu will appear. Select ‘server settings’ from that.
- Tap on ‘Roles.’ A common role, ‘everyone’ is assigned to all the members who have basic permissions enabled for everyone.
- Tap the plus sign and add a role.
- Give the role a color and describe it in a few words.
- Go through the permissions and enable the ones that fit the role.
- Save the changes.
You can repeat this multiple times to create more roles.
2. How to Assign Roles in Discord mobile app?
- Head over to settings and select ‘Members.’
- Select the members you want to assign roles to.
- Tick the boxes beside each member’s name for the roles you are assigning them.
Save the changes, and you are good to go! You can assign multiple roles to a member.
Part 6: FAQs about Discord Server Roles
Just some obvious things you might wonder about.
- How to make someone admin on Discord?
Making someone admin is the same as assigning other roles. Open your server and go to server settings.
- From there, select ‘roles’ from the left pane.
- Create a new role.
- Name the role ‘admin’ or an equivalent title.
- Adjust the setting related to sorting out role members with other members.
- Go to general permissions and tick the ‘Administrator’ option.
- Hit the ‘save changes’ button at the bottom.
- Now it’s time to assign the role to someone. Right-click on the user that you want to assign the role.
- Choose ‘roles’ from the drop-down list and select ‘Admin.’
And now your server has an admin!
- How can I assign roles to new users in Discord automatically?
By default, every member gets the role of ‘everyone’ on the server. However, you can customize this and add the MEE6 bot for automatic role allocation.
- Why can’t I manage the server even I am an admin on the server?
This is likely to happen if the server owner gave you the role of admin, but the permissions are disabled. You can ask the owner to enable the permissions for your user ID.
Richard Bennett
Richard Bennett is a writer and a lover of all things video.
Follow @Richard Bennett
Also read:
- [Updated] 2024 Approved Unlocking the Secrets of Discord Stickers
- [New] Top-Tier Designers Making Magic in Discord Emojis
- The Swift Steps to Stellar Screen Names on Discord
- [Updated] In 2024, Sever Ties With Discord Network
- [New] In 2024, Discovering the Value in Discord's Nitro Details & Access Options
- [Updated] 2024 Approved Bridging Bands and Bots Spotify/Discord Sync Methods
- [Updated] Elite Font Generators Tailored for Discord (Mobile) for 2024
- [New] 2024 Approved Exploring Nitro The Essence and Acquisition of Discord VIP Service
- [Updated] 2024 Approved From Basic to Bold Customizing Your Discord Image
- [Updated] Be Heard in Discord Understanding TTS Functions for 2024
- [Updated] Unveiling Discord Video Communication on Devices for 2024
- [New] 2024 Approved Navigating Discord Server Deletion (Desktop/Mobile)
- [Updated] 2024 Approved Your Guide to Crafting the Best Emblems - No Cost
- [New] 2024 Approved Workplace Dialogue Dominance Unraveling Slack's Edge Over Discord
- [Updated] 2024 Approved Streamlining Your Discord Experience Bulk Deletion Made Simple
- [New] From Novice to Noteworthy A Step-by-Step Guide for Verified Partnership for 2024
- [New] In 2024, Dive Into Free Emoji Worlds with These Innovative Online Locations
- [Updated] How to Execute a Swift and Silent Chat Purge on Discord Platform for 2024
- [New] In 2024, The Ultimate Guide to Discord From Basics to Advanced
- [New] DiscoEmote Studio - Crafting the Ultimate Emojis
- [Updated] Slack Vs. Discord Which Is Better for Your Team
- [New] Superior Alternatives to Discord Services for 2024
- [New] 2024 Approved Navigating Discord's Text-to-Speech Features
- Unraveling the Pioneers Behind Famed Discord Expressions for 2024
- [Updated] Discord's Best Fixed Character Emoji Crafting Apps
- [Updated] How To Craft Strikingly Attractive Pfps for Your DiscoLife in Discord for 2024
- [Updated] Unveiling Nitro Understanding & Obtaining Discord's Premium Tier
- In 2024, Navigating Discord Spoiler Labels with Ease
- 2024 Approved Stepwise Methodology for Launching a Discord Channel
- In 2024, Premier Discord Font Makers - Seamless Online & Portable Use
- [New] In 2024, Navigating Discord's Graphics How to Use GIFs Effectively
- [Updated] Top 5 Dynamic Social Media Brand Animations for 2024
- 2024 Approved Essential Tips for Navigating Discord Spoilers
- In 2024, Become a Pro at Live Streaming on Discord with Our Simple Steps
- [Updated] Advanced Control Enhancing Your Live Broadcast Experience
- [New] 2024 Approved Discovering Nitro in Discord Its Significance and Access Methods
- [New] Key Steps to Successfully Infiltrating Your Dream Discord Server
- [Updated] 2024 Approved Transform Your Discord Sessions Best 10 Enhancing Tools
- [New] The Ultimate Compilation of Tips for Incorporating GIFs Into Discord Conversations
- [Updated] Step-By-Step Process for Adding Unique Emojis to Your Discord Avatar (PC/Mobile) for 2024
- [Updated] Boosting Discord Servers with These Innovative Bots for 2024
- VirtualDub The Ultimate Tool for MPEG2 Video Shrinking for 2024
- Complete Guide For iPhone X Lock Screen | Dr.fone
- Best Dark Moody LUTs During Editing
- [Updated] Snap to GIFs Making Twitter Video Freely Convertible for 2024
- Bypassing Google Account With vnROM Bypass For Infinix Smart 7 HD
- [New] 2024 Approved The Path to Retrospective Facebook Content (Mobile + Laptop)
- 2024 Approved Top 16 Best Free AVI Video Rotators Windows, MAC, Android, iPhone, and Online
- [New] Ultra-Fast Instagram Video Views for Smartphone Users for 2024
- In 2024, 3 Ways to Track Samsung Galaxy S23 FE without Them Knowing | Dr.fone
- [New] Top 5 Mac Capture Programs Outperforming Bandicam for 2024
- In 2024, 3 Ways for Android Pokemon Go Spoofing On Motorola Moto G23 | Dr.fone
- [New] In 2024, Instant MP3 Download From Facebook Vids Directly
- [Updated] Unlocking the Secrets to Stellar Sims Gameplay Recording
- 2024 Approved Unleash Potential Blend the Best of TikTok and Instagram Reel Artistry
- 2024 Approved Practical Tips to Store Your Favorite Instagram Reels
- How to Change Spotify Location After Moving to Another Country On Xiaomi Redmi Note 12 Pro 4G | Dr.fone
- New 2024 Approved Advanced Methods for Silencing Background Music in Videos
- Updated In 2024, MP3 Cutter for Mac - Which Is the Best MP3 Cutter on Mac?
- New 2024 Approved How To Make Transparent Background On Picsart
- 2024 Approved Elite Firefox Screencap Add-Ons
- In 2024, 4 solution to get rid of pokemon fail to detect location On OnePlus 11 5G | Dr.fone
- New How to Add Emojis To Discord for 2024
- [New] Ultimate Laptop ScreenCapture Techniques Reviewed
- New Bring Your Videos to Life Best DVD Creation Software for Beginners for 2024
- Fix Unfortunately Settings Has Stopped on Realme 11 Pro+ Quickly | Dr.fone
- Full Guide to Bypass Lava Storm 5G FRP
- [New] In 2024, The Foremost Non-Udemy Virtual Learning Experiences Reviewed
- New Top Considerations for Selecting the Best Video to Audio Conversion Tool
- Updated In 2024, AI-Powered Video Editors for Instant Reframe
- What You Need To Know To Improve Your Honor Magic 5 Lite Hard Reset | Dr.fone
- 2024 Approved Sound Digitization Audiovisual Preservation
- Instagram TV Essentials Step-by-Step Upload Guide
- New From Photos to Film How to Craft a Compelling Video Slideshow in Final Cut Pro for 2024
- [New] In 2024, The Expert's Choice Top 10 Tools for Spotify Recordings
- 2024 Approved Mastering Tweeted Videos on Facebooks Networks
- New In 2024, Mastering Windows 10 Acoustic Synchronization The 5 Best Tools
- In 2024, Adobe Premiere Pro CS6 Mac Download - Latest Update
- New In 2024, Unleash Your Inner Cartoon Best Mobile Apps for Photo Transformation
- [New] 2024 Approved Prove Your Skills with Flawless PS4 Screen Capture for Gamers
- Updated Easy Steps to Make a Talking Avatar with AI From Any Photos for 2024
- [Updated] Elite Game Line-Up Best 7 FPS Classics
- Title: "[New] Excellence Unveiled Discord's Finest Emoji Designers and Software"
- Author: Timothy
- Created at : 2024-05-23 22:47:43
- Updated at : 2024-05-24 22:47:43
- Link: https://discord-videos.techidaily.com/new-excellence-unveiled-discords-finest-emoji-designers-and-software/
- License: This work is licensed under CC BY-NC-SA 4.0.
