![[New] In 2024, A Compreenas Guide to Incorporating Personalized Emojis in Discord Statuses](https://thmb.techidaily.com/056b5dc5bf38553fc5e62980ac558058cdfef6fae043dca04e140a16eeec969f.jpg)
[New] In 2024, A Compreenas Guide to Incorporating Personalized Emojis in Discord Statuses
A Compreenas Guide to Incorporating Personalized Emojis in Discord Statuses
If you have an active Nitro subscription and want to make your Discord status look better, you can put emojis in Discord status. This article will help you walk through the process of using Discord custom status to upload emojis. Custom status is a new feature introduced by Discord. By uploading the emojis, you can keep your Discord status fresh! So, keep reading to find how to put emojis in Discord status through your desktop and mobile app conveniently.
In this article
01 How to Put Custom Emoji in Discord Status on Desktop and Online?
02 How to Add Custom Emoji on Discord Status on Mobile?
03 How to Copy and Paste Emojis in Discord Status?
04 How to Add Animated Emojis to Discord Status?
05 Custom Discord Status Emoji Ideas
Part 1: How to Put Custom Emoji in Discord Status on Desktop and Online?

For those who want to add an emoji on their Discord status on desktop and online, you can do that easily by following the steps that we have listed below:
Step 1: First, you need to go to https://discord.com . Once you visit the site, please log in using your Discord credential.
Step 2: Once your profile is open, please click on the profile picture.
Step 3: On your profile, look at the bottom of the menu. You will see a pop-up menu that says set a custom status.
Step 4: On the emojis bar, you can add an emoji. To do that, you need to click on the emoji status. Next, you will see a list of emojis. Please note that only an active Nitro subscription user can use animated or custom emojis. On the left will be the category of emojis. Choose one category that suits your mood; once the category opens, click on an emoji to add it.
Step 5: After that, you need to click on the Today option. This will open a drop-down menu. You need to choose a time frame for the emoji or status. You can choose today, 4 hours, 1 hour, etc.
Step 6: If you are done with the emoji selection and have chosen the duration for the status, you need to click on the Save option. The Save option will be on the bottom right of the same pop-up window.
And that’s it. The emojis will be successfully added to your status based on the duration that you have chosen. If you want to change the emoji or remove it, you need to undergo the same process.
Related: How to Get Free Animated Emojis on Discord
Part 2: How to Add Custom Emoji on Discord Status on Mobile?

If you are using the Discord app on your mobile phone, you can add a custom emoji on Discord status using your phone too. Follow the step-by-step guide that we have prepared to learn how to do that.
Step 1: Take your smartphone and look for the Discord app. The icon will look like a controller. Click on it to launch Discord.
Step 2: Just like the web steps, you will have to click on your profile. Click on the hamburger icon, which is there in the upper left corner. Then, look at the bottom right corner to find your profile.
Step 3: Now, click on the Set Status option. This will be the first option on your profile. Go on and click on that.
Step 4: After that, click on the option that says set a custom status. On the status bar, you will see an emoji. You need to click on that to open the list of emojis to choose from.
Step 5: Choose a time frame for the emoji, for example, 30 minutes, 1-hour, clear tomorrow, etc. If you are using an Android, you will see the floppy disk option; click on that to save your status. If you are using an iOS device, you will see the save option.
By following these steps, your status with the emoji you have chosen will be saved successfully. If you want to add a new emoji, repeat the same process.
Related: How to Change Discord Status
Part 3: How to Copy and Paste Emojis in Discord Status?
If you don’t want to go through the hassle of adding an emoji manually, you can just copy and paste one to your status. How to do it? Follow these steps:
Step 1: Go to a website that has emojis for Discord status.
Step 2: Scroll down the list of emojis and copy it.
Step 3: Go back to your Discord Nitro page and open the status setting. There, on the emoji section, paste the emoji that you have copied from another site.
Please note that this may not be possible for all types of emojis, though. Also, this will work if only the website has created emojis that can be directly copied and pasted on the status section.
Part 4: How to Add Animated Emojis to Discord Status?
Apart from the basic emojis, you can also add animated emojis to your Discord Status to make your status look even better. Here are the steps to follow to add an animated emoji:
Step 1: First, go to a website called https://betterdiscord.app/ . Once you are there, click on the Download option.
Step 2: You will see a page loaded with codes, right-click on the screen and click on the Save option. When it is downloaded, click on the Better Discord Windows installer. Next, read the license agreement and click on the Next option.
Step 3: Then click install better Discord and hit the next button. Choose the Discord version that you currently have installed.
Step 4: Open Discord and click on the user settings. There, you will see the Better Discord section. Next, click on the Plugin option. Now, close the Discord window and drag the animated status dot plugin into the plugin folder that opened after clicking on the Plugin option.
Step 5: Go to Discord again, and you will see the Animated Status option. Enable it and click on the gear icon. To add an animated emoji, click on the + icon. Next, you will see a Nitro ID field. Then, go to a chat page and click on the emoji option.
Step 6: Look at the emoji that you like and memorize the animated emoji name. Press \ followed by the name of the emoji. Now, copy the whole text and paste it again. You will see a few numbers; that’s the Nitro ID for the emoji. Copy the number only, go back to the Animated plugin and paste it on the Nitro ID field. Go back to the Nitro page again, and you will see the animated emoji on your status.
Part 5: Custom Discord Status Emoji Ideas

If you want to make your Discord Status look really cool, you can get some custom Discord status emoji ideas from us. Read this section to find out a few super cool custom Discord status emojis ideas and get inspired.
Use Kaomoji in Status
Kaomoji is a collection of super cute emojis that can brighten anyone’s day! They are great because they make your status look different and cute at the same time. You can choose from stars, smiley faces, cute polar bears, and much more! And yes, they are different than your usual emojis.
Add Old-school Emoticons
Remember the good old Nokia 1100 days when you used to send emojis using some signs? Well, you can try this idea too to give a vintage look to your status. Everybody uses the same smiley emojis, so why not try something different? Go back to your old 90s school days and display images, such as @}->– which is a rose! You can find old-school emoticons online easily.

Conclusion
And that’s it; now you know how to put emoji in Discord status without sweating much. We hope you have found this article helpful, and you will start using cool emojis on your status to make your Discord status look different than others!
02 How to Add Custom Emoji on Discord Status on Mobile?
03 How to Copy and Paste Emojis in Discord Status?
04 How to Add Animated Emojis to Discord Status?
05 Custom Discord Status Emoji Ideas
Part 1: How to Put Custom Emoji in Discord Status on Desktop and Online?
For those who want to add an emoji on their Discord status on desktop and online, you can do that easily by following the steps that we have listed below:
Step 1: First, you need to go to https://discord.com . Once you visit the site, please log in using your Discord credential.
Step 2: Once your profile is open, please click on the profile picture.
Step 3: On your profile, look at the bottom of the menu. You will see a pop-up menu that says set a custom status.
Step 4: On the emojis bar, you can add an emoji. To do that, you need to click on the emoji status. Next, you will see a list of emojis. Please note that only an active Nitro subscription user can use animated or custom emojis. On the left will be the category of emojis. Choose one category that suits your mood; once the category opens, click on an emoji to add it.
Step 5: After that, you need to click on the Today option. This will open a drop-down menu. You need to choose a time frame for the emoji or status. You can choose today, 4 hours, 1 hour, etc.
Step 6: If you are done with the emoji selection and have chosen the duration for the status, you need to click on the Save option. The Save option will be on the bottom right of the same pop-up window.
And that’s it. The emojis will be successfully added to your status based on the duration that you have chosen. If you want to change the emoji or remove it, you need to undergo the same process.
Related: How to Get Free Animated Emojis on Discord
Part 2: How to Add Custom Emoji on Discord Status on Mobile?
If you are using the Discord app on your mobile phone, you can add a custom emoji on Discord status using your phone too. Follow the step-by-step guide that we have prepared to learn how to do that.
Step 1: Take your smartphone and look for the Discord app. The icon will look like a controller. Click on it to launch Discord.
Step 2: Just like the web steps, you will have to click on your profile. Click on the hamburger icon, which is there in the upper left corner. Then, look at the bottom right corner to find your profile.
Step 3: Now, click on the Set Status option. This will be the first option on your profile. Go on and click on that.
Step 4: After that, click on the option that says set a custom status. On the status bar, you will see an emoji. You need to click on that to open the list of emojis to choose from.
Step 5: Choose a time frame for the emoji, for example, 30 minutes, 1-hour, clear tomorrow, etc. If you are using an Android, you will see the floppy disk option; click on that to save your status. If you are using an iOS device, you will see the save option.
By following these steps, your status with the emoji you have chosen will be saved successfully. If you want to add a new emoji, repeat the same process.
Related: How to Change Discord Status
Part 3: How to Copy and Paste Emojis in Discord Status?
If you don’t want to go through the hassle of adding an emoji manually, you can just copy and paste one to your status. How to do it? Follow these steps:
Step 1: Go to a website that has emojis for Discord status.
Step 2: Scroll down the list of emojis and copy it.
Step 3: Go back to your Discord Nitro page and open the status setting. There, on the emoji section, paste the emoji that you have copied from another site.
Please note that this may not be possible for all types of emojis, though. Also, this will work if only the website has created emojis that can be directly copied and pasted on the status section.
Part 4: How to Add Animated Emojis to Discord Status?
Apart from the basic emojis, you can also add animated emojis to your Discord Status to make your status look even better. Here are the steps to follow to add an animated emoji:
Step 1: First, go to a website called https://betterdiscord.app/ . Once you are there, click on the Download option.
Step 2: You will see a page loaded with codes, right-click on the screen and click on the Save option. When it is downloaded, click on the Better Discord Windows installer. Next, read the license agreement and click on the Next option.
Step 3: Then click install better Discord and hit the next button. Choose the Discord version that you currently have installed.
Step 4: Open Discord and click on the user settings. There, you will see the Better Discord section. Next, click on the Plugin option. Now, close the Discord window and drag the animated status dot plugin into the plugin folder that opened after clicking on the Plugin option.
Step 5: Go to Discord again, and you will see the Animated Status option. Enable it and click on the gear icon. To add an animated emoji, click on the + icon. Next, you will see a Nitro ID field. Then, go to a chat page and click on the emoji option.
Step 6: Look at the emoji that you like and memorize the animated emoji name. Press \ followed by the name of the emoji. Now, copy the whole text and paste it again. You will see a few numbers; that’s the Nitro ID for the emoji. Copy the number only, go back to the Animated plugin and paste it on the Nitro ID field. Go back to the Nitro page again, and you will see the animated emoji on your status.
Part 5: Custom Discord Status Emoji Ideas
If you want to make your Discord Status look really cool, you can get some custom Discord status emoji ideas from us. Read this section to find out a few super cool custom Discord status emojis ideas and get inspired.
Use Kaomoji in Status
Kaomoji is a collection of super cute emojis that can brighten anyone’s day! They are great because they make your status look different and cute at the same time. You can choose from stars, smiley faces, cute polar bears, and much more! And yes, they are different than your usual emojis.
Add Old-school Emoticons
Remember the good old Nokia 1100 days when you used to send emojis using some signs? Well, you can try this idea too to give a vintage look to your status. Everybody uses the same smiley emojis, so why not try something different? Go back to your old 90s school days and display images, such as @}->– which is a rose! You can find old-school emoticons online easily.
Conclusion
And that’s it; now you know how to put emoji in Discord status without sweating much. We hope you have found this article helpful, and you will start using cool emojis on your status to make your Discord status look different than others!
Unlocking Seamless Discord Conversations on Tablets & Phones
How to Make a Discord Video Call | Desktop & Mobile

Richard Bennett
Mar 27, 2024• Proven solutions
Discord is a great place to hang out with like-minded people and just relax. But sometimes you want to do more than just chat using text messaging, which is where video calling comes in handy.
Discord has video call options built into the desktop app, the web browser and the mobile app, so you don’t need to switch between different software when you want to chat on video with your friends or colleagues. Read on to find out how to make a video call on Discord.
- Part 1: Best Settings for Discord Video Call
- Part 2: How to Make a Private Video Call on Discord?
- Part 3: How to Make a Server Video Call on Discord?
- Part 4: FAQs about Discord Video Call
Part 1: Best Settings for Discord Video Call
Before you start calling everyone, you’ll want to check your settings to make sure you have the best experience. It’s important to make sure you’ve got your best equipment setup to work for the highest quality audio and video possible.

So, start by heading to the User Settings page. You’ll find this at the bottom left of the screen – look for the cog icon next to your name. You won’t see this on mobile, this is only on the desktop app and the web browser version of Discord.
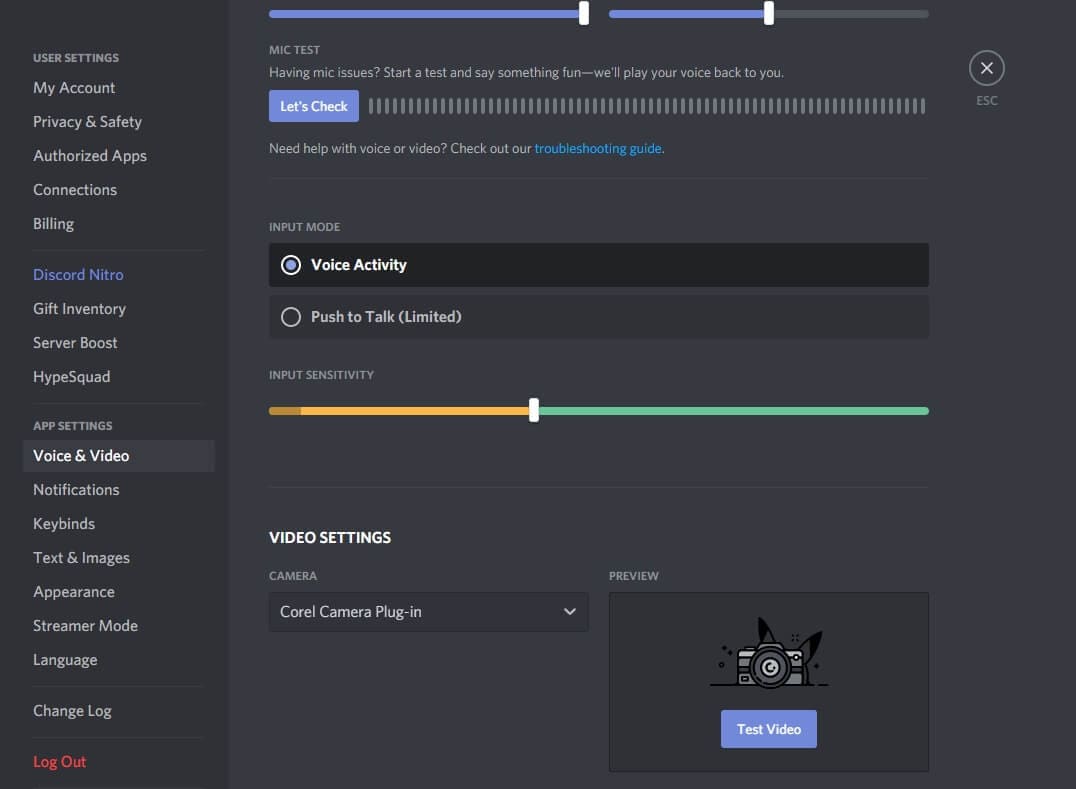
Once you’ve opened settings, you’ll want to click on the Voice & Video tab. Here you can check your microphone settings and adjust the volume, and choose your camera. If you’re using an external camera instead of the built-in option, check that the right one is selected in the dropdown.
You can also use this opportunity to run a test video – so that you know you’re well-lit, properly framed and otherwise good to go. You can adjust the lighting in your room or move the camera if you don’t feel it’s quite right.
One quick note for the web browser version of Discord – you’ll be asked to grant permission to your microphone and camera. Make sure you allow the site to use your equipment otherwise it won’t work on the video call.
Once you are happy, just click the close button at the top right of the settings options.
Part 2: How to Make a Private Video Call on Discord?
Once you’ve got your settings ready, you’re set to make your private Discord video call. If you’re doing it on the web browser or desktop app, you’ll need to first navigate to the inbox you share with the person you want to call. Do this by clicking on the Home button at the top left – you’ll then get a list of all your contacts.
If you’re only calling one person then it’s easy – just click on their name.

If you want to call a private group, you need to click the + button and then create a group DM. Add the names of the users you want to call.
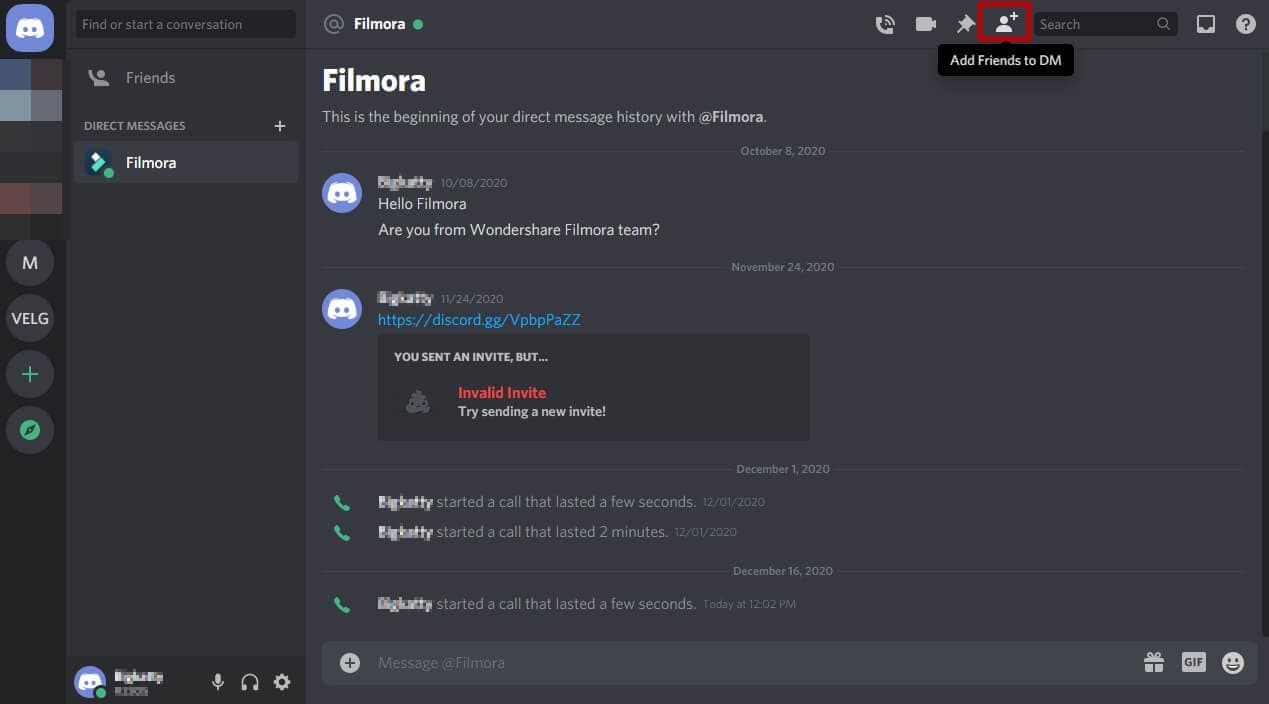
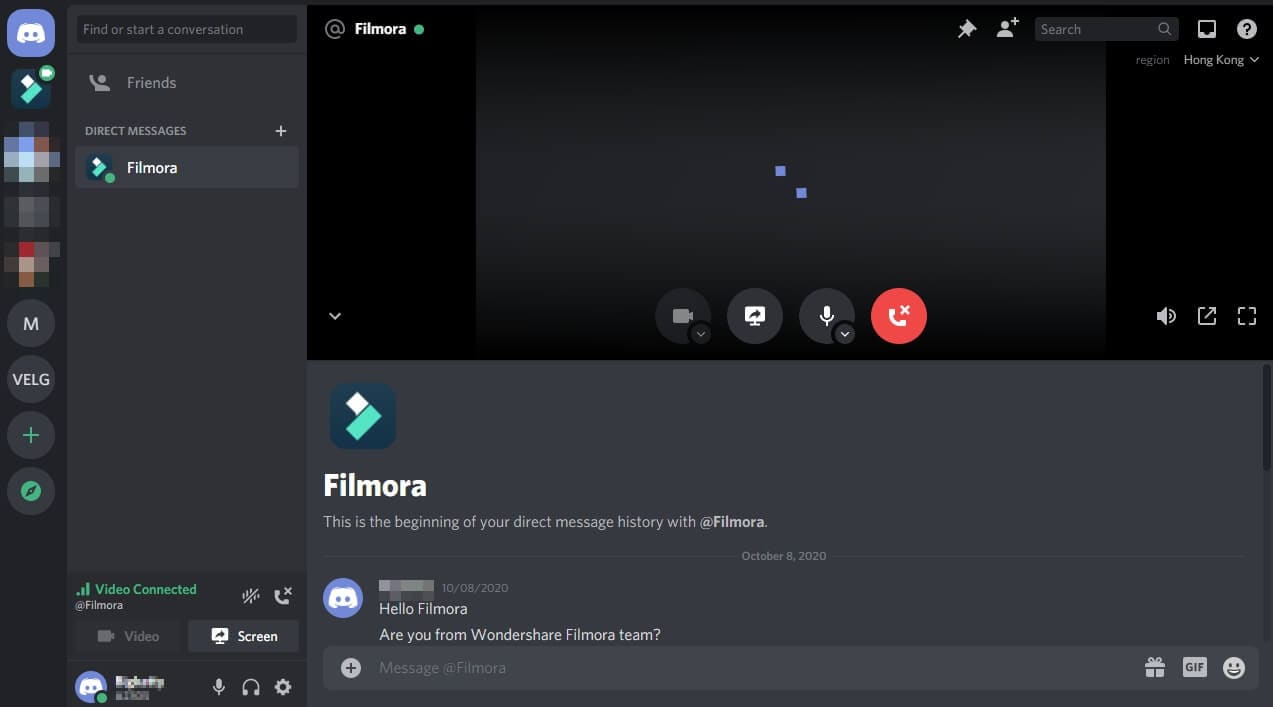
Once you’re in the direct message window of the person or group you want to call, you need to look at the buttons at the top right of the screen. The second icon that looks like a video camera is the one you’re looking for. Click that and you’ll start a video call.
You’ll see yourself on screen at this point, but you’ll need to wait until the other person or group members have joined the call for the chat to properly begin.
The process of making video call on Discord mobile is essentially identical. You just need to open the direct message group and click on the video call icon, which is still at the top right of your screen.
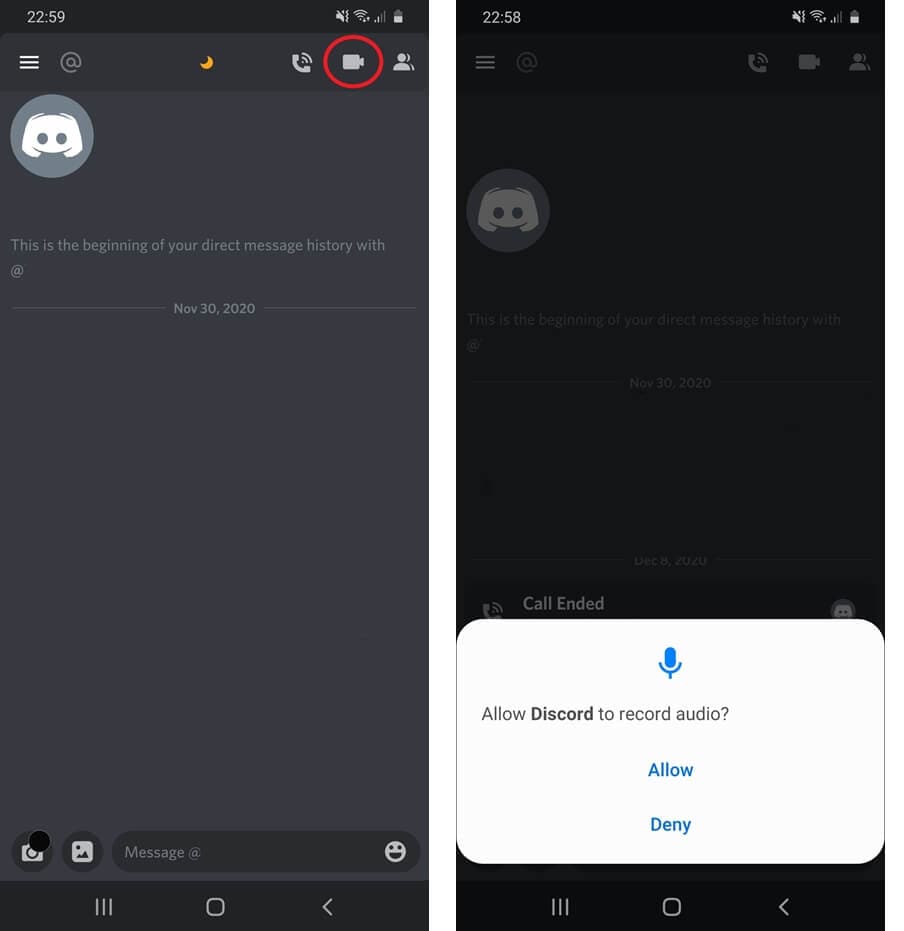
You’ll need to give permissions for the Discord mobile app to use your microphone and camera if you haven’t already.
Once you’ve finished your video call on either desktop or mobile, just hit the red button to end it and switch your camera off again.
Part 3: How to Make a Server Video Call on Discord?
If you want to make a group video call on a public server, you again need to first navigate to the server. Once you’re there, you’ll need to join the voice channel that you should see on the left side of the screen.
Once you’re in the voice channel, click Lounge, Community Hangout or Stream Room, and then switch on your camera by clicking the ‘Video’ button. You’ll find this at the bottom-left of the screen. Again, if you’re on the web browser, you’ll be asked by your browser for permission to use your camera at this stage.
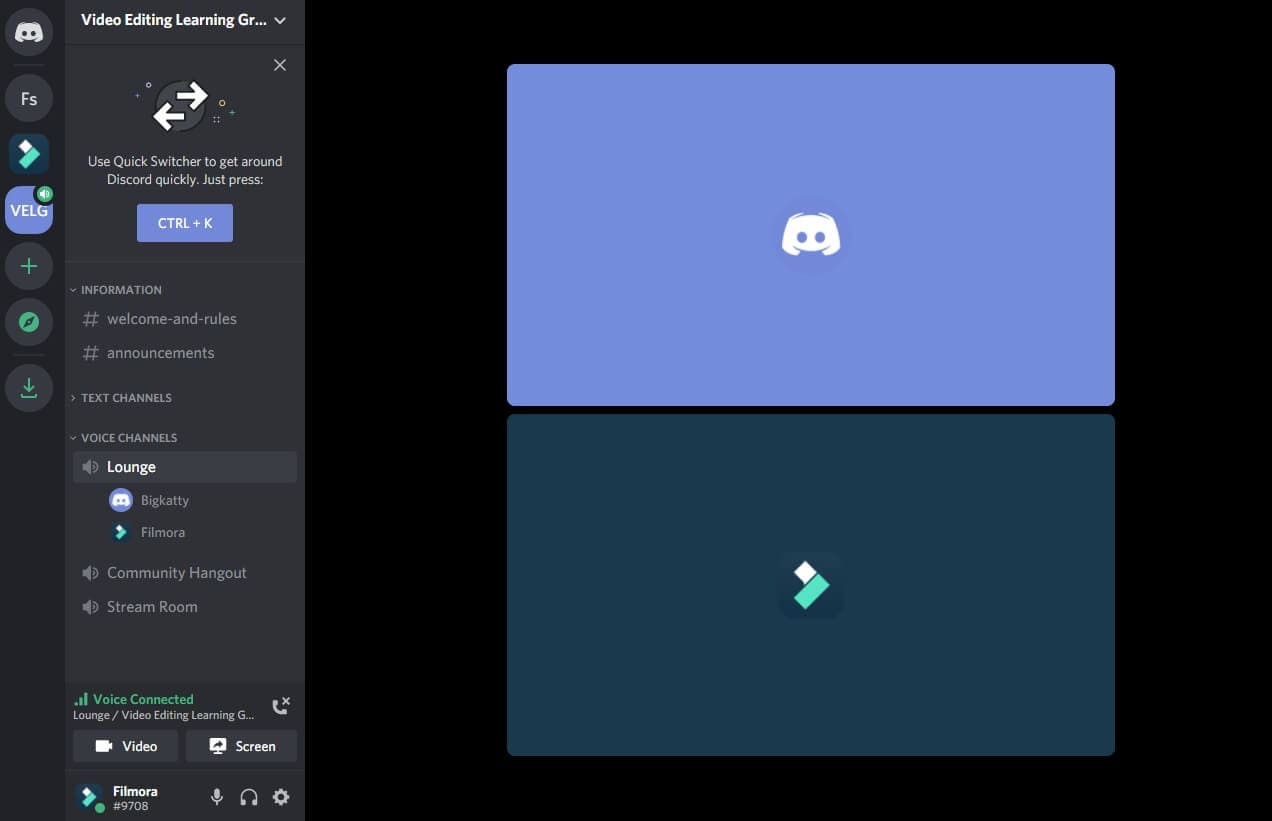
And that’s it – the video call is now live and anyone who joins the voice channel will be able to see you, chat to you and switch on their camera to join the video conference as well.
On mobile, it’s slightly different. You’ll still want to head to the server you want to join and then click on the voice channel to join it. But as soon as you click on the voice channel, you’ll get a pop-up with an icon at the bottom right where you can instantly switch on your camera.
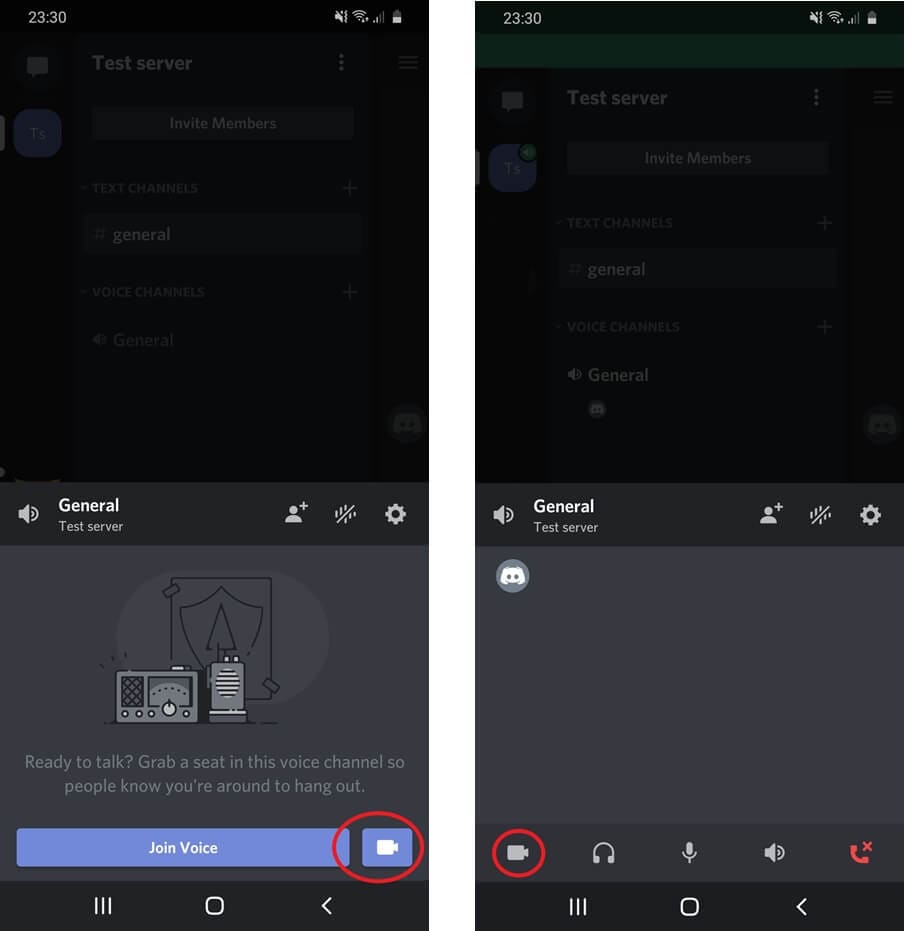
If you prefer, you can still just join as voice, and then at any stage click on your name where you’ll be able to then switch on your camera to turn a voice chat into a video call.
Whenever you want to end the video call, just click on your name again to switch off your camera, or disconnect completely from the voice channel.
FAQs About Discord Video Chat Call
1. How Many People Can Join in the Discord Group Video Call?
Normally, the limit for the number of users on a group video call in Discord is 10. However, during the Coronavirus pandemic, the team behind Discord know that it’s a valuable tool to help people stay connected. So the limit has been increased to 25 users. This may be reduced in the future once the world returns to some sense of normality.
2. How to Join a Video Call on Discord?
Joining an existing video call on Discord is a really easy process.
If it’s a private video call, you’ll get a pop-up in the chat window letting you know that a video call has been started. You have the option of declining the video call, joining it with video, or just joining with voice without your camera switched on.
If instead, it’s a public server where a video call is happening, you just need to join the voice channel by clicking on it on the left side of the screen, and then clicking on the video button next to your name, just as if you were starting the call in the first place.
Richard Bennett
Richard Bennett is a writer and a lover of all things video.
Follow @Richard Bennett
Richard Bennett
Mar 27, 2024• Proven solutions
Discord is a great place to hang out with like-minded people and just relax. But sometimes you want to do more than just chat using text messaging, which is where video calling comes in handy.
Discord has video call options built into the desktop app, the web browser and the mobile app, so you don’t need to switch between different software when you want to chat on video with your friends or colleagues. Read on to find out how to make a video call on Discord.
- Part 1: Best Settings for Discord Video Call
- Part 2: How to Make a Private Video Call on Discord?
- Part 3: How to Make a Server Video Call on Discord?
- Part 4: FAQs about Discord Video Call
Part 1: Best Settings for Discord Video Call
Before you start calling everyone, you’ll want to check your settings to make sure you have the best experience. It’s important to make sure you’ve got your best equipment setup to work for the highest quality audio and video possible.
So, start by heading to the User Settings page. You’ll find this at the bottom left of the screen – look for the cog icon next to your name. You won’t see this on mobile, this is only on the desktop app and the web browser version of Discord.
Once you’ve opened settings, you’ll want to click on the Voice & Video tab. Here you can check your microphone settings and adjust the volume, and choose your camera. If you’re using an external camera instead of the built-in option, check that the right one is selected in the dropdown.
You can also use this opportunity to run a test video – so that you know you’re well-lit, properly framed and otherwise good to go. You can adjust the lighting in your room or move the camera if you don’t feel it’s quite right.
One quick note for the web browser version of Discord – you’ll be asked to grant permission to your microphone and camera. Make sure you allow the site to use your equipment otherwise it won’t work on the video call.
Once you are happy, just click the close button at the top right of the settings options.
Part 2: How to Make a Private Video Call on Discord?
Once you’ve got your settings ready, you’re set to make your private Discord video call. If you’re doing it on the web browser or desktop app, you’ll need to first navigate to the inbox you share with the person you want to call. Do this by clicking on the Home button at the top left – you’ll then get a list of all your contacts.
If you’re only calling one person then it’s easy – just click on their name.
If you want to call a private group, you need to click the + button and then create a group DM. Add the names of the users you want to call.
Once you’re in the direct message window of the person or group you want to call, you need to look at the buttons at the top right of the screen. The second icon that looks like a video camera is the one you’re looking for. Click that and you’ll start a video call.
You’ll see yourself on screen at this point, but you’ll need to wait until the other person or group members have joined the call for the chat to properly begin.
The process of making video call on Discord mobile is essentially identical. You just need to open the direct message group and click on the video call icon, which is still at the top right of your screen.
You’ll need to give permissions for the Discord mobile app to use your microphone and camera if you haven’t already.
Once you’ve finished your video call on either desktop or mobile, just hit the red button to end it and switch your camera off again.
Part 3: How to Make a Server Video Call on Discord?
If you want to make a group video call on a public server, you again need to first navigate to the server. Once you’re there, you’ll need to join the voice channel that you should see on the left side of the screen.
Once you’re in the voice channel, click Lounge, Community Hangout or Stream Room, and then switch on your camera by clicking the ‘Video’ button. You’ll find this at the bottom-left of the screen. Again, if you’re on the web browser, you’ll be asked by your browser for permission to use your camera at this stage.
And that’s it – the video call is now live and anyone who joins the voice channel will be able to see you, chat to you and switch on their camera to join the video conference as well.
On mobile, it’s slightly different. You’ll still want to head to the server you want to join and then click on the voice channel to join it. But as soon as you click on the voice channel, you’ll get a pop-up with an icon at the bottom right where you can instantly switch on your camera.
If you prefer, you can still just join as voice, and then at any stage click on your name where you’ll be able to then switch on your camera to turn a voice chat into a video call.
Whenever you want to end the video call, just click on your name again to switch off your camera, or disconnect completely from the voice channel.
FAQs About Discord Video Chat Call
1. How Many People Can Join in the Discord Group Video Call?
Normally, the limit for the number of users on a group video call in Discord is 10. However, during the Coronavirus pandemic, the team behind Discord know that it’s a valuable tool to help people stay connected. So the limit has been increased to 25 users. This may be reduced in the future once the world returns to some sense of normality.
2. How to Join a Video Call on Discord?
Joining an existing video call on Discord is a really easy process.
If it’s a private video call, you’ll get a pop-up in the chat window letting you know that a video call has been started. You have the option of declining the video call, joining it with video, or just joining with voice without your camera switched on.
If instead, it’s a public server where a video call is happening, you just need to join the voice channel by clicking on it on the left side of the screen, and then clicking on the video button next to your name, just as if you were starting the call in the first place.
Richard Bennett
Richard Bennett is a writer and a lover of all things video.
Follow @Richard Bennett
Also read:
- [New] 2024 Approved The Complete Guide Transforming Your Discord Profile with Custom Emojis
- [New] Slack Vs. Discord Selecting Teams' Ideal Chat Platform
- [New] Top Discord Tools Selecting the Best Plugins for UX Excellence for 2024
- [New] Transforming Discord Communication Best Audio Modification Plugins of 2023 for 2024
- [New] Ultimate Guide to Cool and Captivating Disco Tags for 2024
- [Updated] Top 7 Screen Recorders for Low-End PC for 2024
- 7 Fixes for Unfortunately, Phone Has Stopped on Realme GT 3 | Dr.fone
- Essential Tips for Stepping Away From a Discord Chat Room for 2024
- How to Bypass FRP on Honor 90 Lite?
- How to Fix Errors were detected while saving Excel?
- Interactive Illusions: Leveraging GPT in Crafting Immersive D&D Worlds
- Navigating GPT Spotlight: Countering Fake AI Entities
- Step-by-Step Solutions for MacBook Pro Keyboard Malfunctions
- Style Spectrum Top 10 DiscoTheme Innovations by Expert Curators
- Updated Audio Engineering Simplified Utilizing Dynamic Ducking Techniques in Final Cut Pro X for Professional Results for 2024
- Title: [New] In 2024, A Compreenas Guide to Incorporating Personalized Emojis in Discord Statuses
- Author: Timothy
- Created at : 2024-10-29 00:23:51
- Updated at : 2024-10-29 20:14:29
- Link: https://discord-videos.techidaily.com/new-in-2024-a-compreenas-guide-to-incorporating-personalized-emojis-in-discord-statuses/
- License: This work is licensed under CC BY-NC-SA 4.0.