
![[New] In 2024, Cut Through Background Noise in Discord Conversations Using VoiceMod](https://www.lifewire.com/thmb/E7SxLoAdzClArIUU0WaG58EFnS4=/400x300/filters:no_upscale():max_bytes(150000):strip_icc()/twitter2-56a5310a5f9b58b7d0db681a.jpg)
[New] In 2024, Cut Through Background Noise in Discord Conversations Using VoiceMod
Cut Through Background Noise in Discord Conversations Using VoiceMod
How To Use Voicemod On Discord

Richard Bennett
Mar 27, 2024• Proven solutions
A voice changer will allow you to prank friends, create content, and most of all, secure your presence by maintaining anonymity. With it, you can turn your voice into several unique and exciting voices to serve any purpose you deem fit.
And when it comes to voice changers, none is as easy to operate as the Voicemod in Discord. Its claim to fame is that it features numerous voice options to choose from.
With Vociemod, you have to simply run the program in the background and select your desired voice!
Read on as we discuss how to use Voicemod on Discord in detail:
In this article
Part 1: How To Use Voice Changer Voicemod For Discord On Desktop Computer
Part 2: How To Fix Voicemod Not Working Discord?
Part 3: How To Change Voice For Discord On Mobile?
Part 1: How To Use Voice Changer Voicemod For Discord On Desktop Computer
Voicemod is arguably one of the best voice changer tools available on the internet for its excellent features.
But before we jump straight into using Voicemod for Discord, you must know how to install one on your desktop Mac/PC.
Here’s how to install Voicemod
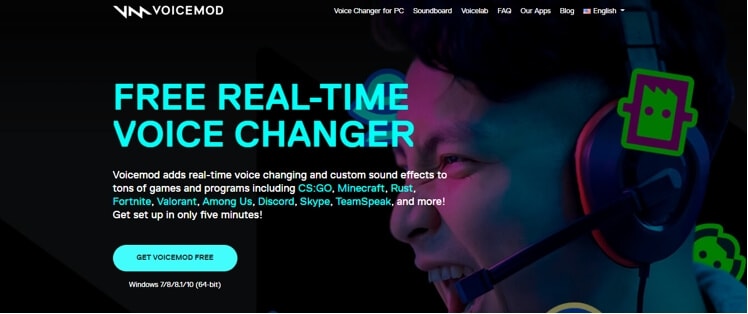
- Visit the Voicemod website to begin the download process.
- You’ll see the button “Get Voicemod Free” on the screen. Click it!
- Upon clicking, the site will ask you to sign in to your account from Discord, Twitch, to Google. Use your Discord login details to sign in.
- After you’re signed in, the “.exe” file will be downloaded to your PC/Mac’s download folder. Open the “.exe” file the moment it’s downloaded.
- An install wizard will open up. Navigate through the wizard’s installation process to install the program on your PC/Mac.
- After installation is complete, the installation wizard will ask to restart your windows’ Mac or PC.
You can skip it, but it’s best to restart it for smooth operations.
Once your Mac/PC restarts, you’ll see the Voicemod app icon on your desktop screen.
Now that you have successfully installed the voice changer Voicemod app into your desktop computer, let’s dive into knowing how to use Voicemod on Discord!
Here’s how to use voice changer on Discord
- Click the Vociemod icon on the desktop to open the app. If you can’t find it there, click the “windows icon” located at the screen’s bottom-left. Just type “Voicemod,” and the program will show up. Double click it to get it opened.
- When the app opens up, you’ll have to choose the output and input it will use. If you’re wondering, why the output? This is to give you an insight into what your voice will sound like on each filter.
Once it’s done, you can play around with different filters!
Every day, you’ll get new free filters to use; however, to unlock and access all filters, you need to upgrade to the “pro-version” of voice changer Voicemod.
On the other hand, if you only need a few filters, the “basic-version” should suffice.
Apart from that, you can unlock an additional free filter in your app by sharing it on your social media accounts.

Step 1
To set up Voicemod with Discord, open your discord account and go to the settings (gear icon) placed at the screen’s bottom-left corner.
Step 2
Click the “Voice and Video” option right under the app settings.
Step 3
To make Voicemod usable, you’ll have to change Voice settings. Within the “Input Device” option, select the option that says “Microphone Voicemod Virtual Audio.”
Step 4
After you have changed settings, you can easily change the voice within the program. Not only this, but other users can also hear your audio alteration.
Step 5
With the “basic version,” you’ll have seven free voice choices that will change each day. On the contrary, with the “pro-version,” you’ll gain access to more than 80 different voice options.
So, if you’re searching for an easy and simple voice-changing app to use, look no further than Voicemod!
Part 2: How To Fix Voicemod Not Working Discord?
Is your voice changer Voicemod not working on Discord? No worries, you can troubleshoot the issues with a few basic steps.
Here are some ways you can use to fix Voicemod not working in Discord:
Method 1: Restart Your Windows PC/Mac
Though it’s not a technical solution, restarting your desktop computer fixes incorrect settings by rebooting them and solves many problems connected with your computer system, programs, and hardware.
So, when your Voicemod suddenly ceases to work in Discord, make sure to restart your Windows PC/Mac before going any further, as it’s the first step in fixing voice issues.
If restarting doesn’t help, slide to the next step!
Method 2: Make Sure The Mic Is Properly Set
The next step is to check if the mic works correctly. This is because faulty settings may stop voice changer Voicemod from operating correctly.
Just follow the steps below to resolve it:
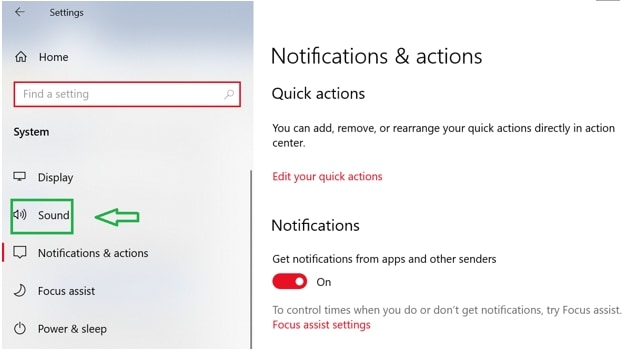
- On the keyboard, press the “Win” logo and the “I” key simultaneously to open Windows settings. Click “System.”
- On the left, you’ll see the option “Sound.” Click it.
- First, you have to test the microphone! To do so, choose the “Headset” option rather than the Voicemod microphone under the “Input” section
- Click “Device properties & test microphone”
- Make sure to uncheck the “disable” box and keep the volume section 100
- Click the “Start test” button and speak into the microphone
- After that, click “Stop test.” If the greatest value it shows is above “0”, then your microphone works correctly
Now, restart your Voicemod app to see if it’s working properly or not! If the issue still persists, jump to the next solution.
Method 3: Install Windows Updates
If you use Windows 10, it has two kinds of updates that offer performance boost and security patches. Sometimes, an update can fix a few driver and software conflicts automatically.
You can quickly solve the voice chat problem by simply updating the system settings. Here’s how to update your Windows 10:
- Open your windows setting by pressing the “Windows button” and the “I” key together.
- Click on “Update and Security”
- Click the “Check for Updates” button. If an update is found, it will install automatically on the system
Make sure to repeat this process until it says you’re up-to-date. Then, restart the PC. Check whether the Vociemod is properly working or not!
If not, try our next option!
Method 4:Re-Install Voice Changer Voicemod Drivers
In many instances, the issue signifies that you’re using outdated or faulty drivers. To troubleshoot this, simply re-install your Voicemod driver, and you’ll be good to go!
First, uninstall your Voicemod driver from the windows PC/Mac. Here’s how to do it:
- On the keyboard, press the “Windows button” as well as the “I” key to bring up the “Run box”
- Paste or type “devmgmt.msc” and click “OK.” This will open the “Device Manager”
- Click the “expand” option of “Audio Inputs & Outputs.”
- Click the “Microphone WMD” and choose the “Uninstall device” option
- A pop-up window will appear. Click the “Uninstall” button
- Restart the PC
Install the voice changer Voicemod again, whether automatically or manually, and see if it works!
Part 3: How To Change Voice For Discord On Mobile?
“Voicemod clips” is the version for both Apple and Android devices. The app will help you make high-quality content using its wide selection of one-of-a-kind effects, which will change your voice so much that you won’t recognize yourself!
In addition to that, you can add filters, which are connected to your cell phone’s camera to create funny, interesting videos.
Additionally, you’ll have the option to choose from 10 different voices. Plus, you can also make unlimited videos and audio from the humorous to the terrifying.
Some of the Voicemod voices on mobile include male-to-female, different robot effects, famous celebrities, scary voices, and much more. In short, everything is based on how you would like to modify your voice!
Not just that, you can also cross-share creative videos and audio to popular social networking platforms such as Facebook, Twitter, Instagram, TikTok, and Snapchat using your smartphone.
Curious to know how to change your voice for Discord on mobile? Here are step-by-step instructions:
- Make sure the Voicemod app is downloaded on your Apple or Android device and appropriately configured
- Open Discord
- Tap the “cogwheel icon” near your name and avatar
- You’ll see the “settings” page
- Within it, tap the “Voice & Video” option
- Tap Voicemod under the “Input Device” option and the headset under the “Output Device” option and tap escape. You’ll have access to numerous exciting sounds
Richard Bennett
Richard Bennett is a writer and a lover of all things video.
Follow @Richard Bennett
Richard Bennett
Mar 27, 2024• Proven solutions
A voice changer will allow you to prank friends, create content, and most of all, secure your presence by maintaining anonymity. With it, you can turn your voice into several unique and exciting voices to serve any purpose you deem fit.
And when it comes to voice changers, none is as easy to operate as the Voicemod in Discord. Its claim to fame is that it features numerous voice options to choose from.
With Vociemod, you have to simply run the program in the background and select your desired voice!
Read on as we discuss how to use Voicemod on Discord in detail:
In this article
Part 1: How To Use Voice Changer Voicemod For Discord On Desktop Computer
Part 2: How To Fix Voicemod Not Working Discord?
Part 3: How To Change Voice For Discord On Mobile?
Part 1: How To Use Voice Changer Voicemod For Discord On Desktop Computer
Voicemod is arguably one of the best voice changer tools available on the internet for its excellent features.
But before we jump straight into using Voicemod for Discord, you must know how to install one on your desktop Mac/PC.
Here’s how to install Voicemod
- Visit the Voicemod website to begin the download process.
- You’ll see the button “Get Voicemod Free” on the screen. Click it!
- Upon clicking, the site will ask you to sign in to your account from Discord, Twitch, to Google. Use your Discord login details to sign in.
- After you’re signed in, the “.exe” file will be downloaded to your PC/Mac’s download folder. Open the “.exe” file the moment it’s downloaded.
- An install wizard will open up. Navigate through the wizard’s installation process to install the program on your PC/Mac.
- After installation is complete, the installation wizard will ask to restart your windows’ Mac or PC.
You can skip it, but it’s best to restart it for smooth operations.
Once your Mac/PC restarts, you’ll see the Voicemod app icon on your desktop screen.
Now that you have successfully installed the voice changer Voicemod app into your desktop computer, let’s dive into knowing how to use Voicemod on Discord!
Here’s how to use voice changer on Discord
- Click the Vociemod icon on the desktop to open the app. If you can’t find it there, click the “windows icon” located at the screen’s bottom-left. Just type “Voicemod,” and the program will show up. Double click it to get it opened.
- When the app opens up, you’ll have to choose the output and input it will use. If you’re wondering, why the output? This is to give you an insight into what your voice will sound like on each filter.
Once it’s done, you can play around with different filters!
Every day, you’ll get new free filters to use; however, to unlock and access all filters, you need to upgrade to the “pro-version” of voice changer Voicemod.
On the other hand, if you only need a few filters, the “basic-version” should suffice.
Apart from that, you can unlock an additional free filter in your app by sharing it on your social media accounts.
Step 1
To set up Voicemod with Discord, open your discord account and go to the settings (gear icon) placed at the screen’s bottom-left corner.
Step 2
Click the “Voice and Video” option right under the app settings.
Step 3
To make Voicemod usable, you’ll have to change Voice settings. Within the “Input Device” option, select the option that says “Microphone Voicemod Virtual Audio.”
Step 4
After you have changed settings, you can easily change the voice within the program. Not only this, but other users can also hear your audio alteration.
Step 5
With the “basic version,” you’ll have seven free voice choices that will change each day. On the contrary, with the “pro-version,” you’ll gain access to more than 80 different voice options.
So, if you’re searching for an easy and simple voice-changing app to use, look no further than Voicemod!
Part 2: How To Fix Voicemod Not Working Discord?
Is your voice changer Voicemod not working on Discord? No worries, you can troubleshoot the issues with a few basic steps.
Here are some ways you can use to fix Voicemod not working in Discord:
Method 1: Restart Your Windows PC/Mac
Though it’s not a technical solution, restarting your desktop computer fixes incorrect settings by rebooting them and solves many problems connected with your computer system, programs, and hardware.
So, when your Voicemod suddenly ceases to work in Discord, make sure to restart your Windows PC/Mac before going any further, as it’s the first step in fixing voice issues.
If restarting doesn’t help, slide to the next step!
Method 2: Make Sure The Mic Is Properly Set
The next step is to check if the mic works correctly. This is because faulty settings may stop voice changer Voicemod from operating correctly.
Just follow the steps below to resolve it:
- On the keyboard, press the “Win” logo and the “I” key simultaneously to open Windows settings. Click “System.”
- On the left, you’ll see the option “Sound.” Click it.
- First, you have to test the microphone! To do so, choose the “Headset” option rather than the Voicemod microphone under the “Input” section
- Click “Device properties & test microphone”
- Make sure to uncheck the “disable” box and keep the volume section 100
- Click the “Start test” button and speak into the microphone
- After that, click “Stop test.” If the greatest value it shows is above “0”, then your microphone works correctly
Now, restart your Voicemod app to see if it’s working properly or not! If the issue still persists, jump to the next solution.
Method 3: Install Windows Updates
If you use Windows 10, it has two kinds of updates that offer performance boost and security patches. Sometimes, an update can fix a few driver and software conflicts automatically.
You can quickly solve the voice chat problem by simply updating the system settings. Here’s how to update your Windows 10:
- Open your windows setting by pressing the “Windows button” and the “I” key together.
- Click on “Update and Security”
- Click the “Check for Updates” button. If an update is found, it will install automatically on the system
Make sure to repeat this process until it says you’re up-to-date. Then, restart the PC. Check whether the Vociemod is properly working or not!
If not, try our next option!
Method 4:Re-Install Voice Changer Voicemod Drivers
In many instances, the issue signifies that you’re using outdated or faulty drivers. To troubleshoot this, simply re-install your Voicemod driver, and you’ll be good to go!
First, uninstall your Voicemod driver from the windows PC/Mac. Here’s how to do it:
- On the keyboard, press the “Windows button” as well as the “I” key to bring up the “Run box”
- Paste or type “devmgmt.msc” and click “OK.” This will open the “Device Manager”
- Click the “expand” option of “Audio Inputs & Outputs.”
- Click the “Microphone WMD” and choose the “Uninstall device” option
- A pop-up window will appear. Click the “Uninstall” button
- Restart the PC
Install the voice changer Voicemod again, whether automatically or manually, and see if it works!
Part 3: How To Change Voice For Discord On Mobile?
“Voicemod clips” is the version for both Apple and Android devices. The app will help you make high-quality content using its wide selection of one-of-a-kind effects, which will change your voice so much that you won’t recognize yourself!
In addition to that, you can add filters, which are connected to your cell phone’s camera to create funny, interesting videos.
Additionally, you’ll have the option to choose from 10 different voices. Plus, you can also make unlimited videos and audio from the humorous to the terrifying.
Some of the Voicemod voices on mobile include male-to-female, different robot effects, famous celebrities, scary voices, and much more. In short, everything is based on how you would like to modify your voice!
Not just that, you can also cross-share creative videos and audio to popular social networking platforms such as Facebook, Twitter, Instagram, TikTok, and Snapchat using your smartphone.
Curious to know how to change your voice for Discord on mobile? Here are step-by-step instructions:
- Make sure the Voicemod app is downloaded on your Apple or Android device and appropriately configured
- Open Discord
- Tap the “cogwheel icon” near your name and avatar
- You’ll see the “settings” page
- Within it, tap the “Voice & Video” option
- Tap Voicemod under the “Input Device” option and the headset under the “Output Device” option and tap escape. You’ll have access to numerous exciting sounds
Richard Bennett
Richard Bennett is a writer and a lover of all things video.
Follow @Richard Bennett
Quick Guide: Applying Discord Spoiler Tags Right
Discord Spoiler Tag: All You Need to Know
Richard Bennett
Mar 27, 2024• Proven solutions
With Discord, you can text with emojis and even send GIFs. However, as servers become crowded, they get bombarded with texts. And some of these texts have spoilers for games (or other stuff) that others may not want to know or read. But ignoring spoilers was not that easy. As you scroll miles and miles of texts, your eyes are bound to catch some hints and ruin the suspense for you.
Thankfully, Discord came out with the perfect solution. Now, if you are sharing some spoilers or secrets, you can mark them as spoilers. The result is a text that is sent but is blacked out. Curious users who are not scared of spoilers can view it. Others can enjoy their bliss of ignorance.
In this article
- Part 1: How to Use Spoilers on Discord to Hide Text Messages?
- Part 2: How to Add Spoiler to Image and Video on Discord?
- Bonus: Is it the same to use Spoiler on Mobile devices?
- Bonus: How to turn off the Spoiler tag?
Part 1: How to Use Spoilers on Discord to Hide Text Messages?
And now we come to the point - how to do spoilers on Discord? Well, there are two ways to do it. You can run through both of them and choose whichever suits you the best. All the methods are simple to follow. Note that some are available only on the desktop.
Method 1: Adding Spoiler Text Via Tag on Discord
We will begin with the tag method. All you have to do is add the spoiler tag on Discord. Here is a quick rundown of the steps –
- Open the Discord app and log in using your credentials.
- Pick a server from your server list or a friend from the friend list.
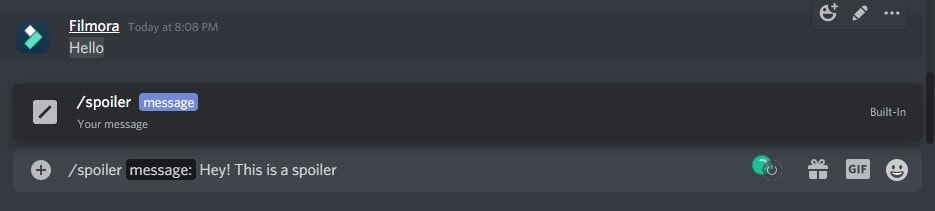
- Type whatever you want to in the chatbox.
- Now add the ‘||’ symbols before and after the spoiler content. For instance, it will look something like this – Hey! This is a spoiler ||spoiler alert||
- Hit the enter key to send and your spoiler is sent without spoiling anything!

This works for the Discord desktop app, browser, and also mobile app. This is like a universal method of hiding spoilers.
You can also add ‘/spoiler’ before the spoiler content. This is an alternative to the ‘||’ we add at the start and the end.
Method 2: Sending Spoiler Message with Mark as Spoiler icon
This alternate method is quite simple. This was a recent update on Discord that enables you to add the spoiler tag quickly. Here is a brief rundown for you –
- Type out the spoiler content in the chatbox.
- Select the spoiler part of the text (highlight it).
- Upon selection, a floating bar will appear. Click the ‘eye’ symbol. and then the ‘||’ mark will immediately accompany the selected text, and the selected message will be spoiled automatically.
- After you hit the send button, the text will be sent to the server. Only the people who wish to see the spoiler will tap on it unveil it.
![]()
This method is available only on the Discord desktop app and browser version. For iOS, the steps are similar. The only difference is that you have to select the spoiler mark from the context menu.
Part 2: How to Add Spoiler to Image and Video on Discord?
There are many scenarios where a Discord spoiler can come in handy. As you might be aware that Discord is quite popular and its cross-platform flexibility make it a favorite among gamers. You can connect to your friends over multiple devices with a single account.
Just like texts, even images, videos, and other attachments can be marked as spoilers. The process of marking images and videos as spoilers differs slightly from that of texts. So, how to add spoiler tags to other files? Here’s the rundown.
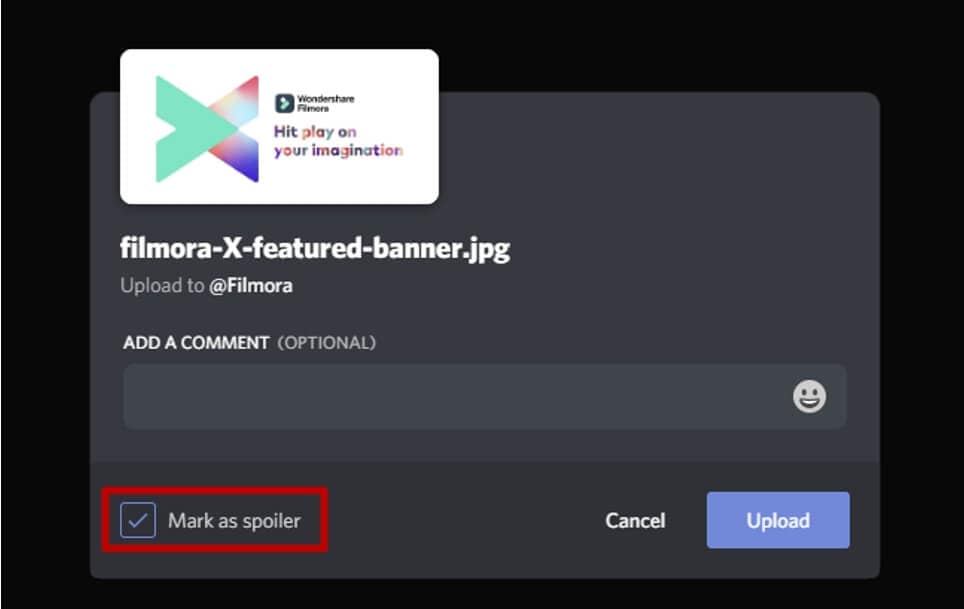
Images can be tagged as spoilers before you upload them on servers. To add spoiler tags to images –
- Open Discord on your desktop app or browser.
- Select the image or video that you want to send on the server.
- Drag it to your server chat and drop it there.
- Next, tap on the ‘+’ symbol.
- From the options that appear, choose ‘Mark as Spoiler.’
- Hit the Upload button.
- The result is a blurred image sent on the server. Anyone who wishes to view the image can tap on it.
Note that spoilers that contain images, videos, or other multimedia files can be sent only on the desktop app or the browser. Mobile apps do not support spoiler marks for images or other media files.
Bonus: Is it the same to use Spoiler on Mobile devices?
The Discord mobile spoiler tag works the same on mobile apps. The process is more or less the same. Here is a quick rundown of the steps –
- Type out the spoiler text.
- Add ‘||’ symbols at the start and end of the text you want to hide.
- Hit the send button, and your spoiler text will be covered.
- Only the curious ones can tap and see your spoiler texts.
You can even mark embedded links as spoilers with the same process. But this does not apply to Discord server links. Furthermore, you cannot add spoiler tags to images, videos, and other files from the mobile app.
For iOS, you can select and highlight the text that you want to hide. Then, tap open the context menu and click on the ‘Mark as Spoiler’ to hide the text.
Bonus: How to turn off the Spoiler tag?
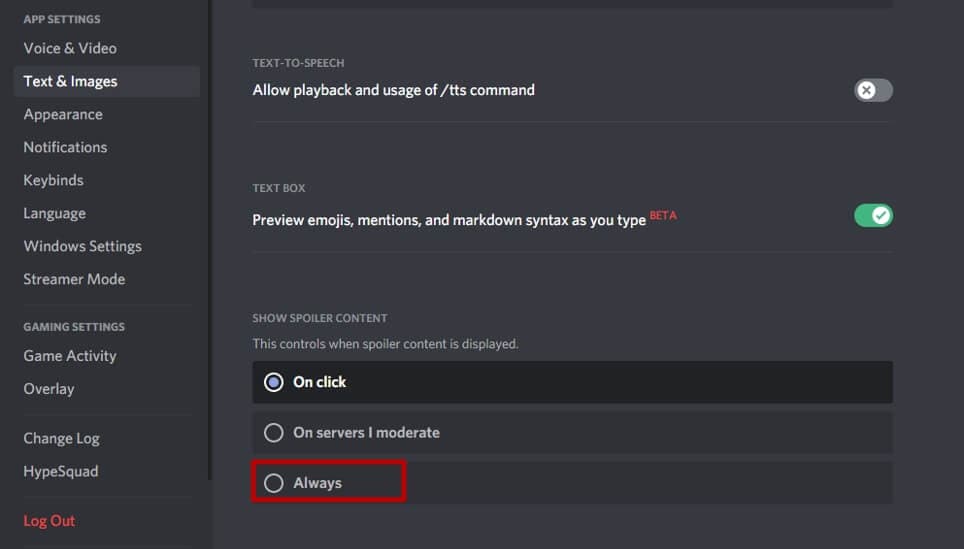
For some reason, you may want to remove the spoiler tag from the spoiler texts. In that case, open the User Settings and tap on Text & Images. Scroll down to the Show Spoiler Content tab and you will see options to control when spoiler content is displayed. You can choose to display on click, on servers I moderate, and always.
If you want to display all spoiler content, choose Always to turn off the spoiler tag. You can hide them again through the same menu if you change your mind.
This was an article on how to use the Discord spoiler tag to hide texts, images, and videos. You can undo and redo the tags as many times as you like. If you are about to unveil some life-changing secret on your Discord server, then don’t forget to add that spoiler tag.
Richard Bennett
Richard Bennett is a writer and a lover of all things video.
Follow @Richard Bennett
Richard Bennett
Mar 27, 2024• Proven solutions
With Discord, you can text with emojis and even send GIFs. However, as servers become crowded, they get bombarded with texts. And some of these texts have spoilers for games (or other stuff) that others may not want to know or read. But ignoring spoilers was not that easy. As you scroll miles and miles of texts, your eyes are bound to catch some hints and ruin the suspense for you.
Thankfully, Discord came out with the perfect solution. Now, if you are sharing some spoilers or secrets, you can mark them as spoilers. The result is a text that is sent but is blacked out. Curious users who are not scared of spoilers can view it. Others can enjoy their bliss of ignorance.
In this article
- Part 1: How to Use Spoilers on Discord to Hide Text Messages?
- Part 2: How to Add Spoiler to Image and Video on Discord?
- Bonus: Is it the same to use Spoiler on Mobile devices?
- Bonus: How to turn off the Spoiler tag?
Part 1: How to Use Spoilers on Discord to Hide Text Messages?
And now we come to the point - how to do spoilers on Discord? Well, there are two ways to do it. You can run through both of them and choose whichever suits you the best. All the methods are simple to follow. Note that some are available only on the desktop.
Method 1: Adding Spoiler Text Via Tag on Discord
We will begin with the tag method. All you have to do is add the spoiler tag on Discord. Here is a quick rundown of the steps –
- Open the Discord app and log in using your credentials.
- Pick a server from your server list or a friend from the friend list.
- Type whatever you want to in the chatbox.
- Now add the ‘||’ symbols before and after the spoiler content. For instance, it will look something like this – Hey! This is a spoiler ||spoiler alert||
- Hit the enter key to send and your spoiler is sent without spoiling anything!
This works for the Discord desktop app, browser, and also mobile app. This is like a universal method of hiding spoilers.
You can also add ‘/spoiler’ before the spoiler content. This is an alternative to the ‘||’ we add at the start and the end.
Method 2: Sending Spoiler Message with Mark as Spoiler icon
This alternate method is quite simple. This was a recent update on Discord that enables you to add the spoiler tag quickly. Here is a brief rundown for you –
- Type out the spoiler content in the chatbox.
- Select the spoiler part of the text (highlight it).
- Upon selection, a floating bar will appear. Click the ‘eye’ symbol. and then the ‘||’ mark will immediately accompany the selected text, and the selected message will be spoiled automatically.
- After you hit the send button, the text will be sent to the server. Only the people who wish to see the spoiler will tap on it unveil it.
![]()
This method is available only on the Discord desktop app and browser version. For iOS, the steps are similar. The only difference is that you have to select the spoiler mark from the context menu.
Part 2: How to Add Spoiler to Image and Video on Discord?
There are many scenarios where a Discord spoiler can come in handy. As you might be aware that Discord is quite popular and its cross-platform flexibility make it a favorite among gamers. You can connect to your friends over multiple devices with a single account.
Just like texts, even images, videos, and other attachments can be marked as spoilers. The process of marking images and videos as spoilers differs slightly from that of texts. So, how to add spoiler tags to other files? Here’s the rundown.
Images can be tagged as spoilers before you upload them on servers. To add spoiler tags to images –
- Open Discord on your desktop app or browser.
- Select the image or video that you want to send on the server.
- Drag it to your server chat and drop it there.
- Next, tap on the ‘+’ symbol.
- From the options that appear, choose ‘Mark as Spoiler.’
- Hit the Upload button.
- The result is a blurred image sent on the server. Anyone who wishes to view the image can tap on it.
Note that spoilers that contain images, videos, or other multimedia files can be sent only on the desktop app or the browser. Mobile apps do not support spoiler marks for images or other media files.
Bonus: Is it the same to use Spoiler on Mobile devices?
The Discord mobile spoiler tag works the same on mobile apps. The process is more or less the same. Here is a quick rundown of the steps –
- Type out the spoiler text.
- Add ‘||’ symbols at the start and end of the text you want to hide.
- Hit the send button, and your spoiler text will be covered.
- Only the curious ones can tap and see your spoiler texts.
You can even mark embedded links as spoilers with the same process. But this does not apply to Discord server links. Furthermore, you cannot add spoiler tags to images, videos, and other files from the mobile app.
For iOS, you can select and highlight the text that you want to hide. Then, tap open the context menu and click on the ‘Mark as Spoiler’ to hide the text.
Bonus: How to turn off the Spoiler tag?
For some reason, you may want to remove the spoiler tag from the spoiler texts. In that case, open the User Settings and tap on Text & Images. Scroll down to the Show Spoiler Content tab and you will see options to control when spoiler content is displayed. You can choose to display on click, on servers I moderate, and always.
If you want to display all spoiler content, choose Always to turn off the spoiler tag. You can hide them again through the same menu if you change your mind.
This was an article on how to use the Discord spoiler tag to hide texts, images, and videos. You can undo and redo the tags as many times as you like. If you are about to unveil some life-changing secret on your Discord server, then don’t forget to add that spoiler tag.
Richard Bennett
Richard Bennett is a writer and a lover of all things video.
Follow @Richard Bennett
Also read:
- [New] Supreme Bot Team in Digital Realms for 2024
- How to Delete Discord Account [Step-by-Step] for 2024
- [Updated] Master Emoji Artistry with These Tools on Discord for 2024
- [Updated] Uncovering the Depths of Discord
- [Updated] 2024 Approved An In-Depth Exploration of Discord Features
- [New] Best Techniques for Saving Your Discord Sessions
- In 2024, Navigating Discord A Must-Know Guide
- [Updated] Premiere Screenshot & Recording Tools for Discord Gamers for 2024
- [Updated] Command Your Chats with Flair Pinning Made Simple in Discord
- [New] In 2024, Mastering Discord A Guide to Filing Reports Against Misconduct
- [New] Sending Streamed Content to Discord with Finesse and Precision for 2024
- Slack Vs. Discord Which Is Better for Your Team for 2024
- [Updated] In 2024, Mastering Response Etiquette Discord Messaging Guide
- [New] 10 Best Free Software to Record Discord Audio for 2024
- Filing a Complaint with Finesse A Discord User's Guide to Reporting
- 2024 Approved The Prime List of Budget-Friendly Discord Voice Recording Tools
- The Ultimate Guide to Integrating Emojis with Discord Statuses
- [New] In 2024, Excellence Unveiled Discord's Finest Emoji Designers and Software
- [Updated] Conduct a Chat Symphony with Discord TTS Capabilities for 2024
- [Updated] In 2024, Boosting Discord's Potential with the Leading 10 Plugins
- [New] How to Delete Discord Account [Step-by-Step] for 2024
- [Updated] 2024 Approved Choosing Between Slack & Discord for Enhanced Team Collaboration
- [New] Professional Font Creation Solutions for Discord Enthusiasts for 2024
- Revolutionize Your Discord Experience with These Must-Have Audio Modifiers for 2024
- [Updated] The Best Social Media Symbols Dynamic Designs for 2024
- [Updated] Unbeatable Value Free Professional Disco Emblem Artist for 2024
- [Updated] 2024 Approved Expert Discord Video Capturing Software (Android/iOS)
- Elevating Your Podcast Remote Recording Done Right
- In 2024, How to Mirror PC to Apple iPhone 11 Pro? | Dr.fone
- How To Change Your SIM PIN Code on Your Samsung Galaxy M14 4G Phone
- [New] 2024 Approved Elevate Your Social Presence Proven Methods for FB Fan Expansion
- Unleash Creativity Best Animation Software for Students and Teachers for 2024
- Easy Guide How To Bypass Infinix GT 10 Pro FRP Android 10/11/12/13
- [New] How to Enrich Social Media Content with Auto-Generated Speech
- [New] 2024 Approved 30 Innovative Ideas to Supercharge Your FB Promotions
- Updated 2024 Approved Behind the Screens The Leading BGM Audio Selections
- How to Recover Data from Broken iPhone X Screen | Stellar
- Navigating the Journey FB Videos & WhatsApp Conversion
- Edit Like a Pro Top 6 Windows Movie Editing Software
- How to turn off the screen lock on my Lava
- In 2024, The Ultimate Playbook of IGTV Mastery Top 10 Branding Techniques
- Title: [New] In 2024, Cut Through Background Noise in Discord Conversations Using VoiceMod
- Author: Timothy
- Created at : 2024-05-23 22:48:04
- Updated at : 2024-05-24 22:48:04
- Link: https://discord-videos.techidaily.com/new-in-2024-cut-through-background-noise-in-discord-conversations-using-voicemod/
- License: This work is licensed under CC BY-NC-SA 4.0.
