
!["[New] In 2024, How to Use Discord Text-To-Speech?"](https://www.lifewire.com/thmb/opH7upWSEou2mQx87JL3gnVYbO0=/400x300/filters:no_upscale():max_bytes(150000):strip_icc()/slingtv-5a0a0a55845b34003bd44484.jpg)
"[New] In 2024, How to Use Discord Text-To-Speech?"
Bringing Voice to Discord Chats: The TTS Journey
How to Use Discord Text-To-Speech?

Richard Bennett
Mar 27, 2024• Proven solutions
While most users of the popular online messaging and content sharing site Discord rely on simple text to communicate, there are numerous situations when using the text-to-speech feature would be quite advantageous. This includes instances when there are language barriers or disabilities to overcome, but also spontaneous moments when users just enjoy hearing each other’s words. Discord supports the use of a text-to-speech (TTS) function and in fact, has a built-in setting for it, but this option only works for desktop users with Windows or Mac devices.
In this article, we will discuss the specifics of activating the TTS function in Discord and using it effectively to improve your communication with other users. By following the detailed instructions provided here, you will be able to learn how to activate text-to-speech on Discord and manage your voice messages on selected servers in the most practical manner.
- Part 1: Enable Text-To-Speech Feature in Discord
- Part 2: How to Set Up Text-To-Speech Notifications on Discord?
- Part 3: How to Use Text-To-Speech in Discord Chatting?
- Part 4: How to Mute All Text-To-Speech Messages on Discord?
- Part 5: Best Text-To-Speech Bots on Discord
Part 1: How to Enable Text-To-Speech Feature in Discord?
Before you can deploy TTS in your chats, you need to change the settings of your profile to enable this option. This isn’t hard to do – just go to the Discord app and select ‘Settings’ from the menu, which will trigger a pop-up window to appear on your screen. Next, you need to find the Text & Images section in the App Settings window, then scroll down to find the Text-to-Speech option, and finally tick the boxes next to Allow playback and Usage of TTS items. After you do this, your Discord will be ready to process your text messages in voice format.
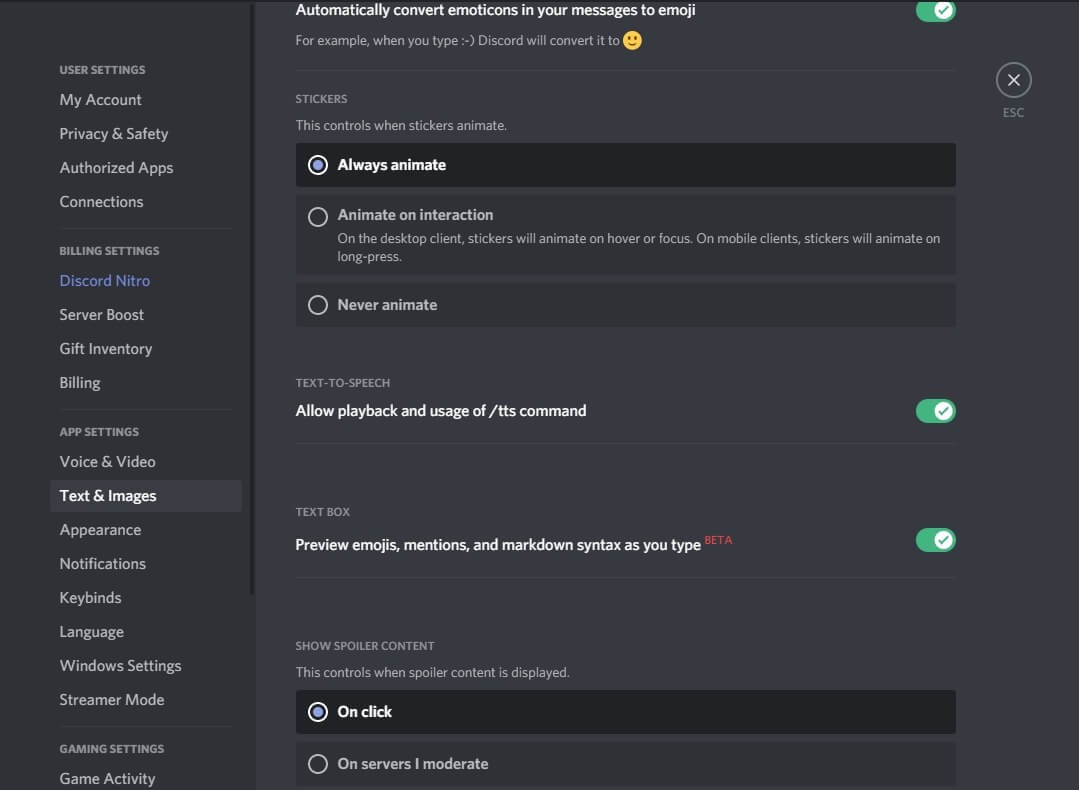
To test whether you successfully activated Text-to-Speech, open any chats on your personal server and try typing out a message, followed immediately by the tag /tts. If everything is working correctly, your message should appear on the screen in the text form, accompanied by its voice rendering delivered by an automated module. The timing of the two should be perfectly synchronized so that you hear the message and see the text at exactly the same instance. Otherwise, go back to settings and make sure you activated the TTS option properly or restart your Discord app.
Part 2: How to Set Up Text-To-Speech Notifications on Discord?
Another practical possibility that can improve your Discord experience is to set up TTS notifications and be immediately informed whenever a fresh message arrives. This can also be done after you change the app parameters from the ‘Settings’ menu. After you see all options, choose ‘App Settings’ and search for the section named ‘Notifications’. By scrolling down, you will reach the item ‘Text-to-Speech notifications’ and after clicking on it you will be given a choice between three options.
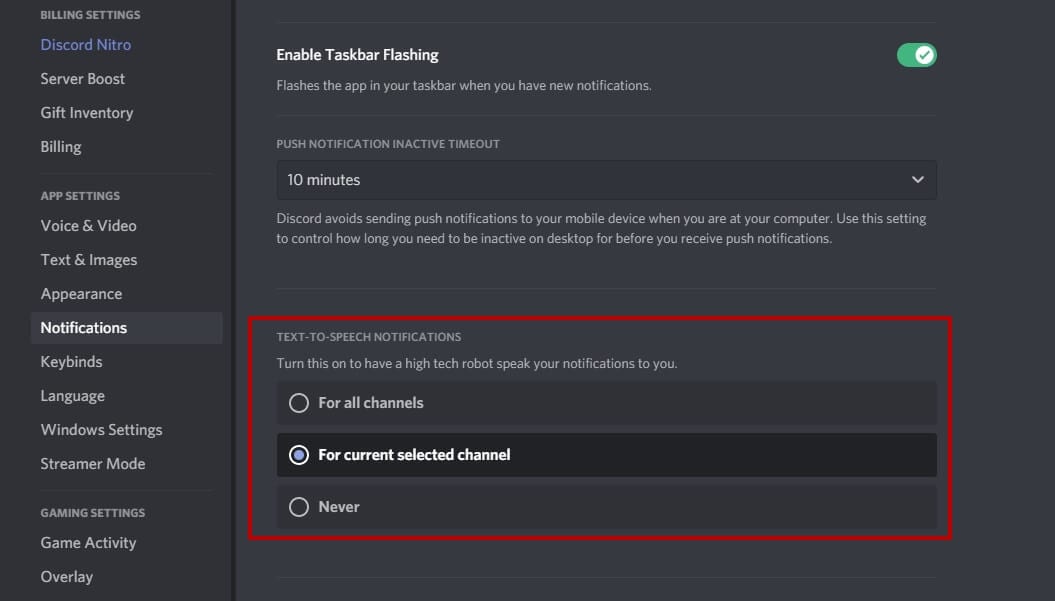
The first option For all channels is to enable notifications on all channels on Discord; choosing it will result in a robotic voice reading all messages from all chats, regardless of whether they have a /tts tag. This option can be useful when you want to maximize your accessibility and receive important information instantly.
By picking the second option, For current selected channel, you can enable TTS notifications only on the current channel. This action will instruct Discord to have an automated voice read all the incoming messages on the active chat aloud, allowing you to stay in the loop at all times. This possibility works well for people who occasionally do multiple things at once, for example, gamers or streamers who use Discord to stay connected with their fans and friends while they are busy.
Finally, you can choose Never to hear any voice messages from your Discord chats never. If you pick this setting, even those messages that were sent with the /tts tag will only be displayed in the text format. This option provides you with peace of mind and prevents spammers from saturating you with voice messages you have no interest in hearing.
Part 3: How to Use Text-To-Speech in Discord Chatting?
It’s not very hard to learn how to effectively use the TTS option in your chats on the Discord platform. This communication format is available on all channels that have an activated Text-to-Speech setting, so you can freely add a few messages to be read aloud or completely switch to automated voice format if you so desire. Doing this in practice is very simple – just start your message by typing the tag /tts and then enter your text as you normally would.

Your TTS message will be reproduced in a voice format by a Discord bot to all participants in the chat who didn’t mute incoming Text-to-Speech chats. An automated voice will say the entire message, and then also pronounce your username to identify the author. At the same time, the message will appear in the chat feed as plain text, so that even those recipients unable to hear it will be able to see the contents.
Part 4: How to Mute All Text-To-Speech Messages on Discord?
You can also decide to prevent any messages from being played to you in a voice format and receive them as text only. This option is available even if you are not the administrator of the chat server and simply want to customize your own experience. To do this, you need to open the Discord app and enter the Settings menu, before selecting the Text & Images section from App Settings. After this, you need to find the Text-to-Speech sub-menu and open it to find the Allow Playback feature. If you disable this feature, you will effectively mute all incoming TTS messages across all Discord servers you are active on.
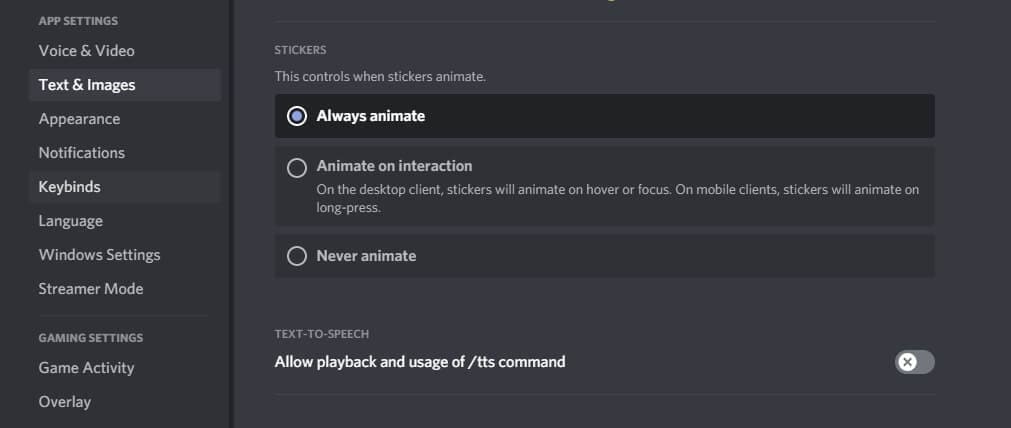
Please keep in mind that deactivating the aforementioned feature won’t block TTS messages from reaching you, but you will see them as text only. On the other hand, you can’t use the /tts tag to send your own Text-to-Speech while the playback setting is disabled. Nothing is preventing you from turning it back on when you want to have a TTS capacity on Discord again.
Part 5: Best Text-To-Speech Bots on Discord
One of the reasons why Discord is so popular is that it allows extensive customization through user-made Bots or modules that automatically perform a certain task. There are several great Bots that can be used for Text-to-Speech, so you might consider utilizing one of them.
1. Text to Speech (TTS)
With many languages supported and a wide range of cool commands, this bot could be the best choice for people who use TTS just for fun.
2. KD Bot
A very popular option for Text-to-Speech on Discord that lets you choose from more than 100 voices and supports upwards of 100 languages, making it a powerful translation tool.
3. Fergun
This multi-language tool responds to more than 100 different commands, so it can be used for a wide variety of purposes with stunning effectiveness.
Frequently asked questions about TTS on Discord
- Can I use the Text-to-Speech feature on Discord from a mobile phone?
Unfortunately, you can’t. Discord works quite well as a text messaging app on mobile platforms, but at this time Text-to-Speech functionality is limited to desktop users.
- Why can’t I use Text-to-Speech on a Discord server?
If you are unable to send or receive TTS messages on Discord, you need to change your settings. Please see Part 1 of this article for detailed instructions.
Richard Bennett
Richard Bennett is a writer and a lover of all things video.
Follow @Richard Bennett
Richard Bennett
Mar 27, 2024• Proven solutions
While most users of the popular online messaging and content sharing site Discord rely on simple text to communicate, there are numerous situations when using the text-to-speech feature would be quite advantageous. This includes instances when there are language barriers or disabilities to overcome, but also spontaneous moments when users just enjoy hearing each other’s words. Discord supports the use of a text-to-speech (TTS) function and in fact, has a built-in setting for it, but this option only works for desktop users with Windows or Mac devices.
In this article, we will discuss the specifics of activating the TTS function in Discord and using it effectively to improve your communication with other users. By following the detailed instructions provided here, you will be able to learn how to activate text-to-speech on Discord and manage your voice messages on selected servers in the most practical manner.
- Part 1: Enable Text-To-Speech Feature in Discord
- Part 2: How to Set Up Text-To-Speech Notifications on Discord?
- Part 3: How to Use Text-To-Speech in Discord Chatting?
- Part 4: How to Mute All Text-To-Speech Messages on Discord?
- Part 5: Best Text-To-Speech Bots on Discord
Part 1: How to Enable Text-To-Speech Feature in Discord?
Before you can deploy TTS in your chats, you need to change the settings of your profile to enable this option. This isn’t hard to do – just go to the Discord app and select ‘Settings’ from the menu, which will trigger a pop-up window to appear on your screen. Next, you need to find the Text & Images section in the App Settings window, then scroll down to find the Text-to-Speech option, and finally tick the boxes next to Allow playback and Usage of TTS items. After you do this, your Discord will be ready to process your text messages in voice format.
To test whether you successfully activated Text-to-Speech, open any chats on your personal server and try typing out a message, followed immediately by the tag /tts. If everything is working correctly, your message should appear on the screen in the text form, accompanied by its voice rendering delivered by an automated module. The timing of the two should be perfectly synchronized so that you hear the message and see the text at exactly the same instance. Otherwise, go back to settings and make sure you activated the TTS option properly or restart your Discord app.
Part 2: How to Set Up Text-To-Speech Notifications on Discord?
Another practical possibility that can improve your Discord experience is to set up TTS notifications and be immediately informed whenever a fresh message arrives. This can also be done after you change the app parameters from the ‘Settings’ menu. After you see all options, choose ‘App Settings’ and search for the section named ‘Notifications’. By scrolling down, you will reach the item ‘Text-to-Speech notifications’ and after clicking on it you will be given a choice between three options.
The first option For all channels is to enable notifications on all channels on Discord; choosing it will result in a robotic voice reading all messages from all chats, regardless of whether they have a /tts tag. This option can be useful when you want to maximize your accessibility and receive important information instantly.
By picking the second option, For current selected channel, you can enable TTS notifications only on the current channel. This action will instruct Discord to have an automated voice read all the incoming messages on the active chat aloud, allowing you to stay in the loop at all times. This possibility works well for people who occasionally do multiple things at once, for example, gamers or streamers who use Discord to stay connected with their fans and friends while they are busy.
Finally, you can choose Never to hear any voice messages from your Discord chats never. If you pick this setting, even those messages that were sent with the /tts tag will only be displayed in the text format. This option provides you with peace of mind and prevents spammers from saturating you with voice messages you have no interest in hearing.
Part 3: How to Use Text-To-Speech in Discord Chatting?
It’s not very hard to learn how to effectively use the TTS option in your chats on the Discord platform. This communication format is available on all channels that have an activated Text-to-Speech setting, so you can freely add a few messages to be read aloud or completely switch to automated voice format if you so desire. Doing this in practice is very simple – just start your message by typing the tag /tts and then enter your text as you normally would.
Your TTS message will be reproduced in a voice format by a Discord bot to all participants in the chat who didn’t mute incoming Text-to-Speech chats. An automated voice will say the entire message, and then also pronounce your username to identify the author. At the same time, the message will appear in the chat feed as plain text, so that even those recipients unable to hear it will be able to see the contents.
Part 4: How to Mute All Text-To-Speech Messages on Discord?
You can also decide to prevent any messages from being played to you in a voice format and receive them as text only. This option is available even if you are not the administrator of the chat server and simply want to customize your own experience. To do this, you need to open the Discord app and enter the Settings menu, before selecting the Text & Images section from App Settings. After this, you need to find the Text-to-Speech sub-menu and open it to find the Allow Playback feature. If you disable this feature, you will effectively mute all incoming TTS messages across all Discord servers you are active on.
Please keep in mind that deactivating the aforementioned feature won’t block TTS messages from reaching you, but you will see them as text only. On the other hand, you can’t use the /tts tag to send your own Text-to-Speech while the playback setting is disabled. Nothing is preventing you from turning it back on when you want to have a TTS capacity on Discord again.
Part 5: Best Text-To-Speech Bots on Discord
One of the reasons why Discord is so popular is that it allows extensive customization through user-made Bots or modules that automatically perform a certain task. There are several great Bots that can be used for Text-to-Speech, so you might consider utilizing one of them.
1. Text to Speech (TTS)
With many languages supported and a wide range of cool commands, this bot could be the best choice for people who use TTS just for fun.
2. KD Bot
A very popular option for Text-to-Speech on Discord that lets you choose from more than 100 voices and supports upwards of 100 languages, making it a powerful translation tool.
3. Fergun
This multi-language tool responds to more than 100 different commands, so it can be used for a wide variety of purposes with stunning effectiveness.
Frequently asked questions about TTS on Discord
- Can I use the Text-to-Speech feature on Discord from a mobile phone?
Unfortunately, you can’t. Discord works quite well as a text messaging app on mobile platforms, but at this time Text-to-Speech functionality is limited to desktop users.
- Why can’t I use Text-to-Speech on a Discord server?
If you are unable to send or receive TTS messages on Discord, you need to change your settings. Please see Part 1 of this article for detailed instructions.
Richard Bennett
Richard Bennett is a writer and a lover of all things video.
Follow @Richard Bennett
Securing Success: Navigating Channels and Encodings in Discord
How to Stream on Discord
Richard Bennett
Mar 27, 2024• Proven solutions
Discord has completely transformed online communication, becoming the preferred platform for gamers, streamers, and reviewers alike.
As of late, it has started integrating with other gaming and streaming services, giving us the streamer mode. With streaming’s growing popularity, it’s essential to know what the streamer mode is all about.
If you’re a gamer, Discord’s streamer mode allows you to stream your gaming session to viewers by broadcasting your game to your friends, fans, and even a closed community of enthusiasts.
Many e-gaming professionals have taken up streaming, offering original and valuable content for like-minded individuals. This mode helps them streamline all their communications in one place.
If you’re new to Discord’s streamer mode, you need to know what it is, how you can use it to engage with other community members, and the primary security concerns you need to be aware of.
- Part 1: How to Stream on Discord from Desktop Computers?
- Part 2: How to Stream on Discord from Chromebook?
- Part 3: How to Stream on Discord from iPhone And Android?
- Part 4: How to Watch Discord Streaming?
- Part 5: Discord Streaming Tips
We have compiled a list of steps to help you learn how to conduct Discord streaming from the most prominent platforms: Windows, Mac, Chromebook, iPhone, Android.
Part 1: How to Stream on Discord from Desktop Computers
How to Stream on Discord from Windows
Discord allows for streaming through its Windows desktop client. You can stream games, podcasts, and any other kind of content through it.
However, it is crucial to remember that you can only stream in 480p and 720p resolutions in the free version. If you want higher resolution streaming, subscribe to Discord Nitro, which costs $9.99 a month.
With that said, follow these steps to start Discord streaming:
- Start the game that you want to stream and then switch back to Discord
- You will find an icon at the bottom left of the window displaying the name of the game you started and a stream icon resembling a camera next to it. Click on this icon to begin streaming
- The Screen Share menu will pop-up displaying the game you have started, and from the ‘Select a voice channel’ drop-down, select the channel you want to stream with
- Adjust your screen resolution and frame rates according to your choice
- After you’ve made all the adjustments, you can hit the ‘Go Live’ button at the bottom right of the window to start streaming.
If you wish to stop streaming, click on the ‘Stop Streaming’ icon at the app’s bottom-left corner
Additionally, if you wish to stream voice and video calls on your Discord server, you can do so as well. To make a call to your friends through Discord:
- Open the Discord app on your Windows PC and then select the server you want to use
- Click the General Voice channel to place a voice connection with Discord
- On the bottom left of the window, you will see a Voice Connected entry. If you wish to video call, click on the ‘Video’ button; otherwise, click on the ‘Screen’ button for screen sharing
- When you click ‘Video,’ your screen’s center will switch to conversation mode, and you will be able to see your camera feed
- If you click on the screen, a pop-up window shows up, allowing you to select the application you want to share
- After setting this up, your friends can join your call by clicking on the General channel
When you want to end the call, click on the red Disconnect icon
How to Stream on Discord from Mac
To achieve the same result with Discord on a Mac:
- Open the Discord app on your Macintosh and then find and join a voice channel that allows you to stream (you can find out which channels will let you stream by joining the channel and checking if you can click on ‘Video’ or ‘Screen’ at the bottom of the window)
- Once you’ve made sure that the channel allows you to stream, you can choose whether you want to stream from your webcam or share your computer screen. Click on the option you want
- If you’ve selected the ‘Video’ option, this will turn on your webcam after a prompt, and it will start streaming immediately
- If you’ve selected the screen-sharing option, choose the window you’d like to share, and it will start broadcasting the specific window
- You can either share your entire screen or specific windows, depending on your choice
- Choose a resolution and frame rate for the stream, but remember that higher resolutions and frame rates take up more bandwidth
- If you’re streaming from your desktop, you can even stream in sound. Toggle the sound button to the right, and you will be able to access your microphone for the stream
- When you’ve decided all the parameters and feel you’re ready to stream, click on ‘Go Live’
Part 2: How to Stream on Discord from Chromebook
Chromebooks have a customized Android operating software that can fit the laptop, functioning seamlessly with its requirements.
However, because Chromebooks use a restrictive OS, the Discord app functions like it would on a smartphone or tablet.
Therefore, for Discord streaming on a Chromebook, you will have to:
- Select a voice channel and then join it
- Press the Video camera icon to share your screen
- Allow the program camera access
- Begin streaming
However, it is slightly challenging to join voice channels using the app. To do this, you will have to:
- Locate the voice channel and click on it
- Upon clicking, you will see a window appear at the bottom
- Scroll to the bottom of the menu, and click on the ‘Join Channel’ button
- To join with the camera, click on the camcorder icon
Part 3: How to Stream on Discord from iPhone And Android
Although Discord does not allow users to broadcast content from the Discord Mobile app, they can still share their screen to stream games and videos. To do so, they must:
- Select a voice channel and join it
- Press the Video camera icon for screen-sharing
- Then allow permission to third-party apps on the mobile to access your camera
- Press the Camera icon to allow the program access to your camera
- Once this is done, you are now streaming live
It is important to note that while sharing your screen on Discord, make sure you are not divulging any crucial details with other users in the form of notifications.
To avoid incoming notifications, put your mobile on airplane mode.
Part 4: How to Watch Discord Streaming
Aside from broadcasting streams, you can also watch other users streaming their content on Discord. To watch someone’s stream, you will need to:
- Go to the voice channel where someone is streaming and click on their name
- If you’ve decided you want to join their stream, click on ‘Join Stream’
- You can also click on ‘Watch Stream’ from the main chat screen on your Discord
When someone is streaming content on Discord, you can see a red ‘Live’ icon next to their name. Knowing this will make it easier to tell when your favorite users are streaming.
Part 5: Discord Streaming Tips
To help you get the max out of your Discord streaming experience, we’ve compiled a couple of tips:
Tip 1: How to Stream Without Lag On Discord
Do you experience lag while streaming games and videos on your Discord server? Don’t worry; streaming is often demanding for casual internet connections, and lags can happen!
Here are some quick fixes to get rid of it:
Close Unnecessary Programs
If you’re running multiple programs on your computer while using Discord, they can cause lag. To solve this, close all unnecessary programs.
Turn Off Hardware Acceleration
To do this:
- Go to the ‘Settings’ option in your Discord app,
- Click on ‘Appearance’ and toggle off the ‘Hardware Acceleration’ option
- Press ‘OK’ to confirm and restart the application
Clear Discord Cache Files
Too many accumulated caches files can cause lag in your Discord. To fix this, you will need to clear the Discord cache from the File Explorer:
- Open the ‘Run’ window
- Enter ‘%APPDATA%/Discord/Cache’ to open the cache folder
- Press ‘Ctrl+A’ to delete the files
Reset Discord Voice Settings
To do this:
- Go to the ‘Settings’ option on your Discord app
- Select the ‘Voice & Video’ option in the left pane
- Click on the ‘Reset Voice Settings’ in the right pane
- Press OK to confirm and restart the application
Reinstall Discord
If none of the above methods seem to fix lag, you might have to reinstall your Discord. To uninstall it: first
- Go to the Discord Panel,
- Select ‘View by: Category’
- Click ‘Uninstall a program’
- Right-click Discord
- Click Uninstall
- After it is uninstalled, reinstall it once again
Tip 2: How to Add A Game to Discord Go Live
If you can’t get access to the game you want to stream through the ‘Go Live’ icon, you can access it manually. All you have to do is:
- Click on the cog icon in the bottom left
- Open the Settings menu
- Click on the ‘Game Activity’ tab on the left
- Click ‘Add It’
- Choose your game
- Go back to your server
- Click the ‘Go Live’ button
Richard Bennett
Richard Bennett is a writer and a lover of all things video.
Follow @Richard Bennett
Richard Bennett
Mar 27, 2024• Proven solutions
Discord has completely transformed online communication, becoming the preferred platform for gamers, streamers, and reviewers alike.
As of late, it has started integrating with other gaming and streaming services, giving us the streamer mode. With streaming’s growing popularity, it’s essential to know what the streamer mode is all about.
If you’re a gamer, Discord’s streamer mode allows you to stream your gaming session to viewers by broadcasting your game to your friends, fans, and even a closed community of enthusiasts.
Many e-gaming professionals have taken up streaming, offering original and valuable content for like-minded individuals. This mode helps them streamline all their communications in one place.
If you’re new to Discord’s streamer mode, you need to know what it is, how you can use it to engage with other community members, and the primary security concerns you need to be aware of.
- Part 1: How to Stream on Discord from Desktop Computers?
- Part 2: How to Stream on Discord from Chromebook?
- Part 3: How to Stream on Discord from iPhone And Android?
- Part 4: How to Watch Discord Streaming?
- Part 5: Discord Streaming Tips
We have compiled a list of steps to help you learn how to conduct Discord streaming from the most prominent platforms: Windows, Mac, Chromebook, iPhone, Android.
Part 1: How to Stream on Discord from Desktop Computers
How to Stream on Discord from Windows
Discord allows for streaming through its Windows desktop client. You can stream games, podcasts, and any other kind of content through it.
However, it is crucial to remember that you can only stream in 480p and 720p resolutions in the free version. If you want higher resolution streaming, subscribe to Discord Nitro, which costs $9.99 a month.
With that said, follow these steps to start Discord streaming:
- Start the game that you want to stream and then switch back to Discord
- You will find an icon at the bottom left of the window displaying the name of the game you started and a stream icon resembling a camera next to it. Click on this icon to begin streaming
- The Screen Share menu will pop-up displaying the game you have started, and from the ‘Select a voice channel’ drop-down, select the channel you want to stream with
- Adjust your screen resolution and frame rates according to your choice
- After you’ve made all the adjustments, you can hit the ‘Go Live’ button at the bottom right of the window to start streaming.
If you wish to stop streaming, click on the ‘Stop Streaming’ icon at the app’s bottom-left corner
Additionally, if you wish to stream voice and video calls on your Discord server, you can do so as well. To make a call to your friends through Discord:
- Open the Discord app on your Windows PC and then select the server you want to use
- Click the General Voice channel to place a voice connection with Discord
- On the bottom left of the window, you will see a Voice Connected entry. If you wish to video call, click on the ‘Video’ button; otherwise, click on the ‘Screen’ button for screen sharing
- When you click ‘Video,’ your screen’s center will switch to conversation mode, and you will be able to see your camera feed
- If you click on the screen, a pop-up window shows up, allowing you to select the application you want to share
- After setting this up, your friends can join your call by clicking on the General channel
When you want to end the call, click on the red Disconnect icon
How to Stream on Discord from Mac
To achieve the same result with Discord on a Mac:
- Open the Discord app on your Macintosh and then find and join a voice channel that allows you to stream (you can find out which channels will let you stream by joining the channel and checking if you can click on ‘Video’ or ‘Screen’ at the bottom of the window)
- Once you’ve made sure that the channel allows you to stream, you can choose whether you want to stream from your webcam or share your computer screen. Click on the option you want
- If you’ve selected the ‘Video’ option, this will turn on your webcam after a prompt, and it will start streaming immediately
- If you’ve selected the screen-sharing option, choose the window you’d like to share, and it will start broadcasting the specific window
- You can either share your entire screen or specific windows, depending on your choice
- Choose a resolution and frame rate for the stream, but remember that higher resolutions and frame rates take up more bandwidth
- If you’re streaming from your desktop, you can even stream in sound. Toggle the sound button to the right, and you will be able to access your microphone for the stream
- When you’ve decided all the parameters and feel you’re ready to stream, click on ‘Go Live’
Part 2: How to Stream on Discord from Chromebook
Chromebooks have a customized Android operating software that can fit the laptop, functioning seamlessly with its requirements.
However, because Chromebooks use a restrictive OS, the Discord app functions like it would on a smartphone or tablet.
Therefore, for Discord streaming on a Chromebook, you will have to:
- Select a voice channel and then join it
- Press the Video camera icon to share your screen
- Allow the program camera access
- Begin streaming
However, it is slightly challenging to join voice channels using the app. To do this, you will have to:
- Locate the voice channel and click on it
- Upon clicking, you will see a window appear at the bottom
- Scroll to the bottom of the menu, and click on the ‘Join Channel’ button
- To join with the camera, click on the camcorder icon
Part 3: How to Stream on Discord from iPhone And Android
Although Discord does not allow users to broadcast content from the Discord Mobile app, they can still share their screen to stream games and videos. To do so, they must:
- Select a voice channel and join it
- Press the Video camera icon for screen-sharing
- Then allow permission to third-party apps on the mobile to access your camera
- Press the Camera icon to allow the program access to your camera
- Once this is done, you are now streaming live
It is important to note that while sharing your screen on Discord, make sure you are not divulging any crucial details with other users in the form of notifications.
To avoid incoming notifications, put your mobile on airplane mode.
Part 4: How to Watch Discord Streaming
Aside from broadcasting streams, you can also watch other users streaming their content on Discord. To watch someone’s stream, you will need to:
- Go to the voice channel where someone is streaming and click on their name
- If you’ve decided you want to join their stream, click on ‘Join Stream’
- You can also click on ‘Watch Stream’ from the main chat screen on your Discord
When someone is streaming content on Discord, you can see a red ‘Live’ icon next to their name. Knowing this will make it easier to tell when your favorite users are streaming.
Part 5: Discord Streaming Tips
To help you get the max out of your Discord streaming experience, we’ve compiled a couple of tips:
Tip 1: How to Stream Without Lag On Discord
Do you experience lag while streaming games and videos on your Discord server? Don’t worry; streaming is often demanding for casual internet connections, and lags can happen!
Here are some quick fixes to get rid of it:
Close Unnecessary Programs
If you’re running multiple programs on your computer while using Discord, they can cause lag. To solve this, close all unnecessary programs.
Turn Off Hardware Acceleration
To do this:
- Go to the ‘Settings’ option in your Discord app,
- Click on ‘Appearance’ and toggle off the ‘Hardware Acceleration’ option
- Press ‘OK’ to confirm and restart the application
Clear Discord Cache Files
Too many accumulated caches files can cause lag in your Discord. To fix this, you will need to clear the Discord cache from the File Explorer:
- Open the ‘Run’ window
- Enter ‘%APPDATA%/Discord/Cache’ to open the cache folder
- Press ‘Ctrl+A’ to delete the files
Reset Discord Voice Settings
To do this:
- Go to the ‘Settings’ option on your Discord app
- Select the ‘Voice & Video’ option in the left pane
- Click on the ‘Reset Voice Settings’ in the right pane
- Press OK to confirm and restart the application
Reinstall Discord
If none of the above methods seem to fix lag, you might have to reinstall your Discord. To uninstall it: first
- Go to the Discord Panel,
- Select ‘View by: Category’
- Click ‘Uninstall a program’
- Right-click Discord
- Click Uninstall
- After it is uninstalled, reinstall it once again
Tip 2: How to Add A Game to Discord Go Live
If you can’t get access to the game you want to stream through the ‘Go Live’ icon, you can access it manually. All you have to do is:
- Click on the cog icon in the bottom left
- Open the Settings menu
- Click on the ‘Game Activity’ tab on the left
- Click ‘Add It’
- Choose your game
- Go back to your server
- Click the ‘Go Live’ button
Richard Bennett
Richard Bennett is a writer and a lover of all things video.
Follow @Richard Bennett
Also read:
- Step-by-Step How to Use and Curate the Best GIFs in Discord Chats for 2024
- [Updated] In 2024, Inside DiscoNitro Navigating the Premium Experience with Ease
- [Updated] In 2024, Uniting Playlists & Pals A Guide to Spotify/Discord Integration
- [Updated] In 2024, Quick Recap Essential Use of Discord Spoiler Labels
- [Updated] Navigate Discord's Streaming Landscape A Comprehensive Tutorial
- [Updated] Strategic Message Management Expert Tips for Discord Pinning for 2024
- 2024 Approved Elevate Your Music in Discord with These Professional Bot Tools
- [Updated] In 2024, Boost Your Discord Engagement with These Essential Plugins
- [Updated] In 2024, Delete and Disconnect Discord (PC/Mobile)
- [Updated] Thrilling Theme Journey 10 BestDiscord Classics for 2024
- [New] 2024 Approved Transforming Text to Speech on Discord
- [New] In 2024, Discord's Best Sound Experience Unlocked by Advanced Bot Technologies
- 2024 Approved Sever Disconnect From Discord
- 2024 Approved Getting Acquainted with Discord's Innovations
- [Updated] Cutting-Edge Emoji Makers Revolutionizing Discord for 2024
- [New] 2024 Approved Premiere Social Signatures Animation Highlights
- [Updated] 10+ Cost-Free Websites Bringing You the Latest in Discord Emojis for 2024
- [Updated] 2024 Approved Elevate Your Sonic Journey on Discord List of Premier Bots to Try
- [New] In 2024, Mastering Privacy Settings A Guide to Discretion in Streaming
- In 2024, Unleash the Power Modify Your Presence on Discord
- [Updated] 2024 Approved The Right Ways to Address Abuse Efficient Steps for Dispute Documentation on Discord
- [Updated] In 2024, Conquering Loud Environments Using VoiceMod on Discord Platforms
- [New] 2024 Approved Premier Discord Font Makers - Seamless Online & Portable Use
- In 2024, Crafting Courteous Responses in Discord Chat
- [Updated] Exclusive Open Source Logo Generators for Discord Servers for 2024
- Unlock Your Potential Designing Captivating Discord Photos for 2024
- In 2024, Explore & Learn About Discord Stickers
- Tips for Perfecting the Art of Making Memorable Discord Avatars for 2024
- Personalizing Your Discord Presence Easily Incorporate Unique Emojis (PC/Mobile) for 2024
- 2024 Approved Platform Comparison Discord Versus Skype for Professionals
- In 2024, Leading Logos for Linked Worldwide Web
- 2024 Approved Ultimate List of 10 Budget-Friendly Discord Voice Recorder Tools
- [New] Unveiling the Best Practices for Crafting Viral Instagram Reels for 2024
- In 2024, Enhancing Mac Use Top 5 Recommended Sniping Apps
- Updated In 2024, Unleash Your Creativity A Beginners Guide to Mac Video Editing Software
- [New] Stream Control Showdown Is OBS Best over Twitch Studio?
- In 2024, The Social Media Whiz's Playbook Analyzing User Behavior with Insta Insights
- In 2024, How To Stream Anything From Vivo S18 Pro to Apple TV | Dr.fone
- [Updated] X-Sync Studio Platform, Personal Computing for 2024
- [New] In 2024, Premier Screenshare Software Reviews
- [New] Fix Blurry Facebook Videos in Smartphones & Chromebooks for 2024
- [New] In 2024, Best Nintendo Switch Fighter Ranks (Max 156)
- An Insightful Guide to Determining Best Practices for Audio Format Selection
- Updated In 2024, The Ultimate Guide to Highlight Video Editors Desktop and Mobile Picks
- [Updated] Chuckle-Fest Twitter's 10 Funniest Tweets for 2024
- In 2024, 3 Effective Ways to Unlock iCloud Account Without Password On Apple iPhone 11 Pro
- In 2024, Demystifying the Purpose and Use of a Blue Status Symbol on Facebook
- [New] 2024 Approved Best Beams Microphones for Education
- How to Change Infinix Zero 5G 2023 Turbo Location on Skout | Dr.fone
- 2024 Approved Mastering the Art of Guitar Production A Compilation of the Best 7 Digital Audio Workstations
- [New] Lost Opportunities Instant Creative Ban
- Pokemon Go Error 12 Failed to Detect Location On Apple iPhone 12? | Dr.fone
- [New] Mastering Mic Levels on a Mac for 2024
- [New] 2024 Approved Design Tips for Captivating Facebook Slideshows
- Vision Capture Expert Insights Into Video Tech
- Title: "[New] In 2024, How to Use Discord Text-To-Speech?"
- Author: Timothy
- Created at : 2024-05-23 22:48:13
- Updated at : 2024-05-24 22:48:13
- Link: https://discord-videos.techidaily.com/new-in-2024-how-to-use-discord-text-to-speech/
- License: This work is licensed under CC BY-NC-SA 4.0.
