
![[New] In 2024, Perfecting Your Status with Emojis in Discord Chat](https://www.lifewire.com/thmb/CStHh_chdzoiHQUYb0I6_K0rN4E=/400x300/filters:no_upscale():max_bytes(150000):strip_icc()/001-is-nintendo-switch-online-down-or-is-it-just-you-4846361-d95930818e9d4bc39ff7535c50087c08.jpg)
[New] In 2024, Perfecting Your Status with Emojis in Discord Chat
Perfecting Your Status with Emojis in Discord Chat
If you have an active Nitro subscription and want to make your Discord status look better, you can put emojis in Discord status. This article will help you walk through the process of using Discord custom status to upload emojis. Custom status is a new feature introduced by Discord. By uploading the emojis, you can keep your Discord status fresh! So, keep reading to find how to put emojis in Discord status through your desktop and mobile app conveniently.
In this article
01 How to Put Custom Emoji in Discord Status on Desktop and Online?
02 How to Add Custom Emoji on Discord Status on Mobile?
03 How to Copy and Paste Emojis in Discord Status?
04 How to Add Animated Emojis to Discord Status?
05 Custom Discord Status Emoji Ideas
Part 1: How to Put Custom Emoji in Discord Status on Desktop and Online?

For those who want to add an emoji on their Discord status on desktop and online, you can do that easily by following the steps that we have listed below:
Step 1: First, you need to go to https://discord.com . Once you visit the site, please log in using your Discord credential.
Step 2: Once your profile is open, please click on the profile picture.
Step 3: On your profile, look at the bottom of the menu. You will see a pop-up menu that says set a custom status.
Step 4: On the emojis bar, you can add an emoji. To do that, you need to click on the emoji status. Next, you will see a list of emojis. Please note that only an active Nitro subscription user can use animated or custom emojis. On the left will be the category of emojis. Choose one category that suits your mood; once the category opens, click on an emoji to add it.
Step 5: After that, you need to click on the Today option. This will open a drop-down menu. You need to choose a time frame for the emoji or status. You can choose today, 4 hours, 1 hour, etc.
Step 6: If you are done with the emoji selection and have chosen the duration for the status, you need to click on the Save option. The Save option will be on the bottom right of the same pop-up window.
And that’s it. The emojis will be successfully added to your status based on the duration that you have chosen. If you want to change the emoji or remove it, you need to undergo the same process.
Related: How to Get Free Animated Emojis on Discord
Part 2: How to Add Custom Emoji on Discord Status on Mobile?

If you are using the Discord app on your mobile phone, you can add a custom emoji on Discord status using your phone too. Follow the step-by-step guide that we have prepared to learn how to do that.
Step 1: Take your smartphone and look for the Discord app. The icon will look like a controller. Click on it to launch Discord.
Step 2: Just like the web steps, you will have to click on your profile. Click on the hamburger icon, which is there in the upper left corner. Then, look at the bottom right corner to find your profile.
Step 3: Now, click on the Set Status option. This will be the first option on your profile. Go on and click on that.
Step 4: After that, click on the option that says set a custom status. On the status bar, you will see an emoji. You need to click on that to open the list of emojis to choose from.
Step 5: Choose a time frame for the emoji, for example, 30 minutes, 1-hour, clear tomorrow, etc. If you are using an Android, you will see the floppy disk option; click on that to save your status. If you are using an iOS device, you will see the save option.
By following these steps, your status with the emoji you have chosen will be saved successfully. If you want to add a new emoji, repeat the same process.
Related: How to Change Discord Status
Part 3: How to Copy and Paste Emojis in Discord Status?
If you don’t want to go through the hassle of adding an emoji manually, you can just copy and paste one to your status. How to do it? Follow these steps:
Step 1: Go to a website that has emojis for Discord status.
Step 2: Scroll down the list of emojis and copy it.
Step 3: Go back to your Discord Nitro page and open the status setting. There, on the emoji section, paste the emoji that you have copied from another site.
Please note that this may not be possible for all types of emojis, though. Also, this will work if only the website has created emojis that can be directly copied and pasted on the status section.
Part 4: How to Add Animated Emojis to Discord Status?
Apart from the basic emojis, you can also add animated emojis to your Discord Status to make your status look even better. Here are the steps to follow to add an animated emoji:
Step 1: First, go to a website called https://betterdiscord.app/ . Once you are there, click on the Download option.
Step 2: You will see a page loaded with codes, right-click on the screen and click on the Save option. When it is downloaded, click on the Better Discord Windows installer. Next, read the license agreement and click on the Next option.
Step 3: Then click install better Discord and hit the next button. Choose the Discord version that you currently have installed.
Step 4: Open Discord and click on the user settings. There, you will see the Better Discord section. Next, click on the Plugin option. Now, close the Discord window and drag the animated status dot plugin into the plugin folder that opened after clicking on the Plugin option.
Step 5: Go to Discord again, and you will see the Animated Status option. Enable it and click on the gear icon. To add an animated emoji, click on the + icon. Next, you will see a Nitro ID field. Then, go to a chat page and click on the emoji option.
Step 6: Look at the emoji that you like and memorize the animated emoji name. Press \ followed by the name of the emoji. Now, copy the whole text and paste it again. You will see a few numbers; that’s the Nitro ID for the emoji. Copy the number only, go back to the Animated plugin and paste it on the Nitro ID field. Go back to the Nitro page again, and you will see the animated emoji on your status.
Part 5: Custom Discord Status Emoji Ideas

If you want to make your Discord Status look really cool, you can get some custom Discord status emoji ideas from us. Read this section to find out a few super cool custom Discord status emojis ideas and get inspired.
Use Kaomoji in Status
Kaomoji is a collection of super cute emojis that can brighten anyone’s day! They are great because they make your status look different and cute at the same time. You can choose from stars, smiley faces, cute polar bears, and much more! And yes, they are different than your usual emojis.
Add Old-school Emoticons
Remember the good old Nokia 1100 days when you used to send emojis using some signs? Well, you can try this idea too to give a vintage look to your status. Everybody uses the same smiley emojis, so why not try something different? Go back to your old 90s school days and display images, such as @}->– which is a rose! You can find old-school emoticons online easily.
Conclusion
And that’s it; now you know how to put emoji in Discord status without sweating much. We hope you have found this article helpful, and you will start using cool emojis on your status to make your Discord status look different than others!
02 How to Add Custom Emoji on Discord Status on Mobile?
03 How to Copy and Paste Emojis in Discord Status?
04 How to Add Animated Emojis to Discord Status?
05 Custom Discord Status Emoji Ideas
Part 1: How to Put Custom Emoji in Discord Status on Desktop and Online?
For those who want to add an emoji on their Discord status on desktop and online, you can do that easily by following the steps that we have listed below:
Step 1: First, you need to go to https://discord.com . Once you visit the site, please log in using your Discord credential.
Step 2: Once your profile is open, please click on the profile picture.
Step 3: On your profile, look at the bottom of the menu. You will see a pop-up menu that says set a custom status.
Step 4: On the emojis bar, you can add an emoji. To do that, you need to click on the emoji status. Next, you will see a list of emojis. Please note that only an active Nitro subscription user can use animated or custom emojis. On the left will be the category of emojis. Choose one category that suits your mood; once the category opens, click on an emoji to add it.
Step 5: After that, you need to click on the Today option. This will open a drop-down menu. You need to choose a time frame for the emoji or status. You can choose today, 4 hours, 1 hour, etc.
Step 6: If you are done with the emoji selection and have chosen the duration for the status, you need to click on the Save option. The Save option will be on the bottom right of the same pop-up window.
And that’s it. The emojis will be successfully added to your status based on the duration that you have chosen. If you want to change the emoji or remove it, you need to undergo the same process.
Related: How to Get Free Animated Emojis on Discord
Part 2: How to Add Custom Emoji on Discord Status on Mobile?
If you are using the Discord app on your mobile phone, you can add a custom emoji on Discord status using your phone too. Follow the step-by-step guide that we have prepared to learn how to do that.
Step 1: Take your smartphone and look for the Discord app. The icon will look like a controller. Click on it to launch Discord.
Step 2: Just like the web steps, you will have to click on your profile. Click on the hamburger icon, which is there in the upper left corner. Then, look at the bottom right corner to find your profile.
Step 3: Now, click on the Set Status option. This will be the first option on your profile. Go on and click on that.
Step 4: After that, click on the option that says set a custom status. On the status bar, you will see an emoji. You need to click on that to open the list of emojis to choose from.
Step 5: Choose a time frame for the emoji, for example, 30 minutes, 1-hour, clear tomorrow, etc. If you are using an Android, you will see the floppy disk option; click on that to save your status. If you are using an iOS device, you will see the save option.
By following these steps, your status with the emoji you have chosen will be saved successfully. If you want to add a new emoji, repeat the same process.
Related: How to Change Discord Status
Part 3: How to Copy and Paste Emojis in Discord Status?
If you don’t want to go through the hassle of adding an emoji manually, you can just copy and paste one to your status. How to do it? Follow these steps:
Step 1: Go to a website that has emojis for Discord status.
Step 2: Scroll down the list of emojis and copy it.
Step 3: Go back to your Discord Nitro page and open the status setting. There, on the emoji section, paste the emoji that you have copied from another site.
Please note that this may not be possible for all types of emojis, though. Also, this will work if only the website has created emojis that can be directly copied and pasted on the status section.
Part 4: How to Add Animated Emojis to Discord Status?
Apart from the basic emojis, you can also add animated emojis to your Discord Status to make your status look even better. Here are the steps to follow to add an animated emoji:
Step 1: First, go to a website called https://betterdiscord.app/ . Once you are there, click on the Download option.
Step 2: You will see a page loaded with codes, right-click on the screen and click on the Save option. When it is downloaded, click on the Better Discord Windows installer. Next, read the license agreement and click on the Next option.
Step 3: Then click install better Discord and hit the next button. Choose the Discord version that you currently have installed.
Step 4: Open Discord and click on the user settings. There, you will see the Better Discord section. Next, click on the Plugin option. Now, close the Discord window and drag the animated status dot plugin into the plugin folder that opened after clicking on the Plugin option.
Step 5: Go to Discord again, and you will see the Animated Status option. Enable it and click on the gear icon. To add an animated emoji, click on the + icon. Next, you will see a Nitro ID field. Then, go to a chat page and click on the emoji option.
Step 6: Look at the emoji that you like and memorize the animated emoji name. Press \ followed by the name of the emoji. Now, copy the whole text and paste it again. You will see a few numbers; that’s the Nitro ID for the emoji. Copy the number only, go back to the Animated plugin and paste it on the Nitro ID field. Go back to the Nitro page again, and you will see the animated emoji on your status.
Part 5: Custom Discord Status Emoji Ideas
If you want to make your Discord Status look really cool, you can get some custom Discord status emoji ideas from us. Read this section to find out a few super cool custom Discord status emojis ideas and get inspired.
Use Kaomoji in Status
Kaomoji is a collection of super cute emojis that can brighten anyone’s day! They are great because they make your status look different and cute at the same time. You can choose from stars, smiley faces, cute polar bears, and much more! And yes, they are different than your usual emojis.
Add Old-school Emoticons
Remember the good old Nokia 1100 days when you used to send emojis using some signs? Well, you can try this idea too to give a vintage look to your status. Everybody uses the same smiley emojis, so why not try something different? Go back to your old 90s school days and display images, such as @}->– which is a rose! You can find old-school emoticons online easily.
Conclusion
And that’s it; now you know how to put emoji in Discord status without sweating much. We hope you have found this article helpful, and you will start using cool emojis on your status to make your Discord status look different than others!
Part Ways with Discord Platform
How to Delete Discord Account [Step-by-Step]

Richard Bennett
Mar 27, 2024• Proven solutions
Discord is a voice and text chat service to bring like-minded people together, especially e-sports professionals.
The goal was to provide users with an improved communications platform that could streamline the way people speak in real-time and over the internet.
Originally designed for gamers, the app allowed users to communicate with others who share interests on a given topic.
After a while, the Discord app expanded its reach and included non-gamers as well. Today, it is one of the most popular chatting apps out there.
However, if, for any reason, you want to delete or disable your account for good, you can. In the following articles, you will learn about how to delete your account step by step.
- Part 1: Deleting A Discord Account Permanently on Desktop Computer
- Part 2: Deleting Discord Account from Mobile Devices
- Part 3: How to Disable Discord Account On Desktop Computer
- Part 4: How To Disable Discord Account On Mobile?
Part 1: How To Delete A Discord Account Permanently?
Are you done with a game, scared about your data, or just bored with the app? No problem! If you want to learn how to delete your discord account, look no further.
But before doing so, you’ll have to do two quick things:
- Reassign ‘administrative rights’ of the servers
- Completely delete them
The only reason you will have to think about these things is if you assumed responsibility for any server.
Without further ado, here are some easy to follow steps to delete a Discord account permanently:
- Open the Discord app
- Sign in to your Discord account and open the user settings option (Cog icon)
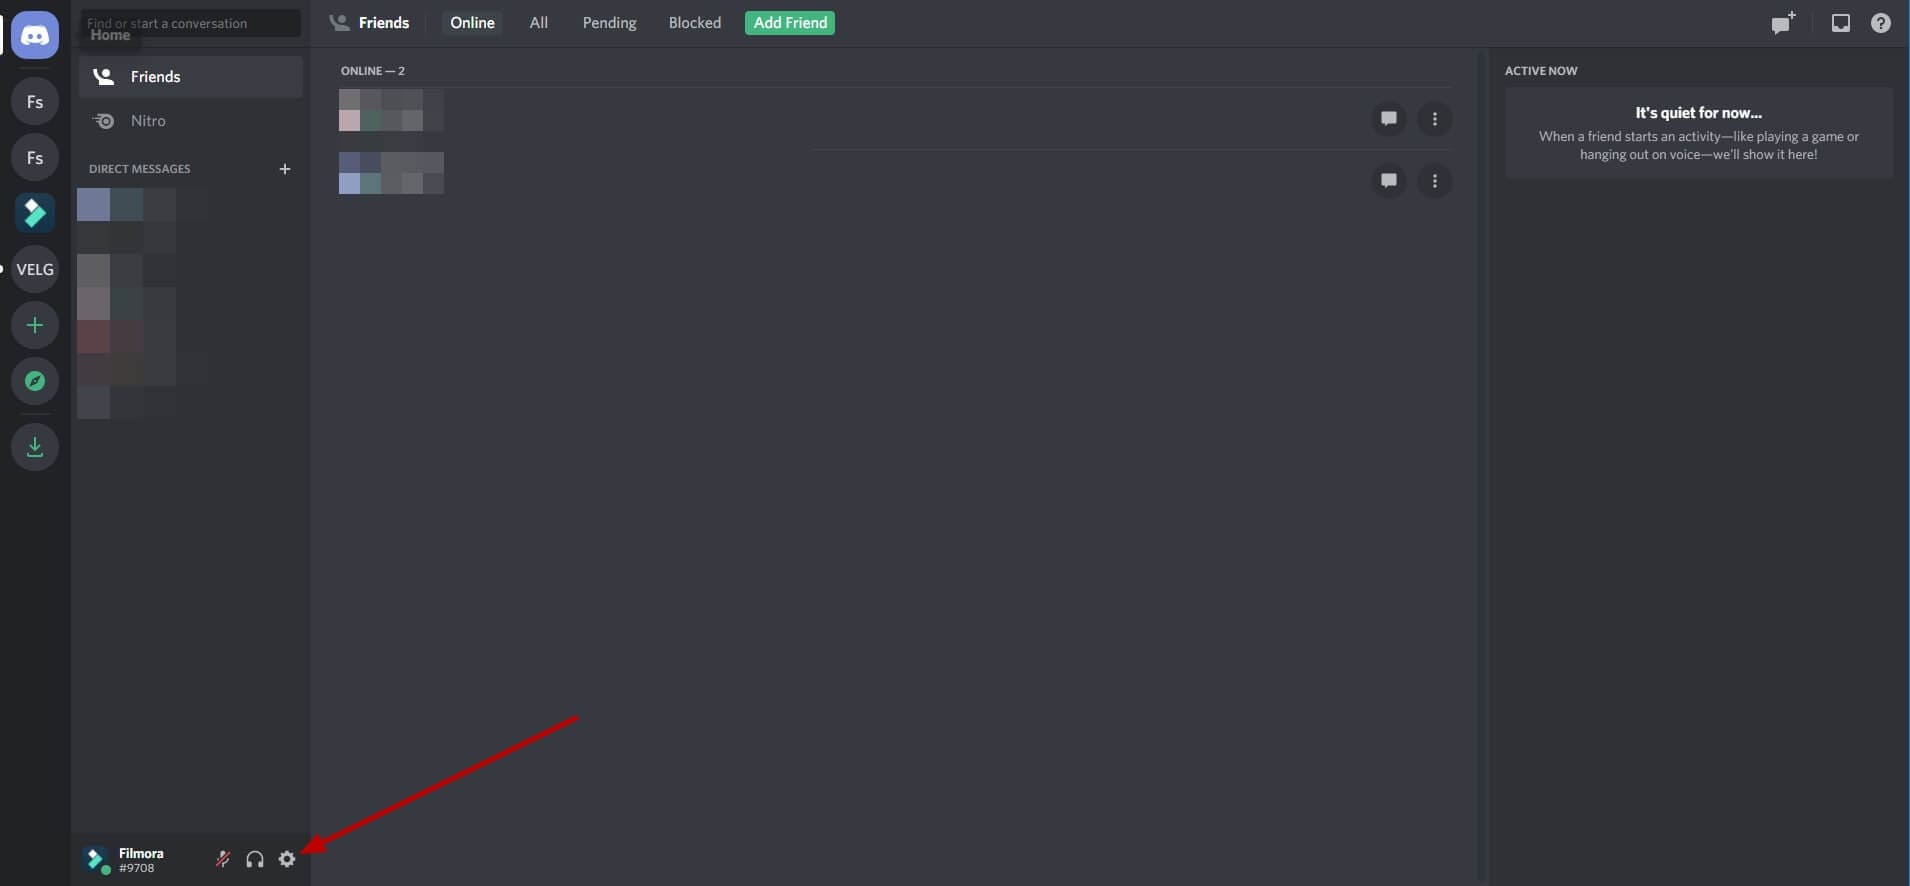
- Click the “My Account” option in the user setting menu. At the very bottom of the screen, you’ll see the “delete account” option
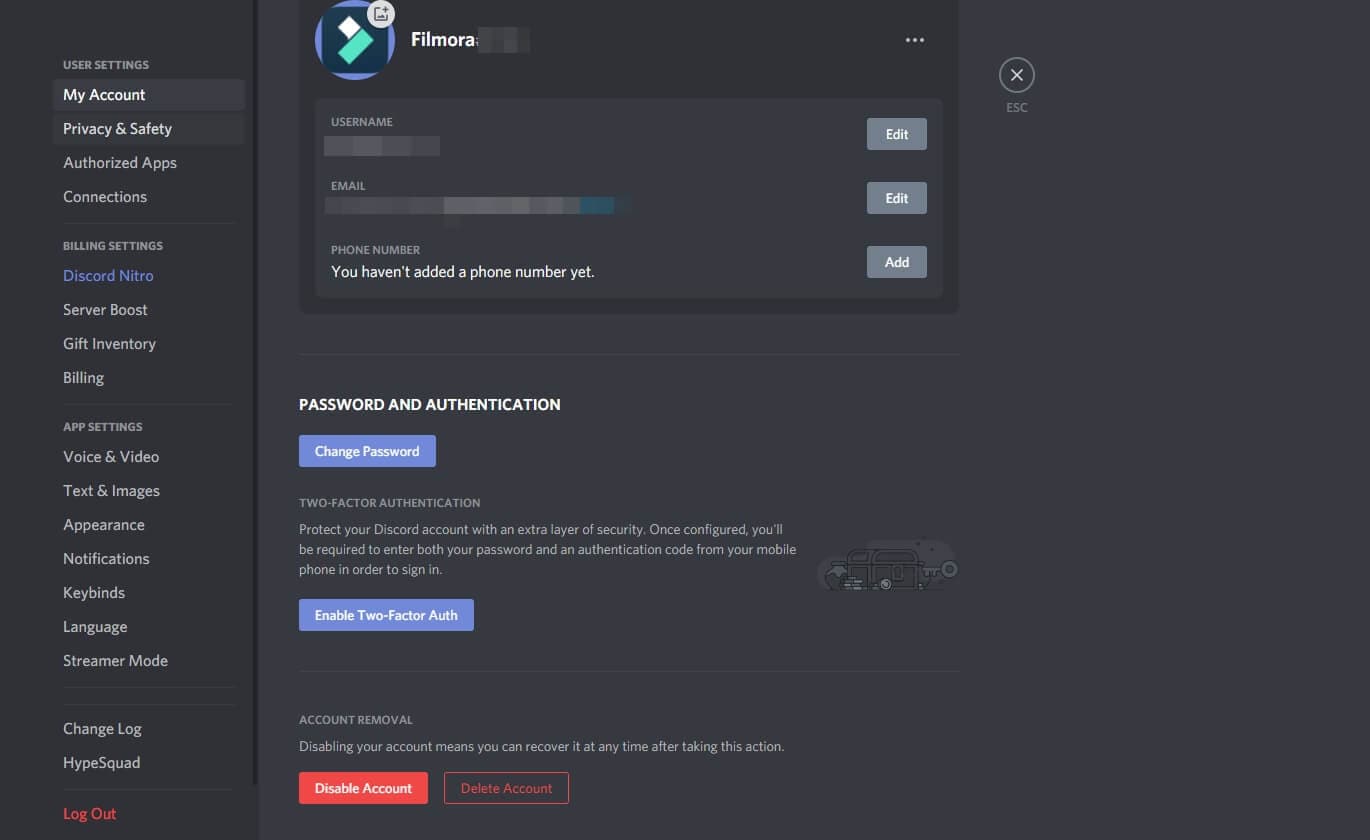
- Click the delete account button to make your Discord account disappear!
However, if you’ve activated 2FA, you may also be asked to put your password and 2FA code.
Also, if you want to delete your account permanently, there are some things you need to do before completing the process.
As mentioned before, if you’re the server’s owner, you’ll have to either delete your server or transfer its ownership to a trusted source.
For transferring ownership on Discord, follow these steps:
- Open the Discord app
- Click the “server name,” and a range of options will open; then click “server setting”
- At the bottom-left of the screen, click the ‘members’ option below “User Management”
- Here you’ll make the critical decision of who gets the keys to your kingdom. Once you decide who to transfer the ownership to, click the “3 vertical dots”
- As the “dialog menu” opens, click “Transfer Ownership”
Once it’s completed, you’ll become a regular server member. Your access to the server will be limited and as per the set position.
On the other hand, if you don’t want to transfer its ownership to someone else, you can also delete it.
Here’s how you can delete the server to complete the process of deleting your Discord account:
- Click the “Server Name” again
- Within the several options, click the “Server Settings.”
- At the bottom-left of your window, click the “Delete Server” option in the “User Management” section.

- Once clicked, the system will ask you to enter the account password to delete your server (or servers) from existence altogether
Like the primary Discord account deletion process, if you have enabled 2FA on this account, you’ll have to put in the code to get things completed.
After this, you’ll be asked one more time to click the “delete server” button before it is completely deleted. Keep in mind that you’ll have 14 days time to recover your Discord account. Once the two-week time passes, you won’t be able to retrieve or sign in to your account.
Once the account is deleted, the username will show up as “deleteduser 0000” or something similar to this. However, users you have texted via your account will still see your texts.
Part 2: How to Delete Discord Account From iPhone And Android?
Yes, you can delete the discord account from iPhone and Android. And if you’re wondering how to delete a Discord account, Here’s a quick way to do it:
- Open your updated discord app and tap the “hamburger” menu located at the top-left
- Tap the gear icon so you can go to the “user settings.”
- Select “My Account”
- Below the “Account Management” option, choose “Delete Account” and put your password and 2FA (if you have set it up)
Part 3: How To Disable Discord Account On Desktop Computer?
Deleting the account means you won’t be able to use it further, whereas disabling the account normally means you’re taking a little break.
So, if you don’t want to remove or delete your account entirely but only want it gone for some time, choose the disable option.
Here’s how you can disable a Discord account on a desktop computer:
- Open the app on your window PC/Mac and then log in to your Discord account
- Click the “User Settings” option and then go to the “My Account” option within the user settings
- In the lower corner of your Mac/PC screen, you’ll see the “Disable Account” button next to the “Delete Account” button
- Click the “Disable Account” option, and it will be disabled.
What’s The Difference Between Disabling And Deleting A Discord Account?
Disabling the account means you can recover it anytime you want, unlike deleting the account where you only have a 14-day restoration window. Additionally, when the account is disabled, you won’t receive notifications, but you will still get “friend requests.”
Part 4: How To Disable Discord Account On Mobile?
Disabling your Discord account for Android and iOS isn’t as simple as it is on a Desktop Windows/Mac PC.
Currently, there is no direct way to either delete or disable your Discord account through a mobile device.
Nevertheless, follow the steps below to disable your Discord account on mobile:
- Open the Discord application on your smartphone
- Tap the cog icon on the lower right corner of the phone
- Tap on the “My Account” option in the “User Settings” menu
- You’ll have the choice to either “Delete Account” or “Disable Account.” However, whatever you choose, you’ll be prompted to the support page explaining ways to disable or delete your account
- To complete disabling process from a mobile device, you’ll have to send a request to the support team, as it’s the only way to disable your account via your smartphone
FAQs About Deleting Discord Account
1. How Long Does Discord Take To Delete Account?
Typically, once you have completed the entire deletion process, Discord takes approximately 14 to 30 days to process it.
2. What Happens When You Delete Discord Account?
Deleting your discord account won’t delete the information you have on the account. It will delete your profile and rename the account to “deleteduser.” However, all your data and messages will remain on the server or servers.
3. Can I Re-Use The Deleted Discord Account?
You can re-use your deleted discord account only if the account is in a “pending deletion state,” which is 14 days. If the time is passed, you won’t be able to re-use it.
Richard Bennett
Richard Bennett is a writer and a lover of all things video.
Follow @Richard Bennett
Richard Bennett
Mar 27, 2024• Proven solutions
Discord is a voice and text chat service to bring like-minded people together, especially e-sports professionals.
The goal was to provide users with an improved communications platform that could streamline the way people speak in real-time and over the internet.
Originally designed for gamers, the app allowed users to communicate with others who share interests on a given topic.
After a while, the Discord app expanded its reach and included non-gamers as well. Today, it is one of the most popular chatting apps out there.
However, if, for any reason, you want to delete or disable your account for good, you can. In the following articles, you will learn about how to delete your account step by step.
- Part 1: Deleting A Discord Account Permanently on Desktop Computer
- Part 2: Deleting Discord Account from Mobile Devices
- Part 3: How to Disable Discord Account On Desktop Computer
- Part 4: How To Disable Discord Account On Mobile?
Part 1: How To Delete A Discord Account Permanently?
Are you done with a game, scared about your data, or just bored with the app? No problem! If you want to learn how to delete your discord account, look no further.
But before doing so, you’ll have to do two quick things:
- Reassign ‘administrative rights’ of the servers
- Completely delete them
The only reason you will have to think about these things is if you assumed responsibility for any server.
Without further ado, here are some easy to follow steps to delete a Discord account permanently:
- Open the Discord app
- Sign in to your Discord account and open the user settings option (Cog icon)
- Click the “My Account” option in the user setting menu. At the very bottom of the screen, you’ll see the “delete account” option
- Click the delete account button to make your Discord account disappear!
However, if you’ve activated 2FA, you may also be asked to put your password and 2FA code.
Also, if you want to delete your account permanently, there are some things you need to do before completing the process.
As mentioned before, if you’re the server’s owner, you’ll have to either delete your server or transfer its ownership to a trusted source.
For transferring ownership on Discord, follow these steps:
- Open the Discord app
- Click the “server name,” and a range of options will open; then click “server setting”
- At the bottom-left of the screen, click the ‘members’ option below “User Management”
- Here you’ll make the critical decision of who gets the keys to your kingdom. Once you decide who to transfer the ownership to, click the “3 vertical dots”
- As the “dialog menu” opens, click “Transfer Ownership”
Once it’s completed, you’ll become a regular server member. Your access to the server will be limited and as per the set position.
On the other hand, if you don’t want to transfer its ownership to someone else, you can also delete it.
Here’s how you can delete the server to complete the process of deleting your Discord account:
- Click the “Server Name” again
- Within the several options, click the “Server Settings.”
- At the bottom-left of your window, click the “Delete Server” option in the “User Management” section.
- Once clicked, the system will ask you to enter the account password to delete your server (or servers) from existence altogether
Like the primary Discord account deletion process, if you have enabled 2FA on this account, you’ll have to put in the code to get things completed.
After this, you’ll be asked one more time to click the “delete server” button before it is completely deleted. Keep in mind that you’ll have 14 days time to recover your Discord account. Once the two-week time passes, you won’t be able to retrieve or sign in to your account.
Once the account is deleted, the username will show up as “deleteduser 0000” or something similar to this. However, users you have texted via your account will still see your texts.
Part 2: How to Delete Discord Account From iPhone And Android?
Yes, you can delete the discord account from iPhone and Android. And if you’re wondering how to delete a Discord account, Here’s a quick way to do it:
- Open your updated discord app and tap the “hamburger” menu located at the top-left
- Tap the gear icon so you can go to the “user settings.”
- Select “My Account”
- Below the “Account Management” option, choose “Delete Account” and put your password and 2FA (if you have set it up)
Part 3: How To Disable Discord Account On Desktop Computer?
Deleting the account means you won’t be able to use it further, whereas disabling the account normally means you’re taking a little break.
So, if you don’t want to remove or delete your account entirely but only want it gone for some time, choose the disable option.
Here’s how you can disable a Discord account on a desktop computer:
- Open the app on your window PC/Mac and then log in to your Discord account
- Click the “User Settings” option and then go to the “My Account” option within the user settings
- In the lower corner of your Mac/PC screen, you’ll see the “Disable Account” button next to the “Delete Account” button
- Click the “Disable Account” option, and it will be disabled.
What’s The Difference Between Disabling And Deleting A Discord Account?
Disabling the account means you can recover it anytime you want, unlike deleting the account where you only have a 14-day restoration window. Additionally, when the account is disabled, you won’t receive notifications, but you will still get “friend requests.”
Part 4: How To Disable Discord Account On Mobile?
Disabling your Discord account for Android and iOS isn’t as simple as it is on a Desktop Windows/Mac PC.
Currently, there is no direct way to either delete or disable your Discord account through a mobile device.
Nevertheless, follow the steps below to disable your Discord account on mobile:
- Open the Discord application on your smartphone
- Tap the cog icon on the lower right corner of the phone
- Tap on the “My Account” option in the “User Settings” menu
- You’ll have the choice to either “Delete Account” or “Disable Account.” However, whatever you choose, you’ll be prompted to the support page explaining ways to disable or delete your account
- To complete disabling process from a mobile device, you’ll have to send a request to the support team, as it’s the only way to disable your account via your smartphone
FAQs About Deleting Discord Account
1. How Long Does Discord Take To Delete Account?
Typically, once you have completed the entire deletion process, Discord takes approximately 14 to 30 days to process it.
2. What Happens When You Delete Discord Account?
Deleting your discord account won’t delete the information you have on the account. It will delete your profile and rename the account to “deleteduser.” However, all your data and messages will remain on the server or servers.
3. Can I Re-Use The Deleted Discord Account?
You can re-use your deleted discord account only if the account is in a “pending deletion state,” which is 14 days. If the time is passed, you won’t be able to re-use it.
Richard Bennett
Richard Bennett is a writer and a lover of all things video.
Follow @Richard Bennett
Also read:
- [Updated] Exploring Workplace Messaging Platforms Ranking Slack & Discord for Efficiency
- [New] The Insider's Guide to Clearer Communication via VoiceMod on Discord
- [New] Innovative Solutions The Best Bot Picks for Servers for 2024
- [Updated] Acquiring Animated Emojis for Disco Without a Subscription for 2024
- 2024 Approved How to Engage Your Audience in Live Discord Streams Easily
- [New] Discord's Broadcasting Features Unveiled A Step-by-Step Guide
- In 2024, Understanding Discord The Ultimate Resource
- [Updated] Efficient Tactics for Exploring and Joining Desired Discords for 2024
- [Updated] Navigating Discord's User Imagery Like a Pro
- Top Audio Modification Tools for Discord A Comprehensive 2023 Roundup
- [New] Mastering Discord PFPs Crafting Impressive Virtual Portraits
- [Updated] In 2024, Essential Knowledge for Manipulating Discord Message Designs
- [New] Daredevil Daters Unite on Discord for 2024
- [Updated] Inside DiscoNitro Navigating the Premium Experience with Ease for 2024
- [Updated] 2024 Approved Boost Your Discord Engagement with These Essential Plugins
- [Updated] In 2024, Premier Font Generators Transforming Discord Channels
- [New] 2024 Approved Top 10 Gratis Tools for Capturing Discord Chats
- [Updated] Foremost Innovative Logos for Social Platforms' Animations for 2024
- [New] In 2024, The Best Social Media Symbols Dynamic Designs
- 2024 Approved Unlocking the Status Code A Guide to Verified Discord Affiliation
- In 2024, How to Modify Your Discord Display at a Glance
- [New] Innovative Messaging Tools Beyond Discord
- [New] Tailoring Your Text The Discord Formatting Handbook for 2024
- In 2024, Navigating and Mastering Discord's Text-to-Speech Tools
- [Updated] Navigating with Precision to Uncover Ideal Discord Spaces
- Cutting-Edge Tools The Leading Applications for DiscoEmojis for 2024
- [Updated] Get Spoken Up on Discord Using TTS
- [New] 2024 Approved Unlocking the Full Potential of Discord Avatars
- 2024 Approved Free or Paid? The Complete Guide to Joining DiscoNitro
- [Updated] 2024 Approved The Ultimate Discord Call Blueprint for PCs/Tablets
- In 2024, Fast-Track Fame Disco Channel Names That Shine Bright
- [New] Perfect Your Discord Voices Avoiding Background Noise with VoiceMod
- Inside the World of Discord Nitro Highlights and Acquisition Strategies for 2024
- [New] 7+ Top-Ranked Free Emoji Sites for Your Discord Experience for 2024
- [New] 2024 Approved Navigating Message Reactions with Ease (Discord)
- Exclusive Communication Apps Post-Discord
- Excellent AI Bots for Social Spheres
- [Updated] The Elite Circle of Glyph Designers Redefining Communication
- [New] In 2024, Pro-Level Discord Capture Software Analysis
- In 2024, Mastering Response Etiquette Discord Messaging Guide
- In 2024, Converting Messages Into Speech on Discord
- [New] 2024 Approved Notable Platforms Replacing Discord
- [Updated] VoIP Excellence Showdown Discord vs Skype Analysis
- [Updated] 2024 Approved BestDiscord's Ultimate Guide to Popular Themes
- [New] In 2024, Enhance Your Discord Interaction Mastering the Art of Pins
- [Updated] Expert Tips Securing Seamless Video Sharing via Discord Channels for 2024
- In 2024, Powerful Presentations Elevate Your Screen Share on Discord
- [Updated] The Ultimate Step-by-Step Guide to Using and Curating GIFs in Discord for 2024
- Selecting the Ideal Team Communication Tool A Slack Vs. Discord Evaluation for 2024
- In 2024, Need to Learn About Halftone Effects? Learn How to Quickly Create a Halftone Effect in Adobe Photoshop with Simple, Easy-to-Follow Instructions
- How to Hard Reset HTC U23 Without Password | Dr.fone
- New 15 Best Free Cinematic LUTs for Your Film for 2024
- Quality Matters A Guide to Converting Video to MP3 without Loss for 2024
- In 2024, Boosting Social Media Presence with Effective FB Instream Ad Plans
- [New] Mastering Instagram Tips for Picture-Perfect Posts
- Updated The Ultimate Beginners Guide to HD Video Pixel Dimensions
- In 2024, Echo Eradicator The Complete Guide to Clean Auditory Experience
- Echo-Free Soundscape Guide for Windows Discovering Best Practices in Auditory Purification for 2024
- [New] Viral Ventures From Likes to Lore in the Facebook Landscape
- How To Upgrade or Downgrade Apple iPhone 6s Without Losing Data? | Dr.fone
- [Updated] Facebook Cover Videos A Step-by-Step Guide
- New In 2024, Achieving Sonic Clarity Overcoming Hiss and Other Unwanted Noises in Audio Tracks
- Updated Flip It! How to Reverse Your TikTok Videos Like a Pro
- How To Fix Auto Lock Greyed Out on Apple iPhone 15 Pro
- [New] 2024 Approved The Path to Profitable FB Animation Ad Success Stories
- New VN Video Editor for Mac A Comprehensive Guide and Alternative Options
- Updated 2024 Approved Top 10 Online Animated Logo Makers Everyone Should Know
- Optimal Logitech Webcam Settings for Professional Video Outputs for 2024
- How To Fix OEM Unlock Missing on Meizu 21?
- [New] Learn Audio Recording in Audacity with Your Mac for 2024
- The Ultimate Guide to Samsung Galaxy S23 Pattern Lock Screen Everything You Need to Know
- New In 2024, Navigating Through the Top Choices for Mac MP3 Metadata Manipulators
- How to Change Your Nubia Red Magic 9 Pro Location on life360 Without Anyone Knowing? | Dr.fone
- Updated The One-Stop Shop for Podcast Platforms and Directories
- Join the Journey to a Calmer Mind (Games)
- New The Ultimate Guide to Aspect Ratio Adjustment in Final Cut Pro for 2024
- In 2024, Mac's Screen Capture Champions The Premier Tools Evaluation
- New 2024 Approved Top 5 Mac-Compatible MP3 Audio Blending Tools
- [Updated] Achieve Crystal Clear Slack Discussions with These 10 Tools
- In 2024, How to Transfer Data from Realme Narzo 60x 5G to Samsung Phone | Dr.fone
- Updated How to Animate Designs With Canva GIF
- What Are Facebook Reels and How to Make for 2024
- [Updated] 2024 Approved Social Snapshot Post Photos/Videos without a Twit
- How to Mirror Honor V Purse to Mac? | Dr.fone
- Updated Chromebook Video Editing Mastery How to Use Any App, Regardless of OS for 2024
- Quick Guide to Professional Video Filming with Your Mac's Webcam (5 Easy Methods) for 2024
- How To Transfer Data From iPhone XR To Other iPhone 13 Pro devices? | Dr.fone
- Title: [New] In 2024, Perfecting Your Status with Emojis in Discord Chat
- Author: Timothy
- Created at : 2024-05-23 22:48:20
- Updated at : 2024-05-24 22:48:20
- Link: https://discord-videos.techidaily.com/new-in-2024-perfecting-your-status-with-emojis-in-discord-chat/
- License: This work is licensed under CC BY-NC-SA 4.0.
