
![[New] In 2024, Premiere Mobile & Desktop Discord Capture Solutions](https://www.lifewire.com/thmb/Y6vVYuznenvIY7JLo4M8rcu2Q08=/400x300/filters:no_upscale():max_bytes(150000):strip_icc()/001_how-to-watch-espn-plus-on-roku-7485522-6ae6587255d2492b9156bee541ba4c39.jpg)
[New] In 2024, Premiere Mobile & Desktop Discord Capture Solutions
Premiere Mobile & Desktop Discord Capture Solutions
Best Discord Screen Recorders [Online/Windows/Mac/Phone]

Liza Brown
Mar 27, 2024• Proven solutions
Discord is packed with great features, but one thing it’s missing is a screen recorder. You can chat, enjoy video calls and share your screen with friends or colleagues, but you can’t record these conversations or videos without using a third-party app.
Thankfully, there are plenty of choices for finding the best screen recorder for Discord. So here we’ll take you through the best options for Discord on the browser, on Windows and Mac, and on mobile so that no matter how you use Discord, you can record those epic gaming sessions or study groups for you to revisit later.
One thing to note before we begin – make sure everyone in your chat or server knows they’re being recorded. In some countries, it’s illegal to record someone without their permission, but even where legalities don’t matter, you don’t want to upset people by recording them without them being aware.
In this article
- Part 1: Best Screen Recorder Software for Discord Desktop App
- Part 2: Best Online Screen Recorder for Discord
- Part 3: Best Screen Recorder Apps for Discord on iPhone and Android
- Part 4: How to Record Discord Video Screen with Filmora?
Part 1: Best Windows/Mac Screen Recorder Software for Discord
If you prefer to use the Discord app on Windows or Mac, you’ll want a more robust screen recording tool . Here are four of the best screen recorders for Discord app users.
1. OBS
OBS (Open Broadcaster Software) is a free, open-source tool that many people use to stream live and record their screens. It works on Windows, Mac, and Linux and offers customization tools.
There are no pricing plans, everything is completely free, and it lets you add a range of sources so that you can record your webcam, Discord audio, and everything on the screen, including any overlays. The two main drawbacks to OBS are its complexity – it can be demanding on your computer, and it’s not the easiest to use. So expect to take some time getting a handle on how to set it up first.
2. Bandicam
Bandicam is another option that manages to be more intuitive. It’s easy to use, although it has many options to help you get the perfect recording. But if you’re not interested in spending ages tinkering, Bandicam is more likely to give you a higher quality recording using default settings, and it’s less demanding.
Bandicam isn’t free, but it doesn’t involve a monthly subscription, unlike many suggested tools. A one-off license for Bandicam for one PC is $39.95, or you can get a two-PC license for $59.95. If you want the editing software, Bandicut included, then that’s $60.95 with a single license. It’s also worth noting that Bandicam only works on Windows.
3. Wondershare Filmora
Though Filmora is a specialized video editing software, it also features screen recording , webcam recording, and audio recording tools. One of the biggest advantages of using Filmora to record Discord videos is that it features lots of elements and game video special effects, which will make your video cool. You can head to Part 4 of this article for detailed information about recording Discord video.


4. DemoCreator
If you plan to edit your screen recordings before uploading them, consider Wondershare DemoCreator . Working with both Windows and Mac, it’s a powerful screen recorder with some basic editing features, making it easy to turn your screen records into epic videos.
You can record in up to 120fps using two devices, such as your screen and webcam, and as well as the editing suite, there are effects tools you can utilize as well. Choose an annual subscription for $23.99 or buy a perpetual license for one PC for $47.99.
5. Camtasia
If you’re specifically looking to record your Discord screen to record tutorials, then Camtasia is a specialist tool with various templates that you can use to record professional-quality videos using your Discord app.
However, while Camtasia is fantastic for these videos, it lacks some of the effects options you might want if you’re recording game streams. And the cost is a huge factor, too – it’s around $300 for a one-off license, with an annual fee of $60 if you need ongoing support and an extra $25 for some of the additional capture tools required.
Part 2: Best Online Screen Recorder for Discord
If you’re using the online version of Discord in your web browser, you’ll be best suited to a screen recorded that specialist recorder.
2. Screen Capture
One such option is Screen Capture , which is extremely easy to use. As well as recording what’s happening on the screen, you have the option to record your microphone, audio, and webcam. As soon as your head to the Screen Capture website, you can start recording in one click, although the free version does have a watermark. It’s £4.95 per month to remove this.
There’s no software to download, and your videos will be saved in HD quality. You’ll need to click Start Recording and then, in the pop-up, permit it to record your screen. It works with all the major browsers – Chrome, Firefox, Edge, and Opera.
3. Clipchamp
If you need some more tools at your disposal, you might prefer Clipchamp . Unlike Screen Capture, you’ll need to create an account, and the free version only lets you output in standard definition. However, Clipchamp includes editing tools to record and tweak your footage before exporting it easily.
It works fully with Chrome and Edge and other Chromium-based browsers, with partial support for other browsers. If you want to output at 720p or higher, you’ll need to upgrade to a Creator account at $9 per month, while Full HD is available with a Business account for $19 per month.
3. Screencast-o-matic
The third option we would recommend as one of the best screen recorders for online Discord is Screencast-o-matic . This will record whatever is on the screen in any browser, working on all Windows, Mac, Chrome OS, Android, and iOS systems.
The free option lets you record up to 15 minutes of footage, while the Deluxe removes that limit and includes basic editing for $1.65 per month. However, the difference here is that you’ll need to download an application to record your browser – it’s not just an online tool. Once it’s downloaded, just run the software, and you can record Discord in your browser with a few clicks.
Part 3: Best Screen Recorder Apps for Discord on iPhone and Android
If you prefer to use the Discord mobile app, you’ll need a dedicated smartphone tool to record your screen. It’s important to do your research, as mobile apps are often full of ads or issues that can cause your device to slow down to a crawl. It’s not helped because review scores are so easily manipulated. You should use one of these recommendations for what we feel are the best screen recorders for Discord mobile.
1. AZ Screen Recorder
AZ Screen Recorder is a free tool you can download from the Google Play Store on an Android device. It lets you record in Full HD quality at 60fps, ideal for recording your Discord video calls to share or review later.
It also includes some editing tools, so you can trim your video, add text or music, and compress it to reduce the file size. However, a major drawback is that it cannot record audio from the source – instead, it’ll record through your phone’s microphone. This is great if you want to add commentary, but not so much if you’re dealing with background noise.
2. Screen Recorder for Game, Video Call, Screenshots
Another option for Android is ‘Screen Recorder for Game, Video Call, Screenshots’ . Despite the mouthful of a name, it’s a pretty simple app to use, and again it’s free. It has an advantage over AZ Screen Recorder in that it can record up to 1440p, perfect for then sharing over Discord with users on a gaming monitor.
The main issue with Screen Recorder is that it’s a little unreliable at times, with many people struggling to access the extra video editing tools. But if you were to combine Screen Recorder with editing software like Filmora, you could get a comprehensive solution for Discord mobile recording.
3. Record It
If you’re an iOS user, you’ll want to look at ‘Record It! ’. It’s another free option that works well on both iPhone and iPad, letting you record your apps, including Discord. You can record the entire screen in high quality and add your Face Cam as an overlay.
The included editor doesn’t have amazingly comprehensive tools, but you can trim your video, add a filter or adjust the playback speed. But, again, if you want to do more intensive editing, you’ll need to pair it with dedicated software such as Filmora.
Part 4: How to Record Discord Video Screen with Filmora?
If you want to record your screen with Filmora, create a video tutorial, or show off your gaming skills.
Start by heading to File and then Record Media, and choose the option to Record from PC.
You’ll then get a pop-up that lets you choose how much of your screen you want to capture. Enter a custom resolution, or drag the box that’s appeared on your screen to the size and location you want to record. You can also use this screen to configure whether your microphone and system audio is recorded.
If you click on the Settings cog, you’ll get a dropdown with more options – change the resolution, frame rate, and the location where you’re saving the file. You can also change the settings for showing mouse clicks, which you’ll want to do if you’re making a tutorial.
Once you hit the red record button, the screen will start recording after a countdown of five seconds – ample time to switch browser window to Discord. Then, when you’re done, head back to Filmora and click the Stop button at the top-right of the screen.
The video will save automatically to your chosen file path. You can then drag it into Filmora to trim off the start and end, if necessary, and use all of Filmora’s editing tools to enhance your video.
Liza Brown
Liza Brown is a writer and a lover of all things video.
Follow @Liza Brown
Liza Brown
Mar 27, 2024• Proven solutions
Discord is packed with great features, but one thing it’s missing is a screen recorder. You can chat, enjoy video calls and share your screen with friends or colleagues, but you can’t record these conversations or videos without using a third-party app.
Thankfully, there are plenty of choices for finding the best screen recorder for Discord. So here we’ll take you through the best options for Discord on the browser, on Windows and Mac, and on mobile so that no matter how you use Discord, you can record those epic gaming sessions or study groups for you to revisit later.
One thing to note before we begin – make sure everyone in your chat or server knows they’re being recorded. In some countries, it’s illegal to record someone without their permission, but even where legalities don’t matter, you don’t want to upset people by recording them without them being aware.
In this article
- Part 1: Best Screen Recorder Software for Discord Desktop App
- Part 2: Best Online Screen Recorder for Discord
- Part 3: Best Screen Recorder Apps for Discord on iPhone and Android
- Part 4: How to Record Discord Video Screen with Filmora?
Part 1: Best Windows/Mac Screen Recorder Software for Discord
If you prefer to use the Discord app on Windows or Mac, you’ll want a more robust screen recording tool . Here are four of the best screen recorders for Discord app users.
1. OBS
OBS (Open Broadcaster Software) is a free, open-source tool that many people use to stream live and record their screens. It works on Windows, Mac, and Linux and offers customization tools.
There are no pricing plans, everything is completely free, and it lets you add a range of sources so that you can record your webcam, Discord audio, and everything on the screen, including any overlays. The two main drawbacks to OBS are its complexity – it can be demanding on your computer, and it’s not the easiest to use. So expect to take some time getting a handle on how to set it up first.
2. Bandicam
Bandicam is another option that manages to be more intuitive. It’s easy to use, although it has many options to help you get the perfect recording. But if you’re not interested in spending ages tinkering, Bandicam is more likely to give you a higher quality recording using default settings, and it’s less demanding.
Bandicam isn’t free, but it doesn’t involve a monthly subscription, unlike many suggested tools. A one-off license for Bandicam for one PC is $39.95, or you can get a two-PC license for $59.95. If you want the editing software, Bandicut included, then that’s $60.95 with a single license. It’s also worth noting that Bandicam only works on Windows.
3. Wondershare Filmora
Though Filmora is a specialized video editing software, it also features screen recording , webcam recording, and audio recording tools. One of the biggest advantages of using Filmora to record Discord videos is that it features lots of elements and game video special effects, which will make your video cool. You can head to Part 4 of this article for detailed information about recording Discord video.
4. DemoCreator
If you plan to edit your screen recordings before uploading them, consider Wondershare DemoCreator . Working with both Windows and Mac, it’s a powerful screen recorder with some basic editing features, making it easy to turn your screen records into epic videos.
You can record in up to 120fps using two devices, such as your screen and webcam, and as well as the editing suite, there are effects tools you can utilize as well. Choose an annual subscription for $23.99 or buy a perpetual license for one PC for $47.99.
5. Camtasia
If you’re specifically looking to record your Discord screen to record tutorials, then Camtasia is a specialist tool with various templates that you can use to record professional-quality videos using your Discord app.
However, while Camtasia is fantastic for these videos, it lacks some of the effects options you might want if you’re recording game streams. And the cost is a huge factor, too – it’s around $300 for a one-off license, with an annual fee of $60 if you need ongoing support and an extra $25 for some of the additional capture tools required.
Part 2: Best Online Screen Recorder for Discord
If you’re using the online version of Discord in your web browser, you’ll be best suited to a screen recorded that specialist recorder.
2. Screen Capture
One such option is Screen Capture , which is extremely easy to use. As well as recording what’s happening on the screen, you have the option to record your microphone, audio, and webcam. As soon as your head to the Screen Capture website, you can start recording in one click, although the free version does have a watermark. It’s £4.95 per month to remove this.
There’s no software to download, and your videos will be saved in HD quality. You’ll need to click Start Recording and then, in the pop-up, permit it to record your screen. It works with all the major browsers – Chrome, Firefox, Edge, and Opera.
3. Clipchamp
If you need some more tools at your disposal, you might prefer Clipchamp . Unlike Screen Capture, you’ll need to create an account, and the free version only lets you output in standard definition. However, Clipchamp includes editing tools to record and tweak your footage before exporting it easily.
It works fully with Chrome and Edge and other Chromium-based browsers, with partial support for other browsers. If you want to output at 720p or higher, you’ll need to upgrade to a Creator account at $9 per month, while Full HD is available with a Business account for $19 per month.
3. Screencast-o-matic
The third option we would recommend as one of the best screen recorders for online Discord is Screencast-o-matic . This will record whatever is on the screen in any browser, working on all Windows, Mac, Chrome OS, Android, and iOS systems.
The free option lets you record up to 15 minutes of footage, while the Deluxe removes that limit and includes basic editing for $1.65 per month. However, the difference here is that you’ll need to download an application to record your browser – it’s not just an online tool. Once it’s downloaded, just run the software, and you can record Discord in your browser with a few clicks.
Part 3: Best Screen Recorder Apps for Discord on iPhone and Android
If you prefer to use the Discord mobile app, you’ll need a dedicated smartphone tool to record your screen. It’s important to do your research, as mobile apps are often full of ads or issues that can cause your device to slow down to a crawl. It’s not helped because review scores are so easily manipulated. You should use one of these recommendations for what we feel are the best screen recorders for Discord mobile.
1. AZ Screen Recorder
AZ Screen Recorder is a free tool you can download from the Google Play Store on an Android device. It lets you record in Full HD quality at 60fps, ideal for recording your Discord video calls to share or review later.
It also includes some editing tools, so you can trim your video, add text or music, and compress it to reduce the file size. However, a major drawback is that it cannot record audio from the source – instead, it’ll record through your phone’s microphone. This is great if you want to add commentary, but not so much if you’re dealing with background noise.
2. Screen Recorder for Game, Video Call, Screenshots
Another option for Android is ‘Screen Recorder for Game, Video Call, Screenshots’ . Despite the mouthful of a name, it’s a pretty simple app to use, and again it’s free. It has an advantage over AZ Screen Recorder in that it can record up to 1440p, perfect for then sharing over Discord with users on a gaming monitor.
The main issue with Screen Recorder is that it’s a little unreliable at times, with many people struggling to access the extra video editing tools. But if you were to combine Screen Recorder with editing software like Filmora, you could get a comprehensive solution for Discord mobile recording.
3. Record It
If you’re an iOS user, you’ll want to look at ‘Record It! ’. It’s another free option that works well on both iPhone and iPad, letting you record your apps, including Discord. You can record the entire screen in high quality and add your Face Cam as an overlay.
The included editor doesn’t have amazingly comprehensive tools, but you can trim your video, add a filter or adjust the playback speed. But, again, if you want to do more intensive editing, you’ll need to pair it with dedicated software such as Filmora.
Part 4: How to Record Discord Video Screen with Filmora?
If you want to record your screen with Filmora, create a video tutorial, or show off your gaming skills.
Start by heading to File and then Record Media, and choose the option to Record from PC.
You’ll then get a pop-up that lets you choose how much of your screen you want to capture. Enter a custom resolution, or drag the box that’s appeared on your screen to the size and location you want to record. You can also use this screen to configure whether your microphone and system audio is recorded.
If you click on the Settings cog, you’ll get a dropdown with more options – change the resolution, frame rate, and the location where you’re saving the file. You can also change the settings for showing mouse clicks, which you’ll want to do if you’re making a tutorial.
Once you hit the red record button, the screen will start recording after a countdown of five seconds – ample time to switch browser window to Discord. Then, when you’re done, head back to Filmora and click the Stop button at the top-right of the screen.
The video will save automatically to your chosen file path. You can then drag it into Filmora to trim off the start and end, if necessary, and use all of Filmora’s editing tools to enhance your video.
Liza Brown
Liza Brown is a writer and a lover of all things video.
Follow @Liza Brown
Mastering Discord Spoilers: Key Insights Revealed
Discord Spoiler Tag: All You Need to Know

Richard Bennett
Mar 27, 2024• Proven solutions
With Discord, you can text with emojis and even send GIFs. However, as servers become crowded, they get bombarded with texts. And some of these texts have spoilers for games (or other stuff) that others may not want to know or read. But ignoring spoilers was not that easy. As you scroll miles and miles of texts, your eyes are bound to catch some hints and ruin the suspense for you.
Thankfully, Discord came out with the perfect solution. Now, if you are sharing some spoilers or secrets, you can mark them as spoilers. The result is a text that is sent but is blacked out. Curious users who are not scared of spoilers can view it. Others can enjoy their bliss of ignorance.
In this article
- Part 1: How to Use Spoilers on Discord to Hide Text Messages?
- Part 2: How to Add Spoiler to Image and Video on Discord?
- Bonus: Is it the same to use Spoiler on Mobile devices?
- Bonus: How to turn off the Spoiler tag?
Part 1: How to Use Spoilers on Discord to Hide Text Messages?
And now we come to the point - how to do spoilers on Discord? Well, there are two ways to do it. You can run through both of them and choose whichever suits you the best. All the methods are simple to follow. Note that some are available only on the desktop.
Method 1: Adding Spoiler Text Via Tag on Discord
We will begin with the tag method. All you have to do is add the spoiler tag on Discord. Here is a quick rundown of the steps –
- Open the Discord app and log in using your credentials.
- Pick a server from your server list or a friend from the friend list.
- Type whatever you want to in the chatbox.
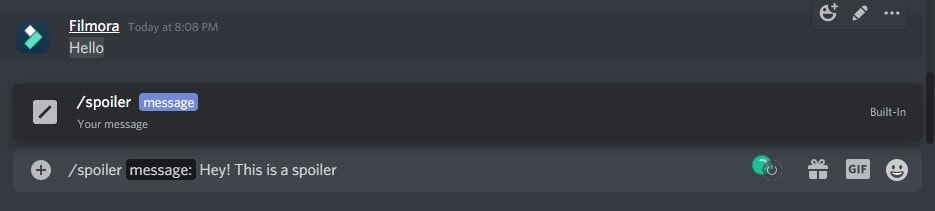
- Now add the ‘||’ symbols before and after the spoiler content. For instance, it will look something like this – Hey! This is a spoiler ||spoiler alert||
- Hit the enter key to send and your spoiler is sent without spoiling anything!

This works for the Discord desktop app, browser, and also mobile app. This is like a universal method of hiding spoilers.
You can also add ‘/spoiler’ before the spoiler content. This is an alternative to the ‘||’ we add at the start and the end.
Method 2: Sending Spoiler Message with Mark as Spoiler icon
This alternate method is quite simple. This was a recent update on Discord that enables you to add the spoiler tag quickly. Here is a brief rundown for you –
- Type out the spoiler content in the chatbox.
- Select the spoiler part of the text (highlight it).
- Upon selection, a floating bar will appear. Click the ‘eye’ symbol. and then the ‘||’ mark will immediately accompany the selected text, and the selected message will be spoiled automatically.
- After you hit the send button, the text will be sent to the server. Only the people who wish to see the spoiler will tap on it unveil it.
![]()
This method is available only on the Discord desktop app and browser version. For iOS, the steps are similar. The only difference is that you have to select the spoiler mark from the context menu.
Part 2: How to Add Spoiler to Image and Video on Discord?
There are many scenarios where a Discord spoiler can come in handy. As you might be aware that Discord is quite popular and its cross-platform flexibility make it a favorite among gamers. You can connect to your friends over multiple devices with a single account.
Just like texts, even images, videos, and other attachments can be marked as spoilers. The process of marking images and videos as spoilers differs slightly from that of texts. So, how to add spoiler tags to other files? Here’s the rundown.
Images can be tagged as spoilers before you upload them on servers. To add spoiler tags to images –
- Open Discord on your desktop app or browser.
- Select the image or video that you want to send on the server.
- Drag it to your server chat and drop it there.
- Next, tap on the ‘+’ symbol.
- From the options that appear, choose ‘Mark as Spoiler.’
- Hit the Upload button.
- The result is a blurred image sent on the server. Anyone who wishes to view the image can tap on it.
Note that spoilers that contain images, videos, or other multimedia files can be sent only on the desktop app or the browser. Mobile apps do not support spoiler marks for images or other media files.
Bonus: Is it the same to use Spoiler on Mobile devices?
The Discord mobile spoiler tag works the same on mobile apps. The process is more or less the same. Here is a quick rundown of the steps –
- Type out the spoiler text.
- Add ‘||’ symbols at the start and end of the text you want to hide.
- Hit the send button, and your spoiler text will be covered.
- Only the curious ones can tap and see your spoiler texts.
You can even mark embedded links as spoilers with the same process. But this does not apply to Discord server links. Furthermore, you cannot add spoiler tags to images, videos, and other files from the mobile app.
For iOS, you can select and highlight the text that you want to hide. Then, tap open the context menu and click on the ‘Mark as Spoiler’ to hide the text.
Bonus: How to turn off the Spoiler tag?
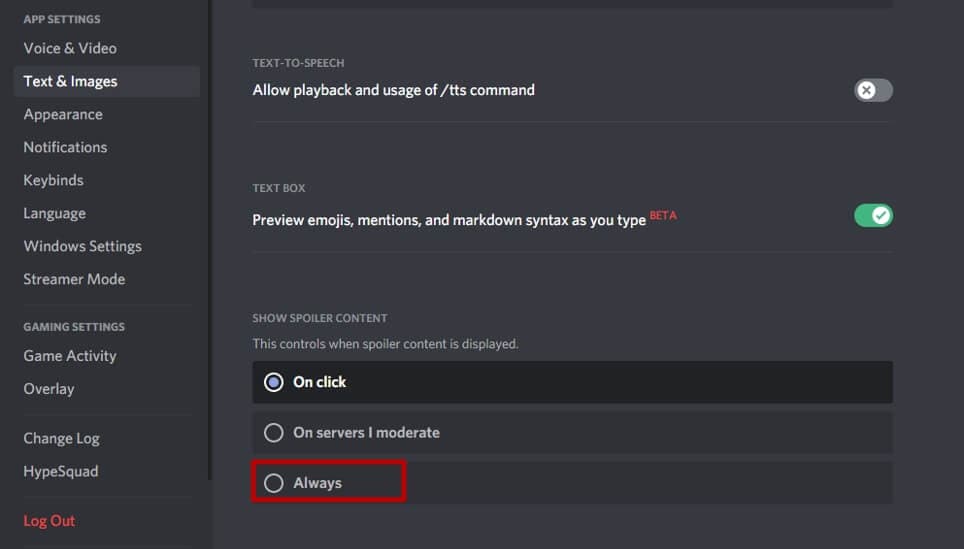
For some reason, you may want to remove the spoiler tag from the spoiler texts. In that case, open the User Settings and tap on Text & Images. Scroll down to the Show Spoiler Content tab and you will see options to control when spoiler content is displayed. You can choose to display on click, on servers I moderate, and always.
If you want to display all spoiler content, choose Always to turn off the spoiler tag. You can hide them again through the same menu if you change your mind.
This was an article on how to use the Discord spoiler tag to hide texts, images, and videos. You can undo and redo the tags as many times as you like. If you are about to unveil some life-changing secret on your Discord server, then don’t forget to add that spoiler tag.
Richard Bennett
Richard Bennett is a writer and a lover of all things video.
Follow @Richard Bennett
Richard Bennett
Mar 27, 2024• Proven solutions
With Discord, you can text with emojis and even send GIFs. However, as servers become crowded, they get bombarded with texts. And some of these texts have spoilers for games (or other stuff) that others may not want to know or read. But ignoring spoilers was not that easy. As you scroll miles and miles of texts, your eyes are bound to catch some hints and ruin the suspense for you.
Thankfully, Discord came out with the perfect solution. Now, if you are sharing some spoilers or secrets, you can mark them as spoilers. The result is a text that is sent but is blacked out. Curious users who are not scared of spoilers can view it. Others can enjoy their bliss of ignorance.
In this article
- Part 1: How to Use Spoilers on Discord to Hide Text Messages?
- Part 2: How to Add Spoiler to Image and Video on Discord?
- Bonus: Is it the same to use Spoiler on Mobile devices?
- Bonus: How to turn off the Spoiler tag?
Part 1: How to Use Spoilers on Discord to Hide Text Messages?
And now we come to the point - how to do spoilers on Discord? Well, there are two ways to do it. You can run through both of them and choose whichever suits you the best. All the methods are simple to follow. Note that some are available only on the desktop.
Method 1: Adding Spoiler Text Via Tag on Discord
We will begin with the tag method. All you have to do is add the spoiler tag on Discord. Here is a quick rundown of the steps –
- Open the Discord app and log in using your credentials.
- Pick a server from your server list or a friend from the friend list.
- Type whatever you want to in the chatbox.
- Now add the ‘||’ symbols before and after the spoiler content. For instance, it will look something like this – Hey! This is a spoiler ||spoiler alert||
- Hit the enter key to send and your spoiler is sent without spoiling anything!
This works for the Discord desktop app, browser, and also mobile app. This is like a universal method of hiding spoilers.
You can also add ‘/spoiler’ before the spoiler content. This is an alternative to the ‘||’ we add at the start and the end.
Method 2: Sending Spoiler Message with Mark as Spoiler icon
This alternate method is quite simple. This was a recent update on Discord that enables you to add the spoiler tag quickly. Here is a brief rundown for you –
- Type out the spoiler content in the chatbox.
- Select the spoiler part of the text (highlight it).
- Upon selection, a floating bar will appear. Click the ‘eye’ symbol. and then the ‘||’ mark will immediately accompany the selected text, and the selected message will be spoiled automatically.
- After you hit the send button, the text will be sent to the server. Only the people who wish to see the spoiler will tap on it unveil it.
![]()
This method is available only on the Discord desktop app and browser version. For iOS, the steps are similar. The only difference is that you have to select the spoiler mark from the context menu.
Part 2: How to Add Spoiler to Image and Video on Discord?
There are many scenarios where a Discord spoiler can come in handy. As you might be aware that Discord is quite popular and its cross-platform flexibility make it a favorite among gamers. You can connect to your friends over multiple devices with a single account.
Just like texts, even images, videos, and other attachments can be marked as spoilers. The process of marking images and videos as spoilers differs slightly from that of texts. So, how to add spoiler tags to other files? Here’s the rundown.
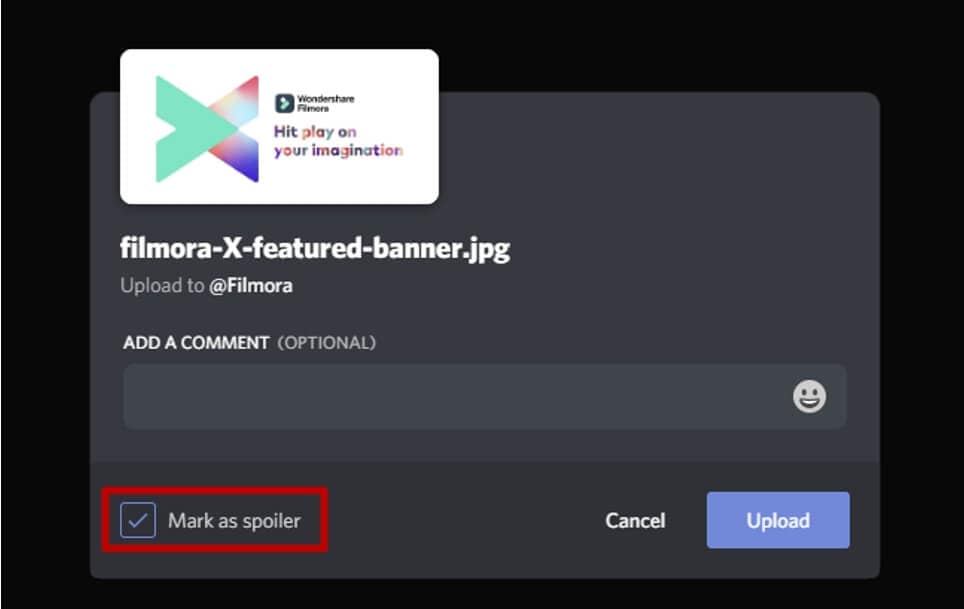
Images can be tagged as spoilers before you upload them on servers. To add spoiler tags to images –
- Open Discord on your desktop app or browser.
- Select the image or video that you want to send on the server.
- Drag it to your server chat and drop it there.
- Next, tap on the ‘+’ symbol.
- From the options that appear, choose ‘Mark as Spoiler.’
- Hit the Upload button.
- The result is a blurred image sent on the server. Anyone who wishes to view the image can tap on it.
Note that spoilers that contain images, videos, or other multimedia files can be sent only on the desktop app or the browser. Mobile apps do not support spoiler marks for images or other media files.
Bonus: Is it the same to use Spoiler on Mobile devices?
The Discord mobile spoiler tag works the same on mobile apps. The process is more or less the same. Here is a quick rundown of the steps –
- Type out the spoiler text.
- Add ‘||’ symbols at the start and end of the text you want to hide.
- Hit the send button, and your spoiler text will be covered.
- Only the curious ones can tap and see your spoiler texts.
You can even mark embedded links as spoilers with the same process. But this does not apply to Discord server links. Furthermore, you cannot add spoiler tags to images, videos, and other files from the mobile app.
For iOS, you can select and highlight the text that you want to hide. Then, tap open the context menu and click on the ‘Mark as Spoiler’ to hide the text.
Bonus: How to turn off the Spoiler tag?
For some reason, you may want to remove the spoiler tag from the spoiler texts. In that case, open the User Settings and tap on Text & Images. Scroll down to the Show Spoiler Content tab and you will see options to control when spoiler content is displayed. You can choose to display on click, on servers I moderate, and always.
If you want to display all spoiler content, choose Always to turn off the spoiler tag. You can hide them again through the same menu if you change your mind.
This was an article on how to use the Discord spoiler tag to hide texts, images, and videos. You can undo and redo the tags as many times as you like. If you are about to unveil some life-changing secret on your Discord server, then don’t forget to add that spoiler tag.
Richard Bennett
Richard Bennett is a writer and a lover of all things video.
Follow @Richard Bennett
Richard Bennett
Mar 27, 2024• Proven solutions
With Discord, you can text with emojis and even send GIFs. However, as servers become crowded, they get bombarded with texts. And some of these texts have spoilers for games (or other stuff) that others may not want to know or read. But ignoring spoilers was not that easy. As you scroll miles and miles of texts, your eyes are bound to catch some hints and ruin the suspense for you.
Thankfully, Discord came out with the perfect solution. Now, if you are sharing some spoilers or secrets, you can mark them as spoilers. The result is a text that is sent but is blacked out. Curious users who are not scared of spoilers can view it. Others can enjoy their bliss of ignorance.
In this article
- Part 1: How to Use Spoilers on Discord to Hide Text Messages?
- Part 2: How to Add Spoiler to Image and Video on Discord?
- Bonus: Is it the same to use Spoiler on Mobile devices?
- Bonus: How to turn off the Spoiler tag?
Part 1: How to Use Spoilers on Discord to Hide Text Messages?
And now we come to the point - how to do spoilers on Discord? Well, there are two ways to do it. You can run through both of them and choose whichever suits you the best. All the methods are simple to follow. Note that some are available only on the desktop.
Method 1: Adding Spoiler Text Via Tag on Discord
We will begin with the tag method. All you have to do is add the spoiler tag on Discord. Here is a quick rundown of the steps –
- Open the Discord app and log in using your credentials.
- Pick a server from your server list or a friend from the friend list.
- Type whatever you want to in the chatbox.
- Now add the ‘||’ symbols before and after the spoiler content. For instance, it will look something like this – Hey! This is a spoiler ||spoiler alert||
- Hit the enter key to send and your spoiler is sent without spoiling anything!
This works for the Discord desktop app, browser, and also mobile app. This is like a universal method of hiding spoilers.
You can also add ‘/spoiler’ before the spoiler content. This is an alternative to the ‘||’ we add at the start and the end.
Method 2: Sending Spoiler Message with Mark as Spoiler icon
This alternate method is quite simple. This was a recent update on Discord that enables you to add the spoiler tag quickly. Here is a brief rundown for you –
- Type out the spoiler content in the chatbox.
- Select the spoiler part of the text (highlight it).
- Upon selection, a floating bar will appear. Click the ‘eye’ symbol. and then the ‘||’ mark will immediately accompany the selected text, and the selected message will be spoiled automatically.
- After you hit the send button, the text will be sent to the server. Only the people who wish to see the spoiler will tap on it unveil it.
![]()
This method is available only on the Discord desktop app and browser version. For iOS, the steps are similar. The only difference is that you have to select the spoiler mark from the context menu.
Part 2: How to Add Spoiler to Image and Video on Discord?
There are many scenarios where a Discord spoiler can come in handy. As you might be aware that Discord is quite popular and its cross-platform flexibility make it a favorite among gamers. You can connect to your friends over multiple devices with a single account.
Just like texts, even images, videos, and other attachments can be marked as spoilers. The process of marking images and videos as spoilers differs slightly from that of texts. So, how to add spoiler tags to other files? Here’s the rundown.
Images can be tagged as spoilers before you upload them on servers. To add spoiler tags to images –
- Open Discord on your desktop app or browser.
- Select the image or video that you want to send on the server.
- Drag it to your server chat and drop it there.
- Next, tap on the ‘+’ symbol.
- From the options that appear, choose ‘Mark as Spoiler.’
- Hit the Upload button.
- The result is a blurred image sent on the server. Anyone who wishes to view the image can tap on it.
Note that spoilers that contain images, videos, or other multimedia files can be sent only on the desktop app or the browser. Mobile apps do not support spoiler marks for images or other media files.
Bonus: Is it the same to use Spoiler on Mobile devices?
The Discord mobile spoiler tag works the same on mobile apps. The process is more or less the same. Here is a quick rundown of the steps –
- Type out the spoiler text.
- Add ‘||’ symbols at the start and end of the text you want to hide.
- Hit the send button, and your spoiler text will be covered.
- Only the curious ones can tap and see your spoiler texts.
You can even mark embedded links as spoilers with the same process. But this does not apply to Discord server links. Furthermore, you cannot add spoiler tags to images, videos, and other files from the mobile app.
For iOS, you can select and highlight the text that you want to hide. Then, tap open the context menu and click on the ‘Mark as Spoiler’ to hide the text.
Bonus: How to turn off the Spoiler tag?
For some reason, you may want to remove the spoiler tag from the spoiler texts. In that case, open the User Settings and tap on Text & Images. Scroll down to the Show Spoiler Content tab and you will see options to control when spoiler content is displayed. You can choose to display on click, on servers I moderate, and always.
If you want to display all spoiler content, choose Always to turn off the spoiler tag. You can hide them again through the same menu if you change your mind.
This was an article on how to use the Discord spoiler tag to hide texts, images, and videos. You can undo and redo the tags as many times as you like. If you are about to unveil some life-changing secret on your Discord server, then don’t forget to add that spoiler tag.
Richard Bennett
Richard Bennett is a writer and a lover of all things video.
Follow @Richard Bennett
Also read:
- [New] Social Sync How to Add Friends on Discord for 2024
- [New] 2024 Approved Discord Customization Essentials Selecting Eye-Catching Flag Designs
- [New] Masterminds of Memorable Discord Symbols Revealed for 2024
- [New] 2024 Approved Iconic Influencer Icons Lively Logos
- 2024 Approved Elevate Your Server Control Add Roles Instruction
- [Updated] Premium Icon Crafting Services, All at NO Cost
- 2024 Approved Noise-Free Conversations Achievable with VoiceMod on Discord Platforms
- Elevate Your Music in Discord with These Professional Bot Tools for 2024
- [New] In 2024, An In-Depth Exploration of Discord Features
- [New] 2024 Approved Finding Fellowship Adding Friends in Discord
- [Updated] In 2024, Best Discord Couple Chat Spaces
- [Updated] 2024 Approved How to Delete Discord Server?
- [New] Efficiently Managing Discord Spoiler Tags in Chats for 2024
- [New] In 2024, Top Screen Recorder Apps From PC to Mobile, Including Discord
- [Updated] In 2024, Unlock Advanced Features in Discord's Live Broadcast
- Securely Discarding Discord Communication in Large Quantities
- In 2024, Boosting Engagement Strategies for Discord Streamers
- [New] Essential Insights Into Using Discord for 2024
- [Updated] 2024 Approved Top Discord Recording Apps for Mobile & Desktop
- 2024 Approved Real-Time Interaction Best Practices for Discord Streamers
- [Updated] 2024 Approved A Comprehensive Guide to Creating Captivating Discord PFPs with Ease
- In 2024, Tactics for Toxic Troubleshooting Your Complete Guide to Addressing Misconduct in Chat Rooms
- 2024 Approved Harmony in Digital 15 High-Fidelity Bots Transforming Discord Soundscape
- [Updated] 2024 Approved Styling Conversations on Discord with Flair & Ease
- [New] 2024 Approved Excellent AI Bots for Social Spheres
- [Updated] Premier Font Generators Transforming Discord Channels
- [Updated] In 2024, What Is Discord Nitro And How to Get It? [Free & Paid]
- [New] 2024 Approved The Insider's Guide to Clearer Communication via VoiceMod on Discord
- [New] Unlocking the Credentials Your Pathway to Validated Disco Memberhood for 2024
- [New] In 2024, Effortless Connectivity Friend up with Discord
- [New] Effortless Socializing Adding Friends Across Platforms for 2024
- [New] 2024 Approved Dive Into Free Emoji Worlds with These Innovative Online Locations
- [Updated] 2024 Approved The Right Way to Disband From a Discord Community
- [Updated] In 2024, Transformative Strategies for Effective Pins in Discord Dialogues
- Part Ways with Discord Platform
- [Updated] In 2024, Unmasking Silence How to Speak Up and Document Toxicity in Virtual Communities Like Discord
- [New] Your Complete Handbook on Discord Usage for 2024
- [New] In 2024, Mastering Discord's Video Communication for PC/iOS Users
- [New] Simplifying Server Organization Discord Roles 101 for 2024
- [New] 2024 Approved Step-By-Step Process for Adding Unique Emojis to Your Discord Avatar (PC/Mobile)
- [New] In 2024, Navigating Voice Modding on Discord Desktop & Mobile Edition
- [New] In 2024, Maximize Your Chat Experience A Complete Guide to Pinning in Discord
- [Updated] In 2024, Discord Text Decoration A Step-by-Step Approach
- [Updated] In 2024, Step-by-Step Protocol for Unearthing Hidden Gems in Discord Servers
- Mastering Discord A Guide to Filing Reports Against Misconduct for 2024
- In 2024, Revolutionize Your Discord Community with These Bots
- 2024 Approved Top Tools to Screen-Capture Discord Online Interactions
- [New] Elevate Your Sonic Journey on Discord List of Premier Bots to Try for 2024
- [New] In 2024, Elevate Your Feed Quality with These Tags
- Updated Smooth Operator 3 Easy Ways to Steady Your Footage in AE for 2024
- Top 10 Fixes for Phone Keep Disconnecting from Wi-Fi On Tecno Pova 5 Pro | Dr.fone
- Fix Unfortunately Settings Has Stopped on Vivo S17e Quickly | Dr.fone
- In 2024, Maximizing Video Reach Sharing YouTube Content via Facebook Network
- Here Are Some Reliable Ways to Get Pokemon Go Friend Codes For Samsung Galaxy A14 4G | Dr.fone
- Apply These Techniques to Improve How to Detect Fake GPS Location On Apple iPhone 12 Pro Max | Dr.fone
- [Updated] In 2024, Exclusive Twitter GIF Compiler for Avid Scribes
- In 2024, Unparalleled Audio Capture Top 9 Online Microphone Systems in '23
- New 2024 Approved Apowersoft for Sound Mastery An In-Depth Tutorial and Review of 4 Competing Technologies
- How to Unlock Apple ID From your iPhone XS Max without Security Questions?
- [Updated] In 2024, Twitter's Most Watched Highest-View Count of 2023
- How To Unlock iPhone X Without Passcode? 4 Easy Methods | Dr.fone
- New 2024 Approved Supercharge Visual & Aural Aspects of Media Content
- Updated EchoEvolution Pro Cutting-Edge Vocal Pitch Correction and Editing Solution for 2024
- Solved Warning Camera Failed on Realme GT 5 Pro | Dr.fone
- Updated Online Cartoon Maker Turn Photos Into Toons for 2024
- [Updated] Quick Guide to Starting an Instagram Live Show
- 8 Best Apps for Screen Mirroring Nokia G22 PC | Dr.fone
- How to Turn Off Google Location to Stop Tracking You on Realme C67 5G | Dr.fone
- Title: [New] In 2024, Premiere Mobile & Desktop Discord Capture Solutions
- Author: Timothy
- Created at : 2024-05-23 22:48:20
- Updated at : 2024-05-24 22:48:20
- Link: https://discord-videos.techidaily.com/new-in-2024-premiere-mobile-and-desktop-discord-capture-solutions/
- License: This work is licensed under CC BY-NC-SA 4.0.
