
![[New] In 2024, Transform Your Profile with Our Discord Pic Insights](https://www.lifewire.com/thmb/ei9si1jCBfFFLJKx_8xaXaf650o=/400x300/filters:no_upscale():max_bytes(150000):strip_icc()/computer-promo-image-3a7546bffced49e0addc218f4ef51aed.jpg)
[New] In 2024, Transform Your Profile with Our Discord Pic Insights
Transform Your Profile with Our Discord Pic Insights
The Ultimate Guide to Make Discord Profile Picture

Richard Bennett
Mar 27, 2024• Proven solutions
A part of the appeal of the popular multimedia messaging platform Discord is that users can assume online identities that present them in a favorable light. Since Discord serves to enable groups of friends or people with shared interests to communicate in real-time, standing out from the crowd and establishing a well-known and well-liked persona can be very challenging. Every element of presence on the platform contributes to the overall impression the user will make, and his profile picture is definitely one of the most impactful elements that go a long way towards identity building.
It’s important to note that Discord users can only use a single profile picture or avatar on the platform, and can’t switch them from one server to another. This rule serves to establish some accountability and familiarity and applies even to server administrators. With that in mind, choosing a great image to represent you everywhere on the Discord platform is a task that shouldn’t be taken lightly. To help you do this the right way while respecting all the rules, we prepared a detailed guide for this process.
- Part 1: Discord Profile Picture Size and Content Guidance
- Part 2: Discord Profile Pictures Download
- Part 3: How to Create A Discord Avatar in Filmora?
- Part 4: How to Change My Profile Picture on Discord?
- Part 5: Frequently Asked Questions About Discord PFP
Part 1: Discord Profile Picture Size and Content Guidance
Like all other social networks and online communication services, Discord has a set of rules determining whether a certain image is suitable for use as an avatar.
First of all, you have to adhere to a size limit for technical reasons, as too large images would slow down the channel. On the other hand, too small images won’t be legible and can look bad due to pixelization. The most optimal image size you should use for your Discord profile photo is at least 512 x 512 pixels – enough to be clearly visible and far above the 180 x 180-pixel minimum.
You don’t have to use your real photo or likeness for your Discord avatar – in fact, you don’t have to use a realistic image at all. Discord allows the use of photographs as well as various types of illustrations and cartoon images and accepts JPG as well as the animated GIF format.
This gives you a lot of freedom to craft your new identity and uses some powerful imagery, either created from scratch or taken from the internet. However, there are still some community standards that you’ll have to meet in terms of image content, or your submission for a profile picture might be rejected for failing to meet Discord’s T&C.
Basically, no NSFW images are allowed on Discord so you will have to avoid anything extreme or controversial. Pornographic content or explicit nudity is not welcome on this platform, and the same goes for showing minors in any sexually suggestive positions or promoting non-consensual forms of sexuality. You also need to stay away from violent imagery or anything depicting illegal activity, including drug use, racial discrimination, or mistreatment of animals. While this eliminates a lot of content, it still leaves enough room to express yourself freely without risking offending any other Discord users.
Part 2: Discord Profile Pictures Download
If you want to download a cool Discord profile picture, you can check the following websites:
1. discordavatars.com
This website collects free Discord avatars and profile pictures, which allow you to download without any limitations. You can search for a Discord avatar on the search bar or find it from the popular tags on the side.
![]()
Besides Discord PFP downloading, you can also find some resources and tips about Discord on this website.
2. Discord Profile Pictures and Server Icons from woodpunchsgraphics.com
This website provides both regular non-animated and animated profile pictures for Discord, but as you may all know, you can only add an animated profile when you subscribed to Discord Nitro.
![]()
There are limited Discord profile picture and server icon templates on this website, and you should customize the color and text, and submit your email to purchase.
Part 3: How to Create A Discord Avatar in Filmora?
Many Discord users ultimately decide to create custom profile pictures using external visual tools, and this option is highly recommended to anyone with at least basic creative skills. It doesn’t take too much effort to make a fantastic avatar that will be completely unique and tell exactly the story you want. There are many different software tools you can use for this purpose, but since the task is very simple you can use a practical, free program such as Filmora.
The procedure of creating a profile picture for Discord in a visual suite like Filmora is not very complex and involves just a few simple steps.
You should start by identifying the picture that will form the basis of your avatar – it can be an animated character or a real-life photo. You can search on Google image or download it from some discord profile sites.
Next, you need to load the selected image into a new project, and then resize the image to fit the preferred dimensions for Discord and change its shape to circular. To change the shape, go to Effects -> Utility -> Image Mask to optimize the image for a Discord avatar.
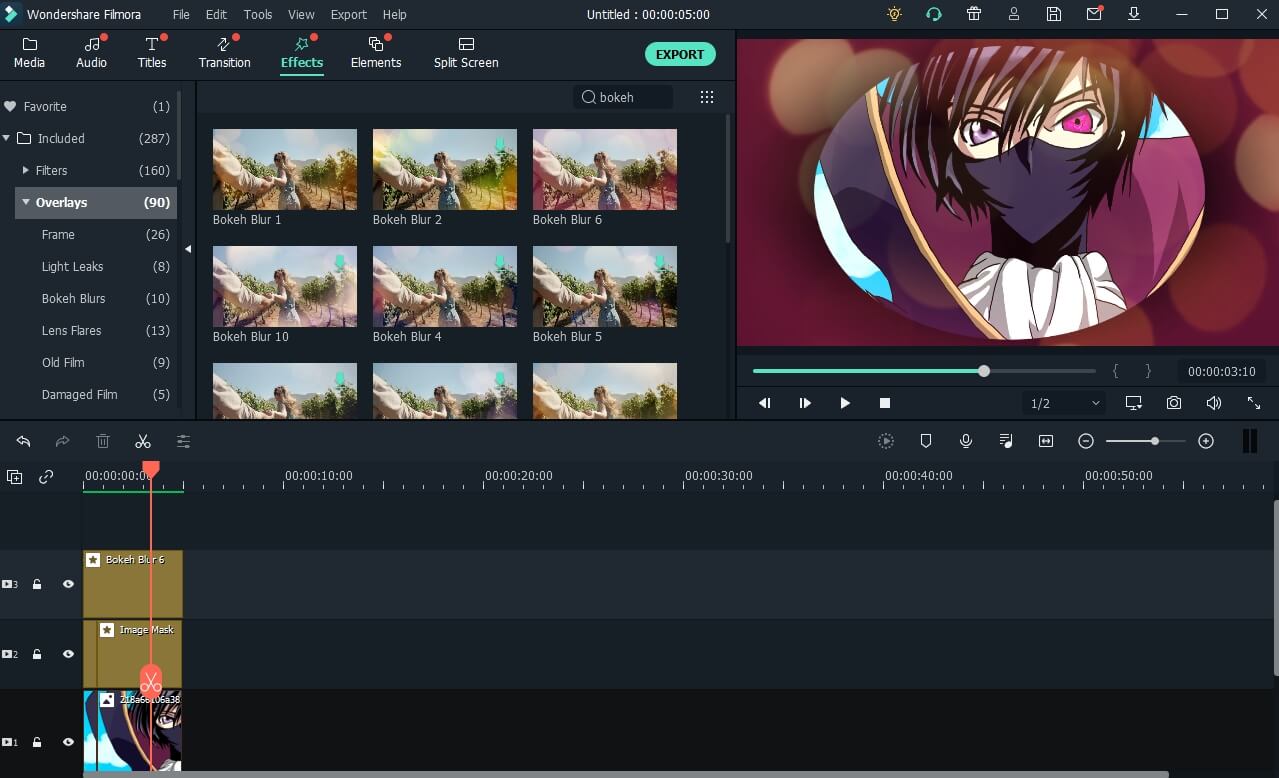
By adding overlays on top of the basic image, you can also introduce any visual or textual elements that will personalize the avatar even further. To get maximum attention, you might want to use a video or animation as part of the avatar – just add them to overlays and save your file as GIF. Since Discord allows GIF format, you can get an avatar that literally jumps off the page in every chat that you are a part of and elicits a strong reaction from those who see it.


Part 4: How to Change My Profile Picture on Discord?
After you successfully created a profile image that you are completely satisfied with, it’s time to upload it to Discord and start using it as your avatar in all your chats. However, this is not done in the same way on different platforms, so you will need to follow the instructions for the type of system you normally use to access your Discord account.
How to Change Avatars on Discord Desktop Computer?
Open your Discord app (Mac or Windows version) and look for a gear icon in the bottom left corner of your screen. Clicking on this icon will take you to the User settings menu, where you need to find the My Account tab.
Next, hover with your mouse cursor over the current profile picture, then click on the icon that appears right next to it. This action will let you upload an image (JPG or GIF) from your hard drive and make it your new profile picture.
![]()
Keep in mind that Discord will automatically crop images that are not already in a circular format, so you need to make sure that the image is well centered before uploading.
How to Change Discord Avatars on Mobile Devices?
The procedure for changing the profile avatar on Discord from a mobile device is equally straightforward, and it’s similar on both Android and iOS phones. After you open the app, you need to tap on the icon in the right bottom corner to access the Account menu.
Find the profile picture in the screen that opens, and tap on it to access your phone gallery, then choose the image you would like to use for identification on Discord. It will automatically be uploaded and replace the current image as your only avatar on all Discord channels until it’s changed again.
Frequently Asked Questions About Profile Pictures on Discord
1. Why can’t I change my profile picture on Discord?
If you experience this problem, it’s most likely a consequence of trying to make too many picture changes too fast. While Discord will allow you to upload two profile images in rapid succession, the third attempt within a few minutes is going to be unsuccessful. The problem will disappear if you wait for a short period of time and try uploading again. Another reason might be that your firewall is preventing you from using an image from a cloud server, but you can easily bypass the issue and download the picture first to your hard disc before uploading it to Discord from there.
2. How can I find my old profile picture?
All of the images you previously used as Discord avatars remain memorized and can be reactivated at any time. You can find this collection of images on a specific portion of your profile page, so if you want to use any of them you can simply click on them without having to go through the regular upload process all over again.
3. What do the colored dots next to my profile picture mean?
Those dots indicate the current status of the user, with each color having a fixed meaning. If you see a green dot, the user is available to chat at the moment. A yellow dot indicated an idle user that hasn’t been active in a while, and the red color means the user is busy and doesn’t want to be disturbed. Finally, a gray dot confirms that the user is currently not signed in to his Discord account.
4. Can I use different avatars on different Discord servers?
Unfortunately, this is not possible to do. While Discord lets you use multiple nicknames on different servers, every member (including admins) can have just one avatar on Discord at any given time.
5. How can I download someone’s profile icon in Discord?
If you like someone’s photo and want to save it, you will need to open that member’s profile by clicking on it and choosing View Profile. Next, you need to activate the Inspect element window and copy the image URL from here. Pasting the URL into your browser will open the image and allow you to save it as you would do with any other picture from the internet.
Richard Bennett
Richard Bennett is a writer and a lover of all things video.
Follow @Richard Bennett
Richard Bennett
Mar 27, 2024• Proven solutions
A part of the appeal of the popular multimedia messaging platform Discord is that users can assume online identities that present them in a favorable light. Since Discord serves to enable groups of friends or people with shared interests to communicate in real-time, standing out from the crowd and establishing a well-known and well-liked persona can be very challenging. Every element of presence on the platform contributes to the overall impression the user will make, and his profile picture is definitely one of the most impactful elements that go a long way towards identity building.
It’s important to note that Discord users can only use a single profile picture or avatar on the platform, and can’t switch them from one server to another. This rule serves to establish some accountability and familiarity and applies even to server administrators. With that in mind, choosing a great image to represent you everywhere on the Discord platform is a task that shouldn’t be taken lightly. To help you do this the right way while respecting all the rules, we prepared a detailed guide for this process.
- Part 1: Discord Profile Picture Size and Content Guidance
- Part 2: Discord Profile Pictures Download
- Part 3: How to Create A Discord Avatar in Filmora?
- Part 4: How to Change My Profile Picture on Discord?
- Part 5: Frequently Asked Questions About Discord PFP
Part 1: Discord Profile Picture Size and Content Guidance
Like all other social networks and online communication services, Discord has a set of rules determining whether a certain image is suitable for use as an avatar.
First of all, you have to adhere to a size limit for technical reasons, as too large images would slow down the channel. On the other hand, too small images won’t be legible and can look bad due to pixelization. The most optimal image size you should use for your Discord profile photo is at least 512 x 512 pixels – enough to be clearly visible and far above the 180 x 180-pixel minimum.
You don’t have to use your real photo or likeness for your Discord avatar – in fact, you don’t have to use a realistic image at all. Discord allows the use of photographs as well as various types of illustrations and cartoon images and accepts JPG as well as the animated GIF format.
This gives you a lot of freedom to craft your new identity and uses some powerful imagery, either created from scratch or taken from the internet. However, there are still some community standards that you’ll have to meet in terms of image content, or your submission for a profile picture might be rejected for failing to meet Discord’s T&C.
Basically, no NSFW images are allowed on Discord so you will have to avoid anything extreme or controversial. Pornographic content or explicit nudity is not welcome on this platform, and the same goes for showing minors in any sexually suggestive positions or promoting non-consensual forms of sexuality. You also need to stay away from violent imagery or anything depicting illegal activity, including drug use, racial discrimination, or mistreatment of animals. While this eliminates a lot of content, it still leaves enough room to express yourself freely without risking offending any other Discord users.
Part 2: Discord Profile Pictures Download
If you want to download a cool Discord profile picture, you can check the following websites:
1. discordavatars.com
This website collects free Discord avatars and profile pictures, which allow you to download without any limitations. You can search for a Discord avatar on the search bar or find it from the popular tags on the side.
![]()
Besides Discord PFP downloading, you can also find some resources and tips about Discord on this website.
2. Discord Profile Pictures and Server Icons from woodpunchsgraphics.com
This website provides both regular non-animated and animated profile pictures for Discord, but as you may all know, you can only add an animated profile when you subscribed to Discord Nitro.
![]()
There are limited Discord profile picture and server icon templates on this website, and you should customize the color and text, and submit your email to purchase.
Part 3: How to Create A Discord Avatar in Filmora?
Many Discord users ultimately decide to create custom profile pictures using external visual tools, and this option is highly recommended to anyone with at least basic creative skills. It doesn’t take too much effort to make a fantastic avatar that will be completely unique and tell exactly the story you want. There are many different software tools you can use for this purpose, but since the task is very simple you can use a practical, free program such as Filmora.
The procedure of creating a profile picture for Discord in a visual suite like Filmora is not very complex and involves just a few simple steps.
You should start by identifying the picture that will form the basis of your avatar – it can be an animated character or a real-life photo. You can search on Google image or download it from some discord profile sites.
Next, you need to load the selected image into a new project, and then resize the image to fit the preferred dimensions for Discord and change its shape to circular. To change the shape, go to Effects -> Utility -> Image Mask to optimize the image for a Discord avatar.
By adding overlays on top of the basic image, you can also introduce any visual or textual elements that will personalize the avatar even further. To get maximum attention, you might want to use a video or animation as part of the avatar – just add them to overlays and save your file as GIF. Since Discord allows GIF format, you can get an avatar that literally jumps off the page in every chat that you are a part of and elicits a strong reaction from those who see it.
Part 4: How to Change My Profile Picture on Discord?
After you successfully created a profile image that you are completely satisfied with, it’s time to upload it to Discord and start using it as your avatar in all your chats. However, this is not done in the same way on different platforms, so you will need to follow the instructions for the type of system you normally use to access your Discord account.
How to Change Avatars on Discord Desktop Computer?
Open your Discord app (Mac or Windows version) and look for a gear icon in the bottom left corner of your screen. Clicking on this icon will take you to the User settings menu, where you need to find the My Account tab.
Next, hover with your mouse cursor over the current profile picture, then click on the icon that appears right next to it. This action will let you upload an image (JPG or GIF) from your hard drive and make it your new profile picture.
![]()
Keep in mind that Discord will automatically crop images that are not already in a circular format, so you need to make sure that the image is well centered before uploading.
How to Change Discord Avatars on Mobile Devices?
The procedure for changing the profile avatar on Discord from a mobile device is equally straightforward, and it’s similar on both Android and iOS phones. After you open the app, you need to tap on the icon in the right bottom corner to access the Account menu.
Find the profile picture in the screen that opens, and tap on it to access your phone gallery, then choose the image you would like to use for identification on Discord. It will automatically be uploaded and replace the current image as your only avatar on all Discord channels until it’s changed again.
Frequently Asked Questions About Profile Pictures on Discord
1. Why can’t I change my profile picture on Discord?
If you experience this problem, it’s most likely a consequence of trying to make too many picture changes too fast. While Discord will allow you to upload two profile images in rapid succession, the third attempt within a few minutes is going to be unsuccessful. The problem will disappear if you wait for a short period of time and try uploading again. Another reason might be that your firewall is preventing you from using an image from a cloud server, but you can easily bypass the issue and download the picture first to your hard disc before uploading it to Discord from there.
2. How can I find my old profile picture?
All of the images you previously used as Discord avatars remain memorized and can be reactivated at any time. You can find this collection of images on a specific portion of your profile page, so if you want to use any of them you can simply click on them without having to go through the regular upload process all over again.
3. What do the colored dots next to my profile picture mean?
Those dots indicate the current status of the user, with each color having a fixed meaning. If you see a green dot, the user is available to chat at the moment. A yellow dot indicated an idle user that hasn’t been active in a while, and the red color means the user is busy and doesn’t want to be disturbed. Finally, a gray dot confirms that the user is currently not signed in to his Discord account.
4. Can I use different avatars on different Discord servers?
Unfortunately, this is not possible to do. While Discord lets you use multiple nicknames on different servers, every member (including admins) can have just one avatar on Discord at any given time.
5. How can I download someone’s profile icon in Discord?
If you like someone’s photo and want to save it, you will need to open that member’s profile by clicking on it and choosing View Profile. Next, you need to activate the Inspect element window and copy the image URL from here. Pasting the URL into your browser will open the image and allow you to save it as you would do with any other picture from the internet.
Richard Bennett
Richard Bennett is a writer and a lover of all things video.
Follow @Richard Bennett
Intro to Role Customization for DiscoPundits
How to Add Roles in Discord?
Richard Bennett
Mar 27, 2024• Proven solutions
Having a Discord server for you and your friends is a fun experience. And for gamers, Discord is a necessity. You can customize it with bots, connect real-time over voice channels, and even add rooms for chat forums.
Obviously, creating and managing a Discord server can get difficult. Especially when the server gets crammed with members, it is no longer a one-person show. You need help with monitoring and moderation. And let’s face it – you cannot watch your server round the clock.
So, let us learn the art of delegation on Discord! This guide will help you with – How to add roles in Discord and how to assign them to members. This includes creating roles, deleting them, and granting appropriate permissions.
- Part 1: Discord Server Permissions Introduction
- Part 2: How to Make and Add Roles in Discord on Computer
- Part 3: How to Manage Roles in Discord?
- Part 4: How to Delete Roles in Discord?
- Part 5: How to Add Roles on Discord Mobile?
- Part 6: Adding Roles to Discord FAQs
Part 1: Discord Server Permissions You Can Set Up
To give you a heads-up, there are around 29 permissions that you can adjust over a Discord server. More specifically, there are 7 voice permissions, 9 permissions related to texts, and about 13 permissions dealing with the server.
1. General server permission
Administrator – this is the highest permission that you can grant to a user. Think twice before giving this authority to anyone.
View Audit Log – with this permission, a user can read the server’s audits.
Manage Server – this permission enables a user to change the server’s name or shift it to another region.
Manage Roles – a user with this authority can make new roles or modify the roles without this permission.
Manage Channels – with this; a user can make, edit, or remove channels on a server.
Manage emojis – users with this authority can manage emotes.
Manage Webhooks – if you have this authority, you can add, modify, and remove webhooks.
Read Text Channels & See Voice Channels – a user with this permission can read text channels.
2. Membership permissions
Ban Members – a member with permission, can ban members from the server.
Create Instant Invite – users with this permission can invite people to the server.
Change Nickname – you can change your nickname anytime if this permission is enabled.
Manage Nicknames – if enabled, a user can change other’s nicknames.
Kick Members – a user with this authority can remove members from the server.
3. Text channel permissions
Send Messages – with this; users can send texts on chats.
Send TTS Messages – this enables users to send text-to-speech texts.
Manage Messages – with this; a user can remove or pin texts of other users.
Embed Links – enables users to embed hyperlinks in texts.
Attach Files – with this; users can attach files in the texts.
Read Message History – enables users to access earlier texts.
Mention Everyone – you can send push notifications on the channel if this permission is enabled.
Use External Emojis – if enabled, users can send emojis from other servers.
Add Reactions – with this; users can add new reactions to a text.
4. Voice channel permissions
Connect – enables users to connect themselves over the voice channel.
Speak – users can talk over the voice channel.
Mute Members – turn off other user’s speech.
Deafen Members – turn off hearing on the channel for a user.
Move Members – enables a user to shift members from one channel to a different channel.
Use Voice Activity – a member can talk without using Push-to-Talk, with this permission.
Priority Speaker – when this permission is turned on for a user, other’s
this permission allows the user to reduce the volume of other users when this user is speaking so that their words are louder on the channel.
5. Advanced permissions
Includes the ‘Administrator’ permission, which by default enables all the permissions to the assigned user.
Part 2: How to Make and Add Roles in Discord on Computer
The desktop app and Browser resemble the mobile apple a lot. The process of assigning roles and configuring members is more or less the same across devices. First, you need to create roles and define their authority before assigning these roles to some members.
How to create roles in Discord?
Before you can assign roles, you need a server. Once you have created your Discord server, start crafting the structure.
- Open your server and right-click on it.
- From the menu that appears, tap server settings.
- Name the role suitably. It should be descriptive of the authority.
- Tap on the plus sign that appears on the top right of the page.
- Here, you can change the title off the roll and even choose the color.
- Now comes the time to grant some permissions. These are basically the authority that you gave to every profile.
- When you are done, save the changes.
How to Assign Roles to Members in Discord?
To be able to assign roles, you should first create them
- Once again, hit that right button on your server and go to server settings.
- From the menu that appears to the left, ‘choose members’ under user management.
- Here, you will see the list of all the members on your server, tap the Plus sign that is right beside the username.
- From the drop-down menu that appears, select a role you want to assign to that member.
- You will notice that the color changes as per your settings. And this is how you assign roles to a server.
Part 3: How to Manage Roles in Discord?
After you learn how to make roles in Discord, you might want to manage them.
If you have got the hang of creating roles, then managing them is no different. Whenever the server gets crowded, you can create more roles or modify the existing ones. A smaller server can run smoothly with just an admin and an ‘everyone’ role.
The quickest and easiest way to manage your bloating server is to let all members be ‘everyone’ and adjust permissions accordingly. So, whenever members enter your server, they will automatically be assigned the common role.
Further, you can easily figure out what roles you have assigned to whom. Due to these colors, the other members can identify moderators, admins, or other roles.
Part 4: How to Delete Roles in Discord?
Honestly, removing Discord roles easier than setting them up. There are hardly a few steps that you need to follow for role removal.
- place the cursor on the server, and hit the right-click.
- From the list, choose server settings. Then click on roles.
- From the roles window, tap on the role that you wish to delete.
- Towards the bottom, you will see the option to delete the role.
- Press ok to confirm.
Part 5: How to Add Roles on Discord Mobile?
Like we mentioned earlier, the user interface of Discord is similar across devices. So, there is little difference between the process of creating and managing roles. But it can be baffling for beginners, so here’s a brief!
1. How to create roles in Discord mobile app?
Before you can assign roles, you have to create them.
- Open your server.
- Tap on the arrow beside the server’s title. A drop-down menu will appear. Select ‘server settings’ from that.
- Tap on ‘Roles.’ A common role, ‘everyone’ is assigned to all the members who have basic permissions enabled for everyone.
- Tap the plus sign and add a role.
- Give the role a color and describe it in a few words.
- Go through the permissions and enable the ones that fit the role.
- Save the changes.
You can repeat this multiple times to create more roles.
2. How to Assign Roles in Discord mobile app?
- Head over to settings and select ‘Members.’
- Select the members you want to assign roles to.
- Tick the boxes beside each member’s name for the roles you are assigning them.
Save the changes, and you are good to go! You can assign multiple roles to a member.
Part 6: FAQs about Discord Server Roles
Just some obvious things you might wonder about.
- How to make someone admin on Discord?
Making someone admin is the same as assigning other roles. Open your server and go to server settings.
- From there, select ‘roles’ from the left pane.
- Create a new role.
- Name the role ‘admin’ or an equivalent title.
- Adjust the setting related to sorting out role members with other members.
- Go to general permissions and tick the ‘Administrator’ option.
- Hit the ‘save changes’ button at the bottom.
- Now it’s time to assign the role to someone. Right-click on the user that you want to assign the role.
- Choose ‘roles’ from the drop-down list and select ‘Admin.’
And now your server has an admin!
- How can I assign roles to new users in Discord automatically?
By default, every member gets the role of ‘everyone’ on the server. However, you can customize this and add the MEE6 bot for automatic role allocation.
- Why can’t I manage the server even I am an admin on the server?
This is likely to happen if the server owner gave you the role of admin, but the permissions are disabled. You can ask the owner to enable the permissions for your user ID.
Richard Bennett
Richard Bennett is a writer and a lover of all things video.
Follow @Richard Bennett
Richard Bennett
Mar 27, 2024• Proven solutions
Having a Discord server for you and your friends is a fun experience. And for gamers, Discord is a necessity. You can customize it with bots, connect real-time over voice channels, and even add rooms for chat forums.
Obviously, creating and managing a Discord server can get difficult. Especially when the server gets crammed with members, it is no longer a one-person show. You need help with monitoring and moderation. And let’s face it – you cannot watch your server round the clock.
So, let us learn the art of delegation on Discord! This guide will help you with – How to add roles in Discord and how to assign them to members. This includes creating roles, deleting them, and granting appropriate permissions.
- Part 1: Discord Server Permissions Introduction
- Part 2: How to Make and Add Roles in Discord on Computer
- Part 3: How to Manage Roles in Discord?
- Part 4: How to Delete Roles in Discord?
- Part 5: How to Add Roles on Discord Mobile?
- Part 6: Adding Roles to Discord FAQs
Part 1: Discord Server Permissions You Can Set Up
To give you a heads-up, there are around 29 permissions that you can adjust over a Discord server. More specifically, there are 7 voice permissions, 9 permissions related to texts, and about 13 permissions dealing with the server.
1. General server permission
Administrator – this is the highest permission that you can grant to a user. Think twice before giving this authority to anyone.
View Audit Log – with this permission, a user can read the server’s audits.
Manage Server – this permission enables a user to change the server’s name or shift it to another region.
Manage Roles – a user with this authority can make new roles or modify the roles without this permission.
Manage Channels – with this; a user can make, edit, or remove channels on a server.
Manage emojis – users with this authority can manage emotes.
Manage Webhooks – if you have this authority, you can add, modify, and remove webhooks.
Read Text Channels & See Voice Channels – a user with this permission can read text channels.
2. Membership permissions
Ban Members – a member with permission, can ban members from the server.
Create Instant Invite – users with this permission can invite people to the server.
Change Nickname – you can change your nickname anytime if this permission is enabled.
Manage Nicknames – if enabled, a user can change other’s nicknames.
Kick Members – a user with this authority can remove members from the server.
3. Text channel permissions
Send Messages – with this; users can send texts on chats.
Send TTS Messages – this enables users to send text-to-speech texts.
Manage Messages – with this; a user can remove or pin texts of other users.
Embed Links – enables users to embed hyperlinks in texts.
Attach Files – with this; users can attach files in the texts.
Read Message History – enables users to access earlier texts.
Mention Everyone – you can send push notifications on the channel if this permission is enabled.
Use External Emojis – if enabled, users can send emojis from other servers.
Add Reactions – with this; users can add new reactions to a text.
4. Voice channel permissions
Connect – enables users to connect themselves over the voice channel.
Speak – users can talk over the voice channel.
Mute Members – turn off other user’s speech.
Deafen Members – turn off hearing on the channel for a user.
Move Members – enables a user to shift members from one channel to a different channel.
Use Voice Activity – a member can talk without using Push-to-Talk, with this permission.
Priority Speaker – when this permission is turned on for a user, other’s
this permission allows the user to reduce the volume of other users when this user is speaking so that their words are louder on the channel.
5. Advanced permissions
Includes the ‘Administrator’ permission, which by default enables all the permissions to the assigned user.
Part 2: How to Make and Add Roles in Discord on Computer
The desktop app and Browser resemble the mobile apple a lot. The process of assigning roles and configuring members is more or less the same across devices. First, you need to create roles and define their authority before assigning these roles to some members.
How to create roles in Discord?
Before you can assign roles, you need a server. Once you have created your Discord server, start crafting the structure.
- Open your server and right-click on it.
- From the menu that appears, tap server settings.
- Name the role suitably. It should be descriptive of the authority.
- Tap on the plus sign that appears on the top right of the page.
- Here, you can change the title off the roll and even choose the color.
- Now comes the time to grant some permissions. These are basically the authority that you gave to every profile.
- When you are done, save the changes.
How to Assign Roles to Members in Discord?
To be able to assign roles, you should first create them
- Once again, hit that right button on your server and go to server settings.
- From the menu that appears to the left, ‘choose members’ under user management.
- Here, you will see the list of all the members on your server, tap the Plus sign that is right beside the username.
- From the drop-down menu that appears, select a role you want to assign to that member.
- You will notice that the color changes as per your settings. And this is how you assign roles to a server.
Part 3: How to Manage Roles in Discord?
After you learn how to make roles in Discord, you might want to manage them.
If you have got the hang of creating roles, then managing them is no different. Whenever the server gets crowded, you can create more roles or modify the existing ones. A smaller server can run smoothly with just an admin and an ‘everyone’ role.
The quickest and easiest way to manage your bloating server is to let all members be ‘everyone’ and adjust permissions accordingly. So, whenever members enter your server, they will automatically be assigned the common role.
Further, you can easily figure out what roles you have assigned to whom. Due to these colors, the other members can identify moderators, admins, or other roles.
Part 4: How to Delete Roles in Discord?
Honestly, removing Discord roles easier than setting them up. There are hardly a few steps that you need to follow for role removal.
- place the cursor on the server, and hit the right-click.
- From the list, choose server settings. Then click on roles.
- From the roles window, tap on the role that you wish to delete.
- Towards the bottom, you will see the option to delete the role.
- Press ok to confirm.
Part 5: How to Add Roles on Discord Mobile?
Like we mentioned earlier, the user interface of Discord is similar across devices. So, there is little difference between the process of creating and managing roles. But it can be baffling for beginners, so here’s a brief!
1. How to create roles in Discord mobile app?
Before you can assign roles, you have to create them.
- Open your server.
- Tap on the arrow beside the server’s title. A drop-down menu will appear. Select ‘server settings’ from that.
- Tap on ‘Roles.’ A common role, ‘everyone’ is assigned to all the members who have basic permissions enabled for everyone.
- Tap the plus sign and add a role.
- Give the role a color and describe it in a few words.
- Go through the permissions and enable the ones that fit the role.
- Save the changes.
You can repeat this multiple times to create more roles.
2. How to Assign Roles in Discord mobile app?
- Head over to settings and select ‘Members.’
- Select the members you want to assign roles to.
- Tick the boxes beside each member’s name for the roles you are assigning them.
Save the changes, and you are good to go! You can assign multiple roles to a member.
Part 6: FAQs about Discord Server Roles
Just some obvious things you might wonder about.
- How to make someone admin on Discord?
Making someone admin is the same as assigning other roles. Open your server and go to server settings.
- From there, select ‘roles’ from the left pane.
- Create a new role.
- Name the role ‘admin’ or an equivalent title.
- Adjust the setting related to sorting out role members with other members.
- Go to general permissions and tick the ‘Administrator’ option.
- Hit the ‘save changes’ button at the bottom.
- Now it’s time to assign the role to someone. Right-click on the user that you want to assign the role.
- Choose ‘roles’ from the drop-down list and select ‘Admin.’
And now your server has an admin!
- How can I assign roles to new users in Discord automatically?
By default, every member gets the role of ‘everyone’ on the server. However, you can customize this and add the MEE6 bot for automatic role allocation.
- Why can’t I manage the server even I am an admin on the server?
This is likely to happen if the server owner gave you the role of admin, but the permissions are disabled. You can ask the owner to enable the permissions for your user ID.
Richard Bennett
Richard Bennett is a writer and a lover of all things video.
Follow @Richard Bennett
Also read:
- [Updated] Achieving Verified Status Your Discord Partner Playbook for 2024
- [New] Best 5 High-Impact Social Media Brand Visuals
- In 2024, Ultimate Anonymous Group Communicators
- A Step-by-Step Guide to Designing Memorable Discord Avatars for 2024
- [New] FREE Icon Designer for Everyone – Perfectly Crafted Logos for 2024
- [New] 2024 Approved Download Free Animated Emojis Explore These 9 Hidden Websites
- [Updated] Elevate Your Discord Experience with TTS for 2024
- [New] Top Auditory Aids The Ultimate List of Premium Discord Music Bots to Try
- 2024 Approved Simple, Quick, and FREE - Make Your Own Discord Symbols
- [Updated] In 2024, Best Discord Couple Chat Spaces
- [Updated] 2024 Approved The Ultimate Guide to Mastering Message Pins on Discord
- [Updated] In 2024, The Art of Combining Spotify and Discord
- [New] Top Non-Discord Streaming Networks
- [New] 2024 Approved Quick Tips for Navigating Discord Message Interaction
- [Updated] 2024 Approved Streamlining Communication Essentials of Discord's Video Sharing Feature
- In 2024, Guide on Populating Emojis in Discord User Status Field
- [New] 2024 Approved Free Apps to Record and Preserve Your Discord Chats Professionally
- Exclusive Open Source Logo Generators for Discord Servers for 2024
- [Updated] Top 10 Budget-Friendly DiscoVoice Alternatives for Discord Users for 2024
- [New] 2024 Approved Enhancing Conversations The Essential Guide to Using GIFs on Discord
- [New] Supreme Bot Team in Digital Realms
- [New] The Essence of Discord's Nitro - High-End Features Explained for 2024
- [New] Step-by-Step Guide Adjusting Discord Presence
- [New] In 2024, Achieve Clear Communication in Discord Using VoiceMod Techniques
- 2024 Approved Avoiding Triggers Exiting with Ease From Discord Servers
- In 2024, Streamlining Connections Spotify Meets Discord
- [New] 2024 Approved Navigating Discord's Virtual Room for Screen Casting
- [New] 2024 Approved Elevate Your Chats with Exclusive Discord GIF Tips
- [Updated] Unveiling the Hottest Disco Screen Names for Fame
- Journey Towards Authenticity A Guide to Verified Discord Affiliation
- Conveying Content via Discord Optimizing Video Sharing for 2024
- In 2024, Discord & GIFs The Ultimate Tutorial for Seamless Integration
- [New] In 2024, Your Ultimate Strategy for Engaging Streams on Discord
- [Updated] The Complete Guide to Building a Captivating Discord PFP for 2024
- [New] 2024 Approved Revolutionize Your Discord Community with These Bots
- The Ultimate Guide to Personalizing Your Discord Experience for 2024
- [Updated] Discovering The Secrets to a Perfect Pfp on Discord for 2024
- In 2024, Easily Unlock Your Lava Yuva 3 Device SIM
- [Updated] 2024 Approved PPT Presentations Merging Audio & Imagery Fluently
- 2024 Approved Top 12 Audio Converters A Comprehensive Review
- [Updated] 2024 Approved Essential List 10 Best Zero-Price Desktop Recorder Apps
- Samsung Data Retrieval tool – restore lost data from Samsung Galaxy S24
- [Updated] The Ultimate Windows Capture Toolkit
- [New] In 2024, Invisible Riches The Online Auction Exclusive to the Elusive, 2023 Edition
- 6 Solutions to Fix Error 505 in Google Play Store on Xiaomi 13T | Dr.fone
- Unique Ideas for Dynamic FB Video Marketing Campaigns for 2024
- How To Unlock A Found Apple iPhone XS Max?
- The Comprehensive Checklist 8 Superior Internet-Accessible, Cost-Free Recording Solutions for 2024
- [New] In 2024, Transmitting Television to Your Desktop Device
- In 2024, How Do You Get Sun Stone Evolutions in Pokémon For Oppo Find N3 Flip? | Dr.fone
- Fixing Persistent Pandora Crashes on Oppo Find N3 | Dr.fone
- How to Transfer Photos from Poco X6 Pro to Laptop Without USB | Dr.fone
- [New] In 2024, Economical Systems Optimized by Ideal OBS Settings
- [New] 2024 Approved Facebook's Vanished Video Suggestions Explained
- [Updated] 2024 Approved Snort Spree Twitter’s Funniest Humor Chronicles
- 2024 Approved Speak and Record IPhone Voice Memo Basics
- Title: [New] In 2024, Transform Your Profile with Our Discord Pic Insights
- Author: Timothy
- Created at : 2024-05-23 22:48:28
- Updated at : 2024-05-24 22:48:28
- Link: https://discord-videos.techidaily.com/new-in-2024-transform-your-profile-with-our-discord-pic-insights/
- License: This work is licensed under CC BY-NC-SA 4.0.
