
!["[New] Maximizing Potential The Art of Role Implementation on Discord for 2024"](https://www.lifewire.com/thmb/P3hB6tFikUScsduyvJradG34nT0=/400x300/filters:no_upscale():max_bytes(150000):strip_icc()/5332755892_99f55416a7_b-kenny-louie-5804eaff5f9b5805c2b40553.jpg)
"[New] Maximizing Potential The Art of Role Implementation on Discord for 2024"
Maximizing Potential: The Art of Role Implementation on Discord
How to Add Roles in Discord?

Richard Bennett
Mar 27, 2024• Proven solutions
Having a Discord server for you and your friends is a fun experience. And for gamers, Discord is a necessity. You can customize it with bots, connect real-time over voice channels, and even add rooms for chat forums.
Obviously, creating and managing a Discord server can get difficult. Especially when the server gets crammed with members, it is no longer a one-person show. You need help with monitoring and moderation. And let’s face it – you cannot watch your server round the clock.
So, let us learn the art of delegation on Discord! This guide will help you with – How to add roles in Discord and how to assign them to members. This includes creating roles, deleting them, and granting appropriate permissions.
- Part 1: Discord Server Permissions Introduction
- Part 2: How to Make and Add Roles in Discord on Computer
- Part 3: How to Manage Roles in Discord?
- Part 4: How to Delete Roles in Discord?
- Part 5: How to Add Roles on Discord Mobile?
- Part 6: Adding Roles to Discord FAQs
Part 1: Discord Server Permissions You Can Set Up
To give you a heads-up, there are around 29 permissions that you can adjust over a Discord server. More specifically, there are 7 voice permissions, 9 permissions related to texts, and about 13 permissions dealing with the server.
1. General server permission
Administrator – this is the highest permission that you can grant to a user. Think twice before giving this authority to anyone.
View Audit Log – with this permission, a user can read the server’s audits.
Manage Server – this permission enables a user to change the server’s name or shift it to another region.
Manage Roles – a user with this authority can make new roles or modify the roles without this permission.
Manage Channels – with this; a user can make, edit, or remove channels on a server.
Manage emojis – users with this authority can manage emotes.
Manage Webhooks – if you have this authority, you can add, modify, and remove webhooks.
Read Text Channels & See Voice Channels – a user with this permission can read text channels.
2. Membership permissions
Ban Members – a member with permission, can ban members from the server.
Create Instant Invite – users with this permission can invite people to the server.
Change Nickname – you can change your nickname anytime if this permission is enabled.
Manage Nicknames – if enabled, a user can change other’s nicknames.
Kick Members – a user with this authority can remove members from the server.
3. Text channel permissions
Send Messages – with this; users can send texts on chats.
Send TTS Messages – this enables users to send text-to-speech texts.
Manage Messages – with this; a user can remove or pin texts of other users.
Embed Links – enables users to embed hyperlinks in texts.
Attach Files – with this; users can attach files in the texts.
Read Message History – enables users to access earlier texts.
Mention Everyone – you can send push notifications on the channel if this permission is enabled.
Use External Emojis – if enabled, users can send emojis from other servers.
Add Reactions – with this; users can add new reactions to a text.
4. Voice channel permissions
Connect – enables users to connect themselves over the voice channel.
Speak – users can talk over the voice channel.
Mute Members – turn off other user’s speech.
Deafen Members – turn off hearing on the channel for a user.
Move Members – enables a user to shift members from one channel to a different channel.
Use Voice Activity – a member can talk without using Push-to-Talk, with this permission.
Priority Speaker – when this permission is turned on for a user, other’s
this permission allows the user to reduce the volume of other users when this user is speaking so that their words are louder on the channel.
5. Advanced permissions
Includes the ‘Administrator’ permission, which by default enables all the permissions to the assigned user.
Part 2: How to Make and Add Roles in Discord on Computer
The desktop app and Browser resemble the mobile apple a lot. The process of assigning roles and configuring members is more or less the same across devices. First, you need to create roles and define their authority before assigning these roles to some members.
How to create roles in Discord?
Before you can assign roles, you need a server. Once you have created your Discord server, start crafting the structure.
- Open your server and right-click on it.
- From the menu that appears, tap server settings.
- Name the role suitably. It should be descriptive of the authority.
- Tap on the plus sign that appears on the top right of the page.
- Here, you can change the title off the roll and even choose the color.
- Now comes the time to grant some permissions. These are basically the authority that you gave to every profile.
- When you are done, save the changes.
How to Assign Roles to Members in Discord?
To be able to assign roles, you should first create them
- Once again, hit that right button on your server and go to server settings.
- From the menu that appears to the left, ‘choose members’ under user management.
- Here, you will see the list of all the members on your server, tap the Plus sign that is right beside the username.
- From the drop-down menu that appears, select a role you want to assign to that member.
- You will notice that the color changes as per your settings. And this is how you assign roles to a server.
Part 3: How to Manage Roles in Discord?
After you learn how to make roles in Discord, you might want to manage them.
If you have got the hang of creating roles, then managing them is no different. Whenever the server gets crowded, you can create more roles or modify the existing ones. A smaller server can run smoothly with just an admin and an ‘everyone’ role.
The quickest and easiest way to manage your bloating server is to let all members be ‘everyone’ and adjust permissions accordingly. So, whenever members enter your server, they will automatically be assigned the common role.
Further, you can easily figure out what roles you have assigned to whom. Due to these colors, the other members can identify moderators, admins, or other roles.
Part 4: How to Delete Roles in Discord?
Honestly, removing Discord roles easier than setting them up. There are hardly a few steps that you need to follow for role removal.
- place the cursor on the server, and hit the right-click.
- From the list, choose server settings. Then click on roles.
- From the roles window, tap on the role that you wish to delete.
- Towards the bottom, you will see the option to delete the role.
- Press ok to confirm.
Part 5: How to Add Roles on Discord Mobile?
Like we mentioned earlier, the user interface of Discord is similar across devices. So, there is little difference between the process of creating and managing roles. But it can be baffling for beginners, so here’s a brief!
1. How to create roles in Discord mobile app?
Before you can assign roles, you have to create them.
- Open your server.
- Tap on the arrow beside the server’s title. A drop-down menu will appear. Select ‘server settings’ from that.
- Tap on ‘Roles.’ A common role, ‘everyone’ is assigned to all the members who have basic permissions enabled for everyone.
- Tap the plus sign and add a role.
- Give the role a color and describe it in a few words.
- Go through the permissions and enable the ones that fit the role.
- Save the changes.
You can repeat this multiple times to create more roles.
2. How to Assign Roles in Discord mobile app?
- Head over to settings and select ‘Members.’
- Select the members you want to assign roles to.
- Tick the boxes beside each member’s name for the roles you are assigning them.
Save the changes, and you are good to go! You can assign multiple roles to a member.
Part 6: FAQs about Discord Server Roles
Just some obvious things you might wonder about.
- How to make someone admin on Discord?
Making someone admin is the same as assigning other roles. Open your server and go to server settings.
- From there, select ‘roles’ from the left pane.
- Create a new role.
- Name the role ‘admin’ or an equivalent title.
- Adjust the setting related to sorting out role members with other members.
- Go to general permissions and tick the ‘Administrator’ option.
- Hit the ‘save changes’ button at the bottom.
- Now it’s time to assign the role to someone. Right-click on the user that you want to assign the role.
- Choose ‘roles’ from the drop-down list and select ‘Admin.’
And now your server has an admin!
- How can I assign roles to new users in Discord automatically?
By default, every member gets the role of ‘everyone’ on the server. However, you can customize this and add the MEE6 bot for automatic role allocation.
- Why can’t I manage the server even I am an admin on the server?
This is likely to happen if the server owner gave you the role of admin, but the permissions are disabled. You can ask the owner to enable the permissions for your user ID.
Richard Bennett
Richard Bennett is a writer and a lover of all things video.
Follow @Richard Bennett
Richard Bennett
Mar 27, 2024• Proven solutions
Having a Discord server for you and your friends is a fun experience. And for gamers, Discord is a necessity. You can customize it with bots, connect real-time over voice channels, and even add rooms for chat forums.
Obviously, creating and managing a Discord server can get difficult. Especially when the server gets crammed with members, it is no longer a one-person show. You need help with monitoring and moderation. And let’s face it – you cannot watch your server round the clock.
So, let us learn the art of delegation on Discord! This guide will help you with – How to add roles in Discord and how to assign them to members. This includes creating roles, deleting them, and granting appropriate permissions.
- Part 1: Discord Server Permissions Introduction
- Part 2: How to Make and Add Roles in Discord on Computer
- Part 3: How to Manage Roles in Discord?
- Part 4: How to Delete Roles in Discord?
- Part 5: How to Add Roles on Discord Mobile?
- Part 6: Adding Roles to Discord FAQs
Part 1: Discord Server Permissions You Can Set Up
To give you a heads-up, there are around 29 permissions that you can adjust over a Discord server. More specifically, there are 7 voice permissions, 9 permissions related to texts, and about 13 permissions dealing with the server.
1. General server permission
Administrator – this is the highest permission that you can grant to a user. Think twice before giving this authority to anyone.
View Audit Log – with this permission, a user can read the server’s audits.
Manage Server – this permission enables a user to change the server’s name or shift it to another region.
Manage Roles – a user with this authority can make new roles or modify the roles without this permission.
Manage Channels – with this; a user can make, edit, or remove channels on a server.
Manage emojis – users with this authority can manage emotes.
Manage Webhooks – if you have this authority, you can add, modify, and remove webhooks.
Read Text Channels & See Voice Channels – a user with this permission can read text channels.
2. Membership permissions
Ban Members – a member with permission, can ban members from the server.
Create Instant Invite – users with this permission can invite people to the server.
Change Nickname – you can change your nickname anytime if this permission is enabled.
Manage Nicknames – if enabled, a user can change other’s nicknames.
Kick Members – a user with this authority can remove members from the server.
3. Text channel permissions
Send Messages – with this; users can send texts on chats.
Send TTS Messages – this enables users to send text-to-speech texts.
Manage Messages – with this; a user can remove or pin texts of other users.
Embed Links – enables users to embed hyperlinks in texts.
Attach Files – with this; users can attach files in the texts.
Read Message History – enables users to access earlier texts.
Mention Everyone – you can send push notifications on the channel if this permission is enabled.
Use External Emojis – if enabled, users can send emojis from other servers.
Add Reactions – with this; users can add new reactions to a text.
4. Voice channel permissions
Connect – enables users to connect themselves over the voice channel.
Speak – users can talk over the voice channel.
Mute Members – turn off other user’s speech.
Deafen Members – turn off hearing on the channel for a user.
Move Members – enables a user to shift members from one channel to a different channel.
Use Voice Activity – a member can talk without using Push-to-Talk, with this permission.
Priority Speaker – when this permission is turned on for a user, other’s
this permission allows the user to reduce the volume of other users when this user is speaking so that their words are louder on the channel.
5. Advanced permissions
Includes the ‘Administrator’ permission, which by default enables all the permissions to the assigned user.
Part 2: How to Make and Add Roles in Discord on Computer
The desktop app and Browser resemble the mobile apple a lot. The process of assigning roles and configuring members is more or less the same across devices. First, you need to create roles and define their authority before assigning these roles to some members.
How to create roles in Discord?
Before you can assign roles, you need a server. Once you have created your Discord server, start crafting the structure.
- Open your server and right-click on it.
- From the menu that appears, tap server settings.
- Name the role suitably. It should be descriptive of the authority.
- Tap on the plus sign that appears on the top right of the page.
- Here, you can change the title off the roll and even choose the color.
- Now comes the time to grant some permissions. These are basically the authority that you gave to every profile.
- When you are done, save the changes.
How to Assign Roles to Members in Discord?
To be able to assign roles, you should first create them
- Once again, hit that right button on your server and go to server settings.
- From the menu that appears to the left, ‘choose members’ under user management.
- Here, you will see the list of all the members on your server, tap the Plus sign that is right beside the username.
- From the drop-down menu that appears, select a role you want to assign to that member.
- You will notice that the color changes as per your settings. And this is how you assign roles to a server.
Part 3: How to Manage Roles in Discord?
After you learn how to make roles in Discord, you might want to manage them.
If you have got the hang of creating roles, then managing them is no different. Whenever the server gets crowded, you can create more roles or modify the existing ones. A smaller server can run smoothly with just an admin and an ‘everyone’ role.
The quickest and easiest way to manage your bloating server is to let all members be ‘everyone’ and adjust permissions accordingly. So, whenever members enter your server, they will automatically be assigned the common role.
Further, you can easily figure out what roles you have assigned to whom. Due to these colors, the other members can identify moderators, admins, or other roles.
Part 4: How to Delete Roles in Discord?
Honestly, removing Discord roles easier than setting them up. There are hardly a few steps that you need to follow for role removal.
- place the cursor on the server, and hit the right-click.
- From the list, choose server settings. Then click on roles.
- From the roles window, tap on the role that you wish to delete.
- Towards the bottom, you will see the option to delete the role.
- Press ok to confirm.
Part 5: How to Add Roles on Discord Mobile?
Like we mentioned earlier, the user interface of Discord is similar across devices. So, there is little difference between the process of creating and managing roles. But it can be baffling for beginners, so here’s a brief!
1. How to create roles in Discord mobile app?
Before you can assign roles, you have to create them.
- Open your server.
- Tap on the arrow beside the server’s title. A drop-down menu will appear. Select ‘server settings’ from that.
- Tap on ‘Roles.’ A common role, ‘everyone’ is assigned to all the members who have basic permissions enabled for everyone.
- Tap the plus sign and add a role.
- Give the role a color and describe it in a few words.
- Go through the permissions and enable the ones that fit the role.
- Save the changes.
You can repeat this multiple times to create more roles.
2. How to Assign Roles in Discord mobile app?
- Head over to settings and select ‘Members.’
- Select the members you want to assign roles to.
- Tick the boxes beside each member’s name for the roles you are assigning them.
Save the changes, and you are good to go! You can assign multiple roles to a member.
Part 6: FAQs about Discord Server Roles
Just some obvious things you might wonder about.
- How to make someone admin on Discord?
Making someone admin is the same as assigning other roles. Open your server and go to server settings.
- From there, select ‘roles’ from the left pane.
- Create a new role.
- Name the role ‘admin’ or an equivalent title.
- Adjust the setting related to sorting out role members with other members.
- Go to general permissions and tick the ‘Administrator’ option.
- Hit the ‘save changes’ button at the bottom.
- Now it’s time to assign the role to someone. Right-click on the user that you want to assign the role.
- Choose ‘roles’ from the drop-down list and select ‘Admin.’
And now your server has an admin!
- How can I assign roles to new users in Discord automatically?
By default, every member gets the role of ‘everyone’ on the server. However, you can customize this and add the MEE6 bot for automatic role allocation.
- Why can’t I manage the server even I am an admin on the server?
This is likely to happen if the server owner gave you the role of admin, but the permissions are disabled. You can ask the owner to enable the permissions for your user ID.
Richard Bennett
Richard Bennett is a writer and a lover of all things video.
Follow @Richard Bennett
Silence the Noise in Online Discussions with VoiceMod Tricks
How To Use Voicemod On Discord
Richard Bennett
Mar 27, 2024• Proven solutions
A voice changer will allow you to prank friends, create content, and most of all, secure your presence by maintaining anonymity. With it, you can turn your voice into several unique and exciting voices to serve any purpose you deem fit.
And when it comes to voice changers, none is as easy to operate as the Voicemod in Discord. Its claim to fame is that it features numerous voice options to choose from.
With Vociemod, you have to simply run the program in the background and select your desired voice!
Read on as we discuss how to use Voicemod on Discord in detail:
In this article
Part 1: How To Use Voice Changer Voicemod For Discord On Desktop Computer
Part 2: How To Fix Voicemod Not Working Discord?
Part 3: How To Change Voice For Discord On Mobile?
Part 1: How To Use Voice Changer Voicemod For Discord On Desktop Computer
Voicemod is arguably one of the best voice changer tools available on the internet for its excellent features.
But before we jump straight into using Voicemod for Discord, you must know how to install one on your desktop Mac/PC.
Here’s how to install Voicemod
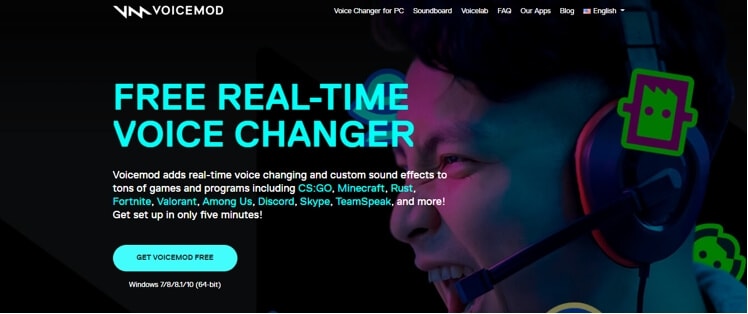
- Visit the Voicemod website to begin the download process.
- You’ll see the button “Get Voicemod Free” on the screen. Click it!
- Upon clicking, the site will ask you to sign in to your account from Discord, Twitch, to Google. Use your Discord login details to sign in.
- After you’re signed in, the “.exe” file will be downloaded to your PC/Mac’s download folder. Open the “.exe” file the moment it’s downloaded.
- An install wizard will open up. Navigate through the wizard’s installation process to install the program on your PC/Mac.
- After installation is complete, the installation wizard will ask to restart your windows’ Mac or PC.
You can skip it, but it’s best to restart it for smooth operations.
Once your Mac/PC restarts, you’ll see the Voicemod app icon on your desktop screen.
Now that you have successfully installed the voice changer Voicemod app into your desktop computer, let’s dive into knowing how to use Voicemod on Discord!
Here’s how to use voice changer on Discord
- Click the Vociemod icon on the desktop to open the app. If you can’t find it there, click the “windows icon” located at the screen’s bottom-left. Just type “Voicemod,” and the program will show up. Double click it to get it opened.
- When the app opens up, you’ll have to choose the output and input it will use. If you’re wondering, why the output? This is to give you an insight into what your voice will sound like on each filter.
Once it’s done, you can play around with different filters!
Every day, you’ll get new free filters to use; however, to unlock and access all filters, you need to upgrade to the “pro-version” of voice changer Voicemod.
On the other hand, if you only need a few filters, the “basic-version” should suffice.
Apart from that, you can unlock an additional free filter in your app by sharing it on your social media accounts.

Step 1
To set up Voicemod with Discord, open your discord account and go to the settings (gear icon) placed at the screen’s bottom-left corner.
Step 2
Click the “Voice and Video” option right under the app settings.
Step 3
To make Voicemod usable, you’ll have to change Voice settings. Within the “Input Device” option, select the option that says “Microphone Voicemod Virtual Audio.”
Step 4
After you have changed settings, you can easily change the voice within the program. Not only this, but other users can also hear your audio alteration.
Step 5
With the “basic version,” you’ll have seven free voice choices that will change each day. On the contrary, with the “pro-version,” you’ll gain access to more than 80 different voice options.
So, if you’re searching for an easy and simple voice-changing app to use, look no further than Voicemod!
Part 2: How To Fix Voicemod Not Working Discord?
Is your voice changer Voicemod not working on Discord? No worries, you can troubleshoot the issues with a few basic steps.
Here are some ways you can use to fix Voicemod not working in Discord:
Method 1: Restart Your Windows PC/Mac
Though it’s not a technical solution, restarting your desktop computer fixes incorrect settings by rebooting them and solves many problems connected with your computer system, programs, and hardware.
So, when your Voicemod suddenly ceases to work in Discord, make sure to restart your Windows PC/Mac before going any further, as it’s the first step in fixing voice issues.
If restarting doesn’t help, slide to the next step!
Method 2: Make Sure The Mic Is Properly Set
The next step is to check if the mic works correctly. This is because faulty settings may stop voice changer Voicemod from operating correctly.
Just follow the steps below to resolve it:
- On the keyboard, press the “Win” logo and the “I” key simultaneously to open Windows settings. Click “System.”
- On the left, you’ll see the option “Sound.” Click it.
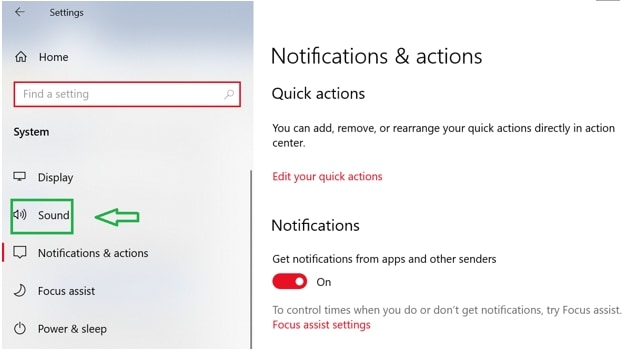
- First, you have to test the microphone! To do so, choose the “Headset” option rather than the Voicemod microphone under the “Input” section
- Click “Device properties & test microphone”
- Make sure to uncheck the “disable” box and keep the volume section 100
- Click the “Start test” button and speak into the microphone
- After that, click “Stop test.” If the greatest value it shows is above “0”, then your microphone works correctly
Now, restart your Voicemod app to see if it’s working properly or not! If the issue still persists, jump to the next solution.
Method 3: Install Windows Updates
If you use Windows 10, it has two kinds of updates that offer performance boost and security patches. Sometimes, an update can fix a few driver and software conflicts automatically.
You can quickly solve the voice chat problem by simply updating the system settings. Here’s how to update your Windows 10:
- Open your windows setting by pressing the “Windows button” and the “I” key together.
- Click on “Update and Security”
- Click the “Check for Updates” button. If an update is found, it will install automatically on the system
Make sure to repeat this process until it says you’re up-to-date. Then, restart the PC. Check whether the Vociemod is properly working or not!
If not, try our next option!
Method 4:Re-Install Voice Changer Voicemod Drivers
In many instances, the issue signifies that you’re using outdated or faulty drivers. To troubleshoot this, simply re-install your Voicemod driver, and you’ll be good to go!
First, uninstall your Voicemod driver from the windows PC/Mac. Here’s how to do it:
- On the keyboard, press the “Windows button” as well as the “I” key to bring up the “Run box”
- Paste or type “devmgmt.msc” and click “OK.” This will open the “Device Manager”
- Click the “expand” option of “Audio Inputs & Outputs.”
- Click the “Microphone WMD” and choose the “Uninstall device” option
- A pop-up window will appear. Click the “Uninstall” button
- Restart the PC
Install the voice changer Voicemod again, whether automatically or manually, and see if it works!
Part 3: How To Change Voice For Discord On Mobile?
“Voicemod clips” is the version for both Apple and Android devices. The app will help you make high-quality content using its wide selection of one-of-a-kind effects, which will change your voice so much that you won’t recognize yourself!
In addition to that, you can add filters, which are connected to your cell phone’s camera to create funny, interesting videos.
Additionally, you’ll have the option to choose from 10 different voices. Plus, you can also make unlimited videos and audio from the humorous to the terrifying.
Some of the Voicemod voices on mobile include male-to-female, different robot effects, famous celebrities, scary voices, and much more. In short, everything is based on how you would like to modify your voice!
Not just that, you can also cross-share creative videos and audio to popular social networking platforms such as Facebook, Twitter, Instagram, TikTok, and Snapchat using your smartphone.
Curious to know how to change your voice for Discord on mobile? Here are step-by-step instructions:
- Make sure the Voicemod app is downloaded on your Apple or Android device and appropriately configured
- Open Discord
- Tap the “cogwheel icon” near your name and avatar
- You’ll see the “settings” page
- Within it, tap the “Voice & Video” option
- Tap Voicemod under the “Input Device” option and the headset under the “Output Device” option and tap escape. You’ll have access to numerous exciting sounds
Richard Bennett
Richard Bennett is a writer and a lover of all things video.
Follow @Richard Bennett
Richard Bennett
Mar 27, 2024• Proven solutions
A voice changer will allow you to prank friends, create content, and most of all, secure your presence by maintaining anonymity. With it, you can turn your voice into several unique and exciting voices to serve any purpose you deem fit.
And when it comes to voice changers, none is as easy to operate as the Voicemod in Discord. Its claim to fame is that it features numerous voice options to choose from.
With Vociemod, you have to simply run the program in the background and select your desired voice!
Read on as we discuss how to use Voicemod on Discord in detail:
In this article
Part 1: How To Use Voice Changer Voicemod For Discord On Desktop Computer
Part 2: How To Fix Voicemod Not Working Discord?
Part 3: How To Change Voice For Discord On Mobile?
Part 1: How To Use Voice Changer Voicemod For Discord On Desktop Computer
Voicemod is arguably one of the best voice changer tools available on the internet for its excellent features.
But before we jump straight into using Voicemod for Discord, you must know how to install one on your desktop Mac/PC.
Here’s how to install Voicemod
- Visit the Voicemod website to begin the download process.
- You’ll see the button “Get Voicemod Free” on the screen. Click it!
- Upon clicking, the site will ask you to sign in to your account from Discord, Twitch, to Google. Use your Discord login details to sign in.
- After you’re signed in, the “.exe” file will be downloaded to your PC/Mac’s download folder. Open the “.exe” file the moment it’s downloaded.
- An install wizard will open up. Navigate through the wizard’s installation process to install the program on your PC/Mac.
- After installation is complete, the installation wizard will ask to restart your windows’ Mac or PC.
You can skip it, but it’s best to restart it for smooth operations.
Once your Mac/PC restarts, you’ll see the Voicemod app icon on your desktop screen.
Now that you have successfully installed the voice changer Voicemod app into your desktop computer, let’s dive into knowing how to use Voicemod on Discord!
Here’s how to use voice changer on Discord
- Click the Vociemod icon on the desktop to open the app. If you can’t find it there, click the “windows icon” located at the screen’s bottom-left. Just type “Voicemod,” and the program will show up. Double click it to get it opened.
- When the app opens up, you’ll have to choose the output and input it will use. If you’re wondering, why the output? This is to give you an insight into what your voice will sound like on each filter.
Once it’s done, you can play around with different filters!
Every day, you’ll get new free filters to use; however, to unlock and access all filters, you need to upgrade to the “pro-version” of voice changer Voicemod.
On the other hand, if you only need a few filters, the “basic-version” should suffice.
Apart from that, you can unlock an additional free filter in your app by sharing it on your social media accounts.
Step 1
To set up Voicemod with Discord, open your discord account and go to the settings (gear icon) placed at the screen’s bottom-left corner.
Step 2
Click the “Voice and Video” option right under the app settings.
Step 3
To make Voicemod usable, you’ll have to change Voice settings. Within the “Input Device” option, select the option that says “Microphone Voicemod Virtual Audio.”
Step 4
After you have changed settings, you can easily change the voice within the program. Not only this, but other users can also hear your audio alteration.
Step 5
With the “basic version,” you’ll have seven free voice choices that will change each day. On the contrary, with the “pro-version,” you’ll gain access to more than 80 different voice options.
So, if you’re searching for an easy and simple voice-changing app to use, look no further than Voicemod!
Part 2: How To Fix Voicemod Not Working Discord?
Is your voice changer Voicemod not working on Discord? No worries, you can troubleshoot the issues with a few basic steps.
Here are some ways you can use to fix Voicemod not working in Discord:
Method 1: Restart Your Windows PC/Mac
Though it’s not a technical solution, restarting your desktop computer fixes incorrect settings by rebooting them and solves many problems connected with your computer system, programs, and hardware.
So, when your Voicemod suddenly ceases to work in Discord, make sure to restart your Windows PC/Mac before going any further, as it’s the first step in fixing voice issues.
If restarting doesn’t help, slide to the next step!
Method 2: Make Sure The Mic Is Properly Set
The next step is to check if the mic works correctly. This is because faulty settings may stop voice changer Voicemod from operating correctly.
Just follow the steps below to resolve it:
- On the keyboard, press the “Win” logo and the “I” key simultaneously to open Windows settings. Click “System.”
- On the left, you’ll see the option “Sound.” Click it.
- First, you have to test the microphone! To do so, choose the “Headset” option rather than the Voicemod microphone under the “Input” section
- Click “Device properties & test microphone”
- Make sure to uncheck the “disable” box and keep the volume section 100
- Click the “Start test” button and speak into the microphone
- After that, click “Stop test.” If the greatest value it shows is above “0”, then your microphone works correctly
Now, restart your Voicemod app to see if it’s working properly or not! If the issue still persists, jump to the next solution.
Method 3: Install Windows Updates
If you use Windows 10, it has two kinds of updates that offer performance boost and security patches. Sometimes, an update can fix a few driver and software conflicts automatically.
You can quickly solve the voice chat problem by simply updating the system settings. Here’s how to update your Windows 10:
- Open your windows setting by pressing the “Windows button” and the “I” key together.
- Click on “Update and Security”
- Click the “Check for Updates” button. If an update is found, it will install automatically on the system
Make sure to repeat this process until it says you’re up-to-date. Then, restart the PC. Check whether the Vociemod is properly working or not!
If not, try our next option!
Method 4:Re-Install Voice Changer Voicemod Drivers
In many instances, the issue signifies that you’re using outdated or faulty drivers. To troubleshoot this, simply re-install your Voicemod driver, and you’ll be good to go!
First, uninstall your Voicemod driver from the windows PC/Mac. Here’s how to do it:
- On the keyboard, press the “Windows button” as well as the “I” key to bring up the “Run box”
- Paste or type “devmgmt.msc” and click “OK.” This will open the “Device Manager”
- Click the “expand” option of “Audio Inputs & Outputs.”
- Click the “Microphone WMD” and choose the “Uninstall device” option
- A pop-up window will appear. Click the “Uninstall” button
- Restart the PC
Install the voice changer Voicemod again, whether automatically or manually, and see if it works!
Part 3: How To Change Voice For Discord On Mobile?
“Voicemod clips” is the version for both Apple and Android devices. The app will help you make high-quality content using its wide selection of one-of-a-kind effects, which will change your voice so much that you won’t recognize yourself!
In addition to that, you can add filters, which are connected to your cell phone’s camera to create funny, interesting videos.
Additionally, you’ll have the option to choose from 10 different voices. Plus, you can also make unlimited videos and audio from the humorous to the terrifying.
Some of the Voicemod voices on mobile include male-to-female, different robot effects, famous celebrities, scary voices, and much more. In short, everything is based on how you would like to modify your voice!
Not just that, you can also cross-share creative videos and audio to popular social networking platforms such as Facebook, Twitter, Instagram, TikTok, and Snapchat using your smartphone.
Curious to know how to change your voice for Discord on mobile? Here are step-by-step instructions:
- Make sure the Voicemod app is downloaded on your Apple or Android device and appropriately configured
- Open Discord
- Tap the “cogwheel icon” near your name and avatar
- You’ll see the “settings” page
- Within it, tap the “Voice & Video” option
- Tap Voicemod under the “Input Device” option and the headset under the “Output Device” option and tap escape. You’ll have access to numerous exciting sounds
Richard Bennett
Richard Bennett is a writer and a lover of all things video.
Follow @Richard Bennett
Also read:
- [New] 2024 Approved Unveiling the Secrets of Live Video Sharing on Discord
- [Updated] Streamlined Approach to Role Assignments on Discord Servers
- [New] Boosting Discord's Sound Quality Review of Best Free Voice Changers
- [New] Enriching Discord with the Top 10 Plugin Choices for 2024
- [Updated] The Pro's Pathway to Effective Discord Dialogue and Reactions for 2024
- [Updated] Dissecting Iconic Discord Emoticons and Their Designers
- [New] Efficiently Managing Discord Spoiler Tags in Chats for 2024
- [New] Premiered 5 Innovative Logo Movements for Networks
- [New] Free Voice-Overhaul Techniques for Discord Users - Top Picks 2023
- In 2024, Essential Top 5 Engaging Platform Logo Movements
- [Updated] Deactivating Your Discord Server A Device-Centric Approach for 2024
- [New] Take Your Discord Chat to the Next Level with TTS for 2024
- Free DiscoLinking Techniques Desktop & Smartphone Edition
- [New] In 2024, The Complete Breakdown of Screen Casting on Discord
- In 2024, Guide on Populating Emojis in Discord User Status Field
- How to Speak Clearly on Discord via TTS for 2024
- Quick and Easy Methods for Including Emojis Into Discord Statements
- [Updated] Captivating Cool Names A Guide to Popularity on Discord for 2024
- In 2024, Streamlined Approach to Role Assignments on Discord Servers
- Premiere Discord Recording Tools - Online, Desktop, Mobile for 2024
- [Updated] 2024 Approved Converting Messages Into Speech on Discord
- [Updated] The Ultimate Tutorial Sharing Screens in Discord
- [Updated] In 2024, Step-By-Step Process to Make Professional Discord Photos
- [New] Discord's Premier Love and Fun Sites for 2024
- [New] 2024 Approved Decoding the Best Platform for Real-Time Team Collaboration Slack Vs. Discord Comparison
- [New] In 2024, Beginner's Pathway to Effective DiscoStreaming
- [Updated] Steps for a Smooth Departure in Online Gatherings for 2024
- Demystifying Discord's Premium Experience DiscoNitro Explored for 2024
- [New] Efficient Tactics for Exploring and Joining Desired Discords for 2024
- [Updated] Top 30 Boosting Bots for Enhanced Discord Servers for 2024
- [Updated] Essential Knowledge on Discord Stickers
- [Updated] 2024 Approved From Conflict to Resolution An In-Depth Tutorial on Reporting Users on Discord
- [New] In 2024, Ultimate List of 10 Budget-Friendly Discord Voice Recorder Tools
- [New] Ranking 5 Cutting-Edge Social Media Animation Logos for 2024
- Mastering Discord GIFs The Ultimate Communication Tool for Teams for 2024
- In 2024, Unlocking the Secrets of DiscoNitro Features & Acquisition
- [New] Discord Spoilers Guide Essential Info at a Glance for 2024
- [Updated] In 2024, Leading Online Screenshot Services Discord Focus
- Premium Free Service Craft Your Own Discord Emblem for 2024
- [Updated] In 2024, Unlock Advanced Features in Discord's Live Broadcast
- The Right Ways to Address Abuse Efficient Steps for Dispute Documentation on Discord
- [New] 2024 Approved Best Discord Couple Chat Spaces
- Exploring Workplace Messaging Platforms Ranking Slack & Discord for Efficiency
- [New] Understanding and Manipulating Discord's Identity System
- 5 Easy Ways to Change Location on YouTube TV On Xiaomi 14 Pro | Dr.fone
- Updated Open-Source Audacity Alternatives Top 5 Free Audio Editors Compared on Windows
- 10 Easy-to-Use FRP Bypass Tools for Unlocking Google Accounts On Vivo Y28 5G
- 2024 Approved Effortless Method to Post Sites on IG Story/Posts
- In 2024, Overview of the Best Vivo V27e Screen Mirroring App | Dr.fone
- How To Install the Latest iOS Beta Version on iPhone 7? | Dr.fone
- The Blueprint for Social Success Six Proven Steps Toward Verification and Growth for 2024
- Updated In 2024, Best 10 Free and Best Text-to-Speech Generators
- Here Are some of the Best Free Online Glitch Effect Generators You Can Use to Edit Photos and Videos
- Cover Insta Peaks IPhone/Android Edition, Enhanced Features for 2024
- How To Leave a Life360 Group On Motorola Moto G Stylus (2023) Without Anyone Knowing? | Dr.fone
- [New] 2024 Approved Your Quick Path to Multimedia Tweeting
- In 2024, 5 Ways To Teach You To Transfer Files from Xiaomi 14 Pro to Other Android Devices Easily | Dr.fone
- How to Unlock SIM Card on iPhone 11 Pro online without jailbreak
- 8 Ultimate Fixes for Google Play Your Samsung Galaxy A05s Isnt Compatible | Dr.fone
- In 2024, 9 Best Free Android Monitoring Apps to Monitor Phone Remotely For your Nubia Z50S Pro | Dr.fone
- How Can I Recover Corrupted PDF v1.1 File
- How to Bypass Google FRP Lock on Vivo T2x 5G Devices
- New In 2024, Maximize Your Viewing Experience with These 4 Pioneering Audio Boosters Online
- 6 Popular Chrome Audio Recorder for 2024
- In 2024, How to Change Location on TikTok to See More Content On your Vivo S17 Pro | Dr.fone
- In 2024, 3 Methods to Mirror Poco F5 5G to Roku | Dr.fone
- 2024 Approved From Rookie to Pro Unveiling the Secrets of Ginger Isle
- 2024 Approved HitPaw Screen Recorder Review
- [Updated] 2024 Approved Expertly Curated Top 15 Android Virtualization Tools (Mac/PC)
- In 2024, Here are Some of the Best Pokemon Discord Servers to Join On Realme 10T 5G | Dr.fone
- Mastering Android Device Manager The Ultimate Guide to Unlocking Your Samsung Galaxy A54 5G Device
- Preparation to Beat Giovani in Pokemon Go For Samsung Galaxy A15 5G | Dr.fone
- Navigating the Best No-Cost Podcast Software A Comprehensive List for Mobile Users for 2024
- [New] 2024 Approved The Ultimate Roku Guide to Facebook Live Streams
- [New] Mac Acoustic Arena Deep Dive for 2024
- Updated Cu
- Full Tutorial to Bypass Your Xiaomi Redmi Note 13 Pro+ 5G Face Lock?
- 2024 Approved How to Chat on Google Meet [Complete Guide]
- New In 2024, Best Websites to Download Public Domain Videos
- In 2024, Top IMEI Unlokers for Apple iPhone 11 Pro and Android Phones
- New 2024 Approved Breeze Be Gone Cutting-Edge Techniques to Purge Wind Interference in Audio Streams
- How to Make Your Voice Deeper With Filmora for 2024
- [Updated] Crafting Impeccable Videos for Instagram Enthusiasts
- Navigate the Best Practices for Efficient HP Notebook Screen Recording for 2024
- [New] Top 10 Insta Management Gadgets for Boosting Engagement for 2024
- Title: "[New] Maximizing Potential The Art of Role Implementation on Discord for 2024"
- Author: Timothy
- Created at : 2024-05-23 22:48:16
- Updated at : 2024-05-24 22:48:16
- Link: https://discord-videos.techidaily.com/new-maximizing-potential-the-art-of-role-implementation-on-discord-for-2024/
- License: This work is licensed under CC BY-NC-SA 4.0.
