![[New] Setting Up a Stream Discord Edition 101 for 2024](https://thmb.techidaily.com/ab11097b735383eb1301c6c7953b6d3e90027241dcabace0ad8db43fe24b30d7.jpg)
"[New] Setting Up a Stream Discord Edition 101 for 2024"
Setting Up a Stream: Discord Edition 101
Discord is a great communication tool that also offers live streaming services. You can use this platform to engage and connect to your audience by conducting a live session. Through its “Voice Chat” feature, you can directly interact with your audience in a comfortable environment. If you are unaware of how to go live on Discord, this article can help you.
For your assistance, this article will instantly address how to live stream on Discord. Let’s dig into the details.
- How to Stream Videos on Discord
- How to Stream your Webcam on Discord
- How to Change the Shared Screen on Discord
- How to Stream Discord on my Mobile Phone?
- FAQs about the live stream on Discord
- Bonus Tip: Easily Record and Edit your Stream with Filmora
Part 1: What is Discord?
Discord is a popular platform created to offer a better communication experience between game players. The major reason for the massive recognition of Discord is its ability to generate servers instantly. Game players and other users can instantly create voice or text servers for enhanced communication.
Discord provides excellent flexibility to users by providing high-quality audio services with no background noise. Even if your friends are in different parts of the world, you can chat with them smoothly. You can create private and public servers in Discord to communicate with people having similar interests.
Along with using Discord Voice and Text chat features, you can live stream your gameplays. The live streaming on Discord won’t be a public show, as it will only be confined to your selected server. Through this, you can ask your friends for assistance while playing games. Moreover, Discord is also capable of capturing other screens. Hence, it’s a great platform for professionals, game lovers, and other individuals to communicate efficiently.
Part 2: Prerequisites for Stream on Discord
Many social media platforms put restrictions on users for live streaming. Some platforms require you to have a specific number of followers in order to conduct live streaming. However, in Discord, you don’t have to worry about such restrictions. By creating a server and channel on Discord, you can easily go for live streaming. Check the below prerequisites for performing a live stream on Discord:
1. Create your Discord Server
Step1 Open your Discord and hit the “Plus” icon given on the left side. It will open a small menu where you can select a template to start or create your own server.
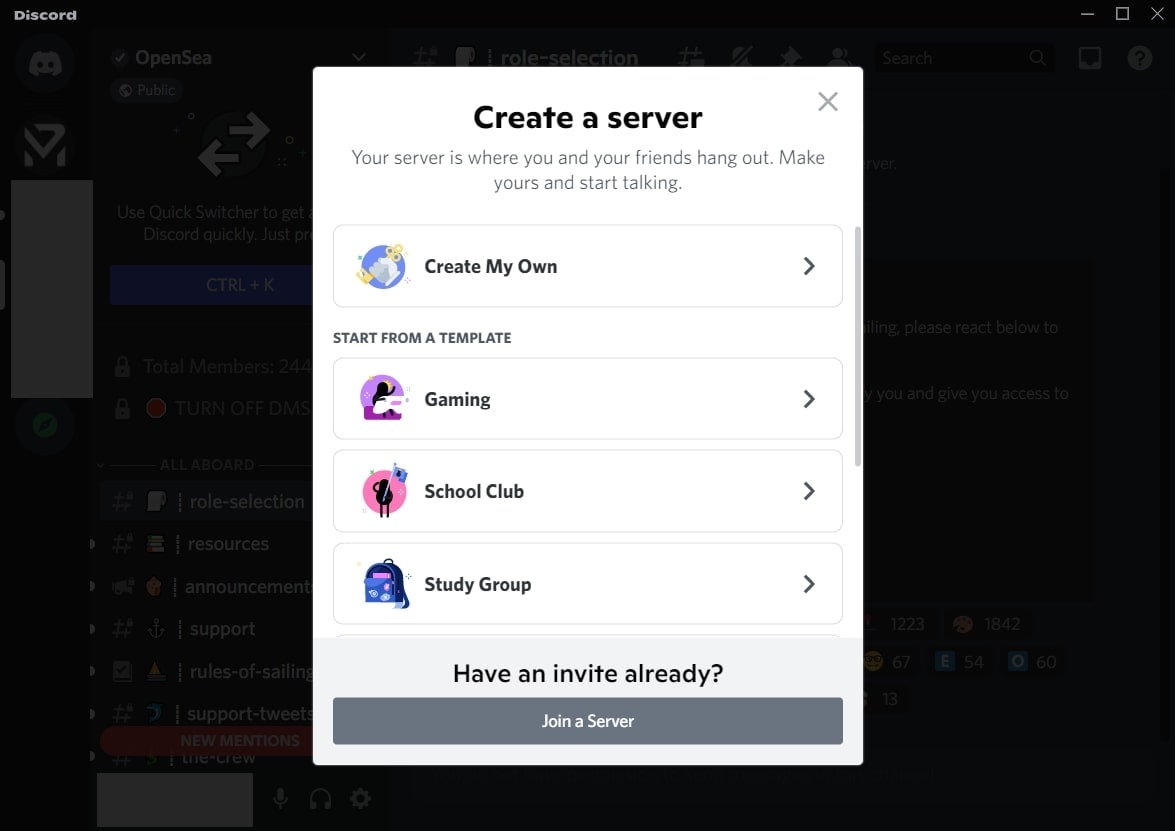
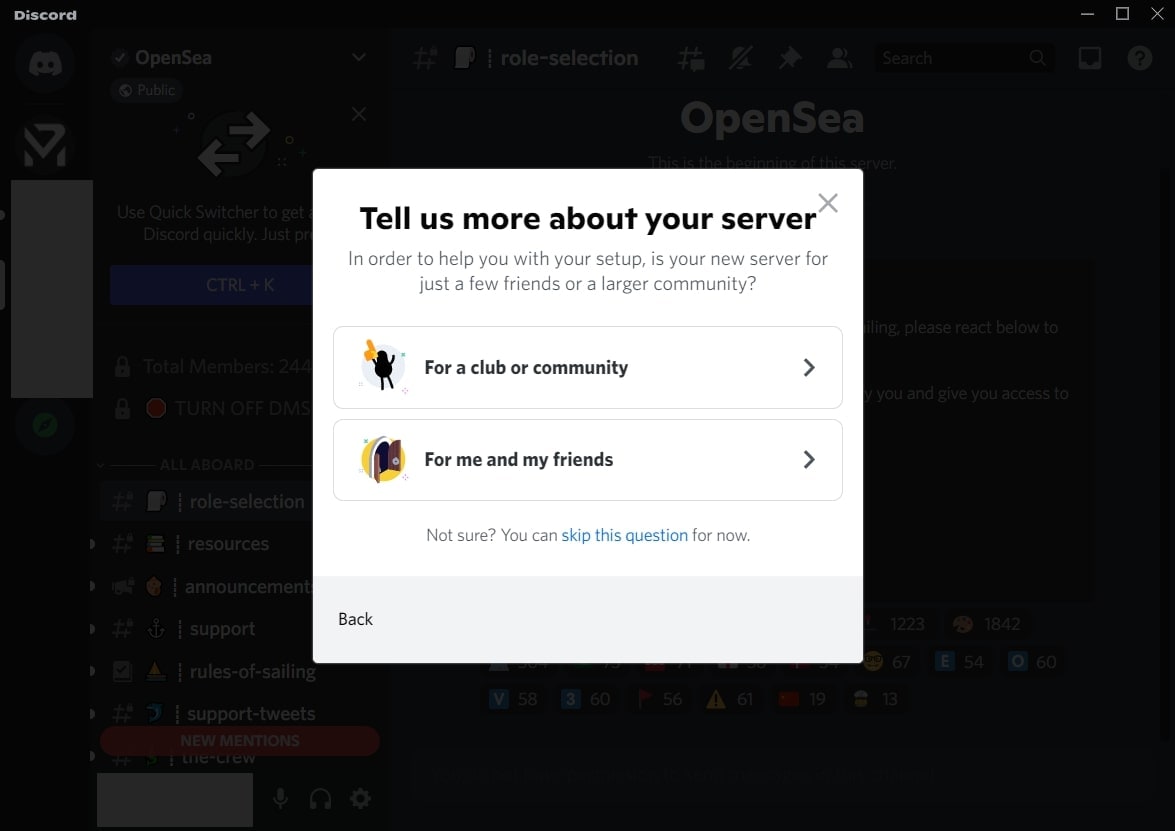
Step2 If you want to create your server, click “Create My Own.” Now select the type of server you want to create. Once done, create the server name and click the “Create” button.
2. Create your Discord Channel
Step1 To create a Discord channel, open any of your servers from the left side. Now tap on the “Plus” icon adjacent to “Voice Channels.”
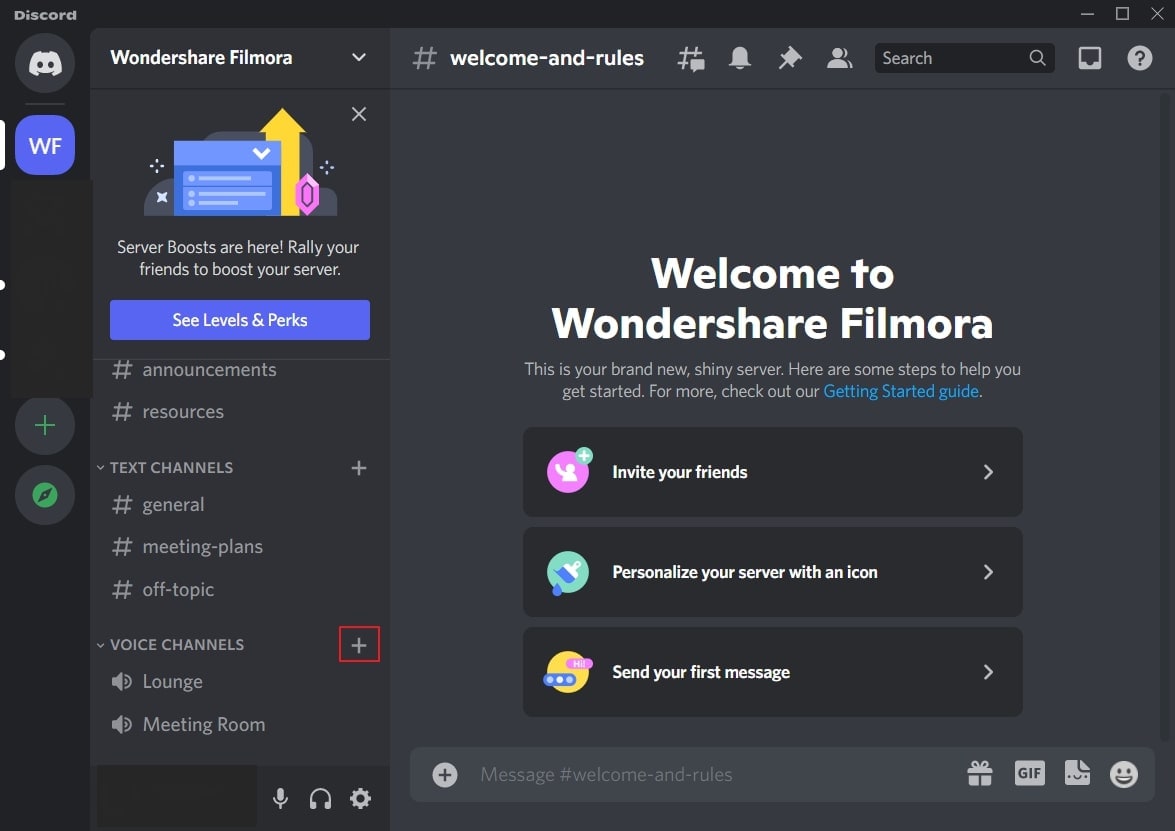
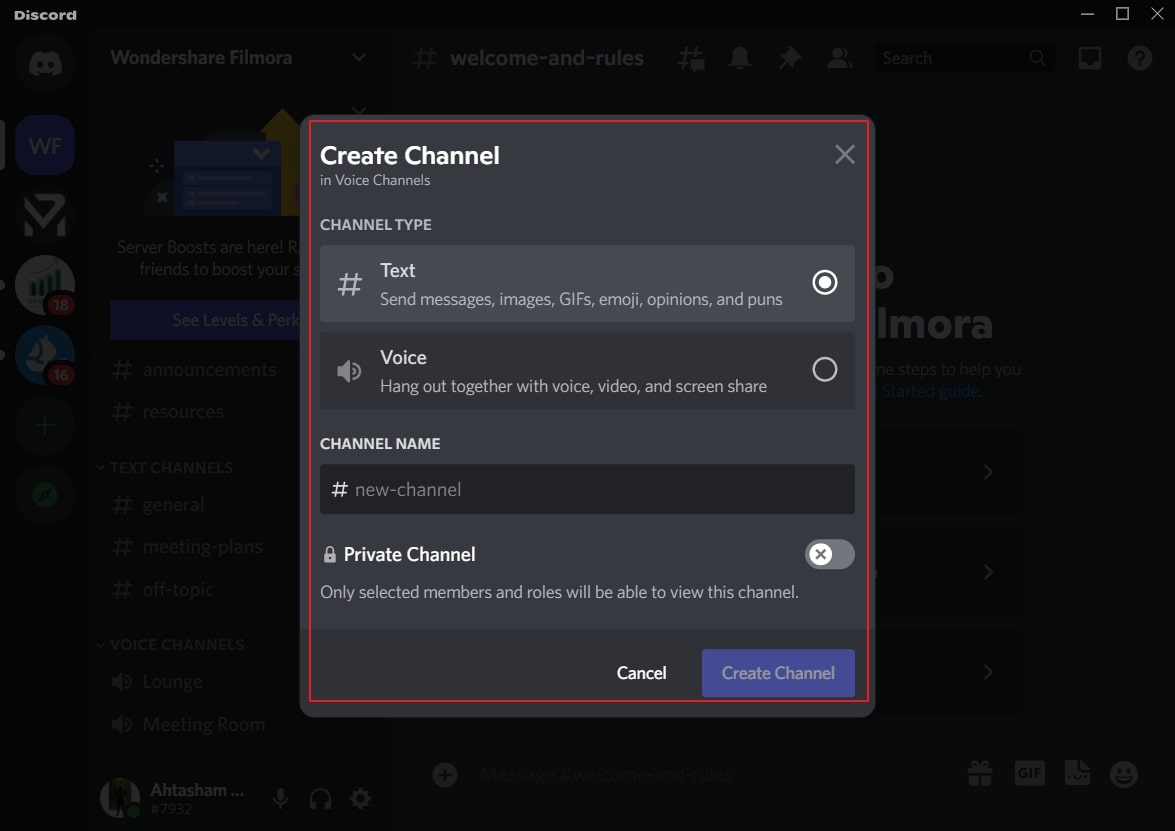
Step2 You can either create a “Text” channel or a “Voice” channel. After choosing the channel type, create a channel name. You can also enable the “Private Channel” option to create a private channel. Once done, click on the “Create Channel” button.
Part 3: How to Stream Videos on Discord
Once you have created a server and channel, you can begin your live streaming. Discord provides you with an option through which you can stream your videos instantly. To know the process, check the below steps:
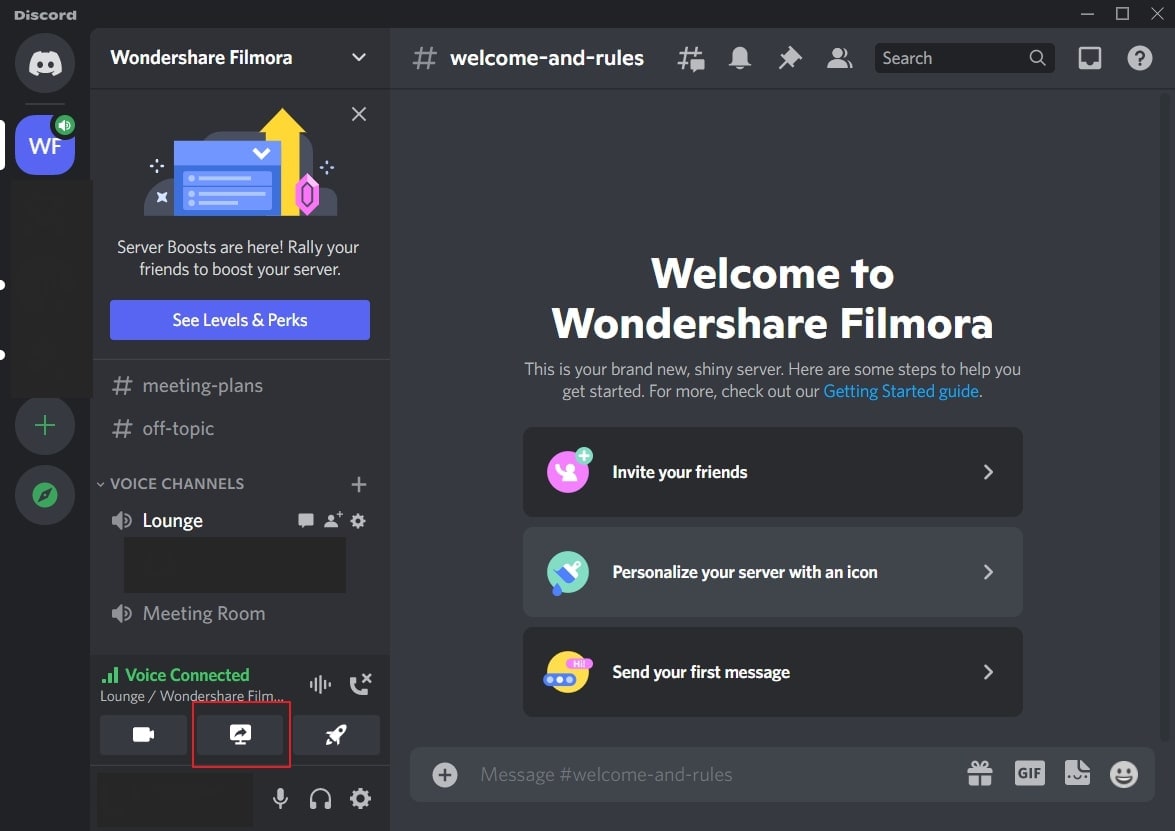
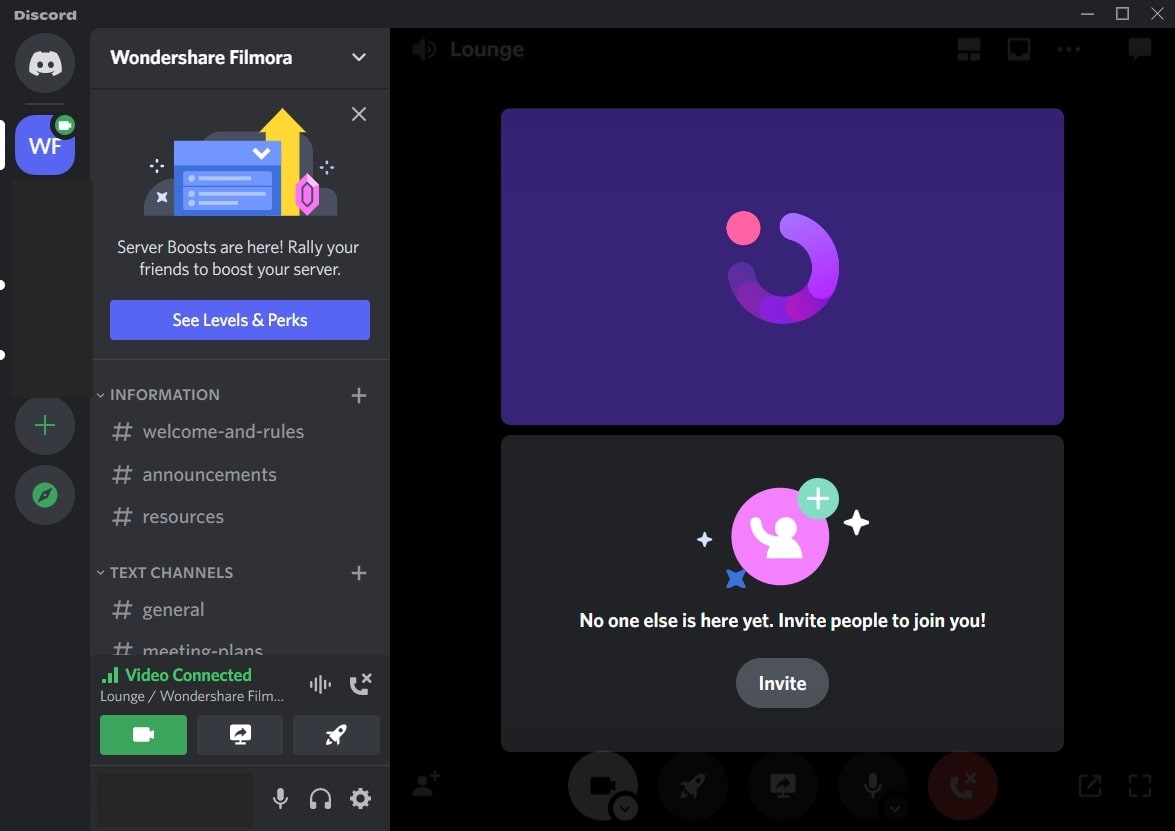
Step1 Open Discord and navigate to your desired server. Now proceed to your voice channel and click on the “Share Your Screen” button given below.
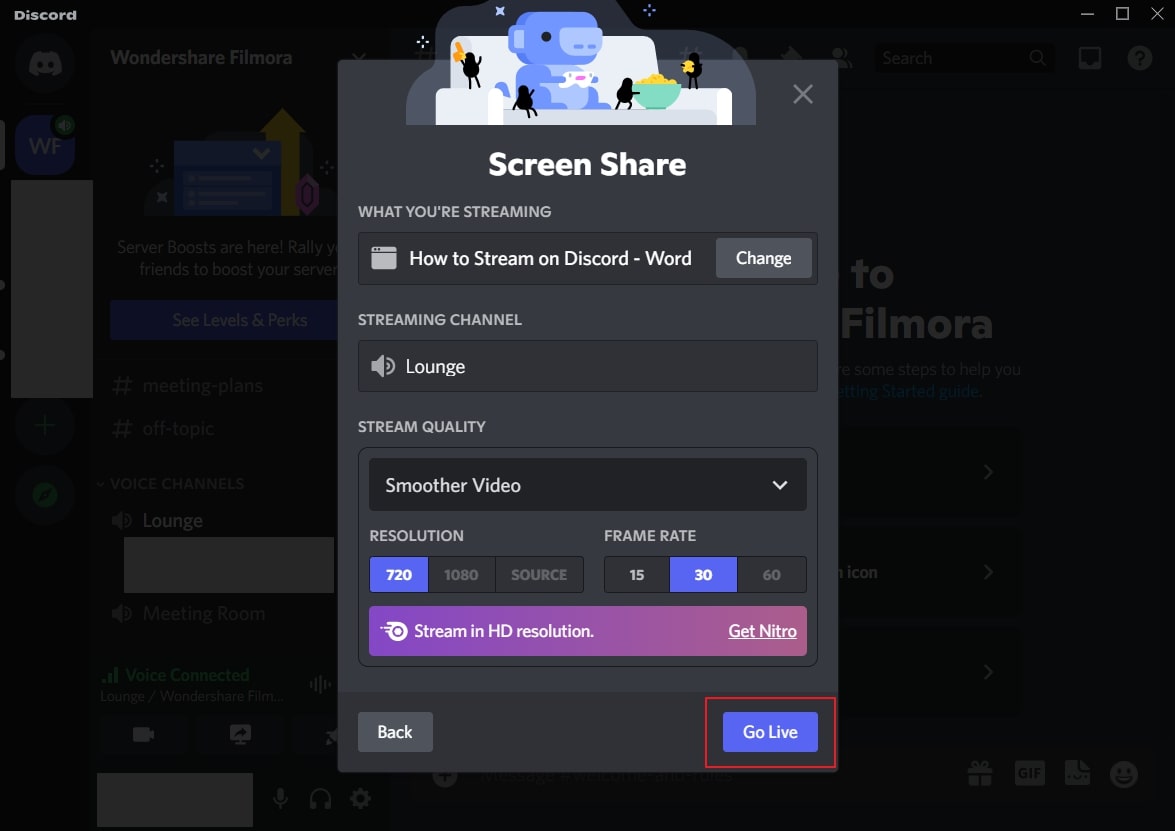
Step2 Select the screen you want to stream in the “Applications” tab. From the new menu, you can adjust the stream quality, such as resolution and frame rate. After adjusting the live streaming settings, click on the “Go Live” button.
Part 4: How to Stream your Webcam on Discord
Do you want to give a tutorial session through your webcam? Through live webcam streaming, you can demonstrate a particular product while giving facial expressions. Using Discord, you can stream your webcam with a single click.
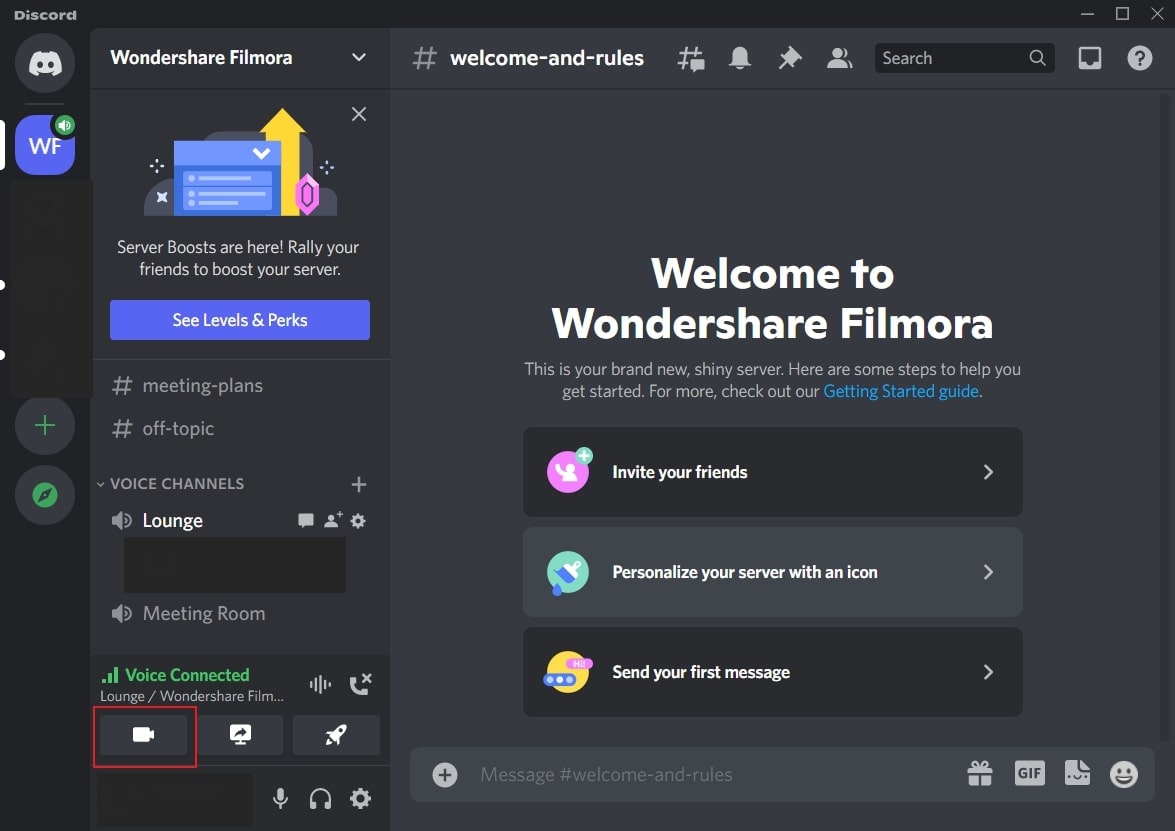
Step1 Once you have opened a server on Discord, go to your Voice channel. From there, tap on the “Camera” icon above your username.
Step2 It will open a new screen through which you can start an activity or share your screen. Moreover, you can also invite others to join your webcam streaming. Once done with your activities, click on the “Red” button to disconnect.
Part 5: How to Change the Shared Screen on Discord
Do you want to change a shared screen on Discord? If you want to open a presentation, web browser, or any other application, Discord can easily change the shared screen. Through this facility, you can quickly shift between multiple screens without hassle.
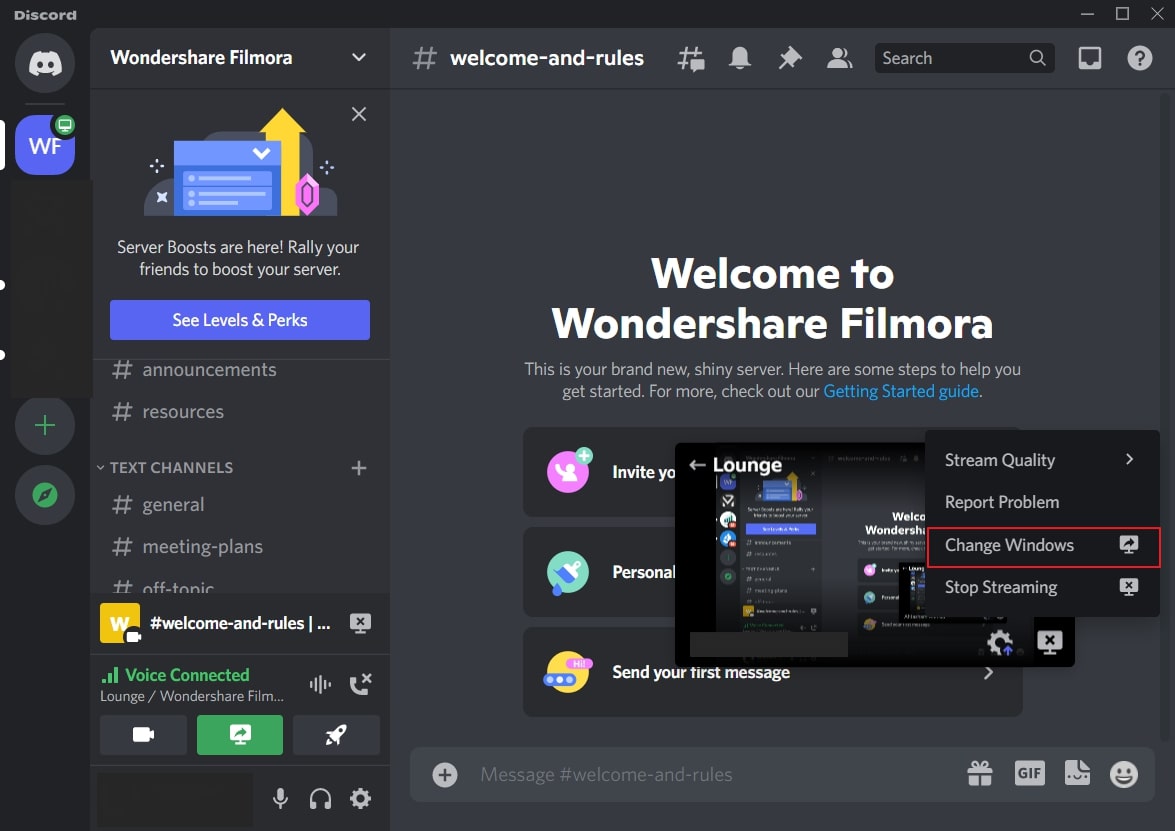
Step1 If you are live streaming your shared screen, you can instantly change windows on Discord. For this, click on the “Gear” icon on your live streaming screen to open settings.

Step2 From the settings menu, click on “Change Windows.” Now select the screen that you want to change. After choosing the required screen, hit on the “Go Live” button.
Part 6: How to Stream Discord on my Mobile Phone?
Discord has the same operating systems on Android and iOS devices. That’s why the steps to stream on Discord on both these devices are the same.
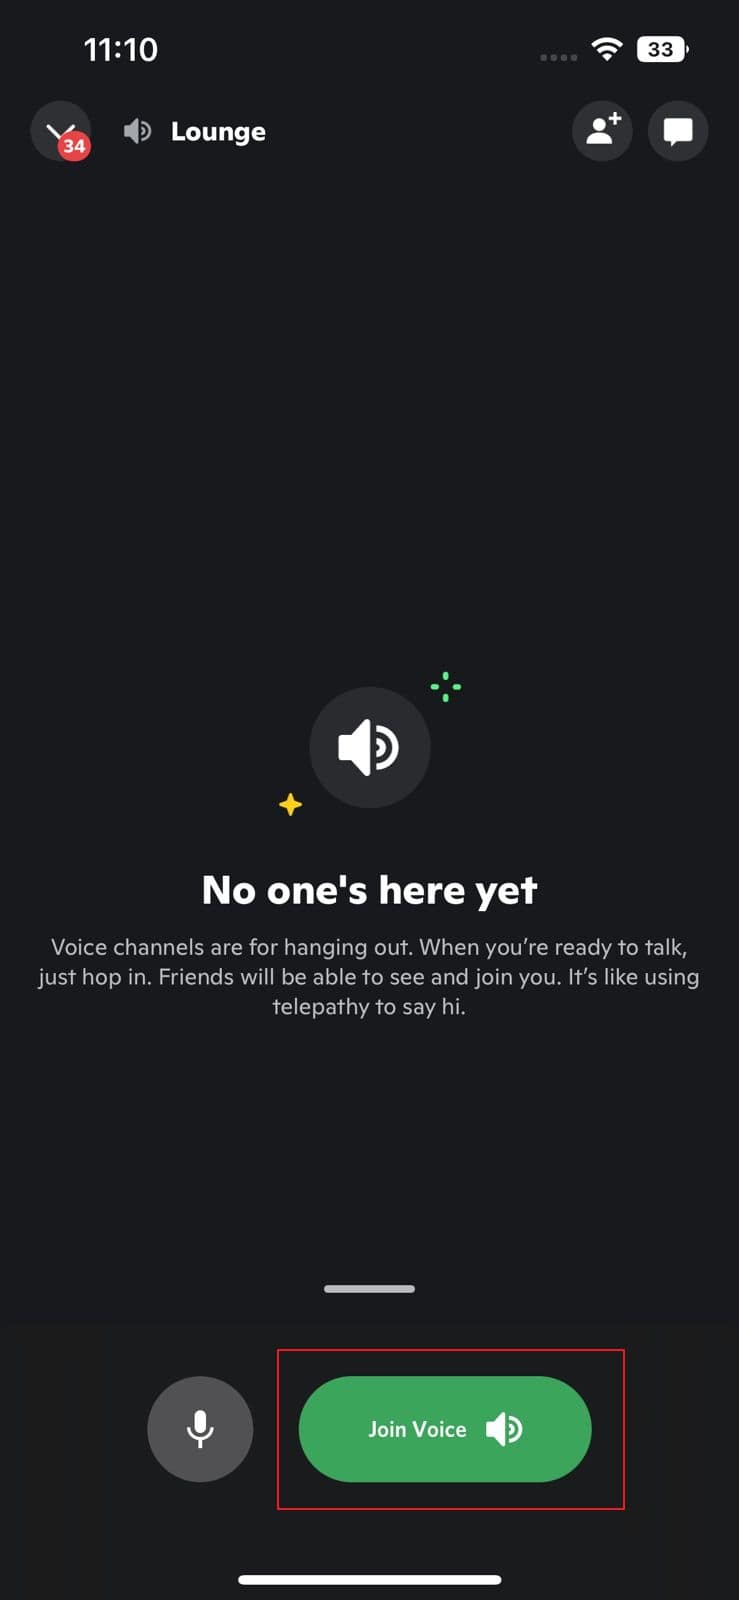
Step1 Open Discord on your mobile and select the desired server. Now choose the voice channel through which you want to live stream Discord.


Step2 Now tap “Join Voice” to initiate live streaming. Here, you can turn on your camera and share the screen. You can also mute your voice from the given options. Once done with live streaming, tap on the “Red” button.
Part 7: FAQs about the live stream on Discord
1. How many people can watch my Discord live simultaneously?
During the pandemic, up to 50 people were able to join live streaming on Discord. Normally, 25 people can watch live streaming on Discord simultaneously.
2. How to add the game types on Discord?
Open Discord and navigate to the “User Settings” given at the bottom of the screen. Select the “Game Activity” section and activate the option “Display currently running game as a status message.” Now click on the “Add it” button and choose the type of games you want to play. Once done, Discord would be able to detect the type of game automatically.
3. How to share a video on Discord?
On your computer, launch Discord and go to your desired channel. On the chat box space, click on the “Plus” icon. Now browse the video from your system that you want to share. Click on the “Open” button and select the “Upload” option. By doing so, you can easily share videos.
For mobile users, go to your Discord app and choose the preferred channel. On the left side of the typing area, you can see the “Image” icon. Tap on this option and choose the video you want to share from your phone. Now hit the “Arrow” button to send the selected video.
Bonus Tip: Easily Record and Edit your Stream with Filmora
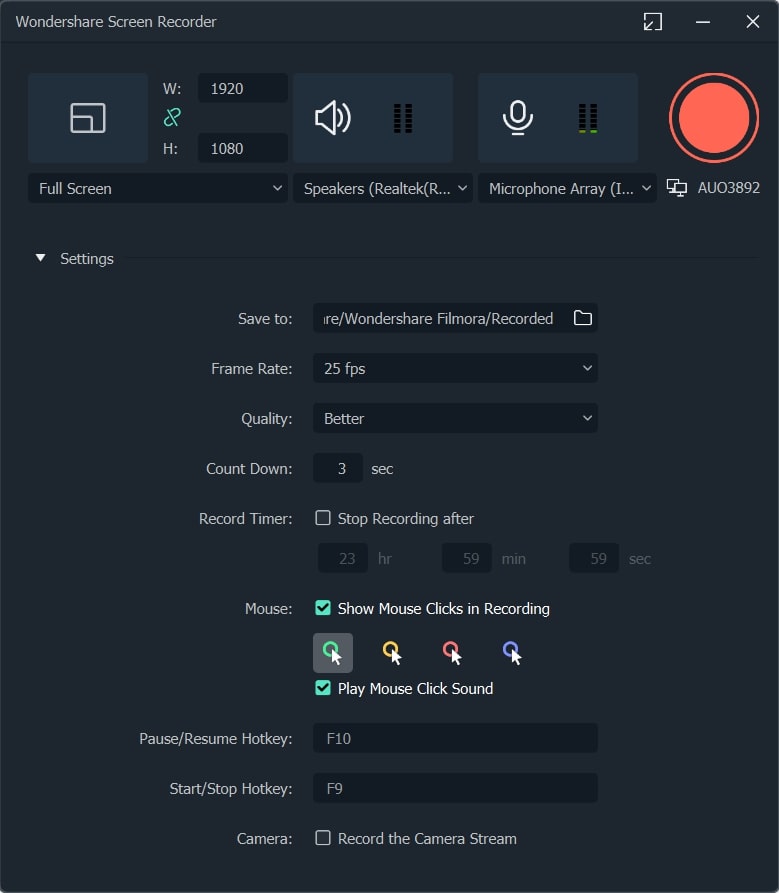
To save and edit your live stream sessions, we will highly recommend you the screen recorder of Wondershare Filmora . Through this screen recorder, you can capture your live-streaming session on Discord in the best possible quality.
Using this screen recorder, you can capture your desired area during live streaming. Once you capture your live-streaming session, you can edit it on this platform. Using the editing tool of Filmora, you can cut, crop, resize, and modify your screen recording efficiently.
Conclusion
Have you ever streamed on Discord before? Discord is a great communication platform that provides advanced features. With its vast flexibility, you can create private servers and channels. This article can guide you to learn how to go live on Discord. We have also suggested Wondershare Filmora, which can help you to screen record and edit your live streaming sessions on Discord.
Free Download For Win 7 or later(64-bit)
Free Download For macOS 10.14 or later
Part 1: What is Discord?
Discord is a popular platform created to offer a better communication experience between game players. The major reason for the massive recognition of Discord is its ability to generate servers instantly. Game players and other users can instantly create voice or text servers for enhanced communication.
Discord provides excellent flexibility to users by providing high-quality audio services with no background noise. Even if your friends are in different parts of the world, you can chat with them smoothly. You can create private and public servers in Discord to communicate with people having similar interests.
Along with using Discord Voice and Text chat features, you can live stream your gameplays. The live streaming on Discord won’t be a public show, as it will only be confined to your selected server. Through this, you can ask your friends for assistance while playing games. Moreover, Discord is also capable of capturing other screens. Hence, it’s a great platform for professionals, game lovers, and other individuals to communicate efficiently.
Part 2: Prerequisites for Stream on Discord
Many social media platforms put restrictions on users for live streaming. Some platforms require you to have a specific number of followers in order to conduct live streaming. However, in Discord, you don’t have to worry about such restrictions. By creating a server and channel on Discord, you can easily go for live streaming. Check the below prerequisites for performing a live stream on Discord:
1. Create your Discord Server
Step1 Open your Discord and hit the “Plus” icon given on the left side. It will open a small menu where you can select a template to start or create your own server.
Step2 If you want to create your server, click “Create My Own.” Now select the type of server you want to create. Once done, create the server name and click the “Create” button.
2. Create your Discord Channel
Step1 To create a Discord channel, open any of your servers from the left side. Now tap on the “Plus” icon adjacent to “Voice Channels.”
Step2 You can either create a “Text” channel or a “Voice” channel. After choosing the channel type, create a channel name. You can also enable the “Private Channel” option to create a private channel. Once done, click on the “Create Channel” button.
Part 3: How to Stream Videos on Discord
Once you have created a server and channel, you can begin your live streaming. Discord provides you with an option through which you can stream your videos instantly. To know the process, check the below steps:
Step1 Open Discord and navigate to your desired server. Now proceed to your voice channel and click on the “Share Your Screen” button given below.
Step2 Select the screen you want to stream in the “Applications” tab. From the new menu, you can adjust the stream quality, such as resolution and frame rate. After adjusting the live streaming settings, click on the “Go Live” button.
Part 4: How to Stream your Webcam on Discord
Do you want to give a tutorial session through your webcam? Through live webcam streaming, you can demonstrate a particular product while giving facial expressions. Using Discord, you can stream your webcam with a single click.
Step1 Once you have opened a server on Discord, go to your Voice channel. From there, tap on the “Camera” icon above your username.
Step2 It will open a new screen through which you can start an activity or share your screen. Moreover, you can also invite others to join your webcam streaming. Once done with your activities, click on the “Red” button to disconnect.
Part 5: How to Change the Shared Screen on Discord
Do you want to change a shared screen on Discord? If you want to open a presentation, web browser, or any other application, Discord can easily change the shared screen. Through this facility, you can quickly shift between multiple screens without hassle.
Step1 If you are live streaming your shared screen, you can instantly change windows on Discord. For this, click on the “Gear” icon on your live streaming screen to open settings.
Step2 From the settings menu, click on “Change Windows.” Now select the screen that you want to change. After choosing the required screen, hit on the “Go Live” button.
Part 6: How to Stream Discord on my Mobile Phone?
Discord has the same operating systems on Android and iOS devices. That’s why the steps to stream on Discord on both these devices are the same.
Step1 Open Discord on your mobile and select the desired server. Now choose the voice channel through which you want to live stream Discord.
Step2 Now tap “Join Voice” to initiate live streaming. Here, you can turn on your camera and share the screen. You can also mute your voice from the given options. Once done with live streaming, tap on the “Red” button.
Part 7: FAQs about the live stream on Discord
1. How many people can watch my Discord live simultaneously?
During the pandemic, up to 50 people were able to join live streaming on Discord. Normally, 25 people can watch live streaming on Discord simultaneously.
2. How to add the game types on Discord?
Open Discord and navigate to the “User Settings” given at the bottom of the screen. Select the “Game Activity” section and activate the option “Display currently running game as a status message.” Now click on the “Add it” button and choose the type of games you want to play. Once done, Discord would be able to detect the type of game automatically.
3. How to share a video on Discord?
On your computer, launch Discord and go to your desired channel. On the chat box space, click on the “Plus” icon. Now browse the video from your system that you want to share. Click on the “Open” button and select the “Upload” option. By doing so, you can easily share videos.
For mobile users, go to your Discord app and choose the preferred channel. On the left side of the typing area, you can see the “Image” icon. Tap on this option and choose the video you want to share from your phone. Now hit the “Arrow” button to send the selected video.
Bonus Tip: Easily Record and Edit your Stream with Filmora
To save and edit your live stream sessions, we will highly recommend you the screen recorder of Wondershare Filmora . Through this screen recorder, you can capture your live-streaming session on Discord in the best possible quality.
Using this screen recorder, you can capture your desired area during live streaming. Once you capture your live-streaming session, you can edit it on this platform. Using the editing tool of Filmora, you can cut, crop, resize, and modify your screen recording efficiently.
Conclusion
Have you ever streamed on Discord before? Discord is a great communication platform that provides advanced features. With its vast flexibility, you can create private servers and channels. This article can guide you to learn how to go live on Discord. We have also suggested Wondershare Filmora, which can help you to screen record and edit your live streaming sessions on Discord.
Free Download For Win 7 or later(64-bit)
Free Download For macOS 10.14 or later
Ace Message Management on Discord with Easy Pins
How to Pin A Message on Discord?

Richard Bennett
Mar 27, 2024• Proven solutions
Like TeamSpeak or Skype, Discord is a chat app aimed at easy mass communication. Although it was made for gamers, it is readily used for communicating in offices, during projects, or for professional collaboration.
Even though it’s straightforward to use, there are several Discord features that you may be unfamiliar with.
One such feature is called pinning messages. It is available to moderators, administrators, server owners, and other users who have permission to “Manage Messages” in various server channels.
This feature helps you find and share vital messages quickly, especially when new users join a specific channel.
It acts like a sticky note for Discord, making sure valuable information such as server rules do not get overshadowed by new messages even months after the pinned messages are first posted.
Today, we will go over how to pin a message on Discord for your desktop app on PC and Mac, as well as on your iPhone and Android mobile devices.
Part 1: How to Pin A Message on Discord Desktop?
If you want to learn how to pin messages on Discord desktop, follow these steps:
- Hover over any message which you wish to pin.
- On the right-hand side of it, there will be a button that would read as More; click it and you will see a screen like below

- Now, click on the “Pin Message” option
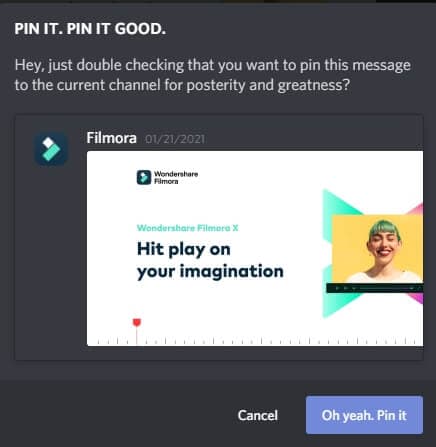
- After which, you will be presented with a prompt asking you to confirm that you want to pin this particular message. Click on “Oh yeah, pin it.”
That’s it! You have now learned how to pin messages on Discord for the desktop application.
But make sure you don’t pin everything that might seem important at a glance — only pin messages that may have utility in the future.
Also, don’t pin messages that are just important for you. In larger channels, prioritize pinning messages that will benefit most participants.
Part 2: How to Pin Messages on Discord Mobile App?
Pinning messages in the mobile app is very similar to how it is done on the desktop application. Do it by:
- Just hold down your finger on the message you wish to pin
- A couple of seconds later, you will be presented with a list of options
- From here, click on “Pin Message”
- A pop-up will appear confirming if you want to pin the message. If you are sure you want to pin a particular message, tap the “Yes” button and then your message is pinned
Part 3: How to View Pinned Messages on Discord
Accessing pinned messages is just as easy as pinning them. To access a pinned message on the app’s desktop version:
- Click on the pin icon appearing on the top right-hand side of your screen

- Doing this will present you with a drop-down list of pinned messages. Now, you can tap on the “Jump” button next to the “x” (cross) icon to go directly to the pinned message
- This will allow you to understand the context behind the pinned message. You can also access and share links in the pinned messages from here
Part 4: How to View Pinned Messages on Discord Mobile
View your pins on the mobile version of Discord by:
- Swiping from right to left, which will open up a side menu
- Then click on “Pins,” which is the second option from the left, as shown in the picture below
- Now you will be in the pinned messages window
- You can jump to a specific pinned message by clicking on it, allowing you to access any content or links in the message
Part 5: Limit on Pinned Messages
You can only pin 50 messages in the pin box in Discord, meaning if you want to pin new messages, you will have to delete older ones to make space.
This may feel like a disadvantage. However, it makes perfect sense. Pinning messages is only for important information that must be used in the future.
Removing this limit and giving people free rein on the number of messages they can pin will eventually lead to too many pinned messages, defeating the feature’s purpose.
Part 6: How to Delete Pinned Messages on Discord?
If something pinned in the past has become redundant over time, you can remove it from the pinned messages.
This will make sure your pinned messages do not stockpile over time, and there is space to add new messages important to the server.
To remove pinned messages on desktops:
- Go to the pin icon used to access pins
- Next, hover over the message you wish to unpin and click on the “x” (cross) button next to the jump button
- After this, click on the “yeah, remove it please kthx” button
- The message will now stop appearing in the list of pinned messages
To do the same for mobile devices:
- Swipe right to left to access the side menu
- Click on “Pins” to view all the messages pinned by you or other people on the server with permissions to pin
- Then hold down on the message, which will give you an option to unpin it
- Click on “Unpin” to remove the message from the list of pinned messages
Things to keep in mind:
- You can skip the pop-up shown above when trying to remove a pinned message. All you must do is hold shift when clicking on the “x” (cross) button allowing you to go on that spree of unpins
- Another thing to remember is that all these tips on how pin messages apply to both Direct Messages (DM) and Server group chats
All in All
Learning how to pin a message on Discord could be a little tricky at first, mostly if you haven’t done so in the past and someone spontaneously asks you to do so.
However, the feature is pretty intuitive and straightforward once you get the hang of it.
The usefulness of pinning makes it very important for both old and new users as you can relay important information without having to go through tons of old messages.
Richard Bennett
Richard Bennett is a writer and a lover of all things video.
Follow @Richard Bennett
Richard Bennett
Mar 27, 2024• Proven solutions
Like TeamSpeak or Skype, Discord is a chat app aimed at easy mass communication. Although it was made for gamers, it is readily used for communicating in offices, during projects, or for professional collaboration.
Even though it’s straightforward to use, there are several Discord features that you may be unfamiliar with.
One such feature is called pinning messages. It is available to moderators, administrators, server owners, and other users who have permission to “Manage Messages” in various server channels.
This feature helps you find and share vital messages quickly, especially when new users join a specific channel.
It acts like a sticky note for Discord, making sure valuable information such as server rules do not get overshadowed by new messages even months after the pinned messages are first posted.
Today, we will go over how to pin a message on Discord for your desktop app on PC and Mac, as well as on your iPhone and Android mobile devices.
Part 1: How to Pin A Message on Discord Desktop?
If you want to learn how to pin messages on Discord desktop, follow these steps:
- Hover over any message which you wish to pin.
- On the right-hand side of it, there will be a button that would read as More; click it and you will see a screen like below
- Now, click on the “Pin Message” option
- After which, you will be presented with a prompt asking you to confirm that you want to pin this particular message. Click on “Oh yeah, pin it.”
That’s it! You have now learned how to pin messages on Discord for the desktop application.
But make sure you don’t pin everything that might seem important at a glance — only pin messages that may have utility in the future.
Also, don’t pin messages that are just important for you. In larger channels, prioritize pinning messages that will benefit most participants.
Part 2: How to Pin Messages on Discord Mobile App?
Pinning messages in the mobile app is very similar to how it is done on the desktop application. Do it by:
- Just hold down your finger on the message you wish to pin
- A couple of seconds later, you will be presented with a list of options
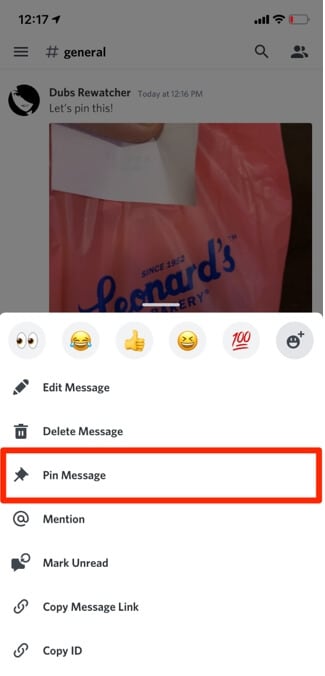
- From here, click on “Pin Message”
- A pop-up will appear confirming if you want to pin the message. If you are sure you want to pin a particular message, tap the “Yes” button and then your message is pinned
Part 3: How to View Pinned Messages on Discord
Accessing pinned messages is just as easy as pinning them. To access a pinned message on the app’s desktop version:
- Click on the pin icon appearing on the top right-hand side of your screen
- Doing this will present you with a drop-down list of pinned messages. Now, you can tap on the “Jump” button next to the “x” (cross) icon to go directly to the pinned message
- This will allow you to understand the context behind the pinned message. You can also access and share links in the pinned messages from here
Part 4: How to View Pinned Messages on Discord Mobile
View your pins on the mobile version of Discord by:
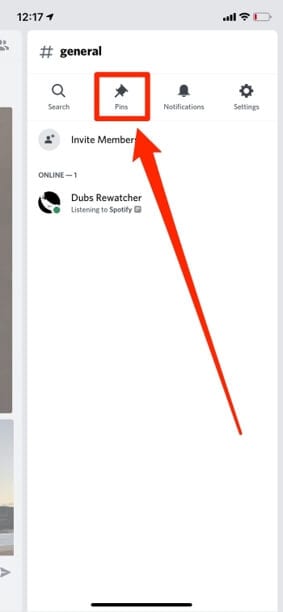
- Swiping from right to left, which will open up a side menu
- Then click on “Pins,” which is the second option from the left, as shown in the picture below
- Now you will be in the pinned messages window
- You can jump to a specific pinned message by clicking on it, allowing you to access any content or links in the message
Part 5: Limit on Pinned Messages
You can only pin 50 messages in the pin box in Discord, meaning if you want to pin new messages, you will have to delete older ones to make space.
This may feel like a disadvantage. However, it makes perfect sense. Pinning messages is only for important information that must be used in the future.
Removing this limit and giving people free rein on the number of messages they can pin will eventually lead to too many pinned messages, defeating the feature’s purpose.
Part 6: How to Delete Pinned Messages on Discord?
If something pinned in the past has become redundant over time, you can remove it from the pinned messages.
This will make sure your pinned messages do not stockpile over time, and there is space to add new messages important to the server.
To remove pinned messages on desktops:
- Go to the pin icon used to access pins
- Next, hover over the message you wish to unpin and click on the “x” (cross) button next to the jump button
- After this, click on the “yeah, remove it please kthx” button
- The message will now stop appearing in the list of pinned messages
To do the same for mobile devices:
- Swipe right to left to access the side menu
- Click on “Pins” to view all the messages pinned by you or other people on the server with permissions to pin
- Then hold down on the message, which will give you an option to unpin it
- Click on “Unpin” to remove the message from the list of pinned messages
Things to keep in mind:
- You can skip the pop-up shown above when trying to remove a pinned message. All you must do is hold shift when clicking on the “x” (cross) button allowing you to go on that spree of unpins
- Another thing to remember is that all these tips on how pin messages apply to both Direct Messages (DM) and Server group chats
All in All
Learning how to pin a message on Discord could be a little tricky at first, mostly if you haven’t done so in the past and someone spontaneously asks you to do so.
However, the feature is pretty intuitive and straightforward once you get the hang of it.
The usefulness of pinning makes it very important for both old and new users as you can relay important information without having to go through tons of old messages.
Richard Bennett
Richard Bennett is a writer and a lover of all things video.
Follow @Richard Bennett
Richard Bennett
Mar 27, 2024• Proven solutions
Like TeamSpeak or Skype, Discord is a chat app aimed at easy mass communication. Although it was made for gamers, it is readily used for communicating in offices, during projects, or for professional collaboration.
Even though it’s straightforward to use, there are several Discord features that you may be unfamiliar with.
One such feature is called pinning messages. It is available to moderators, administrators, server owners, and other users who have permission to “Manage Messages” in various server channels.
This feature helps you find and share vital messages quickly, especially when new users join a specific channel.
It acts like a sticky note for Discord, making sure valuable information such as server rules do not get overshadowed by new messages even months after the pinned messages are first posted.
Today, we will go over how to pin a message on Discord for your desktop app on PC and Mac, as well as on your iPhone and Android mobile devices.
Part 1: How to Pin A Message on Discord Desktop?
If you want to learn how to pin messages on Discord desktop, follow these steps:
- Hover over any message which you wish to pin.
- On the right-hand side of it, there will be a button that would read as More; click it and you will see a screen like below
- Now, click on the “Pin Message” option
- After which, you will be presented with a prompt asking you to confirm that you want to pin this particular message. Click on “Oh yeah, pin it.”
That’s it! You have now learned how to pin messages on Discord for the desktop application.
But make sure you don’t pin everything that might seem important at a glance — only pin messages that may have utility in the future.
Also, don’t pin messages that are just important for you. In larger channels, prioritize pinning messages that will benefit most participants.
Part 2: How to Pin Messages on Discord Mobile App?
Pinning messages in the mobile app is very similar to how it is done on the desktop application. Do it by:
- Just hold down your finger on the message you wish to pin
- A couple of seconds later, you will be presented with a list of options
- From here, click on “Pin Message”
- A pop-up will appear confirming if you want to pin the message. If you are sure you want to pin a particular message, tap the “Yes” button and then your message is pinned
Part 3: How to View Pinned Messages on Discord
Accessing pinned messages is just as easy as pinning them. To access a pinned message on the app’s desktop version:
- Click on the pin icon appearing on the top right-hand side of your screen
- Doing this will present you with a drop-down list of pinned messages. Now, you can tap on the “Jump” button next to the “x” (cross) icon to go directly to the pinned message
- This will allow you to understand the context behind the pinned message. You can also access and share links in the pinned messages from here
Part 4: How to View Pinned Messages on Discord Mobile
View your pins on the mobile version of Discord by:
- Swiping from right to left, which will open up a side menu
- Then click on “Pins,” which is the second option from the left, as shown in the picture below
- Now you will be in the pinned messages window
- You can jump to a specific pinned message by clicking on it, allowing you to access any content or links in the message
Part 5: Limit on Pinned Messages
You can only pin 50 messages in the pin box in Discord, meaning if you want to pin new messages, you will have to delete older ones to make space.
This may feel like a disadvantage. However, it makes perfect sense. Pinning messages is only for important information that must be used in the future.
Removing this limit and giving people free rein on the number of messages they can pin will eventually lead to too many pinned messages, defeating the feature’s purpose.
Part 6: How to Delete Pinned Messages on Discord?
If something pinned in the past has become redundant over time, you can remove it from the pinned messages.
This will make sure your pinned messages do not stockpile over time, and there is space to add new messages important to the server.
To remove pinned messages on desktops:
- Go to the pin icon used to access pins
- Next, hover over the message you wish to unpin and click on the “x” (cross) button next to the jump button
- After this, click on the “yeah, remove it please kthx” button
- The message will now stop appearing in the list of pinned messages
To do the same for mobile devices:
- Swipe right to left to access the side menu
- Click on “Pins” to view all the messages pinned by you or other people on the server with permissions to pin
- Then hold down on the message, which will give you an option to unpin it
- Click on “Unpin” to remove the message from the list of pinned messages
Things to keep in mind:
- You can skip the pop-up shown above when trying to remove a pinned message. All you must do is hold shift when clicking on the “x” (cross) button allowing you to go on that spree of unpins
- Another thing to remember is that all these tips on how pin messages apply to both Direct Messages (DM) and Server group chats
All in All
Learning how to pin a message on Discord could be a little tricky at first, mostly if you haven’t done so in the past and someone spontaneously asks you to do so.
However, the feature is pretty intuitive and straightforward once you get the hang of it.
The usefulness of pinning makes it very important for both old and new users as you can relay important information without having to go through tons of old messages.
Richard Bennett
Richard Bennett is a writer and a lover of all things video.
Follow @Richard Bennett
Also read:
- [New] 2024 Approved From Startup to Shutdown Steam on Discord Devices
- [New] 2024 Approved Surfer’s Choice Ultimate Cam Tech Review 2023
- [New] Facebook Video Orientation Dilemma?
- [New] How to Save a GIF From Twitter on iPhone and Android
- [New] In 2024, A Step-by-Step Guide for Custom Discord Emoji Statuses
- [New] Seamlessly Saving Your Screen Premium Choices on PC & Mac
- [New] Securely Connect A Step-by-Step Guide to Discord Calls
- [Updated] 2024 Approved Optimizing Discord Stream Quality with These Key Steps
- [Updated] Best Spaces on Discord to Date and Meet Love for 2024
- [Updated] In 2024, Efficient Tactics for Exploring and Joining Desired Discords
- [Updated] In 2024, Elevate Your Valorant Skills - Free Voice Altering Awaits You
- [Updated] In 2024, The Essential Steps to Thrive in Discord Livestreaming
- How To Remove Flashlight From Apple iPhone 13 Pro Max Lock Screen | Dr.fone
- In 2024, Spoofing Life360 How to Do it on Samsung Galaxy S24 Ultra? | Dr.fone
- In 2024, Surprise Your Friends with These Unheard Memes
- IPhonE向けレンタルDVD取り込み方法:最新アプリを使って見つける
- Navigate Discord's Streaming Landscape A Comprehensive Tutorial
- Title: [New] Setting Up a Stream Discord Edition 101 for 2024
- Author: Timothy
- Created at : 2024-10-12 06:50:37
- Updated at : 2024-10-18 03:48:20
- Link: https://discord-videos.techidaily.com/new-setting-up-a-stream-discord-edition-101-for-2024/
- License: This work is licensed under CC BY-NC-SA 4.0.