
![[New] Top 10 Essential Disco Upgrades for Peak Performance](https://www.lifewire.com/thmb/u__p9PWL3Uvoj7yKh73LTAz8p1I=/400x300/filters:no_upscale():max_bytes(150000):strip_icc():format(webp)/iphonedefaultalerttone-15a2b7bd66de41878765af23bd0d6c6f.png)
[New] Top 10 Essential Disco Upgrades for Peak Performance
Top 10 Essential Disco Upgrades for Peak Performance
Top 10 Discord Plugins to Improve Using Experience in 2024

Richard Bennett
Mar 27, 2024• Proven solutions
Many of you might be using various Discord Bots for server enhancement, like music bots, voice changers, etc., but not many people know about the Discord plugins. Discord plugins are add-ons for Discord that assist you in accessing extra features that are not available in the original Discord.
For beginners, these are something more than a regular bot.
Better Discord comes with support for using custom plugins and themes. In addition, we can download and install custom-made community plugins in a few clicks.
A plugin is simply an add-on that you can add to Discord to add additional features. For example, you may use various plugins like sending long messages, activating remote controls, showing Spotify controls, and more.
So, let’s dive into our top 10 better discord plugins in the following section without further ado!
- Part 1: Top 10 Discord Plugins You Should Know
- Part 2: How to Download and Apply Better Discord Plugins?
- Part 3: FAQs about Discord Plugins
Part 1: Top 10 Discord Plugins You Should Know
With the official server of Better Discord, you can install Discord Plugins and extend the features and functionalities offered on your Discord server.
Given below are some popular Discord plugins that are easily downloadable to improve the Discord server.
1. Permissions Viewer
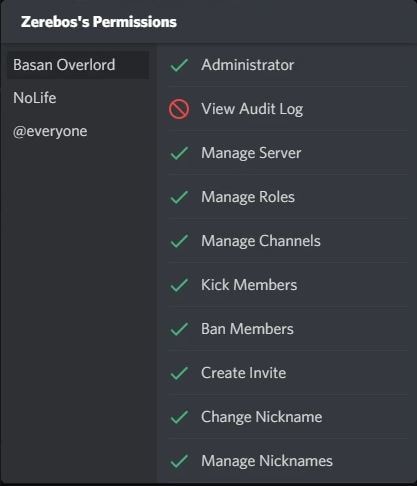
Permission’s Viewer is a useful Discord plugin for everyone. It will allow you to see all users’ approval via a popup notification on a server. Additionally, it will disclose all the user permissions one has on the server.
Tapping the context menu will bring up the modal, which has a role-by-role breakdown. You can see all permissions, including managing channels, managing roles, and creating invites, etc.
2. Hide Disabled Emojis
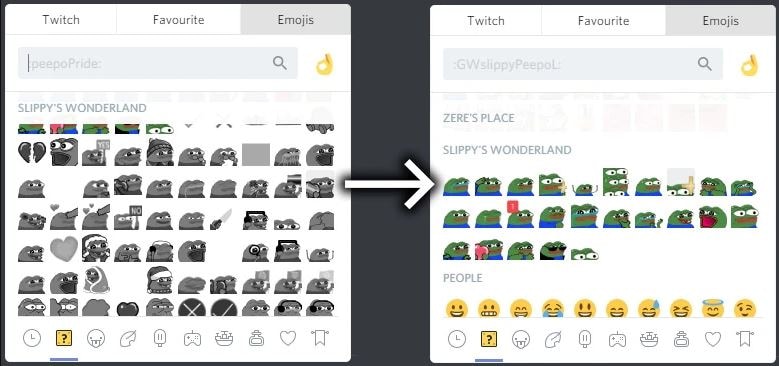
Discord plugins consist of a perfect collection of different emojis from different sections. At the same time, it comes with some disabled emojis as well. Using this plugin, you can easily hide all the disabled emojis, not to make them visible again.
3. Read All Notifications Button
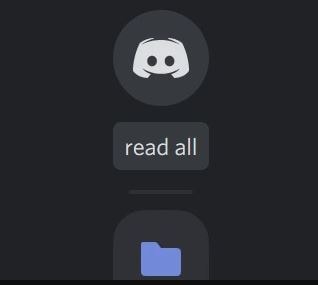
Read All Notifications Button is a handy Discord plugin to remove all notifications instantly. It’s a great way to de-clutter things if you are part of many servers.
Upon activating this plugin, a Clear button will show on your server list, and a mentions popout. Hitting the Clear tab from any of these two options will instantly clear every notification.
4. Better Role Colors
As the name signifies, this plugin will let you set the custom font colors for different server-based roles. The best part is you can set the custom colors for people based on their roles. So it’s for sure that there will be multiple roles in a server.
The plugin includes colored voice, colored typing, color popouts and modals, and finally, a colored audit log.
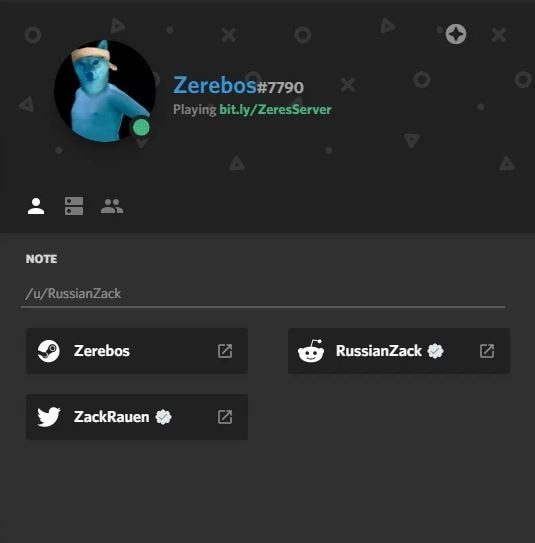
5. Creation Date
Creation Date Discord plugin will assist users in seeing details right from the creation of users’ accounts. Right after the launch, the plugin will display the creation date of an account in the user model and the user popout.
Just beneath the name, you will see a tab called “Create on“ to disclose the information like both date and time. The date is in DD/MM/YYYY format, and time is given in HH: MM format. Thus, it’s quite a simple little Better Discord plugin.
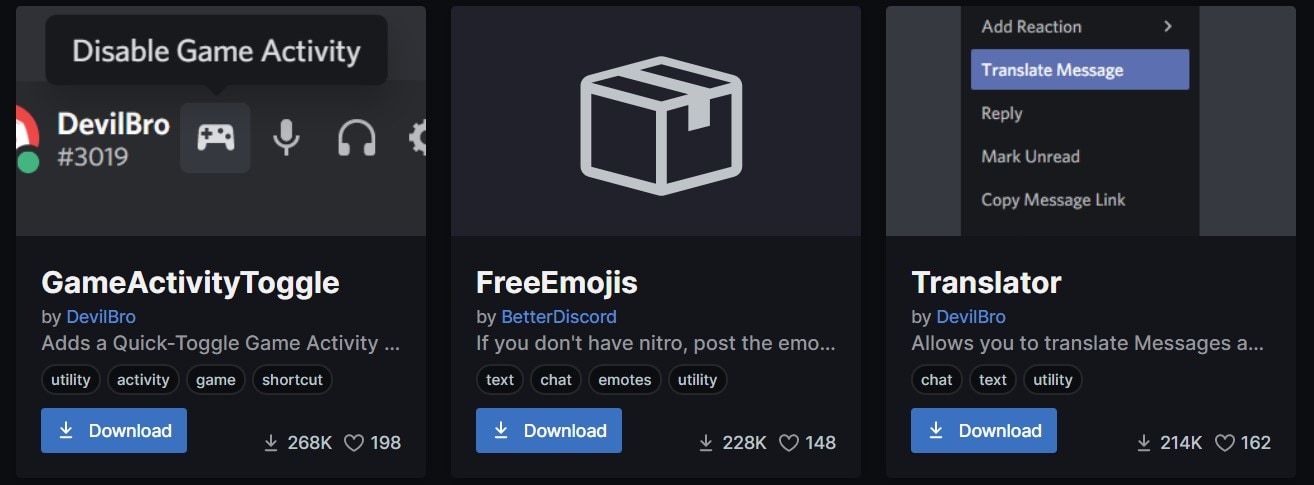
6. Google Translate Option
This is the go-to plugin if you are you use an international Discord server. With its usage, you may want to translate messages and switch to another language.
You can easily translate messages in any language right from Discord itself with the help of this Google Translate Option Discord plugin. This plugin supports both outgoing and incoming and messages, so if you want to send messages in some other language, the better discord plugin will cover you.
7. Show Hidden Controls
Another famous Discord pluginis Show Hidden Controls that allows access to hidden Discord channels. There may be hidden channels due to some role restrictions. With the help of this Show Hidden Controls plugin, you can disclose or see all those hidden channels which you won’t be able to access otherwise.
Using this cool Discord Plugin, you can also see an entire overview of the channel. However, you will be unable to send and view messages on the server. It only discloses the hidden channels and essential details regarding the same.
8. Spotify Controls
Well, we all know that you can connect and use your Spotify account on Discord. Well, if you want to do this, then this plugin is for you. This plugin lets you control the Spotify audio playback right from the Discord itself.
Upon enabling this Discord plugin, you will see a new Spotify Controls section within the server. It consists of information like the singer, cover photo, the song played, and elapsed time. Moreover, you can play/pause, go forward or backward with the in-built Spotify controls.
9. Send Large Messages
We all know that Discord has a messaging limit of 2000 characters. You can use Send Large Messages better discord plugin to bypass this limit. This plugin will automatically split your shorter texts into multiple messages and send them to the other servers for you.
Let’s say you want to send a long message with 25000 characters; this Discord plugin will split the message into multiple texts according to the character limit on Discord and thus place no hassle for you in sending long messages.
10. Badges Everywhere
The Badges Everywhere Discord pluginwill display all the badges everywhere. Certain users will have different badges like Hypesquad, Nitro, etc. This plugin will highlight them in the member’s list and chat section to find details like the members part of the Hypesquad quickly, members using Discord Nitro, etc.
Part 2: How to Download and Apply Better Discord Plugins?
To apply and download your favorite better discord plugin, go through the steps listed below.
Step 1- Go to the official website:
https://betterdiscord.app/plugins
Step 2- Look for your Discord plugin here, which you wish to click and download.
Step 3- Hit the ‘Download’ button to initiate the downloading process on the new page.
Step 4- After the plugin installs, launch the Better Discord application. Here, you can navigate to Settings and choose your server.
Step 5- Tap on ‘Themes’ under the BANDAGED BD section among the list of options.
Step 6- Now, copy and paste the Discord plugin recently downloaded by you.
Step 8- After it appears within the list, enable and apply it on your Better Discord server.
Hopefully, you love the services offered by the better discord plugin in your Discord server.
Part 3: FAQs about Discord Plugins
1 - Is better discord allowed?
Better Discord is a great extension used by many people around the globe, but it violates the Discord ToS and can cause security issues. It’s commonly used for Discord plugins and themes but not yet legally allowed.
2 – Is better discord a virus?
Better Discord is an application or website platform very similar to Discord. However, the users are a bit concerned about using this application as they suspect that installing better discord is just a way of getting viruses inside your computer. However, users use better discord at their own risk as Discord is not officially synced with it.
3 – Are better discord plugins safe?
Better Discord itself is pretty safe to use. However, you must be alert for 3rd party themes as they may affect your PC with malware or virus. To prevent this situation, you must download themes only from the official server of Better Discord.
Conclusion
Discord is itself a great app, but to enhance its features, you can download Better Discord and install various themes and Discord pluginsto personalize Discord as per your desire.
Hopefully, you liked the Discord Plugins we have provided above. If you use any plugin that you think we have missed, feel free to mention it in the comments. We would love to see it through our list.
Richard Bennett
Richard Bennett is a writer and a lover of all things video.
Follow @Richard Bennett
Richard Bennett
Mar 27, 2024• Proven solutions
Many of you might be using various Discord Bots for server enhancement, like music bots, voice changers, etc., but not many people know about the Discord plugins. Discord plugins are add-ons for Discord that assist you in accessing extra features that are not available in the original Discord.
For beginners, these are something more than a regular bot.
Better Discord comes with support for using custom plugins and themes. In addition, we can download and install custom-made community plugins in a few clicks.
A plugin is simply an add-on that you can add to Discord to add additional features. For example, you may use various plugins like sending long messages, activating remote controls, showing Spotify controls, and more.
So, let’s dive into our top 10 better discord plugins in the following section without further ado!
- Part 1: Top 10 Discord Plugins You Should Know
- Part 2: How to Download and Apply Better Discord Plugins?
- Part 3: FAQs about Discord Plugins
Part 1: Top 10 Discord Plugins You Should Know
With the official server of Better Discord, you can install Discord Plugins and extend the features and functionalities offered on your Discord server.
Given below are some popular Discord plugins that are easily downloadable to improve the Discord server.
1. Permissions Viewer
Permission’s Viewer is a useful Discord plugin for everyone. It will allow you to see all users’ approval via a popup notification on a server. Additionally, it will disclose all the user permissions one has on the server.
Tapping the context menu will bring up the modal, which has a role-by-role breakdown. You can see all permissions, including managing channels, managing roles, and creating invites, etc.
2. Hide Disabled Emojis
Discord plugins consist of a perfect collection of different emojis from different sections. At the same time, it comes with some disabled emojis as well. Using this plugin, you can easily hide all the disabled emojis, not to make them visible again.
3. Read All Notifications Button
Read All Notifications Button is a handy Discord plugin to remove all notifications instantly. It’s a great way to de-clutter things if you are part of many servers.
Upon activating this plugin, a Clear button will show on your server list, and a mentions popout. Hitting the Clear tab from any of these two options will instantly clear every notification.
4. Better Role Colors
As the name signifies, this plugin will let you set the custom font colors for different server-based roles. The best part is you can set the custom colors for people based on their roles. So it’s for sure that there will be multiple roles in a server.
The plugin includes colored voice, colored typing, color popouts and modals, and finally, a colored audit log.
5. Creation Date
Creation Date Discord plugin will assist users in seeing details right from the creation of users’ accounts. Right after the launch, the plugin will display the creation date of an account in the user model and the user popout.
Just beneath the name, you will see a tab called “Create on“ to disclose the information like both date and time. The date is in DD/MM/YYYY format, and time is given in HH: MM format. Thus, it’s quite a simple little Better Discord plugin.
6. Google Translate Option
This is the go-to plugin if you are you use an international Discord server. With its usage, you may want to translate messages and switch to another language.
You can easily translate messages in any language right from Discord itself with the help of this Google Translate Option Discord plugin. This plugin supports both outgoing and incoming and messages, so if you want to send messages in some other language, the better discord plugin will cover you.
7. Show Hidden Controls
Another famous Discord pluginis Show Hidden Controls that allows access to hidden Discord channels. There may be hidden channels due to some role restrictions. With the help of this Show Hidden Controls plugin, you can disclose or see all those hidden channels which you won’t be able to access otherwise.
Using this cool Discord Plugin, you can also see an entire overview of the channel. However, you will be unable to send and view messages on the server. It only discloses the hidden channels and essential details regarding the same.
8. Spotify Controls
Well, we all know that you can connect and use your Spotify account on Discord. Well, if you want to do this, then this plugin is for you. This plugin lets you control the Spotify audio playback right from the Discord itself.
Upon enabling this Discord plugin, you will see a new Spotify Controls section within the server. It consists of information like the singer, cover photo, the song played, and elapsed time. Moreover, you can play/pause, go forward or backward with the in-built Spotify controls.
9. Send Large Messages
We all know that Discord has a messaging limit of 2000 characters. You can use Send Large Messages better discord plugin to bypass this limit. This plugin will automatically split your shorter texts into multiple messages and send them to the other servers for you.
Let’s say you want to send a long message with 25000 characters; this Discord plugin will split the message into multiple texts according to the character limit on Discord and thus place no hassle for you in sending long messages.
10. Badges Everywhere
The Badges Everywhere Discord pluginwill display all the badges everywhere. Certain users will have different badges like Hypesquad, Nitro, etc. This plugin will highlight them in the member’s list and chat section to find details like the members part of the Hypesquad quickly, members using Discord Nitro, etc.
Part 2: How to Download and Apply Better Discord Plugins?
To apply and download your favorite better discord plugin, go through the steps listed below.
Step 1- Go to the official website:
https://betterdiscord.app/plugins
Step 2- Look for your Discord plugin here, which you wish to click and download.
Step 3- Hit the ‘Download’ button to initiate the downloading process on the new page.
Step 4- After the plugin installs, launch the Better Discord application. Here, you can navigate to Settings and choose your server.
Step 5- Tap on ‘Themes’ under the BANDAGED BD section among the list of options.
Step 6- Now, copy and paste the Discord plugin recently downloaded by you.
Step 8- After it appears within the list, enable and apply it on your Better Discord server.
Hopefully, you love the services offered by the better discord plugin in your Discord server.
Part 3: FAQs about Discord Plugins
1 - Is better discord allowed?
Better Discord is a great extension used by many people around the globe, but it violates the Discord ToS and can cause security issues. It’s commonly used for Discord plugins and themes but not yet legally allowed.
2 – Is better discord a virus?
Better Discord is an application or website platform very similar to Discord. However, the users are a bit concerned about using this application as they suspect that installing better discord is just a way of getting viruses inside your computer. However, users use better discord at their own risk as Discord is not officially synced with it.
3 – Are better discord plugins safe?
Better Discord itself is pretty safe to use. However, you must be alert for 3rd party themes as they may affect your PC with malware or virus. To prevent this situation, you must download themes only from the official server of Better Discord.
Conclusion
Discord is itself a great app, but to enhance its features, you can download Better Discord and install various themes and Discord pluginsto personalize Discord as per your desire.
Hopefully, you liked the Discord Plugins we have provided above. If you use any plugin that you think we have missed, feel free to mention it in the comments. We would love to see it through our list.
Richard Bennett
Richard Bennett is a writer and a lover of all things video.
Follow @Richard Bennett
Boosting Engagement: Strategies for Discord Streamers
How to Stream on Discord
Richard Bennett
Mar 27, 2024• Proven solutions
Discord has completely transformed online communication, becoming the preferred platform for gamers, streamers, and reviewers alike.
As of late, it has started integrating with other gaming and streaming services, giving us the streamer mode. With streaming’s growing popularity, it’s essential to know what the streamer mode is all about.
If you’re a gamer, Discord’s streamer mode allows you to stream your gaming session to viewers by broadcasting your game to your friends, fans, and even a closed community of enthusiasts.
Many e-gaming professionals have taken up streaming, offering original and valuable content for like-minded individuals. This mode helps them streamline all their communications in one place.
If you’re new to Discord’s streamer mode, you need to know what it is, how you can use it to engage with other community members, and the primary security concerns you need to be aware of.
- Part 1: How to Stream on Discord from Desktop Computers?
- Part 2: How to Stream on Discord from Chromebook?
- Part 3: How to Stream on Discord from iPhone And Android?
- Part 4: How to Watch Discord Streaming?
- Part 5: Discord Streaming Tips
We have compiled a list of steps to help you learn how to conduct Discord streaming from the most prominent platforms: Windows, Mac, Chromebook, iPhone, Android.
Part 1: How to Stream on Discord from Desktop Computers
How to Stream on Discord from Windows
Discord allows for streaming through its Windows desktop client. You can stream games, podcasts, and any other kind of content through it.
However, it is crucial to remember that you can only stream in 480p and 720p resolutions in the free version. If you want higher resolution streaming, subscribe to Discord Nitro, which costs $9.99 a month.
With that said, follow these steps to start Discord streaming:
- Start the game that you want to stream and then switch back to Discord
- You will find an icon at the bottom left of the window displaying the name of the game you started and a stream icon resembling a camera next to it. Click on this icon to begin streaming
- The Screen Share menu will pop-up displaying the game you have started, and from the ‘Select a voice channel’ drop-down, select the channel you want to stream with
- Adjust your screen resolution and frame rates according to your choice
- After you’ve made all the adjustments, you can hit the ‘Go Live’ button at the bottom right of the window to start streaming.
If you wish to stop streaming, click on the ‘Stop Streaming’ icon at the app’s bottom-left corner
Additionally, if you wish to stream voice and video calls on your Discord server, you can do so as well. To make a call to your friends through Discord:
- Open the Discord app on your Windows PC and then select the server you want to use
- Click the General Voice channel to place a voice connection with Discord
- On the bottom left of the window, you will see a Voice Connected entry. If you wish to video call, click on the ‘Video’ button; otherwise, click on the ‘Screen’ button for screen sharing
- When you click ‘Video,’ your screen’s center will switch to conversation mode, and you will be able to see your camera feed
- If you click on the screen, a pop-up window shows up, allowing you to select the application you want to share
- After setting this up, your friends can join your call by clicking on the General channel
When you want to end the call, click on the red Disconnect icon
How to Stream on Discord from Mac
To achieve the same result with Discord on a Mac:
- Open the Discord app on your Macintosh and then find and join a voice channel that allows you to stream (you can find out which channels will let you stream by joining the channel and checking if you can click on ‘Video’ or ‘Screen’ at the bottom of the window)
- Once you’ve made sure that the channel allows you to stream, you can choose whether you want to stream from your webcam or share your computer screen. Click on the option you want
- If you’ve selected the ‘Video’ option, this will turn on your webcam after a prompt, and it will start streaming immediately
- If you’ve selected the screen-sharing option, choose the window you’d like to share, and it will start broadcasting the specific window
- You can either share your entire screen or specific windows, depending on your choice
- Choose a resolution and frame rate for the stream, but remember that higher resolutions and frame rates take up more bandwidth
- If you’re streaming from your desktop, you can even stream in sound. Toggle the sound button to the right, and you will be able to access your microphone for the stream
- When you’ve decided all the parameters and feel you’re ready to stream, click on ‘Go Live’
Part 2: How to Stream on Discord from Chromebook
Chromebooks have a customized Android operating software that can fit the laptop, functioning seamlessly with its requirements.
However, because Chromebooks use a restrictive OS, the Discord app functions like it would on a smartphone or tablet.
Therefore, for Discord streaming on a Chromebook, you will have to:
- Select a voice channel and then join it
- Press the Video camera icon to share your screen
- Allow the program camera access
- Begin streaming
However, it is slightly challenging to join voice channels using the app. To do this, you will have to:
- Locate the voice channel and click on it
- Upon clicking, you will see a window appear at the bottom
- Scroll to the bottom of the menu, and click on the ‘Join Channel’ button
- To join with the camera, click on the camcorder icon
Part 3: How to Stream on Discord from iPhone And Android
Although Discord does not allow users to broadcast content from the Discord Mobile app, they can still share their screen to stream games and videos. To do so, they must:
- Select a voice channel and join it
- Press the Video camera icon for screen-sharing
- Then allow permission to third-party apps on the mobile to access your camera
- Press the Camera icon to allow the program access to your camera
- Once this is done, you are now streaming live
It is important to note that while sharing your screen on Discord, make sure you are not divulging any crucial details with other users in the form of notifications.
To avoid incoming notifications, put your mobile on airplane mode.
Part 4: How to Watch Discord Streaming
Aside from broadcasting streams, you can also watch other users streaming their content on Discord. To watch someone’s stream, you will need to:
- Go to the voice channel where someone is streaming and click on their name
- If you’ve decided you want to join their stream, click on ‘Join Stream’
- You can also click on ‘Watch Stream’ from the main chat screen on your Discord
When someone is streaming content on Discord, you can see a red ‘Live’ icon next to their name. Knowing this will make it easier to tell when your favorite users are streaming.
Part 5: Discord Streaming Tips
To help you get the max out of your Discord streaming experience, we’ve compiled a couple of tips:
Tip 1: How to Stream Without Lag On Discord
Do you experience lag while streaming games and videos on your Discord server? Don’t worry; streaming is often demanding for casual internet connections, and lags can happen!
Here are some quick fixes to get rid of it:
Close Unnecessary Programs
If you’re running multiple programs on your computer while using Discord, they can cause lag. To solve this, close all unnecessary programs.
Turn Off Hardware Acceleration
To do this:
- Go to the ‘Settings’ option in your Discord app,
- Click on ‘Appearance’ and toggle off the ‘Hardware Acceleration’ option
- Press ‘OK’ to confirm and restart the application
Clear Discord Cache Files
Too many accumulated caches files can cause lag in your Discord. To fix this, you will need to clear the Discord cache from the File Explorer:
- Open the ‘Run’ window
- Enter ‘%APPDATA%/Discord/Cache’ to open the cache folder
- Press ‘Ctrl+A’ to delete the files
Reset Discord Voice Settings
To do this:
- Go to the ‘Settings’ option on your Discord app
- Select the ‘Voice & Video’ option in the left pane
- Click on the ‘Reset Voice Settings’ in the right pane
- Press OK to confirm and restart the application
Reinstall Discord
If none of the above methods seem to fix lag, you might have to reinstall your Discord. To uninstall it: first
- Go to the Discord Panel,
- Select ‘View by: Category’
- Click ‘Uninstall a program’
- Right-click Discord
- Click Uninstall
- After it is uninstalled, reinstall it once again
Tip 2: How to Add A Game to Discord Go Live
If you can’t get access to the game you want to stream through the ‘Go Live’ icon, you can access it manually. All you have to do is:
- Click on the cog icon in the bottom left
- Open the Settings menu
- Click on the ‘Game Activity’ tab on the left
- Click ‘Add It’
- Choose your game
- Go back to your server
- Click the ‘Go Live’ button
Richard Bennett
Richard Bennett is a writer and a lover of all things video.
Follow @Richard Bennett
Richard Bennett
Mar 27, 2024• Proven solutions
Discord has completely transformed online communication, becoming the preferred platform for gamers, streamers, and reviewers alike.
As of late, it has started integrating with other gaming and streaming services, giving us the streamer mode. With streaming’s growing popularity, it’s essential to know what the streamer mode is all about.
If you’re a gamer, Discord’s streamer mode allows you to stream your gaming session to viewers by broadcasting your game to your friends, fans, and even a closed community of enthusiasts.
Many e-gaming professionals have taken up streaming, offering original and valuable content for like-minded individuals. This mode helps them streamline all their communications in one place.
If you’re new to Discord’s streamer mode, you need to know what it is, how you can use it to engage with other community members, and the primary security concerns you need to be aware of.
- Part 1: How to Stream on Discord from Desktop Computers?
- Part 2: How to Stream on Discord from Chromebook?
- Part 3: How to Stream on Discord from iPhone And Android?
- Part 4: How to Watch Discord Streaming?
- Part 5: Discord Streaming Tips
We have compiled a list of steps to help you learn how to conduct Discord streaming from the most prominent platforms: Windows, Mac, Chromebook, iPhone, Android.
Part 1: How to Stream on Discord from Desktop Computers
How to Stream on Discord from Windows
Discord allows for streaming through its Windows desktop client. You can stream games, podcasts, and any other kind of content through it.
However, it is crucial to remember that you can only stream in 480p and 720p resolutions in the free version. If you want higher resolution streaming, subscribe to Discord Nitro, which costs $9.99 a month.
With that said, follow these steps to start Discord streaming:
- Start the game that you want to stream and then switch back to Discord
- You will find an icon at the bottom left of the window displaying the name of the game you started and a stream icon resembling a camera next to it. Click on this icon to begin streaming
- The Screen Share menu will pop-up displaying the game you have started, and from the ‘Select a voice channel’ drop-down, select the channel you want to stream with
- Adjust your screen resolution and frame rates according to your choice
- After you’ve made all the adjustments, you can hit the ‘Go Live’ button at the bottom right of the window to start streaming.
If you wish to stop streaming, click on the ‘Stop Streaming’ icon at the app’s bottom-left corner
Additionally, if you wish to stream voice and video calls on your Discord server, you can do so as well. To make a call to your friends through Discord:
- Open the Discord app on your Windows PC and then select the server you want to use
- Click the General Voice channel to place a voice connection with Discord
- On the bottom left of the window, you will see a Voice Connected entry. If you wish to video call, click on the ‘Video’ button; otherwise, click on the ‘Screen’ button for screen sharing
- When you click ‘Video,’ your screen’s center will switch to conversation mode, and you will be able to see your camera feed
- If you click on the screen, a pop-up window shows up, allowing you to select the application you want to share
- After setting this up, your friends can join your call by clicking on the General channel
When you want to end the call, click on the red Disconnect icon
How to Stream on Discord from Mac
To achieve the same result with Discord on a Mac:
- Open the Discord app on your Macintosh and then find and join a voice channel that allows you to stream (you can find out which channels will let you stream by joining the channel and checking if you can click on ‘Video’ or ‘Screen’ at the bottom of the window)
- Once you’ve made sure that the channel allows you to stream, you can choose whether you want to stream from your webcam or share your computer screen. Click on the option you want
- If you’ve selected the ‘Video’ option, this will turn on your webcam after a prompt, and it will start streaming immediately
- If you’ve selected the screen-sharing option, choose the window you’d like to share, and it will start broadcasting the specific window
- You can either share your entire screen or specific windows, depending on your choice
- Choose a resolution and frame rate for the stream, but remember that higher resolutions and frame rates take up more bandwidth
- If you’re streaming from your desktop, you can even stream in sound. Toggle the sound button to the right, and you will be able to access your microphone for the stream
- When you’ve decided all the parameters and feel you’re ready to stream, click on ‘Go Live’
Part 2: How to Stream on Discord from Chromebook
Chromebooks have a customized Android operating software that can fit the laptop, functioning seamlessly with its requirements.
However, because Chromebooks use a restrictive OS, the Discord app functions like it would on a smartphone or tablet.
Therefore, for Discord streaming on a Chromebook, you will have to:
- Select a voice channel and then join it
- Press the Video camera icon to share your screen
- Allow the program camera access
- Begin streaming
However, it is slightly challenging to join voice channels using the app. To do this, you will have to:
- Locate the voice channel and click on it
- Upon clicking, you will see a window appear at the bottom
- Scroll to the bottom of the menu, and click on the ‘Join Channel’ button
- To join with the camera, click on the camcorder icon
Part 3: How to Stream on Discord from iPhone And Android
Although Discord does not allow users to broadcast content from the Discord Mobile app, they can still share their screen to stream games and videos. To do so, they must:
- Select a voice channel and join it
- Press the Video camera icon for screen-sharing
- Then allow permission to third-party apps on the mobile to access your camera
- Press the Camera icon to allow the program access to your camera
- Once this is done, you are now streaming live
It is important to note that while sharing your screen on Discord, make sure you are not divulging any crucial details with other users in the form of notifications.
To avoid incoming notifications, put your mobile on airplane mode.
Part 4: How to Watch Discord Streaming
Aside from broadcasting streams, you can also watch other users streaming their content on Discord. To watch someone’s stream, you will need to:
- Go to the voice channel where someone is streaming and click on their name
- If you’ve decided you want to join their stream, click on ‘Join Stream’
- You can also click on ‘Watch Stream’ from the main chat screen on your Discord
When someone is streaming content on Discord, you can see a red ‘Live’ icon next to their name. Knowing this will make it easier to tell when your favorite users are streaming.
Part 5: Discord Streaming Tips
To help you get the max out of your Discord streaming experience, we’ve compiled a couple of tips:
Tip 1: How to Stream Without Lag On Discord
Do you experience lag while streaming games and videos on your Discord server? Don’t worry; streaming is often demanding for casual internet connections, and lags can happen!
Here are some quick fixes to get rid of it:
Close Unnecessary Programs
If you’re running multiple programs on your computer while using Discord, they can cause lag. To solve this, close all unnecessary programs.
Turn Off Hardware Acceleration
To do this:
- Go to the ‘Settings’ option in your Discord app,
- Click on ‘Appearance’ and toggle off the ‘Hardware Acceleration’ option
- Press ‘OK’ to confirm and restart the application
Clear Discord Cache Files
Too many accumulated caches files can cause lag in your Discord. To fix this, you will need to clear the Discord cache from the File Explorer:
- Open the ‘Run’ window
- Enter ‘%APPDATA%/Discord/Cache’ to open the cache folder
- Press ‘Ctrl+A’ to delete the files
Reset Discord Voice Settings
To do this:
- Go to the ‘Settings’ option on your Discord app
- Select the ‘Voice & Video’ option in the left pane
- Click on the ‘Reset Voice Settings’ in the right pane
- Press OK to confirm and restart the application
Reinstall Discord
If none of the above methods seem to fix lag, you might have to reinstall your Discord. To uninstall it: first
- Go to the Discord Panel,
- Select ‘View by: Category’
- Click ‘Uninstall a program’
- Right-click Discord
- Click Uninstall
- After it is uninstalled, reinstall it once again
Tip 2: How to Add A Game to Discord Go Live
If you can’t get access to the game you want to stream through the ‘Go Live’ icon, you can access it manually. All you have to do is:
- Click on the cog icon in the bottom left
- Open the Settings menu
- Click on the ‘Game Activity’ tab on the left
- Click ‘Add It’
- Choose your game
- Go back to your server
- Click the ‘Go Live’ button
Richard Bennett
Richard Bennett is a writer and a lover of all things video.
Follow @Richard Bennett
Also read:
- [Updated] 2024 Approved Create and Showcase Innovative Discord Flags for Profile Spotlight
- [Updated] In 2024, How to Enhance Your Discord Experience with FREE Animation Emojis
- [Updated] In 2024, Premium Emoji Creation Software for Discord Users
- [New] 2024 Approved Assessing Workplace Messaging Platforms Which Boasts Better Features, Slack or Discord?
- Streamline Your Sound Directly Connecting Spotify & Discord
- [New] 2024 Approved Get Ultimate, Premium-Quality Discord Icons at NO Charge
- In 2024, The Essential Guide to Premium Discord Emoji Tools
- [Updated] 2024 Approved Quick-Win Strategies for Replying on Discord Platforms
- [Updated] Discover How to Style Chat Text with Ease & Speed for 2024
- [New] In 2024, Mastering Response Etiquette Discord Messaging Guide
- [Updated] Mastering the Art of Discord Nitro The Premium Tier's Overview
- Expertly Engineered Font Generators for Discord (Android/iOS)
- [Updated] Top-Tier Designers Making Magic in Discord Emojis for 2024
- [New] Simplifying Streamers Spotify on Discord Setup
- 2024 Approved DiscoDex Switching Your Current Discord Role
- [New] Discord & GIFs The Ultimate Tutorial for Seamless Integration for 2024
- [New] In 2024, Discover Revolutionary Bots for a Better Sonic Experience on Discord
- [New] In 2024, Sever Your Discord Connection
- 2024 Approved Personalize Your Discord Presence Adding Custom Emojis Easily
- [Updated] In 2024, Unraveling the Mysteries of Discord Nitro - Benefits & Acquisition Tactics
- [New] Mastering Discord Stickers Your Ultimate Resource for 2024
- [Updated] In 2024, How to Engage Your Audience in Live Discord Streams Easily
- In 2024, Top 10 Vibes A DiscoTheme Adventure
- [New] 2024 Approved Mastering DiscoNitro The Ultimate Guide for Free/Paid Entry
- [Updated] Discover the Secrets to Effective Video Dissemination on Discord
- [Updated] In 2024, Unveiling Nitro Understanding & Obtaining Discord's Premium Tier
- Be Heard in Discord Understanding TTS Functions for 2024
- [New] Sever Disconnect From Discord for 2024
- In 2024, What Is Discord PFP and How to Make an Attractive PFP for Discord
- [New] 2024 Approved Speak Up, Be Heard An Introduction to Discord TTS
- 2024 Approved Premier Platform Pictograms Captivating Evolve
- [New] Sticker Savvy on Discord Platform for 2024
- [Updated] Enhancing Virtual Meetings How to Use Discord for Screenshots
- 2024 Approved Navigating Message Reactions with Ease (Discord)
- [Updated] 2024 Approved Finding Fellowship Adding Friends in Discord
- In 2024, Online Platform Analysis Which Suits You Best? Discord/Skype
- In 2024, The Essential Guide Adding and Editing Discord Roles
- [New] Get Spoken Up on Discord Using TTS for 2024
- [Updated] 2024 Approved Decoding Iconic Discord Expressions and Their Authors
- [Updated] Premiere Discord Recording Tools - Online, Desktop, Mobile
- In 2024, How To Prominently Display Messages on Discord
- [Updated] 2024 Approved The Logical Path to Exit a Discord Platform
- [Updated] Examining Workplace Messaging Platforms Is Team Efficiency Favored by Slack over Discord, In 2024
- [Updated] 2024 Approved Unleash Your Inner Conversationalist with Discord Responses
- Interactive Media Adding Audio to Visual Narratives for 2024
- Facebook Vids Made Simple as MP4 Downloads
- In 2024, Pioneering Practices Leading the Way in Facecam Filming
- New How to Make Every Call a Chuckle A List of 10 Voice Alteration Tricks
- 2024 Approved Multimedia IPTV Networking
- How to Unlock Apple iPhone 13 Pro with a Mask On | Dr.fone
- [Updated] Reimagining Communication Advanced Tactics for Capturing Skype Calls
- [Updated] The New Short-Form FB Story for 2024
- [Updated] Crafting an Engaging Online Presence with FB
- [New] Tranquility Techniques How to Mute and Manage GMeet Distractions for 2024
- Complete Guide to Hard Reset Your Xiaomi 13 Ultra | Dr.fone
- [Updated] Top 10 Best Farming Games
- Free MKV Trimmer Software Top Picks for 2024
- In 2024, Guide to Mirror Your Honor Play 40C to Other Android devices | Dr.fone
- Hassle-Free Tactics Sharing IGTV in Insta Stories for 2024
- 2024 Approved Elite Mac Graphics Recorder
- How to Factory Reset Vivo T2x 5G in 5 Easy Ways | Dr.fone
- Easy Fixes How To Recover Forgotten iCloud Password On your iPhone 11
- [New] Techniques to Achieve Consistent Frame Rates in OBS Studio
- Updated Experts Guide to Picking Premium, Cost-Free Speech Recording Tools for the New Decade
- Will the iPogo Get You Banned and How to Solve It On Vivo S17 Pro | Dr.fone
- [Updated] Leading Edge FB Video Repository
- In 2024, How to Fake Snapchat Location on Oppo A59 5G | Dr.fone
- In 2024, How to Unlock Vivo X100 Bootloader Easily
- 3 Methods to Mirror Infinix Zero 5G 2023 Turbo to Roku | Dr.fone
- Mac Audio Enthusiasts Guide to Selecting the Optimal Mp3 Trimmer Software
- In 2024, How PGSharp Save You from Ban While Spoofing Pokemon Go On OnePlus Nord 3 5G? | Dr.fone
- [New] Understanding the Rules Behind Sharing Online Content on Social Media for 2024
- Mitigating High-Bitrate in OBS Outputs for 2024
- [Updated] 2024 Approved The Ultimate Approach to Preserving Your PS4 Experience
- Hearing Colors and Movements A Comprehensive List of Top-Notch Music Visualizers (Both Free & Paid) for 2024
- [New] Inspiration on a Plate Top 20 Instagram Food Photos
- No Strings Attached Top Free Video Editing Software without Watermarks for 2024
- Updated 2024 Approved How to Use Emojis on Windows 10 and Windows 11?
- Transforming Viewers Into Fans A Guide to IGTV Hash Tags for 2024
- Cellular Network Not Available for Voice Calls On Samsung Galaxy M54 5G | Dr.fone
- Simple and Effective Ways to Change Your Country on YouTube App Of your Realme C33 2023 | Dr.fone
- Title: [New] Top 10 Essential Disco Upgrades for Peak Performance
- Author: Timothy
- Created at : 2024-05-23 22:47:56
- Updated at : 2024-05-24 22:47:56
- Link: https://discord-videos.techidaily.com/new-top-10-essential-disco-upgrades-for-peak-performance/
- License: This work is licensed under CC BY-NC-SA 4.0.
