
:max_bytes(150000):strip_icc():format(webp)/Instagram_Login-5c004ff2c9e77c000104174d.png)
Taking Audio to the Next Level on Desktop & Mobile Discord with VoiceMod
Taking Audio to the Next Level on Desktop & Mobile Discord with VoiceMod
How To Use Voicemod On Discord

Richard Bennett
Mar 27, 2024• Proven solutions
A voice changer will allow you to prank friends, create content, and most of all, secure your presence by maintaining anonymity. With it, you can turn your voice into several unique and exciting voices to serve any purpose you deem fit.
And when it comes to voice changers, none is as easy to operate as the Voicemod in Discord. Its claim to fame is that it features numerous voice options to choose from.
With Vociemod, you have to simply run the program in the background and select your desired voice!
Read on as we discuss how to use Voicemod on Discord in detail:
In this article
Part 1: How To Use Voice Changer Voicemod For Discord On Desktop Computer
Part 2: How To Fix Voicemod Not Working Discord?
Part 3: How To Change Voice For Discord On Mobile?
Part 1: How To Use Voice Changer Voicemod For Discord On Desktop Computer
Voicemod is arguably one of the best voice changer tools available on the internet for its excellent features.
But before we jump straight into using Voicemod for Discord, you must know how to install one on your desktop Mac/PC.
Here’s how to install Voicemod
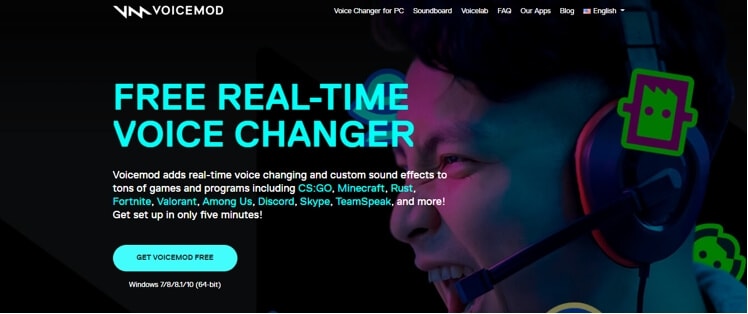
- Visit the Voicemod website to begin the download process.
- You’ll see the button “Get Voicemod Free” on the screen. Click it!
- Upon clicking, the site will ask you to sign in to your account from Discord, Twitch, to Google. Use your Discord login details to sign in.
- After you’re signed in, the “.exe” file will be downloaded to your PC/Mac’s download folder. Open the “.exe” file the moment it’s downloaded.
- An install wizard will open up. Navigate through the wizard’s installation process to install the program on your PC/Mac.
- After installation is complete, the installation wizard will ask to restart your windows’ Mac or PC.
You can skip it, but it’s best to restart it for smooth operations.
Once your Mac/PC restarts, you’ll see the Voicemod app icon on your desktop screen.
Now that you have successfully installed the voice changer Voicemod app into your desktop computer, let’s dive into knowing how to use Voicemod on Discord!
Here’s how to use voice changer on Discord
- Click the Vociemod icon on the desktop to open the app. If you can’t find it there, click the “windows icon” located at the screen’s bottom-left. Just type “Voicemod,” and the program will show up. Double click it to get it opened.
- When the app opens up, you’ll have to choose the output and input it will use. If you’re wondering, why the output? This is to give you an insight into what your voice will sound like on each filter.
Once it’s done, you can play around with different filters!
Every day, you’ll get new free filters to use; however, to unlock and access all filters, you need to upgrade to the “pro-version” of voice changer Voicemod.
On the other hand, if you only need a few filters, the “basic-version” should suffice.
Apart from that, you can unlock an additional free filter in your app by sharing it on your social media accounts.

Step 1
To set up Voicemod with Discord, open your discord account and go to the settings (gear icon) placed at the screen’s bottom-left corner.
Step 2
Click the “Voice and Video” option right under the app settings.
Step 3
To make Voicemod usable, you’ll have to change Voice settings. Within the “Input Device” option, select the option that says “Microphone Voicemod Virtual Audio.”
Step 4
After you have changed settings, you can easily change the voice within the program. Not only this, but other users can also hear your audio alteration.
Step 5
With the “basic version,” you’ll have seven free voice choices that will change each day. On the contrary, with the “pro-version,” you’ll gain access to more than 80 different voice options.
So, if you’re searching for an easy and simple voice-changing app to use, look no further than Voicemod!
Part 2: How To Fix Voicemod Not Working Discord?
Is your voice changer Voicemod not working on Discord? No worries, you can troubleshoot the issues with a few basic steps.
Here are some ways you can use to fix Voicemod not working in Discord:
Method 1: Restart Your Windows PC/Mac
Though it’s not a technical solution, restarting your desktop computer fixes incorrect settings by rebooting them and solves many problems connected with your computer system, programs, and hardware.
So, when your Voicemod suddenly ceases to work in Discord, make sure to restart your Windows PC/Mac before going any further, as it’s the first step in fixing voice issues.
If restarting doesn’t help, slide to the next step!
Method 2: Make Sure The Mic Is Properly Set
The next step is to check if the mic works correctly. This is because faulty settings may stop voice changer Voicemod from operating correctly.
Just follow the steps below to resolve it:
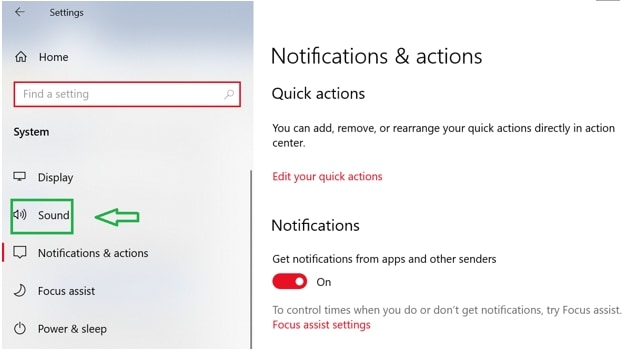
- On the keyboard, press the “Win” logo and the “I” key simultaneously to open Windows settings. Click “System.”
- On the left, you’ll see the option “Sound.” Click it.
- First, you have to test the microphone! To do so, choose the “Headset” option rather than the Voicemod microphone under the “Input” section
- Click “Device properties & test microphone”
- Make sure to uncheck the “disable” box and keep the volume section 100
- Click the “Start test” button and speak into the microphone
- After that, click “Stop test.” If the greatest value it shows is above “0”, then your microphone works correctly
Now, restart your Voicemod app to see if it’s working properly or not! If the issue still persists, jump to the next solution.
Method 3: Install Windows Updates
If you use Windows 10, it has two kinds of updates that offer performance boost and security patches. Sometimes, an update can fix a few driver and software conflicts automatically.
You can quickly solve the voice chat problem by simply updating the system settings. Here’s how to update your Windows 10:
- Open your windows setting by pressing the “Windows button” and the “I” key together.
- Click on “Update and Security”
- Click the “Check for Updates” button. If an update is found, it will install automatically on the system
Make sure to repeat this process until it says you’re up-to-date. Then, restart the PC. Check whether the Vociemod is properly working or not!
If not, try our next option!
Method 4:Re-Install Voice Changer Voicemod Drivers
In many instances, the issue signifies that you’re using outdated or faulty drivers. To troubleshoot this, simply re-install your Voicemod driver, and you’ll be good to go!
First, uninstall your Voicemod driver from the windows PC/Mac. Here’s how to do it:
- On the keyboard, press the “Windows button” as well as the “I” key to bring up the “Run box”
- Paste or type “devmgmt.msc” and click “OK.” This will open the “Device Manager”
- Click the “expand” option of “Audio Inputs & Outputs.”
- Click the “Microphone WMD” and choose the “Uninstall device” option
- A pop-up window will appear. Click the “Uninstall” button
- Restart the PC
Install the voice changer Voicemod again, whether automatically or manually, and see if it works!
Part 3: How To Change Voice For Discord On Mobile?
“Voicemod clips” is the version for both Apple and Android devices. The app will help you make high-quality content using its wide selection of one-of-a-kind effects, which will change your voice so much that you won’t recognize yourself!
In addition to that, you can add filters, which are connected to your cell phone’s camera to create funny, interesting videos.
Additionally, you’ll have the option to choose from 10 different voices. Plus, you can also make unlimited videos and audio from the humorous to the terrifying.
Some of the Voicemod voices on mobile include male-to-female, different robot effects, famous celebrities, scary voices, and much more. In short, everything is based on how you would like to modify your voice!
Not just that, you can also cross-share creative videos and audio to popular social networking platforms such as Facebook, Twitter, Instagram, TikTok, and Snapchat using your smartphone.
Curious to know how to change your voice for Discord on mobile? Here are step-by-step instructions:
- Make sure the Voicemod app is downloaded on your Apple or Android device and appropriately configured
- Open Discord
- Tap the “cogwheel icon” near your name and avatar
- You’ll see the “settings” page
- Within it, tap the “Voice & Video” option
- Tap Voicemod under the “Input Device” option and the headset under the “Output Device” option and tap escape. You’ll have access to numerous exciting sounds
Richard Bennett
Richard Bennett is a writer and a lover of all things video.
Follow @Richard Bennett
Richard Bennett
Mar 27, 2024• Proven solutions
A voice changer will allow you to prank friends, create content, and most of all, secure your presence by maintaining anonymity. With it, you can turn your voice into several unique and exciting voices to serve any purpose you deem fit.
And when it comes to voice changers, none is as easy to operate as the Voicemod in Discord. Its claim to fame is that it features numerous voice options to choose from.
With Vociemod, you have to simply run the program in the background and select your desired voice!
Read on as we discuss how to use Voicemod on Discord in detail:
In this article
Part 1: How To Use Voice Changer Voicemod For Discord On Desktop Computer
Part 2: How To Fix Voicemod Not Working Discord?
Part 3: How To Change Voice For Discord On Mobile?
Part 1: How To Use Voice Changer Voicemod For Discord On Desktop Computer
Voicemod is arguably one of the best voice changer tools available on the internet for its excellent features.
But before we jump straight into using Voicemod for Discord, you must know how to install one on your desktop Mac/PC.
Here’s how to install Voicemod
- Visit the Voicemod website to begin the download process.
- You’ll see the button “Get Voicemod Free” on the screen. Click it!
- Upon clicking, the site will ask you to sign in to your account from Discord, Twitch, to Google. Use your Discord login details to sign in.
- After you’re signed in, the “.exe” file will be downloaded to your PC/Mac’s download folder. Open the “.exe” file the moment it’s downloaded.
- An install wizard will open up. Navigate through the wizard’s installation process to install the program on your PC/Mac.
- After installation is complete, the installation wizard will ask to restart your windows’ Mac or PC.
You can skip it, but it’s best to restart it for smooth operations.
Once your Mac/PC restarts, you’ll see the Voicemod app icon on your desktop screen.
Now that you have successfully installed the voice changer Voicemod app into your desktop computer, let’s dive into knowing how to use Voicemod on Discord!
Here’s how to use voice changer on Discord
- Click the Vociemod icon on the desktop to open the app. If you can’t find it there, click the “windows icon” located at the screen’s bottom-left. Just type “Voicemod,” and the program will show up. Double click it to get it opened.
- When the app opens up, you’ll have to choose the output and input it will use. If you’re wondering, why the output? This is to give you an insight into what your voice will sound like on each filter.
Once it’s done, you can play around with different filters!
Every day, you’ll get new free filters to use; however, to unlock and access all filters, you need to upgrade to the “pro-version” of voice changer Voicemod.
On the other hand, if you only need a few filters, the “basic-version” should suffice.
Apart from that, you can unlock an additional free filter in your app by sharing it on your social media accounts.
Step 1
To set up Voicemod with Discord, open your discord account and go to the settings (gear icon) placed at the screen’s bottom-left corner.
Step 2
Click the “Voice and Video” option right under the app settings.
Step 3
To make Voicemod usable, you’ll have to change Voice settings. Within the “Input Device” option, select the option that says “Microphone Voicemod Virtual Audio.”
Step 4
After you have changed settings, you can easily change the voice within the program. Not only this, but other users can also hear your audio alteration.
Step 5
With the “basic version,” you’ll have seven free voice choices that will change each day. On the contrary, with the “pro-version,” you’ll gain access to more than 80 different voice options.
So, if you’re searching for an easy and simple voice-changing app to use, look no further than Voicemod!
Part 2: How To Fix Voicemod Not Working Discord?
Is your voice changer Voicemod not working on Discord? No worries, you can troubleshoot the issues with a few basic steps.
Here are some ways you can use to fix Voicemod not working in Discord:
Method 1: Restart Your Windows PC/Mac
Though it’s not a technical solution, restarting your desktop computer fixes incorrect settings by rebooting them and solves many problems connected with your computer system, programs, and hardware.
So, when your Voicemod suddenly ceases to work in Discord, make sure to restart your Windows PC/Mac before going any further, as it’s the first step in fixing voice issues.
If restarting doesn’t help, slide to the next step!
Method 2: Make Sure The Mic Is Properly Set
The next step is to check if the mic works correctly. This is because faulty settings may stop voice changer Voicemod from operating correctly.
Just follow the steps below to resolve it:
- On the keyboard, press the “Win” logo and the “I” key simultaneously to open Windows settings. Click “System.”
- On the left, you’ll see the option “Sound.” Click it.
- First, you have to test the microphone! To do so, choose the “Headset” option rather than the Voicemod microphone under the “Input” section
- Click “Device properties & test microphone”
- Make sure to uncheck the “disable” box and keep the volume section 100
- Click the “Start test” button and speak into the microphone
- After that, click “Stop test.” If the greatest value it shows is above “0”, then your microphone works correctly
Now, restart your Voicemod app to see if it’s working properly or not! If the issue still persists, jump to the next solution.
Method 3: Install Windows Updates
If you use Windows 10, it has two kinds of updates that offer performance boost and security patches. Sometimes, an update can fix a few driver and software conflicts automatically.
You can quickly solve the voice chat problem by simply updating the system settings. Here’s how to update your Windows 10:
- Open your windows setting by pressing the “Windows button” and the “I” key together.
- Click on “Update and Security”
- Click the “Check for Updates” button. If an update is found, it will install automatically on the system
Make sure to repeat this process until it says you’re up-to-date. Then, restart the PC. Check whether the Vociemod is properly working or not!
If not, try our next option!
Method 4:Re-Install Voice Changer Voicemod Drivers
In many instances, the issue signifies that you’re using outdated or faulty drivers. To troubleshoot this, simply re-install your Voicemod driver, and you’ll be good to go!
First, uninstall your Voicemod driver from the windows PC/Mac. Here’s how to do it:
- On the keyboard, press the “Windows button” as well as the “I” key to bring up the “Run box”
- Paste or type “devmgmt.msc” and click “OK.” This will open the “Device Manager”
- Click the “expand” option of “Audio Inputs & Outputs.”
- Click the “Microphone WMD” and choose the “Uninstall device” option
- A pop-up window will appear. Click the “Uninstall” button
- Restart the PC
Install the voice changer Voicemod again, whether automatically or manually, and see if it works!
Part 3: How To Change Voice For Discord On Mobile?
“Voicemod clips” is the version for both Apple and Android devices. The app will help you make high-quality content using its wide selection of one-of-a-kind effects, which will change your voice so much that you won’t recognize yourself!
In addition to that, you can add filters, which are connected to your cell phone’s camera to create funny, interesting videos.
Additionally, you’ll have the option to choose from 10 different voices. Plus, you can also make unlimited videos and audio from the humorous to the terrifying.
Some of the Voicemod voices on mobile include male-to-female, different robot effects, famous celebrities, scary voices, and much more. In short, everything is based on how you would like to modify your voice!
Not just that, you can also cross-share creative videos and audio to popular social networking platforms such as Facebook, Twitter, Instagram, TikTok, and Snapchat using your smartphone.
Curious to know how to change your voice for Discord on mobile? Here are step-by-step instructions:
- Make sure the Voicemod app is downloaded on your Apple or Android device and appropriately configured
- Open Discord
- Tap the “cogwheel icon” near your name and avatar
- You’ll see the “settings” page
- Within it, tap the “Voice & Video” option
- Tap Voicemod under the “Input Device” option and the headset under the “Output Device” option and tap escape. You’ll have access to numerous exciting sounds
Richard Bennett
Richard Bennett is a writer and a lover of all things video.
Follow @Richard Bennett
Off-Line Disconnecting Discord Servers
How to Delete Discord Server?
Richard Bennett
Mar 27, 2024• Proven solutions
Discord servers are made and designed to help gamers – and now work colleagues – communicate and coordinate via private rooms.
As a communication app, it offers permanent servers for people who are working on the same project, playing the same game, or even if they’re part of the same family!
However, you may have to someday delete a server you own.
Today we will discuss how to delete Discord server or deleting the Discord server of someone who has passed away:
Part 1: How to Delete Discord Server Permanently on A Desktop?
If you’re familiar with Discord, you will know that there will come a time that you no longer need a server: it may be because you’ve resigned from your workplace or stopped playing a game.
If you are looking into how to delete your Discord server, you came to the right place. Even though Discord makes communication easier, you may need a break from around-the-clock connectivity for various reasons.
Discord works on desktop platforms and smartphones, with a blend of a VoIP chat system, a chat lobby, and a message board in a single app. Therefore, you can attempt to delete a server off on any device that you may have Discord downloaded and active on.
Most server owners choose to delete their Discord server when too many extra, strange, or ill-meaning visitors are visiting.
Servers are more like chat rooms inside the application. Deleting them is a relatively simple process – as you will learn from our how to delete server on Discord tips – however, their retrieval is impossible.
Once the server has been removed, you can not “undo the process” or recreate it. Therefore, be absolutely sure and proceed with caution.
It is also advised to skim through any essential files that you might have on the server. Back them up before letting it go forever.
And lastly, ensure that this is what you intend on doing because deleting a Discord server is permanent. Here are the simple steps to follow on how to delete a server on Discord:
- Open the Discord desktop app and click on the server you want to delete
- Once you select the server, there will be an options list under the server’s name
- Click the “server setting” button from the menu (This will be the second option on the list)

- At the end of the sidebar, you will find the option “delete the server on the left side.” Click it

Image: The image shows the screen that pops up after clicking “Server settings,” here, the delete button can be seen in red.
- After clicking, a pop-up window will appear, asking for confirmation
- Confirm by entering the server’s name and authentication code; this is only required when two-factor authentication is enabled
- Click on “delete server” to confirm
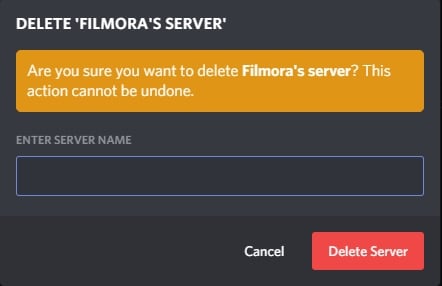
Image: As mentioned, you must be sure you want to permanently lose a server and all of its content before deleting it; this prompt serves the same purpose
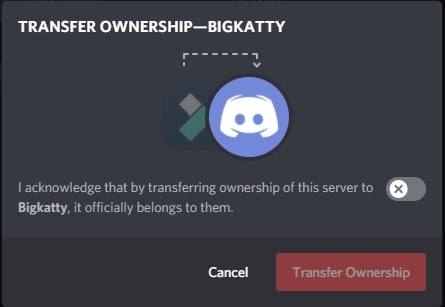
You can also transfer your server’s ownership to another individual if you do not want to delete it. To do this:
- Open server settings and then select “Members” in the left sidebar
- A list of every server member will open, hover over the person’s name that you want to transfer ownership to, and then click the three dots appearing on the right
transfer-ownership-on-discord-server.jpg
- Select “Transfer Ownership” and then confirm the transfer.
How to Delete A Server On Discord Via The Mobile App?
Suppose you do not want to go through the hassle of logging on to the desktop app. In that case, you have the option of deleting your Discord server via the mobile app quickly.
Here are some easy to follow steps on how to delete Discord server using the mobile app:
- Open the Discord app on your Android device or iPhone and then tap the hamburger settings icon on the top-left
- Search for the server you wish to delete, and then long-press the icon of the server you chose
- A mini option bar will pop up; here, you must click on “More Options” and then the server options will slide up on your screen; click on “Settings” to continue.
- This will take you to the control panel; here, click on the three-dotted settings on the top right
- Now you will be provided only one option: “Delete (server name).” Click on it
At this point, in the how to delete server on Discord process, Discord will ask you why you chose to delete the server as part of their customer experience surveys.
It is nothing but a formality; choosing to ignore it or answer it will not affect the process’s outcome.
You can choose from pre-decided answers as well, and to give you an example, one of the options is: “I couldn’t get people to join.”
How Do I Delete A Discord Server Without Ownership?
Previously you could delete your Discord server using a BOT. Anyone who had permission to use the command/action within BOT could also delete the server. However, now only the server owner and the Discord trust and safety team can delete a server.
Richard Bennett
Richard Bennett is a writer and a lover of all things video.
Follow @Richard Bennett
Richard Bennett
Mar 27, 2024• Proven solutions
Discord servers are made and designed to help gamers – and now work colleagues – communicate and coordinate via private rooms.
As a communication app, it offers permanent servers for people who are working on the same project, playing the same game, or even if they’re part of the same family!
However, you may have to someday delete a server you own.
Today we will discuss how to delete Discord server or deleting the Discord server of someone who has passed away:
Part 1: How to Delete Discord Server Permanently on A Desktop?
If you’re familiar with Discord, you will know that there will come a time that you no longer need a server: it may be because you’ve resigned from your workplace or stopped playing a game.
If you are looking into how to delete your Discord server, you came to the right place. Even though Discord makes communication easier, you may need a break from around-the-clock connectivity for various reasons.
Discord works on desktop platforms and smartphones, with a blend of a VoIP chat system, a chat lobby, and a message board in a single app. Therefore, you can attempt to delete a server off on any device that you may have Discord downloaded and active on.
Most server owners choose to delete their Discord server when too many extra, strange, or ill-meaning visitors are visiting.
Servers are more like chat rooms inside the application. Deleting them is a relatively simple process – as you will learn from our how to delete server on Discord tips – however, their retrieval is impossible.
Once the server has been removed, you can not “undo the process” or recreate it. Therefore, be absolutely sure and proceed with caution.
It is also advised to skim through any essential files that you might have on the server. Back them up before letting it go forever.
And lastly, ensure that this is what you intend on doing because deleting a Discord server is permanent. Here are the simple steps to follow on how to delete a server on Discord:
- Open the Discord desktop app and click on the server you want to delete
- Once you select the server, there will be an options list under the server’s name
- Click the “server setting” button from the menu (This will be the second option on the list)
- At the end of the sidebar, you will find the option “delete the server on the left side.” Click it
Image: The image shows the screen that pops up after clicking “Server settings,” here, the delete button can be seen in red.
- After clicking, a pop-up window will appear, asking for confirmation
- Confirm by entering the server’s name and authentication code; this is only required when two-factor authentication is enabled
- Click on “delete server” to confirm
Image: As mentioned, you must be sure you want to permanently lose a server and all of its content before deleting it; this prompt serves the same purpose
You can also transfer your server’s ownership to another individual if you do not want to delete it. To do this:
- Open server settings and then select “Members” in the left sidebar
- A list of every server member will open, hover over the person’s name that you want to transfer ownership to, and then click the three dots appearing on the right
transfer-ownership-on-discord-server.jpg
- Select “Transfer Ownership” and then confirm the transfer.
How to Delete A Server On Discord Via The Mobile App?
Suppose you do not want to go through the hassle of logging on to the desktop app. In that case, you have the option of deleting your Discord server via the mobile app quickly.
Here are some easy to follow steps on how to delete Discord server using the mobile app:
- Open the Discord app on your Android device or iPhone and then tap the hamburger settings icon on the top-left
- Search for the server you wish to delete, and then long-press the icon of the server you chose
- A mini option bar will pop up; here, you must click on “More Options” and then the server options will slide up on your screen; click on “Settings” to continue.
- This will take you to the control panel; here, click on the three-dotted settings on the top right
- Now you will be provided only one option: “Delete (server name).” Click on it
At this point, in the how to delete server on Discord process, Discord will ask you why you chose to delete the server as part of their customer experience surveys.
It is nothing but a formality; choosing to ignore it or answer it will not affect the process’s outcome.
You can choose from pre-decided answers as well, and to give you an example, one of the options is: “I couldn’t get people to join.”
How Do I Delete A Discord Server Without Ownership?
Previously you could delete your Discord server using a BOT. Anyone who had permission to use the command/action within BOT could also delete the server. However, now only the server owner and the Discord trust and safety team can delete a server.
Richard Bennett
Richard Bennett is a writer and a lover of all things video.
Follow @Richard Bennett
Also read:
- [New] Expertly Record Your Discord Sessions for 2024
- [New] Leading Discord Automated Friends
- [Updated] Pro-Level Strategies for Stunningly Pinning Messages in Discord for 2024
- [Updated] In 2024, Step-by-Step Streaming on Discord Tips to Engage and Retain Viewers
- [Updated] 10 Affordable, Open-Source Devices for Discord Chat Capture for 2024
- Unlock the Power of Voice in Discord A TTS Guide
- [New] Navigating with Precision to Uncover Ideal Discord Spaces
- [Updated] 2024 Approved A Harmonious Link Spotify with Discord
- In 2024, Disconnect Wisely Guidelines for Exiting Discords
- [Updated] 2024 Approved Top Auditory Aids The Ultimate List of Premium Discord Music Bots to Try
- [New] Pinpointing Perfect Workplace Messengers Is Slack Surpassing Discord, In 2024
- 2024 Approved The Ultimate Discord Call Blueprint for PCs/Tablets
- [New] In 2024, The Ultimate Technique for Clear Audio via VoiceMod on Discord
- [Updated] Creating Engaging Content for Effective Discord Live Streams
- [Updated] In 2024, Cutting-Edge Emoji Makers Revolutionizing Discord
- [Updated] 2024 Approved 10 Top Discoir Dates Love & Fun Unite
- [Updated] Best Discord Emoji Makers
- What Is Discord - All Things You Need to Know for 2024
- [New] 2024 Approved Navigating Networks Adding Pals via Discord
- [New] Insider Knowledge Effortlessly Navigate the Labyrinth of Discords
- [New] 2024 Approved Pinnacle Non-Discord Communities Online
- Excellence in Emoji Creation Leading DiscoTools for 2024
- In 2024, Your Guide to Streaming Success on Discord Platform
- [New] In 2024, Dive Into Free Emoji Worlds with These Innovative Online Locations
- [Updated] How To Use Voicemod On Discord [Desktop and Mobile] for 2024
- [New] Unleashing Discord Video Talks - Desktop & Mobile Guide for 2024
- [New] 2024 Approved Premium Examples of Dynamic Animation Logos in Social Media
- [New] In 2024, Uncover the Power of Discord's Spoiler System
- [Updated] In 2024, Transforming Servers Top Bots for Enhanced Engagement
- [New] In 2024, Premiere Social Signatures Animation Highlights
- [Updated] 2024 Approved Discord's Best Servers for Finding a Mate
- [New] The Ultimate Guide to Team Chat Apps Slack Vs. Discord Showdown
- [New] What Is Discord - All Things You Need to Know for 2024
- Fix Cant Take Screenshot Due to Security Policy on OnePlus Nord 3 5G | Dr.fone
- New Steady Shots The Best Free Video Stabilization Software
- New 2024 Approved How to Make Split Screen Videos in Filmora
- How to fix Microsoft Excel 2016 has stopped working error? | Stellar
- Uncomplicated Tutorial for Capturing Mac Screenshots
- In 2024, How to Screen Mirroring OnePlus 11 5G to PC? | Dr.fone
- In 2024, The Complete Guide to Xiaomi 14 Ultra FRP Bypass Everything You Need to Know
- How Can I Unlock My iPhone 13 Pro After Forgetting my PIN Code?
- How to Use Phone Clone to Migrate Your OnePlus Ace 3 Data? | Dr.fone
- Updated Translate Videos Like a Pro with Subtitle Cat Your Essential Guide
- Updated Unlock FCPX Potential 10 Must-Have Plugins
- Add Flesh to Your Video Content Before Posting Them for Your Audience to See Using Meme Texts. Use the Tutorial Guide Shared in This Post
- Unlock Social Media Success Hashtag Utilization on Instagram
- How to Sign .xlb document with Electronic Digital Signature - (Tutorial)
- [Updated] Pro Gopro Filming and Live Sharing Best Practices for Facebook/Periscope for 2024
- How to Reset Vivo T2 5G without Losing Data | Dr.fone
- 2024 Approved VN Video Editor Android Review A Comprehensive Guide
- [New] Segment Screen Showdown Recorder's Leader Status
- Election Excitement 5 Best Voting Simulators for 2024
- New Audio-Free Video Guide Five Steps to Remove Unwanted Sounds Online for 2024
- 2024 Approved The Best of the Big Screen Top Movie Trailer Apps for iPhone and iPad Users
- Ways to stop parent tracking your Lava Yuva 3 | Dr.fone
- Updated 2024 Approved How to Make Text Reveal Effect Easily
- [Updated] 2024 Approved Creating a Virtual Office Space with Google Meet
- 9 Quick Fixes to Unfortunately TouchWiz has stopped Of Honor Play 7T | Dr.fone
- [Updated] Unlocking Potential Exploring Ginger Valley
- Updated From Free to Pro 10 Top Intro Maker Websites for Every Need for 2024
- Unlock Your Vivo V27e Phone with Ease The 3 Best Lock Screen Removal Tools
- [Updated] How to Amplify Facebook Stories with Music Elements for 2024
- New Mastering Volume Transitions Keyframe Techniques in Filmora (Mac) for 2024
- [New] Vanishing in the Crowd How to Peruse Instagram Stories on Various Platforms Anonymously
- Title: Taking Audio to the Next Level on Desktop & Mobile Discord with VoiceMod
- Author: Timothy
- Created at : 2024-05-23 22:47:30
- Updated at : 2024-05-24 22:47:30
- Link: https://discord-videos.techidaily.com/taking-audio-to-the-next-level-on-desktop-and-mobile-discord-with-voicemod/
- License: This work is licensed under CC BY-NC-SA 4.0.
