
The Comprehensive Guide to Discord Spoiler Tags for 2024
The Comprehensive Guide to Discord Spoiler Tags
Discord Spoiler Tag: All You Need to Know

Richard Bennett
Mar 27, 2024• Proven solutions
With Discord, you can text with emojis and even send GIFs. However, as servers become crowded, they get bombarded with texts. And some of these texts have spoilers for games (or other stuff) that others may not want to know or read. But ignoring spoilers was not that easy. As you scroll miles and miles of texts, your eyes are bound to catch some hints and ruin the suspense for you.
Thankfully, Discord came out with the perfect solution. Now, if you are sharing some spoilers or secrets, you can mark them as spoilers. The result is a text that is sent but is blacked out. Curious users who are not scared of spoilers can view it. Others can enjoy their bliss of ignorance.
In this article
- Part 1: How to Use Spoilers on Discord to Hide Text Messages?
- Part 2: How to Add Spoiler to Image and Video on Discord?
- Bonus: Is it the same to use Spoiler on Mobile devices?
- Bonus: How to turn off the Spoiler tag?
Part 1: How to Use Spoilers on Discord to Hide Text Messages?
And now we come to the point - how to do spoilers on Discord? Well, there are two ways to do it. You can run through both of them and choose whichever suits you the best. All the methods are simple to follow. Note that some are available only on the desktop.
Method 1: Adding Spoiler Text Via Tag on Discord
We will begin with the tag method. All you have to do is add the spoiler tag on Discord. Here is a quick rundown of the steps –
- Open the Discord app and log in using your credentials.
- Pick a server from your server list or a friend from the friend list.
- Type whatever you want to in the chatbox.
- Now add the ‘||’ symbols before and after the spoiler content. For instance, it will look something like this – Hey! This is a spoiler ||spoiler alert||
- Hit the enter key to send and your spoiler is sent without spoiling anything!


This works for the Discord desktop app, browser, and also mobile app. This is like a universal method of hiding spoilers.
You can also add ‘/spoiler’ before the spoiler content. This is an alternative to the ‘||’ we add at the start and the end.
Method 2: Sending Spoiler Message with Mark as Spoiler icon
This alternate method is quite simple. This was a recent update on Discord that enables you to add the spoiler tag quickly. Here is a brief rundown for you –
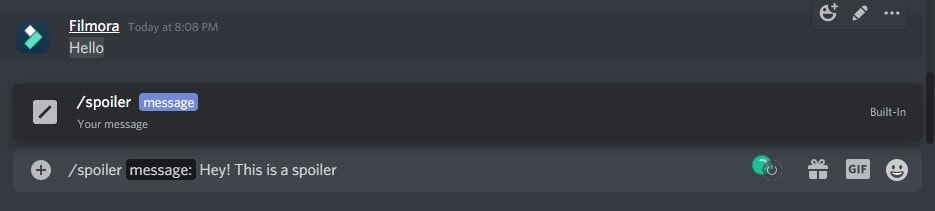
- Type out the spoiler content in the chatbox.
- Select the spoiler part of the text (highlight it).
- Upon selection, a floating bar will appear. Click the ‘eye’ symbol. and then the ‘||’ mark will immediately accompany the selected text, and the selected message will be spoiled automatically.
- After you hit the send button, the text will be sent to the server. Only the people who wish to see the spoiler will tap on it unveil it.
![]()
This method is available only on the Discord desktop app and browser version. For iOS, the steps are similar. The only difference is that you have to select the spoiler mark from the context menu.
Part 2: How to Add Spoiler to Image and Video on Discord?
There are many scenarios where a Discord spoiler can come in handy. As you might be aware that Discord is quite popular and its cross-platform flexibility make it a favorite among gamers. You can connect to your friends over multiple devices with a single account.
Just like texts, even images, videos, and other attachments can be marked as spoilers. The process of marking images and videos as spoilers differs slightly from that of texts. So, how to add spoiler tags to other files? Here’s the rundown.
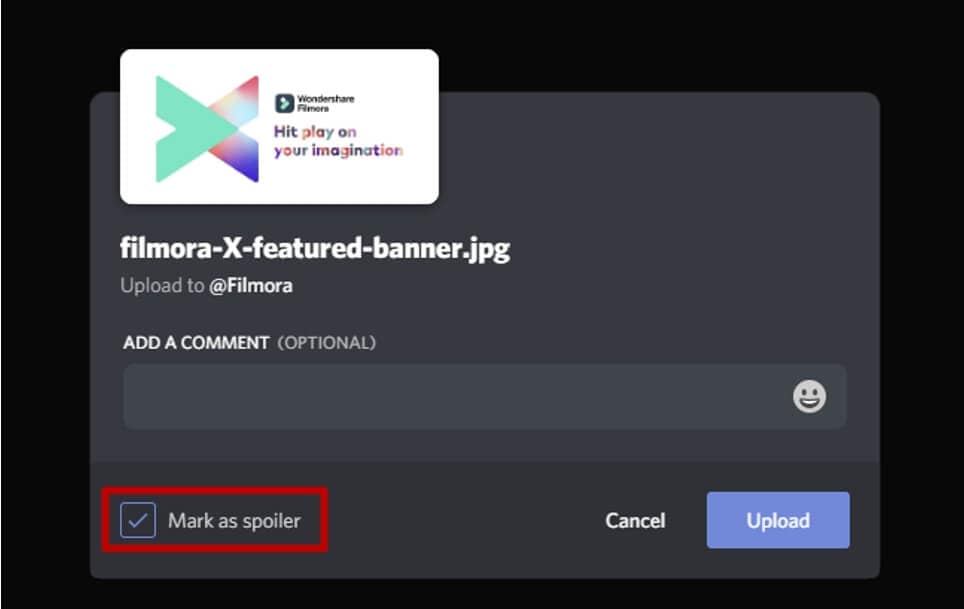
Images can be tagged as spoilers before you upload them on servers. To add spoiler tags to images –
- Open Discord on your desktop app or browser.
- Select the image or video that you want to send on the server.
- Drag it to your server chat and drop it there.
- Next, tap on the ‘+’ symbol.
- From the options that appear, choose ‘Mark as Spoiler.’
- Hit the Upload button.
- The result is a blurred image sent on the server. Anyone who wishes to view the image can tap on it.
Note that spoilers that contain images, videos, or other multimedia files can be sent only on the desktop app or the browser. Mobile apps do not support spoiler marks for images or other media files.
Bonus: Is it the same to use Spoiler on Mobile devices?
The Discord mobile spoiler tag works the same on mobile apps. The process is more or less the same. Here is a quick rundown of the steps –
- Type out the spoiler text.
- Add ‘||’ symbols at the start and end of the text you want to hide.
- Hit the send button, and your spoiler text will be covered.
- Only the curious ones can tap and see your spoiler texts.
You can even mark embedded links as spoilers with the same process. But this does not apply to Discord server links. Furthermore, you cannot add spoiler tags to images, videos, and other files from the mobile app.
For iOS, you can select and highlight the text that you want to hide. Then, tap open the context menu and click on the ‘Mark as Spoiler’ to hide the text.
Bonus: How to turn off the Spoiler tag?
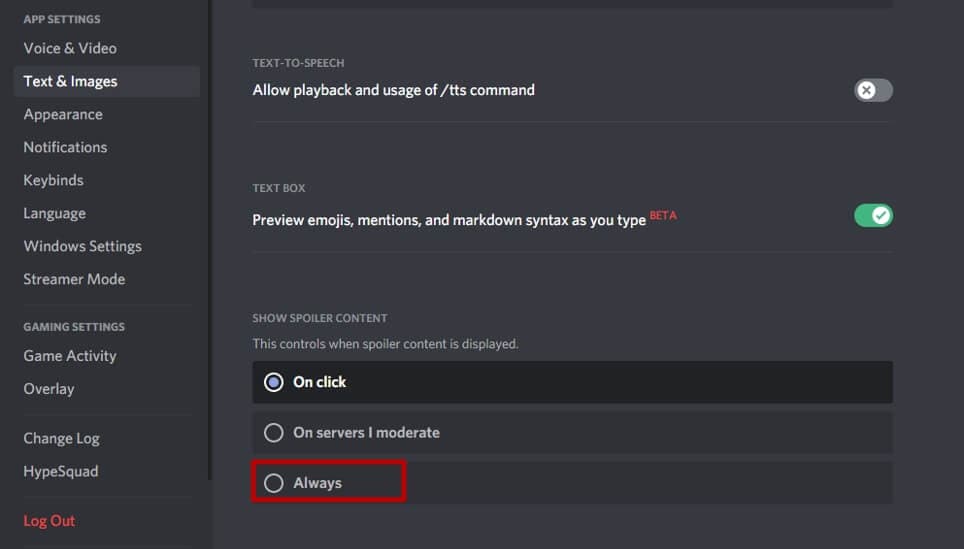
For some reason, you may want to remove the spoiler tag from the spoiler texts. In that case, open the User Settings and tap on Text & Images. Scroll down to the Show Spoiler Content tab and you will see options to control when spoiler content is displayed. You can choose to display on click, on servers I moderate, and always.
If you want to display all spoiler content, choose Always to turn off the spoiler tag. You can hide them again through the same menu if you change your mind.
This was an article on how to use the Discord spoiler tag to hide texts, images, and videos. You can undo and redo the tags as many times as you like. If you are about to unveil some life-changing secret on your Discord server, then don’t forget to add that spoiler tag.
Richard Bennett
Richard Bennett is a writer and a lover of all things video.
Follow @Richard Bennett
Richard Bennett
Mar 27, 2024• Proven solutions
With Discord, you can text with emojis and even send GIFs. However, as servers become crowded, they get bombarded with texts. And some of these texts have spoilers for games (or other stuff) that others may not want to know or read. But ignoring spoilers was not that easy. As you scroll miles and miles of texts, your eyes are bound to catch some hints and ruin the suspense for you.
Thankfully, Discord came out with the perfect solution. Now, if you are sharing some spoilers or secrets, you can mark them as spoilers. The result is a text that is sent but is blacked out. Curious users who are not scared of spoilers can view it. Others can enjoy their bliss of ignorance.
In this article
- Part 1: How to Use Spoilers on Discord to Hide Text Messages?
- Part 2: How to Add Spoiler to Image and Video on Discord?
- Bonus: Is it the same to use Spoiler on Mobile devices?
- Bonus: How to turn off the Spoiler tag?
Part 1: How to Use Spoilers on Discord to Hide Text Messages?
And now we come to the point - how to do spoilers on Discord? Well, there are two ways to do it. You can run through both of them and choose whichever suits you the best. All the methods are simple to follow. Note that some are available only on the desktop.
Method 1: Adding Spoiler Text Via Tag on Discord
We will begin with the tag method. All you have to do is add the spoiler tag on Discord. Here is a quick rundown of the steps –
- Open the Discord app and log in using your credentials.
- Pick a server from your server list or a friend from the friend list.
- Type whatever you want to in the chatbox.
- Now add the ‘||’ symbols before and after the spoiler content. For instance, it will look something like this – Hey! This is a spoiler ||spoiler alert||
- Hit the enter key to send and your spoiler is sent without spoiling anything!
This works for the Discord desktop app, browser, and also mobile app. This is like a universal method of hiding spoilers.
You can also add ‘/spoiler’ before the spoiler content. This is an alternative to the ‘||’ we add at the start and the end.
Method 2: Sending Spoiler Message with Mark as Spoiler icon
This alternate method is quite simple. This was a recent update on Discord that enables you to add the spoiler tag quickly. Here is a brief rundown for you –
- Type out the spoiler content in the chatbox.
- Select the spoiler part of the text (highlight it).
- Upon selection, a floating bar will appear. Click the ‘eye’ symbol. and then the ‘||’ mark will immediately accompany the selected text, and the selected message will be spoiled automatically.
- After you hit the send button, the text will be sent to the server. Only the people who wish to see the spoiler will tap on it unveil it.
![]()
This method is available only on the Discord desktop app and browser version. For iOS, the steps are similar. The only difference is that you have to select the spoiler mark from the context menu.
Part 2: How to Add Spoiler to Image and Video on Discord?
There are many scenarios where a Discord spoiler can come in handy. As you might be aware that Discord is quite popular and its cross-platform flexibility make it a favorite among gamers. You can connect to your friends over multiple devices with a single account.
Just like texts, even images, videos, and other attachments can be marked as spoilers. The process of marking images and videos as spoilers differs slightly from that of texts. So, how to add spoiler tags to other files? Here’s the rundown.
Images can be tagged as spoilers before you upload them on servers. To add spoiler tags to images –
- Open Discord on your desktop app or browser.
- Select the image or video that you want to send on the server.
- Drag it to your server chat and drop it there.
- Next, tap on the ‘+’ symbol.
- From the options that appear, choose ‘Mark as Spoiler.’
- Hit the Upload button.
- The result is a blurred image sent on the server. Anyone who wishes to view the image can tap on it.
Note that spoilers that contain images, videos, or other multimedia files can be sent only on the desktop app or the browser. Mobile apps do not support spoiler marks for images or other media files.
Bonus: Is it the same to use Spoiler on Mobile devices?
The Discord mobile spoiler tag works the same on mobile apps. The process is more or less the same. Here is a quick rundown of the steps –
- Type out the spoiler text.
- Add ‘||’ symbols at the start and end of the text you want to hide.
- Hit the send button, and your spoiler text will be covered.
- Only the curious ones can tap and see your spoiler texts.
You can even mark embedded links as spoilers with the same process. But this does not apply to Discord server links. Furthermore, you cannot add spoiler tags to images, videos, and other files from the mobile app.
For iOS, you can select and highlight the text that you want to hide. Then, tap open the context menu and click on the ‘Mark as Spoiler’ to hide the text.
Bonus: How to turn off the Spoiler tag?
For some reason, you may want to remove the spoiler tag from the spoiler texts. In that case, open the User Settings and tap on Text & Images. Scroll down to the Show Spoiler Content tab and you will see options to control when spoiler content is displayed. You can choose to display on click, on servers I moderate, and always.
If you want to display all spoiler content, choose Always to turn off the spoiler tag. You can hide them again through the same menu if you change your mind.
This was an article on how to use the Discord spoiler tag to hide texts, images, and videos. You can undo and redo the tags as many times as you like. If you are about to unveil some life-changing secret on your Discord server, then don’t forget to add that spoiler tag.
Richard Bennett
Richard Bennett is a writer and a lover of all things video.
Follow @Richard Bennett
Personalize Your Discord Presence: Adding Custom Emojis Easily
If you have an active Nitro subscription and want to make your Discord status look better, you can put emojis in Discord status. This article will help you walk through the process of using Discord custom status to upload emojis. Custom status is a new feature introduced by Discord. By uploading the emojis, you can keep your Discord status fresh! So, keep reading to find how to put emojis in Discord status through your desktop and mobile app conveniently.
In this article
01 How to Put Custom Emoji in Discord Status on Desktop and Online?
02 How to Add Custom Emoji on Discord Status on Mobile?
03 How to Copy and Paste Emojis in Discord Status?
04 How to Add Animated Emojis to Discord Status?
05 Custom Discord Status Emoji Ideas
Part 1: How to Put Custom Emoji in Discord Status on Desktop and Online?

For those who want to add an emoji on their Discord status on desktop and online, you can do that easily by following the steps that we have listed below:
Step 1: First, you need to go to https://discord.com . Once you visit the site, please log in using your Discord credential.
Step 2: Once your profile is open, please click on the profile picture.
Step 3: On your profile, look at the bottom of the menu. You will see a pop-up menu that says set a custom status.
Step 4: On the emojis bar, you can add an emoji. To do that, you need to click on the emoji status. Next, you will see a list of emojis. Please note that only an active Nitro subscription user can use animated or custom emojis. On the left will be the category of emojis. Choose one category that suits your mood; once the category opens, click on an emoji to add it.
Step 5: After that, you need to click on the Today option. This will open a drop-down menu. You need to choose a time frame for the emoji or status. You can choose today, 4 hours, 1 hour, etc.
Step 6: If you are done with the emoji selection and have chosen the duration for the status, you need to click on the Save option. The Save option will be on the bottom right of the same pop-up window.
And that’s it. The emojis will be successfully added to your status based on the duration that you have chosen. If you want to change the emoji or remove it, you need to undergo the same process.
Related: How to Get Free Animated Emojis on Discord
Part 2: How to Add Custom Emoji on Discord Status on Mobile?

If you are using the Discord app on your mobile phone, you can add a custom emoji on Discord status using your phone too. Follow the step-by-step guide that we have prepared to learn how to do that.
Step 1: Take your smartphone and look for the Discord app. The icon will look like a controller. Click on it to launch Discord.
Step 2: Just like the web steps, you will have to click on your profile. Click on the hamburger icon, which is there in the upper left corner. Then, look at the bottom right corner to find your profile.
Step 3: Now, click on the Set Status option. This will be the first option on your profile. Go on and click on that.
Step 4: After that, click on the option that says set a custom status. On the status bar, you will see an emoji. You need to click on that to open the list of emojis to choose from.
Step 5: Choose a time frame for the emoji, for example, 30 minutes, 1-hour, clear tomorrow, etc. If you are using an Android, you will see the floppy disk option; click on that to save your status. If you are using an iOS device, you will see the save option.
By following these steps, your status with the emoji you have chosen will be saved successfully. If you want to add a new emoji, repeat the same process.
Related: How to Change Discord Status
Part 3: How to Copy and Paste Emojis in Discord Status?
If you don’t want to go through the hassle of adding an emoji manually, you can just copy and paste one to your status. How to do it? Follow these steps:
Step 1: Go to a website that has emojis for Discord status.
Step 2: Scroll down the list of emojis and copy it.
Step 3: Go back to your Discord Nitro page and open the status setting. There, on the emoji section, paste the emoji that you have copied from another site.
Please note that this may not be possible for all types of emojis, though. Also, this will work if only the website has created emojis that can be directly copied and pasted on the status section.
Part 4: How to Add Animated Emojis to Discord Status?
Apart from the basic emojis, you can also add animated emojis to your Discord Status to make your status look even better. Here are the steps to follow to add an animated emoji:
Step 1: First, go to a website called https://betterdiscord.app/ . Once you are there, click on the Download option.
Step 2: You will see a page loaded with codes, right-click on the screen and click on the Save option. When it is downloaded, click on the Better Discord Windows installer. Next, read the license agreement and click on the Next option.
Step 3: Then click install better Discord and hit the next button. Choose the Discord version that you currently have installed.
Step 4: Open Discord and click on the user settings. There, you will see the Better Discord section. Next, click on the Plugin option. Now, close the Discord window and drag the animated status dot plugin into the plugin folder that opened after clicking on the Plugin option.
Step 5: Go to Discord again, and you will see the Animated Status option. Enable it and click on the gear icon. To add an animated emoji, click on the + icon. Next, you will see a Nitro ID field. Then, go to a chat page and click on the emoji option.
Step 6: Look at the emoji that you like and memorize the animated emoji name. Press \ followed by the name of the emoji. Now, copy the whole text and paste it again. You will see a few numbers; that’s the Nitro ID for the emoji. Copy the number only, go back to the Animated plugin and paste it on the Nitro ID field. Go back to the Nitro page again, and you will see the animated emoji on your status.
Part 5: Custom Discord Status Emoji Ideas

If you want to make your Discord Status look really cool, you can get some custom Discord status emoji ideas from us. Read this section to find out a few super cool custom Discord status emojis ideas and get inspired.
Use Kaomoji in Status
Kaomoji is a collection of super cute emojis that can brighten anyone’s day! They are great because they make your status look different and cute at the same time. You can choose from stars, smiley faces, cute polar bears, and much more! And yes, they are different than your usual emojis.
Add Old-school Emoticons
Remember the good old Nokia 1100 days when you used to send emojis using some signs? Well, you can try this idea too to give a vintage look to your status. Everybody uses the same smiley emojis, so why not try something different? Go back to your old 90s school days and display images, such as @}->– which is a rose! You can find old-school emoticons online easily.
Conclusion
And that’s it; now you know how to put emoji in Discord status without sweating much. We hope you have found this article helpful, and you will start using cool emojis on your status to make your Discord status look different than others!
02 How to Add Custom Emoji on Discord Status on Mobile?
03 How to Copy and Paste Emojis in Discord Status?
04 How to Add Animated Emojis to Discord Status?
05 Custom Discord Status Emoji Ideas
Part 1: How to Put Custom Emoji in Discord Status on Desktop and Online?
For those who want to add an emoji on their Discord status on desktop and online, you can do that easily by following the steps that we have listed below:
Step 1: First, you need to go to https://discord.com . Once you visit the site, please log in using your Discord credential.
Step 2: Once your profile is open, please click on the profile picture.
Step 3: On your profile, look at the bottom of the menu. You will see a pop-up menu that says set a custom status.
Step 4: On the emojis bar, you can add an emoji. To do that, you need to click on the emoji status. Next, you will see a list of emojis. Please note that only an active Nitro subscription user can use animated or custom emojis. On the left will be the category of emojis. Choose one category that suits your mood; once the category opens, click on an emoji to add it.
Step 5: After that, you need to click on the Today option. This will open a drop-down menu. You need to choose a time frame for the emoji or status. You can choose today, 4 hours, 1 hour, etc.
Step 6: If you are done with the emoji selection and have chosen the duration for the status, you need to click on the Save option. The Save option will be on the bottom right of the same pop-up window.
And that’s it. The emojis will be successfully added to your status based on the duration that you have chosen. If you want to change the emoji or remove it, you need to undergo the same process.
Related: How to Get Free Animated Emojis on Discord
Part 2: How to Add Custom Emoji on Discord Status on Mobile?
If you are using the Discord app on your mobile phone, you can add a custom emoji on Discord status using your phone too. Follow the step-by-step guide that we have prepared to learn how to do that.
Step 1: Take your smartphone and look for the Discord app. The icon will look like a controller. Click on it to launch Discord.
Step 2: Just like the web steps, you will have to click on your profile. Click on the hamburger icon, which is there in the upper left corner. Then, look at the bottom right corner to find your profile.
Step 3: Now, click on the Set Status option. This will be the first option on your profile. Go on and click on that.
Step 4: After that, click on the option that says set a custom status. On the status bar, you will see an emoji. You need to click on that to open the list of emojis to choose from.
Step 5: Choose a time frame for the emoji, for example, 30 minutes, 1-hour, clear tomorrow, etc. If you are using an Android, you will see the floppy disk option; click on that to save your status. If you are using an iOS device, you will see the save option.
By following these steps, your status with the emoji you have chosen will be saved successfully. If you want to add a new emoji, repeat the same process.
Related: How to Change Discord Status
Part 3: How to Copy and Paste Emojis in Discord Status?
If you don’t want to go through the hassle of adding an emoji manually, you can just copy and paste one to your status. How to do it? Follow these steps:
Step 1: Go to a website that has emojis for Discord status.
Step 2: Scroll down the list of emojis and copy it.
Step 3: Go back to your Discord Nitro page and open the status setting. There, on the emoji section, paste the emoji that you have copied from another site.
Please note that this may not be possible for all types of emojis, though. Also, this will work if only the website has created emojis that can be directly copied and pasted on the status section.
Part 4: How to Add Animated Emojis to Discord Status?
Apart from the basic emojis, you can also add animated emojis to your Discord Status to make your status look even better. Here are the steps to follow to add an animated emoji:
Step 1: First, go to a website called https://betterdiscord.app/ . Once you are there, click on the Download option.
Step 2: You will see a page loaded with codes, right-click on the screen and click on the Save option. When it is downloaded, click on the Better Discord Windows installer. Next, read the license agreement and click on the Next option.
Step 3: Then click install better Discord and hit the next button. Choose the Discord version that you currently have installed.
Step 4: Open Discord and click on the user settings. There, you will see the Better Discord section. Next, click on the Plugin option. Now, close the Discord window and drag the animated status dot plugin into the plugin folder that opened after clicking on the Plugin option.
Step 5: Go to Discord again, and you will see the Animated Status option. Enable it and click on the gear icon. To add an animated emoji, click on the + icon. Next, you will see a Nitro ID field. Then, go to a chat page and click on the emoji option.
Step 6: Look at the emoji that you like and memorize the animated emoji name. Press \ followed by the name of the emoji. Now, copy the whole text and paste it again. You will see a few numbers; that’s the Nitro ID for the emoji. Copy the number only, go back to the Animated plugin and paste it on the Nitro ID field. Go back to the Nitro page again, and you will see the animated emoji on your status.
Part 5: Custom Discord Status Emoji Ideas
If you want to make your Discord Status look really cool, you can get some custom Discord status emoji ideas from us. Read this section to find out a few super cool custom Discord status emojis ideas and get inspired.
Use Kaomoji in Status
Kaomoji is a collection of super cute emojis that can brighten anyone’s day! They are great because they make your status look different and cute at the same time. You can choose from stars, smiley faces, cute polar bears, and much more! And yes, they are different than your usual emojis.
Add Old-school Emoticons
Remember the good old Nokia 1100 days when you used to send emojis using some signs? Well, you can try this idea too to give a vintage look to your status. Everybody uses the same smiley emojis, so why not try something different? Go back to your old 90s school days and display images, such as @}->– which is a rose! You can find old-school emoticons online easily.
Conclusion
And that’s it; now you know how to put emoji in Discord status without sweating much. We hope you have found this article helpful, and you will start using cool emojis on your status to make your Discord status look different than others!
Also read:
- [New] 2024 Approved Farewell to Friends How to Leave a Discord Server
- [New] 2024 Approved From Startup to Shutdown Steam on Discord Devices
- [New] In 2024, Step-by-Step Strategies for Hosting Engaging Discord Channels
- [New] In 2024, The Animated Arena Android's Top 12 Game Lineup
- [Updated] Best Spaces on Discord to Date and Meet Love for 2024
- [Updated] Budget No More! Top 5 FREE Visual Effect Sites for 2024
- [Updated] From Meme Noob to Pro Mastering the 9GAG Craft
- [Updated] In 2024, Prime Bot Squadrons on Discord Platform
- [Updated] In 2024, The Essential Steps to Thrive in Discord Livestreaming
- [Updated] Launching a Successful Stream on Discord Essential Steps Revealed for 2024
- Easy Steps to Establish Your Virtual Space: Oculus Quest/Quest 2 Registration
- Forgotten The Voicemail Password Of Oppo Reno 11F 5G? Try These Fixes
- How to Install an SD Card on Your Steam Deck
- In 2024, Life360 Learn How Everything Works On Apple iPhone 8 Plus | Dr.fone
- New FCPX Lower Thirds 101 A Beginners Guide to Success
- Transforming Your Images with Precision: Achieve Perfect Transparency in 7 Techniques - Movavi
- Title: The Comprehensive Guide to Discord Spoiler Tags for 2024
- Author: Timothy
- Created at : 2024-10-27 21:50:46
- Updated at : 2024-10-29 22:34:17
- Link: https://discord-videos.techidaily.com/the-comprehensive-guide-to-discord-spoiler-tags-for-2024/
- License: This work is licensed under CC BY-NC-SA 4.0.