
!["[Updated] 2024 Approved Discord Sticker Guide - Essential Info"](https://www.lifewire.com/thmb/uOuMw8_e1pBrdfuZB3txnHBxmfk=/400x300/filters:no_upscale():max_bytes(150000):strip_icc():format(webp)/sofya-NomETWcv2Fo-unsplash-be3fc2855a7e477db0273993fd22e822.jpg)
"[Updated] 2024 Approved Discord Sticker Guide - Essential Info"
Discord Sticker Guide - Essential Info
Stickers for Discord: Everything You Need to Know

Richard Bennett
Mar 27, 2024• Proven solutions
From Facebook to even WhatsApp and Telegram, plain texts have become boring. Sticker fights on WhatsApp will give you an idea of how popular stickers are. Stickers are the new trend, and Discord just cannot lag behind in the race. Considering this, Discord is about to launch some lively, animated stickers.
In this article
- Part 1: What’s Discord Sticker?
- Part 2: How to Find Sticker Shop and Get Discord Stickers for Free?
- Part 3: How to Buy Discord Stickers?
- Part 4: How to Buy or Redeem a Discord Sticker Pack
- Part 5: How to Use Stickers on Discord?
Part 1: What’s Discord Sticker?
Discord Sticker supports sending emojis and GIFs on chats. The stickers have been soft-launched in Japan, Canada, and Brazil. After testing and feedback, they will be available across the globe.
Luckily, if you are a Nitro user, you can access the stickers for free. These stickers are bundled in the Nitro subscription, and you can claim the cool new stickers for free. Just go to the sticker shop, and tap on the “Free” button to start using them.
For those of you who have a $4.99 subscription, you can get the What’s Up Wumpus sticker pack for free. $9.99 subscription holders can unlock the What’s Up Wumpus sticker pack and can use the Wumpus Nitro Elite pack as long as their subscription is active.
The $9.99 subscribers can also avail of a 33% discount on other Discord sticker packs. Once you purchase these stickers, they are a permanent part of your Discord inventory. Other than these, the shop has Doggo Replies, Nelly At Work, and Hello Wumpus stickers as default sticker packs.
After the soft launch, the Sticker Shop is available for the users across all the platforms – Android, iOS, and even on the desktop app and browser.
Part 2: How to Find Sticker Shop and Get Discord Stickers for Free?
- On Phone
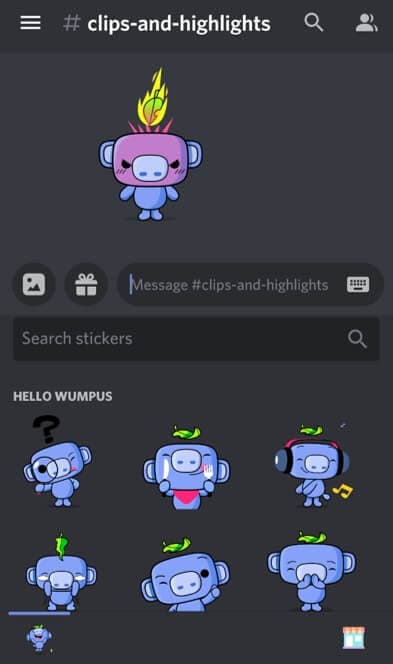
If you are lucky enough to be in Brazil, Japan, or Canada, you can access the Sticker Shop. You can tap on the emoji icon (the one that appears on the text box). The box that opens shows the emoji, and GIF tabs along with the sticker tab.
Tap on the sticker tab. A ‘shop’ symbol pops up towards the bottom (right hand). Tap on the symbol to open the sticker gallery. Here, you will see all the available sticker packs.
- Desktop (Browser)
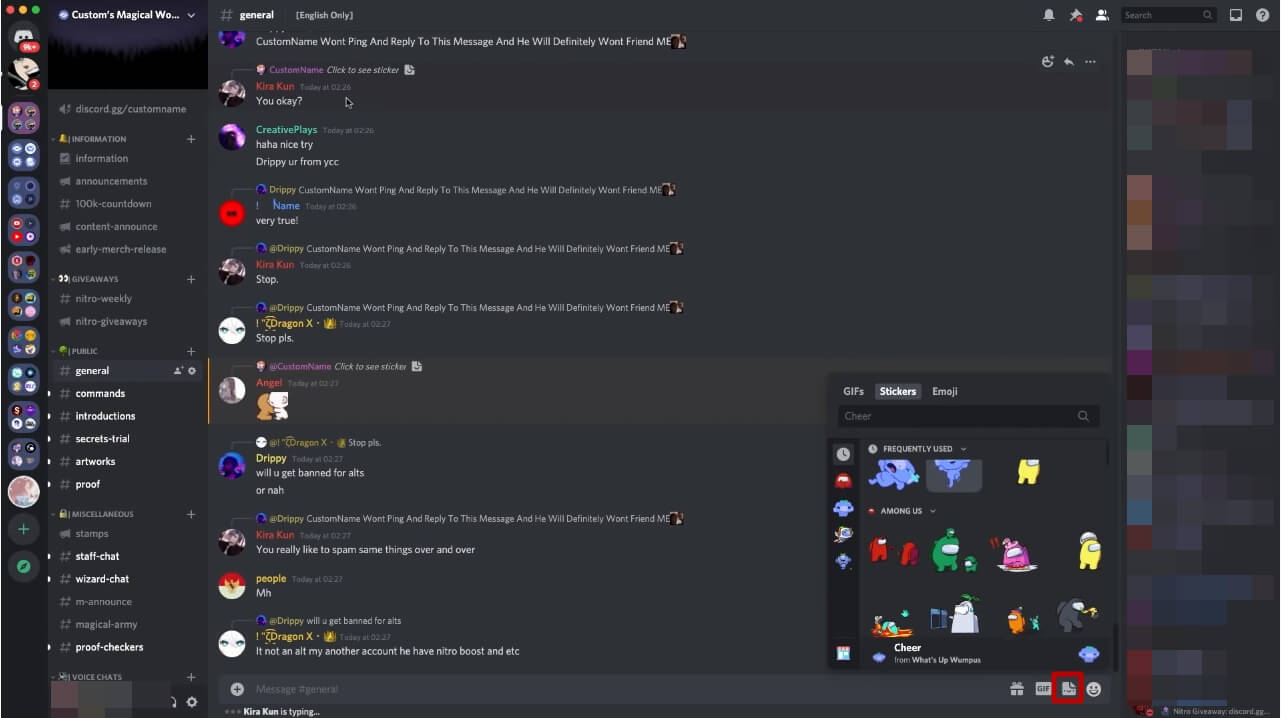
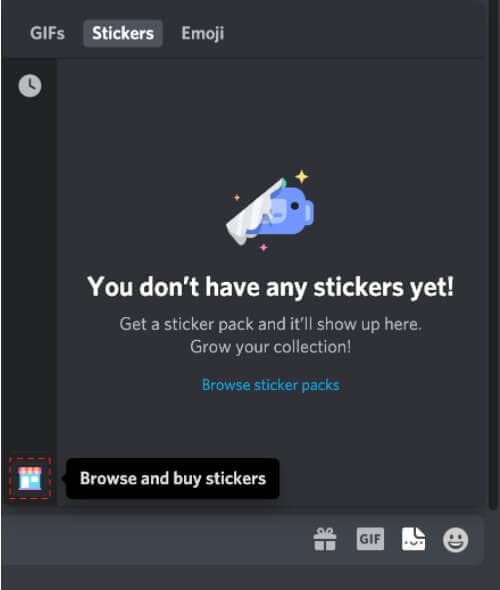
If you use Discord on your desktop or browser, you can see the sticker icon right on the text bar. Tap on it, and then click on the shopping icon that appears towards the bottom (left corner). In the shop, you can browse through the sticker packs.
Nitro users will get the What’s Up Wumpus stickers for free. However, they will have to buy other packs. The $9.99 Nitro users will get a 33% discount on sticker packs.
For now, the stickers can be used only by users in Japan, Brazil, and Canada. These users can send stickers to users in other countries. However, the receivers can see the stickers but cannot buy or send them.
However, you can try and use a VPN proxy to gain early access to it.
Part 3: How to Buy Discord Stickers?
As we described above, you can access the sticker shop on your phone as well as desktop. Once in the shop, you can browse and pick the stickers to buy.
Before buying, you can view the stickers in the sticker pack. As a sample, you will be shown a few stickers. You can view the entire pack by tapping on the ‘View All’ tab.
Part 4: How to Buy or Redeem a Discord Sticker Pack
Here is a brief rundown of the steps to follow if you want to buy a sticker pack.
- Choose a sticker pack that you like. View all the stickers to see what the pack looks like.
- Tap on the purchase button that is located right beside the name of the pack.
- You will be prompted to input your payment details. If you have saved a payment option on Discord, you can choose the relevant option.
- Agree to the Terms and Services of Discord.
- Finally, hit the purchase tab.
- The sticker pack is added to the inventory instantly.
- You can start sending them in the texts.
Note that Discord does not refund the money that is once paid. So, you cannot return the stickers to get a refund.
Another interesting thing to note is that the Sticker Shop refreshes and offers new sticker packs. Due to this rotation, a pack that is available in the shop today may be replaced by a new one tomorrow.
But don’t worry. A timer displayed at the top left corner (besides the title) lets you know for how long the pack is available in the shop. You can grab it before the time runs out.

Part 5: How to Use Stickers on Discord?
Buying stickers is useless if you don’t send them over texts. So, once you purchase stickers, you can immediately start sending them to your servers and texts.
1. Sending Stickers on Discord Mobile App
If you have the Discord app on your phone, tap on the emoji button. The Stickers tab appears, and this menu enables you to send the most-used stickers quickly, view all the purchased stickers, and search for appropriate stickers.
You can type an expression or emoji in the ‘Find the perfect sticker’ bar to find the right sticker. Hit the send button once you find the apt sticker.
2. Sending Stickers from Discord Desktop (and over Browser)
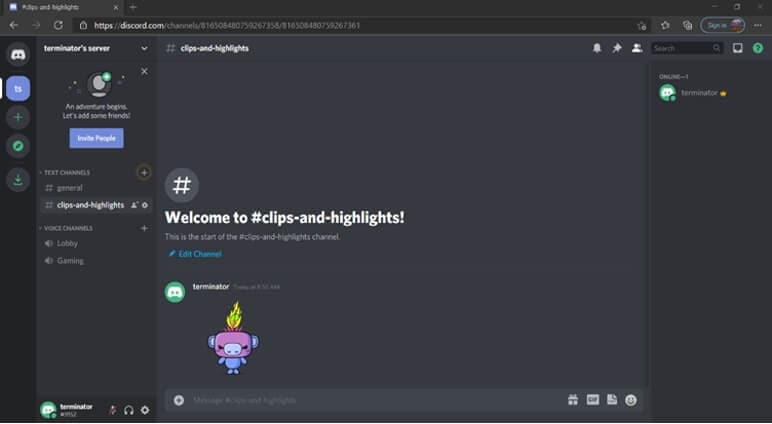
Sending stickers on a desktop or browser is quite similar to the mobile process. On the chatbox, you will find the sticker icon. Tap on it to view your purchased sticker packs.
Once opened, the menu will show you the most-used stickers. You can view other packs and switch between them. You can also search for particular stickers by typing the terms on the search bar.
You can tap on a sticker to send it on chats and servers.
Bonus: Adding Face-tracking AR Stickers to Video with Wondershare Filmora
In the latest version of Wondershare Filmora (V10.5 and later version), you can add face-tracking AR stickers to people in the video, and light up the celebration with flashy and cute characters and elements. Here are some brief steps to add AR stickers to your video in Filmora.
Step 1. Download and install the latest version of Filmora
Click the button below to download and install the latest version of Filmora. If you have installed Filmora already, click the About option under the Help menu to check the version of Filmora.


Note: You need to run Filmora 10.5 and later versions to add the AR stickers.
Step 2. Drag and drop your video footage to timeline
After launching Filmora, you need to import the video footage to the video editor. You can drag and drop the video footage to the timeline directly if you are working on a simple video project.
However, if you are working on a video project with many footages, it is recommended to upload them to the media library in order.
Step 3. Add AR Stickers to the video
After trimming or cutting out unnecessary frames from the video, you can now add the AR stickers to the footage. Go to the Effects tab and then scroll down to the AR Sticker directory.
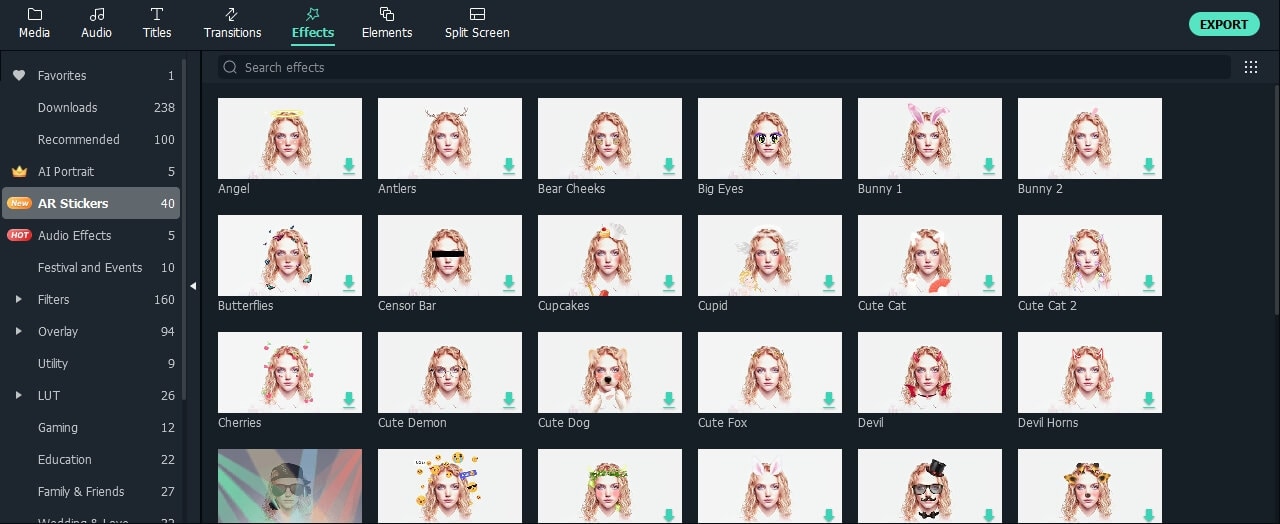
Currently, there are 40 stickers available in Filmora. You can click each one to preview and download. To add a sticker to the video, you can drag and drop it to the video track above or to the video clip directly. You can add several stickers at the same time by placing them in the tracks accordingly.
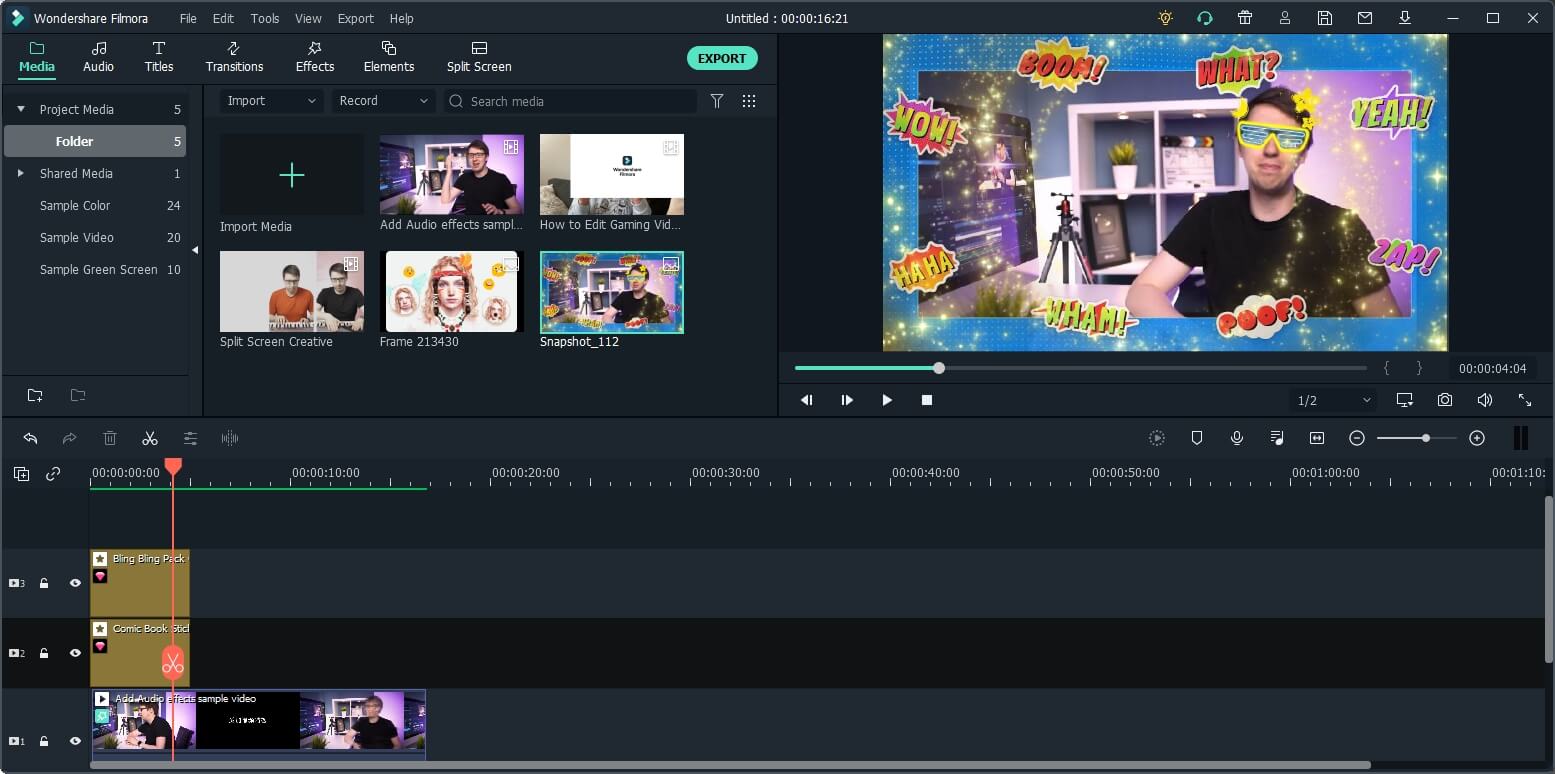
Step 4. Preview and Export
After finishing the editing, you can click the play button in the preview window to preview, and then click the Export button to save the video.
FAQs about Discord Sticker
And here we will answer some stuff that you might wonder about.
- What’s the difference between Discord Sticker and Discord Emoji ?
Well, emojis are emojis, and they are even in-built into your Android (or Google) and other keyboards on your phone. Emojis are not animated, and you can send basic Smiley or Sad faces (of course, there are animals and flowers, too). On the other hand, stickers are animated, and there can be specific sticker characters like What’s Up Wumpus.
- Why can’t I see the Sticker option on my Discord app?
You cannot access the stickers on Discord probably because the feature has not been launched in your country yet. Stickers are only available for users in Brazil, Japan, and Canada. They will be launched in other countries after testing and feedback.
- Is Discord sticker free?
If you are a Nitro subscriber, you will get the What’s Up Wumpus sticker pack for free. You will have to buy the other packs. As a $9.99 Nitro subscriber, you can get other packs at a 33% discount.
- Can I keep the purchased sticker pack forever in my account?
Yes, once you buy a pack, you will have lifetime access to it. However, if you delete your Discord account, you will not get your stickers back. Further, packs like ‘Wumpus Nitro Elite’ can be accessed only on an active $9.99 subscription.
- Can people who are outside of Brazil, Canada, and Japan receive the stickers I sent?
Yes, users from countries other than Japan, Canada, and Brazil can see the stickers in the chat sent to them. However, they could not buy or send them.
- Why my Discord sticker is not moving/animating?
The stickers should move by default when sent. You can check if your sticker inventory is set to the smallest size. You can also go to User Settings, tap on Text & Images, and select Stickers. Adjust the settings appropriately. You can contact the Discord support team should you need further assistance.
Be patient until the cool update rolls out worldwide!
Richard Bennett
Richard Bennett is a writer and a lover of all things video.
Follow @Richard Bennett
Richard Bennett
Mar 27, 2024• Proven solutions
From Facebook to even WhatsApp and Telegram, plain texts have become boring. Sticker fights on WhatsApp will give you an idea of how popular stickers are. Stickers are the new trend, and Discord just cannot lag behind in the race. Considering this, Discord is about to launch some lively, animated stickers.
In this article
- Part 1: What’s Discord Sticker?
- Part 2: How to Find Sticker Shop and Get Discord Stickers for Free?
- Part 3: How to Buy Discord Stickers?
- Part 4: How to Buy or Redeem a Discord Sticker Pack
- Part 5: How to Use Stickers on Discord?
Part 1: What’s Discord Sticker?
Discord Sticker supports sending emojis and GIFs on chats. The stickers have been soft-launched in Japan, Canada, and Brazil. After testing and feedback, they will be available across the globe.
Luckily, if you are a Nitro user, you can access the stickers for free. These stickers are bundled in the Nitro subscription, and you can claim the cool new stickers for free. Just go to the sticker shop, and tap on the “Free” button to start using them.
For those of you who have a $4.99 subscription, you can get the What’s Up Wumpus sticker pack for free. $9.99 subscription holders can unlock the What’s Up Wumpus sticker pack and can use the Wumpus Nitro Elite pack as long as their subscription is active.
The $9.99 subscribers can also avail of a 33% discount on other Discord sticker packs. Once you purchase these stickers, they are a permanent part of your Discord inventory. Other than these, the shop has Doggo Replies, Nelly At Work, and Hello Wumpus stickers as default sticker packs.
After the soft launch, the Sticker Shop is available for the users across all the platforms – Android, iOS, and even on the desktop app and browser.
Part 2: How to Find Sticker Shop and Get Discord Stickers for Free?
- On Phone
If you are lucky enough to be in Brazil, Japan, or Canada, you can access the Sticker Shop. You can tap on the emoji icon (the one that appears on the text box). The box that opens shows the emoji, and GIF tabs along with the sticker tab.
Tap on the sticker tab. A ‘shop’ symbol pops up towards the bottom (right hand). Tap on the symbol to open the sticker gallery. Here, you will see all the available sticker packs.
- Desktop (Browser)
If you use Discord on your desktop or browser, you can see the sticker icon right on the text bar. Tap on it, and then click on the shopping icon that appears towards the bottom (left corner). In the shop, you can browse through the sticker packs.
Nitro users will get the What’s Up Wumpus stickers for free. However, they will have to buy other packs. The $9.99 Nitro users will get a 33% discount on sticker packs.
For now, the stickers can be used only by users in Japan, Brazil, and Canada. These users can send stickers to users in other countries. However, the receivers can see the stickers but cannot buy or send them.
However, you can try and use a VPN proxy to gain early access to it.
Part 3: How to Buy Discord Stickers?
As we described above, you can access the sticker shop on your phone as well as desktop. Once in the shop, you can browse and pick the stickers to buy.
Before buying, you can view the stickers in the sticker pack. As a sample, you will be shown a few stickers. You can view the entire pack by tapping on the ‘View All’ tab.
Part 4: How to Buy or Redeem a Discord Sticker Pack
Here is a brief rundown of the steps to follow if you want to buy a sticker pack.
- Choose a sticker pack that you like. View all the stickers to see what the pack looks like.
- Tap on the purchase button that is located right beside the name of the pack.
- You will be prompted to input your payment details. If you have saved a payment option on Discord, you can choose the relevant option.
- Agree to the Terms and Services of Discord.
- Finally, hit the purchase tab.
- The sticker pack is added to the inventory instantly.
- You can start sending them in the texts.
Note that Discord does not refund the money that is once paid. So, you cannot return the stickers to get a refund.
Another interesting thing to note is that the Sticker Shop refreshes and offers new sticker packs. Due to this rotation, a pack that is available in the shop today may be replaced by a new one tomorrow.
But don’t worry. A timer displayed at the top left corner (besides the title) lets you know for how long the pack is available in the shop. You can grab it before the time runs out.
Part 5: How to Use Stickers on Discord?
Buying stickers is useless if you don’t send them over texts. So, once you purchase stickers, you can immediately start sending them to your servers and texts.
1. Sending Stickers on Discord Mobile App
If you have the Discord app on your phone, tap on the emoji button. The Stickers tab appears, and this menu enables you to send the most-used stickers quickly, view all the purchased stickers, and search for appropriate stickers.
You can type an expression or emoji in the ‘Find the perfect sticker’ bar to find the right sticker. Hit the send button once you find the apt sticker.
2. Sending Stickers from Discord Desktop (and over Browser)
Sending stickers on a desktop or browser is quite similar to the mobile process. On the chatbox, you will find the sticker icon. Tap on it to view your purchased sticker packs.
Once opened, the menu will show you the most-used stickers. You can view other packs and switch between them. You can also search for particular stickers by typing the terms on the search bar.
You can tap on a sticker to send it on chats and servers.
Bonus: Adding Face-tracking AR Stickers to Video with Wondershare Filmora
In the latest version of Wondershare Filmora (V10.5 and later version), you can add face-tracking AR stickers to people in the video, and light up the celebration with flashy and cute characters and elements. Here are some brief steps to add AR stickers to your video in Filmora.
Step 1. Download and install the latest version of Filmora
Click the button below to download and install the latest version of Filmora. If you have installed Filmora already, click the About option under the Help menu to check the version of Filmora.
Note: You need to run Filmora 10.5 and later versions to add the AR stickers.
Step 2. Drag and drop your video footage to timeline
After launching Filmora, you need to import the video footage to the video editor. You can drag and drop the video footage to the timeline directly if you are working on a simple video project.
However, if you are working on a video project with many footages, it is recommended to upload them to the media library in order.
Step 3. Add AR Stickers to the video
After trimming or cutting out unnecessary frames from the video, you can now add the AR stickers to the footage. Go to the Effects tab and then scroll down to the AR Sticker directory.
Currently, there are 40 stickers available in Filmora. You can click each one to preview and download. To add a sticker to the video, you can drag and drop it to the video track above or to the video clip directly. You can add several stickers at the same time by placing them in the tracks accordingly.
Step 4. Preview and Export
After finishing the editing, you can click the play button in the preview window to preview, and then click the Export button to save the video.
FAQs about Discord Sticker
And here we will answer some stuff that you might wonder about.
- What’s the difference between Discord Sticker and Discord Emoji ?
Well, emojis are emojis, and they are even in-built into your Android (or Google) and other keyboards on your phone. Emojis are not animated, and you can send basic Smiley or Sad faces (of course, there are animals and flowers, too). On the other hand, stickers are animated, and there can be specific sticker characters like What’s Up Wumpus.
- Why can’t I see the Sticker option on my Discord app?
You cannot access the stickers on Discord probably because the feature has not been launched in your country yet. Stickers are only available for users in Brazil, Japan, and Canada. They will be launched in other countries after testing and feedback.
- Is Discord sticker free?
If you are a Nitro subscriber, you will get the What’s Up Wumpus sticker pack for free. You will have to buy the other packs. As a $9.99 Nitro subscriber, you can get other packs at a 33% discount.
- Can I keep the purchased sticker pack forever in my account?
Yes, once you buy a pack, you will have lifetime access to it. However, if you delete your Discord account, you will not get your stickers back. Further, packs like ‘Wumpus Nitro Elite’ can be accessed only on an active $9.99 subscription.
- Can people who are outside of Brazil, Canada, and Japan receive the stickers I sent?
Yes, users from countries other than Japan, Canada, and Brazil can see the stickers in the chat sent to them. However, they could not buy or send them.
- Why my Discord sticker is not moving/animating?
The stickers should move by default when sent. You can check if your sticker inventory is set to the smallest size. You can also go to User Settings, tap on Text & Images, and select Stickers. Adjust the settings appropriately. You can contact the Discord support team should you need further assistance.
Be patient until the cool update rolls out worldwide!
Richard Bennett
Richard Bennett is a writer and a lover of all things video.
Follow @Richard Bennett
Step-by-Step: Setting up a Channel for Streaming
How to Stream on Discord
Richard Bennett
Mar 27, 2024• Proven solutions
Discord has completely transformed online communication, becoming the preferred platform for gamers, streamers, and reviewers alike.
As of late, it has started integrating with other gaming and streaming services, giving us the streamer mode. With streaming’s growing popularity, it’s essential to know what the streamer mode is all about.
If you’re a gamer, Discord’s streamer mode allows you to stream your gaming session to viewers by broadcasting your game to your friends, fans, and even a closed community of enthusiasts.
Many e-gaming professionals have taken up streaming, offering original and valuable content for like-minded individuals. This mode helps them streamline all their communications in one place.
If you’re new to Discord’s streamer mode, you need to know what it is, how you can use it to engage with other community members, and the primary security concerns you need to be aware of.
- Part 1: How to Stream on Discord from Desktop Computers?
- Part 2: How to Stream on Discord from Chromebook?
- Part 3: How to Stream on Discord from iPhone And Android?
- Part 4: How to Watch Discord Streaming?
- Part 5: Discord Streaming Tips
We have compiled a list of steps to help you learn how to conduct Discord streaming from the most prominent platforms: Windows, Mac, Chromebook, iPhone, Android.
Part 1: How to Stream on Discord from Desktop Computers
How to Stream on Discord from Windows
Discord allows for streaming through its Windows desktop client. You can stream games, podcasts, and any other kind of content through it.
However, it is crucial to remember that you can only stream in 480p and 720p resolutions in the free version. If you want higher resolution streaming, subscribe to Discord Nitro, which costs $9.99 a month.
With that said, follow these steps to start Discord streaming:
- Start the game that you want to stream and then switch back to Discord
- You will find an icon at the bottom left of the window displaying the name of the game you started and a stream icon resembling a camera next to it. Click on this icon to begin streaming
- The Screen Share menu will pop-up displaying the game you have started, and from the ‘Select a voice channel’ drop-down, select the channel you want to stream with
- Adjust your screen resolution and frame rates according to your choice
- After you’ve made all the adjustments, you can hit the ‘Go Live’ button at the bottom right of the window to start streaming.
If you wish to stop streaming, click on the ‘Stop Streaming’ icon at the app’s bottom-left corner
Additionally, if you wish to stream voice and video calls on your Discord server, you can do so as well. To make a call to your friends through Discord:
- Open the Discord app on your Windows PC and then select the server you want to use
- Click the General Voice channel to place a voice connection with Discord
- On the bottom left of the window, you will see a Voice Connected entry. If you wish to video call, click on the ‘Video’ button; otherwise, click on the ‘Screen’ button for screen sharing
- When you click ‘Video,’ your screen’s center will switch to conversation mode, and you will be able to see your camera feed
- If you click on the screen, a pop-up window shows up, allowing you to select the application you want to share
- After setting this up, your friends can join your call by clicking on the General channel
When you want to end the call, click on the red Disconnect icon
How to Stream on Discord from Mac
To achieve the same result with Discord on a Mac:
- Open the Discord app on your Macintosh and then find and join a voice channel that allows you to stream (you can find out which channels will let you stream by joining the channel and checking if you can click on ‘Video’ or ‘Screen’ at the bottom of the window)
- Once you’ve made sure that the channel allows you to stream, you can choose whether you want to stream from your webcam or share your computer screen. Click on the option you want
- If you’ve selected the ‘Video’ option, this will turn on your webcam after a prompt, and it will start streaming immediately
- If you’ve selected the screen-sharing option, choose the window you’d like to share, and it will start broadcasting the specific window
- You can either share your entire screen or specific windows, depending on your choice
- Choose a resolution and frame rate for the stream, but remember that higher resolutions and frame rates take up more bandwidth
- If you’re streaming from your desktop, you can even stream in sound. Toggle the sound button to the right, and you will be able to access your microphone for the stream
- When you’ve decided all the parameters and feel you’re ready to stream, click on ‘Go Live’
Part 2: How to Stream on Discord from Chromebook
Chromebooks have a customized Android operating software that can fit the laptop, functioning seamlessly with its requirements.
However, because Chromebooks use a restrictive OS, the Discord app functions like it would on a smartphone or tablet.
Therefore, for Discord streaming on a Chromebook, you will have to:
- Select a voice channel and then join it
- Press the Video camera icon to share your screen
- Allow the program camera access
- Begin streaming
However, it is slightly challenging to join voice channels using the app. To do this, you will have to:
- Locate the voice channel and click on it
- Upon clicking, you will see a window appear at the bottom
- Scroll to the bottom of the menu, and click on the ‘Join Channel’ button
- To join with the camera, click on the camcorder icon
Part 3: How to Stream on Discord from iPhone And Android
Although Discord does not allow users to broadcast content from the Discord Mobile app, they can still share their screen to stream games and videos. To do so, they must:
- Select a voice channel and join it
- Press the Video camera icon for screen-sharing
- Then allow permission to third-party apps on the mobile to access your camera
- Press the Camera icon to allow the program access to your camera
- Once this is done, you are now streaming live
It is important to note that while sharing your screen on Discord, make sure you are not divulging any crucial details with other users in the form of notifications.
To avoid incoming notifications, put your mobile on airplane mode.
Part 4: How to Watch Discord Streaming
Aside from broadcasting streams, you can also watch other users streaming their content on Discord. To watch someone’s stream, you will need to:
- Go to the voice channel where someone is streaming and click on their name
- If you’ve decided you want to join their stream, click on ‘Join Stream’
- You can also click on ‘Watch Stream’ from the main chat screen on your Discord
When someone is streaming content on Discord, you can see a red ‘Live’ icon next to their name. Knowing this will make it easier to tell when your favorite users are streaming.
Part 5: Discord Streaming Tips
To help you get the max out of your Discord streaming experience, we’ve compiled a couple of tips:
Tip 1: How to Stream Without Lag On Discord
Do you experience lag while streaming games and videos on your Discord server? Don’t worry; streaming is often demanding for casual internet connections, and lags can happen!
Here are some quick fixes to get rid of it:
Close Unnecessary Programs
If you’re running multiple programs on your computer while using Discord, they can cause lag. To solve this, close all unnecessary programs.
Turn Off Hardware Acceleration
To do this:
- Go to the ‘Settings’ option in your Discord app,
- Click on ‘Appearance’ and toggle off the ‘Hardware Acceleration’ option
- Press ‘OK’ to confirm and restart the application
Clear Discord Cache Files
Too many accumulated caches files can cause lag in your Discord. To fix this, you will need to clear the Discord cache from the File Explorer:
- Open the ‘Run’ window
- Enter ‘%APPDATA%/Discord/Cache’ to open the cache folder
- Press ‘Ctrl+A’ to delete the files
Reset Discord Voice Settings
To do this:
- Go to the ‘Settings’ option on your Discord app
- Select the ‘Voice & Video’ option in the left pane
- Click on the ‘Reset Voice Settings’ in the right pane
- Press OK to confirm and restart the application
Reinstall Discord
If none of the above methods seem to fix lag, you might have to reinstall your Discord. To uninstall it: first
- Go to the Discord Panel,
- Select ‘View by: Category’
- Click ‘Uninstall a program’
- Right-click Discord
- Click Uninstall
- After it is uninstalled, reinstall it once again
Tip 2: How to Add A Game to Discord Go Live
If you can’t get access to the game you want to stream through the ‘Go Live’ icon, you can access it manually. All you have to do is:
- Click on the cog icon in the bottom left
- Open the Settings menu
- Click on the ‘Game Activity’ tab on the left
- Click ‘Add It’
- Choose your game
- Go back to your server
- Click the ‘Go Live’ button
Richard Bennett
Richard Bennett is a writer and a lover of all things video.
Follow @Richard Bennett
Richard Bennett
Mar 27, 2024• Proven solutions
Discord has completely transformed online communication, becoming the preferred platform for gamers, streamers, and reviewers alike.
As of late, it has started integrating with other gaming and streaming services, giving us the streamer mode. With streaming’s growing popularity, it’s essential to know what the streamer mode is all about.
If you’re a gamer, Discord’s streamer mode allows you to stream your gaming session to viewers by broadcasting your game to your friends, fans, and even a closed community of enthusiasts.
Many e-gaming professionals have taken up streaming, offering original and valuable content for like-minded individuals. This mode helps them streamline all their communications in one place.
If you’re new to Discord’s streamer mode, you need to know what it is, how you can use it to engage with other community members, and the primary security concerns you need to be aware of.
- Part 1: How to Stream on Discord from Desktop Computers?
- Part 2: How to Stream on Discord from Chromebook?
- Part 3: How to Stream on Discord from iPhone And Android?
- Part 4: How to Watch Discord Streaming?
- Part 5: Discord Streaming Tips
We have compiled a list of steps to help you learn how to conduct Discord streaming from the most prominent platforms: Windows, Mac, Chromebook, iPhone, Android.
Part 1: How to Stream on Discord from Desktop Computers
How to Stream on Discord from Windows
Discord allows for streaming through its Windows desktop client. You can stream games, podcasts, and any other kind of content through it.
However, it is crucial to remember that you can only stream in 480p and 720p resolutions in the free version. If you want higher resolution streaming, subscribe to Discord Nitro, which costs $9.99 a month.
With that said, follow these steps to start Discord streaming:
- Start the game that you want to stream and then switch back to Discord
- You will find an icon at the bottom left of the window displaying the name of the game you started and a stream icon resembling a camera next to it. Click on this icon to begin streaming
- The Screen Share menu will pop-up displaying the game you have started, and from the ‘Select a voice channel’ drop-down, select the channel you want to stream with
- Adjust your screen resolution and frame rates according to your choice
- After you’ve made all the adjustments, you can hit the ‘Go Live’ button at the bottom right of the window to start streaming.
If you wish to stop streaming, click on the ‘Stop Streaming’ icon at the app’s bottom-left corner
Additionally, if you wish to stream voice and video calls on your Discord server, you can do so as well. To make a call to your friends through Discord:
- Open the Discord app on your Windows PC and then select the server you want to use
- Click the General Voice channel to place a voice connection with Discord
- On the bottom left of the window, you will see a Voice Connected entry. If you wish to video call, click on the ‘Video’ button; otherwise, click on the ‘Screen’ button for screen sharing
- When you click ‘Video,’ your screen’s center will switch to conversation mode, and you will be able to see your camera feed
- If you click on the screen, a pop-up window shows up, allowing you to select the application you want to share
- After setting this up, your friends can join your call by clicking on the General channel
When you want to end the call, click on the red Disconnect icon
How to Stream on Discord from Mac
To achieve the same result with Discord on a Mac:
- Open the Discord app on your Macintosh and then find and join a voice channel that allows you to stream (you can find out which channels will let you stream by joining the channel and checking if you can click on ‘Video’ or ‘Screen’ at the bottom of the window)
- Once you’ve made sure that the channel allows you to stream, you can choose whether you want to stream from your webcam or share your computer screen. Click on the option you want
- If you’ve selected the ‘Video’ option, this will turn on your webcam after a prompt, and it will start streaming immediately
- If you’ve selected the screen-sharing option, choose the window you’d like to share, and it will start broadcasting the specific window
- You can either share your entire screen or specific windows, depending on your choice
- Choose a resolution and frame rate for the stream, but remember that higher resolutions and frame rates take up more bandwidth
- If you’re streaming from your desktop, you can even stream in sound. Toggle the sound button to the right, and you will be able to access your microphone for the stream
- When you’ve decided all the parameters and feel you’re ready to stream, click on ‘Go Live’
Part 2: How to Stream on Discord from Chromebook
Chromebooks have a customized Android operating software that can fit the laptop, functioning seamlessly with its requirements.
However, because Chromebooks use a restrictive OS, the Discord app functions like it would on a smartphone or tablet.
Therefore, for Discord streaming on a Chromebook, you will have to:
- Select a voice channel and then join it
- Press the Video camera icon to share your screen
- Allow the program camera access
- Begin streaming
However, it is slightly challenging to join voice channels using the app. To do this, you will have to:
- Locate the voice channel and click on it
- Upon clicking, you will see a window appear at the bottom
- Scroll to the bottom of the menu, and click on the ‘Join Channel’ button
- To join with the camera, click on the camcorder icon
Part 3: How to Stream on Discord from iPhone And Android
Although Discord does not allow users to broadcast content from the Discord Mobile app, they can still share their screen to stream games and videos. To do so, they must:
- Select a voice channel and join it
- Press the Video camera icon for screen-sharing
- Then allow permission to third-party apps on the mobile to access your camera
- Press the Camera icon to allow the program access to your camera
- Once this is done, you are now streaming live
It is important to note that while sharing your screen on Discord, make sure you are not divulging any crucial details with other users in the form of notifications.
To avoid incoming notifications, put your mobile on airplane mode.
Part 4: How to Watch Discord Streaming
Aside from broadcasting streams, you can also watch other users streaming their content on Discord. To watch someone’s stream, you will need to:
- Go to the voice channel where someone is streaming and click on their name
- If you’ve decided you want to join their stream, click on ‘Join Stream’
- You can also click on ‘Watch Stream’ from the main chat screen on your Discord
When someone is streaming content on Discord, you can see a red ‘Live’ icon next to their name. Knowing this will make it easier to tell when your favorite users are streaming.
Part 5: Discord Streaming Tips
To help you get the max out of your Discord streaming experience, we’ve compiled a couple of tips:
Tip 1: How to Stream Without Lag On Discord
Do you experience lag while streaming games and videos on your Discord server? Don’t worry; streaming is often demanding for casual internet connections, and lags can happen!
Here are some quick fixes to get rid of it:
Close Unnecessary Programs
If you’re running multiple programs on your computer while using Discord, they can cause lag. To solve this, close all unnecessary programs.
Turn Off Hardware Acceleration
To do this:
- Go to the ‘Settings’ option in your Discord app,
- Click on ‘Appearance’ and toggle off the ‘Hardware Acceleration’ option
- Press ‘OK’ to confirm and restart the application
Clear Discord Cache Files
Too many accumulated caches files can cause lag in your Discord. To fix this, you will need to clear the Discord cache from the File Explorer:
- Open the ‘Run’ window
- Enter ‘%APPDATA%/Discord/Cache’ to open the cache folder
- Press ‘Ctrl+A’ to delete the files
Reset Discord Voice Settings
To do this:
- Go to the ‘Settings’ option on your Discord app
- Select the ‘Voice & Video’ option in the left pane
- Click on the ‘Reset Voice Settings’ in the right pane
- Press OK to confirm and restart the application
Reinstall Discord
If none of the above methods seem to fix lag, you might have to reinstall your Discord. To uninstall it: first
- Go to the Discord Panel,
- Select ‘View by: Category’
- Click ‘Uninstall a program’
- Right-click Discord
- Click Uninstall
- After it is uninstalled, reinstall it once again
Tip 2: How to Add A Game to Discord Go Live
If you can’t get access to the game you want to stream through the ‘Go Live’ icon, you can access it manually. All you have to do is:
- Click on the cog icon in the bottom left
- Open the Settings menu
- Click on the ‘Game Activity’ tab on the left
- Click ‘Add It’
- Choose your game
- Go back to your server
- Click the ‘Go Live’ button
Richard Bennett
Richard Bennett is a writer and a lover of all things video.
Follow @Richard Bennett
Also read:
- [Updated] The Complete Guide to Transforming Your Discord Avatar From Ordinary to Extraordinary for 2024
- [New] Step-by-Step How to Delete a Discord Server
- 2024 Approved Techniques for Efficient DiscoScreen Sharing
- In 2024, Mastering Online Persona Transformation in Discord
- [New] Cutting-Edge Emoji Makers Revolutionizing Discord for 2024
- [New] In 2024, Exploring The Architects Behind Popular Discord Glyphs
- [New] Building a Captivating Virtual Persona with Discord's Pfps for 2024
- [New] Premium 5 Dynamic Logo Animation Portfolios for 2024
- Demystifying the Premium Experience An In-Depth Look at DiscoNitro on Discord for 2024
- [New] In 2024, Discover the Best Musically-Focused Bots on Discord Platforms
- In 2024, Innovative Imagery for Interactive Websites
- [New] Essential Disco Plugins Elevate Your User Journey
- In 2024, Exploring Discord Nitro VIP Access & The Steps for Obtainment
- Premium 5 Dynamic Logo Animation Portfolios
- [Updated] Top Non-Discord Streaming Networks
- 2024 Approved Elevate Online Engagement Unlocking the Potential of VoiceMod on Discord
- [Updated] 2024 Approved Transformative Strategies for Effective Pins in Discord Dialogues
- Discord Gifs Made Simple A Step-by-Step Reference Guide for 2024
- [New] Discover the Instant Fame-Boosting Channel Names
- [New] In 2024, Elite Font Creation Apps Optimize Your Discord Experience
- [Updated] The Ultimate List of Discord Bots to Amplify Your Server for 2024
- 2024 Approved Unveiling Discord A Comprehensive Guide for Everyone
- [Updated] Premium Font Fabrication Tools for Discord Users for 2024
- [Updated] Step by Step Guide for Adding Emoji Flair Into Your Discord Status for 2024
- 2024 Approved Bulk Cleanup Tips for Eradicating Unwanted Messages in Discord
- [New] Leveraging Discord's Features for High-Quality Streaming for 2024
- Efficiently Remove Discord Server From PC & Mobile for 2024
- How to Proficiently Use Discord Spoiler Labels for 2024
- 2024 Approved How to Find Discord Server
- Masterful Moderation with New Discord Roles for 2024
- [New] Unmasking Silence How to Speak Up and Document Toxicity in Virtual Communities Like Discord for 2024
- [New] Discord GIFs How to Put GIFs on Discord - An Ultimate Guide
- 2024 Approved How to Delete Discord Account [Step-by-Step]
- [New] Deleting a Discord Server Desktop & Mobile Guide for 2024
- [New] The Complete Breakdown of Screen Casting on Discord for 2024
- [Updated] 2024 Approved Best 5 Animated Emblems for Modern Social Networks
- [Updated] 2024 Approved Crafting Memorable Pfps in Discord with Ease and Style
- [New] Elite Font Designers Specializing in Discord Platforms
- [New] Creative Connections Animated Iconography for 2024
- 2024 Approved Simplified Understanding of Discord Spoilers
- [New] Discover the Magic of Discord Stickers
- [New] In 2024, Setting Up and Managing Discord Channels Step-by-Step Guide
- 2024 Approved Pro Tips for Efficient Message Reactions on Discord
- [New] Ultimate Font Generator Apps for Discord on Mobile Platforms
- [New] In 2024, Top-Class AI Mates for Online Squares
- [Updated] In 2024, Adopting Innovative Approaches to Elevate Your FB Campaigns
- In 2024, Planning to Use a Pokemon Go Joystick on Oppo Find X7 Ultra? | Dr.fone
- In 2024, Step-by-Step Tutorial How To Bypass Oppo Reno 11F 5G FRP
- 7 Fixes for Unfortunately, Phone Has Stopped on Xiaomi Redmi 12 5G | Dr.fone
- In 2024, New Multiple Ways How To Remove iCloud Activation Lock On your iPhone 6s
- Silliest Stories on Twitter for 2024
- [New] From Lurkers to Leaders Elevate Your Facebook Game for 2024
- [New] 2024 Approved Master the Art of FB Video Ads with a Complimentary Kit
- In 2024, The Ultimate Guide How to Bypass Swipe Screen to Unlock on Realme 12+ 5G Device
- [Updated] 2024 Approved Capturing Every Detail Best Practices for HP Laptop Recording
- In 2024, Rewind and Play Instagram's Backwards Videos Unveiled
- In 2024, Complete Tutorial to Use VPNa to Fake GPS Location On Apple iPhone 15 Pro | Dr.fone
- Updated In 2024, Best Apps to Create Engaging WhatsApp Statuses
- iPhone 12 Pro Max activation lock primer
- Updated Easy Peasy Changing Video Ratio Without Hassle for 2024
- How to Change Lock Screen Wallpaper on Gionee
- [New] 2024 Approved Social Media Savvy Crafting Your Best Self with Top Tips for Bios
- Premiere Pro Transition Essentials Top 10 Plugins You Need
- [Updated] In 2024, Expert Tips Implement Borders on Instagram Media
- [Updated] Universal IPTV Access Model for 2024
- [Updated] In 2024, Unlock Facebook Slide-In Content Access
- [Updated] In 2024, Mastering iTunes Archives in 3 Easy Steps
- Android Screen Stuck General OnePlus Nord N30 SE Partly Screen Unresponsive | Dr.fone
- [New] In 2024, Key Takeaways From Reviewing ZDSoft's Vision Recorder
- Boost Your Brand Visibility with Top Hashtag Strategies
- How to Check Distance and Radius on Google Maps For your Tecno Spark 10 4G | Dr.fone
- New S Best Video Editing Apps for Creating Stunning Collages on iPhone and iPad for 2024
- In 2024, Quick Tips for Editing IGTV Content to Stand Out
- [New] Explore The Best-Kept Facebook Meme Secrets for 2024
- Apply These Techniques to Improve How to Detect Fake GPS Location On Infinix Note 30 VIP | Dr.fone
- In 2024, 5 Ways to Transfer Music from Apple iPhone SE to Android | Dr.fone
- Updated Beyond Quik Exploring the Best PC Video Editing Software for GoPro Users for 2024
- In 2024, 2 Ways to Monitor Vivo V29e Activity | Dr.fone
- In 2024, Adjust Default Snapshot Savings in Mac
- A Quick Guide to Oppo K11x FRP Bypass Instantly
- Updated The Art of Auditory Elimination Techniques for Taking Out the Chatter in Videos for 2024
- Delete Gmail Account With/Without Password On Asus ROG Phone 7 Ultimate
- Get Rid of corrupt Excel 2010 File
- [Updated] Pursuit of Riches Terraria’s Quintessential Map Rankings for 2024
- How to fix iCloud lock on your Apple iPhone 15 and iPad
- In 2024, Bandicam Unveiled A Comprehensive Screen Recorder Analysis
- Title: "[Updated] 2024 Approved Discord Sticker Guide - Essential Info"
- Author: Timothy
- Created at : 2024-05-23 22:48:06
- Updated at : 2024-05-24 22:48:06
- Link: https://discord-videos.techidaily.com/updated-2024-approved-discord-sticker-guide-essential-info/
- License: This work is licensed under CC BY-NC-SA 4.0.
