![[Updated] 2024 Approved Discord's Broadcasting Features Unveiled A Step-by-Step Guide](https://thmb.techidaily.com/3bea074e02c00367c73eda64c4dc35b2b7531a1754ee9632a9d2f7f9073f37e2.jpg)
"[Updated] 2024 Approved Discord's Broadcasting Features Unveiled A Step-by-Step Guide"
Discord’s Broadcasting Features Unveiled: A Step-by-Step Guide
Discord is a great communication tool that also offers live streaming services. You can use this platform to engage and connect to your audience by conducting a live session. Through its “Voice Chat” feature, you can directly interact with your audience in a comfortable environment. If you are unaware of how to go live on Discord, this article can help you.
For your assistance, this article will instantly address how to live stream on Discord. Let’s dig into the details.
- How to Stream Videos on Discord
- How to Stream your Webcam on Discord
- How to Change the Shared Screen on Discord
- How to Stream Discord on my Mobile Phone?
- FAQs about the live stream on Discord
- Bonus Tip: Easily Record and Edit your Stream with Filmora
Part 1: What is Discord?
Discord is a popular platform created to offer a better communication experience between game players. The major reason for the massive recognition of Discord is its ability to generate servers instantly. Game players and other users can instantly create voice or text servers for enhanced communication.
Discord provides excellent flexibility to users by providing high-quality audio services with no background noise. Even if your friends are in different parts of the world, you can chat with them smoothly. You can create private and public servers in Discord to communicate with people having similar interests.
Along with using Discord Voice and Text chat features, you can live stream your gameplays. The live streaming on Discord won’t be a public show, as it will only be confined to your selected server. Through this, you can ask your friends for assistance while playing games. Moreover, Discord is also capable of capturing other screens. Hence, it’s a great platform for professionals, game lovers, and other individuals to communicate efficiently.
Part 2: Prerequisites for Stream on Discord
Many social media platforms put restrictions on users for live streaming. Some platforms require you to have a specific number of followers in order to conduct live streaming. However, in Discord, you don’t have to worry about such restrictions. By creating a server and channel on Discord, you can easily go for live streaming. Check the below prerequisites for performing a live stream on Discord:
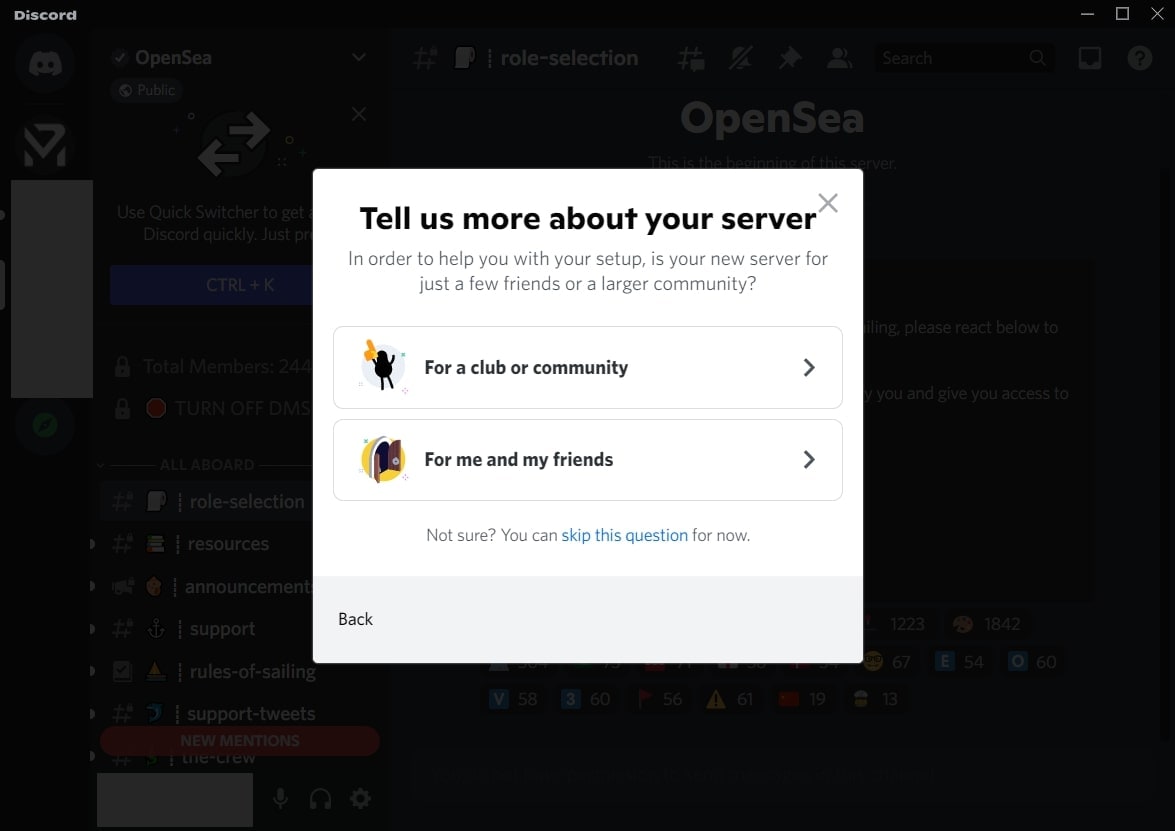
1. Create your Discord Server
Step1 Open your Discord and hit the “Plus” icon given on the left side. It will open a small menu where you can select a template to start or create your own server.
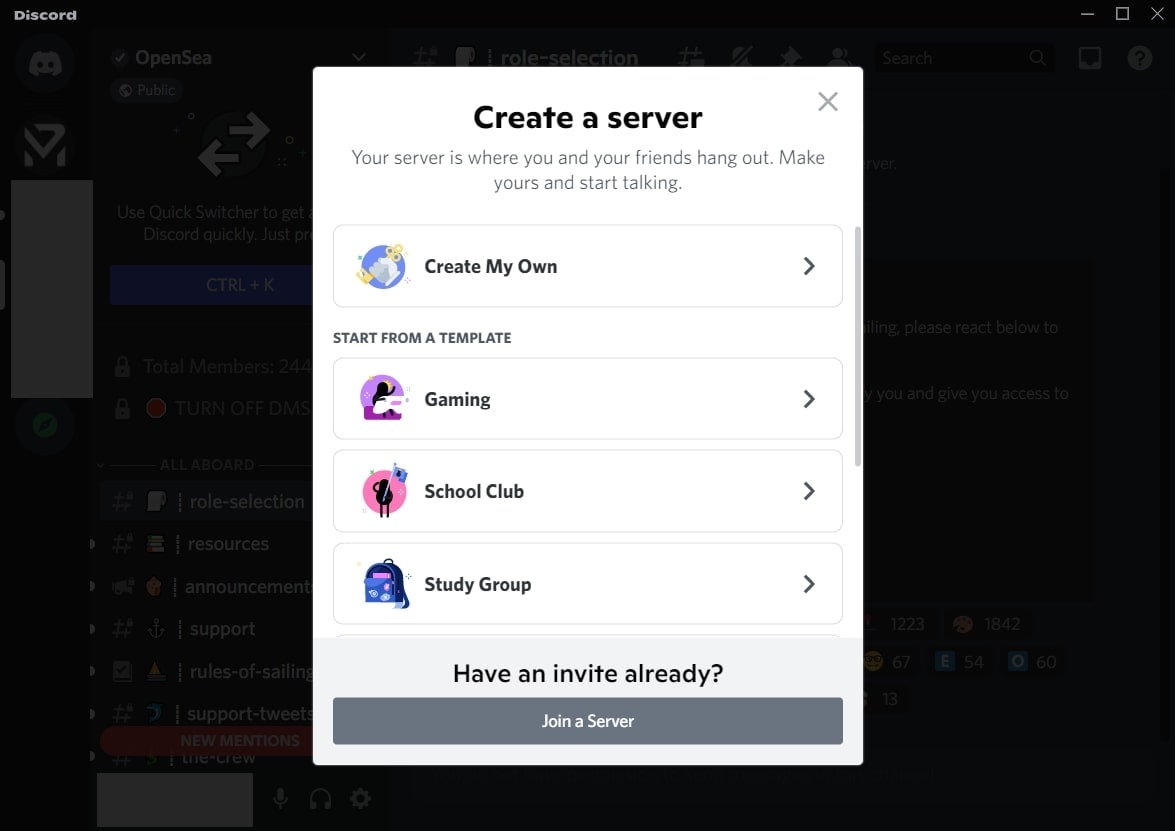
Step2 If you want to create your server, click “Create My Own.” Now select the type of server you want to create. Once done, create the server name and click the “Create” button.
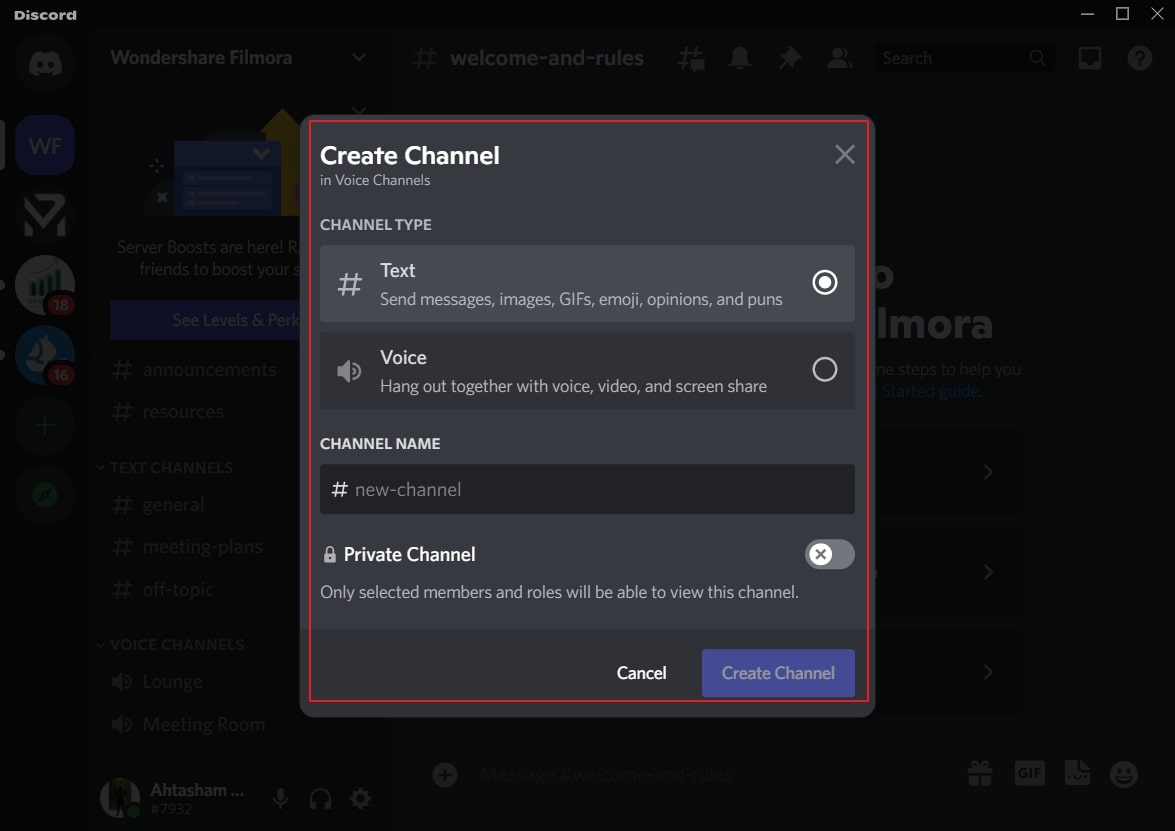
2. Create your Discord Channel
Step1 To create a Discord channel, open any of your servers from the left side. Now tap on the “Plus” icon adjacent to “Voice Channels.”
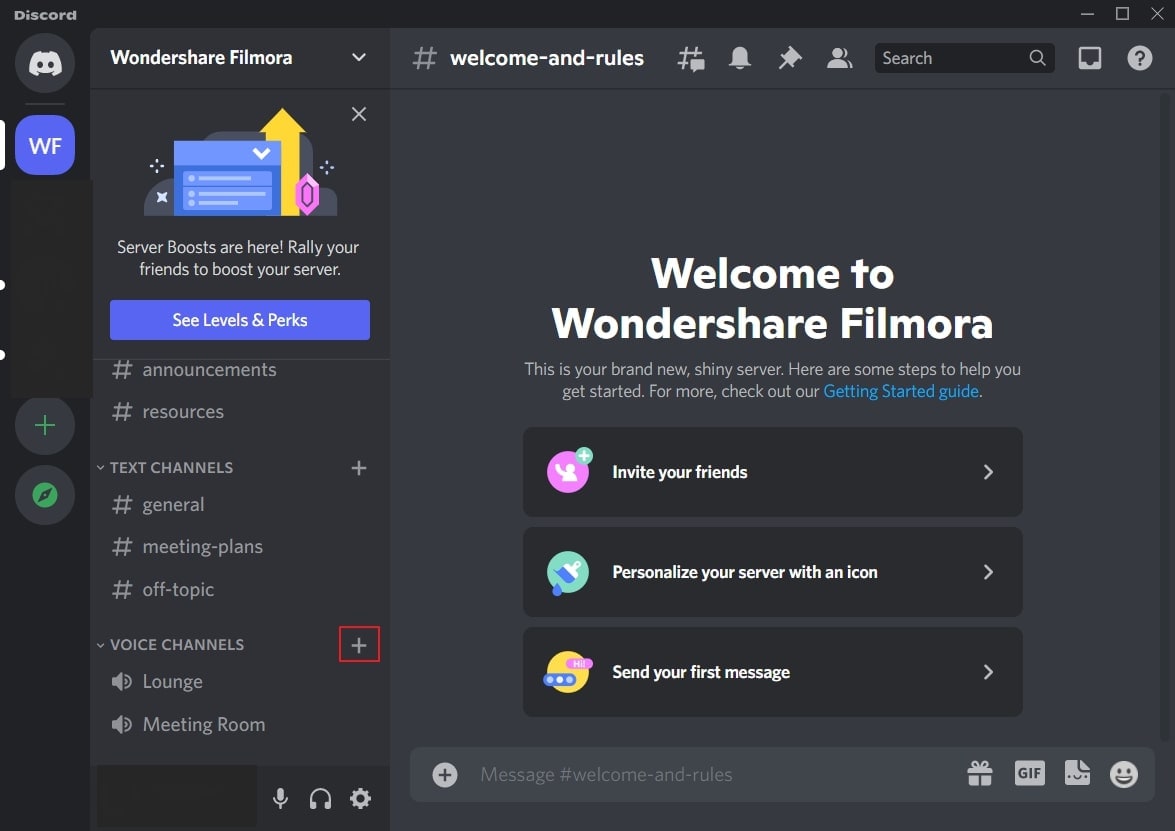
Step2 You can either create a “Text” channel or a “Voice” channel. After choosing the channel type, create a channel name. You can also enable the “Private Channel” option to create a private channel. Once done, click on the “Create Channel” button.
Part 3: How to Stream Videos on Discord
Once you have created a server and channel, you can begin your live streaming. Discord provides you with an option through which you can stream your videos instantly. To know the process, check the below steps:
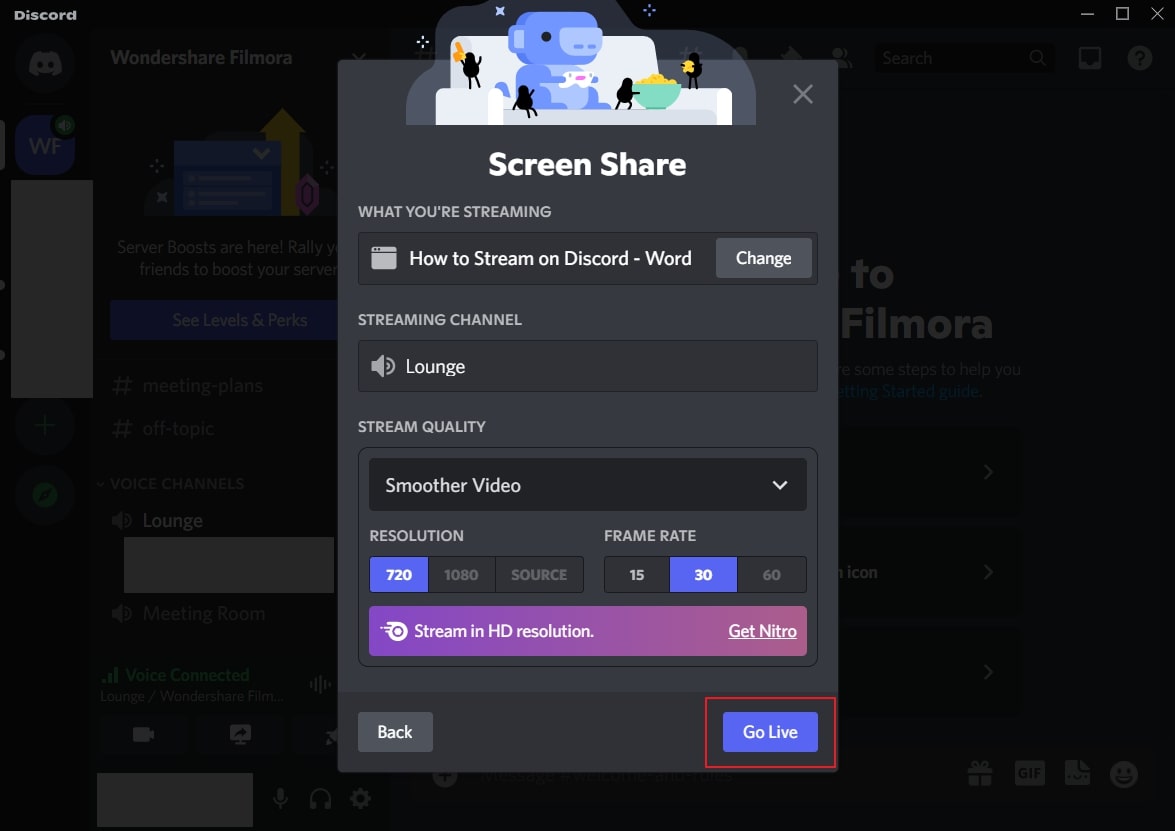
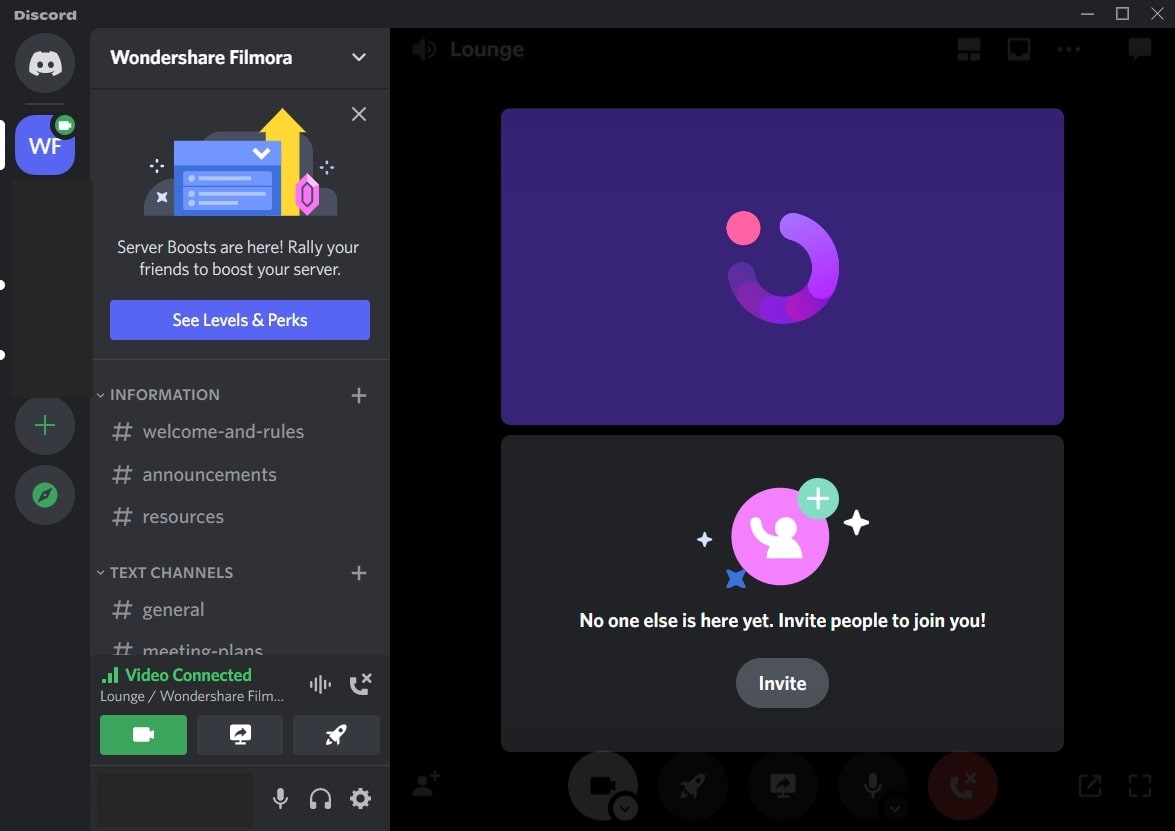
Step1 Open Discord and navigate to your desired server. Now proceed to your voice channel and click on the “Share Your Screen” button given below.
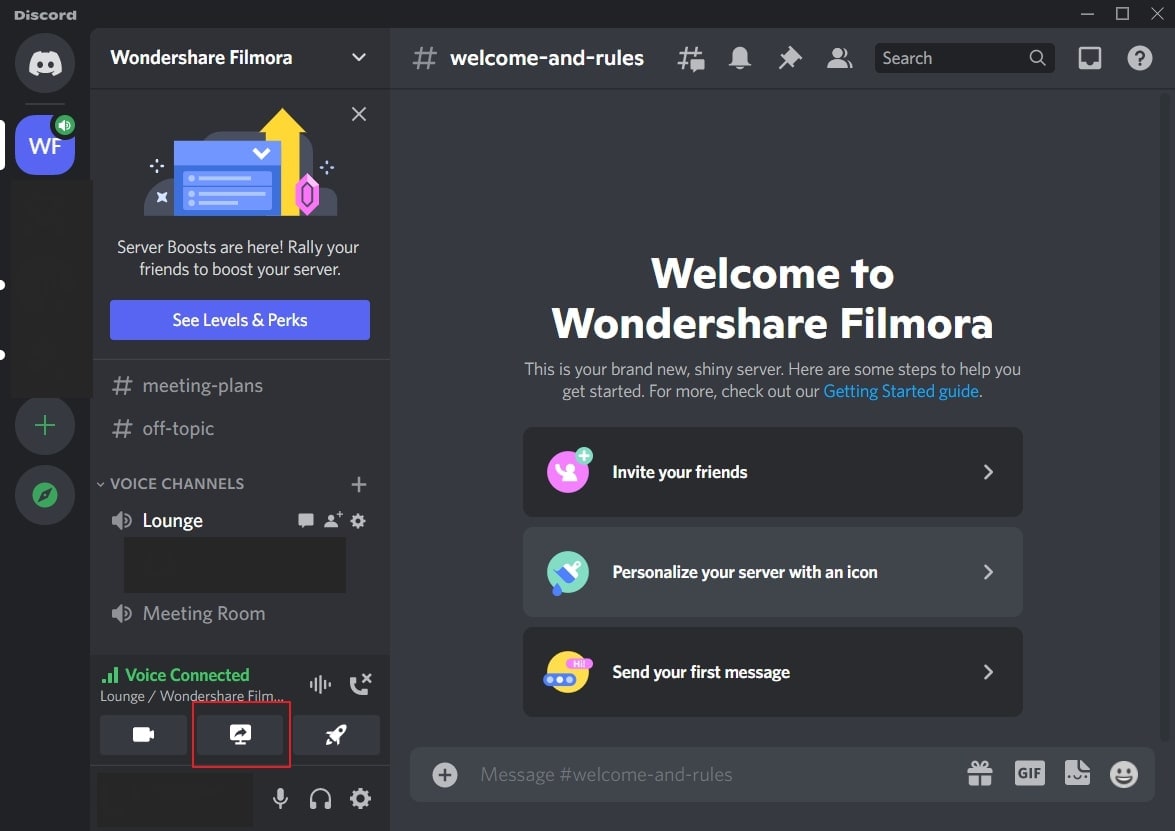

Step2 Select the screen you want to stream in the “Applications” tab. From the new menu, you can adjust the stream quality, such as resolution and frame rate. After adjusting the live streaming settings, click on the “Go Live” button.
Part 4: How to Stream your Webcam on Discord
Do you want to give a tutorial session through your webcam? Through live webcam streaming, you can demonstrate a particular product while giving facial expressions. Using Discord, you can stream your webcam with a single click.
Step1 Once you have opened a server on Discord, go to your Voice channel. From there, tap on the “Camera” icon above your username.
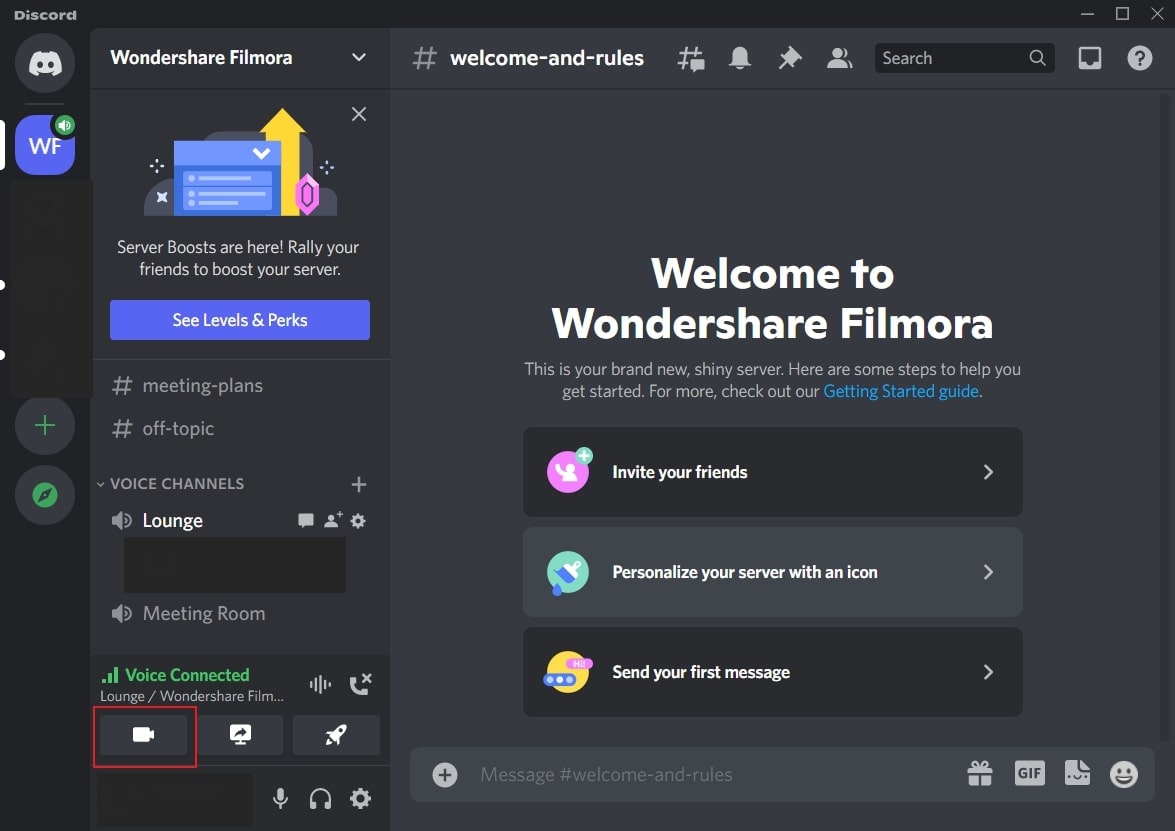
Step2 It will open a new screen through which you can start an activity or share your screen. Moreover, you can also invite others to join your webcam streaming. Once done with your activities, click on the “Red” button to disconnect.
Part 5: How to Change the Shared Screen on Discord
Do you want to change a shared screen on Discord? If you want to open a presentation, web browser, or any other application, Discord can easily change the shared screen. Through this facility, you can quickly shift between multiple screens without hassle.
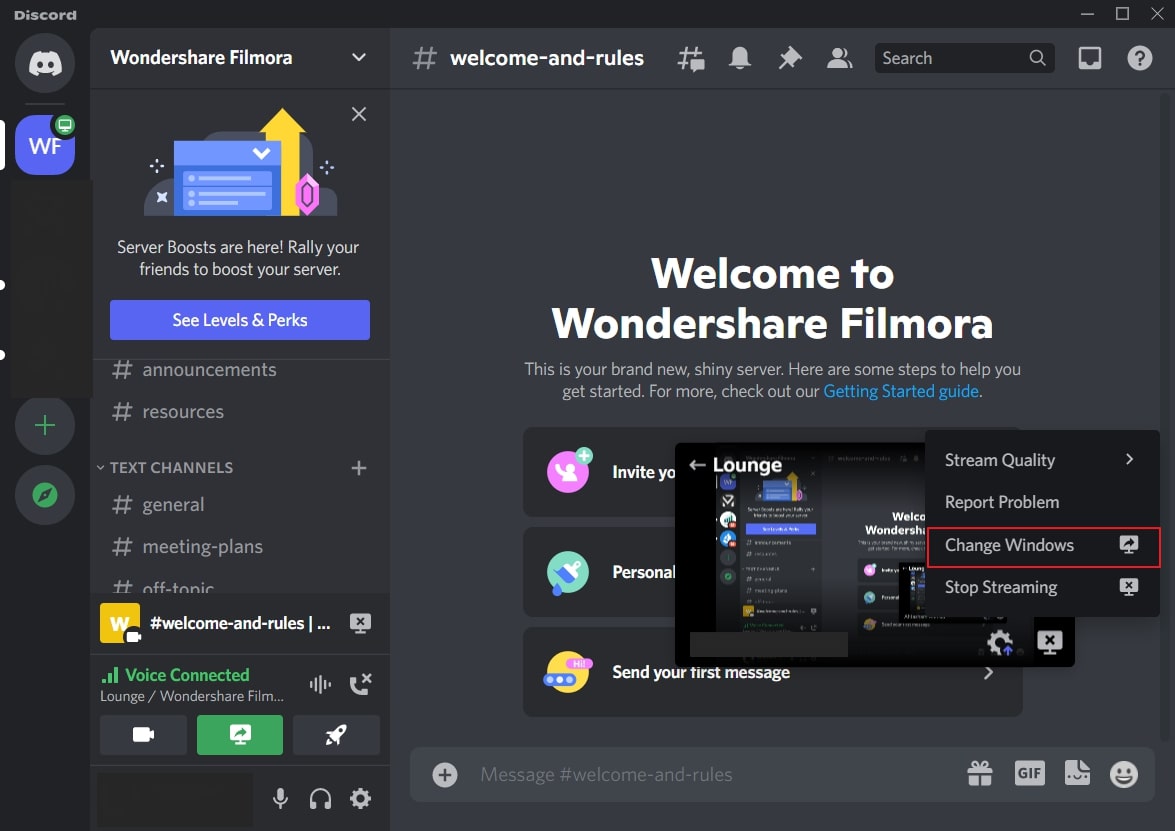
Step1 If you are live streaming your shared screen, you can instantly change windows on Discord. For this, click on the “Gear” icon on your live streaming screen to open settings.

Step2 From the settings menu, click on “Change Windows.” Now select the screen that you want to change. After choosing the required screen, hit on the “Go Live” button.
Part 6: How to Stream Discord on my Mobile Phone?
Discord has the same operating systems on Android and iOS devices. That’s why the steps to stream on Discord on both these devices are the same.
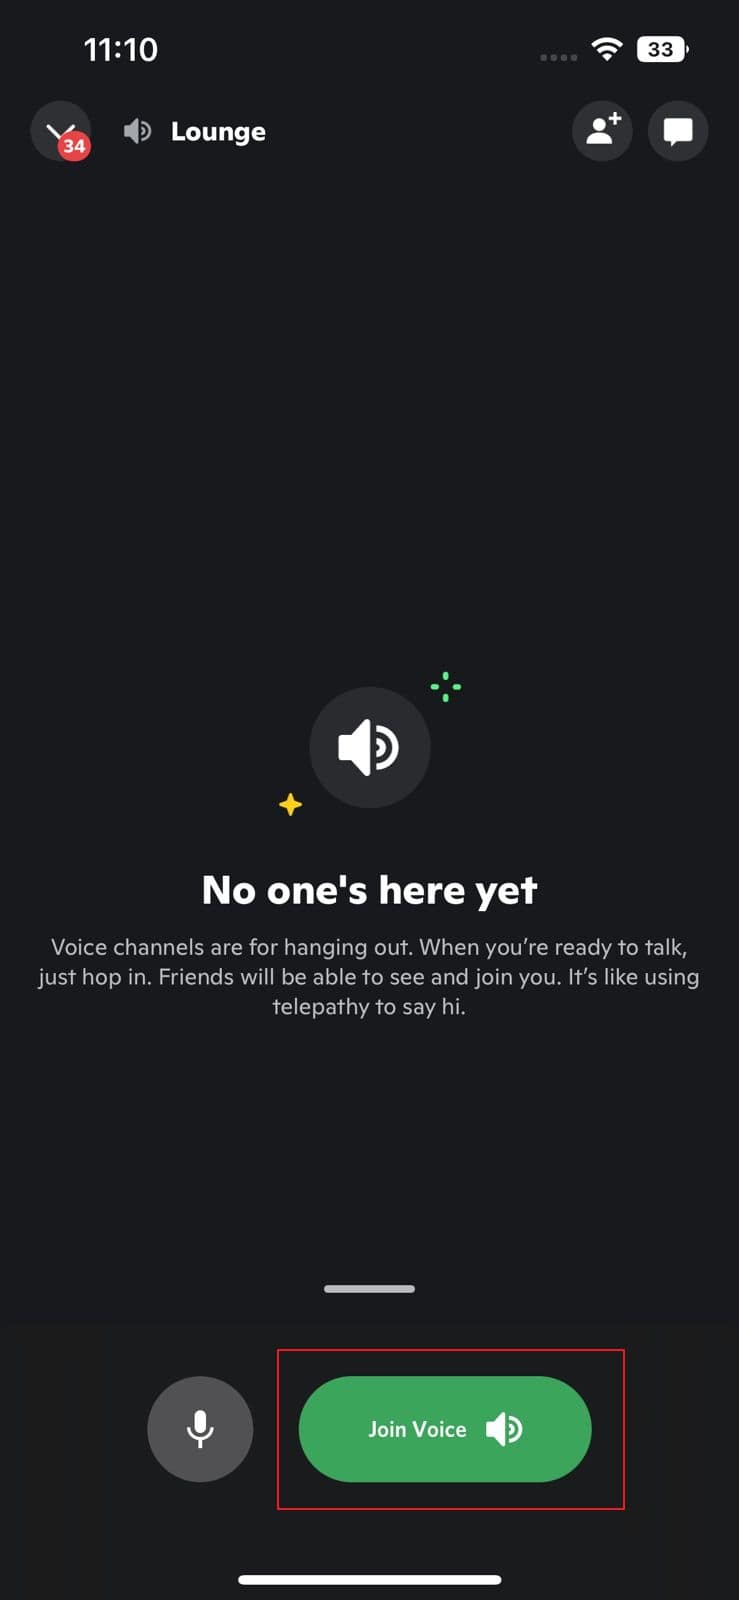
Step1 Open Discord on your mobile and select the desired server. Now choose the voice channel through which you want to live stream Discord.

Step2 Now tap “Join Voice” to initiate live streaming. Here, you can turn on your camera and share the screen. You can also mute your voice from the given options. Once done with live streaming, tap on the “Red” button.
Part 7: FAQs about the live stream on Discord
1. How many people can watch my Discord live simultaneously?
During the pandemic, up to 50 people were able to join live streaming on Discord. Normally, 25 people can watch live streaming on Discord simultaneously.
2. How to add the game types on Discord?
Open Discord and navigate to the “User Settings” given at the bottom of the screen. Select the “Game Activity” section and activate the option “Display currently running game as a status message.” Now click on the “Add it” button and choose the type of games you want to play. Once done, Discord would be able to detect the type of game automatically.
3. How to share a video on Discord?
On your computer, launch Discord and go to your desired channel. On the chat box space, click on the “Plus” icon. Now browse the video from your system that you want to share. Click on the “Open” button and select the “Upload” option. By doing so, you can easily share videos.
For mobile users, go to your Discord app and choose the preferred channel. On the left side of the typing area, you can see the “Image” icon. Tap on this option and choose the video you want to share from your phone. Now hit the “Arrow” button to send the selected video.
Bonus Tip: Easily Record and Edit your Stream with Filmora
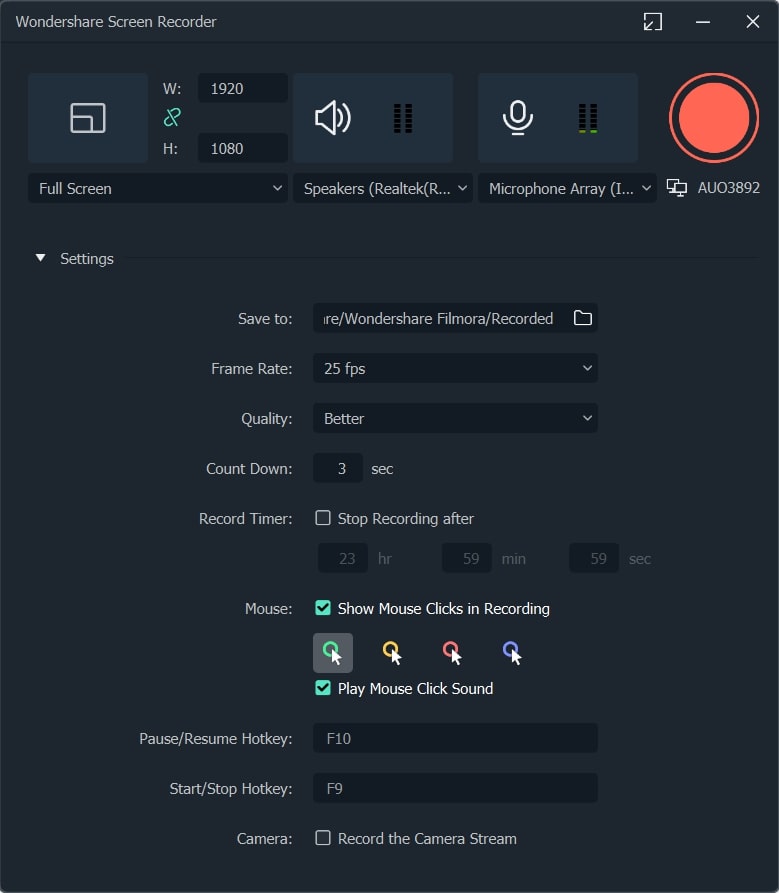
To save and edit your live stream sessions, we will highly recommend you the screen recorder of Wondershare Filmora . Through this screen recorder, you can capture your live-streaming session on Discord in the best possible quality.
Using this screen recorder, you can capture your desired area during live streaming. Once you capture your live-streaming session, you can edit it on this platform. Using the editing tool of Filmora, you can cut, crop, resize, and modify your screen recording efficiently.
Conclusion
Have you ever streamed on Discord before? Discord is a great communication platform that provides advanced features. With its vast flexibility, you can create private servers and channels. This article can guide you to learn how to go live on Discord. We have also suggested Wondershare Filmora, which can help you to screen record and edit your live streaming sessions on Discord.
Free Download For Win 7 or later(64-bit)
Free Download For macOS 10.14 or later
Part 1: What is Discord?
Discord is a popular platform created to offer a better communication experience between game players. The major reason for the massive recognition of Discord is its ability to generate servers instantly. Game players and other users can instantly create voice or text servers for enhanced communication.
Discord provides excellent flexibility to users by providing high-quality audio services with no background noise. Even if your friends are in different parts of the world, you can chat with them smoothly. You can create private and public servers in Discord to communicate with people having similar interests.
Along with using Discord Voice and Text chat features, you can live stream your gameplays. The live streaming on Discord won’t be a public show, as it will only be confined to your selected server. Through this, you can ask your friends for assistance while playing games. Moreover, Discord is also capable of capturing other screens. Hence, it’s a great platform for professionals, game lovers, and other individuals to communicate efficiently.
Part 2: Prerequisites for Stream on Discord
Many social media platforms put restrictions on users for live streaming. Some platforms require you to have a specific number of followers in order to conduct live streaming. However, in Discord, you don’t have to worry about such restrictions. By creating a server and channel on Discord, you can easily go for live streaming. Check the below prerequisites for performing a live stream on Discord:
1. Create your Discord Server
Step1 Open your Discord and hit the “Plus” icon given on the left side. It will open a small menu where you can select a template to start or create your own server.
Step2 If you want to create your server, click “Create My Own.” Now select the type of server you want to create. Once done, create the server name and click the “Create” button.
2. Create your Discord Channel
Step1 To create a Discord channel, open any of your servers from the left side. Now tap on the “Plus” icon adjacent to “Voice Channels.”
Step2 You can either create a “Text” channel or a “Voice” channel. After choosing the channel type, create a channel name. You can also enable the “Private Channel” option to create a private channel. Once done, click on the “Create Channel” button.
Part 3: How to Stream Videos on Discord
Once you have created a server and channel, you can begin your live streaming. Discord provides you with an option through which you can stream your videos instantly. To know the process, check the below steps:
Step1 Open Discord and navigate to your desired server. Now proceed to your voice channel and click on the “Share Your Screen” button given below.
Step2 Select the screen you want to stream in the “Applications” tab. From the new menu, you can adjust the stream quality, such as resolution and frame rate. After adjusting the live streaming settings, click on the “Go Live” button.
Part 4: How to Stream your Webcam on Discord
Do you want to give a tutorial session through your webcam? Through live webcam streaming, you can demonstrate a particular product while giving facial expressions. Using Discord, you can stream your webcam with a single click.
Step1 Once you have opened a server on Discord, go to your Voice channel. From there, tap on the “Camera” icon above your username.
Step2 It will open a new screen through which you can start an activity or share your screen. Moreover, you can also invite others to join your webcam streaming. Once done with your activities, click on the “Red” button to disconnect.
Part 5: How to Change the Shared Screen on Discord
Do you want to change a shared screen on Discord? If you want to open a presentation, web browser, or any other application, Discord can easily change the shared screen. Through this facility, you can quickly shift between multiple screens without hassle.
Step1 If you are live streaming your shared screen, you can instantly change windows on Discord. For this, click on the “Gear” icon on your live streaming screen to open settings.
Step2 From the settings menu, click on “Change Windows.” Now select the screen that you want to change. After choosing the required screen, hit on the “Go Live” button.
Part 6: How to Stream Discord on my Mobile Phone?
Discord has the same operating systems on Android and iOS devices. That’s why the steps to stream on Discord on both these devices are the same.
Step1 Open Discord on your mobile and select the desired server. Now choose the voice channel through which you want to live stream Discord.
Step2 Now tap “Join Voice” to initiate live streaming. Here, you can turn on your camera and share the screen. You can also mute your voice from the given options. Once done with live streaming, tap on the “Red” button.
Part 7: FAQs about the live stream on Discord
1. How many people can watch my Discord live simultaneously?
During the pandemic, up to 50 people were able to join live streaming on Discord. Normally, 25 people can watch live streaming on Discord simultaneously.
2. How to add the game types on Discord?
Open Discord and navigate to the “User Settings” given at the bottom of the screen. Select the “Game Activity” section and activate the option “Display currently running game as a status message.” Now click on the “Add it” button and choose the type of games you want to play. Once done, Discord would be able to detect the type of game automatically.
3. How to share a video on Discord?
On your computer, launch Discord and go to your desired channel. On the chat box space, click on the “Plus” icon. Now browse the video from your system that you want to share. Click on the “Open” button and select the “Upload” option. By doing so, you can easily share videos.
For mobile users, go to your Discord app and choose the preferred channel. On the left side of the typing area, you can see the “Image” icon. Tap on this option and choose the video you want to share from your phone. Now hit the “Arrow” button to send the selected video.
Bonus Tip: Easily Record and Edit your Stream with Filmora
To save and edit your live stream sessions, we will highly recommend you the screen recorder of Wondershare Filmora . Through this screen recorder, you can capture your live-streaming session on Discord in the best possible quality.
Using this screen recorder, you can capture your desired area during live streaming. Once you capture your live-streaming session, you can edit it on this platform. Using the editing tool of Filmora, you can cut, crop, resize, and modify your screen recording efficiently.
Conclusion
Have you ever streamed on Discord before? Discord is a great communication platform that provides advanced features. With its vast flexibility, you can create private servers and channels. This article can guide you to learn how to go live on Discord. We have also suggested Wondershare Filmora, which can help you to screen record and edit your live streaming sessions on Discord.
Free Download For Win 7 or later(64-bit)
Free Download For macOS 10.14 or later
Cut Through Background Noise in Discord Conversations Using VoiceMod
How To Use Voicemod On Discord

Richard Bennett
Mar 27, 2024• Proven solutions
A voice changer will allow you to prank friends, create content, and most of all, secure your presence by maintaining anonymity. With it, you can turn your voice into several unique and exciting voices to serve any purpose you deem fit.
And when it comes to voice changers, none is as easy to operate as the Voicemod in Discord. Its claim to fame is that it features numerous voice options to choose from.
With Vociemod, you have to simply run the program in the background and select your desired voice!
Read on as we discuss how to use Voicemod on Discord in detail:
In this article
Part 1: How To Use Voice Changer Voicemod For Discord On Desktop Computer
Part 2: How To Fix Voicemod Not Working Discord?
Part 3: How To Change Voice For Discord On Mobile?
Part 1: How To Use Voice Changer Voicemod For Discord On Desktop Computer
Voicemod is arguably one of the best voice changer tools available on the internet for its excellent features.
But before we jump straight into using Voicemod for Discord, you must know how to install one on your desktop Mac/PC.
Here’s how to install Voicemod
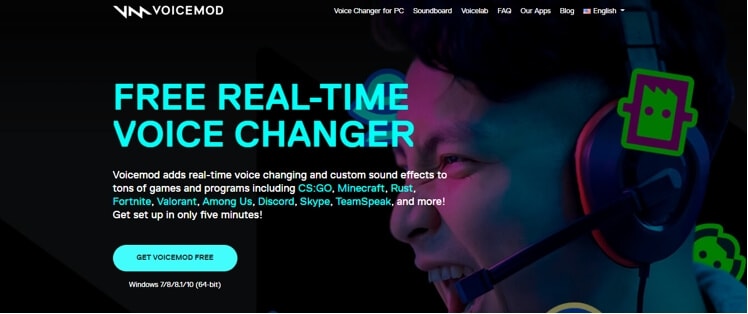
- Visit the Voicemod website to begin the download process.
- You’ll see the button “Get Voicemod Free” on the screen. Click it!
- Upon clicking, the site will ask you to sign in to your account from Discord, Twitch, to Google. Use your Discord login details to sign in.
- After you’re signed in, the “.exe” file will be downloaded to your PC/Mac’s download folder. Open the “.exe” file the moment it’s downloaded.
- An install wizard will open up. Navigate through the wizard’s installation process to install the program on your PC/Mac.
- After installation is complete, the installation wizard will ask to restart your windows’ Mac or PC.
You can skip it, but it’s best to restart it for smooth operations.
Once your Mac/PC restarts, you’ll see the Voicemod app icon on your desktop screen.
Now that you have successfully installed the voice changer Voicemod app into your desktop computer, let’s dive into knowing how to use Voicemod on Discord!
Here’s how to use voice changer on Discord
- Click the Vociemod icon on the desktop to open the app. If you can’t find it there, click the “windows icon” located at the screen’s bottom-left. Just type “Voicemod,” and the program will show up. Double click it to get it opened.
- When the app opens up, you’ll have to choose the output and input it will use. If you’re wondering, why the output? This is to give you an insight into what your voice will sound like on each filter.
Once it’s done, you can play around with different filters!
Every day, you’ll get new free filters to use; however, to unlock and access all filters, you need to upgrade to the “pro-version” of voice changer Voicemod.
On the other hand, if you only need a few filters, the “basic-version” should suffice.
Apart from that, you can unlock an additional free filter in your app by sharing it on your social media accounts.

Step 1
To set up Voicemod with Discord, open your discord account and go to the settings (gear icon) placed at the screen’s bottom-left corner.
Step 2
Click the “Voice and Video” option right under the app settings.
Step 3
To make Voicemod usable, you’ll have to change Voice settings. Within the “Input Device” option, select the option that says “Microphone Voicemod Virtual Audio.”
Step 4
After you have changed settings, you can easily change the voice within the program. Not only this, but other users can also hear your audio alteration.
Step 5
With the “basic version,” you’ll have seven free voice choices that will change each day. On the contrary, with the “pro-version,” you’ll gain access to more than 80 different voice options.
So, if you’re searching for an easy and simple voice-changing app to use, look no further than Voicemod!
Part 2: How To Fix Voicemod Not Working Discord?
Is your voice changer Voicemod not working on Discord? No worries, you can troubleshoot the issues with a few basic steps.
Here are some ways you can use to fix Voicemod not working in Discord:
Method 1: Restart Your Windows PC/Mac
Though it’s not a technical solution, restarting your desktop computer fixes incorrect settings by rebooting them and solves many problems connected with your computer system, programs, and hardware.
So, when your Voicemod suddenly ceases to work in Discord, make sure to restart your Windows PC/Mac before going any further, as it’s the first step in fixing voice issues.
If restarting doesn’t help, slide to the next step!
Method 2: Make Sure The Mic Is Properly Set
The next step is to check if the mic works correctly. This is because faulty settings may stop voice changer Voicemod from operating correctly.
Just follow the steps below to resolve it:
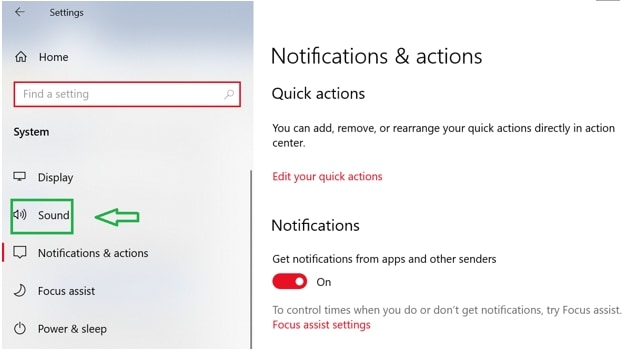
- On the keyboard, press the “Win” logo and the “I” key simultaneously to open Windows settings. Click “System.”
- On the left, you’ll see the option “Sound.” Click it.
- First, you have to test the microphone! To do so, choose the “Headset” option rather than the Voicemod microphone under the “Input” section
- Click “Device properties & test microphone”
- Make sure to uncheck the “disable” box and keep the volume section 100
- Click the “Start test” button and speak into the microphone
- After that, click “Stop test.” If the greatest value it shows is above “0”, then your microphone works correctly
Now, restart your Voicemod app to see if it’s working properly or not! If the issue still persists, jump to the next solution.
Method 3: Install Windows Updates
If you use Windows 10, it has two kinds of updates that offer performance boost and security patches. Sometimes, an update can fix a few driver and software conflicts automatically.
You can quickly solve the voice chat problem by simply updating the system settings. Here’s how to update your Windows 10:
- Open your windows setting by pressing the “Windows button” and the “I” key together.
- Click on “Update and Security”
- Click the “Check for Updates” button. If an update is found, it will install automatically on the system
Make sure to repeat this process until it says you’re up-to-date. Then, restart the PC. Check whether the Vociemod is properly working or not!
If not, try our next option!
Method 4:Re-Install Voice Changer Voicemod Drivers
In many instances, the issue signifies that you’re using outdated or faulty drivers. To troubleshoot this, simply re-install your Voicemod driver, and you’ll be good to go!
First, uninstall your Voicemod driver from the windows PC/Mac. Here’s how to do it:
- On the keyboard, press the “Windows button” as well as the “I” key to bring up the “Run box”
- Paste or type “devmgmt.msc” and click “OK.” This will open the “Device Manager”
- Click the “expand” option of “Audio Inputs & Outputs.”
- Click the “Microphone WMD” and choose the “Uninstall device” option
- A pop-up window will appear. Click the “Uninstall” button
- Restart the PC
Install the voice changer Voicemod again, whether automatically or manually, and see if it works!
Part 3: How To Change Voice For Discord On Mobile?
“Voicemod clips” is the version for both Apple and Android devices. The app will help you make high-quality content using its wide selection of one-of-a-kind effects, which will change your voice so much that you won’t recognize yourself!
In addition to that, you can add filters, which are connected to your cell phone’s camera to create funny, interesting videos.
Additionally, you’ll have the option to choose from 10 different voices. Plus, you can also make unlimited videos and audio from the humorous to the terrifying.
Some of the Voicemod voices on mobile include male-to-female, different robot effects, famous celebrities, scary voices, and much more. In short, everything is based on how you would like to modify your voice!
Not just that, you can also cross-share creative videos and audio to popular social networking platforms such as Facebook, Twitter, Instagram, TikTok, and Snapchat using your smartphone.
Curious to know how to change your voice for Discord on mobile? Here are step-by-step instructions:
- Make sure the Voicemod app is downloaded on your Apple or Android device and appropriately configured
- Open Discord
- Tap the “cogwheel icon” near your name and avatar
- You’ll see the “settings” page
- Within it, tap the “Voice & Video” option
- Tap Voicemod under the “Input Device” option and the headset under the “Output Device” option and tap escape. You’ll have access to numerous exciting sounds
Richard Bennett
Richard Bennett is a writer and a lover of all things video.
Follow @Richard Bennett
Richard Bennett
Mar 27, 2024• Proven solutions
A voice changer will allow you to prank friends, create content, and most of all, secure your presence by maintaining anonymity. With it, you can turn your voice into several unique and exciting voices to serve any purpose you deem fit.
And when it comes to voice changers, none is as easy to operate as the Voicemod in Discord. Its claim to fame is that it features numerous voice options to choose from.
With Vociemod, you have to simply run the program in the background and select your desired voice!
Read on as we discuss how to use Voicemod on Discord in detail:
In this article
Part 1: How To Use Voice Changer Voicemod For Discord On Desktop Computer
Part 2: How To Fix Voicemod Not Working Discord?
Part 3: How To Change Voice For Discord On Mobile?
Part 1: How To Use Voice Changer Voicemod For Discord On Desktop Computer
Voicemod is arguably one of the best voice changer tools available on the internet for its excellent features.
But before we jump straight into using Voicemod for Discord, you must know how to install one on your desktop Mac/PC.
Here’s how to install Voicemod
- Visit the Voicemod website to begin the download process.
- You’ll see the button “Get Voicemod Free” on the screen. Click it!
- Upon clicking, the site will ask you to sign in to your account from Discord, Twitch, to Google. Use your Discord login details to sign in.
- After you’re signed in, the “.exe” file will be downloaded to your PC/Mac’s download folder. Open the “.exe” file the moment it’s downloaded.
- An install wizard will open up. Navigate through the wizard’s installation process to install the program on your PC/Mac.
- After installation is complete, the installation wizard will ask to restart your windows’ Mac or PC.
You can skip it, but it’s best to restart it for smooth operations.
Once your Mac/PC restarts, you’ll see the Voicemod app icon on your desktop screen.
Now that you have successfully installed the voice changer Voicemod app into your desktop computer, let’s dive into knowing how to use Voicemod on Discord!
Here’s how to use voice changer on Discord
- Click the Vociemod icon on the desktop to open the app. If you can’t find it there, click the “windows icon” located at the screen’s bottom-left. Just type “Voicemod,” and the program will show up. Double click it to get it opened.
- When the app opens up, you’ll have to choose the output and input it will use. If you’re wondering, why the output? This is to give you an insight into what your voice will sound like on each filter.
Once it’s done, you can play around with different filters!
Every day, you’ll get new free filters to use; however, to unlock and access all filters, you need to upgrade to the “pro-version” of voice changer Voicemod.
On the other hand, if you only need a few filters, the “basic-version” should suffice.
Apart from that, you can unlock an additional free filter in your app by sharing it on your social media accounts.
Step 1
To set up Voicemod with Discord, open your discord account and go to the settings (gear icon) placed at the screen’s bottom-left corner.
Step 2
Click the “Voice and Video” option right under the app settings.
Step 3
To make Voicemod usable, you’ll have to change Voice settings. Within the “Input Device” option, select the option that says “Microphone Voicemod Virtual Audio.”
Step 4
After you have changed settings, you can easily change the voice within the program. Not only this, but other users can also hear your audio alteration.
Step 5
With the “basic version,” you’ll have seven free voice choices that will change each day. On the contrary, with the “pro-version,” you’ll gain access to more than 80 different voice options.
So, if you’re searching for an easy and simple voice-changing app to use, look no further than Voicemod!
Part 2: How To Fix Voicemod Not Working Discord?
Is your voice changer Voicemod not working on Discord? No worries, you can troubleshoot the issues with a few basic steps.
Here are some ways you can use to fix Voicemod not working in Discord:
Method 1: Restart Your Windows PC/Mac
Though it’s not a technical solution, restarting your desktop computer fixes incorrect settings by rebooting them and solves many problems connected with your computer system, programs, and hardware.
So, when your Voicemod suddenly ceases to work in Discord, make sure to restart your Windows PC/Mac before going any further, as it’s the first step in fixing voice issues.
If restarting doesn’t help, slide to the next step!
Method 2: Make Sure The Mic Is Properly Set
The next step is to check if the mic works correctly. This is because faulty settings may stop voice changer Voicemod from operating correctly.
Just follow the steps below to resolve it:
- On the keyboard, press the “Win” logo and the “I” key simultaneously to open Windows settings. Click “System.”
- On the left, you’ll see the option “Sound.” Click it.
- First, you have to test the microphone! To do so, choose the “Headset” option rather than the Voicemod microphone under the “Input” section
- Click “Device properties & test microphone”
- Make sure to uncheck the “disable” box and keep the volume section 100
- Click the “Start test” button and speak into the microphone
- After that, click “Stop test.” If the greatest value it shows is above “0”, then your microphone works correctly
Now, restart your Voicemod app to see if it’s working properly or not! If the issue still persists, jump to the next solution.
Method 3: Install Windows Updates
If you use Windows 10, it has two kinds of updates that offer performance boost and security patches. Sometimes, an update can fix a few driver and software conflicts automatically.
You can quickly solve the voice chat problem by simply updating the system settings. Here’s how to update your Windows 10:
- Open your windows setting by pressing the “Windows button” and the “I” key together.
- Click on “Update and Security”
- Click the “Check for Updates” button. If an update is found, it will install automatically on the system
Make sure to repeat this process until it says you’re up-to-date. Then, restart the PC. Check whether the Vociemod is properly working or not!
If not, try our next option!
Method 4:Re-Install Voice Changer Voicemod Drivers
In many instances, the issue signifies that you’re using outdated or faulty drivers. To troubleshoot this, simply re-install your Voicemod driver, and you’ll be good to go!
First, uninstall your Voicemod driver from the windows PC/Mac. Here’s how to do it:
- On the keyboard, press the “Windows button” as well as the “I” key to bring up the “Run box”
- Paste or type “devmgmt.msc” and click “OK.” This will open the “Device Manager”
- Click the “expand” option of “Audio Inputs & Outputs.”
- Click the “Microphone WMD” and choose the “Uninstall device” option
- A pop-up window will appear. Click the “Uninstall” button
- Restart the PC
Install the voice changer Voicemod again, whether automatically or manually, and see if it works!
Part 3: How To Change Voice For Discord On Mobile?
“Voicemod clips” is the version for both Apple and Android devices. The app will help you make high-quality content using its wide selection of one-of-a-kind effects, which will change your voice so much that you won’t recognize yourself!
In addition to that, you can add filters, which are connected to your cell phone’s camera to create funny, interesting videos.
Additionally, you’ll have the option to choose from 10 different voices. Plus, you can also make unlimited videos and audio from the humorous to the terrifying.
Some of the Voicemod voices on mobile include male-to-female, different robot effects, famous celebrities, scary voices, and much more. In short, everything is based on how you would like to modify your voice!
Not just that, you can also cross-share creative videos and audio to popular social networking platforms such as Facebook, Twitter, Instagram, TikTok, and Snapchat using your smartphone.
Curious to know how to change your voice for Discord on mobile? Here are step-by-step instructions:
- Make sure the Voicemod app is downloaded on your Apple or Android device and appropriately configured
- Open Discord
- Tap the “cogwheel icon” near your name and avatar
- You’ll see the “settings” page
- Within it, tap the “Voice & Video” option
- Tap Voicemod under the “Input Device” option and the headset under the “Output Device” option and tap escape. You’ll have access to numerous exciting sounds
Richard Bennett
Richard Bennett is a writer and a lover of all things video.
Follow @Richard Bennett
Also read:
- [New] Elevate Conversational Impact How to Pin Messages Wisely in Discord for 2024
- [New] In 2024, Elevate Chat Dynamics Pin Messages with Confidence in Discord
- [New] In 2024, Step-by-Step Guide Screen Casts on Discord
- [New] Master Your Presence The Complete Guide to Altering Status & Avatars
- [Updated] In 2024, Create Meme with Imgflip
- [Updated] M1 MacBook Air Video Editor's Dream Machine for 2024
- 2024 Approved Counterclockwise Chronicles IPhone's Video Tutorial
- 2024 Approved From Setting Up to Broadcasting A DiscoGuide
- 6 Futile ChatGPT Extensions You Can Do Without
- Best 3 Software to Transfer Files to/from Your Samsung Galaxy F14 5G via a USB Cable | Dr.fone
- Enhancing Pointer Access for Low-Vision Users on Windows 11
- Ensure Peak Protection for Your Windows Machine: Follow Our 5-Step Advice
- Pinnacle Alternatives to Discord Voice Groups
- Transform Your Photos with Nixplay Iris's Cloud Capability
- Title: [Updated] 2024 Approved Discord's Broadcasting Features Unveiled A Step-by-Step Guide
- Author: Timothy
- Created at : 2024-10-24 17:29:09
- Updated at : 2024-10-29 19:32:00
- Link: https://discord-videos.techidaily.com/updated-2024-approved-discords-broadcasting-features-unveiled-a-step-by-step-guide/
- License: This work is licensed under CC BY-NC-SA 4.0.