![[Updated] 2024 Approved Stepwise Methodology for Launching a Discord Channel](https://thmb.techidaily.com/ee5c0d7e477d155cf7c4d7a41bb4baf523bd4dd370c1eec84bd95b2e762714db.png)
"[Updated] 2024 Approved Stepwise Methodology for Launching a Discord Channel"
Stepwise Methodology for Launching a Discord Channel
Discord is a great communication tool that also offers live streaming services. You can use this platform to engage and connect to your audience by conducting a live session. Through its “Voice Chat” feature, you can directly interact with your audience in a comfortable environment. If you are unaware of how to go live on Discord, this article can help you.
For your assistance, this article will instantly address how to live stream on Discord. Let’s dig into the details.
- How to Stream Videos on Discord
- How to Stream your Webcam on Discord
- How to Change the Shared Screen on Discord
- How to Stream Discord on my Mobile Phone?
- FAQs about the live stream on Discord
- Bonus Tip: Easily Record and Edit your Stream with Filmora
Part 1: What is Discord?
Discord is a popular platform created to offer a better communication experience between game players. The major reason for the massive recognition of Discord is its ability to generate servers instantly. Game players and other users can instantly create voice or text servers for enhanced communication.
Discord provides excellent flexibility to users by providing high-quality audio services with no background noise. Even if your friends are in different parts of the world, you can chat with them smoothly. You can create private and public servers in Discord to communicate with people having similar interests.
Along with using Discord Voice and Text chat features, you can live stream your gameplays. The live streaming on Discord won’t be a public show, as it will only be confined to your selected server. Through this, you can ask your friends for assistance while playing games. Moreover, Discord is also capable of capturing other screens. Hence, it’s a great platform for professionals, game lovers, and other individuals to communicate efficiently.
Part 2: Prerequisites for Stream on Discord
Many social media platforms put restrictions on users for live streaming. Some platforms require you to have a specific number of followers in order to conduct live streaming. However, in Discord, you don’t have to worry about such restrictions. By creating a server and channel on Discord, you can easily go for live streaming. Check the below prerequisites for performing a live stream on Discord:
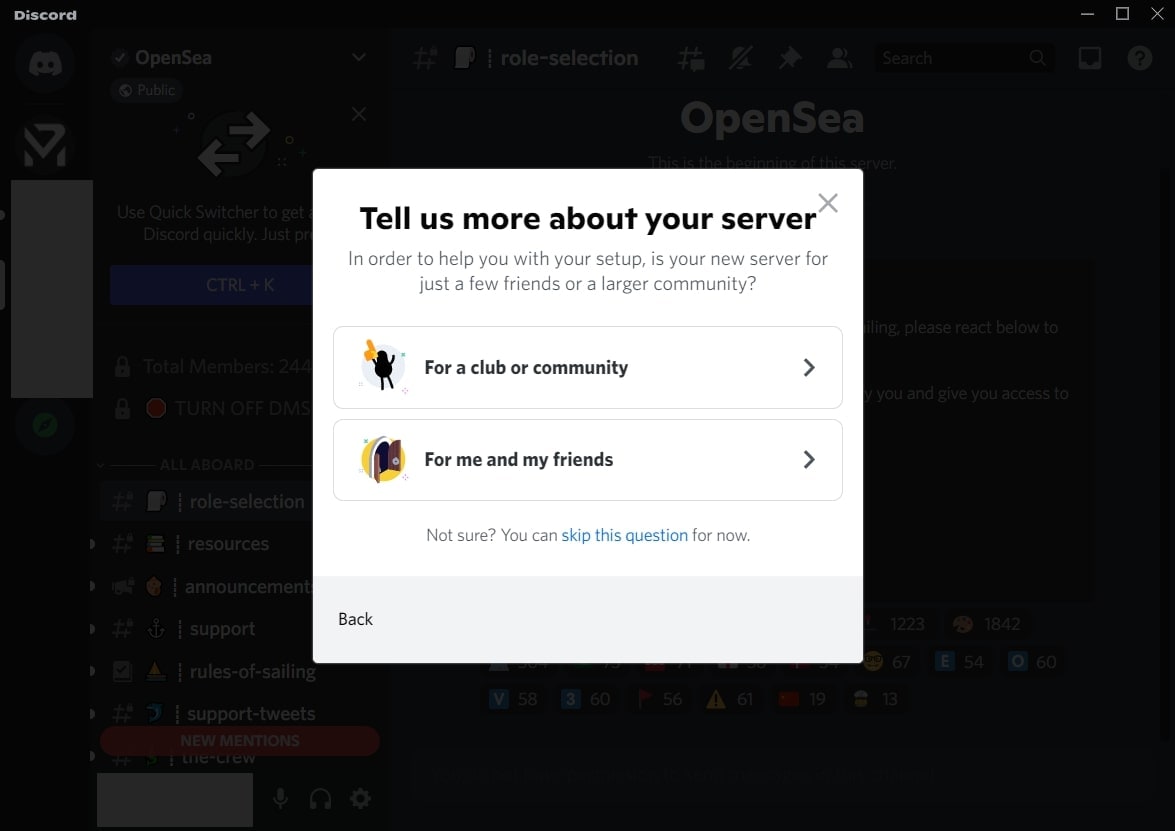
1. Create your Discord Server
Step1 Open your Discord and hit the “Plus” icon given on the left side. It will open a small menu where you can select a template to start or create your own server.
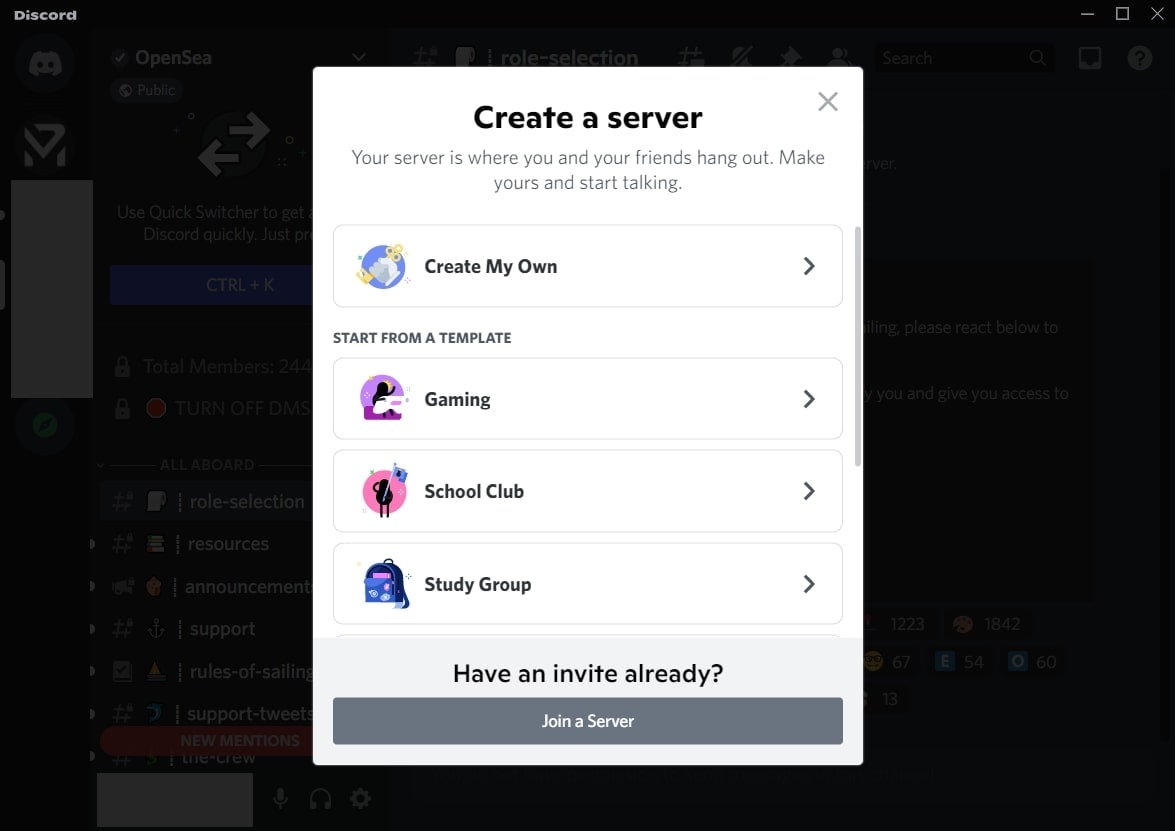
Step2 If you want to create your server, click “Create My Own.” Now select the type of server you want to create. Once done, create the server name and click the “Create” button.
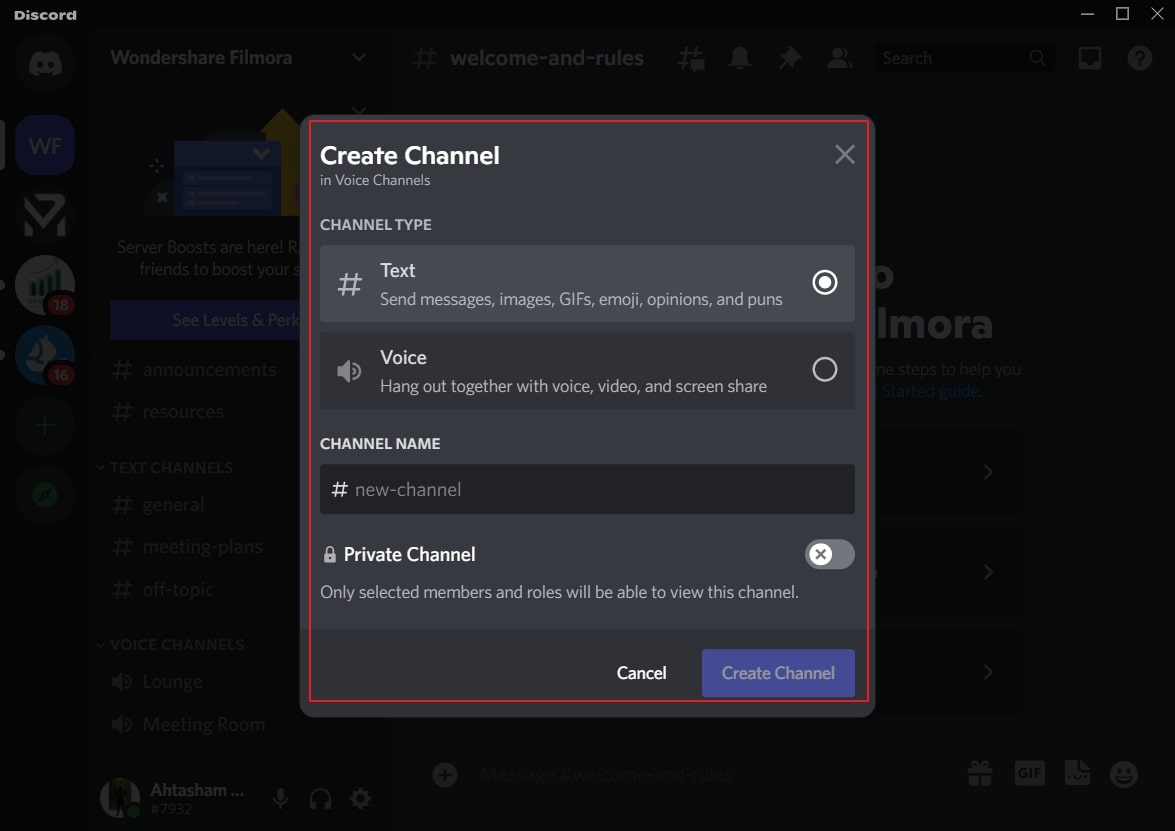
2. Create your Discord Channel
Step1 To create a Discord channel, open any of your servers from the left side. Now tap on the “Plus” icon adjacent to “Voice Channels.”
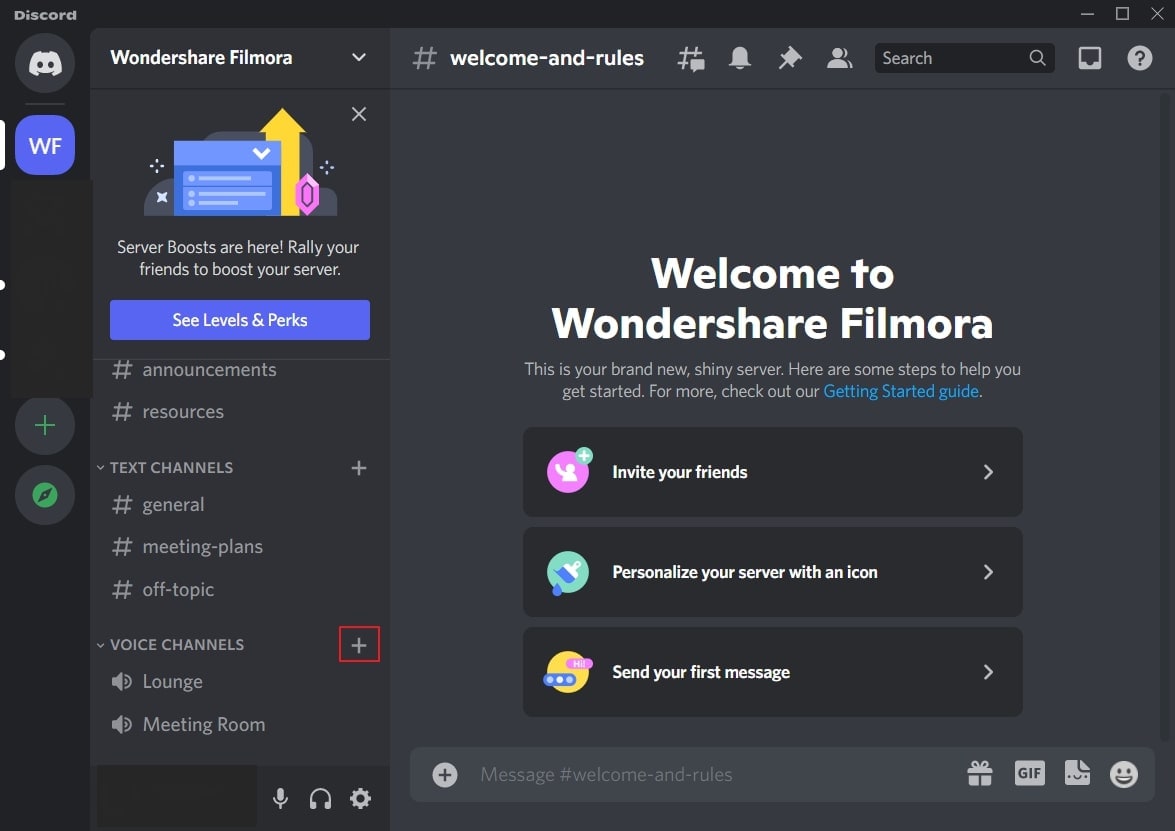
Step2 You can either create a “Text” channel or a “Voice” channel. After choosing the channel type, create a channel name. You can also enable the “Private Channel” option to create a private channel. Once done, click on the “Create Channel” button.

Part 3: How to Stream Videos on Discord
Once you have created a server and channel, you can begin your live streaming. Discord provides you with an option through which you can stream your videos instantly. To know the process, check the below steps:
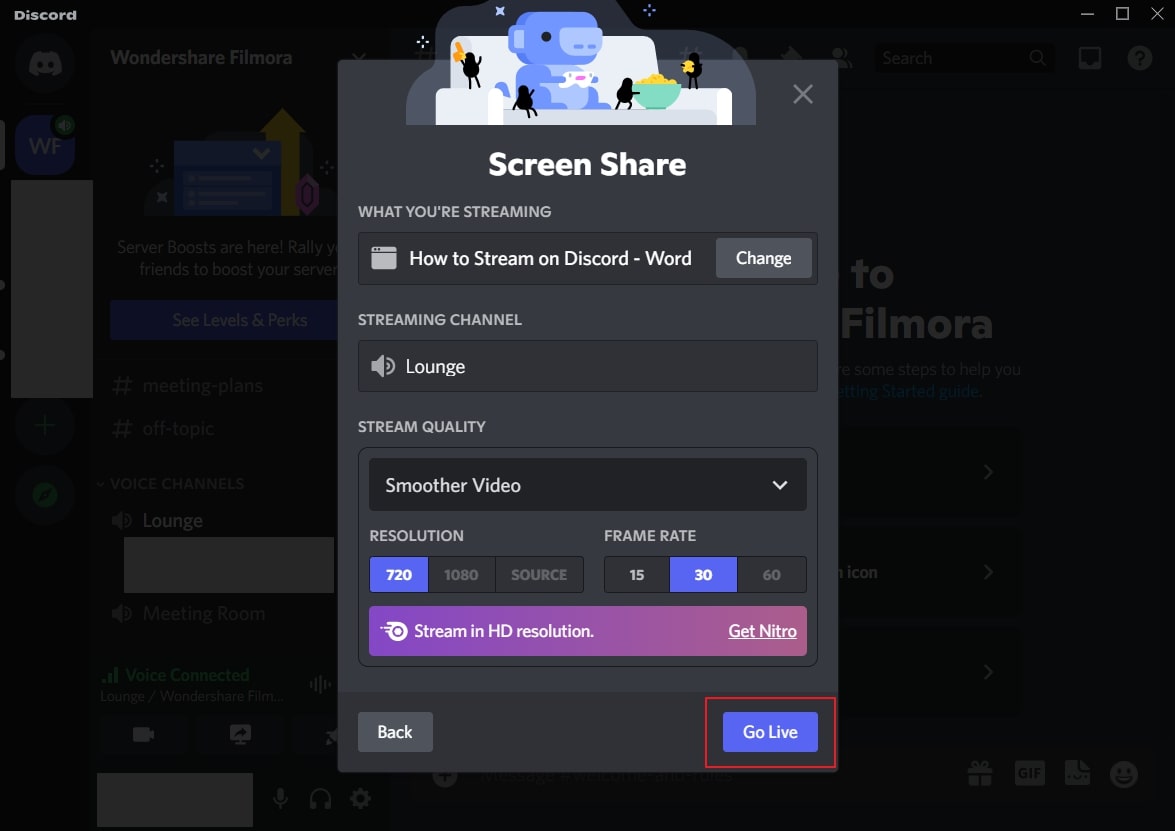
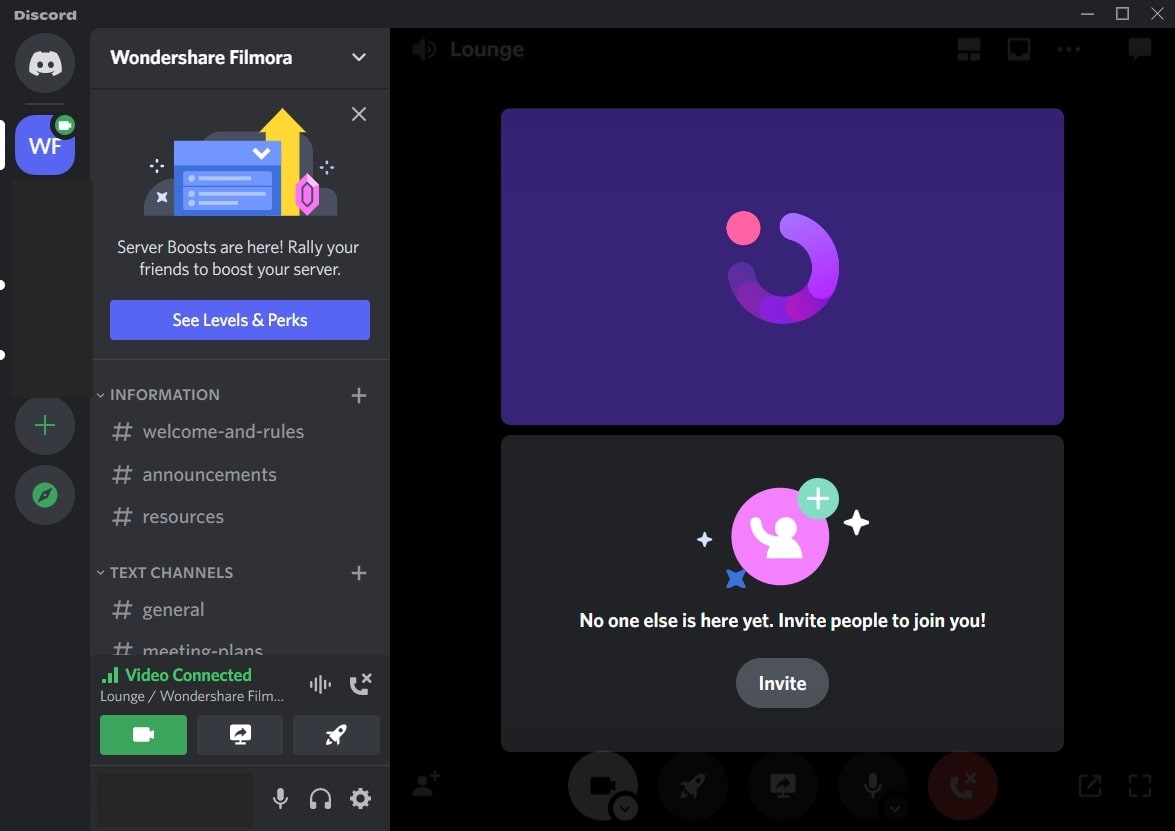
Step1 Open Discord and navigate to your desired server. Now proceed to your voice channel and click on the “Share Your Screen” button given below.
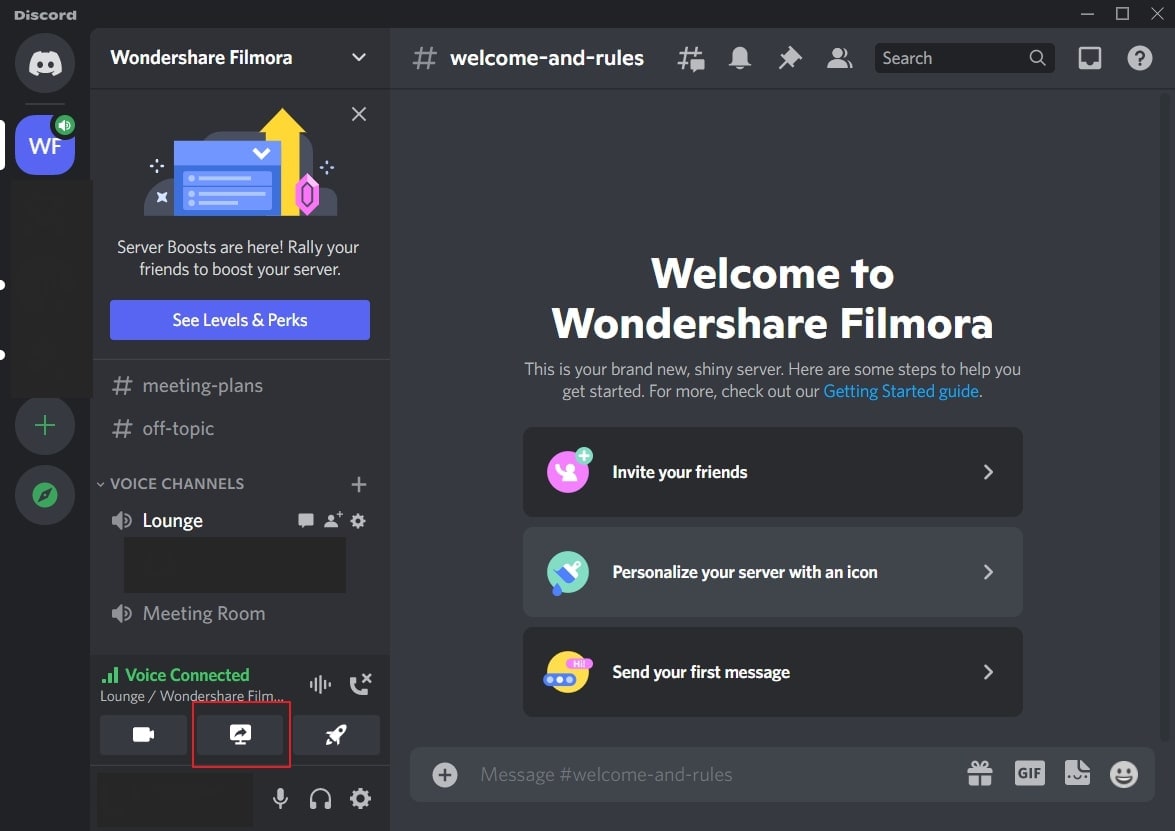
Step2 Select the screen you want to stream in the “Applications” tab. From the new menu, you can adjust the stream quality, such as resolution and frame rate. After adjusting the live streaming settings, click on the “Go Live” button.
Part 4: How to Stream your Webcam on Discord
Do you want to give a tutorial session through your webcam? Through live webcam streaming, you can demonstrate a particular product while giving facial expressions. Using Discord, you can stream your webcam with a single click.
Step1 Once you have opened a server on Discord, go to your Voice channel. From there, tap on the “Camera” icon above your username.
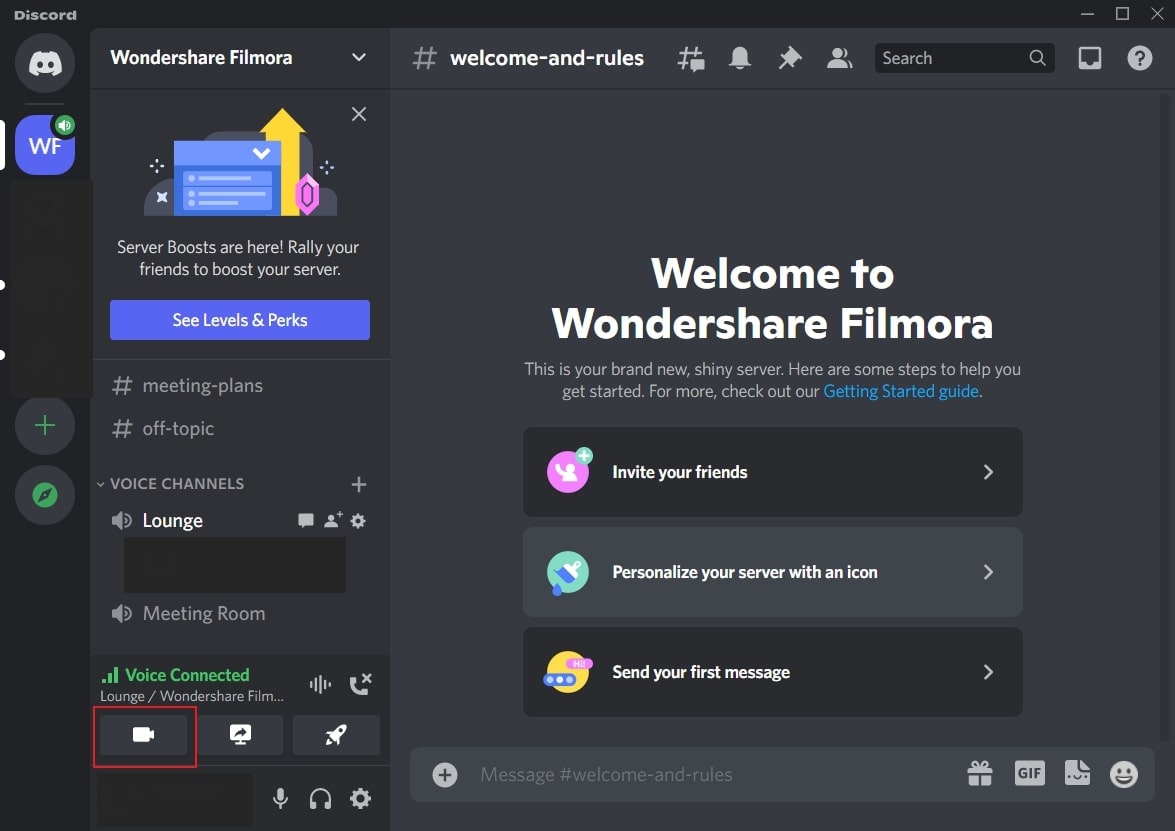
Step2 It will open a new screen through which you can start an activity or share your screen. Moreover, you can also invite others to join your webcam streaming. Once done with your activities, click on the “Red” button to disconnect.
Part 5: How to Change the Shared Screen on Discord
Do you want to change a shared screen on Discord? If you want to open a presentation, web browser, or any other application, Discord can easily change the shared screen. Through this facility, you can quickly shift between multiple screens without hassle.
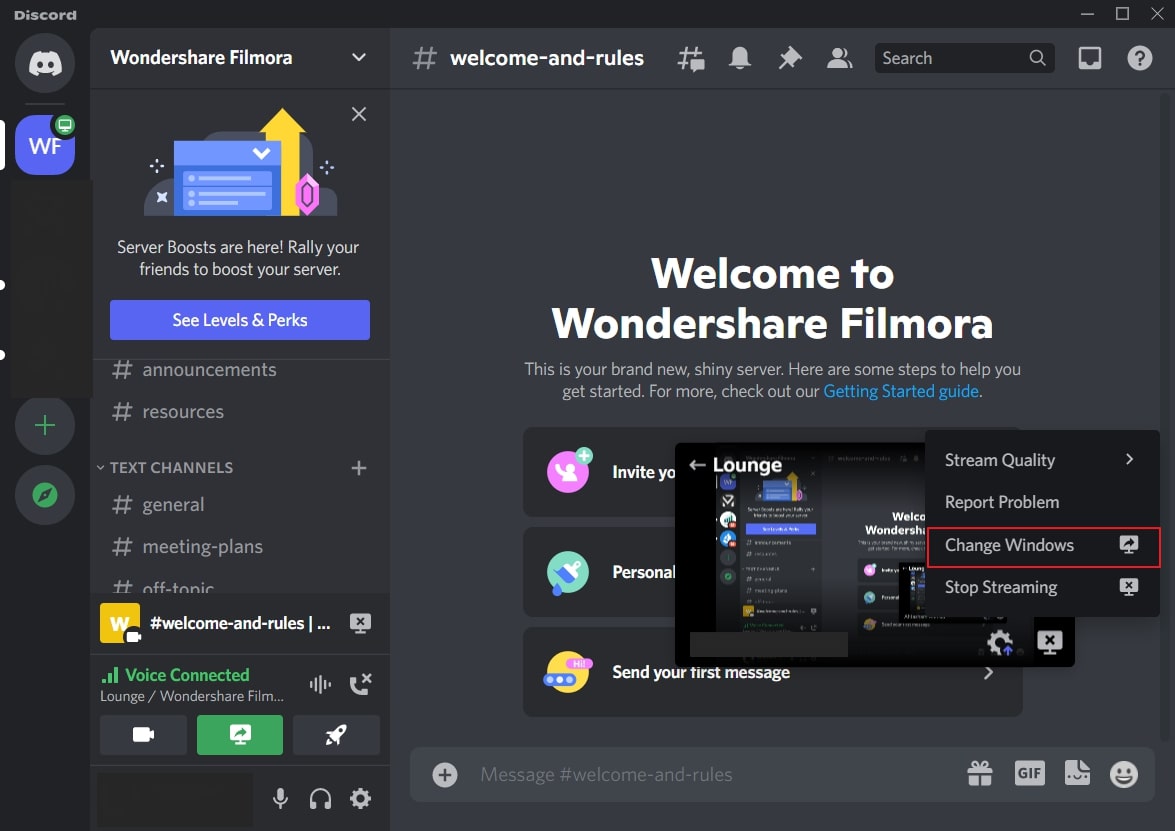
Step1 If you are live streaming your shared screen, you can instantly change windows on Discord. For this, click on the “Gear” icon on your live streaming screen to open settings.

Step2 From the settings menu, click on “Change Windows.” Now select the screen that you want to change. After choosing the required screen, hit on the “Go Live” button.
Part 6: How to Stream Discord on my Mobile Phone?
Discord has the same operating systems on Android and iOS devices. That’s why the steps to stream on Discord on both these devices are the same.
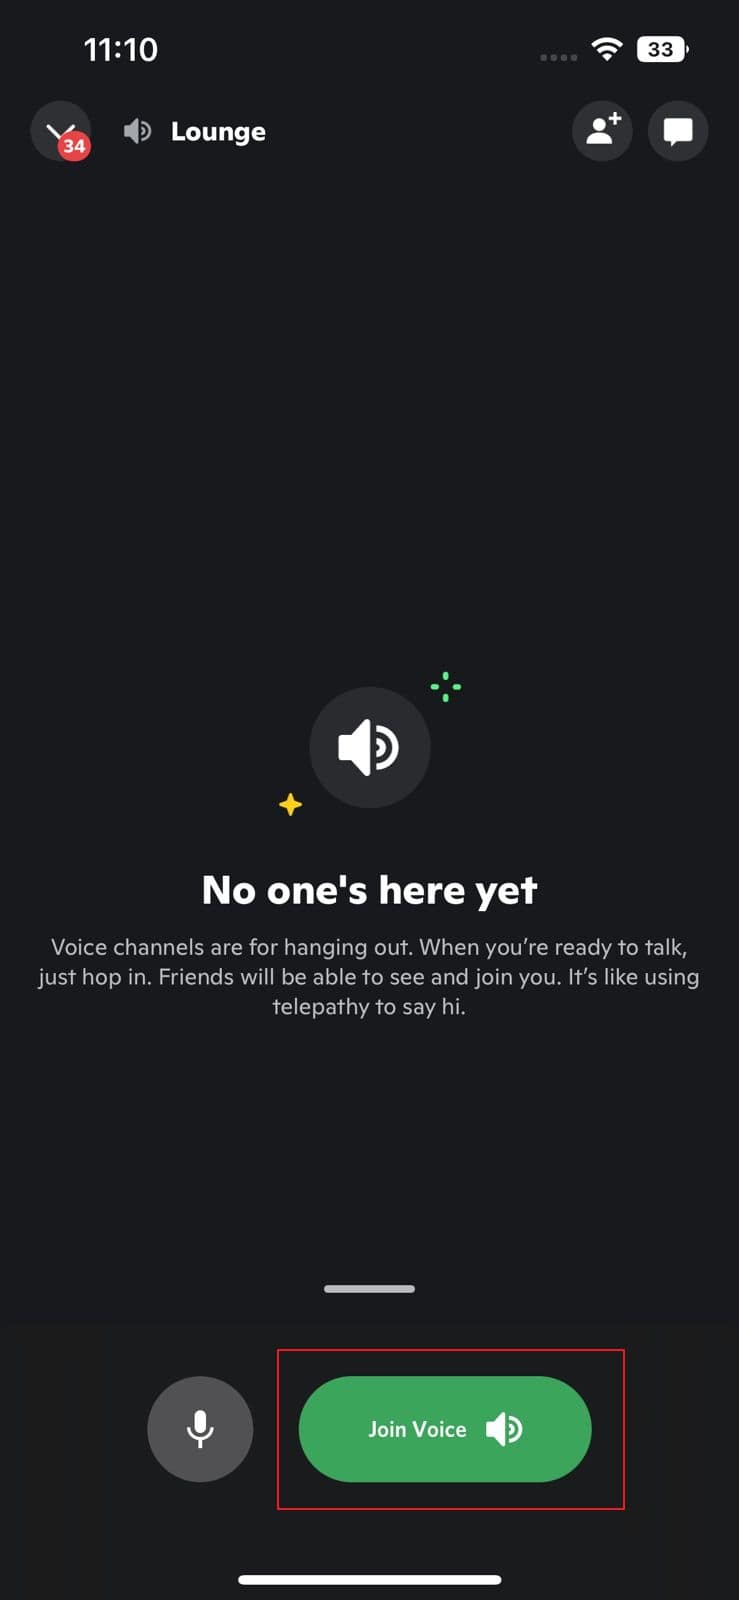
Step1 Open Discord on your mobile and select the desired server. Now choose the voice channel through which you want to live stream Discord.

Step2 Now tap “Join Voice” to initiate live streaming. Here, you can turn on your camera and share the screen. You can also mute your voice from the given options. Once done with live streaming, tap on the “Red” button.
Part 7: FAQs about the live stream on Discord
1. How many people can watch my Discord live simultaneously?
During the pandemic, up to 50 people were able to join live streaming on Discord. Normally, 25 people can watch live streaming on Discord simultaneously.
2. How to add the game types on Discord?
Open Discord and navigate to the “User Settings” given at the bottom of the screen. Select the “Game Activity” section and activate the option “Display currently running game as a status message.” Now click on the “Add it” button and choose the type of games you want to play. Once done, Discord would be able to detect the type of game automatically.
3. How to share a video on Discord?
On your computer, launch Discord and go to your desired channel. On the chat box space, click on the “Plus” icon. Now browse the video from your system that you want to share. Click on the “Open” button and select the “Upload” option. By doing so, you can easily share videos.
For mobile users, go to your Discord app and choose the preferred channel. On the left side of the typing area, you can see the “Image” icon. Tap on this option and choose the video you want to share from your phone. Now hit the “Arrow” button to send the selected video.
Bonus Tip: Easily Record and Edit your Stream with Filmora
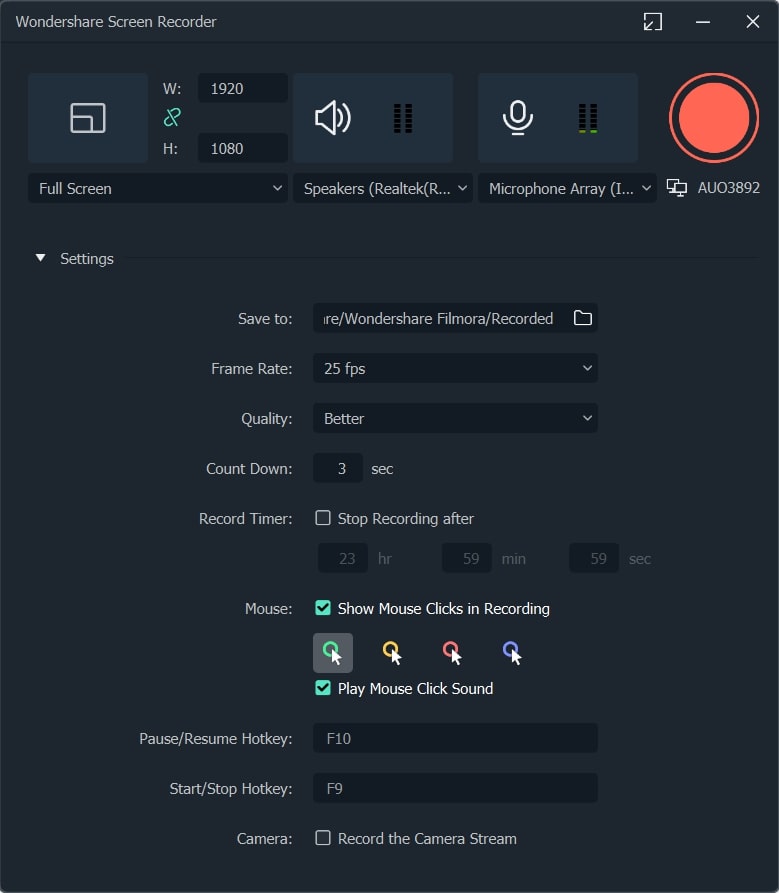
To save and edit your live stream sessions, we will highly recommend you the screen recorder of Wondershare Filmora . Through this screen recorder, you can capture your live-streaming session on Discord in the best possible quality.
Using this screen recorder, you can capture your desired area during live streaming. Once you capture your live-streaming session, you can edit it on this platform. Using the editing tool of Filmora, you can cut, crop, resize, and modify your screen recording efficiently.
Conclusion
Have you ever streamed on Discord before? Discord is a great communication platform that provides advanced features. With its vast flexibility, you can create private servers and channels. This article can guide you to learn how to go live on Discord. We have also suggested Wondershare Filmora, which can help you to screen record and edit your live streaming sessions on Discord.
Free Download For Win 7 or later(64-bit)
Free Download For macOS 10.14 or later
Part 1: What is Discord?
Discord is a popular platform created to offer a better communication experience between game players. The major reason for the massive recognition of Discord is its ability to generate servers instantly. Game players and other users can instantly create voice or text servers for enhanced communication.
Discord provides excellent flexibility to users by providing high-quality audio services with no background noise. Even if your friends are in different parts of the world, you can chat with them smoothly. You can create private and public servers in Discord to communicate with people having similar interests.
Along with using Discord Voice and Text chat features, you can live stream your gameplays. The live streaming on Discord won’t be a public show, as it will only be confined to your selected server. Through this, you can ask your friends for assistance while playing games. Moreover, Discord is also capable of capturing other screens. Hence, it’s a great platform for professionals, game lovers, and other individuals to communicate efficiently.
Part 2: Prerequisites for Stream on Discord
Many social media platforms put restrictions on users for live streaming. Some platforms require you to have a specific number of followers in order to conduct live streaming. However, in Discord, you don’t have to worry about such restrictions. By creating a server and channel on Discord, you can easily go for live streaming. Check the below prerequisites for performing a live stream on Discord:
1. Create your Discord Server
Step1 Open your Discord and hit the “Plus” icon given on the left side. It will open a small menu where you can select a template to start or create your own server.
Step2 If you want to create your server, click “Create My Own.” Now select the type of server you want to create. Once done, create the server name and click the “Create” button.
2. Create your Discord Channel
Step1 To create a Discord channel, open any of your servers from the left side. Now tap on the “Plus” icon adjacent to “Voice Channels.”
Step2 You can either create a “Text” channel or a “Voice” channel. After choosing the channel type, create a channel name. You can also enable the “Private Channel” option to create a private channel. Once done, click on the “Create Channel” button.
Part 3: How to Stream Videos on Discord
Once you have created a server and channel, you can begin your live streaming. Discord provides you with an option through which you can stream your videos instantly. To know the process, check the below steps:
Step1 Open Discord and navigate to your desired server. Now proceed to your voice channel and click on the “Share Your Screen” button given below.
Step2 Select the screen you want to stream in the “Applications” tab. From the new menu, you can adjust the stream quality, such as resolution and frame rate. After adjusting the live streaming settings, click on the “Go Live” button.
Part 4: How to Stream your Webcam on Discord
Do you want to give a tutorial session through your webcam? Through live webcam streaming, you can demonstrate a particular product while giving facial expressions. Using Discord, you can stream your webcam with a single click.
Step1 Once you have opened a server on Discord, go to your Voice channel. From there, tap on the “Camera” icon above your username.
Step2 It will open a new screen through which you can start an activity or share your screen. Moreover, you can also invite others to join your webcam streaming. Once done with your activities, click on the “Red” button to disconnect.
Part 5: How to Change the Shared Screen on Discord
Do you want to change a shared screen on Discord? If you want to open a presentation, web browser, or any other application, Discord can easily change the shared screen. Through this facility, you can quickly shift between multiple screens without hassle.
Step1 If you are live streaming your shared screen, you can instantly change windows on Discord. For this, click on the “Gear” icon on your live streaming screen to open settings.
Step2 From the settings menu, click on “Change Windows.” Now select the screen that you want to change. After choosing the required screen, hit on the “Go Live” button.
Part 6: How to Stream Discord on my Mobile Phone?
Discord has the same operating systems on Android and iOS devices. That’s why the steps to stream on Discord on both these devices are the same.
Step1 Open Discord on your mobile and select the desired server. Now choose the voice channel through which you want to live stream Discord.
Step2 Now tap “Join Voice” to initiate live streaming. Here, you can turn on your camera and share the screen. You can also mute your voice from the given options. Once done with live streaming, tap on the “Red” button.
Part 7: FAQs about the live stream on Discord
1. How many people can watch my Discord live simultaneously?
During the pandemic, up to 50 people were able to join live streaming on Discord. Normally, 25 people can watch live streaming on Discord simultaneously.
2. How to add the game types on Discord?
Open Discord and navigate to the “User Settings” given at the bottom of the screen. Select the “Game Activity” section and activate the option “Display currently running game as a status message.” Now click on the “Add it” button and choose the type of games you want to play. Once done, Discord would be able to detect the type of game automatically.
3. How to share a video on Discord?
On your computer, launch Discord and go to your desired channel. On the chat box space, click on the “Plus” icon. Now browse the video from your system that you want to share. Click on the “Open” button and select the “Upload” option. By doing so, you can easily share videos.
For mobile users, go to your Discord app and choose the preferred channel. On the left side of the typing area, you can see the “Image” icon. Tap on this option and choose the video you want to share from your phone. Now hit the “Arrow” button to send the selected video.
Bonus Tip: Easily Record and Edit your Stream with Filmora
To save and edit your live stream sessions, we will highly recommend you the screen recorder of Wondershare Filmora . Through this screen recorder, you can capture your live-streaming session on Discord in the best possible quality.
Using this screen recorder, you can capture your desired area during live streaming. Once you capture your live-streaming session, you can edit it on this platform. Using the editing tool of Filmora, you can cut, crop, resize, and modify your screen recording efficiently.
Conclusion
Have you ever streamed on Discord before? Discord is a great communication platform that provides advanced features. With its vast flexibility, you can create private servers and channels. This article can guide you to learn how to go live on Discord. We have also suggested Wondershare Filmora, which can help you to screen record and edit your live streaming sessions on Discord.
Free Download For Win 7 or later(64-bit)
Free Download For macOS 10.14 or later
A Compact Guide to Using Discord Spoiler Tags
Discord Spoiler Tag: All You Need to Know

Richard Bennett
Mar 27, 2024• Proven solutions
With Discord, you can text with emojis and even send GIFs. However, as servers become crowded, they get bombarded with texts. And some of these texts have spoilers for games (or other stuff) that others may not want to know or read. But ignoring spoilers was not that easy. As you scroll miles and miles of texts, your eyes are bound to catch some hints and ruin the suspense for you.
Thankfully, Discord came out with the perfect solution. Now, if you are sharing some spoilers or secrets, you can mark them as spoilers. The result is a text that is sent but is blacked out. Curious users who are not scared of spoilers can view it. Others can enjoy their bliss of ignorance.
In this article
- Part 1: How to Use Spoilers on Discord to Hide Text Messages?
- Part 2: How to Add Spoiler to Image and Video on Discord?
- Bonus: Is it the same to use Spoiler on Mobile devices?
- Bonus: How to turn off the Spoiler tag?
Part 1: How to Use Spoilers on Discord to Hide Text Messages?
And now we come to the point - how to do spoilers on Discord? Well, there are two ways to do it. You can run through both of them and choose whichever suits you the best. All the methods are simple to follow. Note that some are available only on the desktop.
Method 1: Adding Spoiler Text Via Tag on Discord
We will begin with the tag method. All you have to do is add the spoiler tag on Discord. Here is a quick rundown of the steps –
- Open the Discord app and log in using your credentials.
- Pick a server from your server list or a friend from the friend list.
- Type whatever you want to in the chatbox.
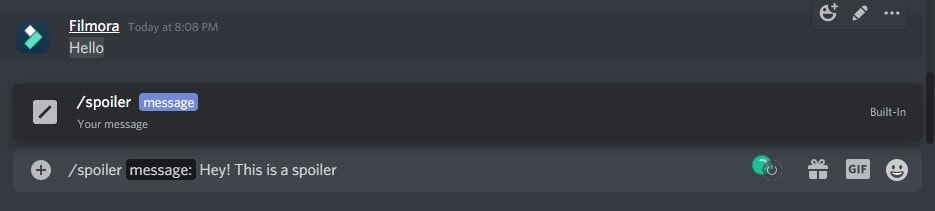
- Now add the ‘||’ symbols before and after the spoiler content. For instance, it will look something like this – Hey! This is a spoiler ||spoiler alert||
- Hit the enter key to send and your spoiler is sent without spoiling anything!

This works for the Discord desktop app, browser, and also mobile app. This is like a universal method of hiding spoilers.
You can also add ‘/spoiler’ before the spoiler content. This is an alternative to the ‘||’ we add at the start and the end.
Method 2: Sending Spoiler Message with Mark as Spoiler icon
This alternate method is quite simple. This was a recent update on Discord that enables you to add the spoiler tag quickly. Here is a brief rundown for you –
- Type out the spoiler content in the chatbox.
- Select the spoiler part of the text (highlight it).
- Upon selection, a floating bar will appear. Click the ‘eye’ symbol. and then the ‘||’ mark will immediately accompany the selected text, and the selected message will be spoiled automatically.
- After you hit the send button, the text will be sent to the server. Only the people who wish to see the spoiler will tap on it unveil it.
![]()
This method is available only on the Discord desktop app and browser version. For iOS, the steps are similar. The only difference is that you have to select the spoiler mark from the context menu.
Part 2: How to Add Spoiler to Image and Video on Discord?
There are many scenarios where a Discord spoiler can come in handy. As you might be aware that Discord is quite popular and its cross-platform flexibility make it a favorite among gamers. You can connect to your friends over multiple devices with a single account.
Just like texts, even images, videos, and other attachments can be marked as spoilers. The process of marking images and videos as spoilers differs slightly from that of texts. So, how to add spoiler tags to other files? Here’s the rundown.
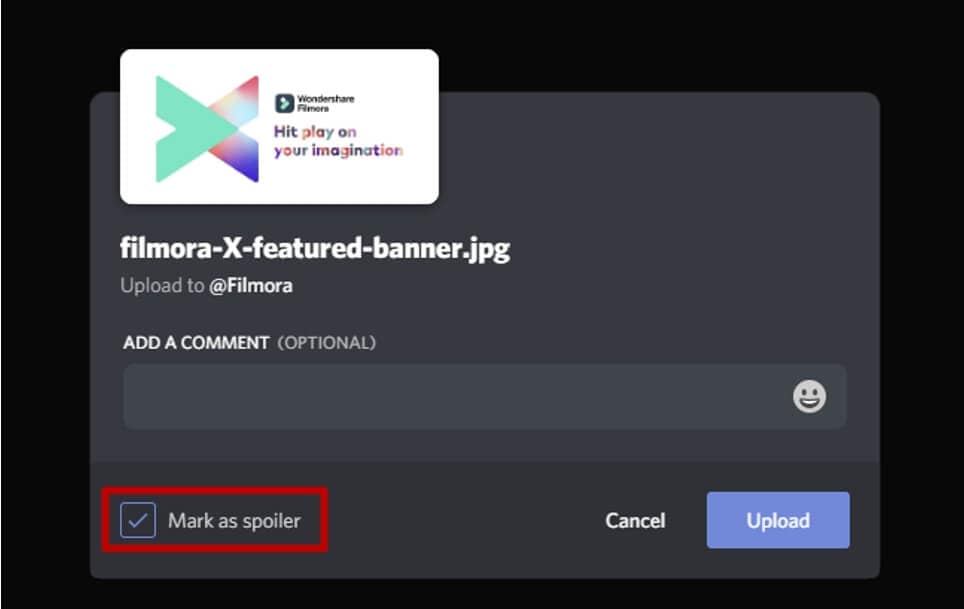
Images can be tagged as spoilers before you upload them on servers. To add spoiler tags to images –
- Open Discord on your desktop app or browser.
- Select the image or video that you want to send on the server.
- Drag it to your server chat and drop it there.
- Next, tap on the ‘+’ symbol.
- From the options that appear, choose ‘Mark as Spoiler.’
- Hit the Upload button.
- The result is a blurred image sent on the server. Anyone who wishes to view the image can tap on it.
Note that spoilers that contain images, videos, or other multimedia files can be sent only on the desktop app or the browser. Mobile apps do not support spoiler marks for images or other media files.
Bonus: Is it the same to use Spoiler on Mobile devices?
The Discord mobile spoiler tag works the same on mobile apps. The process is more or less the same. Here is a quick rundown of the steps –
- Type out the spoiler text.
- Add ‘||’ symbols at the start and end of the text you want to hide.
- Hit the send button, and your spoiler text will be covered.
- Only the curious ones can tap and see your spoiler texts.
You can even mark embedded links as spoilers with the same process. But this does not apply to Discord server links. Furthermore, you cannot add spoiler tags to images, videos, and other files from the mobile app.
For iOS, you can select and highlight the text that you want to hide. Then, tap open the context menu and click on the ‘Mark as Spoiler’ to hide the text.
Bonus: How to turn off the Spoiler tag?
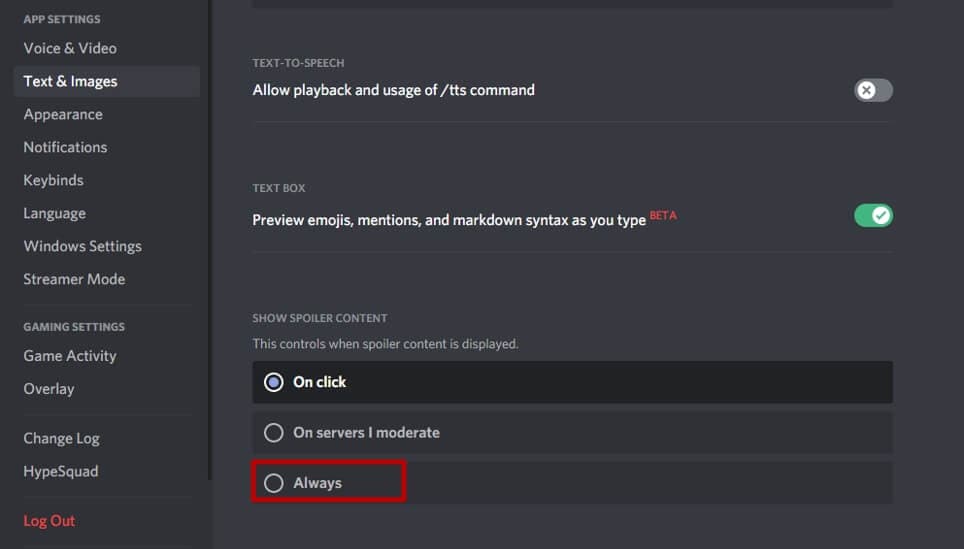
For some reason, you may want to remove the spoiler tag from the spoiler texts. In that case, open the User Settings and tap on Text & Images. Scroll down to the Show Spoiler Content tab and you will see options to control when spoiler content is displayed. You can choose to display on click, on servers I moderate, and always.
If you want to display all spoiler content, choose Always to turn off the spoiler tag. You can hide them again through the same menu if you change your mind.
This was an article on how to use the Discord spoiler tag to hide texts, images, and videos. You can undo and redo the tags as many times as you like. If you are about to unveil some life-changing secret on your Discord server, then don’t forget to add that spoiler tag.
Richard Bennett
Richard Bennett is a writer and a lover of all things video.
Follow @Richard Bennett
Richard Bennett
Mar 27, 2024• Proven solutions
With Discord, you can text with emojis and even send GIFs. However, as servers become crowded, they get bombarded with texts. And some of these texts have spoilers for games (or other stuff) that others may not want to know or read. But ignoring spoilers was not that easy. As you scroll miles and miles of texts, your eyes are bound to catch some hints and ruin the suspense for you.
Thankfully, Discord came out with the perfect solution. Now, if you are sharing some spoilers or secrets, you can mark them as spoilers. The result is a text that is sent but is blacked out. Curious users who are not scared of spoilers can view it. Others can enjoy their bliss of ignorance.
In this article
- Part 1: How to Use Spoilers on Discord to Hide Text Messages?
- Part 2: How to Add Spoiler to Image and Video on Discord?
- Bonus: Is it the same to use Spoiler on Mobile devices?
- Bonus: How to turn off the Spoiler tag?
Part 1: How to Use Spoilers on Discord to Hide Text Messages?
And now we come to the point - how to do spoilers on Discord? Well, there are two ways to do it. You can run through both of them and choose whichever suits you the best. All the methods are simple to follow. Note that some are available only on the desktop.
Method 1: Adding Spoiler Text Via Tag on Discord
We will begin with the tag method. All you have to do is add the spoiler tag on Discord. Here is a quick rundown of the steps –
- Open the Discord app and log in using your credentials.
- Pick a server from your server list or a friend from the friend list.
- Type whatever you want to in the chatbox.
- Now add the ‘||’ symbols before and after the spoiler content. For instance, it will look something like this – Hey! This is a spoiler ||spoiler alert||
- Hit the enter key to send and your spoiler is sent without spoiling anything!
This works for the Discord desktop app, browser, and also mobile app. This is like a universal method of hiding spoilers.
You can also add ‘/spoiler’ before the spoiler content. This is an alternative to the ‘||’ we add at the start and the end.
Method 2: Sending Spoiler Message with Mark as Spoiler icon
This alternate method is quite simple. This was a recent update on Discord that enables you to add the spoiler tag quickly. Here is a brief rundown for you –
- Type out the spoiler content in the chatbox.
- Select the spoiler part of the text (highlight it).
- Upon selection, a floating bar will appear. Click the ‘eye’ symbol. and then the ‘||’ mark will immediately accompany the selected text, and the selected message will be spoiled automatically.
- After you hit the send button, the text will be sent to the server. Only the people who wish to see the spoiler will tap on it unveil it.
![]()
This method is available only on the Discord desktop app and browser version. For iOS, the steps are similar. The only difference is that you have to select the spoiler mark from the context menu.
Part 2: How to Add Spoiler to Image and Video on Discord?
There are many scenarios where a Discord spoiler can come in handy. As you might be aware that Discord is quite popular and its cross-platform flexibility make it a favorite among gamers. You can connect to your friends over multiple devices with a single account.
Just like texts, even images, videos, and other attachments can be marked as spoilers. The process of marking images and videos as spoilers differs slightly from that of texts. So, how to add spoiler tags to other files? Here’s the rundown.
Images can be tagged as spoilers before you upload them on servers. To add spoiler tags to images –
- Open Discord on your desktop app or browser.
- Select the image or video that you want to send on the server.
- Drag it to your server chat and drop it there.
- Next, tap on the ‘+’ symbol.
- From the options that appear, choose ‘Mark as Spoiler.’
- Hit the Upload button.
- The result is a blurred image sent on the server. Anyone who wishes to view the image can tap on it.
Note that spoilers that contain images, videos, or other multimedia files can be sent only on the desktop app or the browser. Mobile apps do not support spoiler marks for images or other media files.
Bonus: Is it the same to use Spoiler on Mobile devices?
The Discord mobile spoiler tag works the same on mobile apps. The process is more or less the same. Here is a quick rundown of the steps –
- Type out the spoiler text.
- Add ‘||’ symbols at the start and end of the text you want to hide.
- Hit the send button, and your spoiler text will be covered.
- Only the curious ones can tap and see your spoiler texts.
You can even mark embedded links as spoilers with the same process. But this does not apply to Discord server links. Furthermore, you cannot add spoiler tags to images, videos, and other files from the mobile app.
For iOS, you can select and highlight the text that you want to hide. Then, tap open the context menu and click on the ‘Mark as Spoiler’ to hide the text.
Bonus: How to turn off the Spoiler tag?
For some reason, you may want to remove the spoiler tag from the spoiler texts. In that case, open the User Settings and tap on Text & Images. Scroll down to the Show Spoiler Content tab and you will see options to control when spoiler content is displayed. You can choose to display on click, on servers I moderate, and always.
If you want to display all spoiler content, choose Always to turn off the spoiler tag. You can hide them again through the same menu if you change your mind.
This was an article on how to use the Discord spoiler tag to hide texts, images, and videos. You can undo and redo the tags as many times as you like. If you are about to unveil some life-changing secret on your Discord server, then don’t forget to add that spoiler tag.
Richard Bennett
Richard Bennett is a writer and a lover of all things video.
Follow @Richard Bennett
Also read:
- [New] 2024 Approved Amplify Engagement Through Linked Story Sharing
- [Updated] In 2024, How to Stream on Discord
- [Updated] Rights and Recourse Following Sudden Account Suspension on FB
- [Updated] Top Screen Capture Software for Discord (Android/iOS) for 2024
- [Updated] Unbind From Discord on All Platforms for 2024
- 2024 Approved 3 Top Picks of Voice Capture Apps for Your iPad
- End Battlefield 5 Game-Breaking PC Errors - A Comprehensive Guide to Stability
- How To Change Infinix GT 10 Pro Lock Screen Clock in Seconds
- In 2024, Exploring the Unexpected Sideway Effects in IG Videos
- Vision Disabled: Graphic Device Missing
- Title: [Updated] 2024 Approved Stepwise Methodology for Launching a Discord Channel
- Author: Timothy
- Created at : 2024-10-11 01:59:37
- Updated at : 2024-10-17 20:52:42
- Link: https://discord-videos.techidaily.com/updated-2024-approved-stepwise-methodology-for-launching-a-discord-channel/
- License: This work is licensed under CC BY-NC-SA 4.0.