
!["[Updated] 2024 Approved The Logical Path to Exit a Discord Platform"](https://thmb.techidaily.com/bedeaab43df1b8b5afd8fae799c1b0ff2cb5a9adc8ca952932303c5e2c53ba39.jpg)
"[Updated] 2024 Approved The Logical Path to Exit a Discord Platform"
The Logical Path to Exit a Discord Platform
How to Leave A Discord Server

Richard Bennett
Mar 27, 2024• Proven solutions
Discord is all fun and games if you are a part of a lively server that has a cool community. You can obsess about some game, comic, or song with hundreds of other people without the fear of being called geeky.
However, sometimes you might disagree with other members, which can lead you to hunt for some other server. Other times, the server might be inactive, or you may not mix well with the crowd. Or maybe, you landed there by mistake. So, how do you leave a Discord server?
Whatever your reason, here is a detailed guide on how to leave a server on Discord!
A few things to note before you leave a server –
- After you exit from a server, you will no longer be able to send any texts on it.
- You will not receive any notifications from the server.
- Your username will no longer appear in the member list of the server.
- Whatever role you had in the server will be disabled.
- If you own a server, you will have to transfer the ownership to another member before you quit.
- The person you hand over your server to can do whatever they want with it.
- You can join the server you left again if you change your mind.
Part 1: How to Leave a Discord Server on Computer?
Several peoples and hardcore gamers use Discord over a PC. And you can wave goodbye to the channel in a matter of few seconds. The procedure is the same for Mac and Windows.
- Open Discord on your computer (the desktop app or on the browser).
- Tap on the server name that appears towards the top left.
- Right at the bottom of the list, click on the option leave server
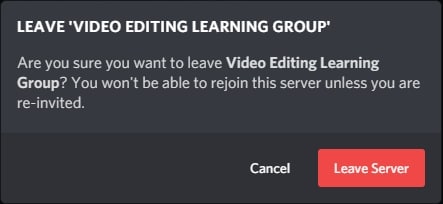
After confirming you won’t be a part of that server anymore. You cannot send any texts or get any notifications. The server name will disappear from the server list in your profile.
Part 2: How to Leave a Discord Server on the Mobile App?
The procedure of leaving the server is more or less the same on the mobile app. The user interface of Discord does not differ much across the devices. To quit a server, follow these steps -
- Click open the Discord app on your mobile.
- Click on the right pane and click on the 3 dots that appear. Click on the name of the server that you want to leave.
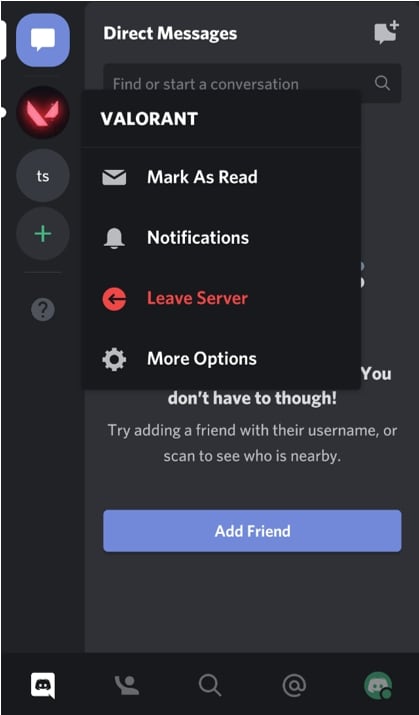
- From the menu that opens, scroll towards the bottom and click on the leave server option.

After confirmation, you will not be a part of the server anymore. The process is the same for ios and Android devices.
If you have decided to take a break from gaming and Discord, you can consider uninstalling the app temporarily. You can also turn off the notifications in the app settings on your device.
Bonus: How to Transfer Discord Server Ownership?
How to leave your own Discord server? If your server has many members in it, it is wiser to transfer the ownership rather than shutting the server completely or abandoning it to fate. Especially if the users are active, then you can handover the ownership to a trustworthy person.
Here is how you can do it -
For desktop
The process is quite simple and only takes a few minutes.
- Open the Discord app or log in using the browser.
- Click on the server that you want to leave.
- With right-click, open up the floating menu.
- From that list, select server settings and then choose members.
- Select the user that You Want To handover your server to. Tap those 3 dots and tap on ‘transfer ownership.’
- Confirm your choice and then click on transfer ownership.
- The chosen member will become the new owner of the server.
On mobile
The transfer procedure is quite similar to the desktop version. However, it has a few extra steps.
- Open your Discord App on your phone.
- Select the server that you want to give away.
- Tap those 3 dots to open up the menu. Under user management, tap on ‘members.’
- Select the member that will be the new owner of your server. Tap the 3 dots that appear next to the name of that user.
- A confirmation box will appear.
- Check off the box to confirm your choice.
Your server is now successfully transferred to the selected member. And the new owner can decide what to do with the server.
FAQs About Leaving A Discord Server
- How can I leave a Discord server without anyone knowing?
Frankly speaking, there is no magic to help conceal your disappearance from a server. There is no way to hide your departure. However, you can take a few measures to make it less noticeable.
- Lay low for a few hours or days. This won’t work if you are the loudest member on the server. But still, it’s worth a shot.
- Try changing your avatar, profile picture, and nickname. This can throw people off the track or confuse them for a while.
- Control yourself and try not to tell anyone that you are leaving.
- And now it’s time for the discreet farewell!
You might still get some texts on personal asking about your exit. This is not a surefire way of making your exit a secret. However, hundreds of members along with bots will make your disappearance less apparent. Another solution would be to create a new user ID and leave the old one inactive.
- Does leaving a Discord server delete your messages?
No, none of the texts that you sent on the server get deleted. Every text remains, even after you leave. The only way you can delete your texts if you delete them all one by one, or someone with sufficient permissions deletes them. If you get banned, then the member who banned you decides whether to keep your messages on the server or remove them. In this case, your texts can be removed if the member deletes them.
This was a guide on ‘how to leave a Discord server’ that provided a detailed how-to on leaving servers and transferring servers.
Richard Bennett
Richard Bennett is a writer and a lover of all things video.
Follow @Richard Bennett
Richard Bennett
Mar 27, 2024• Proven solutions
Discord is all fun and games if you are a part of a lively server that has a cool community. You can obsess about some game, comic, or song with hundreds of other people without the fear of being called geeky.
However, sometimes you might disagree with other members, which can lead you to hunt for some other server. Other times, the server might be inactive, or you may not mix well with the crowd. Or maybe, you landed there by mistake. So, how do you leave a Discord server?
Whatever your reason, here is a detailed guide on how to leave a server on Discord!
A few things to note before you leave a server –
- After you exit from a server, you will no longer be able to send any texts on it.
- You will not receive any notifications from the server.
- Your username will no longer appear in the member list of the server.
- Whatever role you had in the server will be disabled.
- If you own a server, you will have to transfer the ownership to another member before you quit.
- The person you hand over your server to can do whatever they want with it.
- You can join the server you left again if you change your mind.
Part 1: How to Leave a Discord Server on Computer?
Several peoples and hardcore gamers use Discord over a PC. And you can wave goodbye to the channel in a matter of few seconds. The procedure is the same for Mac and Windows.
- Open Discord on your computer (the desktop app or on the browser).
- Tap on the server name that appears towards the top left.
- Right at the bottom of the list, click on the option leave server
After confirming you won’t be a part of that server anymore. You cannot send any texts or get any notifications. The server name will disappear from the server list in your profile.
Part 2: How to Leave a Discord Server on the Mobile App?
The procedure of leaving the server is more or less the same on the mobile app. The user interface of Discord does not differ much across the devices. To quit a server, follow these steps -
- Click open the Discord app on your mobile.
- Click on the right pane and click on the 3 dots that appear. Click on the name of the server that you want to leave.
- From the menu that opens, scroll towards the bottom and click on the leave server option.
After confirmation, you will not be a part of the server anymore. The process is the same for ios and Android devices.
If you have decided to take a break from gaming and Discord, you can consider uninstalling the app temporarily. You can also turn off the notifications in the app settings on your device.
Bonus: How to Transfer Discord Server Ownership?
How to leave your own Discord server? If your server has many members in it, it is wiser to transfer the ownership rather than shutting the server completely or abandoning it to fate. Especially if the users are active, then you can handover the ownership to a trustworthy person.
Here is how you can do it -
For desktop
The process is quite simple and only takes a few minutes.
- Open the Discord app or log in using the browser.
- Click on the server that you want to leave.
- With right-click, open up the floating menu.
- From that list, select server settings and then choose members.
- Select the user that You Want To handover your server to. Tap those 3 dots and tap on ‘transfer ownership.’
- Confirm your choice and then click on transfer ownership.
- The chosen member will become the new owner of the server.
On mobile
The transfer procedure is quite similar to the desktop version. However, it has a few extra steps.
- Open your Discord App on your phone.
- Select the server that you want to give away.
- Tap those 3 dots to open up the menu. Under user management, tap on ‘members.’
- Select the member that will be the new owner of your server. Tap the 3 dots that appear next to the name of that user.
- A confirmation box will appear.
- Check off the box to confirm your choice.
Your server is now successfully transferred to the selected member. And the new owner can decide what to do with the server.
FAQs About Leaving A Discord Server
- How can I leave a Discord server without anyone knowing?
Frankly speaking, there is no magic to help conceal your disappearance from a server. There is no way to hide your departure. However, you can take a few measures to make it less noticeable.
- Lay low for a few hours or days. This won’t work if you are the loudest member on the server. But still, it’s worth a shot.
- Try changing your avatar, profile picture, and nickname. This can throw people off the track or confuse them for a while.
- Control yourself and try not to tell anyone that you are leaving.
- And now it’s time for the discreet farewell!
You might still get some texts on personal asking about your exit. This is not a surefire way of making your exit a secret. However, hundreds of members along with bots will make your disappearance less apparent. Another solution would be to create a new user ID and leave the old one inactive.
- Does leaving a Discord server delete your messages?
No, none of the texts that you sent on the server get deleted. Every text remains, even after you leave. The only way you can delete your texts if you delete them all one by one, or someone with sufficient permissions deletes them. If you get banned, then the member who banned you decides whether to keep your messages on the server or remove them. In this case, your texts can be removed if the member deletes them.
This was a guide on ‘how to leave a Discord server’ that provided a detailed how-to on leaving servers and transferring servers.
Richard Bennett
Richard Bennett is a writer and a lover of all things video.
Follow @Richard Bennett
Simplifying Video Distribution: A Discord Insider’s Approach
How to Send Videos on Discord
Richard Bennett
Mar 27, 2024• Proven solutions
The whole point of Discord is to bring together communities of like-minded people to talk, share ideas and have fun together. And this isn’t just limited to chatting but sometimes you’re going to want to share content, including videos.
So, whether it’s a compilation of your best gaming moments that you’ve carefully edited together, a home movie that you want to share with friends, or just a funny clip that someone’s sent you that you want to pass on, here we’ll take you through how to send videos on Discord both on PC and mobile, and the likely issues you might face.
- Part 1: How to Send Videos on Discord PC
- Part 2: How to Send Videos on Discord Mobile
- Part 3: How to Send Long Videos on Discord That Are More Than 8MB
- Part 4: FAQs About Uploading Videos to Discord
Part 1: How to Send Videos on Discord PC
It’s actually pretty simple to send videos on Discord when using a PC, providing they aren’t too large a file size.
Firstly, you just need to navigate to the channel or private message where you want to send the video. Just find the right option on the list of servers you’re a member of, or head to your message inbox to find the user you want to send it to privately.
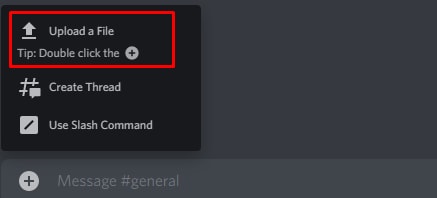
Once you’re in the right place, click on the plus (+) icon that you’ll find to the left of the chatbox at the bottom of the screen where you’d normally type your message.
You’ll then just need to find the file on your computer, and double click on it. It’ll then bring up a pop-up for the video where you can add a comment, which will sit above the video (ideal if you need to give context on why you’re sharing it). You can also mark it as a spoiler – useful if you’re sharing a gaming tip but you don’t want to spoil the story for anyone who’s not reached that point yet.
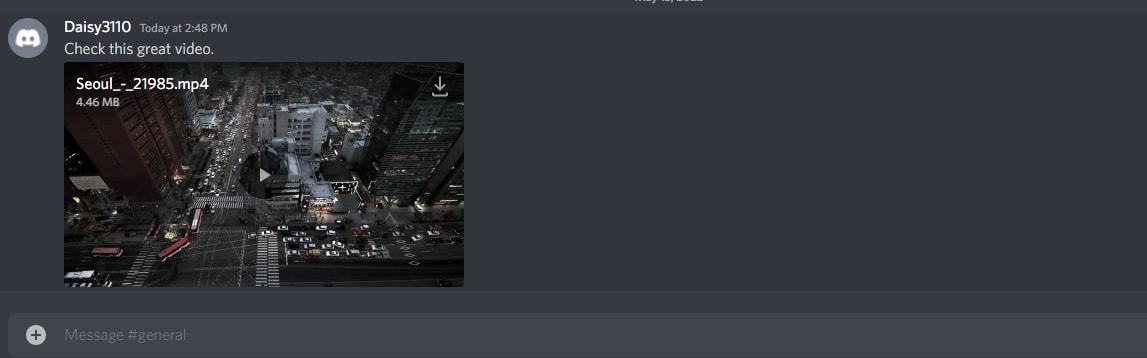
From there, it’s as simple as clicking the upload button. Once it’s ready, the video will be in the chat window for anyone in the server to watch, or for your friend if you’ve sent it privately. And if they want to download it, they’ll just need to click the download button (a downward-facing arrow) at the top right of the video.
It’s worth noting that, while Discord will play most video formats, it can’t manage everything. If you upload a format that Discord isn’t compatible with, then it won’t show a video player – instead, the file will just be uploaded. Other people can still download it to watch on their own devices.
Also, there’s a strict file limit of 8MB. This isn’t huge at all – while there’s no definitive file size for video (as it depends on file type, resolution, compression, etc) it’s unlikely to be more than 60 seconds of footage, and could just be a few seconds. If the video you want to upload is more than 8MB, carry on reading below to find out how.
Part 2: How to Send Videos on Discord Mobile
The process to send video on Discord Mobile is pretty similar both with iOS and Android, but with just a few minor tweaks.
Firstly, you still need to navigate to either the server or inbox where you want to share the video. You can then click the ‘Photo Selector’ button directly to the left of the chatbox.
This will open your phone’s gallery, but it’ll only be searching for photos. You instead want the File Selector, which will be the third icon along – it looks like a text document with a folded-over corner.
Click this and it’ll give you the option to directly upload a video from your phone’s Downloads folder. To send a video that’s stored elsewhere, click on the Expand arrow at the top left of the menu. This will send you to your phone’s file navigation system where you can find the video you want.
Once you’ve selected the video, just hit the blue Send icon to send your video to the chat. Again you can add a message as a caption, but this time it’ll just be in the normal message box rather than a dedicated comment box before you hit upload.
Part 3: How to Send Long Videos on Discord That Are More Than 8MB
So as we’ve said above, there is a file size limit when you’re using a free Discord account of just 8MB, which isn’t much at all. There are a few ways around this, so take your pick from the one that sounds best for you.
1. Update to Discord Nitro to Upload 100MB
The first option is possibly the simplest but it’s definitely not the cheapest, and that’s to pay for an upgrade to Discord Nitro. The paid version of Discord has a number of benefits, one of which is the increased file upload size of 100MB. It costs $4.99 per month or $49.99 per year, so if you’re likely to be regularly uploading videos that are lower than this limit, it might make sense.
2. Cut Unwanted Clips/Compress Video with Filmora Video Editor
The second choice would be to take your video and cut it into pieces, sending them one at a time. This might sound time-consuming but with Filmora’s Instant Cutter Tool, it’s really simple.
All you need to do is open a video in Filmora by clicking the arrow next to Import and then choosing ‘Import with Instant Cutter Tool’.
This will open the Instant Cutter window where you can click Open File to add your video. From here you can trim your files and export them in multiple sections. There are different ways that you can do this, and while each is a simple process, there are still a few steps to follow.


For more detail, check out this post for a step-by-step guide on the different ways you can trim a video in Filmora.
You can also try to compress your video size, which may let you keep the whole video at the expense of some of the quality. Again, using Filmora, this is easy. But also again, there are different ways to go about it.
You could literally crop the video in order to trim some of the data, as the reduced viewing screen won’t be as big a file. You can also reduce the resolution, or convert your video to a format that uses fewer data. You’ll need to test it though, as converting to some video formats might result in blurry footage.
There are advanced settings you can tinker with too, such as lowering the frame rate or the bit rate. Again, rather than go through all of those options in an epic article here, it’s easier to head to a post dedicated to these steps about compress videos with Filmora .
3. Upload to YouTube/Vimeo/Google Drive/Dropbox
The final option is to upload your video to an online player or storage site, and link to it, rather than having Discord host the file. YouTube and Vimeo are the obvious options, but Streamable is another popular choice too with a free membership. YouTube’s maximum video uploads are 128GB, which is huge, while other sites like Streamable cap free accounts to 500MB per video.
So, if you want to upload massive files, you’ll need to decide whether to choose YouTube or pay for an upgraded membership elsewhere. Wherever you host your video, once it’s online just grab the link and paste it into Discord to share your content.
The only drawback to this option is that it stops other users from being able to download the video directly, and you may need to look at a file sharing alternative such as Dropbox if you want to send the actual file.
FAQs About Uploading Videos to Discord
Which Kind of Video Formats Can I Upload to Discord?
You can send any filetype to another user on Discord, so that they can download it and watch it on their own device. But if you want to upload a video so that Discord embeds it, and makes it playable within the chat, you’re limited to only mp4 and WebM filetypes.
You can also use MOV files, but not everyone will be able to play them, and FLAC files are supported on desktop only but not on mobile.
How Can I Upload Saved Videos to Discord?
If you find a video on Discord that you want to share on a different server or in a private DM, you can use the download icon to save it locally. Then, follow the steps above to upload the video to the server or DM chat window where you want to share it.
Richard Bennett
Richard Bennett is a writer and a lover of all things video.
Follow @Richard Bennett
Richard Bennett
Mar 27, 2024• Proven solutions
The whole point of Discord is to bring together communities of like-minded people to talk, share ideas and have fun together. And this isn’t just limited to chatting but sometimes you’re going to want to share content, including videos.
So, whether it’s a compilation of your best gaming moments that you’ve carefully edited together, a home movie that you want to share with friends, or just a funny clip that someone’s sent you that you want to pass on, here we’ll take you through how to send videos on Discord both on PC and mobile, and the likely issues you might face.
- Part 1: How to Send Videos on Discord PC
- Part 2: How to Send Videos on Discord Mobile
- Part 3: How to Send Long Videos on Discord That Are More Than 8MB
- Part 4: FAQs About Uploading Videos to Discord
Part 1: How to Send Videos on Discord PC
It’s actually pretty simple to send videos on Discord when using a PC, providing they aren’t too large a file size.
Firstly, you just need to navigate to the channel or private message where you want to send the video. Just find the right option on the list of servers you’re a member of, or head to your message inbox to find the user you want to send it to privately.
Once you’re in the right place, click on the plus (+) icon that you’ll find to the left of the chatbox at the bottom of the screen where you’d normally type your message.
You’ll then just need to find the file on your computer, and double click on it. It’ll then bring up a pop-up for the video where you can add a comment, which will sit above the video (ideal if you need to give context on why you’re sharing it). You can also mark it as a spoiler – useful if you’re sharing a gaming tip but you don’t want to spoil the story for anyone who’s not reached that point yet.
From there, it’s as simple as clicking the upload button. Once it’s ready, the video will be in the chat window for anyone in the server to watch, or for your friend if you’ve sent it privately. And if they want to download it, they’ll just need to click the download button (a downward-facing arrow) at the top right of the video.
It’s worth noting that, while Discord will play most video formats, it can’t manage everything. If you upload a format that Discord isn’t compatible with, then it won’t show a video player – instead, the file will just be uploaded. Other people can still download it to watch on their own devices.
Also, there’s a strict file limit of 8MB. This isn’t huge at all – while there’s no definitive file size for video (as it depends on file type, resolution, compression, etc) it’s unlikely to be more than 60 seconds of footage, and could just be a few seconds. If the video you want to upload is more than 8MB, carry on reading below to find out how.
Part 2: How to Send Videos on Discord Mobile
The process to send video on Discord Mobile is pretty similar both with iOS and Android, but with just a few minor tweaks.
Firstly, you still need to navigate to either the server or inbox where you want to share the video. You can then click the ‘Photo Selector’ button directly to the left of the chatbox.
This will open your phone’s gallery, but it’ll only be searching for photos. You instead want the File Selector, which will be the third icon along – it looks like a text document with a folded-over corner.
Click this and it’ll give you the option to directly upload a video from your phone’s Downloads folder. To send a video that’s stored elsewhere, click on the Expand arrow at the top left of the menu. This will send you to your phone’s file navigation system where you can find the video you want.
Once you’ve selected the video, just hit the blue Send icon to send your video to the chat. Again you can add a message as a caption, but this time it’ll just be in the normal message box rather than a dedicated comment box before you hit upload.
Part 3: How to Send Long Videos on Discord That Are More Than 8MB
So as we’ve said above, there is a file size limit when you’re using a free Discord account of just 8MB, which isn’t much at all. There are a few ways around this, so take your pick from the one that sounds best for you.
1. Update to Discord Nitro to Upload 100MB
The first option is possibly the simplest but it’s definitely not the cheapest, and that’s to pay for an upgrade to Discord Nitro. The paid version of Discord has a number of benefits, one of which is the increased file upload size of 100MB. It costs $4.99 per month or $49.99 per year, so if you’re likely to be regularly uploading videos that are lower than this limit, it might make sense.
2. Cut Unwanted Clips/Compress Video with Filmora Video Editor
The second choice would be to take your video and cut it into pieces, sending them one at a time. This might sound time-consuming but with Filmora’s Instant Cutter Tool, it’s really simple.
All you need to do is open a video in Filmora by clicking the arrow next to Import and then choosing ‘Import with Instant Cutter Tool’.
This will open the Instant Cutter window where you can click Open File to add your video. From here you can trim your files and export them in multiple sections. There are different ways that you can do this, and while each is a simple process, there are still a few steps to follow.
For more detail, check out this post for a step-by-step guide on the different ways you can trim a video in Filmora.
You can also try to compress your video size, which may let you keep the whole video at the expense of some of the quality. Again, using Filmora, this is easy. But also again, there are different ways to go about it.
You could literally crop the video in order to trim some of the data, as the reduced viewing screen won’t be as big a file. You can also reduce the resolution, or convert your video to a format that uses fewer data. You’ll need to test it though, as converting to some video formats might result in blurry footage.
There are advanced settings you can tinker with too, such as lowering the frame rate or the bit rate. Again, rather than go through all of those options in an epic article here, it’s easier to head to a post dedicated to these steps about compress videos with Filmora .
3. Upload to YouTube/Vimeo/Google Drive/Dropbox
The final option is to upload your video to an online player or storage site, and link to it, rather than having Discord host the file. YouTube and Vimeo are the obvious options, but Streamable is another popular choice too with a free membership. YouTube’s maximum video uploads are 128GB, which is huge, while other sites like Streamable cap free accounts to 500MB per video.
So, if you want to upload massive files, you’ll need to decide whether to choose YouTube or pay for an upgraded membership elsewhere. Wherever you host your video, once it’s online just grab the link and paste it into Discord to share your content.
The only drawback to this option is that it stops other users from being able to download the video directly, and you may need to look at a file sharing alternative such as Dropbox if you want to send the actual file.
FAQs About Uploading Videos to Discord
Which Kind of Video Formats Can I Upload to Discord?
You can send any filetype to another user on Discord, so that they can download it and watch it on their own device. But if you want to upload a video so that Discord embeds it, and makes it playable within the chat, you’re limited to only mp4 and WebM filetypes.
You can also use MOV files, but not everyone will be able to play them, and FLAC files are supported on desktop only but not on mobile.
How Can I Upload Saved Videos to Discord?
If you find a video on Discord that you want to share on a different server or in a private DM, you can use the download icon to save it locally. Then, follow the steps above to upload the video to the server or DM chat window where you want to share it.
Richard Bennett
Richard Bennett is a writer and a lover of all things video.
Follow @Richard Bennett
Also read:
- In 2024, Perfecting Your Status with Emojis in Discord Chat
- [Updated] In 2024, Essential Steps for Starting a Channel on Discord
- [New] From Ordinary to Outstanding Making Unique Discord Pfps for 2024
- [Updated] In 2024, Your Complete Handbook on Discord Usage
- [New] Best 5 Social Media Logo Animation for 2024
- 2024 Approved Discord's Premier Love and Fun Sites
- [Updated] In 2024, How to Modify Your Discord Display at a Glance
- In 2024, Hottest Hooks in the Crowd Ultimate Discord Nicknames Guide
- In 2024, Revolutionize Your Discord Community with These Bots
- In 2024, Masterful Moderation with New Discord Roles
- [New] Unleashing Creativity on Discord A Complete Guide to Adding GIFS
- 2024 Approved The Ultimate Guide to Interacting in Discord DMs
- [New] In 2024, Seamless Blend Linking Spotify & Discord Directly
- [Updated] 2024 Approved In Search for Auditory Perfection? Try These Top-Rated Discord Bots
- In 2024, Streamlining Office Communication Which Favors Teams More, Slack or Discord?
- [New] 2024 Approved From Free to Paid An Introduction to DiscoNitro Benefits
- 2024 Approved Best Practices in Discord Recording Software
- 2024 Approved Master the Art of Message Interaction on Desktop/Mobile
- [New] Understanding Discord Spoiler Tags Quick Tips & Tricks
- [New] In 2024, Step-by-Step Guide Adjusting Discord Presence
- [Updated] 2024 Approved Unveiling Style Secrets for Customized Discord Messages
- Unveiling Discord A Comprehensive Guide for Everyone for 2024
- [Updated] In 2024, Step-by-Step Strategies for Hosting Engaging Discord Channels
- [Updated] Inside DiscoNitro Navigating the Premium Experience with Ease
- [Updated] In 2024, Bringing Voice to Discord Chats The TTS Journey
- [New] Proven Techniques for Swiftly Locating Your Desired Discord Server for 2024
- 2024 Approved Discord Dialogue Perfecting Your Replies
- [New] 2024 Approved Discover BetterDiscord's Top 10 Trending Themes
- [Updated] Discord Dating Sites Worth Exploring for 2024
- In 2024, How to Speak Clearly on Discord via TTS
- [Updated] Streamline Your Life Quick Tips to Beginning on Discord Broadcasts for 2024
- Explore Discord's Colored Palette with Over 7 FREE Emoji Resources
- In 2024, Unlocking the Power of Discord Stickers
- [Updated] 2024 Approved Essential Symbols in Social Networking Movement Magic
- [Updated] 2024 Approved Delving Into Discord Nitro - High-Quality Features & How to Obtain Them
- How to Voice-Activate Your Discord Conversations
- Updated 5 Best Tools to Help You Distort Audio
- How to play HEVC H.265 video on Xiaomi ?
- In 2024, Unlocking the Power of Smart Lock A Beginners Guide for Xiaomi Redmi Note 12 Pro+ 5G Users
- Updated 2024 Approved Unlock Animation Magic Top 8 Photo Animation Tools
- [Updated] Detailed Walkthrough IPad Screen Recording
- In 2024, Expert Presentations to Video Files
- In 2024, How to Watch Hulu Outside US On Vivo Y56 5G | Dr.fone
- How to Track Samsung Galaxy A23 5G by Phone Number | Dr.fone
- [New] 2024 Approved Elite Slide-to-Digital Recorder
- In 2024, What Pokémon Evolve with A Dawn Stone For Honor X50i? | Dr.fone
- 9 Solutions to Fix Honor 70 Lite 5G System Crash Issue | Dr.fone
- [Updated] Troubleshoot Tweets on Chrome Not Loading
- Updated Capturing Sound with Precision Your Complete Guide to Audio Recording in Windows 10
- In 2024, Tapping Into Trends 5 Game-Changing Strategies for Influencers
- [Updated] FB Watch Icon Recovery - Tips and Tricks for 2024
- In 2024, Top 7 Skype Hacker to Hack Any Skype Account On your Poco F5 Pro 5G | Dr.fone
- Unlock Xiaomi 14 Ultra Phone Password Without Factory Reset Full Guide Here
- In 2024, Keeping the Memories Efficiently Taking Screenshots on Xbox One
- In 2024, No Frills Screensaver - Windows Compatible
- List of Pokémon Go Joysticks On Tecno Spark Go (2024) | Dr.fone
- In 2024, Launching Live Recordings on HP Computers
- In 2024, 10 Free Location Spoofers to Fake GPS Location on your Samsung Galaxy F14 5G | Dr.fone
- Guide How To Unbrick a Bricked Realme 11 Pro+ Phone | Dr.fone
- [Updated] MiniRecord Screen Snapshot Evaluation for 2024
- In 2024, Change Location on Yik Yak For your Realme 11 Pro to Enjoy More Fun | Dr.fone
- Best Ways on How to Unlock/Bypass/Swipe/Remove Honor Play 40C Fingerprint Lock
- In 2024, 9 Best Free Android Monitoring Apps to Monitor Phone Remotely For your Realme GT 3 | Dr.fone
- Updated Adjusting Video Playback Speed in QuickTime A Beginners Guide for 2024
- OBS vs ShadowPlay
- Ultimate Guide, How to Transfer Music From Apple iPhone 15 to iPhone | Dr.fone
- Audio Recipe Converting Insta Vids to Mp3 for 2024
- 3uTools Virtual Location Not Working On Xiaomi 14 Ultra? Fix Now | Dr.fone
- New 2024 Approved How to Make a GIF in Photoshop
- Updated 2024 Approved Key Findings From the Leading OGG Conversion Software
- Title: "[Updated] 2024 Approved The Logical Path to Exit a Discord Platform"
- Author: Timothy
- Created at : 2024-06-20 01:40:39
- Updated at : 2024-06-21 01:40:39
- Link: https://discord-videos.techidaily.com/updated-2024-approved-the-logical-path-to-exit-a-discord-platform/
- License: This work is licensed under CC BY-NC-SA 4.0.
