
!["[Updated] 2024 Approved The Ultimate Pathway to Discord's Premium Service, DiscoNitro"](https://www.lifewire.com/thmb/1e0lAWRimhVHbQkTAV-f6BKr0q8=/400x300/filters:no_upscale():max_bytes(150000):strip_icc()/finger-2081169_1280-1aea4fd076b84091b3468211e7b3b3aa.jpg)
"[Updated] 2024 Approved The Ultimate Pathway to Discord's Premium Service, DiscoNitro"
The Ultimate Pathway to Discord’s Premium Service, DiscoNitro
What Is Discord Nitro

Liza Brown
Mar 27, 2024• Proven solutions
If you want to join an online community of like-minded folks, Discord is a perfect platform to do so. Introduced originally for gamers, it now has become a platform for all types of communities who want video calls, voice chats, video streaming, and more.
It’s arguably one of the best and most popular apps among the global gaming community. Though it’s free to use, you need a paid subscription plan to unlock its full potential like almost all other online services available.
The premium subscription service for Discord is known as Discord Nitro! Want to learn more about it? Read on as we elaborate.
- Part 1: What Is Discord Nitro?
- Part 2: Why Should People Use The Discord Nitro?
- Part 3: How Much Does Discord Nitro Cost??
- Part 4: How to Subscribe to Discord Nitro?
- Part 5: How to Get Discord Nitro for Free?
- Part 6: When People should Use Discord Nitro?
Part 1: What Is Discord Nitro And What Does It Do?
Discord is absolutely free, but you may require a Discord Nitro subscription if you want to use its more powerful features! At this point, you may be wondering, what does Discord Nitro do?
Though upgrading is not a requirement as most features do not require a subscription, free users still have certain limitations.
For instance, they can’t use the same emojis on two servers. In addition to that, the streaming quality and account customization features also lack on the free plan. These features and more are strictly for Discord Nitro users only.
Apart from the fact that Discord Nitro offers better additional features, it also lets users help their preferred servers and unlock various features.
Part 2: Why Should People Use The Discord Nitro?
With the discord free version, you can do many things: communicate with your friend outside and inside of games, start your server, and even participate in various channels.
For some, these features are more than adequate; for others, they aren’t! They want more capabilities, and Discord Nitro provides them exactly with that.
However, most of these new features are cosmetic.
For instance, you can make and use your custom emojis if you’re an emoji admirer. Not only this, but you can also use animated emojis, including GIFs.
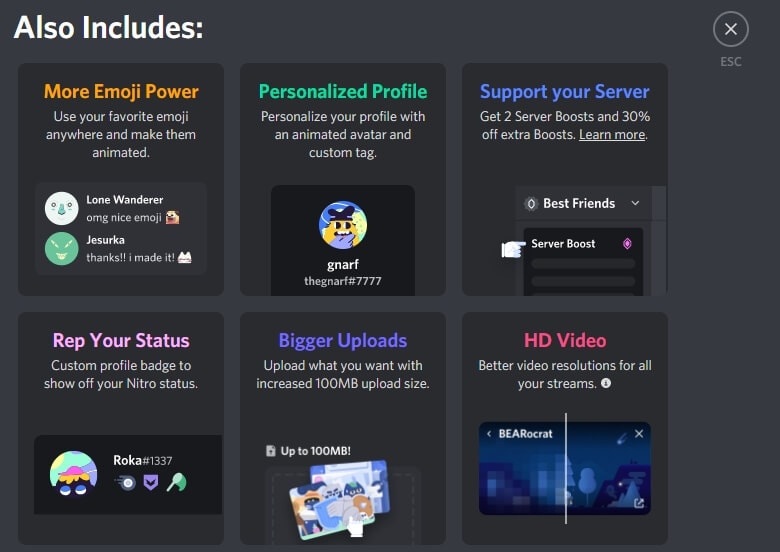
Without further ado, here are a few key benefits you’ll get with Discord Nitro:
Better Emojis
We all know how vital emojis have become for healthy chitchats, even to the extent that no conversation seems complete if you don’t have an emoji in it.
Discord Nitro allows you to collect and create your customized emojis. Usually, these emojis are animated and easily used while chatting with other Discord users.
Personal Profile
Since your personal profile is your only Discord identity, make sure to customize it with animated avatars and claim custom tags to get going.
Better Animation
With Discord Nitro, you can also unblock various GIF avatars and custom tags.
High-Definition (HD) Screen Sharing
You can share the game screen on the server or with friends and other users with Discord Nitro. Choose from 720p and 1080p at 30fps.
Fancy Badge
One of the better additions for several Discord users is getting the latest, fancy badge. With Discord Nitro, you can earn new badges to display on your personal profile.
Part 3: How Much Does Discord Nitro Cost?
Free Discord users can choose from two variants if they want to switch to Discord Nitro premium services.
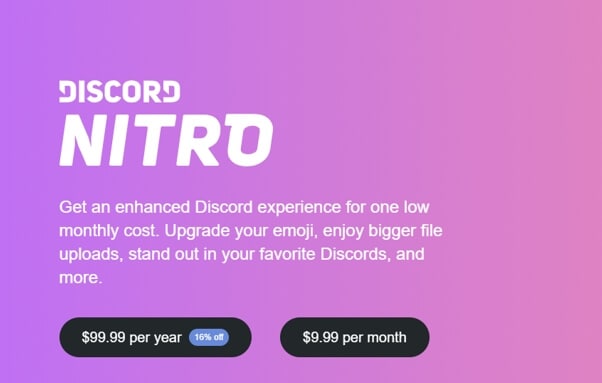
You can choose between annual or monthly subscription plans. And if you pick a yearly subscription plan, you’ll get a 16% discount.
The two Discord Nitro variants are Nitro Classic and Nitro!
If you choose the Nitro classic subscription service, you’ll have to pay $4.99 on the monthly plan or $49.99 annually. This variant is comparatively cheaper than the Nitro and provides stripped-down features.
On the other hand, if you go for the Nitro subscription service, get ready to pay $99.99 on the yearly plan and $9.99 on the monthly. It offers many features to its users.
Both these variants provide loads of advantages to discord users; here are a handful of benefits the two paid subscription services offer:
- If you choose the free version, your screen share settings typically max out at the 720p resolution (30fps). However, if you select either of the two paid versions, you can share a screen with friends at 720p (60fps) resolution or 1080p resolution (30fps)
- Go-Live provides users with limited streaming; it means you can stream games to users who don’t happen to be your friends, unlike screen-share. So, with a free version, you can stream at 720p (30fps), whereas, Nitro Classic subscription will allow you to stream up to 1080p resolution (60fps), and the Nitro will provide you with 60fps and more quality
- With the free version, you can upload and share only 8MB size files. But with paid variants, you’ll get an increased uploading limit. For example, Nitro Classic allows an upload limit up to 50MB, while the Nitro goes a step further and allows 100MB
- Users of both paid versions will get a badge which will be displayed with their usernames
- You can upgrade your image to an animated GIF!
- With paid subscriptions, you can create customized usernames and emojis to enhance your experience
One significant difference between the Nitro and Nitro Classic versions is the difference between their server boost capability.
Server boost is a user-gifted advantage that paid subscribers can provide to server owners to unlock extra perks for other users. The Nitro service has two server boosts, unlike the Nitro Classic service.
Part 4: How to Subscribe to Discord Nitro?
Looking at the perks you get if you become a paid Discord member, it’s evident that several users will want to avail the opportunity. Especially with the number of streamers and gamers increasing every day!
But how does one upgrade to Discord Nitro?
It’s quite straightforward to get a paid subscription plan with Discord. You can either do it using the mobile app or through your desktop.
Subscribing On MAC Or PC
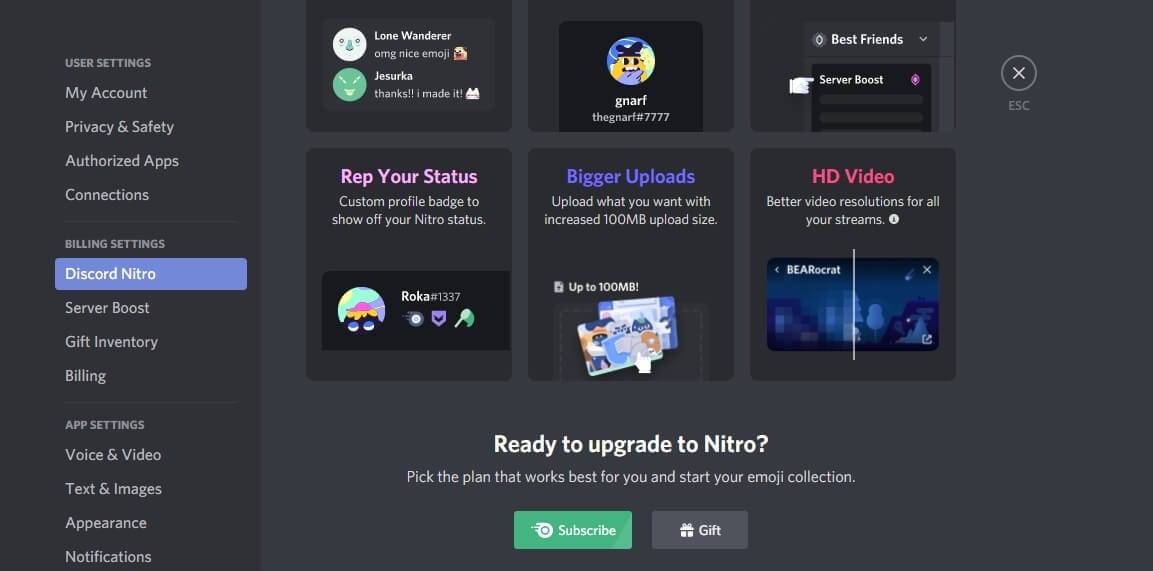
To get a subscription plan through a desktop app or Discord website, follow the steps below:
- Click the ‘settings’ icon at the bottom of your screen
- Once your settings menu appear, click Discord Nitro
- Press the subscribe button below Discord Nitro to subscribe to either of the two variants you choose
- If you want to gift a paid subscription plan to some other user on Discord, click gift next to the ‘subscribe’ button
Subscribing Via Mobile Apps
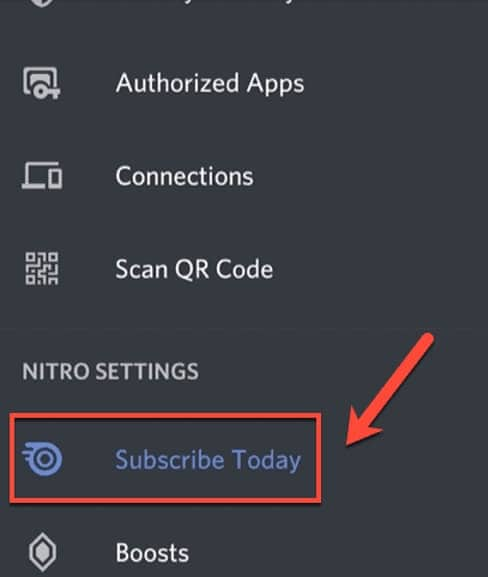
If you want to subscribe through a mobile app, you can tap the hamburger menu on the top-left.
As the menu appears, tap the user icon and then tap Subscribe Today from the various options listed below the settings category.
You’ll see brief info on the subscription-plan. Once you read it, tap subscribe button below Discord Nitro Classic or Discord Nitro.
Follow the directions to confirm the payment. The moment it gets approved, your subscription is activated.
Part 5: How to Get Discord Nitro for Free?
If you want to get Discord Nitro for free, you can get it without paying a dime. There are various methods you can follow to get a free subscription plan.
Today, we will tell you two effective ways through which you’ll get your free Discord Nitro subscription plan.
First Method
Here’s how to get free Nitro with your Xbox game-pass:
As the menu appears, tap the user icon and then tap Subscribe Today from the various options listed below the settings category.
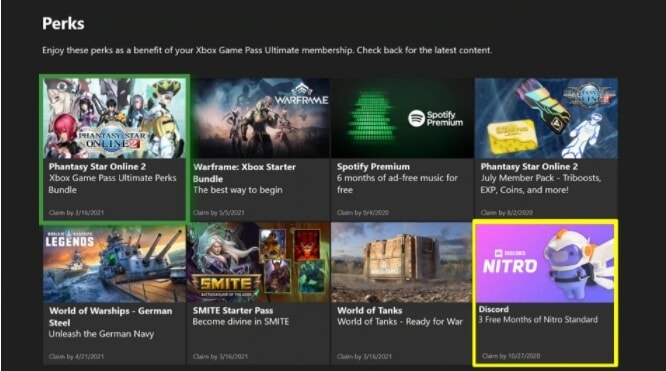
- Download, install, and run your Xbox app for Windows
- Log in to your account; if you don’t have one, create your account using outlook email. After that, place a gamer tag, press Game Pass and then press Get a Game Pass
- Press Join Game Pass and make sure to join through “Xbox game pass ultimate” to qualify for a free subscription plan
- Buy a game pass that will cost you only a dollar to get a free Discord Nitro
- Click the perks button on your Game Pass window tab and scroll down and click the Get Link button
- As the link opens, subscribe for the three-month plan of Nitro
- Now visit Microsoft services to claim it
- Log in to the account through which you bought “game pass ultimate” and cancel the subscription
This way, you can Discord Nitro free of cost!
Second Method
Here’s how you can get free Discord Nitro through your mobile app:
- Create a Discord account using a mobile app
- Join some, if not many, public servers
- Now add some people
- Buy a Discord “Nitro Gift” for one month using your dummy account (make sure to purchase the gift through Apple)
- Then, send the Nitro Gift back to your primary account
- Redeem the gift on the primary account and wait at least a day or two
- Now, contact Apple and say you have no idea what this ten-dollar charge is on the Discord. Make them believe your little brother or kid has been purchasing things using your cell phone
- Apple Inc. will repay you the entire $10 you spent on buying
- Discord will likely ban the dummy account you have created in the first place
Note: Make sure your primary account is safe. If you intend to repeat the process, make a new dummy account and Apple ID and use a different type of payment method.
Part 6: When Should I Use Discord Nitro?
Discord Nitro improves your all in one Discord video, voice, and chats. Here’s when you should use Discord Nitro subscription plans, be it Nitro Classic or Nitro:
- Use the Discord Nitro if you want better, customized, and animated emojis in your chats to make the conversation more lively
- Go for the paid plan if you want a personalized profile with custom tags and an animated avatar
- Use discord Nitro if you want an extra 30% boost and two server boosts
- Lastly, if you want bigger uploads and high-definition videos, you should use Discord Nitro!
Liza Brown
Liza Brown is a writer and a lover of all things video.
Follow @Liza Brown
Liza Brown
Mar 27, 2024• Proven solutions
If you want to join an online community of like-minded folks, Discord is a perfect platform to do so. Introduced originally for gamers, it now has become a platform for all types of communities who want video calls, voice chats, video streaming, and more.
It’s arguably one of the best and most popular apps among the global gaming community. Though it’s free to use, you need a paid subscription plan to unlock its full potential like almost all other online services available.
The premium subscription service for Discord is known as Discord Nitro! Want to learn more about it? Read on as we elaborate.
- Part 1: What Is Discord Nitro?
- Part 2: Why Should People Use The Discord Nitro?
- Part 3: How Much Does Discord Nitro Cost??
- Part 4: How to Subscribe to Discord Nitro?
- Part 5: How to Get Discord Nitro for Free?
- Part 6: When People should Use Discord Nitro?
Part 1: What Is Discord Nitro And What Does It Do?
Discord is absolutely free, but you may require a Discord Nitro subscription if you want to use its more powerful features! At this point, you may be wondering, what does Discord Nitro do?
Though upgrading is not a requirement as most features do not require a subscription, free users still have certain limitations.
For instance, they can’t use the same emojis on two servers. In addition to that, the streaming quality and account customization features also lack on the free plan. These features and more are strictly for Discord Nitro users only.
Apart from the fact that Discord Nitro offers better additional features, it also lets users help their preferred servers and unlock various features.
Part 2: Why Should People Use The Discord Nitro?
With the discord free version, you can do many things: communicate with your friend outside and inside of games, start your server, and even participate in various channels.
For some, these features are more than adequate; for others, they aren’t! They want more capabilities, and Discord Nitro provides them exactly with that.
However, most of these new features are cosmetic.
For instance, you can make and use your custom emojis if you’re an emoji admirer. Not only this, but you can also use animated emojis, including GIFs.
Without further ado, here are a few key benefits you’ll get with Discord Nitro:
Better Emojis
We all know how vital emojis have become for healthy chitchats, even to the extent that no conversation seems complete if you don’t have an emoji in it.
Discord Nitro allows you to collect and create your customized emojis. Usually, these emojis are animated and easily used while chatting with other Discord users.
Personal Profile
Since your personal profile is your only Discord identity, make sure to customize it with animated avatars and claim custom tags to get going.
Better Animation
With Discord Nitro, you can also unblock various GIF avatars and custom tags.
High-Definition (HD) Screen Sharing
You can share the game screen on the server or with friends and other users with Discord Nitro. Choose from 720p and 1080p at 30fps.
Fancy Badge
One of the better additions for several Discord users is getting the latest, fancy badge. With Discord Nitro, you can earn new badges to display on your personal profile.
Part 3: How Much Does Discord Nitro Cost?
Free Discord users can choose from two variants if they want to switch to Discord Nitro premium services.
You can choose between annual or monthly subscription plans. And if you pick a yearly subscription plan, you’ll get a 16% discount.
The two Discord Nitro variants are Nitro Classic and Nitro!
If you choose the Nitro classic subscription service, you’ll have to pay $4.99 on the monthly plan or $49.99 annually. This variant is comparatively cheaper than the Nitro and provides stripped-down features.
On the other hand, if you go for the Nitro subscription service, get ready to pay $99.99 on the yearly plan and $9.99 on the monthly. It offers many features to its users.
Both these variants provide loads of advantages to discord users; here are a handful of benefits the two paid subscription services offer:
- If you choose the free version, your screen share settings typically max out at the 720p resolution (30fps). However, if you select either of the two paid versions, you can share a screen with friends at 720p (60fps) resolution or 1080p resolution (30fps)
- Go-Live provides users with limited streaming; it means you can stream games to users who don’t happen to be your friends, unlike screen-share. So, with a free version, you can stream at 720p (30fps), whereas, Nitro Classic subscription will allow you to stream up to 1080p resolution (60fps), and the Nitro will provide you with 60fps and more quality
- With the free version, you can upload and share only 8MB size files. But with paid variants, you’ll get an increased uploading limit. For example, Nitro Classic allows an upload limit up to 50MB, while the Nitro goes a step further and allows 100MB
- Users of both paid versions will get a badge which will be displayed with their usernames
- You can upgrade your image to an animated GIF!
- With paid subscriptions, you can create customized usernames and emojis to enhance your experience
One significant difference between the Nitro and Nitro Classic versions is the difference between their server boost capability.
Server boost is a user-gifted advantage that paid subscribers can provide to server owners to unlock extra perks for other users. The Nitro service has two server boosts, unlike the Nitro Classic service.
Part 4: How to Subscribe to Discord Nitro?
Looking at the perks you get if you become a paid Discord member, it’s evident that several users will want to avail the opportunity. Especially with the number of streamers and gamers increasing every day!
But how does one upgrade to Discord Nitro?
It’s quite straightforward to get a paid subscription plan with Discord. You can either do it using the mobile app or through your desktop.
Subscribing On MAC Or PC
To get a subscription plan through a desktop app or Discord website, follow the steps below:
- Click the ‘settings’ icon at the bottom of your screen
- Once your settings menu appear, click Discord Nitro
- Press the subscribe button below Discord Nitro to subscribe to either of the two variants you choose
- If you want to gift a paid subscription plan to some other user on Discord, click gift next to the ‘subscribe’ button
Subscribing Via Mobile Apps
If you want to subscribe through a mobile app, you can tap the hamburger menu on the top-left.
As the menu appears, tap the user icon and then tap Subscribe Today from the various options listed below the settings category.
You’ll see brief info on the subscription-plan. Once you read it, tap subscribe button below Discord Nitro Classic or Discord Nitro.
Follow the directions to confirm the payment. The moment it gets approved, your subscription is activated.
Part 5: How to Get Discord Nitro for Free?
If you want to get Discord Nitro for free, you can get it without paying a dime. There are various methods you can follow to get a free subscription plan.
Today, we will tell you two effective ways through which you’ll get your free Discord Nitro subscription plan.
First Method
Here’s how to get free Nitro with your Xbox game-pass:
As the menu appears, tap the user icon and then tap Subscribe Today from the various options listed below the settings category.
- Download, install, and run your Xbox app for Windows
- Log in to your account; if you don’t have one, create your account using outlook email. After that, place a gamer tag, press Game Pass and then press Get a Game Pass
- Press Join Game Pass and make sure to join through “Xbox game pass ultimate” to qualify for a free subscription plan
- Buy a game pass that will cost you only a dollar to get a free Discord Nitro
- Click the perks button on your Game Pass window tab and scroll down and click the Get Link button
- As the link opens, subscribe for the three-month plan of Nitro
- Now visit Microsoft services to claim it
- Log in to the account through which you bought “game pass ultimate” and cancel the subscription
This way, you can Discord Nitro free of cost!
Second Method
Here’s how you can get free Discord Nitro through your mobile app:
- Create a Discord account using a mobile app
- Join some, if not many, public servers
- Now add some people
- Buy a Discord “Nitro Gift” for one month using your dummy account (make sure to purchase the gift through Apple)
- Then, send the Nitro Gift back to your primary account
- Redeem the gift on the primary account and wait at least a day or two
- Now, contact Apple and say you have no idea what this ten-dollar charge is on the Discord. Make them believe your little brother or kid has been purchasing things using your cell phone
- Apple Inc. will repay you the entire $10 you spent on buying
- Discord will likely ban the dummy account you have created in the first place
Note: Make sure your primary account is safe. If you intend to repeat the process, make a new dummy account and Apple ID and use a different type of payment method.
Part 6: When Should I Use Discord Nitro?
Discord Nitro improves your all in one Discord video, voice, and chats. Here’s when you should use Discord Nitro subscription plans, be it Nitro Classic or Nitro:
- Use the Discord Nitro if you want better, customized, and animated emojis in your chats to make the conversation more lively
- Go for the paid plan if you want a personalized profile with custom tags and an animated avatar
- Use discord Nitro if you want an extra 30% boost and two server boosts
- Lastly, if you want bigger uploads and high-definition videos, you should use Discord Nitro!
Liza Brown
Liza Brown is a writer and a lover of all things video.
Follow @Liza Brown
Dial Down Distractions: Mastering VoiceMod Techniques for Discord Chats
How To Use Voicemod On Discord

Richard Bennett
Mar 27, 2024• Proven solutions
A voice changer will allow you to prank friends, create content, and most of all, secure your presence by maintaining anonymity. With it, you can turn your voice into several unique and exciting voices to serve any purpose you deem fit.
And when it comes to voice changers, none is as easy to operate as the Voicemod in Discord. Its claim to fame is that it features numerous voice options to choose from.
With Vociemod, you have to simply run the program in the background and select your desired voice!
Read on as we discuss how to use Voicemod on Discord in detail:
In this article
Part 1: How To Use Voice Changer Voicemod For Discord On Desktop Computer
Part 2: How To Fix Voicemod Not Working Discord?
Part 3: How To Change Voice For Discord On Mobile?
Part 1: How To Use Voice Changer Voicemod For Discord On Desktop Computer
Voicemod is arguably one of the best voice changer tools available on the internet for its excellent features.
But before we jump straight into using Voicemod for Discord, you must know how to install one on your desktop Mac/PC.
Here’s how to install Voicemod
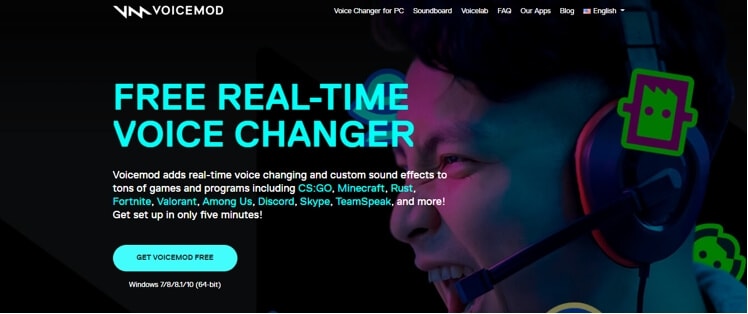
- Visit the Voicemod website to begin the download process.
- You’ll see the button “Get Voicemod Free” on the screen. Click it!
- Upon clicking, the site will ask you to sign in to your account from Discord, Twitch, to Google. Use your Discord login details to sign in.
- After you’re signed in, the “.exe” file will be downloaded to your PC/Mac’s download folder. Open the “.exe” file the moment it’s downloaded.
- An install wizard will open up. Navigate through the wizard’s installation process to install the program on your PC/Mac.
- After installation is complete, the installation wizard will ask to restart your windows’ Mac or PC.
You can skip it, but it’s best to restart it for smooth operations.
Once your Mac/PC restarts, you’ll see the Voicemod app icon on your desktop screen.
Now that you have successfully installed the voice changer Voicemod app into your desktop computer, let’s dive into knowing how to use Voicemod on Discord!
Here’s how to use voice changer on Discord
- Click the Vociemod icon on the desktop to open the app. If you can’t find it there, click the “windows icon” located at the screen’s bottom-left. Just type “Voicemod,” and the program will show up. Double click it to get it opened.
- When the app opens up, you’ll have to choose the output and input it will use. If you’re wondering, why the output? This is to give you an insight into what your voice will sound like on each filter.
Once it’s done, you can play around with different filters!
Every day, you’ll get new free filters to use; however, to unlock and access all filters, you need to upgrade to the “pro-version” of voice changer Voicemod.
On the other hand, if you only need a few filters, the “basic-version” should suffice.
Apart from that, you can unlock an additional free filter in your app by sharing it on your social media accounts.

Step 1
To set up Voicemod with Discord, open your discord account and go to the settings (gear icon) placed at the screen’s bottom-left corner.
Step 2
Click the “Voice and Video” option right under the app settings.
Step 3
To make Voicemod usable, you’ll have to change Voice settings. Within the “Input Device” option, select the option that says “Microphone Voicemod Virtual Audio.”
Step 4
After you have changed settings, you can easily change the voice within the program. Not only this, but other users can also hear your audio alteration.
Step 5
With the “basic version,” you’ll have seven free voice choices that will change each day. On the contrary, with the “pro-version,” you’ll gain access to more than 80 different voice options.
So, if you’re searching for an easy and simple voice-changing app to use, look no further than Voicemod!
Part 2: How To Fix Voicemod Not Working Discord?
Is your voice changer Voicemod not working on Discord? No worries, you can troubleshoot the issues with a few basic steps.
Here are some ways you can use to fix Voicemod not working in Discord:
Method 1: Restart Your Windows PC/Mac
Though it’s not a technical solution, restarting your desktop computer fixes incorrect settings by rebooting them and solves many problems connected with your computer system, programs, and hardware.
So, when your Voicemod suddenly ceases to work in Discord, make sure to restart your Windows PC/Mac before going any further, as it’s the first step in fixing voice issues.
If restarting doesn’t help, slide to the next step!
Method 2: Make Sure The Mic Is Properly Set
The next step is to check if the mic works correctly. This is because faulty settings may stop voice changer Voicemod from operating correctly.
Just follow the steps below to resolve it:
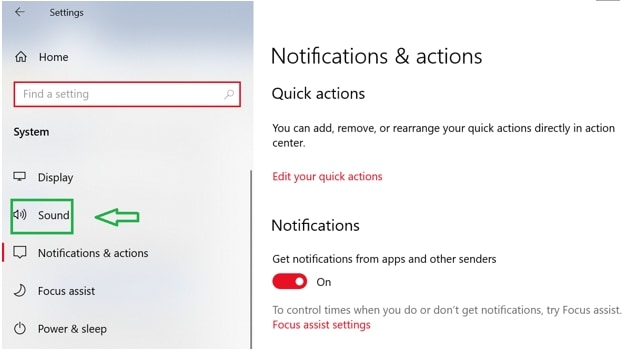
- On the keyboard, press the “Win” logo and the “I” key simultaneously to open Windows settings. Click “System.”
- On the left, you’ll see the option “Sound.” Click it.
- First, you have to test the microphone! To do so, choose the “Headset” option rather than the Voicemod microphone under the “Input” section
- Click “Device properties & test microphone”
- Make sure to uncheck the “disable” box and keep the volume section 100
- Click the “Start test” button and speak into the microphone
- After that, click “Stop test.” If the greatest value it shows is above “0”, then your microphone works correctly
Now, restart your Voicemod app to see if it’s working properly or not! If the issue still persists, jump to the next solution.
Method 3: Install Windows Updates
If you use Windows 10, it has two kinds of updates that offer performance boost and security patches. Sometimes, an update can fix a few driver and software conflicts automatically.
You can quickly solve the voice chat problem by simply updating the system settings. Here’s how to update your Windows 10:
- Open your windows setting by pressing the “Windows button” and the “I” key together.
- Click on “Update and Security”
- Click the “Check for Updates” button. If an update is found, it will install automatically on the system
Make sure to repeat this process until it says you’re up-to-date. Then, restart the PC. Check whether the Vociemod is properly working or not!
If not, try our next option!
Method 4:Re-Install Voice Changer Voicemod Drivers
In many instances, the issue signifies that you’re using outdated or faulty drivers. To troubleshoot this, simply re-install your Voicemod driver, and you’ll be good to go!
First, uninstall your Voicemod driver from the windows PC/Mac. Here’s how to do it:
- On the keyboard, press the “Windows button” as well as the “I” key to bring up the “Run box”
- Paste or type “devmgmt.msc” and click “OK.” This will open the “Device Manager”
- Click the “expand” option of “Audio Inputs & Outputs.”
- Click the “Microphone WMD” and choose the “Uninstall device” option
- A pop-up window will appear. Click the “Uninstall” button
- Restart the PC
Install the voice changer Voicemod again, whether automatically or manually, and see if it works!
Part 3: How To Change Voice For Discord On Mobile?
“Voicemod clips” is the version for both Apple and Android devices. The app will help you make high-quality content using its wide selection of one-of-a-kind effects, which will change your voice so much that you won’t recognize yourself!
In addition to that, you can add filters, which are connected to your cell phone’s camera to create funny, interesting videos.
Additionally, you’ll have the option to choose from 10 different voices. Plus, you can also make unlimited videos and audio from the humorous to the terrifying.
Some of the Voicemod voices on mobile include male-to-female, different robot effects, famous celebrities, scary voices, and much more. In short, everything is based on how you would like to modify your voice!
Not just that, you can also cross-share creative videos and audio to popular social networking platforms such as Facebook, Twitter, Instagram, TikTok, and Snapchat using your smartphone.
Curious to know how to change your voice for Discord on mobile? Here are step-by-step instructions:
- Make sure the Voicemod app is downloaded on your Apple or Android device and appropriately configured
- Open Discord
- Tap the “cogwheel icon” near your name and avatar
- You’ll see the “settings” page
- Within it, tap the “Voice & Video” option
- Tap Voicemod under the “Input Device” option and the headset under the “Output Device” option and tap escape. You’ll have access to numerous exciting sounds
Richard Bennett
Richard Bennett is a writer and a lover of all things video.
Follow @Richard Bennett
Richard Bennett
Mar 27, 2024• Proven solutions
A voice changer will allow you to prank friends, create content, and most of all, secure your presence by maintaining anonymity. With it, you can turn your voice into several unique and exciting voices to serve any purpose you deem fit.
And when it comes to voice changers, none is as easy to operate as the Voicemod in Discord. Its claim to fame is that it features numerous voice options to choose from.
With Vociemod, you have to simply run the program in the background and select your desired voice!
Read on as we discuss how to use Voicemod on Discord in detail:
In this article
Part 1: How To Use Voice Changer Voicemod For Discord On Desktop Computer
Part 2: How To Fix Voicemod Not Working Discord?
Part 3: How To Change Voice For Discord On Mobile?
Part 1: How To Use Voice Changer Voicemod For Discord On Desktop Computer
Voicemod is arguably one of the best voice changer tools available on the internet for its excellent features.
But before we jump straight into using Voicemod for Discord, you must know how to install one on your desktop Mac/PC.
Here’s how to install Voicemod
- Visit the Voicemod website to begin the download process.
- You’ll see the button “Get Voicemod Free” on the screen. Click it!
- Upon clicking, the site will ask you to sign in to your account from Discord, Twitch, to Google. Use your Discord login details to sign in.
- After you’re signed in, the “.exe” file will be downloaded to your PC/Mac’s download folder. Open the “.exe” file the moment it’s downloaded.
- An install wizard will open up. Navigate through the wizard’s installation process to install the program on your PC/Mac.
- After installation is complete, the installation wizard will ask to restart your windows’ Mac or PC.
You can skip it, but it’s best to restart it for smooth operations.
Once your Mac/PC restarts, you’ll see the Voicemod app icon on your desktop screen.
Now that you have successfully installed the voice changer Voicemod app into your desktop computer, let’s dive into knowing how to use Voicemod on Discord!
Here’s how to use voice changer on Discord
- Click the Vociemod icon on the desktop to open the app. If you can’t find it there, click the “windows icon” located at the screen’s bottom-left. Just type “Voicemod,” and the program will show up. Double click it to get it opened.
- When the app opens up, you’ll have to choose the output and input it will use. If you’re wondering, why the output? This is to give you an insight into what your voice will sound like on each filter.
Once it’s done, you can play around with different filters!
Every day, you’ll get new free filters to use; however, to unlock and access all filters, you need to upgrade to the “pro-version” of voice changer Voicemod.
On the other hand, if you only need a few filters, the “basic-version” should suffice.
Apart from that, you can unlock an additional free filter in your app by sharing it on your social media accounts.
Step 1
To set up Voicemod with Discord, open your discord account and go to the settings (gear icon) placed at the screen’s bottom-left corner.
Step 2
Click the “Voice and Video” option right under the app settings.
Step 3
To make Voicemod usable, you’ll have to change Voice settings. Within the “Input Device” option, select the option that says “Microphone Voicemod Virtual Audio.”
Step 4
After you have changed settings, you can easily change the voice within the program. Not only this, but other users can also hear your audio alteration.
Step 5
With the “basic version,” you’ll have seven free voice choices that will change each day. On the contrary, with the “pro-version,” you’ll gain access to more than 80 different voice options.
So, if you’re searching for an easy and simple voice-changing app to use, look no further than Voicemod!
Part 2: How To Fix Voicemod Not Working Discord?
Is your voice changer Voicemod not working on Discord? No worries, you can troubleshoot the issues with a few basic steps.
Here are some ways you can use to fix Voicemod not working in Discord:
Method 1: Restart Your Windows PC/Mac
Though it’s not a technical solution, restarting your desktop computer fixes incorrect settings by rebooting them and solves many problems connected with your computer system, programs, and hardware.
So, when your Voicemod suddenly ceases to work in Discord, make sure to restart your Windows PC/Mac before going any further, as it’s the first step in fixing voice issues.
If restarting doesn’t help, slide to the next step!
Method 2: Make Sure The Mic Is Properly Set
The next step is to check if the mic works correctly. This is because faulty settings may stop voice changer Voicemod from operating correctly.
Just follow the steps below to resolve it:
- On the keyboard, press the “Win” logo and the “I” key simultaneously to open Windows settings. Click “System.”
- On the left, you’ll see the option “Sound.” Click it.
- First, you have to test the microphone! To do so, choose the “Headset” option rather than the Voicemod microphone under the “Input” section
- Click “Device properties & test microphone”
- Make sure to uncheck the “disable” box and keep the volume section 100
- Click the “Start test” button and speak into the microphone
- After that, click “Stop test.” If the greatest value it shows is above “0”, then your microphone works correctly
Now, restart your Voicemod app to see if it’s working properly or not! If the issue still persists, jump to the next solution.
Method 3: Install Windows Updates
If you use Windows 10, it has two kinds of updates that offer performance boost and security patches. Sometimes, an update can fix a few driver and software conflicts automatically.
You can quickly solve the voice chat problem by simply updating the system settings. Here’s how to update your Windows 10:
- Open your windows setting by pressing the “Windows button” and the “I” key together.
- Click on “Update and Security”
- Click the “Check for Updates” button. If an update is found, it will install automatically on the system
Make sure to repeat this process until it says you’re up-to-date. Then, restart the PC. Check whether the Vociemod is properly working or not!
If not, try our next option!
Method 4:Re-Install Voice Changer Voicemod Drivers
In many instances, the issue signifies that you’re using outdated or faulty drivers. To troubleshoot this, simply re-install your Voicemod driver, and you’ll be good to go!
First, uninstall your Voicemod driver from the windows PC/Mac. Here’s how to do it:
- On the keyboard, press the “Windows button” as well as the “I” key to bring up the “Run box”
- Paste or type “devmgmt.msc” and click “OK.” This will open the “Device Manager”
- Click the “expand” option of “Audio Inputs & Outputs.”
- Click the “Microphone WMD” and choose the “Uninstall device” option
- A pop-up window will appear. Click the “Uninstall” button
- Restart the PC
Install the voice changer Voicemod again, whether automatically or manually, and see if it works!
Part 3: How To Change Voice For Discord On Mobile?
“Voicemod clips” is the version for both Apple and Android devices. The app will help you make high-quality content using its wide selection of one-of-a-kind effects, which will change your voice so much that you won’t recognize yourself!
In addition to that, you can add filters, which are connected to your cell phone’s camera to create funny, interesting videos.
Additionally, you’ll have the option to choose from 10 different voices. Plus, you can also make unlimited videos and audio from the humorous to the terrifying.
Some of the Voicemod voices on mobile include male-to-female, different robot effects, famous celebrities, scary voices, and much more. In short, everything is based on how you would like to modify your voice!
Not just that, you can also cross-share creative videos and audio to popular social networking platforms such as Facebook, Twitter, Instagram, TikTok, and Snapchat using your smartphone.
Curious to know how to change your voice for Discord on mobile? Here are step-by-step instructions:
- Make sure the Voicemod app is downloaded on your Apple or Android device and appropriately configured
- Open Discord
- Tap the “cogwheel icon” near your name and avatar
- You’ll see the “settings” page
- Within it, tap the “Voice & Video” option
- Tap Voicemod under the “Input Device” option and the headset under the “Output Device” option and tap escape. You’ll have access to numerous exciting sounds
Richard Bennett
Richard Bennett is a writer and a lover of all things video.
Follow @Richard Bennett
Also read:
- [New] Standout 5 Dynamic Social Platform Logo Movements
- 2024 Approved Best Banners in the Business of Broadcasting
- The Essential Steps to Thrive in Discord Livestreaming
- [Updated] Personalizing Every Aspect of Your Discord Image for 2024
- [Updated] The Ultimate Playlist of Premium Discord Audio Bots
- Guide to Delete Discord Server From Mobile
- 2024 Approved Demystifying the World of Discord Stickers
- [New] Uniting Worlds Adding Friends via Discord
- [New] In 2024, Tailored to Your Taste The BestDiscord's Hot 10 Themes
- [Updated] The Ultimate Guide to Make Discord Profile Picture
- [New] How to Share Screen on Discord for 2024
- [Updated] Premier 5 Socially Engaging Logo Movements for 2024
- [Updated] Navigating Discord's Text-to-Speech Features
- [Updated] In 2024, Understanding and Manipulating Discord's Identity System
- [New] In 2024, Mastering Photoshop A Path to Exceptional Discord Pfps
- [Updated] 2024 Approved A Comprehensive Overview of Adding Roles in Discord
- [Updated] 2024 Approved From Joiner to Trustee Securing a Place as a Disco Partner
- [Updated] What Is Discord PFP and How to Make an Attractive PFP for Discord
- [Updated] Efficient Ways to Terminate Your Discord Membership for 2024
- The Ultimate Guide to Adding Customized Emojis for Your Discord Avatar for 2024
- In 2024, Mastering DiscoNitro The Ultimate Guide for Free/Paid Entry
- [Updated] In 2024, Explore Exceptional Auditory Aids for a Richer Discord Experience
- 2024 Approved A Comprehensive Overview of Adding Roles in Discord
- Harmony in Digital 15 High-Fidelity Bots Transforming Discord Soundscape
- [New] The Ultimate Guide to Enhancing Your Discord Talk with No-Cost Tools for 2024
- Mastering The Art Becoming a Verified Discord Partner
- [New] 2024 Approved Highest Ranking Mobile & Desktop Discord Recorder Apps
- Expert Insights Leveraging Discord's Video Call Capabilities for 2024
- [Updated] In 2024, Precision and Perfection Leading Discord Emoji Makers of Today
- [New] Discover the Top 10 Cost-Free Audio Recorders for Discord for 2024
- [Updated] Real-Time Interaction Best Practices for Discord Streamers for 2024
- [Updated] Demystifying Discord's Features and Tools for 2024
- How to Keep the Conversation Flowing on Discord for 2024
- [New] Navigating the Nuances of Social Cues Status Update for 2024
- [Updated] In 2024, Decoding DiscoNitro How It Works and How You Can Join
- [New] Unleash Your Inner Conversationalist with Discord Responses for 2024
- [Updated] Leveraging Discord's Features for High-Quality Streaming
- [New] Mastering Melodies on Discord Top-Tier Bots for Sonic Enthusiasts
- [New] 2024 Approved Captivating Cool Names A Guide to Popularity on Discord
- [New] Revolutionize Discord Top Bots to Boost Interaction for 2024
- 2024 Approved A Harmonious Link Spotify with Discord
- [New] From Ordinary to Outstanding Making Unique Discord Pfps for 2024
- [New] Transforming Text to Speech on Discord for 2024
- In 2024, Mastering Live Broadcasts Your Step-by-Step Guide to Discord Streaming
- How to Change Text Style in Discord | 3 Methods for 2024
- [Updated] Deciding Between Discord and Skype for Teams for 2024
- [Updated] In 2024, Leading Chatrooms That Outperform Discord
- [New] Superior Alternatives to Discord Services for 2024
- [Updated] Navigating the Nuances of Social Cues Status Update for 2024
- [Updated] In 2024, How to Make Reels on Instagram Like a Ninja
- How To Free Up Apple iPhone 6s Plus Space | Dr.fone
- Do You Wish to Convert GIF to Animated PNG? Then, You Need to Know About Using a GIF to APNG Converter to Help You Carry This Process Out in No Time. Read On
- Updated Free Listen Explore Our Unlimited Sound Library
- Downloading SamFw FRP Tool 3.0 for OnePlus Ace 2V
- Latest Guide How To Bypass Tecno Pop 8 FRP Without Computer
- In 2024, How To Use Special Features - Virtual Location On Xiaomi Civi 3? | Dr.fone
- In 2024, Complete Tutorial to Use GPS Joystick to Fake GPS Location On Vivo Y78+ (T1) Edition | Dr.fone
- In 2024, PixelGrabber Evaluation with Vendors' Offerings
- In 2024, List of Pokémon Go Joysticks On HTC U23 Pro | Dr.fone
- 3 Ways to Fake GPS Without Root On Huawei P60 | Dr.fone
- Title: "[Updated] 2024 Approved The Ultimate Pathway to Discord's Premium Service, DiscoNitro"
- Author: Timothy
- Created at : 2024-05-23 22:48:26
- Updated at : 2024-05-24 22:48:26
- Link: https://discord-videos.techidaily.com/updated-2024-approved-the-ultimate-pathway-to-discords-premium-service-disconitro/
- License: This work is licensed under CC BY-NC-SA 4.0.
