
!["[Updated] Avoiding Distractions Implementing VoiceMod on Desktop & Mobile Discord"](https://www.lifewire.com/thmb/5Hk3OeMwXnJsYVlAr-DvpgKR1cA=/400x300/filters:no_upscale():max_bytes(150000):strip_icc()/Netflix-vs-Max-314e297891b54d66ba48792cae9b2934.jpg)
"[Updated] Avoiding Distractions Implementing VoiceMod on Desktop & Mobile Discord"
Avoiding Distractions: Implementing VoiceMod on Desktop & Mobile Discord
How To Use Voicemod On Discord

Richard Bennett
Mar 27, 2024• Proven solutions
A voice changer will allow you to prank friends, create content, and most of all, secure your presence by maintaining anonymity. With it, you can turn your voice into several unique and exciting voices to serve any purpose you deem fit.
And when it comes to voice changers, none is as easy to operate as the Voicemod in Discord. Its claim to fame is that it features numerous voice options to choose from.
With Vociemod, you have to simply run the program in the background and select your desired voice!
Read on as we discuss how to use Voicemod on Discord in detail:
In this article
Part 1: How To Use Voice Changer Voicemod For Discord On Desktop Computer
Part 2: How To Fix Voicemod Not Working Discord?
Part 3: How To Change Voice For Discord On Mobile?
Part 1: How To Use Voice Changer Voicemod For Discord On Desktop Computer
Voicemod is arguably one of the best voice changer tools available on the internet for its excellent features.
But before we jump straight into using Voicemod for Discord, you must know how to install one on your desktop Mac/PC.
Here’s how to install Voicemod
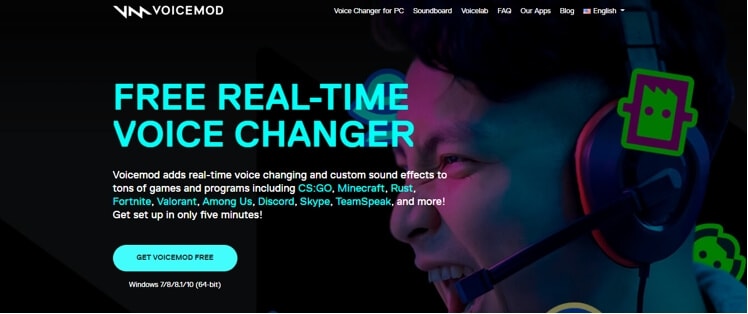
- Visit the Voicemod website to begin the download process.
- You’ll see the button “Get Voicemod Free” on the screen. Click it!
- Upon clicking, the site will ask you to sign in to your account from Discord, Twitch, to Google. Use your Discord login details to sign in.
- After you’re signed in, the “.exe” file will be downloaded to your PC/Mac’s download folder. Open the “.exe” file the moment it’s downloaded.
- An install wizard will open up. Navigate through the wizard’s installation process to install the program on your PC/Mac.
- After installation is complete, the installation wizard will ask to restart your windows’ Mac or PC.
You can skip it, but it’s best to restart it for smooth operations.
Once your Mac/PC restarts, you’ll see the Voicemod app icon on your desktop screen.
Now that you have successfully installed the voice changer Voicemod app into your desktop computer, let’s dive into knowing how to use Voicemod on Discord!
Here’s how to use voice changer on Discord
- Click the Vociemod icon on the desktop to open the app. If you can’t find it there, click the “windows icon” located at the screen’s bottom-left. Just type “Voicemod,” and the program will show up. Double click it to get it opened.
- When the app opens up, you’ll have to choose the output and input it will use. If you’re wondering, why the output? This is to give you an insight into what your voice will sound like on each filter.
Once it’s done, you can play around with different filters!
Every day, you’ll get new free filters to use; however, to unlock and access all filters, you need to upgrade to the “pro-version” of voice changer Voicemod.
On the other hand, if you only need a few filters, the “basic-version” should suffice.
Apart from that, you can unlock an additional free filter in your app by sharing it on your social media accounts.

Step 1
To set up Voicemod with Discord, open your discord account and go to the settings (gear icon) placed at the screen’s bottom-left corner.
Step 2
Click the “Voice and Video” option right under the app settings.
Step 3
To make Voicemod usable, you’ll have to change Voice settings. Within the “Input Device” option, select the option that says “Microphone Voicemod Virtual Audio.”
Step 4
After you have changed settings, you can easily change the voice within the program. Not only this, but other users can also hear your audio alteration.
Step 5
With the “basic version,” you’ll have seven free voice choices that will change each day. On the contrary, with the “pro-version,” you’ll gain access to more than 80 different voice options.
So, if you’re searching for an easy and simple voice-changing app to use, look no further than Voicemod!
Part 2: How To Fix Voicemod Not Working Discord?
Is your voice changer Voicemod not working on Discord? No worries, you can troubleshoot the issues with a few basic steps.
Here are some ways you can use to fix Voicemod not working in Discord:
Method 1: Restart Your Windows PC/Mac
Though it’s not a technical solution, restarting your desktop computer fixes incorrect settings by rebooting them and solves many problems connected with your computer system, programs, and hardware.
So, when your Voicemod suddenly ceases to work in Discord, make sure to restart your Windows PC/Mac before going any further, as it’s the first step in fixing voice issues.
If restarting doesn’t help, slide to the next step!
Method 2: Make Sure The Mic Is Properly Set
The next step is to check if the mic works correctly. This is because faulty settings may stop voice changer Voicemod from operating correctly.
Just follow the steps below to resolve it:
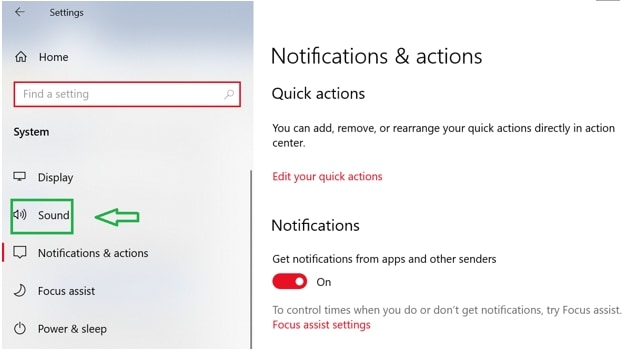
- On the keyboard, press the “Win” logo and the “I” key simultaneously to open Windows settings. Click “System.”
- On the left, you’ll see the option “Sound.” Click it.
- First, you have to test the microphone! To do so, choose the “Headset” option rather than the Voicemod microphone under the “Input” section
- Click “Device properties & test microphone”
- Make sure to uncheck the “disable” box and keep the volume section 100
- Click the “Start test” button and speak into the microphone
- After that, click “Stop test.” If the greatest value it shows is above “0”, then your microphone works correctly
Now, restart your Voicemod app to see if it’s working properly or not! If the issue still persists, jump to the next solution.
Method 3: Install Windows Updates
If you use Windows 10, it has two kinds of updates that offer performance boost and security patches. Sometimes, an update can fix a few driver and software conflicts automatically.
You can quickly solve the voice chat problem by simply updating the system settings. Here’s how to update your Windows 10:
- Open your windows setting by pressing the “Windows button” and the “I” key together.
- Click on “Update and Security”
- Click the “Check for Updates” button. If an update is found, it will install automatically on the system
Make sure to repeat this process until it says you’re up-to-date. Then, restart the PC. Check whether the Vociemod is properly working or not!
If not, try our next option!
Method 4:Re-Install Voice Changer Voicemod Drivers
In many instances, the issue signifies that you’re using outdated or faulty drivers. To troubleshoot this, simply re-install your Voicemod driver, and you’ll be good to go!
First, uninstall your Voicemod driver from the windows PC/Mac. Here’s how to do it:
- On the keyboard, press the “Windows button” as well as the “I” key to bring up the “Run box”
- Paste or type “devmgmt.msc” and click “OK.” This will open the “Device Manager”
- Click the “expand” option of “Audio Inputs & Outputs.”
- Click the “Microphone WMD” and choose the “Uninstall device” option
- A pop-up window will appear. Click the “Uninstall” button
- Restart the PC
Install the voice changer Voicemod again, whether automatically or manually, and see if it works!
Part 3: How To Change Voice For Discord On Mobile?
“Voicemod clips” is the version for both Apple and Android devices. The app will help you make high-quality content using its wide selection of one-of-a-kind effects, which will change your voice so much that you won’t recognize yourself!
In addition to that, you can add filters, which are connected to your cell phone’s camera to create funny, interesting videos.
Additionally, you’ll have the option to choose from 10 different voices. Plus, you can also make unlimited videos and audio from the humorous to the terrifying.
Some of the Voicemod voices on mobile include male-to-female, different robot effects, famous celebrities, scary voices, and much more. In short, everything is based on how you would like to modify your voice!
Not just that, you can also cross-share creative videos and audio to popular social networking platforms such as Facebook, Twitter, Instagram, TikTok, and Snapchat using your smartphone.
Curious to know how to change your voice for Discord on mobile? Here are step-by-step instructions:
- Make sure the Voicemod app is downloaded on your Apple or Android device and appropriately configured
- Open Discord
- Tap the “cogwheel icon” near your name and avatar
- You’ll see the “settings” page
- Within it, tap the “Voice & Video” option
- Tap Voicemod under the “Input Device” option and the headset under the “Output Device” option and tap escape. You’ll have access to numerous exciting sounds
Richard Bennett
Richard Bennett is a writer and a lover of all things video.
Follow @Richard Bennett
Richard Bennett
Mar 27, 2024• Proven solutions
A voice changer will allow you to prank friends, create content, and most of all, secure your presence by maintaining anonymity. With it, you can turn your voice into several unique and exciting voices to serve any purpose you deem fit.
And when it comes to voice changers, none is as easy to operate as the Voicemod in Discord. Its claim to fame is that it features numerous voice options to choose from.
With Vociemod, you have to simply run the program in the background and select your desired voice!
Read on as we discuss how to use Voicemod on Discord in detail:
In this article
Part 1: How To Use Voice Changer Voicemod For Discord On Desktop Computer
Part 2: How To Fix Voicemod Not Working Discord?
Part 3: How To Change Voice For Discord On Mobile?
Part 1: How To Use Voice Changer Voicemod For Discord On Desktop Computer
Voicemod is arguably one of the best voice changer tools available on the internet for its excellent features.
But before we jump straight into using Voicemod for Discord, you must know how to install one on your desktop Mac/PC.
Here’s how to install Voicemod
- Visit the Voicemod website to begin the download process.
- You’ll see the button “Get Voicemod Free” on the screen. Click it!
- Upon clicking, the site will ask you to sign in to your account from Discord, Twitch, to Google. Use your Discord login details to sign in.
- After you’re signed in, the “.exe” file will be downloaded to your PC/Mac’s download folder. Open the “.exe” file the moment it’s downloaded.
- An install wizard will open up. Navigate through the wizard’s installation process to install the program on your PC/Mac.
- After installation is complete, the installation wizard will ask to restart your windows’ Mac or PC.
You can skip it, but it’s best to restart it for smooth operations.
Once your Mac/PC restarts, you’ll see the Voicemod app icon on your desktop screen.
Now that you have successfully installed the voice changer Voicemod app into your desktop computer, let’s dive into knowing how to use Voicemod on Discord!
Here’s how to use voice changer on Discord
- Click the Vociemod icon on the desktop to open the app. If you can’t find it there, click the “windows icon” located at the screen’s bottom-left. Just type “Voicemod,” and the program will show up. Double click it to get it opened.
- When the app opens up, you’ll have to choose the output and input it will use. If you’re wondering, why the output? This is to give you an insight into what your voice will sound like on each filter.
Once it’s done, you can play around with different filters!
Every day, you’ll get new free filters to use; however, to unlock and access all filters, you need to upgrade to the “pro-version” of voice changer Voicemod.
On the other hand, if you only need a few filters, the “basic-version” should suffice.
Apart from that, you can unlock an additional free filter in your app by sharing it on your social media accounts.
Step 1
To set up Voicemod with Discord, open your discord account and go to the settings (gear icon) placed at the screen’s bottom-left corner.
Step 2
Click the “Voice and Video” option right under the app settings.
Step 3
To make Voicemod usable, you’ll have to change Voice settings. Within the “Input Device” option, select the option that says “Microphone Voicemod Virtual Audio.”
Step 4
After you have changed settings, you can easily change the voice within the program. Not only this, but other users can also hear your audio alteration.
Step 5
With the “basic version,” you’ll have seven free voice choices that will change each day. On the contrary, with the “pro-version,” you’ll gain access to more than 80 different voice options.
So, if you’re searching for an easy and simple voice-changing app to use, look no further than Voicemod!
Part 2: How To Fix Voicemod Not Working Discord?
Is your voice changer Voicemod not working on Discord? No worries, you can troubleshoot the issues with a few basic steps.
Here are some ways you can use to fix Voicemod not working in Discord:
Method 1: Restart Your Windows PC/Mac
Though it’s not a technical solution, restarting your desktop computer fixes incorrect settings by rebooting them and solves many problems connected with your computer system, programs, and hardware.
So, when your Voicemod suddenly ceases to work in Discord, make sure to restart your Windows PC/Mac before going any further, as it’s the first step in fixing voice issues.
If restarting doesn’t help, slide to the next step!
Method 2: Make Sure The Mic Is Properly Set
The next step is to check if the mic works correctly. This is because faulty settings may stop voice changer Voicemod from operating correctly.
Just follow the steps below to resolve it:
- On the keyboard, press the “Win” logo and the “I” key simultaneously to open Windows settings. Click “System.”
- On the left, you’ll see the option “Sound.” Click it.
- First, you have to test the microphone! To do so, choose the “Headset” option rather than the Voicemod microphone under the “Input” section
- Click “Device properties & test microphone”
- Make sure to uncheck the “disable” box and keep the volume section 100
- Click the “Start test” button and speak into the microphone
- After that, click “Stop test.” If the greatest value it shows is above “0”, then your microphone works correctly
Now, restart your Voicemod app to see if it’s working properly or not! If the issue still persists, jump to the next solution.
Method 3: Install Windows Updates
If you use Windows 10, it has two kinds of updates that offer performance boost and security patches. Sometimes, an update can fix a few driver and software conflicts automatically.
You can quickly solve the voice chat problem by simply updating the system settings. Here’s how to update your Windows 10:
- Open your windows setting by pressing the “Windows button” and the “I” key together.
- Click on “Update and Security”
- Click the “Check for Updates” button. If an update is found, it will install automatically on the system
Make sure to repeat this process until it says you’re up-to-date. Then, restart the PC. Check whether the Vociemod is properly working or not!
If not, try our next option!
Method 4:Re-Install Voice Changer Voicemod Drivers
In many instances, the issue signifies that you’re using outdated or faulty drivers. To troubleshoot this, simply re-install your Voicemod driver, and you’ll be good to go!
First, uninstall your Voicemod driver from the windows PC/Mac. Here’s how to do it:
- On the keyboard, press the “Windows button” as well as the “I” key to bring up the “Run box”
- Paste or type “devmgmt.msc” and click “OK.” This will open the “Device Manager”
- Click the “expand” option of “Audio Inputs & Outputs.”
- Click the “Microphone WMD” and choose the “Uninstall device” option
- A pop-up window will appear. Click the “Uninstall” button
- Restart the PC
Install the voice changer Voicemod again, whether automatically or manually, and see if it works!
Part 3: How To Change Voice For Discord On Mobile?
“Voicemod clips” is the version for both Apple and Android devices. The app will help you make high-quality content using its wide selection of one-of-a-kind effects, which will change your voice so much that you won’t recognize yourself!
In addition to that, you can add filters, which are connected to your cell phone’s camera to create funny, interesting videos.
Additionally, you’ll have the option to choose from 10 different voices. Plus, you can also make unlimited videos and audio from the humorous to the terrifying.
Some of the Voicemod voices on mobile include male-to-female, different robot effects, famous celebrities, scary voices, and much more. In short, everything is based on how you would like to modify your voice!
Not just that, you can also cross-share creative videos and audio to popular social networking platforms such as Facebook, Twitter, Instagram, TikTok, and Snapchat using your smartphone.
Curious to know how to change your voice for Discord on mobile? Here are step-by-step instructions:
- Make sure the Voicemod app is downloaded on your Apple or Android device and appropriately configured
- Open Discord
- Tap the “cogwheel icon” near your name and avatar
- You’ll see the “settings” page
- Within it, tap the “Voice & Video” option
- Tap Voicemod under the “Input Device” option and the headset under the “Output Device” option and tap escape. You’ll have access to numerous exciting sounds
Richard Bennett
Richard Bennett is a writer and a lover of all things video.
Follow @Richard Bennett
Step-by-Step Guide to Pinning in Discord Dialogues
How to Pin A Message on Discord?
Richard Bennett
Mar 27, 2024• Proven solutions
Like TeamSpeak or Skype, Discord is a chat app aimed at easy mass communication. Although it was made for gamers, it is readily used for communicating in offices, during projects, or for professional collaboration.
Even though it’s straightforward to use, there are several Discord features that you may be unfamiliar with.
One such feature is called pinning messages. It is available to moderators, administrators, server owners, and other users who have permission to “Manage Messages” in various server channels.
This feature helps you find and share vital messages quickly, especially when new users join a specific channel.
It acts like a sticky note for Discord, making sure valuable information such as server rules do not get overshadowed by new messages even months after the pinned messages are first posted.
Today, we will go over how to pin a message on Discord for your desktop app on PC and Mac, as well as on your iPhone and Android mobile devices.
Part 1: How to Pin A Message on Discord Desktop?
If you want to learn how to pin messages on Discord desktop, follow these steps:
- Hover over any message which you wish to pin.
- On the right-hand side of it, there will be a button that would read as More; click it and you will see a screen like below

- Now, click on the “Pin Message” option
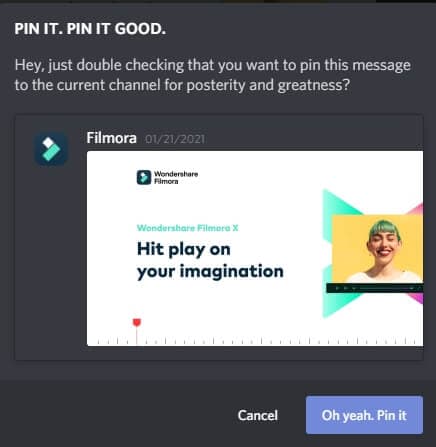
- After which, you will be presented with a prompt asking you to confirm that you want to pin this particular message. Click on “Oh yeah, pin it.”
That’s it! You have now learned how to pin messages on Discord for the desktop application.
But make sure you don’t pin everything that might seem important at a glance — only pin messages that may have utility in the future.
Also, don’t pin messages that are just important for you. In larger channels, prioritize pinning messages that will benefit most participants.
Part 2: How to Pin Messages on Discord Mobile App?
Pinning messages in the mobile app is very similar to how it is done on the desktop application. Do it by:
- Just hold down your finger on the message you wish to pin
- A couple of seconds later, you will be presented with a list of options
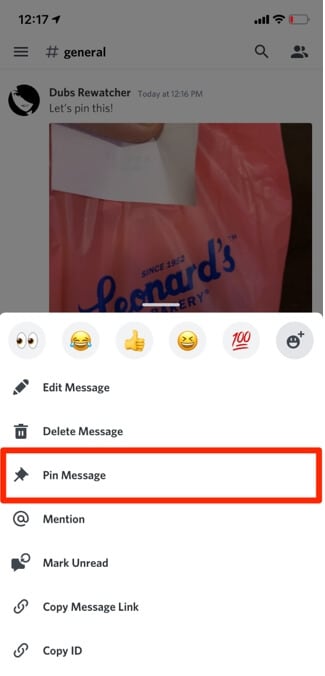
- From here, click on “Pin Message”
- A pop-up will appear confirming if you want to pin the message. If you are sure you want to pin a particular message, tap the “Yes” button and then your message is pinned
Part 3: How to View Pinned Messages on Discord
Accessing pinned messages is just as easy as pinning them. To access a pinned message on the app’s desktop version:
- Click on the pin icon appearing on the top right-hand side of your screen

- Doing this will present you with a drop-down list of pinned messages. Now, you can tap on the “Jump” button next to the “x” (cross) icon to go directly to the pinned message
- This will allow you to understand the context behind the pinned message. You can also access and share links in the pinned messages from here
Part 4: How to View Pinned Messages on Discord Mobile
View your pins on the mobile version of Discord by:
- Swiping from right to left, which will open up a side menu
- Then click on “Pins,” which is the second option from the left, as shown in the picture below
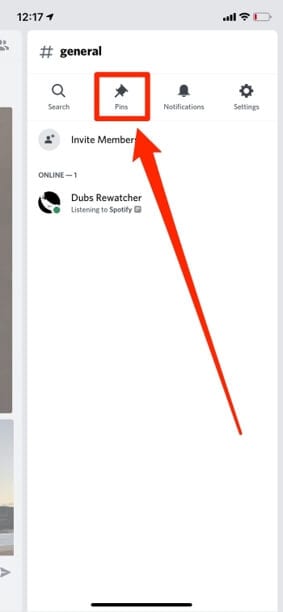
- Now you will be in the pinned messages window
- You can jump to a specific pinned message by clicking on it, allowing you to access any content or links in the message
Part 5: Limit on Pinned Messages
You can only pin 50 messages in the pin box in Discord, meaning if you want to pin new messages, you will have to delete older ones to make space.
This may feel like a disadvantage. However, it makes perfect sense. Pinning messages is only for important information that must be used in the future.
Removing this limit and giving people free rein on the number of messages they can pin will eventually lead to too many pinned messages, defeating the feature’s purpose.
Part 6: How to Delete Pinned Messages on Discord?
If something pinned in the past has become redundant over time, you can remove it from the pinned messages.
This will make sure your pinned messages do not stockpile over time, and there is space to add new messages important to the server.
To remove pinned messages on desktops:
- Go to the pin icon used to access pins
- Next, hover over the message you wish to unpin and click on the “x” (cross) button next to the jump button
- After this, click on the “yeah, remove it please kthx” button
- The message will now stop appearing in the list of pinned messages
To do the same for mobile devices:
- Swipe right to left to access the side menu
- Click on “Pins” to view all the messages pinned by you or other people on the server with permissions to pin
- Then hold down on the message, which will give you an option to unpin it
- Click on “Unpin” to remove the message from the list of pinned messages
Things to keep in mind:
- You can skip the pop-up shown above when trying to remove a pinned message. All you must do is hold shift when clicking on the “x” (cross) button allowing you to go on that spree of unpins
- Another thing to remember is that all these tips on how pin messages apply to both Direct Messages (DM) and Server group chats
All in All
Learning how to pin a message on Discord could be a little tricky at first, mostly if you haven’t done so in the past and someone spontaneously asks you to do so.
However, the feature is pretty intuitive and straightforward once you get the hang of it.
The usefulness of pinning makes it very important for both old and new users as you can relay important information without having to go through tons of old messages.
Richard Bennett
Richard Bennett is a writer and a lover of all things video.
Follow @Richard Bennett
Richard Bennett
Mar 27, 2024• Proven solutions
Like TeamSpeak or Skype, Discord is a chat app aimed at easy mass communication. Although it was made for gamers, it is readily used for communicating in offices, during projects, or for professional collaboration.
Even though it’s straightforward to use, there are several Discord features that you may be unfamiliar with.
One such feature is called pinning messages. It is available to moderators, administrators, server owners, and other users who have permission to “Manage Messages” in various server channels.
This feature helps you find and share vital messages quickly, especially when new users join a specific channel.
It acts like a sticky note for Discord, making sure valuable information such as server rules do not get overshadowed by new messages even months after the pinned messages are first posted.
Today, we will go over how to pin a message on Discord for your desktop app on PC and Mac, as well as on your iPhone and Android mobile devices.
Part 1: How to Pin A Message on Discord Desktop?
If you want to learn how to pin messages on Discord desktop, follow these steps:
- Hover over any message which you wish to pin.
- On the right-hand side of it, there will be a button that would read as More; click it and you will see a screen like below
- Now, click on the “Pin Message” option
- After which, you will be presented with a prompt asking you to confirm that you want to pin this particular message. Click on “Oh yeah, pin it.”
That’s it! You have now learned how to pin messages on Discord for the desktop application.
But make sure you don’t pin everything that might seem important at a glance — only pin messages that may have utility in the future.
Also, don’t pin messages that are just important for you. In larger channels, prioritize pinning messages that will benefit most participants.
Part 2: How to Pin Messages on Discord Mobile App?
Pinning messages in the mobile app is very similar to how it is done on the desktop application. Do it by:
- Just hold down your finger on the message you wish to pin
- A couple of seconds later, you will be presented with a list of options
- From here, click on “Pin Message”
- A pop-up will appear confirming if you want to pin the message. If you are sure you want to pin a particular message, tap the “Yes” button and then your message is pinned
Part 3: How to View Pinned Messages on Discord
Accessing pinned messages is just as easy as pinning them. To access a pinned message on the app’s desktop version:
- Click on the pin icon appearing on the top right-hand side of your screen
- Doing this will present you with a drop-down list of pinned messages. Now, you can tap on the “Jump” button next to the “x” (cross) icon to go directly to the pinned message
- This will allow you to understand the context behind the pinned message. You can also access and share links in the pinned messages from here
Part 4: How to View Pinned Messages on Discord Mobile
View your pins on the mobile version of Discord by:
- Swiping from right to left, which will open up a side menu
- Then click on “Pins,” which is the second option from the left, as shown in the picture below
- Now you will be in the pinned messages window
- You can jump to a specific pinned message by clicking on it, allowing you to access any content or links in the message
Part 5: Limit on Pinned Messages
You can only pin 50 messages in the pin box in Discord, meaning if you want to pin new messages, you will have to delete older ones to make space.
This may feel like a disadvantage. However, it makes perfect sense. Pinning messages is only for important information that must be used in the future.
Removing this limit and giving people free rein on the number of messages they can pin will eventually lead to too many pinned messages, defeating the feature’s purpose.
Part 6: How to Delete Pinned Messages on Discord?
If something pinned in the past has become redundant over time, you can remove it from the pinned messages.
This will make sure your pinned messages do not stockpile over time, and there is space to add new messages important to the server.
To remove pinned messages on desktops:
- Go to the pin icon used to access pins
- Next, hover over the message you wish to unpin and click on the “x” (cross) button next to the jump button
- After this, click on the “yeah, remove it please kthx” button
- The message will now stop appearing in the list of pinned messages
To do the same for mobile devices:
- Swipe right to left to access the side menu
- Click on “Pins” to view all the messages pinned by you or other people on the server with permissions to pin
- Then hold down on the message, which will give you an option to unpin it
- Click on “Unpin” to remove the message from the list of pinned messages
Things to keep in mind:
- You can skip the pop-up shown above when trying to remove a pinned message. All you must do is hold shift when clicking on the “x” (cross) button allowing you to go on that spree of unpins
- Another thing to remember is that all these tips on how pin messages apply to both Direct Messages (DM) and Server group chats
All in All
Learning how to pin a message on Discord could be a little tricky at first, mostly if you haven’t done so in the past and someone spontaneously asks you to do so.
However, the feature is pretty intuitive and straightforward once you get the hang of it.
The usefulness of pinning makes it very important for both old and new users as you can relay important information without having to go through tons of old messages.
Richard Bennett
Richard Bennett is a writer and a lover of all things video.
Follow @Richard Bennett
Also read:
- [New] Uncluttering Chats How to Erase Thousands of Discord Messages at Once
- [New] Unleash Creativity with These Best-Of Discord's Emoji Makers
- No Cost, No Problem? Here Are the 10 Best for Discord Voice Captures
- [New] 2024 Approved How To Prominently Display Messages on Discord
- [New] In 2024, The Ultimate How-To for Eye-Catching Discord Profile Pics
- [Updated] In 2024, Transforming Discord Communication Best Audio Modification Plugins of 2023
- [New] 2024 Approved Step-By-Step Instruction Changing Profile Display on Discord
- [New] In 2024, Free Apps to Record and Preserve Your Discord Chats Professionally
- [Updated] Discord Broadcasting Step-by-Step Techniques for Seamless Sessions for 2024
- [Updated] 2024 Approved The Prime List of Budget-Friendly Discord Voice Recording Tools
- Top VoIP Platforms Face-Off Discord Vs Skype Showdown
- [New] 2024 Approved Sync Up Soundtracks Connecting Spotify to Discord Effortlessly
- In 2024, Foremost 5 Animated Logos for Interactive Channels
- [Updated] Ultimate Anonymous Group Communicators for 2024
- [New] Discord's Ultimate Romance Hubs
- In 2024, Masterful Bot Networks on Discord
- [Updated] 2024 Approved Enhance Discord Explore the 10 Most Influential Plugins
- 2024 Approved Elite Font Designers Specializing in Discord Platforms
- [Updated] In 2024, How to Create Stunning PFPs That Stand Out in a Crowd
- [New] Tricks and Tips for Quality Streaming on Discord for 2024
- In 2024, Exploring Alternative Pathways for Free Anime Emoji Integration in Discord
- [Updated] Part Ways with Discord Platform for 2024
- [New] Social Sync How to Add Friends on Discord for 2024
- Workplace Dialogue Dominance Unraveling Slack's Edge Over Discord for 2024
- [Updated] In 2024, A Journey to Discover Navigate This List of 8 Amazing Emoji Archives
- Enabling Cross-Platform Play A Step-by-Step Guide for 2024
- Expert Screenshots for Discord Enthusiasts
- [Updated] Making New Connections Discord for PC/Mobile
- In 2024, Mastering Privacy Settings A Guide to Discretion in Streaming
- [New] Unparalleled Screenshot Solutions for Discord Users
- [New] In 2024, Setting Up and Managing Discord Channels Step-by-Step Guide
- [New] 2024 Approved Top Logo Evolutions for Online Communities
- 2024 Approved From Isolation to Connection Discord's Pathway
- Updated Video Creation Made Easy on Mac Top-Rated Software Solutions for 2024
- New The Ultimate List 8 Exceptional Movie Creators for Mac Users for 2024
- In 2024, Acoustic Detox The Best Programs for Minimizing Environmental Audio Interference
- New 2024 Approved The Ultimate Guide 10 Leading Audio-to-Text Transcription Applications (Free/Paid)
- Condense Time, Amplify Impact Time Lapse Video Creation in Final Cut Pro for 2024
- 2024 Approved Ultimate Screen Recorder - Unleash Potential on Win11
- How to Cut Audio From Video on iPhone/Mac for 2024
- Troubleshooting Guide How to Fix an Unresponsive Poco X6 Screen | Dr.fone
- [New] 2024 Approved Essential Tools #15 Windows 11 Recorder Software
- In 2024, Enhancing Video Experience with Easy-to-Implement Audio Effects
- How To Delete iCloud Account Remove Your Apple ID Permanently On Apple iPhone SE (2020)
- New EchoShift Elite Revolutionary Sound Design and Pitch Adjustment App
- Complete Review & Guide to Techeligible FRP Bypass and More For OnePlus Open
- Updated Sophisticated Serenades to Pair with Web Casts for 2024
- Unova Stone Pokémon Go Evolution List and How Catch Them For Motorola Razr 40 Ultra | Dr.fone
- Updated 2024 Approved Shine On Best Video Brightening Apps for Mobile and Desktop
- [Updated] 2024 Approved Efficient Techniques to Record and Store Facebook Calls
- In 2024, Hassle-Free Ways to Remove FRP Lock from Itel A60 Phones with/without a PC
- [Updated] In 2024, Professional Edge Mastering Bordered Videos on Insta
- [Updated] Premier 10 Terraria Mods for Superior Play
- [New] 2024 Approved Unveiling the Secrets to a Flawless FB Live Session
- In 2024, Edit and Send Fake Location on Telegram For your Xiaomi Redmi Note 12R in 3 Ways | Dr.fone
- In 2024, Advanced Settings for Uniform Stream Lighting
- In 2024, How To Unlock Apple iPhone 15 Pro Without Passcode? 4 Easy Methods
- [Updated] Win10 Video Capture Pro - Professional Edition
- How To Check if Your Realme C67 5G Is Unlocked
- In 2024, Top 10 AirPlay Apps in Honor Play 40C for Streaming | Dr.fone
- [Updated] 2024 Approved Dissecting FreeCapture A Software Review
- [Updated] Advanced Methods for Recording in Adobe Presenter
- In 2024, How to Remove Find My iPhone without Apple ID From your iPhone 14?
- Updated 2024 Approved How to Choose the Right Aiff Converter for Your Needs
- [Updated] Skaldic Epic Odin's Final Stand for 2024
- How to Stop Google Chrome from Tracking Your Location On Huawei Nova Y71? | Dr.fone
- Title: "[Updated] Avoiding Distractions Implementing VoiceMod on Desktop & Mobile Discord"
- Author: Timothy
- Created at : 2024-05-23 22:47:34
- Updated at : 2024-05-24 22:47:34
- Link: https://discord-videos.techidaily.com/updated-avoiding-distractions-implementing-voicemod-on-desktop-and-mobile-discord/
- License: This work is licensed under CC BY-NC-SA 4.0.
