
!["[Updated] Conveying Content via Discord Optimizing Video Sharing for 2024"](https://www.lifewire.com/thmb/Dle-s2KY0Be649mxZL5Z0_Dgqgk=/400x300/filters:no_upscale():max_bytes(150000):strip_icc()/Temporary-Cloud-Backup_dl2-0c86817b8c2c46049eba5d447a875fbb.jpg)
"[Updated] Conveying Content via Discord Optimizing Video Sharing for 2024"
Conveying Content via Discord: Optimizing Video Sharing
How to Send Videos on Discord

Richard Bennett
Mar 27, 2024• Proven solutions
The whole point of Discord is to bring together communities of like-minded people to talk, share ideas and have fun together. And this isn’t just limited to chatting but sometimes you’re going to want to share content, including videos.
So, whether it’s a compilation of your best gaming moments that you’ve carefully edited together, a home movie that you want to share with friends, or just a funny clip that someone’s sent you that you want to pass on, here we’ll take you through how to send videos on Discord both on PC and mobile, and the likely issues you might face.
- Part 1: How to Send Videos on Discord PC
- Part 2: How to Send Videos on Discord Mobile
- Part 3: How to Send Long Videos on Discord That Are More Than 8MB
- Part 4: FAQs About Uploading Videos to Discord
Part 1: How to Send Videos on Discord PC
It’s actually pretty simple to send videos on Discord when using a PC, providing they aren’t too large a file size.
Firstly, you just need to navigate to the channel or private message where you want to send the video. Just find the right option on the list of servers you’re a member of, or head to your message inbox to find the user you want to send it to privately.
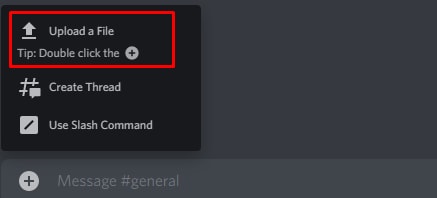
Once you’re in the right place, click on the plus (+) icon that you’ll find to the left of the chatbox at the bottom of the screen where you’d normally type your message.
You’ll then just need to find the file on your computer, and double click on it. It’ll then bring up a pop-up for the video where you can add a comment, which will sit above the video (ideal if you need to give context on why you’re sharing it). You can also mark it as a spoiler – useful if you’re sharing a gaming tip but you don’t want to spoil the story for anyone who’s not reached that point yet.
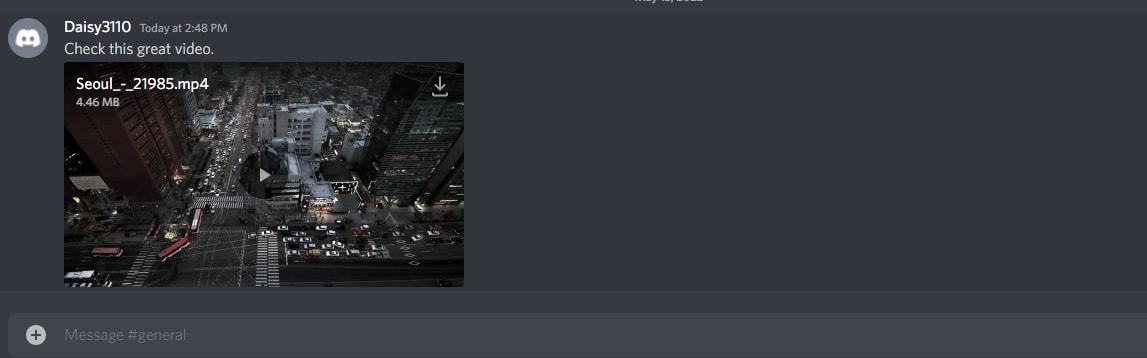
From there, it’s as simple as clicking the upload button. Once it’s ready, the video will be in the chat window for anyone in the server to watch, or for your friend if you’ve sent it privately. And if they want to download it, they’ll just need to click the download button (a downward-facing arrow) at the top right of the video.
It’s worth noting that, while Discord will play most video formats, it can’t manage everything. If you upload a format that Discord isn’t compatible with, then it won’t show a video player – instead, the file will just be uploaded. Other people can still download it to watch on their own devices.
Also, there’s a strict file limit of 8MB. This isn’t huge at all – while there’s no definitive file size for video (as it depends on file type, resolution, compression, etc) it’s unlikely to be more than 60 seconds of footage, and could just be a few seconds. If the video you want to upload is more than 8MB, carry on reading below to find out how.
Part 2: How to Send Videos on Discord Mobile
The process to send video on Discord Mobile is pretty similar both with iOS and Android, but with just a few minor tweaks.
Firstly, you still need to navigate to either the server or inbox where you want to share the video. You can then click the ‘Photo Selector’ button directly to the left of the chatbox.
This will open your phone’s gallery, but it’ll only be searching for photos. You instead want the File Selector, which will be the third icon along – it looks like a text document with a folded-over corner.
Click this and it’ll give you the option to directly upload a video from your phone’s Downloads folder. To send a video that’s stored elsewhere, click on the Expand arrow at the top left of the menu. This will send you to your phone’s file navigation system where you can find the video you want.
Once you’ve selected the video, just hit the blue Send icon to send your video to the chat. Again you can add a message as a caption, but this time it’ll just be in the normal message box rather than a dedicated comment box before you hit upload.
Part 3: How to Send Long Videos on Discord That Are More Than 8MB
So as we’ve said above, there is a file size limit when you’re using a free Discord account of just 8MB, which isn’t much at all. There are a few ways around this, so take your pick from the one that sounds best for you.
1. Update to Discord Nitro to Upload 100MB
The first option is possibly the simplest but it’s definitely not the cheapest, and that’s to pay for an upgrade to Discord Nitro. The paid version of Discord has a number of benefits, one of which is the increased file upload size of 100MB. It costs $4.99 per month or $49.99 per year, so if you’re likely to be regularly uploading videos that are lower than this limit, it might make sense.
2. Cut Unwanted Clips/Compress Video with Filmora Video Editor
The second choice would be to take your video and cut it into pieces, sending them one at a time. This might sound time-consuming but with Filmora’s Instant Cutter Tool, it’s really simple.
All you need to do is open a video in Filmora by clicking the arrow next to Import and then choosing ‘Import with Instant Cutter Tool’.
This will open the Instant Cutter window where you can click Open File to add your video. From here you can trim your files and export them in multiple sections. There are different ways that you can do this, and while each is a simple process, there are still a few steps to follow.


For more detail, check out this post for a step-by-step guide on the different ways you can trim a video in Filmora.
You can also try to compress your video size, which may let you keep the whole video at the expense of some of the quality. Again, using Filmora, this is easy. But also again, there are different ways to go about it.
You could literally crop the video in order to trim some of the data, as the reduced viewing screen won’t be as big a file. You can also reduce the resolution, or convert your video to a format that uses fewer data. You’ll need to test it though, as converting to some video formats might result in blurry footage.
There are advanced settings you can tinker with too, such as lowering the frame rate or the bit rate. Again, rather than go through all of those options in an epic article here, it’s easier to head to a post dedicated to these steps about compress videos with Filmora .
3. Upload to YouTube/Vimeo/Google Drive/Dropbox
The final option is to upload your video to an online player or storage site, and link to it, rather than having Discord host the file. YouTube and Vimeo are the obvious options, but Streamable is another popular choice too with a free membership. YouTube’s maximum video uploads are 128GB, which is huge, while other sites like Streamable cap free accounts to 500MB per video.
So, if you want to upload massive files, you’ll need to decide whether to choose YouTube or pay for an upgraded membership elsewhere. Wherever you host your video, once it’s online just grab the link and paste it into Discord to share your content.
The only drawback to this option is that it stops other users from being able to download the video directly, and you may need to look at a file sharing alternative such as Dropbox if you want to send the actual file.
FAQs About Uploading Videos to Discord
Which Kind of Video Formats Can I Upload to Discord?
You can send any filetype to another user on Discord, so that they can download it and watch it on their own device. But if you want to upload a video so that Discord embeds it, and makes it playable within the chat, you’re limited to only mp4 and WebM filetypes.
You can also use MOV files, but not everyone will be able to play them, and FLAC files are supported on desktop only but not on mobile.
How Can I Upload Saved Videos to Discord?
If you find a video on Discord that you want to share on a different server or in a private DM, you can use the download icon to save it locally. Then, follow the steps above to upload the video to the server or DM chat window where you want to share it.
Richard Bennett
Richard Bennett is a writer and a lover of all things video.
Follow @Richard Bennett
Richard Bennett
Mar 27, 2024• Proven solutions
The whole point of Discord is to bring together communities of like-minded people to talk, share ideas and have fun together. And this isn’t just limited to chatting but sometimes you’re going to want to share content, including videos.
So, whether it’s a compilation of your best gaming moments that you’ve carefully edited together, a home movie that you want to share with friends, or just a funny clip that someone’s sent you that you want to pass on, here we’ll take you through how to send videos on Discord both on PC and mobile, and the likely issues you might face.
- Part 1: How to Send Videos on Discord PC
- Part 2: How to Send Videos on Discord Mobile
- Part 3: How to Send Long Videos on Discord That Are More Than 8MB
- Part 4: FAQs About Uploading Videos to Discord
Part 1: How to Send Videos on Discord PC
It’s actually pretty simple to send videos on Discord when using a PC, providing they aren’t too large a file size.
Firstly, you just need to navigate to the channel or private message where you want to send the video. Just find the right option on the list of servers you’re a member of, or head to your message inbox to find the user you want to send it to privately.
Once you’re in the right place, click on the plus (+) icon that you’ll find to the left of the chatbox at the bottom of the screen where you’d normally type your message.
You’ll then just need to find the file on your computer, and double click on it. It’ll then bring up a pop-up for the video where you can add a comment, which will sit above the video (ideal if you need to give context on why you’re sharing it). You can also mark it as a spoiler – useful if you’re sharing a gaming tip but you don’t want to spoil the story for anyone who’s not reached that point yet.
From there, it’s as simple as clicking the upload button. Once it’s ready, the video will be in the chat window for anyone in the server to watch, or for your friend if you’ve sent it privately. And if they want to download it, they’ll just need to click the download button (a downward-facing arrow) at the top right of the video.
It’s worth noting that, while Discord will play most video formats, it can’t manage everything. If you upload a format that Discord isn’t compatible with, then it won’t show a video player – instead, the file will just be uploaded. Other people can still download it to watch on their own devices.
Also, there’s a strict file limit of 8MB. This isn’t huge at all – while there’s no definitive file size for video (as it depends on file type, resolution, compression, etc) it’s unlikely to be more than 60 seconds of footage, and could just be a few seconds. If the video you want to upload is more than 8MB, carry on reading below to find out how.
Part 2: How to Send Videos on Discord Mobile
The process to send video on Discord Mobile is pretty similar both with iOS and Android, but with just a few minor tweaks.
Firstly, you still need to navigate to either the server or inbox where you want to share the video. You can then click the ‘Photo Selector’ button directly to the left of the chatbox.
This will open your phone’s gallery, but it’ll only be searching for photos. You instead want the File Selector, which will be the third icon along – it looks like a text document with a folded-over corner.
Click this and it’ll give you the option to directly upload a video from your phone’s Downloads folder. To send a video that’s stored elsewhere, click on the Expand arrow at the top left of the menu. This will send you to your phone’s file navigation system where you can find the video you want.
Once you’ve selected the video, just hit the blue Send icon to send your video to the chat. Again you can add a message as a caption, but this time it’ll just be in the normal message box rather than a dedicated comment box before you hit upload.
Part 3: How to Send Long Videos on Discord That Are More Than 8MB
So as we’ve said above, there is a file size limit when you’re using a free Discord account of just 8MB, which isn’t much at all. There are a few ways around this, so take your pick from the one that sounds best for you.
1. Update to Discord Nitro to Upload 100MB
The first option is possibly the simplest but it’s definitely not the cheapest, and that’s to pay for an upgrade to Discord Nitro. The paid version of Discord has a number of benefits, one of which is the increased file upload size of 100MB. It costs $4.99 per month or $49.99 per year, so if you’re likely to be regularly uploading videos that are lower than this limit, it might make sense.
2. Cut Unwanted Clips/Compress Video with Filmora Video Editor
The second choice would be to take your video and cut it into pieces, sending them one at a time. This might sound time-consuming but with Filmora’s Instant Cutter Tool, it’s really simple.
All you need to do is open a video in Filmora by clicking the arrow next to Import and then choosing ‘Import with Instant Cutter Tool’.
This will open the Instant Cutter window where you can click Open File to add your video. From here you can trim your files and export them in multiple sections. There are different ways that you can do this, and while each is a simple process, there are still a few steps to follow.
For more detail, check out this post for a step-by-step guide on the different ways you can trim a video in Filmora.
You can also try to compress your video size, which may let you keep the whole video at the expense of some of the quality. Again, using Filmora, this is easy. But also again, there are different ways to go about it.
You could literally crop the video in order to trim some of the data, as the reduced viewing screen won’t be as big a file. You can also reduce the resolution, or convert your video to a format that uses fewer data. You’ll need to test it though, as converting to some video formats might result in blurry footage.
There are advanced settings you can tinker with too, such as lowering the frame rate or the bit rate. Again, rather than go through all of those options in an epic article here, it’s easier to head to a post dedicated to these steps about compress videos with Filmora .
3. Upload to YouTube/Vimeo/Google Drive/Dropbox
The final option is to upload your video to an online player or storage site, and link to it, rather than having Discord host the file. YouTube and Vimeo are the obvious options, but Streamable is another popular choice too with a free membership. YouTube’s maximum video uploads are 128GB, which is huge, while other sites like Streamable cap free accounts to 500MB per video.
So, if you want to upload massive files, you’ll need to decide whether to choose YouTube or pay for an upgraded membership elsewhere. Wherever you host your video, once it’s online just grab the link and paste it into Discord to share your content.
The only drawback to this option is that it stops other users from being able to download the video directly, and you may need to look at a file sharing alternative such as Dropbox if you want to send the actual file.
FAQs About Uploading Videos to Discord
Which Kind of Video Formats Can I Upload to Discord?
You can send any filetype to another user on Discord, so that they can download it and watch it on their own device. But if you want to upload a video so that Discord embeds it, and makes it playable within the chat, you’re limited to only mp4 and WebM filetypes.
You can also use MOV files, but not everyone will be able to play them, and FLAC files are supported on desktop only but not on mobile.
How Can I Upload Saved Videos to Discord?
If you find a video on Discord that you want to share on a different server or in a private DM, you can use the download icon to save it locally. Then, follow the steps above to upload the video to the server or DM chat window where you want to share it.
Richard Bennett
Richard Bennett is a writer and a lover of all things video.
Follow @Richard Bennett
Elite Mobile & Desktop Capture Software - For Discord Enthusiasts
Best Discord Screen Recorders [Online/Windows/Mac/Phone]

Liza Brown
Mar 27, 2024• Proven solutions
Discord is packed with great features, but one thing it’s missing is a screen recorder. You can chat, enjoy video calls and share your screen with friends or colleagues, but you can’t record these conversations or videos without using a third-party app.
Thankfully, there are plenty of choices for finding the best screen recorder for Discord. So here we’ll take you through the best options for Discord on the browser, on Windows and Mac, and on mobile so that no matter how you use Discord, you can record those epic gaming sessions or study groups for you to revisit later.
One thing to note before we begin – make sure everyone in your chat or server knows they’re being recorded. In some countries, it’s illegal to record someone without their permission, but even where legalities don’t matter, you don’t want to upset people by recording them without them being aware.
In this article
- Part 1: Best Screen Recorder Software for Discord Desktop App
- Part 2: Best Online Screen Recorder for Discord
- Part 3: Best Screen Recorder Apps for Discord on iPhone and Android
- Part 4: How to Record Discord Video Screen with Filmora?
Part 1: Best Windows/Mac Screen Recorder Software for Discord
If you prefer to use the Discord app on Windows or Mac, you’ll want a more robust screen recording tool . Here are four of the best screen recorders for Discord app users.
1. OBS
OBS (Open Broadcaster Software) is a free, open-source tool that many people use to stream live and record their screens. It works on Windows, Mac, and Linux and offers customization tools.
There are no pricing plans, everything is completely free, and it lets you add a range of sources so that you can record your webcam, Discord audio, and everything on the screen, including any overlays. The two main drawbacks to OBS are its complexity – it can be demanding on your computer, and it’s not the easiest to use. So expect to take some time getting a handle on how to set it up first.
2. Bandicam
Bandicam is another option that manages to be more intuitive. It’s easy to use, although it has many options to help you get the perfect recording. But if you’re not interested in spending ages tinkering, Bandicam is more likely to give you a higher quality recording using default settings, and it’s less demanding.
Bandicam isn’t free, but it doesn’t involve a monthly subscription, unlike many suggested tools. A one-off license for Bandicam for one PC is $39.95, or you can get a two-PC license for $59.95. If you want the editing software, Bandicut included, then that’s $60.95 with a single license. It’s also worth noting that Bandicam only works on Windows.
3. Wondershare Filmora
Though Filmora is a specialized video editing software, it also features screen recording , webcam recording, and audio recording tools. One of the biggest advantages of using Filmora to record Discord videos is that it features lots of elements and game video special effects, which will make your video cool. You can head to Part 4 of this article for detailed information about recording Discord video.
4. DemoCreator
If you plan to edit your screen recordings before uploading them, consider Wondershare DemoCreator . Working with both Windows and Mac, it’s a powerful screen recorder with some basic editing features, making it easy to turn your screen records into epic videos.
You can record in up to 120fps using two devices, such as your screen and webcam, and as well as the editing suite, there are effects tools you can utilize as well. Choose an annual subscription for $23.99 or buy a perpetual license for one PC for $47.99.
5. Camtasia
If you’re specifically looking to record your Discord screen to record tutorials, then Camtasia is a specialist tool with various templates that you can use to record professional-quality videos using your Discord app.
However, while Camtasia is fantastic for these videos, it lacks some of the effects options you might want if you’re recording game streams. And the cost is a huge factor, too – it’s around $300 for a one-off license, with an annual fee of $60 if you need ongoing support and an extra $25 for some of the additional capture tools required.
Part 2: Best Online Screen Recorder for Discord
If you’re using the online version of Discord in your web browser, you’ll be best suited to a screen recorded that specialist recorder.
2. Screen Capture
One such option is Screen Capture , which is extremely easy to use. As well as recording what’s happening on the screen, you have the option to record your microphone, audio, and webcam. As soon as your head to the Screen Capture website, you can start recording in one click, although the free version does have a watermark. It’s £4.95 per month to remove this.
There’s no software to download, and your videos will be saved in HD quality. You’ll need to click Start Recording and then, in the pop-up, permit it to record your screen. It works with all the major browsers – Chrome, Firefox, Edge, and Opera.
3. Clipchamp
If you need some more tools at your disposal, you might prefer Clipchamp . Unlike Screen Capture, you’ll need to create an account, and the free version only lets you output in standard definition. However, Clipchamp includes editing tools to record and tweak your footage before exporting it easily.
It works fully with Chrome and Edge and other Chromium-based browsers, with partial support for other browsers. If you want to output at 720p or higher, you’ll need to upgrade to a Creator account at $9 per month, while Full HD is available with a Business account for $19 per month.
3. Screencast-o-matic
The third option we would recommend as one of the best screen recorders for online Discord is Screencast-o-matic . This will record whatever is on the screen in any browser, working on all Windows, Mac, Chrome OS, Android, and iOS systems.
The free option lets you record up to 15 minutes of footage, while the Deluxe removes that limit and includes basic editing for $1.65 per month. However, the difference here is that you’ll need to download an application to record your browser – it’s not just an online tool. Once it’s downloaded, just run the software, and you can record Discord in your browser with a few clicks.
Part 3: Best Screen Recorder Apps for Discord on iPhone and Android
If you prefer to use the Discord mobile app, you’ll need a dedicated smartphone tool to record your screen. It’s important to do your research, as mobile apps are often full of ads or issues that can cause your device to slow down to a crawl. It’s not helped because review scores are so easily manipulated. You should use one of these recommendations for what we feel are the best screen recorders for Discord mobile.
1. AZ Screen Recorder
AZ Screen Recorder is a free tool you can download from the Google Play Store on an Android device. It lets you record in Full HD quality at 60fps, ideal for recording your Discord video calls to share or review later.
It also includes some editing tools, so you can trim your video, add text or music, and compress it to reduce the file size. However, a major drawback is that it cannot record audio from the source – instead, it’ll record through your phone’s microphone. This is great if you want to add commentary, but not so much if you’re dealing with background noise.
2. Screen Recorder for Game, Video Call, Screenshots
Another option for Android is ‘Screen Recorder for Game, Video Call, Screenshots’ . Despite the mouthful of a name, it’s a pretty simple app to use, and again it’s free. It has an advantage over AZ Screen Recorder in that it can record up to 1440p, perfect for then sharing over Discord with users on a gaming monitor.
The main issue with Screen Recorder is that it’s a little unreliable at times, with many people struggling to access the extra video editing tools. But if you were to combine Screen Recorder with editing software like Filmora, you could get a comprehensive solution for Discord mobile recording.
3. Record It
If you’re an iOS user, you’ll want to look at ‘Record It! ’. It’s another free option that works well on both iPhone and iPad, letting you record your apps, including Discord. You can record the entire screen in high quality and add your Face Cam as an overlay.
The included editor doesn’t have amazingly comprehensive tools, but you can trim your video, add a filter or adjust the playback speed. But, again, if you want to do more intensive editing, you’ll need to pair it with dedicated software such as Filmora.
Part 4: How to Record Discord Video Screen with Filmora?
If you want to record your screen with Filmora, create a video tutorial, or show off your gaming skills.
Start by heading to File and then Record Media, and choose the option to Record from PC.
You’ll then get a pop-up that lets you choose how much of your screen you want to capture. Enter a custom resolution, or drag the box that’s appeared on your screen to the size and location you want to record. You can also use this screen to configure whether your microphone and system audio is recorded.
If you click on the Settings cog, you’ll get a dropdown with more options – change the resolution, frame rate, and the location where you’re saving the file. You can also change the settings for showing mouse clicks, which you’ll want to do if you’re making a tutorial.
Once you hit the red record button, the screen will start recording after a countdown of five seconds – ample time to switch browser window to Discord. Then, when you’re done, head back to Filmora and click the Stop button at the top-right of the screen.
The video will save automatically to your chosen file path. You can then drag it into Filmora to trim off the start and end, if necessary, and use all of Filmora’s editing tools to enhance your video.
Liza Brown
Liza Brown is a writer and a lover of all things video.
Follow @Liza Brown
Liza Brown
Mar 27, 2024• Proven solutions
Discord is packed with great features, but one thing it’s missing is a screen recorder. You can chat, enjoy video calls and share your screen with friends or colleagues, but you can’t record these conversations or videos without using a third-party app.
Thankfully, there are plenty of choices for finding the best screen recorder for Discord. So here we’ll take you through the best options for Discord on the browser, on Windows and Mac, and on mobile so that no matter how you use Discord, you can record those epic gaming sessions or study groups for you to revisit later.
One thing to note before we begin – make sure everyone in your chat or server knows they’re being recorded. In some countries, it’s illegal to record someone without their permission, but even where legalities don’t matter, you don’t want to upset people by recording them without them being aware.
In this article
- Part 1: Best Screen Recorder Software for Discord Desktop App
- Part 2: Best Online Screen Recorder for Discord
- Part 3: Best Screen Recorder Apps for Discord on iPhone and Android
- Part 4: How to Record Discord Video Screen with Filmora?
Part 1: Best Windows/Mac Screen Recorder Software for Discord
If you prefer to use the Discord app on Windows or Mac, you’ll want a more robust screen recording tool . Here are four of the best screen recorders for Discord app users.
1. OBS
OBS (Open Broadcaster Software) is a free, open-source tool that many people use to stream live and record their screens. It works on Windows, Mac, and Linux and offers customization tools.
There are no pricing plans, everything is completely free, and it lets you add a range of sources so that you can record your webcam, Discord audio, and everything on the screen, including any overlays. The two main drawbacks to OBS are its complexity – it can be demanding on your computer, and it’s not the easiest to use. So expect to take some time getting a handle on how to set it up first.
2. Bandicam
Bandicam is another option that manages to be more intuitive. It’s easy to use, although it has many options to help you get the perfect recording. But if you’re not interested in spending ages tinkering, Bandicam is more likely to give you a higher quality recording using default settings, and it’s less demanding.
Bandicam isn’t free, but it doesn’t involve a monthly subscription, unlike many suggested tools. A one-off license for Bandicam for one PC is $39.95, or you can get a two-PC license for $59.95. If you want the editing software, Bandicut included, then that’s $60.95 with a single license. It’s also worth noting that Bandicam only works on Windows.
3. Wondershare Filmora
Though Filmora is a specialized video editing software, it also features screen recording , webcam recording, and audio recording tools. One of the biggest advantages of using Filmora to record Discord videos is that it features lots of elements and game video special effects, which will make your video cool. You can head to Part 4 of this article for detailed information about recording Discord video.
4. DemoCreator
If you plan to edit your screen recordings before uploading them, consider Wondershare DemoCreator . Working with both Windows and Mac, it’s a powerful screen recorder with some basic editing features, making it easy to turn your screen records into epic videos.
You can record in up to 120fps using two devices, such as your screen and webcam, and as well as the editing suite, there are effects tools you can utilize as well. Choose an annual subscription for $23.99 or buy a perpetual license for one PC for $47.99.
5. Camtasia
If you’re specifically looking to record your Discord screen to record tutorials, then Camtasia is a specialist tool with various templates that you can use to record professional-quality videos using your Discord app.
However, while Camtasia is fantastic for these videos, it lacks some of the effects options you might want if you’re recording game streams. And the cost is a huge factor, too – it’s around $300 for a one-off license, with an annual fee of $60 if you need ongoing support and an extra $25 for some of the additional capture tools required.
Part 2: Best Online Screen Recorder for Discord
If you’re using the online version of Discord in your web browser, you’ll be best suited to a screen recorded that specialist recorder.
2. Screen Capture
One such option is Screen Capture , which is extremely easy to use. As well as recording what’s happening on the screen, you have the option to record your microphone, audio, and webcam. As soon as your head to the Screen Capture website, you can start recording in one click, although the free version does have a watermark. It’s £4.95 per month to remove this.
There’s no software to download, and your videos will be saved in HD quality. You’ll need to click Start Recording and then, in the pop-up, permit it to record your screen. It works with all the major browsers – Chrome, Firefox, Edge, and Opera.
3. Clipchamp
If you need some more tools at your disposal, you might prefer Clipchamp . Unlike Screen Capture, you’ll need to create an account, and the free version only lets you output in standard definition. However, Clipchamp includes editing tools to record and tweak your footage before exporting it easily.
It works fully with Chrome and Edge and other Chromium-based browsers, with partial support for other browsers. If you want to output at 720p or higher, you’ll need to upgrade to a Creator account at $9 per month, while Full HD is available with a Business account for $19 per month.
3. Screencast-o-matic
The third option we would recommend as one of the best screen recorders for online Discord is Screencast-o-matic . This will record whatever is on the screen in any browser, working on all Windows, Mac, Chrome OS, Android, and iOS systems.
The free option lets you record up to 15 minutes of footage, while the Deluxe removes that limit and includes basic editing for $1.65 per month. However, the difference here is that you’ll need to download an application to record your browser – it’s not just an online tool. Once it’s downloaded, just run the software, and you can record Discord in your browser with a few clicks.
Part 3: Best Screen Recorder Apps for Discord on iPhone and Android
If you prefer to use the Discord mobile app, you’ll need a dedicated smartphone tool to record your screen. It’s important to do your research, as mobile apps are often full of ads or issues that can cause your device to slow down to a crawl. It’s not helped because review scores are so easily manipulated. You should use one of these recommendations for what we feel are the best screen recorders for Discord mobile.
1. AZ Screen Recorder
AZ Screen Recorder is a free tool you can download from the Google Play Store on an Android device. It lets you record in Full HD quality at 60fps, ideal for recording your Discord video calls to share or review later.
It also includes some editing tools, so you can trim your video, add text or music, and compress it to reduce the file size. However, a major drawback is that it cannot record audio from the source – instead, it’ll record through your phone’s microphone. This is great if you want to add commentary, but not so much if you’re dealing with background noise.
2. Screen Recorder for Game, Video Call, Screenshots
Another option for Android is ‘Screen Recorder for Game, Video Call, Screenshots’ . Despite the mouthful of a name, it’s a pretty simple app to use, and again it’s free. It has an advantage over AZ Screen Recorder in that it can record up to 1440p, perfect for then sharing over Discord with users on a gaming monitor.
The main issue with Screen Recorder is that it’s a little unreliable at times, with many people struggling to access the extra video editing tools. But if you were to combine Screen Recorder with editing software like Filmora, you could get a comprehensive solution for Discord mobile recording.
3. Record It
If you’re an iOS user, you’ll want to look at ‘Record It! ’. It’s another free option that works well on both iPhone and iPad, letting you record your apps, including Discord. You can record the entire screen in high quality and add your Face Cam as an overlay.
The included editor doesn’t have amazingly comprehensive tools, but you can trim your video, add a filter or adjust the playback speed. But, again, if you want to do more intensive editing, you’ll need to pair it with dedicated software such as Filmora.
Part 4: How to Record Discord Video Screen with Filmora?
If you want to record your screen with Filmora, create a video tutorial, or show off your gaming skills.
Start by heading to File and then Record Media, and choose the option to Record from PC.
You’ll then get a pop-up that lets you choose how much of your screen you want to capture. Enter a custom resolution, or drag the box that’s appeared on your screen to the size and location you want to record. You can also use this screen to configure whether your microphone and system audio is recorded.
If you click on the Settings cog, you’ll get a dropdown with more options – change the resolution, frame rate, and the location where you’re saving the file. You can also change the settings for showing mouse clicks, which you’ll want to do if you’re making a tutorial.
Once you hit the red record button, the screen will start recording after a countdown of five seconds – ample time to switch browser window to Discord. Then, when you’re done, head back to Filmora and click the Stop button at the top-right of the screen.
The video will save automatically to your chosen file path. You can then drag it into Filmora to trim off the start and end, if necessary, and use all of Filmora’s editing tools to enhance your video.
Liza Brown
Liza Brown is a writer and a lover of all things video.
Follow @Liza Brown
Also read:
- In 2024, Exclusive A Step-by-Step Process to Finding Hidden Discords
- [Updated] In 2024, Integrating Spotify & Discord A Complete Guide
- [Updated] Discord Vs. Skype Which One Should You Choose?
- A Comprehensive Overview of Adding Roles in Discord for 2024
- Step-By-Step Process to Make Professional Discord Photos
- [Updated] In 2024, The Disco Diplomat's Manual How to Respond Effectively
- [New] Guide to Setting Up and Managing Discord Channels for Beginners
- [New] Decoding the Perks A Breakdown of DiscoNitro on Discord
- [New] 2024 Approved Mastering The Art Becoming a Verified Discord Partner
- [New] In 2024, Mastering Response Etiquette Discord Messaging Guide
- [New] 2024 Approved Mastering Response Etiquette Discord Messaging Guide
- [New] Power up Your Discord Experience with the Art of Adding GIFs for 2024
- How to Perfectly Incorinate Emojis Into Your Discord User's Statuses for 2024
- Optimizing Your Discord Adventure Essentials to Explore for 2024
- [New] 2024 Approved Cutting-Edge Font Creators for Discord on the Go
- [New] 2024 Approved Epic Environments Discover the Hottest 10 Themes at BetterDiscord
- In 2024, Leading Edge Bots in Social Chats
- [Updated] In 2024, Essential Know-How Screen Share Magic on Discord
- [Updated] In 2024, Break Free From Discord Support
- [Updated] Demystifying the Premium Experience An In-Depth Look at DiscoNitro on Discord
- [New] In 2024, Choosing the Best Online Messaging Discord vs Skype Battle
- [Updated] Clearing the Air Methodical Guidance for Taking Action Against Harassment on Discord
- [Updated] In 2024, Break Off From Discord Integration (PC/Mobile)
- 2024 Approved Discord Nitro Demystified The Ultimate VIP Service for Gamers
- [Updated] In 2024, Master the Art of Crafting Impressive Discord Profile Pictures
- [Updated] Cross-Platform Chumming Discord Friend Guide for 2024
- [New] 2024 Approved From Joiner to Trustee Securing a Place as a Disco Partner
- Rootjunky APK To Bypass Google FRP Lock For Infinix Note 30 5G
- [Updated] Image Improvement Masterclass - Top Apps Decoded
- [New] Tailor FB Videos for Maximum Full-Screen Effect
- New In 2024, How to Use Audacity for Podcasts
- [Updated] Audio Restoration on Visual Posts From Twitter
- In 2024, How to Track Vivo V29 Location without Installing Software? | Dr.fone
- FB's Viral Hits Decoded Crafting Your Number One Song Video for 2024
- 2024 Approved Optimal Free Screen Capture Suites Reviewed
- [Updated] Top-Notch Game Capture Applications Outshining FBX Capabilities for 2024
- Super Easy Ways To Deal with Tecno Spark 10 Pro Unresponsive Screen | Dr.fone
- How to Fix Error 495 While Download/Updating Android Apps On Sony Xperia 10 V | Dr.fone
- Updated 2024 Approved From Beats to Pages The Ultimate Guide to Online MP3 Conversion to Text
- In 2024, The Secret to Viral Instagram Videos Optimizing Dimensions and Aspect Ratios
- [Updated] Capturing Motion Setting up a Timelapse on an iPad
- In 2024, 4 Ways to Transfer Music from Google Pixel Fold to iPhone | Dr.fone
- In 2024, How to Screen Share on Apple iPhone 8 Plus? | Dr.fone
- Bridging Platforms Posting IGTV on Facebook Efficiently
- Title: "[Updated] Conveying Content via Discord Optimizing Video Sharing for 2024"
- Author: Timothy
- Created at : 2024-05-23 22:48:03
- Updated at : 2024-05-24 22:48:03
- Link: https://discord-videos.techidaily.com/updated-conveying-content-via-discord-optimizing-video-sharing-for-2024/
- License: This work is licensed under CC BY-NC-SA 4.0.
