
!["[Updated] From Zero to Hero Integrating Roles in Discord"](https://www.lifewire.com/thmb/FyEEajdYrw2_6pUcZRPNDJrLm4E=/400x300/filters:no_upscale():max_bytes(150000):strip_icc()/Echo-Pop-vs-Echo-Dot-09671f8f0db34e33a2bcdbbfba71dea3.jpg)
"[Updated] From Zero to Hero Integrating Roles in Discord"
From Zero to Hero: Integrating Roles in Discord
How to Add Roles in Discord?

Richard Bennett
Mar 27, 2024• Proven solutions
Having a Discord server for you and your friends is a fun experience. And for gamers, Discord is a necessity. You can customize it with bots, connect real-time over voice channels, and even add rooms for chat forums.
Obviously, creating and managing a Discord server can get difficult. Especially when the server gets crammed with members, it is no longer a one-person show. You need help with monitoring and moderation. And let’s face it – you cannot watch your server round the clock.
So, let us learn the art of delegation on Discord! This guide will help you with – How to add roles in Discord and how to assign them to members. This includes creating roles, deleting them, and granting appropriate permissions.
- Part 1: Discord Server Permissions Introduction
- Part 2: How to Make and Add Roles in Discord on Computer
- Part 3: How to Manage Roles in Discord?
- Part 4: How to Delete Roles in Discord?
- Part 5: How to Add Roles on Discord Mobile?
- Part 6: Adding Roles to Discord FAQs
Part 1: Discord Server Permissions You Can Set Up
To give you a heads-up, there are around 29 permissions that you can adjust over a Discord server. More specifically, there are 7 voice permissions, 9 permissions related to texts, and about 13 permissions dealing with the server.
1. General server permission
Administrator – this is the highest permission that you can grant to a user. Think twice before giving this authority to anyone.
View Audit Log – with this permission, a user can read the server’s audits.
Manage Server – this permission enables a user to change the server’s name or shift it to another region.
Manage Roles – a user with this authority can make new roles or modify the roles without this permission.
Manage Channels – with this; a user can make, edit, or remove channels on a server.
Manage emojis – users with this authority can manage emotes.
Manage Webhooks – if you have this authority, you can add, modify, and remove webhooks.
Read Text Channels & See Voice Channels – a user with this permission can read text channels.
2. Membership permissions
Ban Members – a member with permission, can ban members from the server.
Create Instant Invite – users with this permission can invite people to the server.
Change Nickname – you can change your nickname anytime if this permission is enabled.
Manage Nicknames – if enabled, a user can change other’s nicknames.
Kick Members – a user with this authority can remove members from the server.
3. Text channel permissions
Send Messages – with this; users can send texts on chats.
Send TTS Messages – this enables users to send text-to-speech texts.
Manage Messages – with this; a user can remove or pin texts of other users.
Embed Links – enables users to embed hyperlinks in texts.
Attach Files – with this; users can attach files in the texts.
Read Message History – enables users to access earlier texts.
Mention Everyone – you can send push notifications on the channel if this permission is enabled.
Use External Emojis – if enabled, users can send emojis from other servers.
Add Reactions – with this; users can add new reactions to a text.
4. Voice channel permissions
Connect – enables users to connect themselves over the voice channel.
Speak – users can talk over the voice channel.
Mute Members – turn off other user’s speech.
Deafen Members – turn off hearing on the channel for a user.
Move Members – enables a user to shift members from one channel to a different channel.
Use Voice Activity – a member can talk without using Push-to-Talk, with this permission.
Priority Speaker – when this permission is turned on for a user, other’s
this permission allows the user to reduce the volume of other users when this user is speaking so that their words are louder on the channel.
5. Advanced permissions
Includes the ‘Administrator’ permission, which by default enables all the permissions to the assigned user.
Part 2: How to Make and Add Roles in Discord on Computer
The desktop app and Browser resemble the mobile apple a lot. The process of assigning roles and configuring members is more or less the same across devices. First, you need to create roles and define their authority before assigning these roles to some members.
How to create roles in Discord?
Before you can assign roles, you need a server. Once you have created your Discord server, start crafting the structure.
- Open your server and right-click on it.
- From the menu that appears, tap server settings.
- Name the role suitably. It should be descriptive of the authority.
- Tap on the plus sign that appears on the top right of the page.
- Here, you can change the title off the roll and even choose the color.
- Now comes the time to grant some permissions. These are basically the authority that you gave to every profile.
- When you are done, save the changes.
How to Assign Roles to Members in Discord?
To be able to assign roles, you should first create them
- Once again, hit that right button on your server and go to server settings.
- From the menu that appears to the left, ‘choose members’ under user management.
- Here, you will see the list of all the members on your server, tap the Plus sign that is right beside the username.
- From the drop-down menu that appears, select a role you want to assign to that member.
- You will notice that the color changes as per your settings. And this is how you assign roles to a server.
Part 3: How to Manage Roles in Discord?
After you learn how to make roles in Discord, you might want to manage them.
If you have got the hang of creating roles, then managing them is no different. Whenever the server gets crowded, you can create more roles or modify the existing ones. A smaller server can run smoothly with just an admin and an ‘everyone’ role.
The quickest and easiest way to manage your bloating server is to let all members be ‘everyone’ and adjust permissions accordingly. So, whenever members enter your server, they will automatically be assigned the common role.
Further, you can easily figure out what roles you have assigned to whom. Due to these colors, the other members can identify moderators, admins, or other roles.
Part 4: How to Delete Roles in Discord?
Honestly, removing Discord roles easier than setting them up. There are hardly a few steps that you need to follow for role removal.
- place the cursor on the server, and hit the right-click.
- From the list, choose server settings. Then click on roles.
- From the roles window, tap on the role that you wish to delete.
- Towards the bottom, you will see the option to delete the role.
- Press ok to confirm.
Part 5: How to Add Roles on Discord Mobile?
Like we mentioned earlier, the user interface of Discord is similar across devices. So, there is little difference between the process of creating and managing roles. But it can be baffling for beginners, so here’s a brief!
1. How to create roles in Discord mobile app?
Before you can assign roles, you have to create them.
- Open your server.
- Tap on the arrow beside the server’s title. A drop-down menu will appear. Select ‘server settings’ from that.
- Tap on ‘Roles.’ A common role, ‘everyone’ is assigned to all the members who have basic permissions enabled for everyone.
- Tap the plus sign and add a role.
- Give the role a color and describe it in a few words.
- Go through the permissions and enable the ones that fit the role.
- Save the changes.
You can repeat this multiple times to create more roles.
2. How to Assign Roles in Discord mobile app?
- Head over to settings and select ‘Members.’
- Select the members you want to assign roles to.
- Tick the boxes beside each member’s name for the roles you are assigning them.
Save the changes, and you are good to go! You can assign multiple roles to a member.
Part 6: FAQs about Discord Server Roles
Just some obvious things you might wonder about.
- How to make someone admin on Discord?
Making someone admin is the same as assigning other roles. Open your server and go to server settings.
- From there, select ‘roles’ from the left pane.
- Create a new role.
- Name the role ‘admin’ or an equivalent title.
- Adjust the setting related to sorting out role members with other members.
- Go to general permissions and tick the ‘Administrator’ option.
- Hit the ‘save changes’ button at the bottom.
- Now it’s time to assign the role to someone. Right-click on the user that you want to assign the role.
- Choose ‘roles’ from the drop-down list and select ‘Admin.’
And now your server has an admin!
- How can I assign roles to new users in Discord automatically?
By default, every member gets the role of ‘everyone’ on the server. However, you can customize this and add the MEE6 bot for automatic role allocation.
- Why can’t I manage the server even I am an admin on the server?
This is likely to happen if the server owner gave you the role of admin, but the permissions are disabled. You can ask the owner to enable the permissions for your user ID.
Richard Bennett
Richard Bennett is a writer and a lover of all things video.
Follow @Richard Bennett
Richard Bennett
Mar 27, 2024• Proven solutions
Having a Discord server for you and your friends is a fun experience. And for gamers, Discord is a necessity. You can customize it with bots, connect real-time over voice channels, and even add rooms for chat forums.
Obviously, creating and managing a Discord server can get difficult. Especially when the server gets crammed with members, it is no longer a one-person show. You need help with monitoring and moderation. And let’s face it – you cannot watch your server round the clock.
So, let us learn the art of delegation on Discord! This guide will help you with – How to add roles in Discord and how to assign them to members. This includes creating roles, deleting them, and granting appropriate permissions.
- Part 1: Discord Server Permissions Introduction
- Part 2: How to Make and Add Roles in Discord on Computer
- Part 3: How to Manage Roles in Discord?
- Part 4: How to Delete Roles in Discord?
- Part 5: How to Add Roles on Discord Mobile?
- Part 6: Adding Roles to Discord FAQs
Part 1: Discord Server Permissions You Can Set Up
To give you a heads-up, there are around 29 permissions that you can adjust over a Discord server. More specifically, there are 7 voice permissions, 9 permissions related to texts, and about 13 permissions dealing with the server.
1. General server permission
Administrator – this is the highest permission that you can grant to a user. Think twice before giving this authority to anyone.
View Audit Log – with this permission, a user can read the server’s audits.
Manage Server – this permission enables a user to change the server’s name or shift it to another region.
Manage Roles – a user with this authority can make new roles or modify the roles without this permission.
Manage Channels – with this; a user can make, edit, or remove channels on a server.
Manage emojis – users with this authority can manage emotes.
Manage Webhooks – if you have this authority, you can add, modify, and remove webhooks.
Read Text Channels & See Voice Channels – a user with this permission can read text channels.
2. Membership permissions
Ban Members – a member with permission, can ban members from the server.
Create Instant Invite – users with this permission can invite people to the server.
Change Nickname – you can change your nickname anytime if this permission is enabled.
Manage Nicknames – if enabled, a user can change other’s nicknames.
Kick Members – a user with this authority can remove members from the server.
3. Text channel permissions
Send Messages – with this; users can send texts on chats.
Send TTS Messages – this enables users to send text-to-speech texts.
Manage Messages – with this; a user can remove or pin texts of other users.
Embed Links – enables users to embed hyperlinks in texts.
Attach Files – with this; users can attach files in the texts.
Read Message History – enables users to access earlier texts.
Mention Everyone – you can send push notifications on the channel if this permission is enabled.
Use External Emojis – if enabled, users can send emojis from other servers.
Add Reactions – with this; users can add new reactions to a text.
4. Voice channel permissions
Connect – enables users to connect themselves over the voice channel.
Speak – users can talk over the voice channel.
Mute Members – turn off other user’s speech.
Deafen Members – turn off hearing on the channel for a user.
Move Members – enables a user to shift members from one channel to a different channel.
Use Voice Activity – a member can talk without using Push-to-Talk, with this permission.
Priority Speaker – when this permission is turned on for a user, other’s
this permission allows the user to reduce the volume of other users when this user is speaking so that their words are louder on the channel.
5. Advanced permissions
Includes the ‘Administrator’ permission, which by default enables all the permissions to the assigned user.
Part 2: How to Make and Add Roles in Discord on Computer
The desktop app and Browser resemble the mobile apple a lot. The process of assigning roles and configuring members is more or less the same across devices. First, you need to create roles and define their authority before assigning these roles to some members.
How to create roles in Discord?
Before you can assign roles, you need a server. Once you have created your Discord server, start crafting the structure.
- Open your server and right-click on it.
- From the menu that appears, tap server settings.
- Name the role suitably. It should be descriptive of the authority.
- Tap on the plus sign that appears on the top right of the page.
- Here, you can change the title off the roll and even choose the color.
- Now comes the time to grant some permissions. These are basically the authority that you gave to every profile.
- When you are done, save the changes.
How to Assign Roles to Members in Discord?
To be able to assign roles, you should first create them
- Once again, hit that right button on your server and go to server settings.
- From the menu that appears to the left, ‘choose members’ under user management.
- Here, you will see the list of all the members on your server, tap the Plus sign that is right beside the username.
- From the drop-down menu that appears, select a role you want to assign to that member.
- You will notice that the color changes as per your settings. And this is how you assign roles to a server.
Part 3: How to Manage Roles in Discord?
After you learn how to make roles in Discord, you might want to manage them.
If you have got the hang of creating roles, then managing them is no different. Whenever the server gets crowded, you can create more roles or modify the existing ones. A smaller server can run smoothly with just an admin and an ‘everyone’ role.
The quickest and easiest way to manage your bloating server is to let all members be ‘everyone’ and adjust permissions accordingly. So, whenever members enter your server, they will automatically be assigned the common role.
Further, you can easily figure out what roles you have assigned to whom. Due to these colors, the other members can identify moderators, admins, or other roles.
Part 4: How to Delete Roles in Discord?
Honestly, removing Discord roles easier than setting them up. There are hardly a few steps that you need to follow for role removal.
- place the cursor on the server, and hit the right-click.
- From the list, choose server settings. Then click on roles.
- From the roles window, tap on the role that you wish to delete.
- Towards the bottom, you will see the option to delete the role.
- Press ok to confirm.
Part 5: How to Add Roles on Discord Mobile?
Like we mentioned earlier, the user interface of Discord is similar across devices. So, there is little difference between the process of creating and managing roles. But it can be baffling for beginners, so here’s a brief!
1. How to create roles in Discord mobile app?
Before you can assign roles, you have to create them.
- Open your server.
- Tap on the arrow beside the server’s title. A drop-down menu will appear. Select ‘server settings’ from that.
- Tap on ‘Roles.’ A common role, ‘everyone’ is assigned to all the members who have basic permissions enabled for everyone.
- Tap the plus sign and add a role.
- Give the role a color and describe it in a few words.
- Go through the permissions and enable the ones that fit the role.
- Save the changes.
You can repeat this multiple times to create more roles.
2. How to Assign Roles in Discord mobile app?
- Head over to settings and select ‘Members.’
- Select the members you want to assign roles to.
- Tick the boxes beside each member’s name for the roles you are assigning them.
Save the changes, and you are good to go! You can assign multiple roles to a member.
Part 6: FAQs about Discord Server Roles
Just some obvious things you might wonder about.
- How to make someone admin on Discord?
Making someone admin is the same as assigning other roles. Open your server and go to server settings.
- From there, select ‘roles’ from the left pane.
- Create a new role.
- Name the role ‘admin’ or an equivalent title.
- Adjust the setting related to sorting out role members with other members.
- Go to general permissions and tick the ‘Administrator’ option.
- Hit the ‘save changes’ button at the bottom.
- Now it’s time to assign the role to someone. Right-click on the user that you want to assign the role.
- Choose ‘roles’ from the drop-down list and select ‘Admin.’
And now your server has an admin!
- How can I assign roles to new users in Discord automatically?
By default, every member gets the role of ‘everyone’ on the server. However, you can customize this and add the MEE6 bot for automatic role allocation.
- Why can’t I manage the server even I am an admin on the server?
This is likely to happen if the server owner gave you the role of admin, but the permissions are disabled. You can ask the owner to enable the permissions for your user ID.
Richard Bennett
Richard Bennett is a writer and a lover of all things video.
Follow @Richard Bennett
Unlocking the Secrets of Discord Stickers
Stickers for Discord: Everything You Need to Know
Richard Bennett
Mar 27, 2024• Proven solutions
From Facebook to even WhatsApp and Telegram, plain texts have become boring. Sticker fights on WhatsApp will give you an idea of how popular stickers are. Stickers are the new trend, and Discord just cannot lag behind in the race. Considering this, Discord is about to launch some lively, animated stickers.
In this article
- Part 1: What’s Discord Sticker?
- Part 2: How to Find Sticker Shop and Get Discord Stickers for Free?
- Part 3: How to Buy Discord Stickers?
- Part 4: How to Buy or Redeem a Discord Sticker Pack
- Part 5: How to Use Stickers on Discord?
Part 1: What’s Discord Sticker?
Discord Sticker supports sending emojis and GIFs on chats. The stickers have been soft-launched in Japan, Canada, and Brazil. After testing and feedback, they will be available across the globe.
Luckily, if you are a Nitro user, you can access the stickers for free. These stickers are bundled in the Nitro subscription, and you can claim the cool new stickers for free. Just go to the sticker shop, and tap on the “Free” button to start using them.
For those of you who have a $4.99 subscription, you can get the What’s Up Wumpus sticker pack for free. $9.99 subscription holders can unlock the What’s Up Wumpus sticker pack and can use the Wumpus Nitro Elite pack as long as their subscription is active.
The $9.99 subscribers can also avail of a 33% discount on other Discord sticker packs. Once you purchase these stickers, they are a permanent part of your Discord inventory. Other than these, the shop has Doggo Replies, Nelly At Work, and Hello Wumpus stickers as default sticker packs.
After the soft launch, the Sticker Shop is available for the users across all the platforms – Android, iOS, and even on the desktop app and browser.
Part 2: How to Find Sticker Shop and Get Discord Stickers for Free?
- On Phone
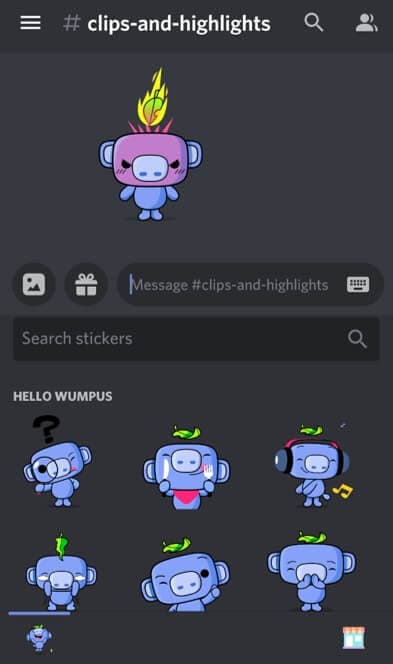
If you are lucky enough to be in Brazil, Japan, or Canada, you can access the Sticker Shop. You can tap on the emoji icon (the one that appears on the text box). The box that opens shows the emoji, and GIF tabs along with the sticker tab.
Tap on the sticker tab. A ‘shop’ symbol pops up towards the bottom (right hand). Tap on the symbol to open the sticker gallery. Here, you will see all the available sticker packs.
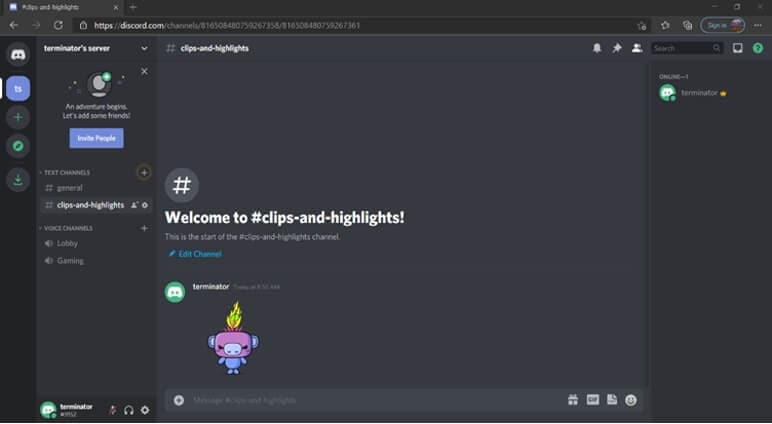
- Desktop (Browser)
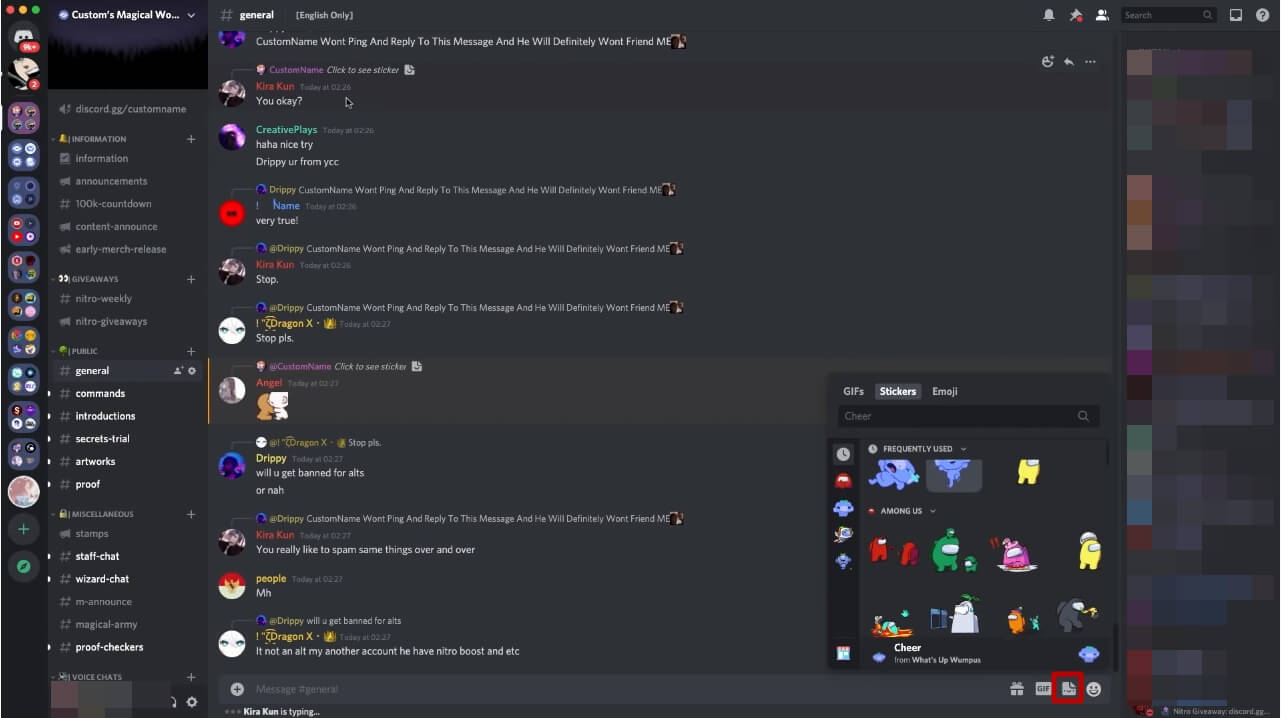
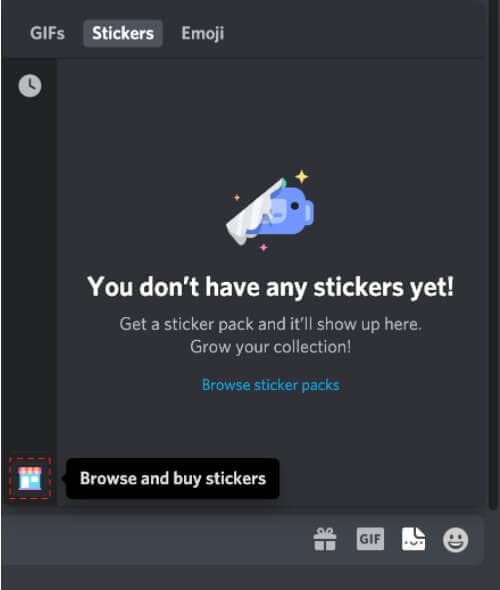
If you use Discord on your desktop or browser, you can see the sticker icon right on the text bar. Tap on it, and then click on the shopping icon that appears towards the bottom (left corner). In the shop, you can browse through the sticker packs.
Nitro users will get the What’s Up Wumpus stickers for free. However, they will have to buy other packs. The $9.99 Nitro users will get a 33% discount on sticker packs.
For now, the stickers can be used only by users in Japan, Brazil, and Canada. These users can send stickers to users in other countries. However, the receivers can see the stickers but cannot buy or send them.
However, you can try and use a VPN proxy to gain early access to it.
Part 3: How to Buy Discord Stickers?
As we described above, you can access the sticker shop on your phone as well as desktop. Once in the shop, you can browse and pick the stickers to buy.
Before buying, you can view the stickers in the sticker pack. As a sample, you will be shown a few stickers. You can view the entire pack by tapping on the ‘View All’ tab.
Part 4: How to Buy or Redeem a Discord Sticker Pack
Here is a brief rundown of the steps to follow if you want to buy a sticker pack.
- Choose a sticker pack that you like. View all the stickers to see what the pack looks like.
- Tap on the purchase button that is located right beside the name of the pack.
- You will be prompted to input your payment details. If you have saved a payment option on Discord, you can choose the relevant option.
- Agree to the Terms and Services of Discord.
- Finally, hit the purchase tab.
- The sticker pack is added to the inventory instantly.
- You can start sending them in the texts.
Note that Discord does not refund the money that is once paid. So, you cannot return the stickers to get a refund.
Another interesting thing to note is that the Sticker Shop refreshes and offers new sticker packs. Due to this rotation, a pack that is available in the shop today may be replaced by a new one tomorrow.
But don’t worry. A timer displayed at the top left corner (besides the title) lets you know for how long the pack is available in the shop. You can grab it before the time runs out.

Part 5: How to Use Stickers on Discord?
Buying stickers is useless if you don’t send them over texts. So, once you purchase stickers, you can immediately start sending them to your servers and texts.
1. Sending Stickers on Discord Mobile App
If you have the Discord app on your phone, tap on the emoji button. The Stickers tab appears, and this menu enables you to send the most-used stickers quickly, view all the purchased stickers, and search for appropriate stickers.
You can type an expression or emoji in the ‘Find the perfect sticker’ bar to find the right sticker. Hit the send button once you find the apt sticker.
2. Sending Stickers from Discord Desktop (and over Browser)
Sending stickers on a desktop or browser is quite similar to the mobile process. On the chatbox, you will find the sticker icon. Tap on it to view your purchased sticker packs.
Once opened, the menu will show you the most-used stickers. You can view other packs and switch between them. You can also search for particular stickers by typing the terms on the search bar.
You can tap on a sticker to send it on chats and servers.
Bonus: Adding Face-tracking AR Stickers to Video with Wondershare Filmora
In the latest version of Wondershare Filmora (V10.5 and later version), you can add face-tracking AR stickers to people in the video, and light up the celebration with flashy and cute characters and elements. Here are some brief steps to add AR stickers to your video in Filmora.
Step 1. Download and install the latest version of Filmora
Click the button below to download and install the latest version of Filmora. If you have installed Filmora already, click the About option under the Help menu to check the version of Filmora.


Note: You need to run Filmora 10.5 and later versions to add the AR stickers.
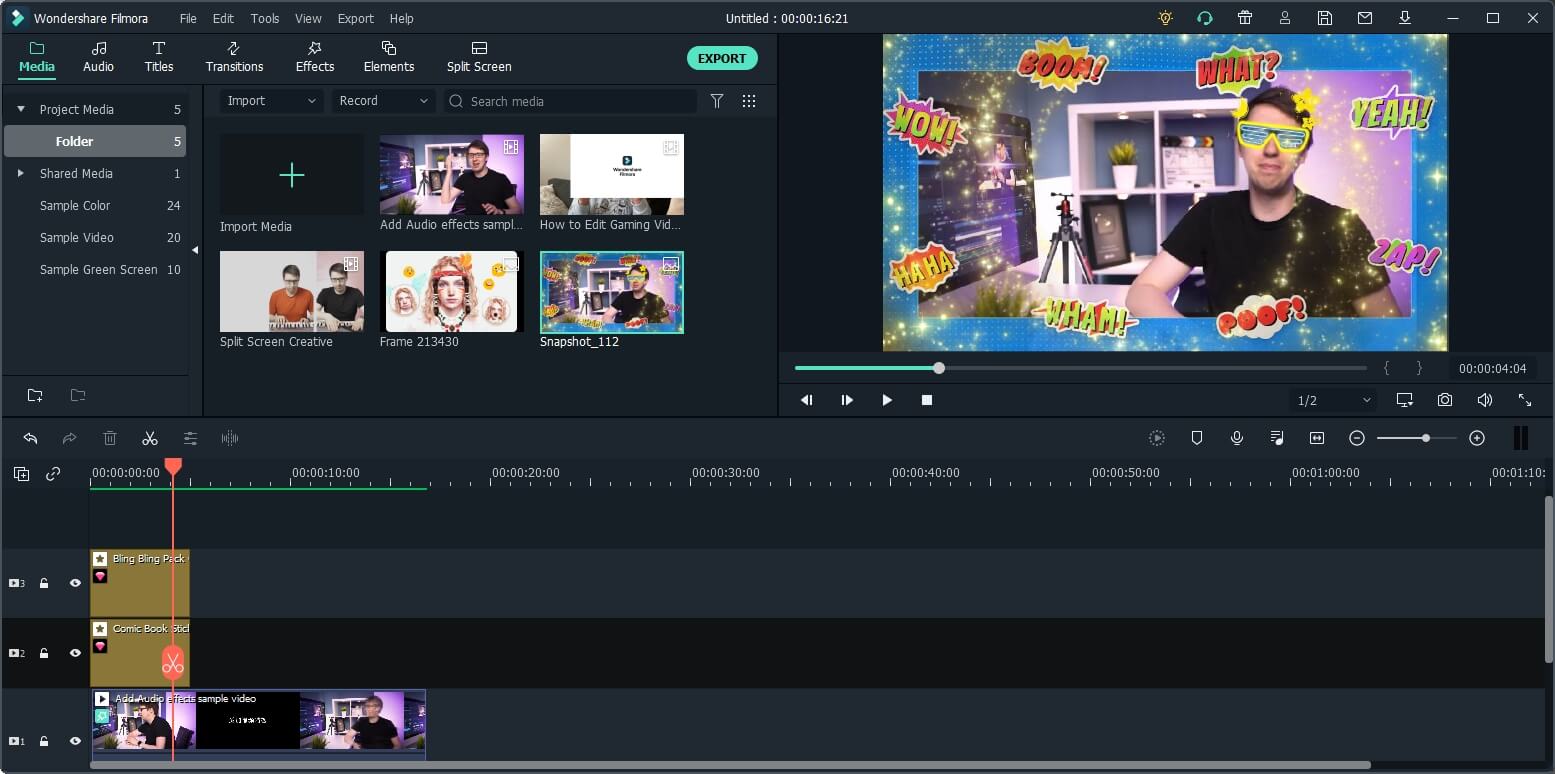
Step 2. Drag and drop your video footage to timeline
After launching Filmora, you need to import the video footage to the video editor. You can drag and drop the video footage to the timeline directly if you are working on a simple video project.
However, if you are working on a video project with many footages, it is recommended to upload them to the media library in order.
Step 3. Add AR Stickers to the video
After trimming or cutting out unnecessary frames from the video, you can now add the AR stickers to the footage. Go to the Effects tab and then scroll down to the AR Sticker directory.
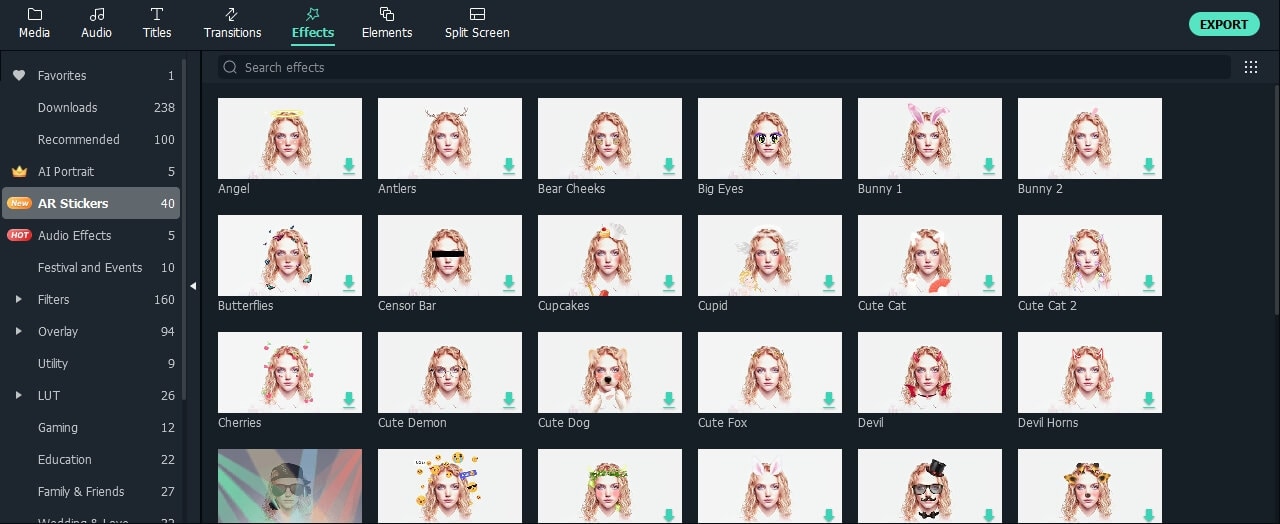
Currently, there are 40 stickers available in Filmora. You can click each one to preview and download. To add a sticker to the video, you can drag and drop it to the video track above or to the video clip directly. You can add several stickers at the same time by placing them in the tracks accordingly.
Step 4. Preview and Export
After finishing the editing, you can click the play button in the preview window to preview, and then click the Export button to save the video.
FAQs about Discord Sticker
And here we will answer some stuff that you might wonder about.
- What’s the difference between Discord Sticker and Discord Emoji ?
Well, emojis are emojis, and they are even in-built into your Android (or Google) and other keyboards on your phone. Emojis are not animated, and you can send basic Smiley or Sad faces (of course, there are animals and flowers, too). On the other hand, stickers are animated, and there can be specific sticker characters like What’s Up Wumpus.
- Why can’t I see the Sticker option on my Discord app?
You cannot access the stickers on Discord probably because the feature has not been launched in your country yet. Stickers are only available for users in Brazil, Japan, and Canada. They will be launched in other countries after testing and feedback.
- Is Discord sticker free?
If you are a Nitro subscriber, you will get the What’s Up Wumpus sticker pack for free. You will have to buy the other packs. As a $9.99 Nitro subscriber, you can get other packs at a 33% discount.
- Can I keep the purchased sticker pack forever in my account?
Yes, once you buy a pack, you will have lifetime access to it. However, if you delete your Discord account, you will not get your stickers back. Further, packs like ‘Wumpus Nitro Elite’ can be accessed only on an active $9.99 subscription.
- Can people who are outside of Brazil, Canada, and Japan receive the stickers I sent?
Yes, users from countries other than Japan, Canada, and Brazil can see the stickers in the chat sent to them. However, they could not buy or send them.
- Why my Discord sticker is not moving/animating?
The stickers should move by default when sent. You can check if your sticker inventory is set to the smallest size. You can also go to User Settings, tap on Text & Images, and select Stickers. Adjust the settings appropriately. You can contact the Discord support team should you need further assistance.
Be patient until the cool update rolls out worldwide!
Richard Bennett
Richard Bennett is a writer and a lover of all things video.
Follow @Richard Bennett
Richard Bennett
Mar 27, 2024• Proven solutions
From Facebook to even WhatsApp and Telegram, plain texts have become boring. Sticker fights on WhatsApp will give you an idea of how popular stickers are. Stickers are the new trend, and Discord just cannot lag behind in the race. Considering this, Discord is about to launch some lively, animated stickers.
In this article
- Part 1: What’s Discord Sticker?
- Part 2: How to Find Sticker Shop and Get Discord Stickers for Free?
- Part 3: How to Buy Discord Stickers?
- Part 4: How to Buy or Redeem a Discord Sticker Pack
- Part 5: How to Use Stickers on Discord?
Part 1: What’s Discord Sticker?
Discord Sticker supports sending emojis and GIFs on chats. The stickers have been soft-launched in Japan, Canada, and Brazil. After testing and feedback, they will be available across the globe.
Luckily, if you are a Nitro user, you can access the stickers for free. These stickers are bundled in the Nitro subscription, and you can claim the cool new stickers for free. Just go to the sticker shop, and tap on the “Free” button to start using them.
For those of you who have a $4.99 subscription, you can get the What’s Up Wumpus sticker pack for free. $9.99 subscription holders can unlock the What’s Up Wumpus sticker pack and can use the Wumpus Nitro Elite pack as long as their subscription is active.
The $9.99 subscribers can also avail of a 33% discount on other Discord sticker packs. Once you purchase these stickers, they are a permanent part of your Discord inventory. Other than these, the shop has Doggo Replies, Nelly At Work, and Hello Wumpus stickers as default sticker packs.
After the soft launch, the Sticker Shop is available for the users across all the platforms – Android, iOS, and even on the desktop app and browser.
Part 2: How to Find Sticker Shop and Get Discord Stickers for Free?
- On Phone
If you are lucky enough to be in Brazil, Japan, or Canada, you can access the Sticker Shop. You can tap on the emoji icon (the one that appears on the text box). The box that opens shows the emoji, and GIF tabs along with the sticker tab.
Tap on the sticker tab. A ‘shop’ symbol pops up towards the bottom (right hand). Tap on the symbol to open the sticker gallery. Here, you will see all the available sticker packs.
- Desktop (Browser)
If you use Discord on your desktop or browser, you can see the sticker icon right on the text bar. Tap on it, and then click on the shopping icon that appears towards the bottom (left corner). In the shop, you can browse through the sticker packs.
Nitro users will get the What’s Up Wumpus stickers for free. However, they will have to buy other packs. The $9.99 Nitro users will get a 33% discount on sticker packs.
For now, the stickers can be used only by users in Japan, Brazil, and Canada. These users can send stickers to users in other countries. However, the receivers can see the stickers but cannot buy or send them.
However, you can try and use a VPN proxy to gain early access to it.
Part 3: How to Buy Discord Stickers?
As we described above, you can access the sticker shop on your phone as well as desktop. Once in the shop, you can browse and pick the stickers to buy.
Before buying, you can view the stickers in the sticker pack. As a sample, you will be shown a few stickers. You can view the entire pack by tapping on the ‘View All’ tab.
Part 4: How to Buy or Redeem a Discord Sticker Pack
Here is a brief rundown of the steps to follow if you want to buy a sticker pack.
- Choose a sticker pack that you like. View all the stickers to see what the pack looks like.
- Tap on the purchase button that is located right beside the name of the pack.
- You will be prompted to input your payment details. If you have saved a payment option on Discord, you can choose the relevant option.
- Agree to the Terms and Services of Discord.
- Finally, hit the purchase tab.
- The sticker pack is added to the inventory instantly.
- You can start sending them in the texts.
Note that Discord does not refund the money that is once paid. So, you cannot return the stickers to get a refund.
Another interesting thing to note is that the Sticker Shop refreshes and offers new sticker packs. Due to this rotation, a pack that is available in the shop today may be replaced by a new one tomorrow.
But don’t worry. A timer displayed at the top left corner (besides the title) lets you know for how long the pack is available in the shop. You can grab it before the time runs out.
Part 5: How to Use Stickers on Discord?
Buying stickers is useless if you don’t send them over texts. So, once you purchase stickers, you can immediately start sending them to your servers and texts.
1. Sending Stickers on Discord Mobile App
If you have the Discord app on your phone, tap on the emoji button. The Stickers tab appears, and this menu enables you to send the most-used stickers quickly, view all the purchased stickers, and search for appropriate stickers.
You can type an expression or emoji in the ‘Find the perfect sticker’ bar to find the right sticker. Hit the send button once you find the apt sticker.
2. Sending Stickers from Discord Desktop (and over Browser)
Sending stickers on a desktop or browser is quite similar to the mobile process. On the chatbox, you will find the sticker icon. Tap on it to view your purchased sticker packs.
Once opened, the menu will show you the most-used stickers. You can view other packs and switch between them. You can also search for particular stickers by typing the terms on the search bar.
You can tap on a sticker to send it on chats and servers.
Bonus: Adding Face-tracking AR Stickers to Video with Wondershare Filmora
In the latest version of Wondershare Filmora (V10.5 and later version), you can add face-tracking AR stickers to people in the video, and light up the celebration with flashy and cute characters and elements. Here are some brief steps to add AR stickers to your video in Filmora.
Step 1. Download and install the latest version of Filmora
Click the button below to download and install the latest version of Filmora. If you have installed Filmora already, click the About option under the Help menu to check the version of Filmora.
Note: You need to run Filmora 10.5 and later versions to add the AR stickers.
Step 2. Drag and drop your video footage to timeline
After launching Filmora, you need to import the video footage to the video editor. You can drag and drop the video footage to the timeline directly if you are working on a simple video project.
However, if you are working on a video project with many footages, it is recommended to upload them to the media library in order.
Step 3. Add AR Stickers to the video
After trimming or cutting out unnecessary frames from the video, you can now add the AR stickers to the footage. Go to the Effects tab and then scroll down to the AR Sticker directory.
Currently, there are 40 stickers available in Filmora. You can click each one to preview and download. To add a sticker to the video, you can drag and drop it to the video track above or to the video clip directly. You can add several stickers at the same time by placing them in the tracks accordingly.
Step 4. Preview and Export
After finishing the editing, you can click the play button in the preview window to preview, and then click the Export button to save the video.
FAQs about Discord Sticker
And here we will answer some stuff that you might wonder about.
- What’s the difference between Discord Sticker and Discord Emoji ?
Well, emojis are emojis, and they are even in-built into your Android (or Google) and other keyboards on your phone. Emojis are not animated, and you can send basic Smiley or Sad faces (of course, there are animals and flowers, too). On the other hand, stickers are animated, and there can be specific sticker characters like What’s Up Wumpus.
- Why can’t I see the Sticker option on my Discord app?
You cannot access the stickers on Discord probably because the feature has not been launched in your country yet. Stickers are only available for users in Brazil, Japan, and Canada. They will be launched in other countries after testing and feedback.
- Is Discord sticker free?
If you are a Nitro subscriber, you will get the What’s Up Wumpus sticker pack for free. You will have to buy the other packs. As a $9.99 Nitro subscriber, you can get other packs at a 33% discount.
- Can I keep the purchased sticker pack forever in my account?
Yes, once you buy a pack, you will have lifetime access to it. However, if you delete your Discord account, you will not get your stickers back. Further, packs like ‘Wumpus Nitro Elite’ can be accessed only on an active $9.99 subscription.
- Can people who are outside of Brazil, Canada, and Japan receive the stickers I sent?
Yes, users from countries other than Japan, Canada, and Brazil can see the stickers in the chat sent to them. However, they could not buy or send them.
- Why my Discord sticker is not moving/animating?
The stickers should move by default when sent. You can check if your sticker inventory is set to the smallest size. You can also go to User Settings, tap on Text & Images, and select Stickers. Adjust the settings appropriately. You can contact the Discord support team should you need further assistance.
Be patient until the cool update rolls out worldwide!
Richard Bennett
Richard Bennett is a writer and a lover of all things video.
Follow @Richard Bennett
Also read:
- 2024 Approved Unleash Your Creativity Designing Stunning Pfps on Discord
- [Updated] Top Non-Discord Streaming Networks
- [Updated] Step-by-Step Link Up on Desktop and Mobile for 2024
- [New] Uncluttering Chats How to Erase Thousands of Discord Messages at Once
- [Updated] In 2024, Best Video Recording Tools for Discord Streaming
- [Updated] 2024 Approved A Harmonious Link Spotify with Discord
- [New] In 2024, Transform Your Discord Sessions Best 10 Enhancing Tools
- [Updated] 2024 Approved Top Servers for Romance Discord Edition
- 2024 Approved Extinguish Your Discord Access
- [New] Closing Out of a Discord Channel Best Practices
- [Updated] In 2024, Decoding A Systematic Approach to Finding Specific Discords
- [New] No-Cost, High-Quality Logos - Your Free Discord Tool
- [New] Comparing Slack and Discord Best Communication Tool for Co-Workers for 2024
- Insider Knowledge Effortlessly Navigate the Labyrinth of Discords for 2024
- [New] 2024 Approved Unveiling the Secrets of Custom Emoji Integration in Discord
- [Updated] In 2024, Leading Discord Font Crafting Applications for All Platforms
- [New] In 2024, How to Stream on Discord [Step-by-Step Guide]
- [New] Discord's Favorite Font Makers IOS & Android Edition
- [Updated] Clear Out Your Discord Server (PC/Android)
- [Updated] The Complete Guide to Sharing Your Desktop on Discord for 2024
- Step-by-Step How to Delete a Discord Server
- [Updated] Decoding the Best Workplace Messaging Tool Slack or Discord?
- In 2024, Discover the Pathway Earning Your Place as a Validated Disco Partner
- [Updated] Premier Techniques in Online Screen Capture Software
- [New] From Setting Up to Broadcasting A DiscoGuide for 2024
- 2024 Approved Hot 30 Discord Handles That Turn Heads Fast
- Updated In 2024, Glitch Your Way to Creativity Top Free Online Effect Generators
- In 2024, Tweeting with Videos A Quick Tutorial
- Updated Get Talking The Best Free Mac Speech Recognition Apps with No Strings Attached for 2024
- [New] Elite 10 Virtual Clashes
- In 2024, Enhanced Clarity Clear Background in Cam Recordings
- [New] Elite Internet Recorder Choices - 7 to Try for 2024
- New 2024 Approved Where Can I Find Bell Sound Effect?
- How to Mirror Your Tecno Spark 10 4G Screen to PC with Chromecast | Dr.fone
- Prevent Cross-Site Tracking on Motorola G54 5G and Browser | Dr.fone
- In 2024, Complete Tutorial to Use GPS Joystick to Fake GPS Location On Samsung Galaxy F14 5G | Dr.fone
- In 2024, Step-by-Step Tutorial How To Bypass Samsung Galaxy A15 4G FRP
- Updated Design an Animated Scene Powered by Sound Without Spending Money
- [New] In 2024, Secure 5 Insta Story-Watchers' Selection
- 2024 Approved In-Depth Strategies for Organizing Your Windows .mov Collection
- In 2024, Easy Guide to Oppo Reno 8T FRP Bypass With Best Methods
- [Updated] Golden Geographies The Best Maps for Treasure Hunters for 2024
- [Updated] In 2024, The Ultimate Playlist Best Sandbox Game Choices
- How Do I Stop Someone From Tracking My Samsung Galaxy F15 5G? | Dr.fone
- In 2024, How to Unlock Nokia C12 Pro Bootloader Easily
- [Updated] Discovering Digital Dialogues Facebook Video Exchange for 2024
- Best Free DVD Playback Options for Windows 10 Users Updated 2023
- Title: "[Updated] From Zero to Hero Integrating Roles in Discord"
- Author: Timothy
- Created at : 2024-05-23 22:47:44
- Updated at : 2024-05-24 22:47:44
- Link: https://discord-videos.techidaily.com/updated-from-zero-to-hero-integrating-roles-in-discord/
- License: This work is licensed under CC BY-NC-SA 4.0.
