
!["[Updated] In 2024, Achieving Perfection The Art of Live Broadcasting on Discord"](https://www.lifewire.com/thmb/y76bYzyJbgKxvbEJs-YJEbw1Vfk=/540x405/filters:no_upscale():max_bytes(150000):strip_icc()/PS5-Slim-Wide-fe2f63e3b1cf443a81fed71f109aacd0.jpg)
"[Updated] In 2024, Achieving Perfection The Art of Live Broadcasting on Discord"
Achieving Perfection: The Art of Live Broadcasting on Discord
How to Stream on Discord

Richard Bennett
Mar 27, 2024• Proven solutions
Discord has completely transformed online communication, becoming the preferred platform for gamers, streamers, and reviewers alike.
As of late, it has started integrating with other gaming and streaming services, giving us the streamer mode. With streaming’s growing popularity, it’s essential to know what the streamer mode is all about.
If you’re a gamer, Discord’s streamer mode allows you to stream your gaming session to viewers by broadcasting your game to your friends, fans, and even a closed community of enthusiasts.
Many e-gaming professionals have taken up streaming, offering original and valuable content for like-minded individuals. This mode helps them streamline all their communications in one place.
If you’re new to Discord’s streamer mode, you need to know what it is, how you can use it to engage with other community members, and the primary security concerns you need to be aware of.
- Part 1: How to Stream on Discord from Desktop Computers?
- Part 2: How to Stream on Discord from Chromebook?
- Part 3: How to Stream on Discord from iPhone And Android?
- Part 4: How to Watch Discord Streaming?
- Part 5: Discord Streaming Tips
We have compiled a list of steps to help you learn how to conduct Discord streaming from the most prominent platforms: Windows, Mac, Chromebook, iPhone, Android.
Part 1: How to Stream on Discord from Desktop Computers
How to Stream on Discord from Windows
Discord allows for streaming through its Windows desktop client. You can stream games, podcasts, and any other kind of content through it.
However, it is crucial to remember that you can only stream in 480p and 720p resolutions in the free version. If you want higher resolution streaming, subscribe to Discord Nitro, which costs $9.99 a month.
With that said, follow these steps to start Discord streaming:
- Start the game that you want to stream and then switch back to Discord
- You will find an icon at the bottom left of the window displaying the name of the game you started and a stream icon resembling a camera next to it. Click on this icon to begin streaming
- The Screen Share menu will pop-up displaying the game you have started, and from the ‘Select a voice channel’ drop-down, select the channel you want to stream with
- Adjust your screen resolution and frame rates according to your choice
- After you’ve made all the adjustments, you can hit the ‘Go Live’ button at the bottom right of the window to start streaming.
If you wish to stop streaming, click on the ‘Stop Streaming’ icon at the app’s bottom-left corner
Additionally, if you wish to stream voice and video calls on your Discord server, you can do so as well. To make a call to your friends through Discord:
- Open the Discord app on your Windows PC and then select the server you want to use
- Click the General Voice channel to place a voice connection with Discord
- On the bottom left of the window, you will see a Voice Connected entry. If you wish to video call, click on the ‘Video’ button; otherwise, click on the ‘Screen’ button for screen sharing
- When you click ‘Video,’ your screen’s center will switch to conversation mode, and you will be able to see your camera feed
- If you click on the screen, a pop-up window shows up, allowing you to select the application you want to share
- After setting this up, your friends can join your call by clicking on the General channel
When you want to end the call, click on the red Disconnect icon
How to Stream on Discord from Mac
To achieve the same result with Discord on a Mac:
- Open the Discord app on your Macintosh and then find and join a voice channel that allows you to stream (you can find out which channels will let you stream by joining the channel and checking if you can click on ‘Video’ or ‘Screen’ at the bottom of the window)
- Once you’ve made sure that the channel allows you to stream, you can choose whether you want to stream from your webcam or share your computer screen. Click on the option you want
- If you’ve selected the ‘Video’ option, this will turn on your webcam after a prompt, and it will start streaming immediately
- If you’ve selected the screen-sharing option, choose the window you’d like to share, and it will start broadcasting the specific window
- You can either share your entire screen or specific windows, depending on your choice
- Choose a resolution and frame rate for the stream, but remember that higher resolutions and frame rates take up more bandwidth
- If you’re streaming from your desktop, you can even stream in sound. Toggle the sound button to the right, and you will be able to access your microphone for the stream
- When you’ve decided all the parameters and feel you’re ready to stream, click on ‘Go Live’
Part 2: How to Stream on Discord from Chromebook
Chromebooks have a customized Android operating software that can fit the laptop, functioning seamlessly with its requirements.
However, because Chromebooks use a restrictive OS, the Discord app functions like it would on a smartphone or tablet.
Therefore, for Discord streaming on a Chromebook, you will have to:
- Select a voice channel and then join it
- Press the Video camera icon to share your screen
- Allow the program camera access
- Begin streaming
However, it is slightly challenging to join voice channels using the app. To do this, you will have to:
- Locate the voice channel and click on it
- Upon clicking, you will see a window appear at the bottom
- Scroll to the bottom of the menu, and click on the ‘Join Channel’ button
- To join with the camera, click on the camcorder icon
Part 3: How to Stream on Discord from iPhone And Android
Although Discord does not allow users to broadcast content from the Discord Mobile app, they can still share their screen to stream games and videos. To do so, they must:
- Select a voice channel and join it
- Press the Video camera icon for screen-sharing
- Then allow permission to third-party apps on the mobile to access your camera
- Press the Camera icon to allow the program access to your camera
- Once this is done, you are now streaming live
It is important to note that while sharing your screen on Discord, make sure you are not divulging any crucial details with other users in the form of notifications.
To avoid incoming notifications, put your mobile on airplane mode.
Part 4: How to Watch Discord Streaming
Aside from broadcasting streams, you can also watch other users streaming their content on Discord. To watch someone’s stream, you will need to:
- Go to the voice channel where someone is streaming and click on their name
- If you’ve decided you want to join their stream, click on ‘Join Stream’
- You can also click on ‘Watch Stream’ from the main chat screen on your Discord
When someone is streaming content on Discord, you can see a red ‘Live’ icon next to their name. Knowing this will make it easier to tell when your favorite users are streaming.
Part 5: Discord Streaming Tips
To help you get the max out of your Discord streaming experience, we’ve compiled a couple of tips:
Tip 1: How to Stream Without Lag On Discord
Do you experience lag while streaming games and videos on your Discord server? Don’t worry; streaming is often demanding for casual internet connections, and lags can happen!
Here are some quick fixes to get rid of it:
Close Unnecessary Programs
If you’re running multiple programs on your computer while using Discord, they can cause lag. To solve this, close all unnecessary programs.
Turn Off Hardware Acceleration
To do this:
- Go to the ‘Settings’ option in your Discord app,
- Click on ‘Appearance’ and toggle off the ‘Hardware Acceleration’ option
- Press ‘OK’ to confirm and restart the application
Clear Discord Cache Files
Too many accumulated caches files can cause lag in your Discord. To fix this, you will need to clear the Discord cache from the File Explorer:
- Open the ‘Run’ window
- Enter ‘%APPDATA%/Discord/Cache’ to open the cache folder
- Press ‘Ctrl+A’ to delete the files
Reset Discord Voice Settings
To do this:
- Go to the ‘Settings’ option on your Discord app
- Select the ‘Voice & Video’ option in the left pane
- Click on the ‘Reset Voice Settings’ in the right pane
- Press OK to confirm and restart the application
Reinstall Discord
If none of the above methods seem to fix lag, you might have to reinstall your Discord. To uninstall it: first
- Go to the Discord Panel,
- Select ‘View by: Category’
- Click ‘Uninstall a program’
- Right-click Discord
- Click Uninstall
- After it is uninstalled, reinstall it once again
Tip 2: How to Add A Game to Discord Go Live
If you can’t get access to the game you want to stream through the ‘Go Live’ icon, you can access it manually. All you have to do is:
- Click on the cog icon in the bottom left
- Open the Settings menu
- Click on the ‘Game Activity’ tab on the left
- Click ‘Add It’
- Choose your game
- Go back to your server
- Click the ‘Go Live’ button
Richard Bennett
Richard Bennett is a writer and a lover of all things video.
Follow @Richard Bennett
Richard Bennett
Mar 27, 2024• Proven solutions
Discord has completely transformed online communication, becoming the preferred platform for gamers, streamers, and reviewers alike.
As of late, it has started integrating with other gaming and streaming services, giving us the streamer mode. With streaming’s growing popularity, it’s essential to know what the streamer mode is all about.
If you’re a gamer, Discord’s streamer mode allows you to stream your gaming session to viewers by broadcasting your game to your friends, fans, and even a closed community of enthusiasts.
Many e-gaming professionals have taken up streaming, offering original and valuable content for like-minded individuals. This mode helps them streamline all their communications in one place.
If you’re new to Discord’s streamer mode, you need to know what it is, how you can use it to engage with other community members, and the primary security concerns you need to be aware of.
- Part 1: How to Stream on Discord from Desktop Computers?
- Part 2: How to Stream on Discord from Chromebook?
- Part 3: How to Stream on Discord from iPhone And Android?
- Part 4: How to Watch Discord Streaming?
- Part 5: Discord Streaming Tips
We have compiled a list of steps to help you learn how to conduct Discord streaming from the most prominent platforms: Windows, Mac, Chromebook, iPhone, Android.
Part 1: How to Stream on Discord from Desktop Computers
How to Stream on Discord from Windows
Discord allows for streaming through its Windows desktop client. You can stream games, podcasts, and any other kind of content through it.
However, it is crucial to remember that you can only stream in 480p and 720p resolutions in the free version. If you want higher resolution streaming, subscribe to Discord Nitro, which costs $9.99 a month.
With that said, follow these steps to start Discord streaming:
- Start the game that you want to stream and then switch back to Discord
- You will find an icon at the bottom left of the window displaying the name of the game you started and a stream icon resembling a camera next to it. Click on this icon to begin streaming
- The Screen Share menu will pop-up displaying the game you have started, and from the ‘Select a voice channel’ drop-down, select the channel you want to stream with
- Adjust your screen resolution and frame rates according to your choice
- After you’ve made all the adjustments, you can hit the ‘Go Live’ button at the bottom right of the window to start streaming.
If you wish to stop streaming, click on the ‘Stop Streaming’ icon at the app’s bottom-left corner
Additionally, if you wish to stream voice and video calls on your Discord server, you can do so as well. To make a call to your friends through Discord:
- Open the Discord app on your Windows PC and then select the server you want to use
- Click the General Voice channel to place a voice connection with Discord
- On the bottom left of the window, you will see a Voice Connected entry. If you wish to video call, click on the ‘Video’ button; otherwise, click on the ‘Screen’ button for screen sharing
- When you click ‘Video,’ your screen’s center will switch to conversation mode, and you will be able to see your camera feed
- If you click on the screen, a pop-up window shows up, allowing you to select the application you want to share
- After setting this up, your friends can join your call by clicking on the General channel
When you want to end the call, click on the red Disconnect icon
How to Stream on Discord from Mac
To achieve the same result with Discord on a Mac:
- Open the Discord app on your Macintosh and then find and join a voice channel that allows you to stream (you can find out which channels will let you stream by joining the channel and checking if you can click on ‘Video’ or ‘Screen’ at the bottom of the window)
- Once you’ve made sure that the channel allows you to stream, you can choose whether you want to stream from your webcam or share your computer screen. Click on the option you want
- If you’ve selected the ‘Video’ option, this will turn on your webcam after a prompt, and it will start streaming immediately
- If you’ve selected the screen-sharing option, choose the window you’d like to share, and it will start broadcasting the specific window
- You can either share your entire screen or specific windows, depending on your choice
- Choose a resolution and frame rate for the stream, but remember that higher resolutions and frame rates take up more bandwidth
- If you’re streaming from your desktop, you can even stream in sound. Toggle the sound button to the right, and you will be able to access your microphone for the stream
- When you’ve decided all the parameters and feel you’re ready to stream, click on ‘Go Live’
Part 2: How to Stream on Discord from Chromebook
Chromebooks have a customized Android operating software that can fit the laptop, functioning seamlessly with its requirements.
However, because Chromebooks use a restrictive OS, the Discord app functions like it would on a smartphone or tablet.
Therefore, for Discord streaming on a Chromebook, you will have to:
- Select a voice channel and then join it
- Press the Video camera icon to share your screen
- Allow the program camera access
- Begin streaming
However, it is slightly challenging to join voice channels using the app. To do this, you will have to:
- Locate the voice channel and click on it
- Upon clicking, you will see a window appear at the bottom
- Scroll to the bottom of the menu, and click on the ‘Join Channel’ button
- To join with the camera, click on the camcorder icon
Part 3: How to Stream on Discord from iPhone And Android
Although Discord does not allow users to broadcast content from the Discord Mobile app, they can still share their screen to stream games and videos. To do so, they must:
- Select a voice channel and join it
- Press the Video camera icon for screen-sharing
- Then allow permission to third-party apps on the mobile to access your camera
- Press the Camera icon to allow the program access to your camera
- Once this is done, you are now streaming live
It is important to note that while sharing your screen on Discord, make sure you are not divulging any crucial details with other users in the form of notifications.
To avoid incoming notifications, put your mobile on airplane mode.
Part 4: How to Watch Discord Streaming
Aside from broadcasting streams, you can also watch other users streaming their content on Discord. To watch someone’s stream, you will need to:
- Go to the voice channel where someone is streaming and click on their name
- If you’ve decided you want to join their stream, click on ‘Join Stream’
- You can also click on ‘Watch Stream’ from the main chat screen on your Discord
When someone is streaming content on Discord, you can see a red ‘Live’ icon next to their name. Knowing this will make it easier to tell when your favorite users are streaming.
Part 5: Discord Streaming Tips
To help you get the max out of your Discord streaming experience, we’ve compiled a couple of tips:
Tip 1: How to Stream Without Lag On Discord
Do you experience lag while streaming games and videos on your Discord server? Don’t worry; streaming is often demanding for casual internet connections, and lags can happen!
Here are some quick fixes to get rid of it:
Close Unnecessary Programs
If you’re running multiple programs on your computer while using Discord, they can cause lag. To solve this, close all unnecessary programs.
Turn Off Hardware Acceleration
To do this:
- Go to the ‘Settings’ option in your Discord app,
- Click on ‘Appearance’ and toggle off the ‘Hardware Acceleration’ option
- Press ‘OK’ to confirm and restart the application
Clear Discord Cache Files
Too many accumulated caches files can cause lag in your Discord. To fix this, you will need to clear the Discord cache from the File Explorer:
- Open the ‘Run’ window
- Enter ‘%APPDATA%/Discord/Cache’ to open the cache folder
- Press ‘Ctrl+A’ to delete the files
Reset Discord Voice Settings
To do this:
- Go to the ‘Settings’ option on your Discord app
- Select the ‘Voice & Video’ option in the left pane
- Click on the ‘Reset Voice Settings’ in the right pane
- Press OK to confirm and restart the application
Reinstall Discord
If none of the above methods seem to fix lag, you might have to reinstall your Discord. To uninstall it: first
- Go to the Discord Panel,
- Select ‘View by: Category’
- Click ‘Uninstall a program’
- Right-click Discord
- Click Uninstall
- After it is uninstalled, reinstall it once again
Tip 2: How to Add A Game to Discord Go Live
If you can’t get access to the game you want to stream through the ‘Go Live’ icon, you can access it manually. All you have to do is:
- Click on the cog icon in the bottom left
- Open the Settings menu
- Click on the ‘Game Activity’ tab on the left
- Click ‘Add It’
- Choose your game
- Go back to your server
- Click the ‘Go Live’ button
Richard Bennett
Richard Bennett is a writer and a lover of all things video.
Follow @Richard Bennett
The Comprehensive Guide to Discord Spoiler Tags
Discord Spoiler Tag: All You Need to Know
Richard Bennett
Mar 27, 2024• Proven solutions
With Discord, you can text with emojis and even send GIFs. However, as servers become crowded, they get bombarded with texts. And some of these texts have spoilers for games (or other stuff) that others may not want to know or read. But ignoring spoilers was not that easy. As you scroll miles and miles of texts, your eyes are bound to catch some hints and ruin the suspense for you.
Thankfully, Discord came out with the perfect solution. Now, if you are sharing some spoilers or secrets, you can mark them as spoilers. The result is a text that is sent but is blacked out. Curious users who are not scared of spoilers can view it. Others can enjoy their bliss of ignorance.
In this article
- Part 1: How to Use Spoilers on Discord to Hide Text Messages?
- Part 2: How to Add Spoiler to Image and Video on Discord?
- Bonus: Is it the same to use Spoiler on Mobile devices?
- Bonus: How to turn off the Spoiler tag?
Part 1: How to Use Spoilers on Discord to Hide Text Messages?
And now we come to the point - how to do spoilers on Discord? Well, there are two ways to do it. You can run through both of them and choose whichever suits you the best. All the methods are simple to follow. Note that some are available only on the desktop.
Method 1: Adding Spoiler Text Via Tag on Discord
We will begin with the tag method. All you have to do is add the spoiler tag on Discord. Here is a quick rundown of the steps –
- Open the Discord app and log in using your credentials.
- Pick a server from your server list or a friend from the friend list.
- Type whatever you want to in the chatbox.
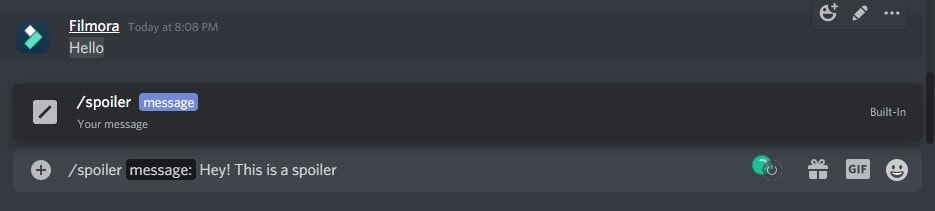
- Now add the ‘||’ symbols before and after the spoiler content. For instance, it will look something like this – Hey! This is a spoiler ||spoiler alert||
- Hit the enter key to send and your spoiler is sent without spoiling anything!

This works for the Discord desktop app, browser, and also mobile app. This is like a universal method of hiding spoilers.
You can also add ‘/spoiler’ before the spoiler content. This is an alternative to the ‘||’ we add at the start and the end.
Method 2: Sending Spoiler Message with Mark as Spoiler icon
This alternate method is quite simple. This was a recent update on Discord that enables you to add the spoiler tag quickly. Here is a brief rundown for you –
- Type out the spoiler content in the chatbox.
- Select the spoiler part of the text (highlight it).
- Upon selection, a floating bar will appear. Click the ‘eye’ symbol. and then the ‘||’ mark will immediately accompany the selected text, and the selected message will be spoiled automatically.
- After you hit the send button, the text will be sent to the server. Only the people who wish to see the spoiler will tap on it unveil it.
![]()
This method is available only on the Discord desktop app and browser version. For iOS, the steps are similar. The only difference is that you have to select the spoiler mark from the context menu.
Part 2: How to Add Spoiler to Image and Video on Discord?
There are many scenarios where a Discord spoiler can come in handy. As you might be aware that Discord is quite popular and its cross-platform flexibility make it a favorite among gamers. You can connect to your friends over multiple devices with a single account.
Just like texts, even images, videos, and other attachments can be marked as spoilers. The process of marking images and videos as spoilers differs slightly from that of texts. So, how to add spoiler tags to other files? Here’s the rundown.
Images can be tagged as spoilers before you upload them on servers. To add spoiler tags to images –
- Open Discord on your desktop app or browser.
- Select the image or video that you want to send on the server.
- Drag it to your server chat and drop it there.
- Next, tap on the ‘+’ symbol.
- From the options that appear, choose ‘Mark as Spoiler.’
- Hit the Upload button.
- The result is a blurred image sent on the server. Anyone who wishes to view the image can tap on it.
Note that spoilers that contain images, videos, or other multimedia files can be sent only on the desktop app or the browser. Mobile apps do not support spoiler marks for images or other media files.
Bonus: Is it the same to use Spoiler on Mobile devices?
The Discord mobile spoiler tag works the same on mobile apps. The process is more or less the same. Here is a quick rundown of the steps –
- Type out the spoiler text.
- Add ‘||’ symbols at the start and end of the text you want to hide.
- Hit the send button, and your spoiler text will be covered.
- Only the curious ones can tap and see your spoiler texts.
You can even mark embedded links as spoilers with the same process. But this does not apply to Discord server links. Furthermore, you cannot add spoiler tags to images, videos, and other files from the mobile app.
For iOS, you can select and highlight the text that you want to hide. Then, tap open the context menu and click on the ‘Mark as Spoiler’ to hide the text.
Bonus: How to turn off the Spoiler tag?
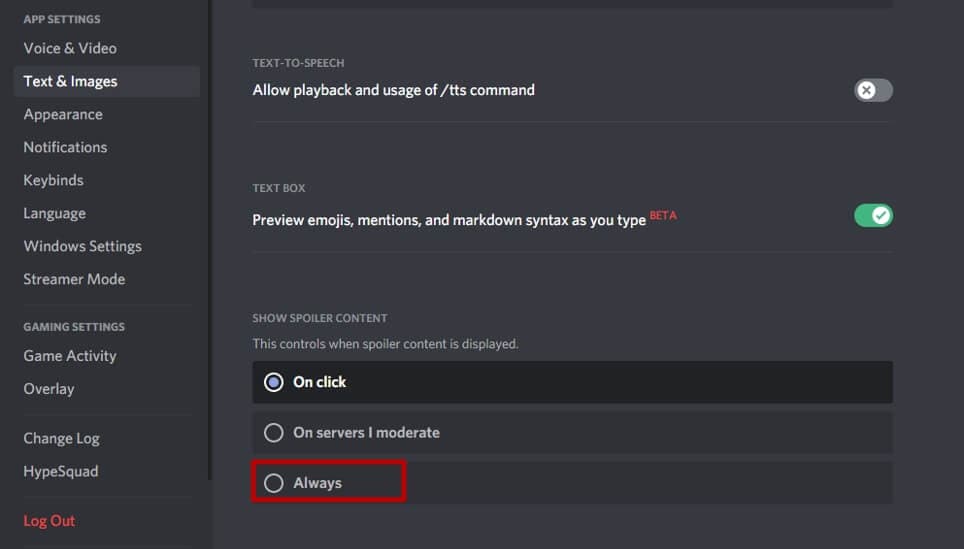
For some reason, you may want to remove the spoiler tag from the spoiler texts. In that case, open the User Settings and tap on Text & Images. Scroll down to the Show Spoiler Content tab and you will see options to control when spoiler content is displayed. You can choose to display on click, on servers I moderate, and always.
If you want to display all spoiler content, choose Always to turn off the spoiler tag. You can hide them again through the same menu if you change your mind.
This was an article on how to use the Discord spoiler tag to hide texts, images, and videos. You can undo and redo the tags as many times as you like. If you are about to unveil some life-changing secret on your Discord server, then don’t forget to add that spoiler tag.
Richard Bennett
Richard Bennett is a writer and a lover of all things video.
Follow @Richard Bennett
Richard Bennett
Mar 27, 2024• Proven solutions
With Discord, you can text with emojis and even send GIFs. However, as servers become crowded, they get bombarded with texts. And some of these texts have spoilers for games (or other stuff) that others may not want to know or read. But ignoring spoilers was not that easy. As you scroll miles and miles of texts, your eyes are bound to catch some hints and ruin the suspense for you.
Thankfully, Discord came out with the perfect solution. Now, if you are sharing some spoilers or secrets, you can mark them as spoilers. The result is a text that is sent but is blacked out. Curious users who are not scared of spoilers can view it. Others can enjoy their bliss of ignorance.
In this article
- Part 1: How to Use Spoilers on Discord to Hide Text Messages?
- Part 2: How to Add Spoiler to Image and Video on Discord?
- Bonus: Is it the same to use Spoiler on Mobile devices?
- Bonus: How to turn off the Spoiler tag?
Part 1: How to Use Spoilers on Discord to Hide Text Messages?
And now we come to the point - how to do spoilers on Discord? Well, there are two ways to do it. You can run through both of them and choose whichever suits you the best. All the methods are simple to follow. Note that some are available only on the desktop.
Method 1: Adding Spoiler Text Via Tag on Discord
We will begin with the tag method. All you have to do is add the spoiler tag on Discord. Here is a quick rundown of the steps –
- Open the Discord app and log in using your credentials.
- Pick a server from your server list or a friend from the friend list.
- Type whatever you want to in the chatbox.
- Now add the ‘||’ symbols before and after the spoiler content. For instance, it will look something like this – Hey! This is a spoiler ||spoiler alert||
- Hit the enter key to send and your spoiler is sent without spoiling anything!
This works for the Discord desktop app, browser, and also mobile app. This is like a universal method of hiding spoilers.
You can also add ‘/spoiler’ before the spoiler content. This is an alternative to the ‘||’ we add at the start and the end.
Method 2: Sending Spoiler Message with Mark as Spoiler icon
This alternate method is quite simple. This was a recent update on Discord that enables you to add the spoiler tag quickly. Here is a brief rundown for you –
- Type out the spoiler content in the chatbox.
- Select the spoiler part of the text (highlight it).
- Upon selection, a floating bar will appear. Click the ‘eye’ symbol. and then the ‘||’ mark will immediately accompany the selected text, and the selected message will be spoiled automatically.
- After you hit the send button, the text will be sent to the server. Only the people who wish to see the spoiler will tap on it unveil it.
![]()
This method is available only on the Discord desktop app and browser version. For iOS, the steps are similar. The only difference is that you have to select the spoiler mark from the context menu.
Part 2: How to Add Spoiler to Image and Video on Discord?
There are many scenarios where a Discord spoiler can come in handy. As you might be aware that Discord is quite popular and its cross-platform flexibility make it a favorite among gamers. You can connect to your friends over multiple devices with a single account.
Just like texts, even images, videos, and other attachments can be marked as spoilers. The process of marking images and videos as spoilers differs slightly from that of texts. So, how to add spoiler tags to other files? Here’s the rundown.
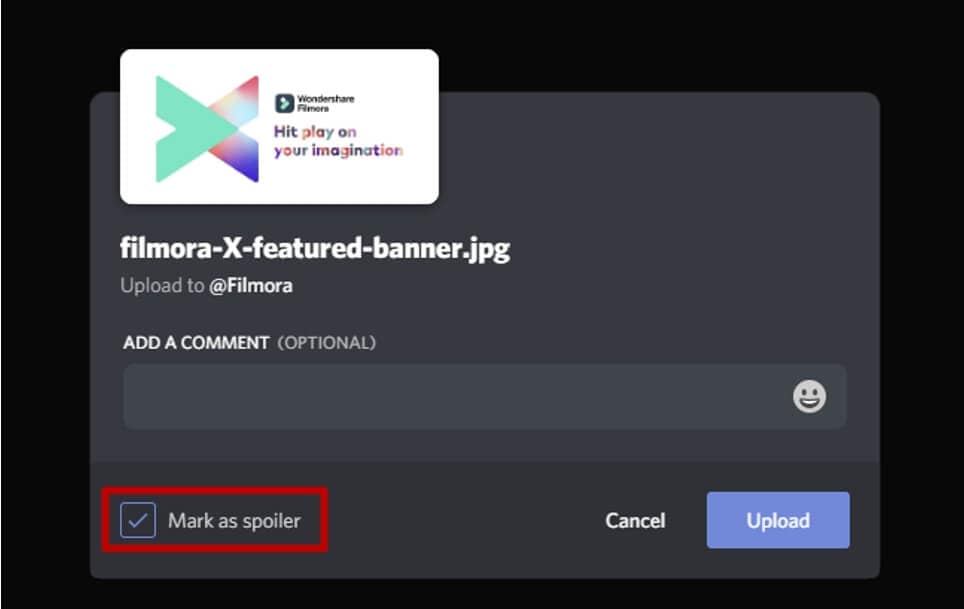
Images can be tagged as spoilers before you upload them on servers. To add spoiler tags to images –
- Open Discord on your desktop app or browser.
- Select the image or video that you want to send on the server.
- Drag it to your server chat and drop it there.
- Next, tap on the ‘+’ symbol.
- From the options that appear, choose ‘Mark as Spoiler.’
- Hit the Upload button.
- The result is a blurred image sent on the server. Anyone who wishes to view the image can tap on it.
Note that spoilers that contain images, videos, or other multimedia files can be sent only on the desktop app or the browser. Mobile apps do not support spoiler marks for images or other media files.
Bonus: Is it the same to use Spoiler on Mobile devices?
The Discord mobile spoiler tag works the same on mobile apps. The process is more or less the same. Here is a quick rundown of the steps –
- Type out the spoiler text.
- Add ‘||’ symbols at the start and end of the text you want to hide.
- Hit the send button, and your spoiler text will be covered.
- Only the curious ones can tap and see your spoiler texts.
You can even mark embedded links as spoilers with the same process. But this does not apply to Discord server links. Furthermore, you cannot add spoiler tags to images, videos, and other files from the mobile app.
For iOS, you can select and highlight the text that you want to hide. Then, tap open the context menu and click on the ‘Mark as Spoiler’ to hide the text.
Bonus: How to turn off the Spoiler tag?
For some reason, you may want to remove the spoiler tag from the spoiler texts. In that case, open the User Settings and tap on Text & Images. Scroll down to the Show Spoiler Content tab and you will see options to control when spoiler content is displayed. You can choose to display on click, on servers I moderate, and always.
If you want to display all spoiler content, choose Always to turn off the spoiler tag. You can hide them again through the same menu if you change your mind.
This was an article on how to use the Discord spoiler tag to hide texts, images, and videos. You can undo and redo the tags as many times as you like. If you are about to unveil some life-changing secret on your Discord server, then don’t forget to add that spoiler tag.
Richard Bennett
Richard Bennett is a writer and a lover of all things video.
Follow @Richard Bennett
Richard Bennett
Mar 27, 2024• Proven solutions
With Discord, you can text with emojis and even send GIFs. However, as servers become crowded, they get bombarded with texts. And some of these texts have spoilers for games (or other stuff) that others may not want to know or read. But ignoring spoilers was not that easy. As you scroll miles and miles of texts, your eyes are bound to catch some hints and ruin the suspense for you.
Thankfully, Discord came out with the perfect solution. Now, if you are sharing some spoilers or secrets, you can mark them as spoilers. The result is a text that is sent but is blacked out. Curious users who are not scared of spoilers can view it. Others can enjoy their bliss of ignorance.
In this article
- Part 1: How to Use Spoilers on Discord to Hide Text Messages?
- Part 2: How to Add Spoiler to Image and Video on Discord?
- Bonus: Is it the same to use Spoiler on Mobile devices?
- Bonus: How to turn off the Spoiler tag?
Part 1: How to Use Spoilers on Discord to Hide Text Messages?
And now we come to the point - how to do spoilers on Discord? Well, there are two ways to do it. You can run through both of them and choose whichever suits you the best. All the methods are simple to follow. Note that some are available only on the desktop.
Method 1: Adding Spoiler Text Via Tag on Discord
We will begin with the tag method. All you have to do is add the spoiler tag on Discord. Here is a quick rundown of the steps –
- Open the Discord app and log in using your credentials.
- Pick a server from your server list or a friend from the friend list.
- Type whatever you want to in the chatbox.
- Now add the ‘||’ symbols before and after the spoiler content. For instance, it will look something like this – Hey! This is a spoiler ||spoiler alert||
- Hit the enter key to send and your spoiler is sent without spoiling anything!
This works for the Discord desktop app, browser, and also mobile app. This is like a universal method of hiding spoilers.
You can also add ‘/spoiler’ before the spoiler content. This is an alternative to the ‘||’ we add at the start and the end.
Method 2: Sending Spoiler Message with Mark as Spoiler icon
This alternate method is quite simple. This was a recent update on Discord that enables you to add the spoiler tag quickly. Here is a brief rundown for you –
- Type out the spoiler content in the chatbox.
- Select the spoiler part of the text (highlight it).
- Upon selection, a floating bar will appear. Click the ‘eye’ symbol. and then the ‘||’ mark will immediately accompany the selected text, and the selected message will be spoiled automatically.
- After you hit the send button, the text will be sent to the server. Only the people who wish to see the spoiler will tap on it unveil it.
![]()
This method is available only on the Discord desktop app and browser version. For iOS, the steps are similar. The only difference is that you have to select the spoiler mark from the context menu.
Part 2: How to Add Spoiler to Image and Video on Discord?
There are many scenarios where a Discord spoiler can come in handy. As you might be aware that Discord is quite popular and its cross-platform flexibility make it a favorite among gamers. You can connect to your friends over multiple devices with a single account.
Just like texts, even images, videos, and other attachments can be marked as spoilers. The process of marking images and videos as spoilers differs slightly from that of texts. So, how to add spoiler tags to other files? Here’s the rundown.
Images can be tagged as spoilers before you upload them on servers. To add spoiler tags to images –
- Open Discord on your desktop app or browser.
- Select the image or video that you want to send on the server.
- Drag it to your server chat and drop it there.
- Next, tap on the ‘+’ symbol.
- From the options that appear, choose ‘Mark as Spoiler.’
- Hit the Upload button.
- The result is a blurred image sent on the server. Anyone who wishes to view the image can tap on it.
Note that spoilers that contain images, videos, or other multimedia files can be sent only on the desktop app or the browser. Mobile apps do not support spoiler marks for images or other media files.
Bonus: Is it the same to use Spoiler on Mobile devices?
The Discord mobile spoiler tag works the same on mobile apps. The process is more or less the same. Here is a quick rundown of the steps –
- Type out the spoiler text.
- Add ‘||’ symbols at the start and end of the text you want to hide.
- Hit the send button, and your spoiler text will be covered.
- Only the curious ones can tap and see your spoiler texts.
You can even mark embedded links as spoilers with the same process. But this does not apply to Discord server links. Furthermore, you cannot add spoiler tags to images, videos, and other files from the mobile app.
For iOS, you can select and highlight the text that you want to hide. Then, tap open the context menu and click on the ‘Mark as Spoiler’ to hide the text.
Bonus: How to turn off the Spoiler tag?
For some reason, you may want to remove the spoiler tag from the spoiler texts. In that case, open the User Settings and tap on Text & Images. Scroll down to the Show Spoiler Content tab and you will see options to control when spoiler content is displayed. You can choose to display on click, on servers I moderate, and always.
If you want to display all spoiler content, choose Always to turn off the spoiler tag. You can hide them again through the same menu if you change your mind.
This was an article on how to use the Discord spoiler tag to hide texts, images, and videos. You can undo and redo the tags as many times as you like. If you are about to unveil some life-changing secret on your Discord server, then don’t forget to add that spoiler tag.
Richard Bennett
Richard Bennett is a writer and a lover of all things video.
Follow @Richard Bennett
Also read:
- [New] 2024 Approved Easy Steps to Setting Up a Professional Discord Stream
- [Updated] 2024 Approved Deciphering the Code of Conduct Your Practical Guide to Filing Reports in Online Spaces Like Discord
- [Updated] Streamlining Communication Essentials of Discord's Video Sharing Feature for 2024
- [Updated] Discord Vs. Skype Which One Should You Choose for 2024
- [New] How to Share Screen on Discord, In 2024
- In 2024, Best 5 Social Media Logo Animation
- [New] 2024 Approved Step-by-Step Changing Text Appearance in Discord
- [New] In 2024, Foremost Innovative Logos for Social Platforms' Animations
- [New] The Best 10 Discord Plugins for Elevated User Interaction for 2024
- Discovering The Secrets to a Perfect Pfp on Discord for 2024
- [Updated] Streamlining Your Discord Experience Bulk Deletion Made Simple for 2024
- [Updated] In 2024, Best of the Bots Discover Premium Music Players for a Richer Discord Soundscape
- [Updated] In 2024, Charting Your Course to Certification A Guide to Verified Partnership
- In 2024, Unlock Partner Status A Step-by-Step Guide to Discord Verification
- [Updated] In 2024, Maintaining Digital Decorum Effective Techniques for Filing Complaints in Virtual Realms Like Discord
- [New] 2024 Approved Discord Vs. Skype Which One Should You Choose?
- 2024 Approved Ensuring Smooth Operations in Your Discord Channels with These Steps
- [Updated] 2024 Approved The Premier Selection of Top 10 Emoji Creation Tools for Discord
- [Updated] Top Audio Modification Tools for Discord A Comprehensive 2023 Roundup for 2024
- Step-by-Step Guide Screen Casts on Discord
- Guide to Setting Up and Managing Discord Channels for Beginners for 2024
- In 2024, Top 9 Discord Banner Makers and How to Make a Profile Banner
- [Updated] Guide to Hosting Channels with Real-Time Video Streaming for 2024
- [Updated] In 2024, Elevating Engagement Top Discord Bots You Must Try
- [New] Mastering Discord's Profile Pics A Guide to Sizzling Pfps for 2024
- In 2024, Connecting Dots Spotify + Discord Easy Steps
- [New] In 2024, Breakdown Effective Video Conferencing Using Discord
- [Updated] The Complete Walkthrough to Emoji-Enriched Discord Statuses for 2024
- 2024 Approved Stepwise Methodology for Launching a Discord Channel
- [Updated] Guide to Hosting Channels with Real-Time Video Streaming
- In 2024, Farm Fanatics’ Forecast Future of Virtual Harvesting
- In 2024, Top 15 Apps To Hack WiFi Password On Samsung Galaxy S23 Ultra
- Top 10 AI Script Writers to Choose
- 2024 Approved Chromebook Masterclass Excellent Recording Suite
- How to Captivate Viewers with Stunning Story Bokeh for 2024
- Popcorn Projections Thorough Review of Film Snack Recorder
- 2024 Approved Unplugged Fun The Best Non-Networked Android Apps
- [Updated] Obsudio's Deep Dive Into Best Screencast Software for Live Broadcasts
- In 2024, How to Unlock Vivo G2 Phone without Any Data Loss
- New How to Find & Make Animated Christmas GIFs for 2024
- [New] In 2024, Viral Video Voyage Unveiling the Trendiest Tweets of 2023
- [New] In 2024, Ranked Best iPad Speech-to-Text Programs #3
- [New] In 2024, Capture and Share Adventures with GoPro Tips for Livestreams & Social Media
- Updated In 2024, AI Voice Manipulation Techniques for Authentic and Natural Sound Replication
- Updated Multimodal Media Mastery Integrating Audio Into Video Projects Today for 2024
- Mac Video Creator Effortless Video Production for Beginners and Pros
- Updated 2024 Approved The Ultimate Mac Video Editor Adobe Premiere Pro for Experts
- AddROM Bypass An Android Tool to Unlock FRP Lock Screen For your ZTE Blade A73 5G
- [New] In 2024, Techniques for Finding Original Images in Instagram Posts
- Updated In 2024, S Leading Lego Stop Motion Studios and Filmmakers
- [New] 2024 Approved Formulating Interactive Virtual Meeting Zones Messenger
- How To Restore a Bricked Oppo Find X7 Ultra Back to Operation | Dr.fone
- Virtual Teamwork Made Simple on Facebook Live
- New 2024 Approved Amazing Ideas About Creating Personalised WhatsApp GIF Sticker
- New Unraveling How the Slow Motion Guys Have Revolutionized The Slow Motion Game
- Updated In 2024, Editing Videos on Mac OS X Yosemite A Beginners Guide
- [New] Screencast Essentials From Basics to Advanced Tactics
- [New] Essential 10 Screen Capture Apps for Mac Users for 2024
- In 2024, How To Fix Apple ID Verification Code Not Working On iPhone 12 Pro Max
- Engaging Audiences via VO-Enhanced Slideshows
- Title: "[Updated] In 2024, Achieving Perfection The Art of Live Broadcasting on Discord"
- Author: Timothy
- Created at : 2024-05-23 22:48:01
- Updated at : 2024-05-24 22:48:01
- Link: https://discord-videos.techidaily.com/updated-in-2024-achieving-perfection-the-art-of-live-broadcasting-on-discord/
- License: This work is licensed under CC BY-NC-SA 4.0.
