![[Updated] In 2024, Mastering the Art of Custom Discord Emojis PC & Mobile Edition](https://thmb.techidaily.com/403ee604a3f16d045c6709201099032edd204086d93c80ae19bbdd0f525004e0.png)
"[Updated] In 2024, Mastering the Art of Custom Discord Emojis PC & Mobile Edition"
Mastering the Art of Custom Discord Emojis: PC & Mobile Edition
If you have an active Nitro subscription and want to make your Discord status look better, you can put emojis in Discord status. This article will help you walk through the process of using Discord custom status to upload emojis. Custom status is a new feature introduced by Discord. By uploading the emojis, you can keep your Discord status fresh! So, keep reading to find how to put emojis in Discord status through your desktop and mobile app conveniently.
In this article
01 How to Put Custom Emoji in Discord Status on Desktop and Online?
02 How to Add Custom Emoji on Discord Status on Mobile?
03 How to Copy and Paste Emojis in Discord Status?
04 How to Add Animated Emojis to Discord Status?
05 Custom Discord Status Emoji Ideas
Part 1: How to Put Custom Emoji in Discord Status on Desktop and Online?

For those who want to add an emoji on their Discord status on desktop and online, you can do that easily by following the steps that we have listed below:
Step 1: First, you need to go to https://discord.com . Once you visit the site, please log in using your Discord credential.
Step 2: Once your profile is open, please click on the profile picture.
Step 3: On your profile, look at the bottom of the menu. You will see a pop-up menu that says set a custom status.
Step 4: On the emojis bar, you can add an emoji. To do that, you need to click on the emoji status. Next, you will see a list of emojis. Please note that only an active Nitro subscription user can use animated or custom emojis. On the left will be the category of emojis. Choose one category that suits your mood; once the category opens, click on an emoji to add it.
Step 5: After that, you need to click on the Today option. This will open a drop-down menu. You need to choose a time frame for the emoji or status. You can choose today, 4 hours, 1 hour, etc.
Step 6: If you are done with the emoji selection and have chosen the duration for the status, you need to click on the Save option. The Save option will be on the bottom right of the same pop-up window.
And that’s it. The emojis will be successfully added to your status based on the duration that you have chosen. If you want to change the emoji or remove it, you need to undergo the same process.
Related: How to Get Free Animated Emojis on Discord
Part 2: How to Add Custom Emoji on Discord Status on Mobile?

If you are using the Discord app on your mobile phone, you can add a custom emoji on Discord status using your phone too. Follow the step-by-step guide that we have prepared to learn how to do that.
Step 1: Take your smartphone and look for the Discord app. The icon will look like a controller. Click on it to launch Discord.
Step 2: Just like the web steps, you will have to click on your profile. Click on the hamburger icon, which is there in the upper left corner. Then, look at the bottom right corner to find your profile.
Step 3: Now, click on the Set Status option. This will be the first option on your profile. Go on and click on that.
Step 4: After that, click on the option that says set a custom status. On the status bar, you will see an emoji. You need to click on that to open the list of emojis to choose from.
Step 5: Choose a time frame for the emoji, for example, 30 minutes, 1-hour, clear tomorrow, etc. If you are using an Android, you will see the floppy disk option; click on that to save your status. If you are using an iOS device, you will see the save option.
By following these steps, your status with the emoji you have chosen will be saved successfully. If you want to add a new emoji, repeat the same process.
Related: How to Change Discord Status
Part 3: How to Copy and Paste Emojis in Discord Status?
If you don’t want to go through the hassle of adding an emoji manually, you can just copy and paste one to your status. How to do it? Follow these steps:
Step 1: Go to a website that has emojis for Discord status.
Step 2: Scroll down the list of emojis and copy it.
Step 3: Go back to your Discord Nitro page and open the status setting. There, on the emoji section, paste the emoji that you have copied from another site.
Please note that this may not be possible for all types of emojis, though. Also, this will work if only the website has created emojis that can be directly copied and pasted on the status section.
Part 4: How to Add Animated Emojis to Discord Status?
Apart from the basic emojis, you can also add animated emojis to your Discord Status to make your status look even better. Here are the steps to follow to add an animated emoji:
Step 1: First, go to a website called https://betterdiscord.app/ . Once you are there, click on the Download option.
Step 2: You will see a page loaded with codes, right-click on the screen and click on the Save option. When it is downloaded, click on the Better Discord Windows installer. Next, read the license agreement and click on the Next option.
Step 3: Then click install better Discord and hit the next button. Choose the Discord version that you currently have installed.
Step 4: Open Discord and click on the user settings. There, you will see the Better Discord section. Next, click on the Plugin option. Now, close the Discord window and drag the animated status dot plugin into the plugin folder that opened after clicking on the Plugin option.
Step 5: Go to Discord again, and you will see the Animated Status option. Enable it and click on the gear icon. To add an animated emoji, click on the + icon. Next, you will see a Nitro ID field. Then, go to a chat page and click on the emoji option.
Step 6: Look at the emoji that you like and memorize the animated emoji name. Press \ followed by the name of the emoji. Now, copy the whole text and paste it again. You will see a few numbers; that’s the Nitro ID for the emoji. Copy the number only, go back to the Animated plugin and paste it on the Nitro ID field. Go back to the Nitro page again, and you will see the animated emoji on your status.
Part 5: Custom Discord Status Emoji Ideas

If you want to make your Discord Status look really cool, you can get some custom Discord status emoji ideas from us. Read this section to find out a few super cool custom Discord status emojis ideas and get inspired.
Use Kaomoji in Status
Kaomoji is a collection of super cute emojis that can brighten anyone’s day! They are great because they make your status look different and cute at the same time. You can choose from stars, smiley faces, cute polar bears, and much more! And yes, they are different than your usual emojis.

Add Old-school Emoticons
Remember the good old Nokia 1100 days when you used to send emojis using some signs? Well, you can try this idea too to give a vintage look to your status. Everybody uses the same smiley emojis, so why not try something different? Go back to your old 90s school days and display images, such as @}->– which is a rose! You can find old-school emoticons online easily.
Conclusion
And that’s it; now you know how to put emoji in Discord status without sweating much. We hope you have found this article helpful, and you will start using cool emojis on your status to make your Discord status look different than others!
02 How to Add Custom Emoji on Discord Status on Mobile?
03 How to Copy and Paste Emojis in Discord Status?
04 How to Add Animated Emojis to Discord Status?
05 Custom Discord Status Emoji Ideas
Part 1: How to Put Custom Emoji in Discord Status on Desktop and Online?
For those who want to add an emoji on their Discord status on desktop and online, you can do that easily by following the steps that we have listed below:
Step 1: First, you need to go to https://discord.com . Once you visit the site, please log in using your Discord credential.
Step 2: Once your profile is open, please click on the profile picture.
Step 3: On your profile, look at the bottom of the menu. You will see a pop-up menu that says set a custom status.
Step 4: On the emojis bar, you can add an emoji. To do that, you need to click on the emoji status. Next, you will see a list of emojis. Please note that only an active Nitro subscription user can use animated or custom emojis. On the left will be the category of emojis. Choose one category that suits your mood; once the category opens, click on an emoji to add it.
Step 5: After that, you need to click on the Today option. This will open a drop-down menu. You need to choose a time frame for the emoji or status. You can choose today, 4 hours, 1 hour, etc.
Step 6: If you are done with the emoji selection and have chosen the duration for the status, you need to click on the Save option. The Save option will be on the bottom right of the same pop-up window.
And that’s it. The emojis will be successfully added to your status based on the duration that you have chosen. If you want to change the emoji or remove it, you need to undergo the same process.
Related: How to Get Free Animated Emojis on Discord
Part 2: How to Add Custom Emoji on Discord Status on Mobile?
If you are using the Discord app on your mobile phone, you can add a custom emoji on Discord status using your phone too. Follow the step-by-step guide that we have prepared to learn how to do that.
Step 1: Take your smartphone and look for the Discord app. The icon will look like a controller. Click on it to launch Discord.
Step 2: Just like the web steps, you will have to click on your profile. Click on the hamburger icon, which is there in the upper left corner. Then, look at the bottom right corner to find your profile.
Step 3: Now, click on the Set Status option. This will be the first option on your profile. Go on and click on that.
Step 4: After that, click on the option that says set a custom status. On the status bar, you will see an emoji. You need to click on that to open the list of emojis to choose from.
Step 5: Choose a time frame for the emoji, for example, 30 minutes, 1-hour, clear tomorrow, etc. If you are using an Android, you will see the floppy disk option; click on that to save your status. If you are using an iOS device, you will see the save option.
By following these steps, your status with the emoji you have chosen will be saved successfully. If you want to add a new emoji, repeat the same process.
Related: How to Change Discord Status
Part 3: How to Copy and Paste Emojis in Discord Status?
If you don’t want to go through the hassle of adding an emoji manually, you can just copy and paste one to your status. How to do it? Follow these steps:
Step 1: Go to a website that has emojis for Discord status.
Step 2: Scroll down the list of emojis and copy it.
Step 3: Go back to your Discord Nitro page and open the status setting. There, on the emoji section, paste the emoji that you have copied from another site.
Please note that this may not be possible for all types of emojis, though. Also, this will work if only the website has created emojis that can be directly copied and pasted on the status section.
Part 4: How to Add Animated Emojis to Discord Status?
Apart from the basic emojis, you can also add animated emojis to your Discord Status to make your status look even better. Here are the steps to follow to add an animated emoji:
Step 1: First, go to a website called https://betterdiscord.app/ . Once you are there, click on the Download option.
Step 2: You will see a page loaded with codes, right-click on the screen and click on the Save option. When it is downloaded, click on the Better Discord Windows installer. Next, read the license agreement and click on the Next option.
Step 3: Then click install better Discord and hit the next button. Choose the Discord version that you currently have installed.
Step 4: Open Discord and click on the user settings. There, you will see the Better Discord section. Next, click on the Plugin option. Now, close the Discord window and drag the animated status dot plugin into the plugin folder that opened after clicking on the Plugin option.
Step 5: Go to Discord again, and you will see the Animated Status option. Enable it and click on the gear icon. To add an animated emoji, click on the + icon. Next, you will see a Nitro ID field. Then, go to a chat page and click on the emoji option.
Step 6: Look at the emoji that you like and memorize the animated emoji name. Press \ followed by the name of the emoji. Now, copy the whole text and paste it again. You will see a few numbers; that’s the Nitro ID for the emoji. Copy the number only, go back to the Animated plugin and paste it on the Nitro ID field. Go back to the Nitro page again, and you will see the animated emoji on your status.
Part 5: Custom Discord Status Emoji Ideas
If you want to make your Discord Status look really cool, you can get some custom Discord status emoji ideas from us. Read this section to find out a few super cool custom Discord status emojis ideas and get inspired.
Use Kaomoji in Status
Kaomoji is a collection of super cute emojis that can brighten anyone’s day! They are great because they make your status look different and cute at the same time. You can choose from stars, smiley faces, cute polar bears, and much more! And yes, they are different than your usual emojis.
Add Old-school Emoticons
Remember the good old Nokia 1100 days when you used to send emojis using some signs? Well, you can try this idea too to give a vintage look to your status. Everybody uses the same smiley emojis, so why not try something different? Go back to your old 90s school days and display images, such as @}->– which is a rose! You can find old-school emoticons online easily.
Conclusion
And that’s it; now you know how to put emoji in Discord status without sweating much. We hope you have found this article helpful, and you will start using cool emojis on your status to make your Discord status look different than others!
Strategies for Departing From Your Discord Clan
How to Leave A Discord Server

Richard Bennett
Mar 27, 2024• Proven solutions
Discord is all fun and games if you are a part of a lively server that has a cool community. You can obsess about some game, comic, or song with hundreds of other people without the fear of being called geeky.
However, sometimes you might disagree with other members, which can lead you to hunt for some other server. Other times, the server might be inactive, or you may not mix well with the crowd. Or maybe, you landed there by mistake. So, how do you leave a Discord server?
Whatever your reason, here is a detailed guide on how to leave a server on Discord!
A few things to note before you leave a server –
- After you exit from a server, you will no longer be able to send any texts on it.
- You will not receive any notifications from the server.
- Your username will no longer appear in the member list of the server.
- Whatever role you had in the server will be disabled.
- If you own a server, you will have to transfer the ownership to another member before you quit.
- The person you hand over your server to can do whatever they want with it.
- You can join the server you left again if you change your mind.
Part 1: How to Leave a Discord Server on Computer?
Several peoples and hardcore gamers use Discord over a PC. And you can wave goodbye to the channel in a matter of few seconds. The procedure is the same for Mac and Windows.
- Open Discord on your computer (the desktop app or on the browser).
- Tap on the server name that appears towards the top left.
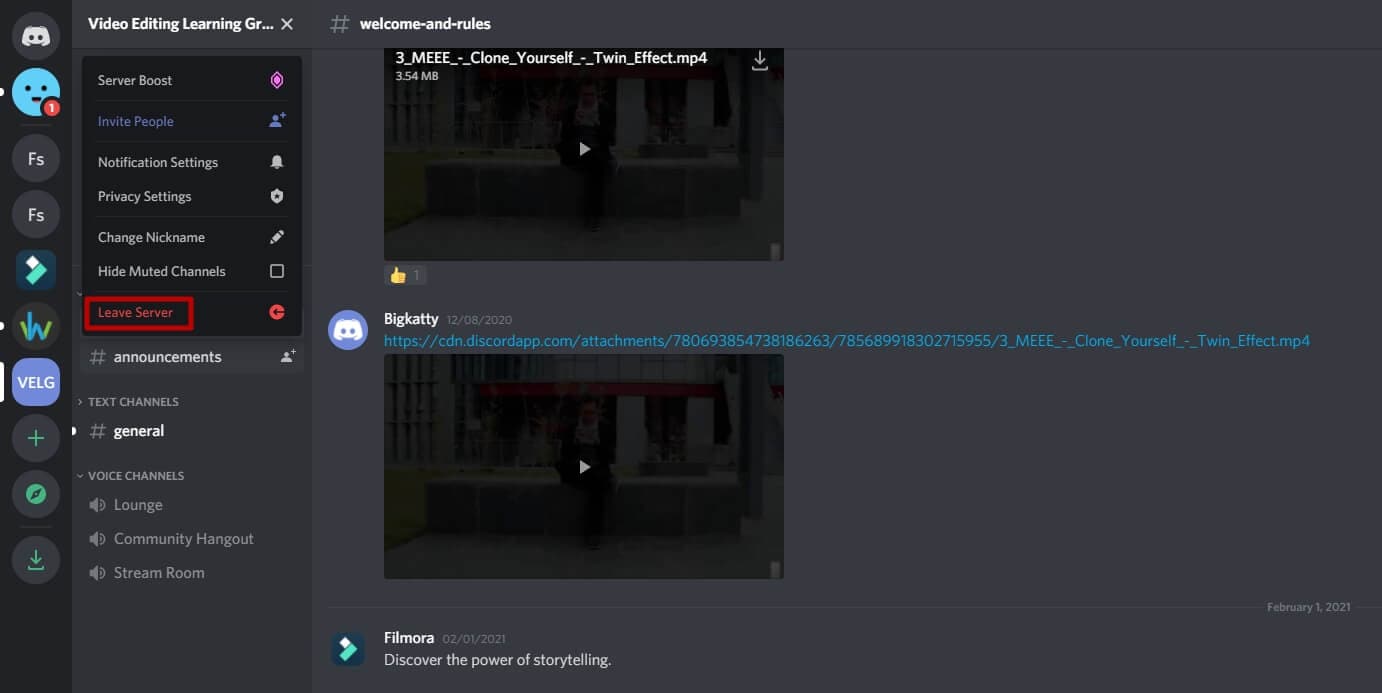
- Right at the bottom of the list, click on the option leave server
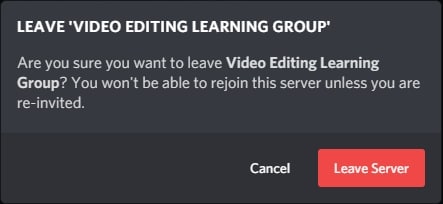
After confirming you won’t be a part of that server anymore. You cannot send any texts or get any notifications. The server name will disappear from the server list in your profile.
Part 2: How to Leave a Discord Server on the Mobile App?
The procedure of leaving the server is more or less the same on the mobile app. The user interface of Discord does not differ much across the devices. To quit a server, follow these steps -
- Click open the Discord app on your mobile.
- Click on the right pane and click on the 3 dots that appear. Click on the name of the server that you want to leave.
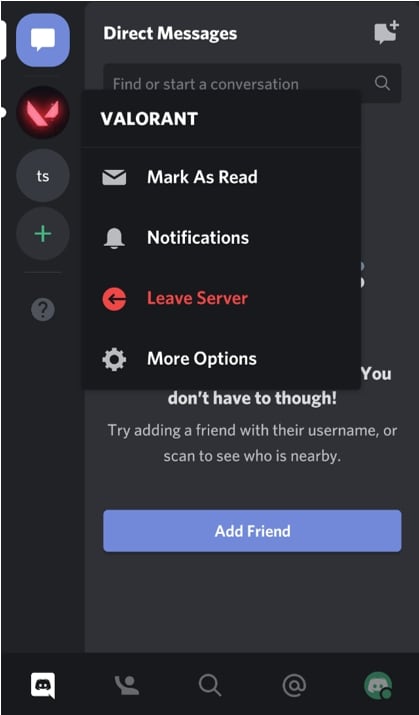
- From the menu that opens, scroll towards the bottom and click on the leave server option.

After confirmation, you will not be a part of the server anymore. The process is the same for ios and Android devices.
If you have decided to take a break from gaming and Discord, you can consider uninstalling the app temporarily. You can also turn off the notifications in the app settings on your device.
Bonus: How to Transfer Discord Server Ownership?
How to leave your own Discord server? If your server has many members in it, it is wiser to transfer the ownership rather than shutting the server completely or abandoning it to fate. Especially if the users are active, then you can handover the ownership to a trustworthy person.
Here is how you can do it -
For desktop
The process is quite simple and only takes a few minutes.
- Open the Discord app or log in using the browser.
- Click on the server that you want to leave.
- With right-click, open up the floating menu.
- From that list, select server settings and then choose members.
- Select the user that You Want To handover your server to. Tap those 3 dots and tap on ‘transfer ownership.’
- Confirm your choice and then click on transfer ownership.
- The chosen member will become the new owner of the server.
On mobile
The transfer procedure is quite similar to the desktop version. However, it has a few extra steps.
- Open your Discord App on your phone.
- Select the server that you want to give away.
- Tap those 3 dots to open up the menu. Under user management, tap on ‘members.’
- Select the member that will be the new owner of your server. Tap the 3 dots that appear next to the name of that user.
- A confirmation box will appear.
- Check off the box to confirm your choice.
Your server is now successfully transferred to the selected member. And the new owner can decide what to do with the server.
FAQs About Leaving A Discord Server
- How can I leave a Discord server without anyone knowing?
Frankly speaking, there is no magic to help conceal your disappearance from a server. There is no way to hide your departure. However, you can take a few measures to make it less noticeable.
- Lay low for a few hours or days. This won’t work if you are the loudest member on the server. But still, it’s worth a shot.
- Try changing your avatar, profile picture, and nickname. This can throw people off the track or confuse them for a while.
- Control yourself and try not to tell anyone that you are leaving.
- And now it’s time for the discreet farewell!
You might still get some texts on personal asking about your exit. This is not a surefire way of making your exit a secret. However, hundreds of members along with bots will make your disappearance less apparent. Another solution would be to create a new user ID and leave the old one inactive.
- Does leaving a Discord server delete your messages?
No, none of the texts that you sent on the server get deleted. Every text remains, even after you leave. The only way you can delete your texts if you delete them all one by one, or someone with sufficient permissions deletes them. If you get banned, then the member who banned you decides whether to keep your messages on the server or remove them. In this case, your texts can be removed if the member deletes them.
This was a guide on ‘how to leave a Discord server’ that provided a detailed how-to on leaving servers and transferring servers.
Richard Bennett
Richard Bennett is a writer and a lover of all things video.
Follow @Richard Bennett
Richard Bennett
Mar 27, 2024• Proven solutions
Discord is all fun and games if you are a part of a lively server that has a cool community. You can obsess about some game, comic, or song with hundreds of other people without the fear of being called geeky.
However, sometimes you might disagree with other members, which can lead you to hunt for some other server. Other times, the server might be inactive, or you may not mix well with the crowd. Or maybe, you landed there by mistake. So, how do you leave a Discord server?
Whatever your reason, here is a detailed guide on how to leave a server on Discord!
A few things to note before you leave a server –
- After you exit from a server, you will no longer be able to send any texts on it.
- You will not receive any notifications from the server.
- Your username will no longer appear in the member list of the server.
- Whatever role you had in the server will be disabled.
- If you own a server, you will have to transfer the ownership to another member before you quit.
- The person you hand over your server to can do whatever they want with it.
- You can join the server you left again if you change your mind.
Part 1: How to Leave a Discord Server on Computer?
Several peoples and hardcore gamers use Discord over a PC. And you can wave goodbye to the channel in a matter of few seconds. The procedure is the same for Mac and Windows.
- Open Discord on your computer (the desktop app or on the browser).
- Tap on the server name that appears towards the top left.
- Right at the bottom of the list, click on the option leave server
After confirming you won’t be a part of that server anymore. You cannot send any texts or get any notifications. The server name will disappear from the server list in your profile.
Part 2: How to Leave a Discord Server on the Mobile App?
The procedure of leaving the server is more or less the same on the mobile app. The user interface of Discord does not differ much across the devices. To quit a server, follow these steps -
- Click open the Discord app on your mobile.
- Click on the right pane and click on the 3 dots that appear. Click on the name of the server that you want to leave.
- From the menu that opens, scroll towards the bottom and click on the leave server option.
After confirmation, you will not be a part of the server anymore. The process is the same for ios and Android devices.
If you have decided to take a break from gaming and Discord, you can consider uninstalling the app temporarily. You can also turn off the notifications in the app settings on your device.
Bonus: How to Transfer Discord Server Ownership?
How to leave your own Discord server? If your server has many members in it, it is wiser to transfer the ownership rather than shutting the server completely or abandoning it to fate. Especially if the users are active, then you can handover the ownership to a trustworthy person.
Here is how you can do it -
For desktop
The process is quite simple and only takes a few minutes.
- Open the Discord app or log in using the browser.
- Click on the server that you want to leave.
- With right-click, open up the floating menu.
- From that list, select server settings and then choose members.
- Select the user that You Want To handover your server to. Tap those 3 dots and tap on ‘transfer ownership.’
- Confirm your choice and then click on transfer ownership.
- The chosen member will become the new owner of the server.
On mobile
The transfer procedure is quite similar to the desktop version. However, it has a few extra steps.
- Open your Discord App on your phone.
- Select the server that you want to give away.
- Tap those 3 dots to open up the menu. Under user management, tap on ‘members.’
- Select the member that will be the new owner of your server. Tap the 3 dots that appear next to the name of that user.
- A confirmation box will appear.
- Check off the box to confirm your choice.
Your server is now successfully transferred to the selected member. And the new owner can decide what to do with the server.
FAQs About Leaving A Discord Server
- How can I leave a Discord server without anyone knowing?
Frankly speaking, there is no magic to help conceal your disappearance from a server. There is no way to hide your departure. However, you can take a few measures to make it less noticeable.
- Lay low for a few hours or days. This won’t work if you are the loudest member on the server. But still, it’s worth a shot.
- Try changing your avatar, profile picture, and nickname. This can throw people off the track or confuse them for a while.
- Control yourself and try not to tell anyone that you are leaving.
- And now it’s time for the discreet farewell!
You might still get some texts on personal asking about your exit. This is not a surefire way of making your exit a secret. However, hundreds of members along with bots will make your disappearance less apparent. Another solution would be to create a new user ID and leave the old one inactive.
- Does leaving a Discord server delete your messages?
No, none of the texts that you sent on the server get deleted. Every text remains, even after you leave. The only way you can delete your texts if you delete them all one by one, or someone with sufficient permissions deletes them. If you get banned, then the member who banned you decides whether to keep your messages on the server or remove them. In this case, your texts can be removed if the member deletes them.
This was a guide on ‘how to leave a Discord server’ that provided a detailed how-to on leaving servers and transferring servers.
Richard Bennett
Richard Bennett is a writer and a lover of all things video.
Follow @Richard Bennett
Also read:
- [New] 2024 Approved Ultimate Highlight Hits IOS & Android Instagram Covers Apps
- [New] Charting the Course A Comprehensive Guide to YouTube Teaser Vids
- [New] In 2024, Elite Nintendo Switch Battle Selection (Max 156)
- [New] In 2024, Hottest Hooks in the Crowd Ultimate Discord Nicknames Guide
- [New] Navigate Discord with Ease A Compreeher Guide to Pins for 2024
- [Updated] 2024 Approved Mastering the Art of Addressing Conflict A Guide to Effective Reporting Methods on Discord
- [Updated] How to Remove a Desktop Discord Server for 2024
- [Updated] Quick Profit on Reddit? Here Are Your 13 Most Accessible Ways
- [Updated] The Ultimate List of Flashy Discord Tags
- A Quick Guide to Vivo G2 FRP Bypass Instantly
- Harmonious Photographic Overlays Guide for 2024
- In 2024, Decoding Discord Spoilers in Minutes
- In 2024, The Best iSpoofer Alternative to Try On Realme GT 5 (240W) | Dr.fone
- Sony's Revolutionary Leap in VR Gaming - PSVR 2 Arrival Info, Price Insight & Hardware Breakdown
- Title: [Updated] In 2024, Mastering the Art of Custom Discord Emojis PC & Mobile Edition
- Author: Timothy
- Created at : 2024-10-23 04:11:17
- Updated at : 2024-10-24 00:45:16
- Link: https://discord-videos.techidaily.com/updated-in-2024-mastering-the-art-of-custom-discord-emojis-pc-and-mobile-edition/
- License: This work is licensed under CC BY-NC-SA 4.0.