
![[Updated] Perfecting the Art of Transmitting Videos via Discord's Channels for 2024](https://www.lifewire.com/thmb/0XOSR_cSdI-UPr8TRlThT4Fytnk=/400x300/filters:no_upscale():max_bytes(150000):strip_icc()/GorillaArmor-6d65059c5c99453d85e9a960592adb9a.jpeg)
[Updated] Perfecting the Art of Transmitting Videos via Discord's Channels for 2024
Perfecting the Art of Transmitting Videos via Discord’s Channels
How to Send Videos on Discord

Richard Bennett
Mar 27, 2024• Proven solutions
The whole point of Discord is to bring together communities of like-minded people to talk, share ideas and have fun together. And this isn’t just limited to chatting but sometimes you’re going to want to share content, including videos.
So, whether it’s a compilation of your best gaming moments that you’ve carefully edited together, a home movie that you want to share with friends, or just a funny clip that someone’s sent you that you want to pass on, here we’ll take you through how to send videos on Discord both on PC and mobile, and the likely issues you might face.
- Part 1: How to Send Videos on Discord PC
- Part 2: How to Send Videos on Discord Mobile
- Part 3: How to Send Long Videos on Discord That Are More Than 8MB
- Part 4: FAQs About Uploading Videos to Discord
Part 1: How to Send Videos on Discord PC
It’s actually pretty simple to send videos on Discord when using a PC, providing they aren’t too large a file size.
Firstly, you just need to navigate to the channel or private message where you want to send the video. Just find the right option on the list of servers you’re a member of, or head to your message inbox to find the user you want to send it to privately.
Once you’re in the right place, click on the plus (+) icon that you’ll find to the left of the chatbox at the bottom of the screen where you’d normally type your message.
You’ll then just need to find the file on your computer, and double click on it. It’ll then bring up a pop-up for the video where you can add a comment, which will sit above the video (ideal if you need to give context on why you’re sharing it). You can also mark it as a spoiler – useful if you’re sharing a gaming tip but you don’t want to spoil the story for anyone who’s not reached that point yet.
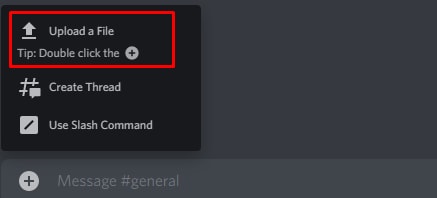
From there, it’s as simple as clicking the upload button. Once it’s ready, the video will be in the chat window for anyone in the server to watch, or for your friend if you’ve sent it privately. And if they want to download it, they’ll just need to click the download button (a downward-facing arrow) at the top right of the video.
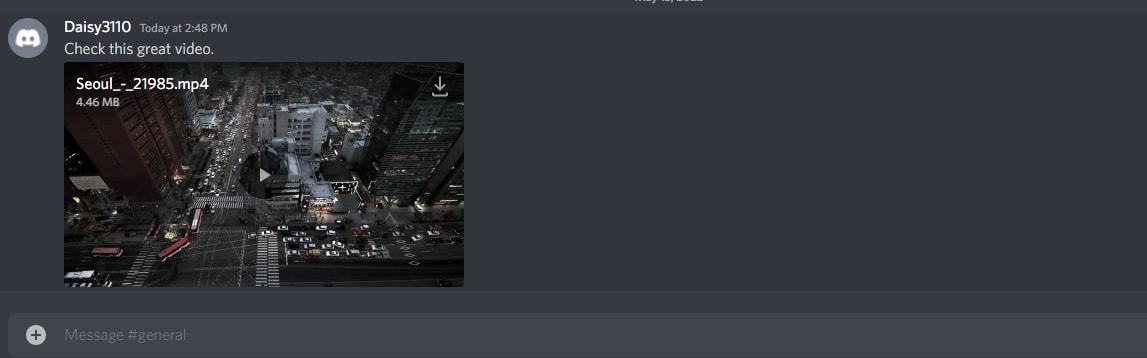
It’s worth noting that, while Discord will play most video formats, it can’t manage everything. If you upload a format that Discord isn’t compatible with, then it won’t show a video player – instead, the file will just be uploaded. Other people can still download it to watch on their own devices.
Also, there’s a strict file limit of 8MB. This isn’t huge at all – while there’s no definitive file size for video (as it depends on file type, resolution, compression, etc) it’s unlikely to be more than 60 seconds of footage, and could just be a few seconds. If the video you want to upload is more than 8MB, carry on reading below to find out how.
Part 2: How to Send Videos on Discord Mobile
The process to send video on Discord Mobile is pretty similar both with iOS and Android, but with just a few minor tweaks.
Firstly, you still need to navigate to either the server or inbox where you want to share the video. You can then click the ‘Photo Selector’ button directly to the left of the chatbox.
This will open your phone’s gallery, but it’ll only be searching for photos. You instead want the File Selector, which will be the third icon along – it looks like a text document with a folded-over corner.
Click this and it’ll give you the option to directly upload a video from your phone’s Downloads folder. To send a video that’s stored elsewhere, click on the Expand arrow at the top left of the menu. This will send you to your phone’s file navigation system where you can find the video you want.
Once you’ve selected the video, just hit the blue Send icon to send your video to the chat. Again you can add a message as a caption, but this time it’ll just be in the normal message box rather than a dedicated comment box before you hit upload.
Part 3: How to Send Long Videos on Discord That Are More Than 8MB
So as we’ve said above, there is a file size limit when you’re using a free Discord account of just 8MB, which isn’t much at all. There are a few ways around this, so take your pick from the one that sounds best for you.
1. Update to Discord Nitro to Upload 100MB
The first option is possibly the simplest but it’s definitely not the cheapest, and that’s to pay for an upgrade to Discord Nitro. The paid version of Discord has a number of benefits, one of which is the increased file upload size of 100MB. It costs $4.99 per month or $49.99 per year, so if you’re likely to be regularly uploading videos that are lower than this limit, it might make sense.
2. Cut Unwanted Clips/Compress Video with Filmora Video Editor
The second choice would be to take your video and cut it into pieces, sending them one at a time. This might sound time-consuming but with Filmora’s Instant Cutter Tool, it’s really simple.
All you need to do is open a video in Filmora by clicking the arrow next to Import and then choosing ‘Import with Instant Cutter Tool’.
This will open the Instant Cutter window where you can click Open File to add your video. From here you can trim your files and export them in multiple sections. There are different ways that you can do this, and while each is a simple process, there are still a few steps to follow.


For more detail, check out this post for a step-by-step guide on the different ways you can trim a video in Filmora.
You can also try to compress your video size, which may let you keep the whole video at the expense of some of the quality. Again, using Filmora, this is easy. But also again, there are different ways to go about it.
You could literally crop the video in order to trim some of the data, as the reduced viewing screen won’t be as big a file. You can also reduce the resolution, or convert your video to a format that uses fewer data. You’ll need to test it though, as converting to some video formats might result in blurry footage.
There are advanced settings you can tinker with too, such as lowering the frame rate or the bit rate. Again, rather than go through all of those options in an epic article here, it’s easier to head to a post dedicated to these steps about compress videos with Filmora .
3. Upload to YouTube/Vimeo/Google Drive/Dropbox
The final option is to upload your video to an online player or storage site, and link to it, rather than having Discord host the file. YouTube and Vimeo are the obvious options, but Streamable is another popular choice too with a free membership. YouTube’s maximum video uploads are 128GB, which is huge, while other sites like Streamable cap free accounts to 500MB per video.
So, if you want to upload massive files, you’ll need to decide whether to choose YouTube or pay for an upgraded membership elsewhere. Wherever you host your video, once it’s online just grab the link and paste it into Discord to share your content.
The only drawback to this option is that it stops other users from being able to download the video directly, and you may need to look at a file sharing alternative such as Dropbox if you want to send the actual file.
FAQs About Uploading Videos to Discord
Which Kind of Video Formats Can I Upload to Discord?
You can send any filetype to another user on Discord, so that they can download it and watch it on their own device. But if you want to upload a video so that Discord embeds it, and makes it playable within the chat, you’re limited to only mp4 and WebM filetypes.
You can also use MOV files, but not everyone will be able to play them, and FLAC files are supported on desktop only but not on mobile.
How Can I Upload Saved Videos to Discord?
If you find a video on Discord that you want to share on a different server or in a private DM, you can use the download icon to save it locally. Then, follow the steps above to upload the video to the server or DM chat window where you want to share it.
Richard Bennett
Richard Bennett is a writer and a lover of all things video.
Follow @Richard Bennett
Richard Bennett
Mar 27, 2024• Proven solutions
The whole point of Discord is to bring together communities of like-minded people to talk, share ideas and have fun together. And this isn’t just limited to chatting but sometimes you’re going to want to share content, including videos.
So, whether it’s a compilation of your best gaming moments that you’ve carefully edited together, a home movie that you want to share with friends, or just a funny clip that someone’s sent you that you want to pass on, here we’ll take you through how to send videos on Discord both on PC and mobile, and the likely issues you might face.
- Part 1: How to Send Videos on Discord PC
- Part 2: How to Send Videos on Discord Mobile
- Part 3: How to Send Long Videos on Discord That Are More Than 8MB
- Part 4: FAQs About Uploading Videos to Discord
Part 1: How to Send Videos on Discord PC
It’s actually pretty simple to send videos on Discord when using a PC, providing they aren’t too large a file size.
Firstly, you just need to navigate to the channel or private message where you want to send the video. Just find the right option on the list of servers you’re a member of, or head to your message inbox to find the user you want to send it to privately.
Once you’re in the right place, click on the plus (+) icon that you’ll find to the left of the chatbox at the bottom of the screen where you’d normally type your message.
You’ll then just need to find the file on your computer, and double click on it. It’ll then bring up a pop-up for the video where you can add a comment, which will sit above the video (ideal if you need to give context on why you’re sharing it). You can also mark it as a spoiler – useful if you’re sharing a gaming tip but you don’t want to spoil the story for anyone who’s not reached that point yet.
From there, it’s as simple as clicking the upload button. Once it’s ready, the video will be in the chat window for anyone in the server to watch, or for your friend if you’ve sent it privately. And if they want to download it, they’ll just need to click the download button (a downward-facing arrow) at the top right of the video.
It’s worth noting that, while Discord will play most video formats, it can’t manage everything. If you upload a format that Discord isn’t compatible with, then it won’t show a video player – instead, the file will just be uploaded. Other people can still download it to watch on their own devices.
Also, there’s a strict file limit of 8MB. This isn’t huge at all – while there’s no definitive file size for video (as it depends on file type, resolution, compression, etc) it’s unlikely to be more than 60 seconds of footage, and could just be a few seconds. If the video you want to upload is more than 8MB, carry on reading below to find out how.
Part 2: How to Send Videos on Discord Mobile
The process to send video on Discord Mobile is pretty similar both with iOS and Android, but with just a few minor tweaks.
Firstly, you still need to navigate to either the server or inbox where you want to share the video. You can then click the ‘Photo Selector’ button directly to the left of the chatbox.
This will open your phone’s gallery, but it’ll only be searching for photos. You instead want the File Selector, which will be the third icon along – it looks like a text document with a folded-over corner.
Click this and it’ll give you the option to directly upload a video from your phone’s Downloads folder. To send a video that’s stored elsewhere, click on the Expand arrow at the top left of the menu. This will send you to your phone’s file navigation system where you can find the video you want.
Once you’ve selected the video, just hit the blue Send icon to send your video to the chat. Again you can add a message as a caption, but this time it’ll just be in the normal message box rather than a dedicated comment box before you hit upload.
Part 3: How to Send Long Videos on Discord That Are More Than 8MB
So as we’ve said above, there is a file size limit when you’re using a free Discord account of just 8MB, which isn’t much at all. There are a few ways around this, so take your pick from the one that sounds best for you.
1. Update to Discord Nitro to Upload 100MB
The first option is possibly the simplest but it’s definitely not the cheapest, and that’s to pay for an upgrade to Discord Nitro. The paid version of Discord has a number of benefits, one of which is the increased file upload size of 100MB. It costs $4.99 per month or $49.99 per year, so if you’re likely to be regularly uploading videos that are lower than this limit, it might make sense.
2. Cut Unwanted Clips/Compress Video with Filmora Video Editor
The second choice would be to take your video and cut it into pieces, sending them one at a time. This might sound time-consuming but with Filmora’s Instant Cutter Tool, it’s really simple.
All you need to do is open a video in Filmora by clicking the arrow next to Import and then choosing ‘Import with Instant Cutter Tool’.
This will open the Instant Cutter window where you can click Open File to add your video. From here you can trim your files and export them in multiple sections. There are different ways that you can do this, and while each is a simple process, there are still a few steps to follow.
For more detail, check out this post for a step-by-step guide on the different ways you can trim a video in Filmora.
You can also try to compress your video size, which may let you keep the whole video at the expense of some of the quality. Again, using Filmora, this is easy. But also again, there are different ways to go about it.
You could literally crop the video in order to trim some of the data, as the reduced viewing screen won’t be as big a file. You can also reduce the resolution, or convert your video to a format that uses fewer data. You’ll need to test it though, as converting to some video formats might result in blurry footage.
There are advanced settings you can tinker with too, such as lowering the frame rate or the bit rate. Again, rather than go through all of those options in an epic article here, it’s easier to head to a post dedicated to these steps about compress videos with Filmora .
3. Upload to YouTube/Vimeo/Google Drive/Dropbox
The final option is to upload your video to an online player or storage site, and link to it, rather than having Discord host the file. YouTube and Vimeo are the obvious options, but Streamable is another popular choice too with a free membership. YouTube’s maximum video uploads are 128GB, which is huge, while other sites like Streamable cap free accounts to 500MB per video.
So, if you want to upload massive files, you’ll need to decide whether to choose YouTube or pay for an upgraded membership elsewhere. Wherever you host your video, once it’s online just grab the link and paste it into Discord to share your content.
The only drawback to this option is that it stops other users from being able to download the video directly, and you may need to look at a file sharing alternative such as Dropbox if you want to send the actual file.
FAQs About Uploading Videos to Discord
Which Kind of Video Formats Can I Upload to Discord?
You can send any filetype to another user on Discord, so that they can download it and watch it on their own device. But if you want to upload a video so that Discord embeds it, and makes it playable within the chat, you’re limited to only mp4 and WebM filetypes.
You can also use MOV files, but not everyone will be able to play them, and FLAC files are supported on desktop only but not on mobile.
How Can I Upload Saved Videos to Discord?
If you find a video on Discord that you want to share on a different server or in a private DM, you can use the download icon to save it locally. Then, follow the steps above to upload the video to the server or DM chat window where you want to share it.
Richard Bennett
Richard Bennett is a writer and a lover of all things video.
Follow @Richard Bennett
Step-by-Step Guide to Including Emojis in Discord’s Display Settings
If you have an active Nitro subscription and want to make your Discord status look better, you can put emojis in Discord status. This article will help you walk through the process of using Discord custom status to upload emojis. Custom status is a new feature introduced by Discord. By uploading the emojis, you can keep your Discord status fresh! So, keep reading to find how to put emojis in Discord status through your desktop and mobile app conveniently.
In this article
01 How to Put Custom Emoji in Discord Status on Desktop and Online?
02 How to Add Custom Emoji on Discord Status on Mobile?
03 How to Copy and Paste Emojis in Discord Status?
04 How to Add Animated Emojis to Discord Status?
05 Custom Discord Status Emoji Ideas
Part 1: How to Put Custom Emoji in Discord Status on Desktop and Online?

For those who want to add an emoji on their Discord status on desktop and online, you can do that easily by following the steps that we have listed below:
Step 1: First, you need to go to https://discord.com . Once you visit the site, please log in using your Discord credential.
Step 2: Once your profile is open, please click on the profile picture.
Step 3: On your profile, look at the bottom of the menu. You will see a pop-up menu that says set a custom status.
Step 4: On the emojis bar, you can add an emoji. To do that, you need to click on the emoji status. Next, you will see a list of emojis. Please note that only an active Nitro subscription user can use animated or custom emojis. On the left will be the category of emojis. Choose one category that suits your mood; once the category opens, click on an emoji to add it.
Step 5: After that, you need to click on the Today option. This will open a drop-down menu. You need to choose a time frame for the emoji or status. You can choose today, 4 hours, 1 hour, etc.
Step 6: If you are done with the emoji selection and have chosen the duration for the status, you need to click on the Save option. The Save option will be on the bottom right of the same pop-up window.
And that’s it. The emojis will be successfully added to your status based on the duration that you have chosen. If you want to change the emoji or remove it, you need to undergo the same process.
Related: How to Get Free Animated Emojis on Discord
Part 2: How to Add Custom Emoji on Discord Status on Mobile?

If you are using the Discord app on your mobile phone, you can add a custom emoji on Discord status using your phone too. Follow the step-by-step guide that we have prepared to learn how to do that.
Step 1: Take your smartphone and look for the Discord app. The icon will look like a controller. Click on it to launch Discord.
Step 2: Just like the web steps, you will have to click on your profile. Click on the hamburger icon, which is there in the upper left corner. Then, look at the bottom right corner to find your profile.
Step 3: Now, click on the Set Status option. This will be the first option on your profile. Go on and click on that.
Step 4: After that, click on the option that says set a custom status. On the status bar, you will see an emoji. You need to click on that to open the list of emojis to choose from.
Step 5: Choose a time frame for the emoji, for example, 30 minutes, 1-hour, clear tomorrow, etc. If you are using an Android, you will see the floppy disk option; click on that to save your status. If you are using an iOS device, you will see the save option.
By following these steps, your status with the emoji you have chosen will be saved successfully. If you want to add a new emoji, repeat the same process.
Related: How to Change Discord Status
Part 3: How to Copy and Paste Emojis in Discord Status?
If you don’t want to go through the hassle of adding an emoji manually, you can just copy and paste one to your status. How to do it? Follow these steps:
Step 1: Go to a website that has emojis for Discord status.
Step 2: Scroll down the list of emojis and copy it.
Step 3: Go back to your Discord Nitro page and open the status setting. There, on the emoji section, paste the emoji that you have copied from another site.
Please note that this may not be possible for all types of emojis, though. Also, this will work if only the website has created emojis that can be directly copied and pasted on the status section.
Part 4: How to Add Animated Emojis to Discord Status?
Apart from the basic emojis, you can also add animated emojis to your Discord Status to make your status look even better. Here are the steps to follow to add an animated emoji:
Step 1: First, go to a website called https://betterdiscord.app/ . Once you are there, click on the Download option.
Step 2: You will see a page loaded with codes, right-click on the screen and click on the Save option. When it is downloaded, click on the Better Discord Windows installer. Next, read the license agreement and click on the Next option.
Step 3: Then click install better Discord and hit the next button. Choose the Discord version that you currently have installed.
Step 4: Open Discord and click on the user settings. There, you will see the Better Discord section. Next, click on the Plugin option. Now, close the Discord window and drag the animated status dot plugin into the plugin folder that opened after clicking on the Plugin option.
Step 5: Go to Discord again, and you will see the Animated Status option. Enable it and click on the gear icon. To add an animated emoji, click on the + icon. Next, you will see a Nitro ID field. Then, go to a chat page and click on the emoji option.
Step 6: Look at the emoji that you like and memorize the animated emoji name. Press \ followed by the name of the emoji. Now, copy the whole text and paste it again. You will see a few numbers; that’s the Nitro ID for the emoji. Copy the number only, go back to the Animated plugin and paste it on the Nitro ID field. Go back to the Nitro page again, and you will see the animated emoji on your status.
Part 5: Custom Discord Status Emoji Ideas

If you want to make your Discord Status look really cool, you can get some custom Discord status emoji ideas from us. Read this section to find out a few super cool custom Discord status emojis ideas and get inspired.
Use Kaomoji in Status
Kaomoji is a collection of super cute emojis that can brighten anyone’s day! They are great because they make your status look different and cute at the same time. You can choose from stars, smiley faces, cute polar bears, and much more! And yes, they are different than your usual emojis.
Add Old-school Emoticons
Remember the good old Nokia 1100 days when you used to send emojis using some signs? Well, you can try this idea too to give a vintage look to your status. Everybody uses the same smiley emojis, so why not try something different? Go back to your old 90s school days and display images, such as @}->– which is a rose! You can find old-school emoticons online easily.
Conclusion
And that’s it; now you know how to put emoji in Discord status without sweating much. We hope you have found this article helpful, and you will start using cool emojis on your status to make your Discord status look different than others!
02 How to Add Custom Emoji on Discord Status on Mobile?
03 How to Copy and Paste Emojis in Discord Status?
04 How to Add Animated Emojis to Discord Status?
05 Custom Discord Status Emoji Ideas
Part 1: How to Put Custom Emoji in Discord Status on Desktop and Online?
For those who want to add an emoji on their Discord status on desktop and online, you can do that easily by following the steps that we have listed below:
Step 1: First, you need to go to https://discord.com . Once you visit the site, please log in using your Discord credential.
Step 2: Once your profile is open, please click on the profile picture.
Step 3: On your profile, look at the bottom of the menu. You will see a pop-up menu that says set a custom status.
Step 4: On the emojis bar, you can add an emoji. To do that, you need to click on the emoji status. Next, you will see a list of emojis. Please note that only an active Nitro subscription user can use animated or custom emojis. On the left will be the category of emojis. Choose one category that suits your mood; once the category opens, click on an emoji to add it.
Step 5: After that, you need to click on the Today option. This will open a drop-down menu. You need to choose a time frame for the emoji or status. You can choose today, 4 hours, 1 hour, etc.
Step 6: If you are done with the emoji selection and have chosen the duration for the status, you need to click on the Save option. The Save option will be on the bottom right of the same pop-up window.
And that’s it. The emojis will be successfully added to your status based on the duration that you have chosen. If you want to change the emoji or remove it, you need to undergo the same process.
Related: How to Get Free Animated Emojis on Discord
Part 2: How to Add Custom Emoji on Discord Status on Mobile?
If you are using the Discord app on your mobile phone, you can add a custom emoji on Discord status using your phone too. Follow the step-by-step guide that we have prepared to learn how to do that.
Step 1: Take your smartphone and look for the Discord app. The icon will look like a controller. Click on it to launch Discord.
Step 2: Just like the web steps, you will have to click on your profile. Click on the hamburger icon, which is there in the upper left corner. Then, look at the bottom right corner to find your profile.
Step 3: Now, click on the Set Status option. This will be the first option on your profile. Go on and click on that.
Step 4: After that, click on the option that says set a custom status. On the status bar, you will see an emoji. You need to click on that to open the list of emojis to choose from.
Step 5: Choose a time frame for the emoji, for example, 30 minutes, 1-hour, clear tomorrow, etc. If you are using an Android, you will see the floppy disk option; click on that to save your status. If you are using an iOS device, you will see the save option.
By following these steps, your status with the emoji you have chosen will be saved successfully. If you want to add a new emoji, repeat the same process.
Related: How to Change Discord Status
Part 3: How to Copy and Paste Emojis in Discord Status?
If you don’t want to go through the hassle of adding an emoji manually, you can just copy and paste one to your status. How to do it? Follow these steps:
Step 1: Go to a website that has emojis for Discord status.
Step 2: Scroll down the list of emojis and copy it.
Step 3: Go back to your Discord Nitro page and open the status setting. There, on the emoji section, paste the emoji that you have copied from another site.
Please note that this may not be possible for all types of emojis, though. Also, this will work if only the website has created emojis that can be directly copied and pasted on the status section.
Part 4: How to Add Animated Emojis to Discord Status?
Apart from the basic emojis, you can also add animated emojis to your Discord Status to make your status look even better. Here are the steps to follow to add an animated emoji:
Step 1: First, go to a website called https://betterdiscord.app/ . Once you are there, click on the Download option.
Step 2: You will see a page loaded with codes, right-click on the screen and click on the Save option. When it is downloaded, click on the Better Discord Windows installer. Next, read the license agreement and click on the Next option.
Step 3: Then click install better Discord and hit the next button. Choose the Discord version that you currently have installed.
Step 4: Open Discord and click on the user settings. There, you will see the Better Discord section. Next, click on the Plugin option. Now, close the Discord window and drag the animated status dot plugin into the plugin folder that opened after clicking on the Plugin option.
Step 5: Go to Discord again, and you will see the Animated Status option. Enable it and click on the gear icon. To add an animated emoji, click on the + icon. Next, you will see a Nitro ID field. Then, go to a chat page and click on the emoji option.
Step 6: Look at the emoji that you like and memorize the animated emoji name. Press \ followed by the name of the emoji. Now, copy the whole text and paste it again. You will see a few numbers; that’s the Nitro ID for the emoji. Copy the number only, go back to the Animated plugin and paste it on the Nitro ID field. Go back to the Nitro page again, and you will see the animated emoji on your status.
Part 5: Custom Discord Status Emoji Ideas
If you want to make your Discord Status look really cool, you can get some custom Discord status emoji ideas from us. Read this section to find out a few super cool custom Discord status emojis ideas and get inspired.
Use Kaomoji in Status
Kaomoji is a collection of super cute emojis that can brighten anyone’s day! They are great because they make your status look different and cute at the same time. You can choose from stars, smiley faces, cute polar bears, and much more! And yes, they are different than your usual emojis.
Add Old-school Emoticons
Remember the good old Nokia 1100 days when you used to send emojis using some signs? Well, you can try this idea too to give a vintage look to your status. Everybody uses the same smiley emojis, so why not try something different? Go back to your old 90s school days and display images, such as @}->– which is a rose! You can find old-school emoticons online easily.
Conclusion
And that’s it; now you know how to put emoji in Discord status without sweating much. We hope you have found this article helpful, and you will start using cool emojis on your status to make your Discord status look different than others!
Also read:
- [New] In 2024, Accessing and Saving Discord Media Free Methods Revealed
- [New] In 2024, Essential 5 Social Media Logo Animation Hits
- [Updated] How to Download Discord Videos FREE for 2024
- In 2024, Essential Insights Into Using Discord
- The Ultimate Guide to Crafting Your Own Emoji Statuses
- [Updated] In 2024, Achieving Seamless Synchronization on Desktop & Mobile
- Step-by-Step Strategies for Hosting Engaging Discord Channels for 2024
- [Updated] Pioneering Collaboration Sharing Your Screen on Discord for 2024
- [New] In 2024, How to Pin A Message on Discord?
- [New] In 2024, The Ultimate Discord Spoiler Tag Reference
- The Ultimate Guide to Adding Customized Emojis for Your Discord Avatar
- Best 5 Animated Emblems for Modern Social Networks for 2024
- [New] In 2024, The DiscoResponder's Handbook React and Converse
- Optimizing Discord Stream Quality with These Key Steps for 2024
- [Updated] In 2024, How to Create Stunning PFPs That Stand Out in a Crowd
- The Ultimate Guide to Disable Desktop Discords for 2024
- [New] 2024 Approved Simplifying Server Management Bulk Delete Messages with Ease
- [Updated] 2024 Approved Leveraging Discord for Efficient Media Broadcasting Techniques
- [Updated] 2024 Approved Best Video Recording Tools for Discord Streaming
- [Updated] In 2024, How to Send Videos on Discord
- [New] Essential Knowledge on Discord Stickers
- [New] Discord Streaming Essentials A Comprehensive Beginner's Tutorial for 2024
- Vital 5 Creative Social Network Animation Examples for 2024
- [New] Becoming a Master at Creating Flattering Discord PFPs
- [New] Mastering the Art of Profiling A Complete Guide to Pfps in Discord
- [New] Enhancing Discord Communication with TTS
- [New] Mastering Discord Color Coding Techniques for 2024
- The Right Way to Disband From a Discord Community for 2024
- [New] Top 10 Gratis Tools for Capturing Discord Chats
- [Updated] 2024 Approved Step-by-Step to Stunning Discord Profiles
- [Updated] In 2024, Top 10 Love-Focused Discord Communities
- [New] 2024 Approved A Step-by-Step Guide to Designing Memorable Discord Avatars
- [New] In 2024, Innovative Bots to Revolutionize Your Discord Space
- [New] The Best Social Media Symbols Dynamic Designs
- [Updated] 2024 Approved Exclusive Discord Matchmaking Groups
- [New] Selective Top 5 Socially Engaging Media Animations
- [New] In 2024, Navigating and Mastering Discord's Text-to-Speech Tools
- [New] In 2024, VoIP Excellence Showdown Discord vs Skype Analysis
- In 2024, Understanding Discord's Report System Procedures and Tips
- [New] Personalize Your Discord Presence Adding Custom Emojis Easily
- [New] Discord Video Downloading Guide Free iOS, Android, PC, Mac Methods
- Simplifying Server Management Bulk Delete Messages with Ease
- Navigating Discord's User Imagery Like a Pro for 2024
- Join the Discord Emoji Revolution with Free Resources Here for 2024
- In 2024, Affordable Graphic Creation FREE Discord Emblems Online
- [Updated] Speaking in Code Learn Discord's Text-to-Speech
- In 2024, Step-by-Step Guide Sending Videos in Discord
- New Simplify Your Reaction Videos A Step-by-Step Guide with Filmora for 2024
- How to Unlock Nokia C300 Phone Forgot Password
- Crop, Resize, and Reform Mastering Video Shape Editing for 2024
- [New] Windows' Leading Video Chat Pros Top 8 for 2024
- [New] Your Android & iPhone Companion to IGTV Downloads for 2024
- [Updated] Optimal OBS Configurations for Thrifty Computers for 2024
- [New] In 2024, Efficient Content Curation Multiple Photos/Videos to Instagram Storyboard
- New In 2024, Best Music Editing Apps for Mac Devices - Ranked No. 1-4
- In 2024, The Ultimate Guide to Get the Rare Candy on Pokemon Go Fire Red On Nokia C300 | Dr.fone
- 8 Solutions to Fix Find My Friends Location Not Available On Xiaomi Redmi A2 | Dr.fone
- [Updated] In 2024, Unlock Professional Broadcasting on YouTube & Twitch with OBS
- In 2024, iSpoofer is not working On Samsung Galaxy A14 5G? Fixed | Dr.fone
- In 2024, 5 Solutions For Itel S23 Unlock Without Password
- Updated Video Maker with Song
- Separating Audio and Video A Comprehensive Approach for Premiere Pro Editors for 2024
- [New] 2024 Approved 12 Best Free Capture Apps (Ads Off)
- In 2024, Top 15 Apps To Hack WiFi Password On ZTE Blade A73 5G
- In 2024, How to Remove iPhone 12 Activation Lock
- How to Transfer Videos from Vivo V30 Pro to iPad | Dr.fone
- In 2024, Why Your WhatsApp Live Location is Not Updating and How to Fix on your Lava Blaze 2 Pro | Dr.fone
- Possible solutions to restore deleted pictures from 13T.
- Top 10 Fixes for Phone Keep Disconnecting from Wi-Fi On Vivo S17 | Dr.fone
- In 2024, How To Use Allshare Cast To Turn On Screen Mirroring On OnePlus Ace 3 | Dr.fone
- How To Transfer Data From iPhone 13 mini To Other iPhone 12 devices? | Dr.fone
- Updated Mac-Friendly MKV Video Editing Software Top 3 Picks
- In 2024, Top 5 Innovative Mac Capturing Tools, Not Bandicam
- New FCPX on the House Top 10 Free Plugins for Video Editors for 2024
- 10 Free Location Spoofers to Fake GPS Location on your Poco F5 5G | Dr.fone
- How to Add Music to Final Cut Pro?
- Title: [Updated] Perfecting the Art of Transmitting Videos via Discord's Channels for 2024
- Author: Timothy
- Created at : 2024-05-23 22:48:20
- Updated at : 2024-05-24 22:48:20
- Link: https://discord-videos.techidaily.com/updated-perfecting-the-art-of-transmitting-videos-via-discords-channels-for-2024/
- License: This work is licensed under CC BY-NC-SA 4.0.
