
!["[Updated] Removing Redundant Conversations A Comprehensive Guide to Discarding Discord Chats"](https://thmb.techidaily.com/c3d35b16437bab1ad5b7b686beca2df570e5510e7d66b97529a73f9cf277751a.jpg)
"[Updated] Removing Redundant Conversations A Comprehensive Guide to Discarding Discord Chats"
Removing Redundant Conversations: A Comprehensive Guide to Discarding Discord Chats
How To Delete Messages On Discord [2024 Updated]

Richard Bennett
Mar 27, 2024• Proven solutions
Discord allows users to hold onto their message history forever, storing billions of messages in a blog post. And unlike other apps, Discord does not allow users to mass-delete their message history. For some, that can sound like a nightmare because of privacy and security reasons. You will have to wade through every message, deleting each of them, one by one.
However, if you find yourself in that position, fret not because there are several solutions to help you get around this limitation. Unfortunately, none of them are perfect.
Since there is no official method of mass deleting messages, these workarounds are shoddy, but until Discord offers an official solution, we’ll have to do with them.
If you’re looking to mass-delete your messages from a server or channel on Discord, here’s how you will go about it for the desktop and mobile versions:
- Part 1: Understanding Discord Message Types
- Part 2: How to Delete Direct Messages on Discord
- Part 3: Deleting Channel Messages in Discord
- Part 4: Deleting Messages with Discord Clear Chat Bot
- Part 5: Clear All Chats and Delete All Messages In Discord
Part 1: Understanding Discord Message Types
In Discord, you will see two types of messages: Direct Messages and Channel Messages in servers. Here are the differences between the two:
- Direct Messages: These messages are private and held between two users
- Channel Messages: These messages are sent in a channel or a specific group
Both of these message types abide by different rules and functions. In the early days of Discord, users had the luxury of deleting messages in bulk.
However, this was soon changed because the mass execution directly affected the app’s database. Since then, the application has adopted specific rules regarding message deletion.
![]()
A cross-platform for making videos anywhere for all creators

Why your video editing isn’t good enough? How about some creative inspo?
- 100 Million+ Users
- 150+ Countries and Regions
- 4 Million+ Social Media Followers
- 5 Million+ Stock Media for Use
* Secure Download

Part 2: How to Delete Direct Messages on Discord
If you use Discord on your desktop computer, this section will discuss the steps to follow to delete your direct messages.
However, keep in mind that Discord does not allow you to delete direct messages. If you don’t want to show messages from a particular friend, you can remove the chat copy, and it will disappear from the messages temporarily, although it will still be visible in the recipient’s chats. And if the friend contacts you again, the messages will show.

You can delete the local copy of messages by following the steps below:
- Open the Discord program on your computer and go to the chat panel of the person whom you direct messaged;
- Tap on the ‘Message’ option on the left side, and then select the ‘Direct Message’ option on the top left side;
- Select the message that you want to delete and click the 3 dots to click on Delete Message, then the message you sent will be deleted at your end.

The procedure for deleting DMs from your Discord smartphone application applies for both the Android and IOS application, and it is as follows:
- Open the Discord app on your smartphone
- Find the message that you want to delete
- Tap and hold the message. You will be presented with a list
- Tap ‘Delete’ on that list
- Confirm your decision by tapping ‘Delete’ once again
- The message will be deleted
Part 3: How to Delete Channel Messages in Discord?
This method has to be the most effective and easy way to delete a Discord message, and it’s a simple, straightforward procedure:
- Go to the message and glide over it to reveal the three-tier settings icon
- Click on it to show options, and then select Delete Message
To do this individually, you will need to use the mouse consistently, eating up a lot of time. If you wish to do it by keyboard, you can do so, provided you know the sequence for the keyboard commands for deletion.
Here is a more detailed breakdown of the sequence:
- Select the Chat panel that you want to delete
- Hover your cursor over the messages you wish to delete
- A three-dot icon will appear on the right side of the message
- Click on the icon, and a pop-menu will show
- On the pop-up menu, select ‘Delete’
- You will be prompted with a confirmation for deleting the message
- Tick the confirmation and tap the ‘Delete’ button
- Your message will be deleted
At first glance, it seems like a long and tedious process, but once you get down to doing it and develop a rhythm, it is an easy task.
Part 4: Deleting Message with Discord Clear Chat Bot
Please keep in mind that Discord has changed its policy regarding bots, going from discouraging their use to outright flagging them as a violation of its terms.
Using bots can put you at risk of termination from the app, so we would not advise you to adopt this method, and if you do, please tread with caution.
With that said, many users report that using self-bots does not significantly lead to any disciplinary action from Discord, given that the reason for use is not harmful or disruptive.
Discord requires that all bots are tracked through its ‘Develop Portal.’ Self-bots run on a Discord API token and can circumvent this rule, allowing them access to API requests hence automating many tasks, such as deleting messages.
The Discord API supports a POST request, letting bots swiftly discard messages less than fourteen days old. Messages that are older than this timeframe can be queued and discarded one-by-one.
One particular bot that is of interest to us is the MEE6. It is used to control moderation, set-up leveling, manage music, and much more, including mass-deleting messages on Discord.
We’ve outlined a few commands you can use to delete your chats. These are as follows:
- Go to the official MEE6 website and click on the button that says Add to Discord
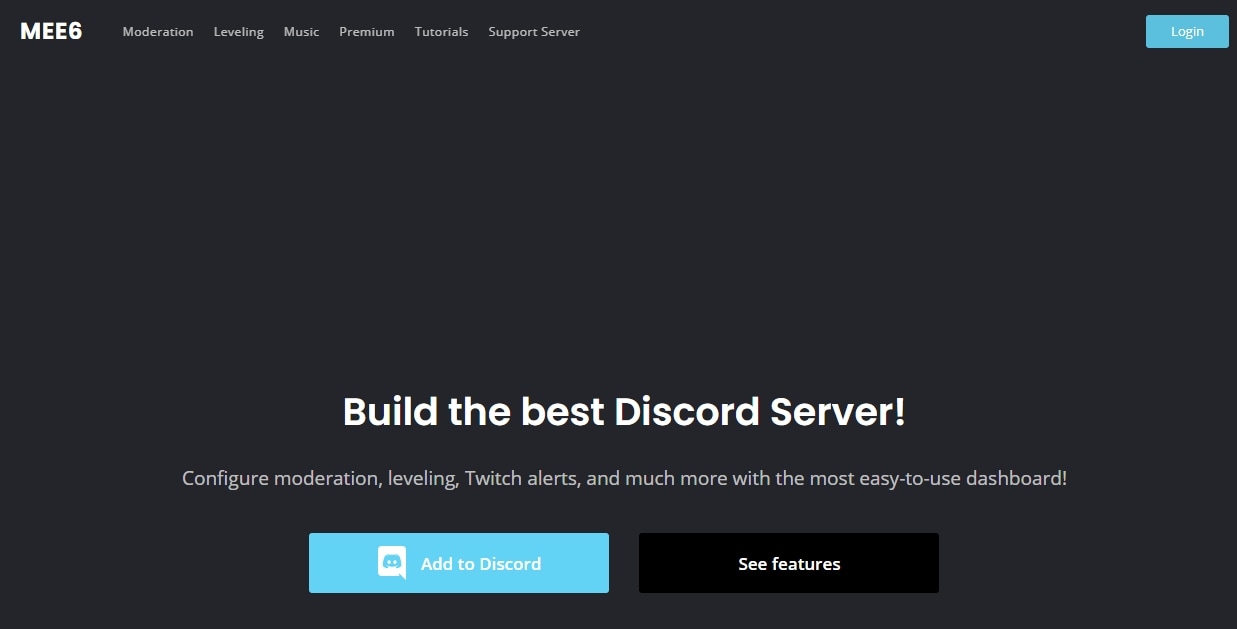
- You’ll be prompted to authorize so that MEE6 bot can access your username, and know what server you’re in.
- Pin-point the server you want to add the bot and then set up to connect MEE6 to the Discord server.

- Click Authorize again and the bot will be added to your Discord server soon;
- To enable MEE6 to clear the chat, you should enable the Moderator plugin first. Click the Moderator option under Plugins first, and then click Yes.

- Now go to the server in your Discord and type in “!clear @username” to remove every message sent by the user you’ve mentioned.

To clear the last 100 messages on your server, type in “!clear 100”. You can replace 100 with any number of your choice. However, MEE6 can’t delete messages past 2 weeks.
Part 5: How to Clear All Chats and Delete All Messages In Discord?
In the section above, we talked about deleting messages without using the mouse. That leads us to the possibility of utilizing the ‘AutoHotkey’ script to automate the process.
Most developers have come up with codes that can delete Discord messages from your account on a mass scale. We’ll be expanding on one of the most popular instances of this: the AutoHotkey script.
Before you get started with this, you will need an ‘AutoHotkey installer.’ Continue the process by:
- Download and install the ‘AutoHotkey installer’ ;
- Head onto your desktop, right-click and click ‘New’ on the drop-down menu;
- Choose the ‘AutoHotkey script’ and right-click on this file and edit with ‘Notepad’
- Delete everything in the script and paste the following code
t::
Loop, 100000
{
send, {Up}
send, ^a
send, {BS}
send, {Enter}
send, {Enter}
sleep, 100
}
Return
- Save the file as any name that you wish to
- Once you’ve done that, launch Discord and double-click on the script file
- Open the chat data that you wish to delete and press T
- The script will now delete all the messages
To stop the script, click on the H icon located on the right side of your taskbar and select Pause Script.
This is the process by which you can use an ‘Autohotkey script’ to delete messages in bulk. Please note that this option is only available to Windows users as AutoHotkey does not currently work on macOS.
Ideally, you’ll want the following things from your AutoHotkey script:
- A toggle key for turning it on and off
- The complete keyboard sequence with stops between each step
Disclaimer: you can delete a message you sent, but there’s no saying if the other person took a screenshot before you got around to deleting it. Things on the internet tend to stick around. So, as a safe bet, it’s a good idea to take some time to consider what you wrote before pressing send to avoid any regrets.
You May Also Interested In
- Best Discord Font Generators [Online/iPhone/Android]
- Best Discord Emoji Makers
- 10+ Best Free Discord Voice Changers
FAQs About Deleting Discord Messages
1. Can I Recover A Deleted Message on Discord?
Unfortunately, once a message is deleted, there is no way for Discord users to reaccess it.
2. Can I View Deleted Messages?
Unfortunately, there is no way to see deleted messages. Channel and server admins can see if a message was deleted, but they cannot see the deleted message’s contents.
3. How Can I Delete Other People’s Messages?
If you are an admin or an owner of a server, you can delete other people’s messages by following one of the methods mentioned above.
Richard Bennett
Richard Bennett is a writer and a lover of all things video.
Follow @Richard Bennett
Richard Bennett
Mar 27, 2024• Proven solutions
Discord allows users to hold onto their message history forever, storing billions of messages in a blog post. And unlike other apps, Discord does not allow users to mass-delete their message history. For some, that can sound like a nightmare because of privacy and security reasons. You will have to wade through every message, deleting each of them, one by one.
However, if you find yourself in that position, fret not because there are several solutions to help you get around this limitation. Unfortunately, none of them are perfect.
Since there is no official method of mass deleting messages, these workarounds are shoddy, but until Discord offers an official solution, we’ll have to do with them.
If you’re looking to mass-delete your messages from a server or channel on Discord, here’s how you will go about it for the desktop and mobile versions:
- Part 1: Understanding Discord Message Types
- Part 2: How to Delete Direct Messages on Discord
- Part 3: Deleting Channel Messages in Discord
- Part 4: Deleting Messages with Discord Clear Chat Bot
- Part 5: Clear All Chats and Delete All Messages In Discord
Part 1: Understanding Discord Message Types
In Discord, you will see two types of messages: Direct Messages and Channel Messages in servers. Here are the differences between the two:
- Direct Messages: These messages are private and held between two users
- Channel Messages: These messages are sent in a channel or a specific group
Both of these message types abide by different rules and functions. In the early days of Discord, users had the luxury of deleting messages in bulk.
However, this was soon changed because the mass execution directly affected the app’s database. Since then, the application has adopted specific rules regarding message deletion.
![]()
A cross-platform for making videos anywhere for all creators
Why your video editing isn’t good enough? How about some creative inspo?
- 100 Million+ Users
- 150+ Countries and Regions
- 4 Million+ Social Media Followers
- 5 Million+ Stock Media for Use
* Secure Download
Part 2: How to Delete Direct Messages on Discord
If you use Discord on your desktop computer, this section will discuss the steps to follow to delete your direct messages.
However, keep in mind that Discord does not allow you to delete direct messages. If you don’t want to show messages from a particular friend, you can remove the chat copy, and it will disappear from the messages temporarily, although it will still be visible in the recipient’s chats. And if the friend contacts you again, the messages will show.
You can delete the local copy of messages by following the steps below:
- Open the Discord program on your computer and go to the chat panel of the person whom you direct messaged;
- Tap on the ‘Message’ option on the left side, and then select the ‘Direct Message’ option on the top left side;
- Select the message that you want to delete and click the 3 dots to click on Delete Message, then the message you sent will be deleted at your end.
The procedure for deleting DMs from your Discord smartphone application applies for both the Android and IOS application, and it is as follows:
- Open the Discord app on your smartphone
- Find the message that you want to delete
- Tap and hold the message. You will be presented with a list
- Tap ‘Delete’ on that list
- Confirm your decision by tapping ‘Delete’ once again
- The message will be deleted
Part 3: How to Delete Channel Messages in Discord?
This method has to be the most effective and easy way to delete a Discord message, and it’s a simple, straightforward procedure:
- Go to the message and glide over it to reveal the three-tier settings icon
- Click on it to show options, and then select Delete Message
To do this individually, you will need to use the mouse consistently, eating up a lot of time. If you wish to do it by keyboard, you can do so, provided you know the sequence for the keyboard commands for deletion.
Here is a more detailed breakdown of the sequence:
- Select the Chat panel that you want to delete
- Hover your cursor over the messages you wish to delete
- A three-dot icon will appear on the right side of the message
- Click on the icon, and a pop-menu will show
- On the pop-up menu, select ‘Delete’
- You will be prompted with a confirmation for deleting the message
- Tick the confirmation and tap the ‘Delete’ button
- Your message will be deleted
At first glance, it seems like a long and tedious process, but once you get down to doing it and develop a rhythm, it is an easy task.
Part 4: Deleting Message with Discord Clear Chat Bot
Please keep in mind that Discord has changed its policy regarding bots, going from discouraging their use to outright flagging them as a violation of its terms.
Using bots can put you at risk of termination from the app, so we would not advise you to adopt this method, and if you do, please tread with caution.
With that said, many users report that using self-bots does not significantly lead to any disciplinary action from Discord, given that the reason for use is not harmful or disruptive.
Discord requires that all bots are tracked through its ‘Develop Portal.’ Self-bots run on a Discord API token and can circumvent this rule, allowing them access to API requests hence automating many tasks, such as deleting messages.
The Discord API supports a POST request, letting bots swiftly discard messages less than fourteen days old. Messages that are older than this timeframe can be queued and discarded one-by-one.
One particular bot that is of interest to us is the MEE6. It is used to control moderation, set-up leveling, manage music, and much more, including mass-deleting messages on Discord.
We’ve outlined a few commands you can use to delete your chats. These are as follows:
- Go to the official MEE6 website and click on the button that says Add to Discord
- You’ll be prompted to authorize so that MEE6 bot can access your username, and know what server you’re in.
- Pin-point the server you want to add the bot and then set up to connect MEE6 to the Discord server.
- Click Authorize again and the bot will be added to your Discord server soon;
- To enable MEE6 to clear the chat, you should enable the Moderator plugin first. Click the Moderator option under Plugins first, and then click Yes.
- Now go to the server in your Discord and type in “!clear @username” to remove every message sent by the user you’ve mentioned.
To clear the last 100 messages on your server, type in “!clear 100”. You can replace 100 with any number of your choice. However, MEE6 can’t delete messages past 2 weeks.
Part 5: How to Clear All Chats and Delete All Messages In Discord?
In the section above, we talked about deleting messages without using the mouse. That leads us to the possibility of utilizing the ‘AutoHotkey’ script to automate the process.
Most developers have come up with codes that can delete Discord messages from your account on a mass scale. We’ll be expanding on one of the most popular instances of this: the AutoHotkey script.
Before you get started with this, you will need an ‘AutoHotkey installer.’ Continue the process by:
- Download and install the ‘AutoHotkey installer’ ;
- Head onto your desktop, right-click and click ‘New’ on the drop-down menu;
- Choose the ‘AutoHotkey script’ and right-click on this file and edit with ‘Notepad’
- Delete everything in the script and paste the following code
t::
Loop, 100000
{
send, {Up}
send, ^a
send, {BS}
send, {Enter}
send, {Enter}
sleep, 100
}
Return
- Save the file as any name that you wish to
- Once you’ve done that, launch Discord and double-click on the script file
- Open the chat data that you wish to delete and press T
- The script will now delete all the messages
To stop the script, click on the H icon located on the right side of your taskbar and select Pause Script.
This is the process by which you can use an ‘Autohotkey script’ to delete messages in bulk. Please note that this option is only available to Windows users as AutoHotkey does not currently work on macOS.
Ideally, you’ll want the following things from your AutoHotkey script:
- A toggle key for turning it on and off
- The complete keyboard sequence with stops between each step
Disclaimer: you can delete a message you sent, but there’s no saying if the other person took a screenshot before you got around to deleting it. Things on the internet tend to stick around. So, as a safe bet, it’s a good idea to take some time to consider what you wrote before pressing send to avoid any regrets.
You May Also Interested In
- Best Discord Font Generators [Online/iPhone/Android]
- Best Discord Emoji Makers
- 10+ Best Free Discord Voice Changers
FAQs About Deleting Discord Messages
1. Can I Recover A Deleted Message on Discord?
Unfortunately, once a message is deleted, there is no way for Discord users to reaccess it.
2. Can I View Deleted Messages?
Unfortunately, there is no way to see deleted messages. Channel and server admins can see if a message was deleted, but they cannot see the deleted message’s contents.
3. How Can I Delete Other People’s Messages?
If you are an admin or an owner of a server, you can delete other people’s messages by following one of the methods mentioned above.
Richard Bennett
Richard Bennett is a writer and a lover of all things video.
Follow @Richard Bennett
Tips for Integrating Emojis Into Discord User Statuses
If you have an active Nitro subscription and want to make your Discord status look better, you can put emojis in Discord status. This article will help you walk through the process of using Discord custom status to upload emojis. Custom status is a new feature introduced by Discord. By uploading the emojis, you can keep your Discord status fresh! So, keep reading to find how to put emojis in Discord status through your desktop and mobile app conveniently.
In this article
01 How to Put Custom Emoji in Discord Status on Desktop and Online?
02 How to Add Custom Emoji on Discord Status on Mobile?
03 How to Copy and Paste Emojis in Discord Status?
04 How to Add Animated Emojis to Discord Status?
05 Custom Discord Status Emoji Ideas
Part 1: How to Put Custom Emoji in Discord Status on Desktop and Online?

For those who want to add an emoji on their Discord status on desktop and online, you can do that easily by following the steps that we have listed below:
Step 1: First, you need to go to https://discord.com . Once you visit the site, please log in using your Discord credential.
Step 2: Once your profile is open, please click on the profile picture.
Step 3: On your profile, look at the bottom of the menu. You will see a pop-up menu that says set a custom status.
Step 4: On the emojis bar, you can add an emoji. To do that, you need to click on the emoji status. Next, you will see a list of emojis. Please note that only an active Nitro subscription user can use animated or custom emojis. On the left will be the category of emojis. Choose one category that suits your mood; once the category opens, click on an emoji to add it.
Step 5: After that, you need to click on the Today option. This will open a drop-down menu. You need to choose a time frame for the emoji or status. You can choose today, 4 hours, 1 hour, etc.
Step 6: If you are done with the emoji selection and have chosen the duration for the status, you need to click on the Save option. The Save option will be on the bottom right of the same pop-up window.
And that’s it. The emojis will be successfully added to your status based on the duration that you have chosen. If you want to change the emoji or remove it, you need to undergo the same process.
Related: How to Get Free Animated Emojis on Discord
Part 2: How to Add Custom Emoji on Discord Status on Mobile?

If you are using the Discord app on your mobile phone, you can add a custom emoji on Discord status using your phone too. Follow the step-by-step guide that we have prepared to learn how to do that.
Step 1: Take your smartphone and look for the Discord app. The icon will look like a controller. Click on it to launch Discord.
Step 2: Just like the web steps, you will have to click on your profile. Click on the hamburger icon, which is there in the upper left corner. Then, look at the bottom right corner to find your profile.
Step 3: Now, click on the Set Status option. This will be the first option on your profile. Go on and click on that.
Step 4: After that, click on the option that says set a custom status. On the status bar, you will see an emoji. You need to click on that to open the list of emojis to choose from.
Step 5: Choose a time frame for the emoji, for example, 30 minutes, 1-hour, clear tomorrow, etc. If you are using an Android, you will see the floppy disk option; click on that to save your status. If you are using an iOS device, you will see the save option.
By following these steps, your status with the emoji you have chosen will be saved successfully. If you want to add a new emoji, repeat the same process.
Related: How to Change Discord Status
Part 3: How to Copy and Paste Emojis in Discord Status?
If you don’t want to go through the hassle of adding an emoji manually, you can just copy and paste one to your status. How to do it? Follow these steps:
Step 1: Go to a website that has emojis for Discord status.
Step 2: Scroll down the list of emojis and copy it.
Step 3: Go back to your Discord Nitro page and open the status setting. There, on the emoji section, paste the emoji that you have copied from another site.
Please note that this may not be possible for all types of emojis, though. Also, this will work if only the website has created emojis that can be directly copied and pasted on the status section.
Part 4: How to Add Animated Emojis to Discord Status?
Apart from the basic emojis, you can also add animated emojis to your Discord Status to make your status look even better. Here are the steps to follow to add an animated emoji:
Step 1: First, go to a website called https://betterdiscord.app/ . Once you are there, click on the Download option.
Step 2: You will see a page loaded with codes, right-click on the screen and click on the Save option. When it is downloaded, click on the Better Discord Windows installer. Next, read the license agreement and click on the Next option.
Step 3: Then click install better Discord and hit the next button. Choose the Discord version that you currently have installed.
Step 4: Open Discord and click on the user settings. There, you will see the Better Discord section. Next, click on the Plugin option. Now, close the Discord window and drag the animated status dot plugin into the plugin folder that opened after clicking on the Plugin option.
Step 5: Go to Discord again, and you will see the Animated Status option. Enable it and click on the gear icon. To add an animated emoji, click on the + icon. Next, you will see a Nitro ID field. Then, go to a chat page and click on the emoji option.
Step 6: Look at the emoji that you like and memorize the animated emoji name. Press \ followed by the name of the emoji. Now, copy the whole text and paste it again. You will see a few numbers; that’s the Nitro ID for the emoji. Copy the number only, go back to the Animated plugin and paste it on the Nitro ID field. Go back to the Nitro page again, and you will see the animated emoji on your status.
Part 5: Custom Discord Status Emoji Ideas

If you want to make your Discord Status look really cool, you can get some custom Discord status emoji ideas from us. Read this section to find out a few super cool custom Discord status emojis ideas and get inspired.
Use Kaomoji in Status
Kaomoji is a collection of super cute emojis that can brighten anyone’s day! They are great because they make your status look different and cute at the same time. You can choose from stars, smiley faces, cute polar bears, and much more! And yes, they are different than your usual emojis.
Add Old-school Emoticons
Remember the good old Nokia 1100 days when you used to send emojis using some signs? Well, you can try this idea too to give a vintage look to your status. Everybody uses the same smiley emojis, so why not try something different? Go back to your old 90s school days and display images, such as @}->– which is a rose! You can find old-school emoticons online easily.
Conclusion
And that’s it; now you know how to put emoji in Discord status without sweating much. We hope you have found this article helpful, and you will start using cool emojis on your status to make your Discord status look different than others!
02 How to Add Custom Emoji on Discord Status on Mobile?
03 How to Copy and Paste Emojis in Discord Status?
04 How to Add Animated Emojis to Discord Status?
05 Custom Discord Status Emoji Ideas
Part 1: How to Put Custom Emoji in Discord Status on Desktop and Online?
For those who want to add an emoji on their Discord status on desktop and online, you can do that easily by following the steps that we have listed below:
Step 1: First, you need to go to https://discord.com . Once you visit the site, please log in using your Discord credential.
Step 2: Once your profile is open, please click on the profile picture.
Step 3: On your profile, look at the bottom of the menu. You will see a pop-up menu that says set a custom status.
Step 4: On the emojis bar, you can add an emoji. To do that, you need to click on the emoji status. Next, you will see a list of emojis. Please note that only an active Nitro subscription user can use animated or custom emojis. On the left will be the category of emojis. Choose one category that suits your mood; once the category opens, click on an emoji to add it.
Step 5: After that, you need to click on the Today option. This will open a drop-down menu. You need to choose a time frame for the emoji or status. You can choose today, 4 hours, 1 hour, etc.
Step 6: If you are done with the emoji selection and have chosen the duration for the status, you need to click on the Save option. The Save option will be on the bottom right of the same pop-up window.
And that’s it. The emojis will be successfully added to your status based on the duration that you have chosen. If you want to change the emoji or remove it, you need to undergo the same process.
Related: How to Get Free Animated Emojis on Discord
Part 2: How to Add Custom Emoji on Discord Status on Mobile?
If you are using the Discord app on your mobile phone, you can add a custom emoji on Discord status using your phone too. Follow the step-by-step guide that we have prepared to learn how to do that.
Step 1: Take your smartphone and look for the Discord app. The icon will look like a controller. Click on it to launch Discord.
Step 2: Just like the web steps, you will have to click on your profile. Click on the hamburger icon, which is there in the upper left corner. Then, look at the bottom right corner to find your profile.
Step 3: Now, click on the Set Status option. This will be the first option on your profile. Go on and click on that.
Step 4: After that, click on the option that says set a custom status. On the status bar, you will see an emoji. You need to click on that to open the list of emojis to choose from.
Step 5: Choose a time frame for the emoji, for example, 30 minutes, 1-hour, clear tomorrow, etc. If you are using an Android, you will see the floppy disk option; click on that to save your status. If you are using an iOS device, you will see the save option.
By following these steps, your status with the emoji you have chosen will be saved successfully. If you want to add a new emoji, repeat the same process.
Related: How to Change Discord Status
Part 3: How to Copy and Paste Emojis in Discord Status?
If you don’t want to go through the hassle of adding an emoji manually, you can just copy and paste one to your status. How to do it? Follow these steps:
Step 1: Go to a website that has emojis for Discord status.
Step 2: Scroll down the list of emojis and copy it.
Step 3: Go back to your Discord Nitro page and open the status setting. There, on the emoji section, paste the emoji that you have copied from another site.
Please note that this may not be possible for all types of emojis, though. Also, this will work if only the website has created emojis that can be directly copied and pasted on the status section.
Part 4: How to Add Animated Emojis to Discord Status?
Apart from the basic emojis, you can also add animated emojis to your Discord Status to make your status look even better. Here are the steps to follow to add an animated emoji:
Step 1: First, go to a website called https://betterdiscord.app/ . Once you are there, click on the Download option.
Step 2: You will see a page loaded with codes, right-click on the screen and click on the Save option. When it is downloaded, click on the Better Discord Windows installer. Next, read the license agreement and click on the Next option.
Step 3: Then click install better Discord and hit the next button. Choose the Discord version that you currently have installed.
Step 4: Open Discord and click on the user settings. There, you will see the Better Discord section. Next, click on the Plugin option. Now, close the Discord window and drag the animated status dot plugin into the plugin folder that opened after clicking on the Plugin option.
Step 5: Go to Discord again, and you will see the Animated Status option. Enable it and click on the gear icon. To add an animated emoji, click on the + icon. Next, you will see a Nitro ID field. Then, go to a chat page and click on the emoji option.
Step 6: Look at the emoji that you like and memorize the animated emoji name. Press \ followed by the name of the emoji. Now, copy the whole text and paste it again. You will see a few numbers; that’s the Nitro ID for the emoji. Copy the number only, go back to the Animated plugin and paste it on the Nitro ID field. Go back to the Nitro page again, and you will see the animated emoji on your status.
Part 5: Custom Discord Status Emoji Ideas
If you want to make your Discord Status look really cool, you can get some custom Discord status emoji ideas from us. Read this section to find out a few super cool custom Discord status emojis ideas and get inspired.
Use Kaomoji in Status
Kaomoji is a collection of super cute emojis that can brighten anyone’s day! They are great because they make your status look different and cute at the same time. You can choose from stars, smiley faces, cute polar bears, and much more! And yes, they are different than your usual emojis.
Add Old-school Emoticons
Remember the good old Nokia 1100 days when you used to send emojis using some signs? Well, you can try this idea too to give a vintage look to your status. Everybody uses the same smiley emojis, so why not try something different? Go back to your old 90s school days and display images, such as @}->– which is a rose! You can find old-school emoticons online easily.
Conclusion
And that’s it; now you know how to put emoji in Discord status without sweating much. We hope you have found this article helpful, and you will start using cool emojis on your status to make your Discord status look different than others!
Also read:
- In 2024, How to Make a Discord Video Call | Desktop & Mobile
- [New] 2024 Approved Mastering the Art of Mass Message Removal on Discord Servers
- Mastering Cross-Platform Play Spotify/Discord Tutorial for 2024
- [New] In 2024, Get Insightful What Is Discord Nitro? Benefits & Purchase Paths
- [Updated] Skype or Discord Finding Your Ideal Chat App
- 2024 Approved Decoding the Art of Identifying Off-the-Beaten-Path Discord Servers
- [Updated] Text-To-Speech Excellence on Discord - Your Ultimate Manual for 2024
- [New] In 2024, Key Strategies for Efficient Screenshare Experience with Discord
- Streamlining Your Discord Experience Bulk Deletion Made Simple for 2024
- In 2024, Animation Anthems of Social Sites
- 2024 Approved Top Servers for Romance Discord Edition
- [New] 2024 Approved Find the Best Value 10 Free Tools to Record Your Discord Voice Chats
- [Updated] Analyzing Networking Services Discord Meets Skype
- In 2024, Your Complete Discord Companion Manual
- [Updated] From Joining to Being Known Securing Your Role on Discord for 2024
- [New] Cut Off Discord Services (Desktop/Phone) for 2024
- [Updated] Top Non-Discord Streaming Networks
- [Updated] In Search for Auditory Perfection? Try These Top-Rated Discord Bots for 2024
- In 2024, Revolutionize Discord Top Bots to Boost Interaction
- [Updated] In 2024, Navigating Fee-Free Discord Videos Download Handheld & Workstation Guide
- [Updated] Dating Servers for Romance on Discord
- [Updated] 2024 Approved Navigating the Nuances of Network-Based Video Sharing on Discord
- In 2024, Mastering the Art Discord Stickers Unraveayered
- The Ultimate Guide to Disable Desktop Discords
- [Updated] Sending Streamed Content to Discord with Finesse and Precision
- In 2024, Choosing the Best Online Messaging Discord vs Skype Battle
- In 2024, From Novice to Nexus Steps for Earning Your Verified Status on Discord
- [Updated] DiscoStreaming 101 Desktop + Mobile Tips
- Understanding & Implementing Discord Text Styles for 2024
- [New] Mastering the Art of Memorable Channel Titles on Discord
- 2024 Approved Leading Online Screenshot Services Discord Focus
- [New] Top 10 Vibes A DiscoTheme Adventure for 2024
- [New] Get Ultimate, Premium-Quality Discord Icons at NO Charge for 2024
- Top Custom Font Services for Discord on iOS/Android Devices
- [Updated] In 2024, Decoding Discord's Textual Customization Options
- 2024 Approved Uncovering All About Discord Stickers
- Unraveling Discord's Features for Aspiring Broadc Writers (Streaming)
- Dissecting Discord's Visual Language Innovators and Their Works for 2024
- [New] In 2024, Simplified Discord Integration for PC & Phones
- [Updated] Premiere Online Screen Recording Apps Discord Edition for 2024
- In 2024, The Ultimate Tutorial for Removing Multiple Messages on Discord
- [New] In 2024, Incorporating Leadership in Your Discord Network
- [New] 2024 Approved Platform Comparison Discord Versus Skype for Professionals
- [New] A Comprehensive Tutorial on Adding Dynamic Graphics (GIFs) to Discord Chats
- [Updated] In 2024, Top-Ranked Discord Recorder Tools (Desktop, Mobile)
- In 2024, How to Unlock Apple iPhone 14 Pro without Passcode or Face ID | Dr.fone
- Top 10 Best Spy Watches For your Vivo Y27 4G | Dr.fone
- How To Revive Your Bricked Nokia C22 in Minutes | Dr.fone
- In 2024, 4 Effective Methods Fake GPS Location on Apple iPhone XS Max/iPad | Dr.fone
- [Updated] 2024 Approved Unlocking Video Treasures Securely Capturing IGTV Videos on Windows & MacOS
- [New] Unmissable Upgrades Top 8 Tech & Tools Reshaping Modern Enterprises
- Possible solutions to restore deleted videos from Infinix GT 10 Pro
- [Updated] 2024 Approved Giggle Grind Exploring Twitters' Comedy Gold
- 2024 Approved Review of VN Video Editor APK Features and Performance
- How does the stardust trade cost In pokemon go On Poco M6 Pro 5G? | Dr.fone
- New Best Websites to Erase TikTok Watermarks From Videos for 2024
- In 2024, The Ultimate Guide to Motion Tracking on Android and iPhone
- Innovative MC Shelter Design Tips for 2024
- Updated 2024 Approved Highest-Rated Audio-to-Text Conversion Software
- The Complete Guide to Tecno Spark 10 Pro FRP Bypass Everything You Need to Know
- How to Recover Deleted Videos from iPhone SE Without Backup? | Stellar
- Easy Way to Inset Text in Video for 2024
- [New] Harnessing the Power of Video The Most Effective FB Ad Practices
- Updated Free and Fantastic Top 10 WebM Video Editors
- Tips and Tricks for Setting Up your Poco F5 Pro 5G Phone Pattern Lock
- In 2024, Ultimate Guide on Samsung Galaxy A05 FRP Bypass
- [Updated] Navigating Zoom Chats A Guide to Effective Online Interactions for 2024
- Updated 2024 Approved Unleash Your Inner Toon Top Cartoonization Apps for Mobile
- 4 Ways to Add White Borders on Mobile and Desktop
- Updated Which 10 Best Video Editing Online Makers Is Worth Your Attention, In 2024
- [New] Pioneering Video Player Apps for TikTok & Vimeo
- Updated How to Color-Correct an S-Log Footage
- New 2024 Approved Best MP4 Editor for Mavericks Unlock Professional Editing Features
- In 2024, Change Location on Yik Yak For your Xiaomi Redmi Note 12 Pro 5G to Enjoy More Fun | Dr.fone
- How to Fix Android.Process.Media Has Stopped on Honor 90 Pro | Dr.fone
- In 2024, Full Guide to Catch 100 IV Pokémon Using a Map On Vivo Y55s 5G (2023) | Dr.fone
- [New] Mastering Xbox Ultimate Screen Capture Tips for 2024
- [New] In 2024, Social Laughter Downloaded IPhone/Android Tutorial for GIFS
- [Updated] In 2024, Expert's Guide to Effective Webinars
- 2024 Approved Adobe Premiere Pro Power-Ups The Best Plugins Free & Paid
- [New] In 2024, How To Check What You've Liked on Facebook Lately
- [Updated] In 2024, Best Free PC Video Capture Software Roundup
- Title: "[Updated] Removing Redundant Conversations A Comprehensive Guide to Discarding Discord Chats"
- Author: Timothy
- Created at : 2024-06-28 03:27:36
- Updated at : 2024-06-29 03:27:36
- Link: https://discord-videos.techidaily.com/updated-removing-redundant-conversations-a-comprehensive-guide-to-discarding-discord-chats/
- License: This work is licensed under CC BY-NC-SA 4.0.
