![[Updated] Stepwise Methodology for Launching a Discord Channel](https://www.lifewire.com/thmb/TIhbojtPiLWxPexEUegjc5UUv38=/400x300/filters:no_upscale():max_bytes(150000):strip_icc()/how-to-send-a-spotify-playlist-5201669-dc4feee2c4884280949cdb9c39614796.jpg)
[Updated] Stepwise Methodology for Launching a Discord Channel
Stepwise Methodology for Launching a Discord Channel
Discord is a great communication tool that also offers live streaming services. You can use this platform to engage and connect to your audience by conducting a live session. Through its “Voice Chat” feature, you can directly interact with your audience in a comfortable environment. If you are unaware of how to go live on Discord, this article can help you.
For your assistance, this article will instantly address how to live stream on Discord. Let’s dig into the details.
- How to Stream Videos on Discord
- How to Stream your Webcam on Discord
- How to Change the Shared Screen on Discord
- How to Stream Discord on my Mobile Phone?
- FAQs about the live stream on Discord
- Bonus Tip: Easily Record and Edit your Stream with Filmora
Part 1: What is Discord?
Discord is a popular platform created to offer a better communication experience between game players. The major reason for the massive recognition of Discord is its ability to generate servers instantly. Game players and other users can instantly create voice or text servers for enhanced communication.
Discord provides excellent flexibility to users by providing high-quality audio services with no background noise. Even if your friends are in different parts of the world, you can chat with them smoothly. You can create private and public servers in Discord to communicate with people having similar interests.
Along with using Discord Voice and Text chat features, you can live stream your gameplays. The live streaming on Discord won’t be a public show, as it will only be confined to your selected server. Through this, you can ask your friends for assistance while playing games. Moreover, Discord is also capable of capturing other screens. Hence, it’s a great platform for professionals, game lovers, and other individuals to communicate efficiently.
Part 2: Prerequisites for Stream on Discord
Many social media platforms put restrictions on users for live streaming. Some platforms require you to have a specific number of followers in order to conduct live streaming. However, in Discord, you don’t have to worry about such restrictions. By creating a server and channel on Discord, you can easily go for live streaming. Check the below prerequisites for performing a live stream on Discord:
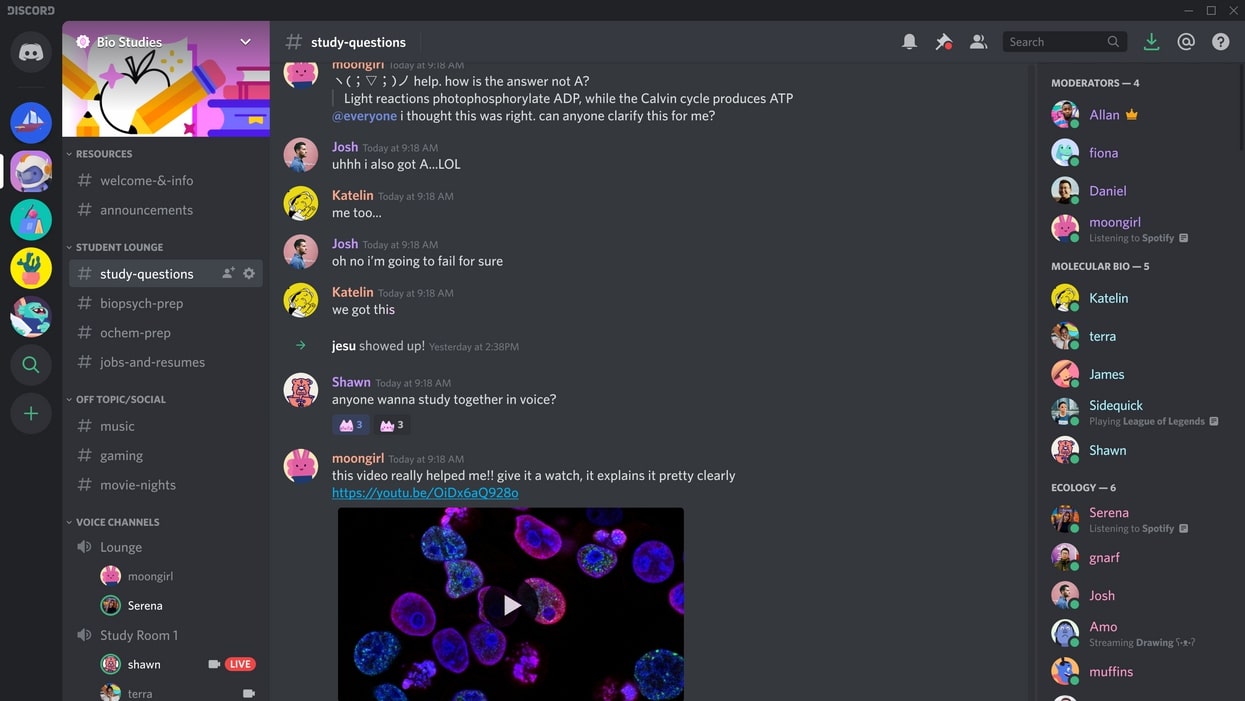
1. Create your Discord Server
Step1 Open your Discord and hit the “Plus” icon given on the left side. It will open a small menu where you can select a template to start or create your own server.
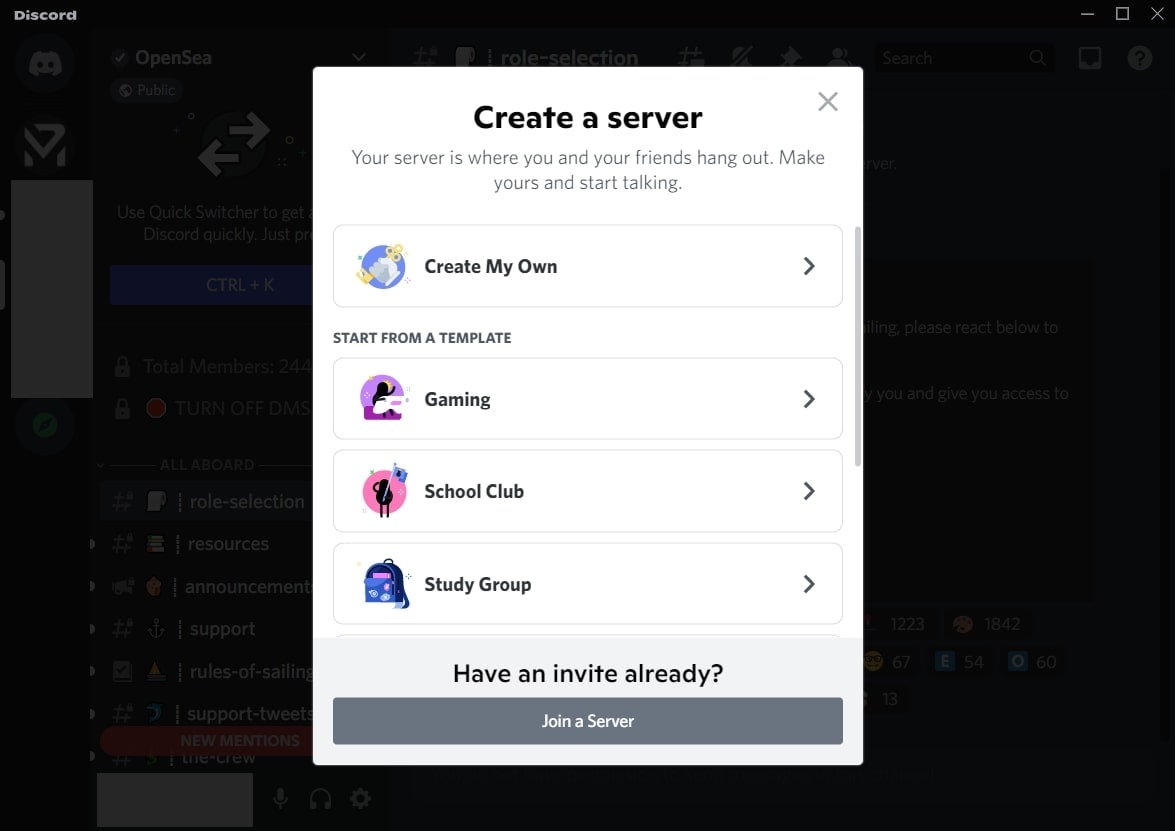
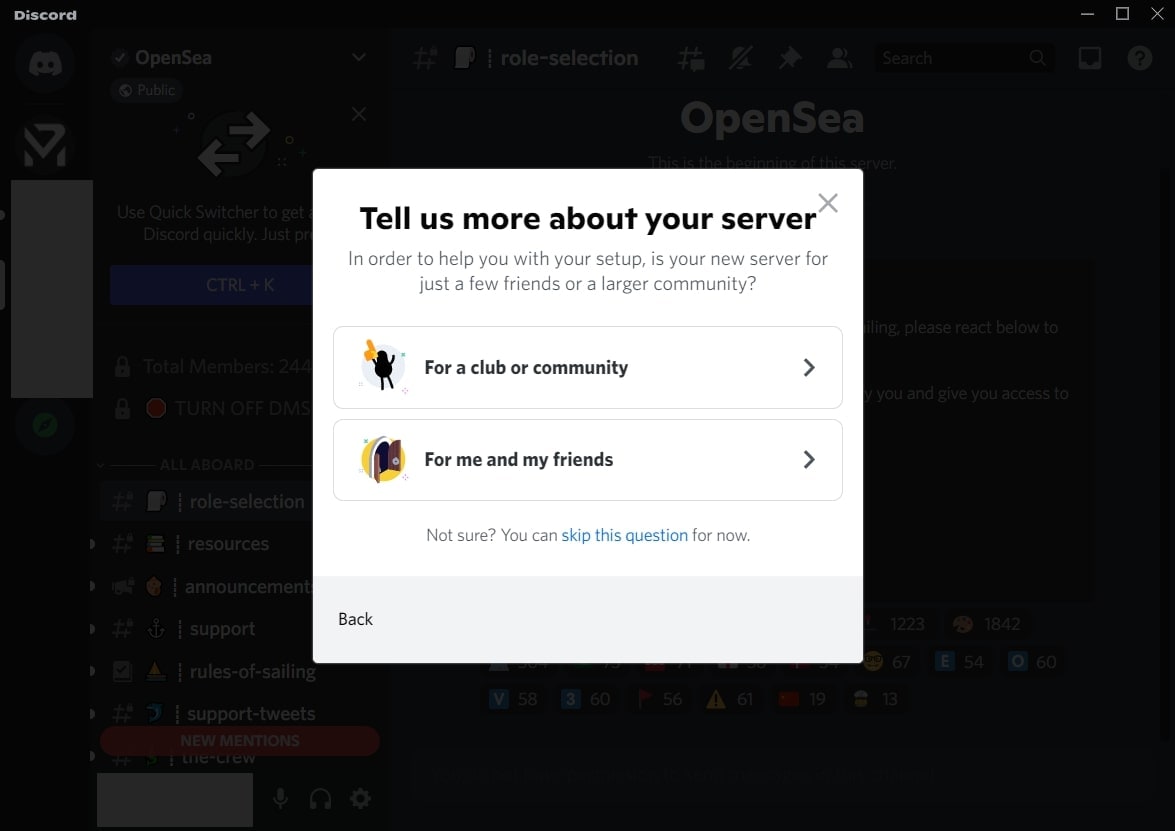
Step2 If you want to create your server, click “Create My Own.” Now select the type of server you want to create. Once done, create the server name and click the “Create” button.
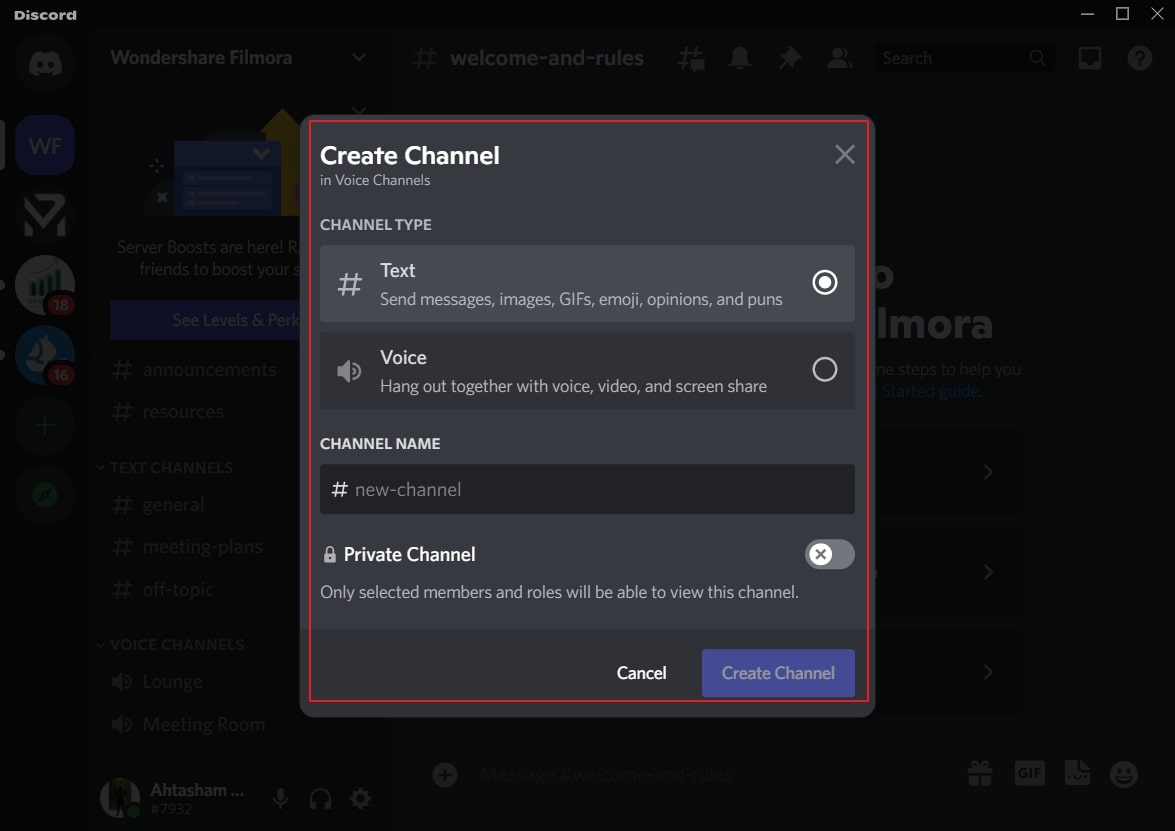
2. Create your Discord Channel
Step1 To create a Discord channel, open any of your servers from the left side. Now tap on the “Plus” icon adjacent to “Voice Channels.”
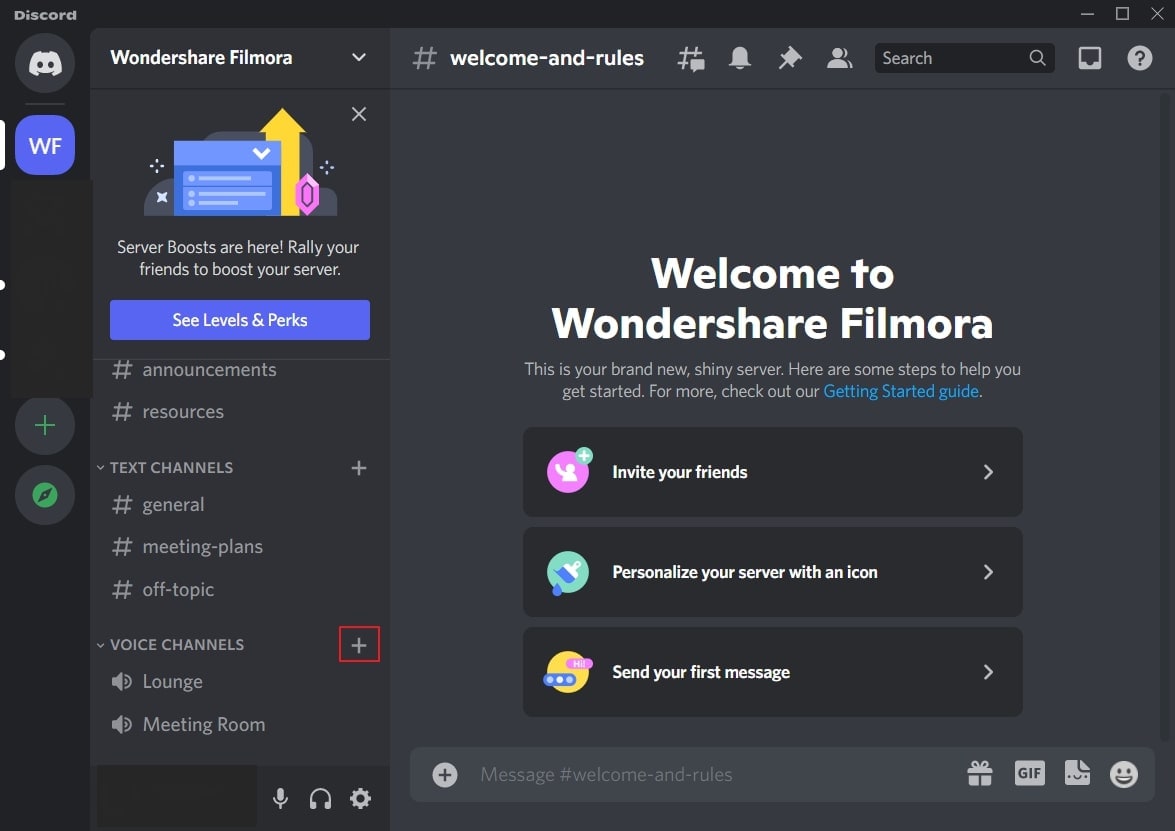
Step2 You can either create a “Text” channel or a “Voice” channel. After choosing the channel type, create a channel name. You can also enable the “Private Channel” option to create a private channel. Once done, click on the “Create Channel” button.

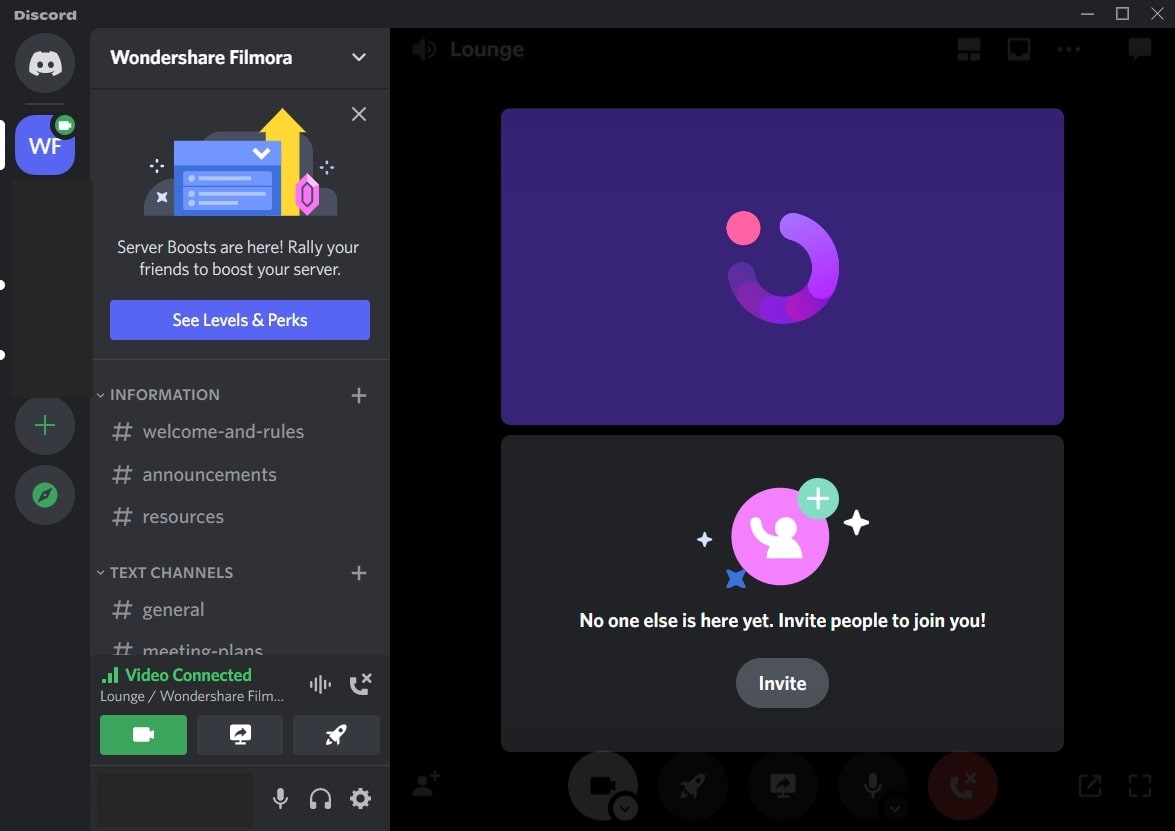
Part 3: How to Stream Videos on Discord
Once you have created a server and channel, you can begin your live streaming. Discord provides you with an option through which you can stream your videos instantly. To know the process, check the below steps:
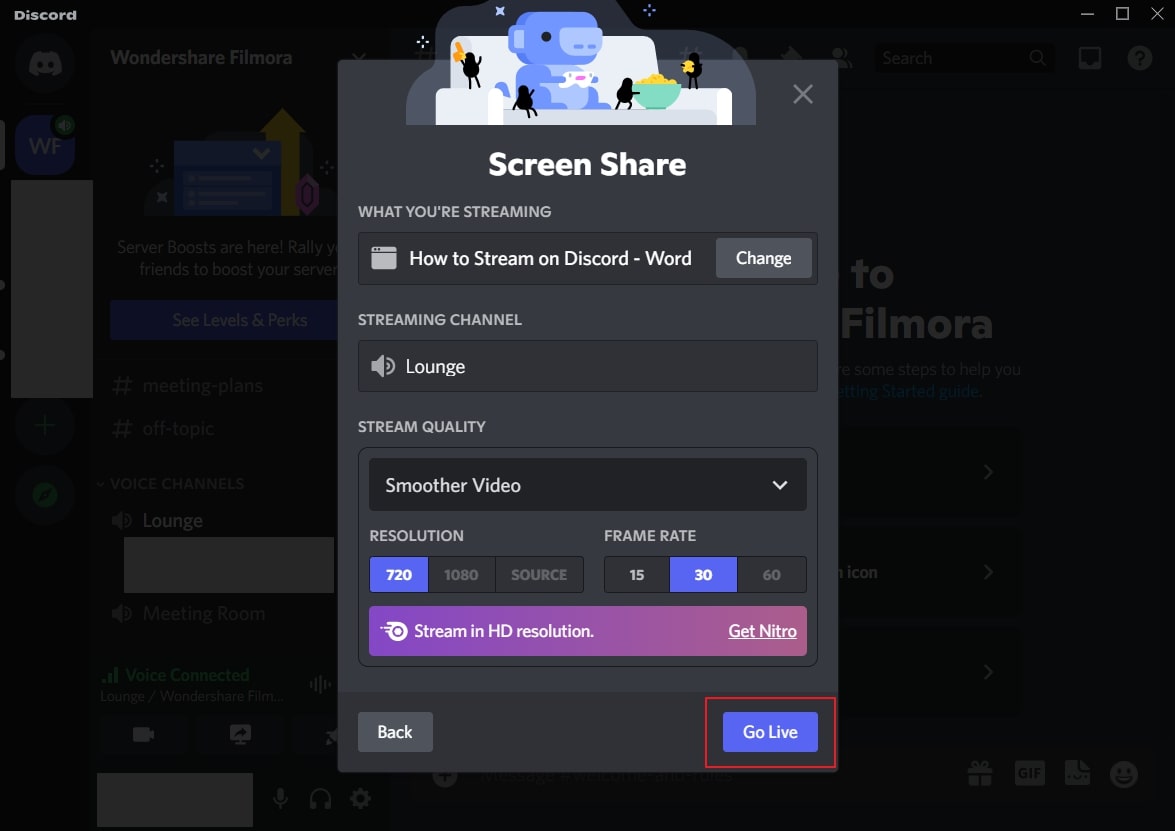
Step1 Open Discord and navigate to your desired server. Now proceed to your voice channel and click on the “Share Your Screen” button given below.
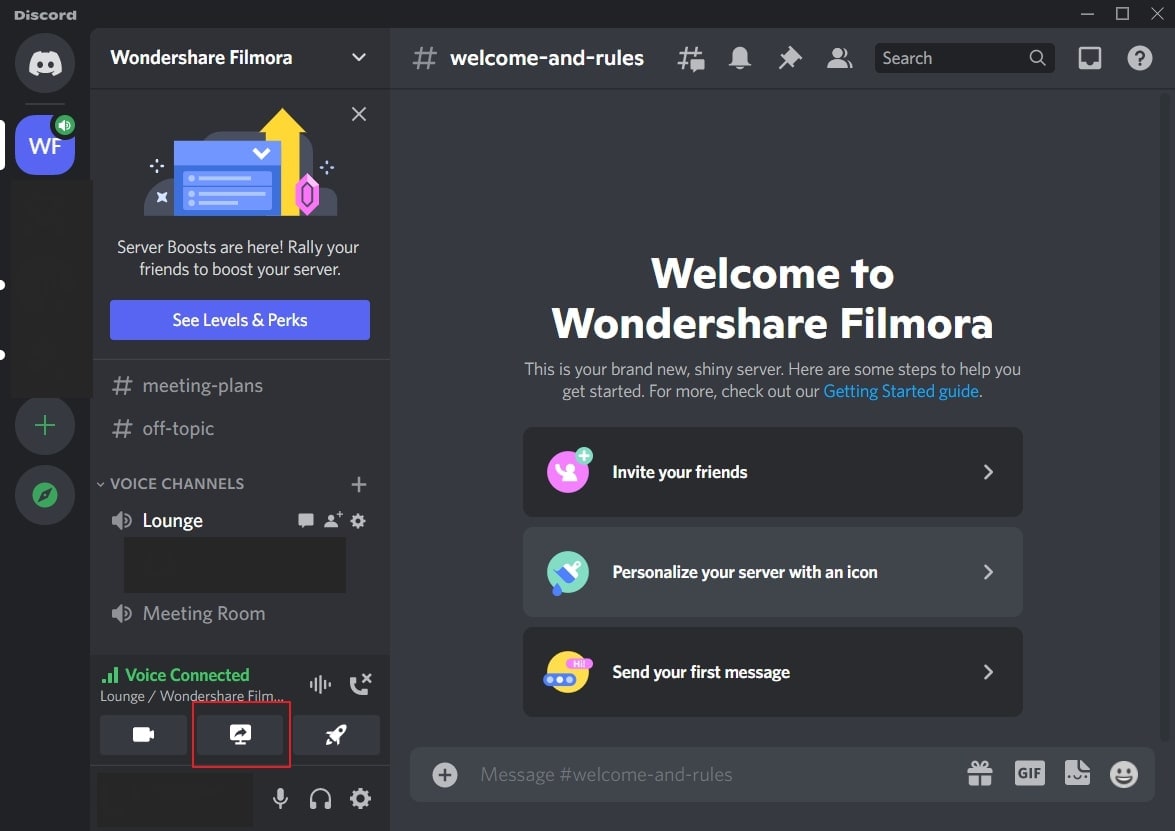
Step2 Select the screen you want to stream in the “Applications” tab. From the new menu, you can adjust the stream quality, such as resolution and frame rate. After adjusting the live streaming settings, click on the “Go Live” button.
Part 4: How to Stream your Webcam on Discord
Do you want to give a tutorial session through your webcam? Through live webcam streaming, you can demonstrate a particular product while giving facial expressions. Using Discord, you can stream your webcam with a single click.
Step1 Once you have opened a server on Discord, go to your Voice channel. From there, tap on the “Camera” icon above your username.
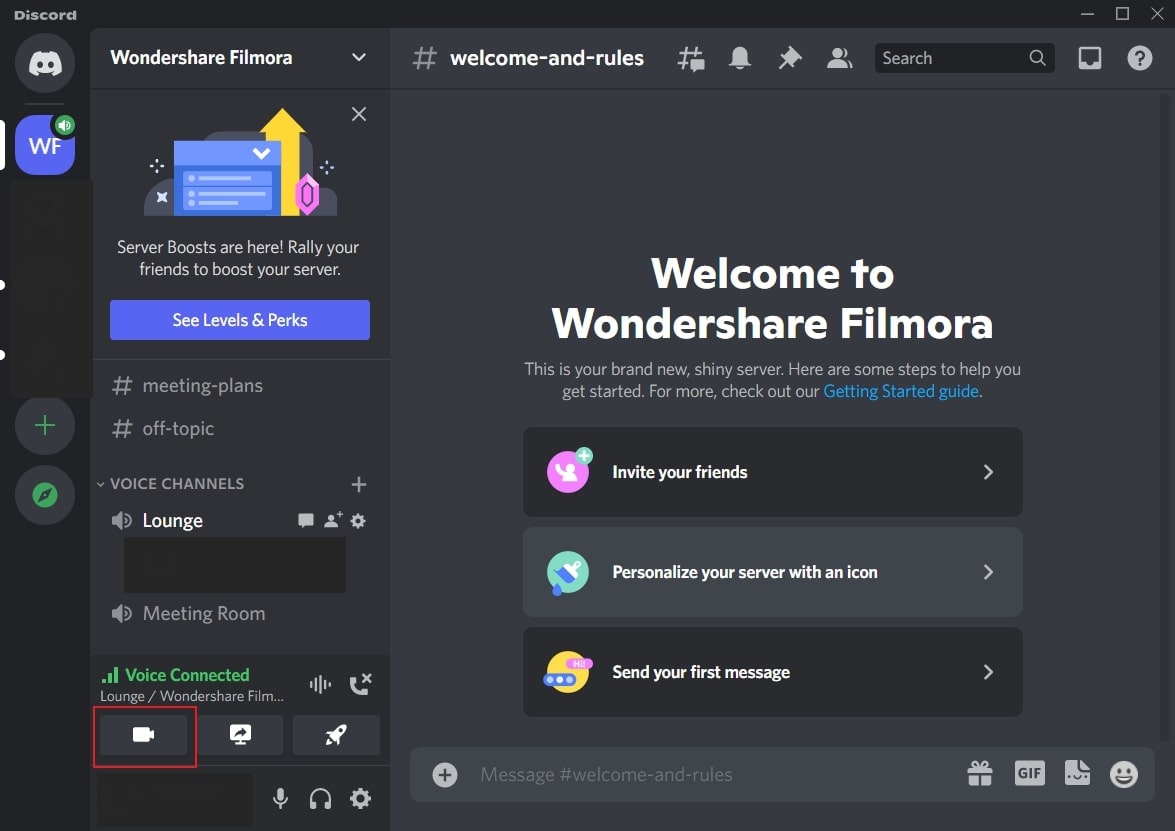
Step2 It will open a new screen through which you can start an activity or share your screen. Moreover, you can also invite others to join your webcam streaming. Once done with your activities, click on the “Red” button to disconnect.
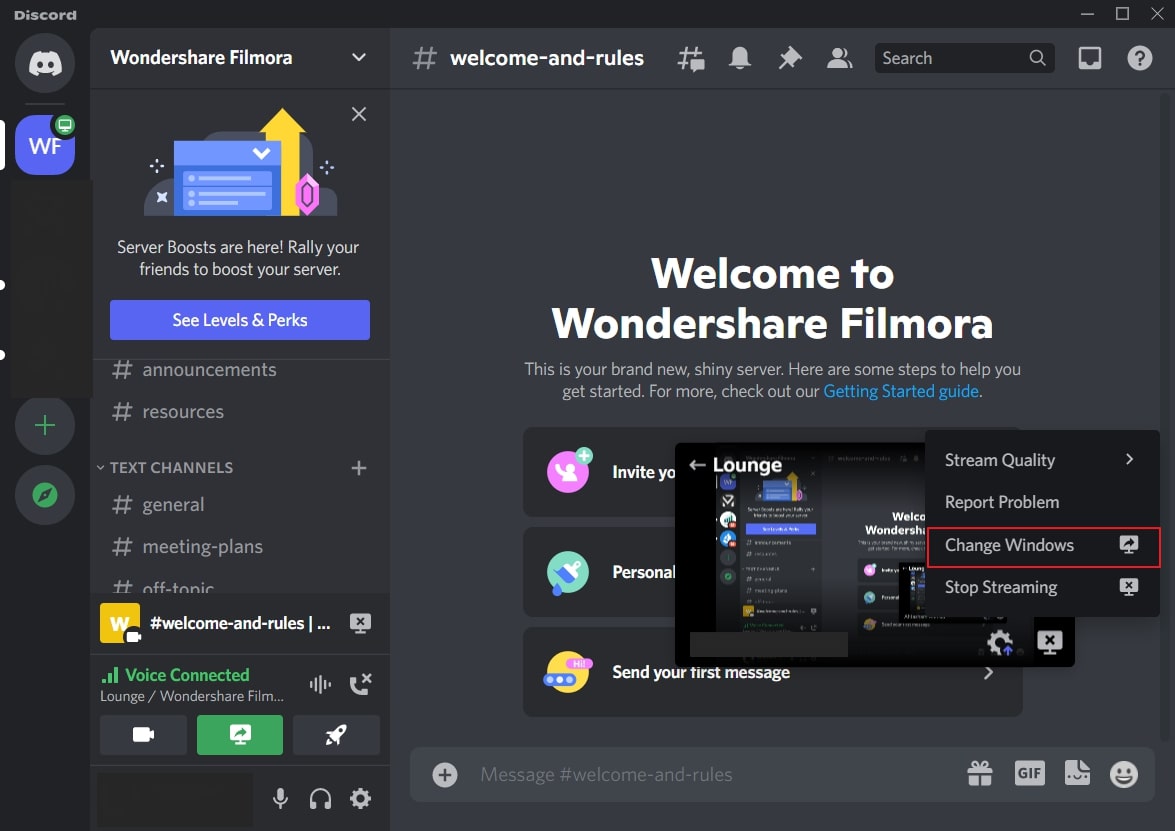
Part 5: How to Change the Shared Screen on Discord
Do you want to change a shared screen on Discord? If you want to open a presentation, web browser, or any other application, Discord can easily change the shared screen. Through this facility, you can quickly shift between multiple screens without hassle.
Step1 If you are live streaming your shared screen, you can instantly change windows on Discord. For this, click on the “Gear” icon on your live streaming screen to open settings.

Step2 From the settings menu, click on “Change Windows.” Now select the screen that you want to change. After choosing the required screen, hit on the “Go Live” button.
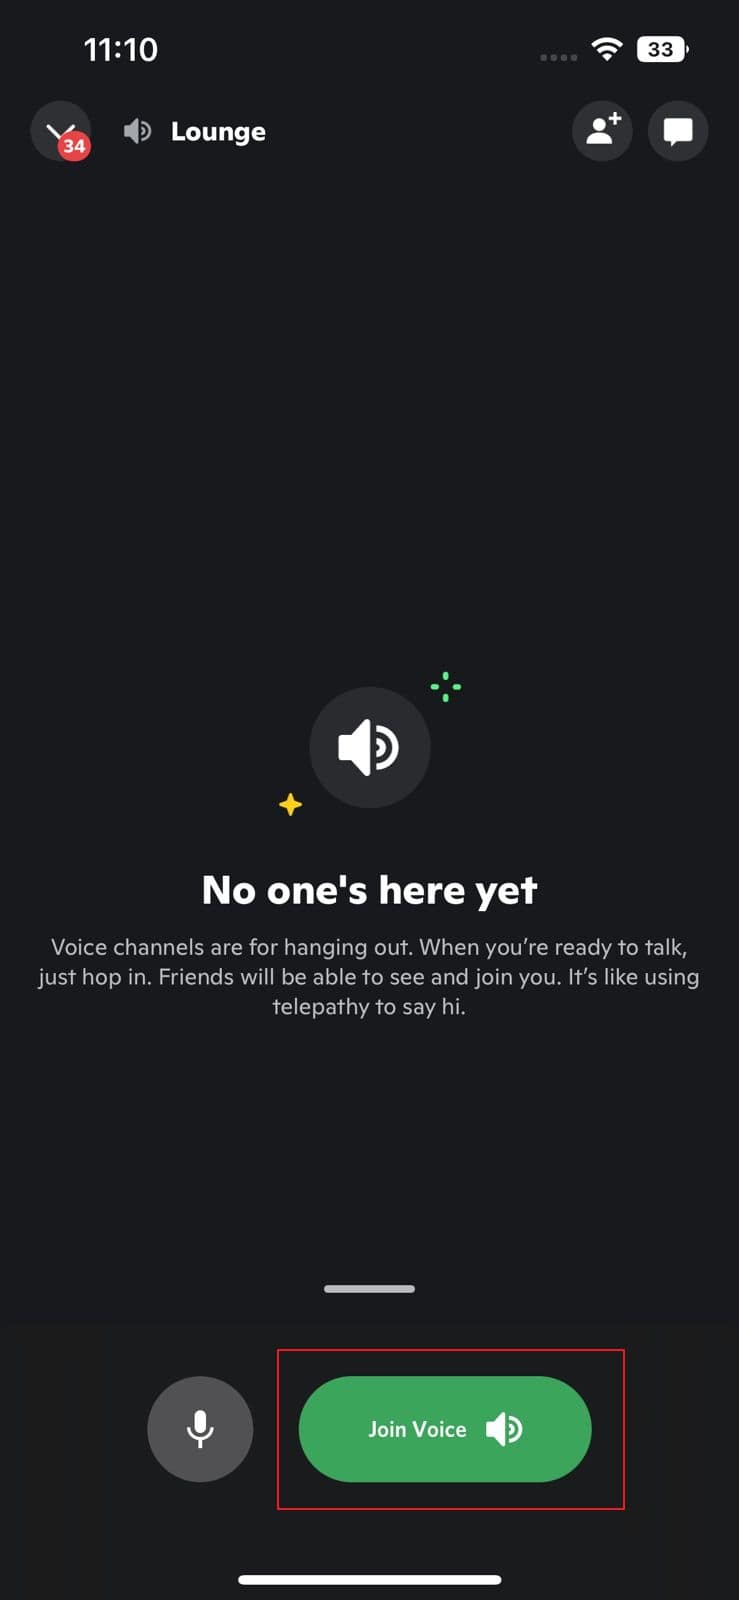
Part 6: How to Stream Discord on my Mobile Phone?
Discord has the same operating systems on Android and iOS devices. That’s why the steps to stream on Discord on both these devices are the same.
Step1 Open Discord on your mobile and select the desired server. Now choose the voice channel through which you want to live stream Discord.

Step2 Now tap “Join Voice” to initiate live streaming. Here, you can turn on your camera and share the screen. You can also mute your voice from the given options. Once done with live streaming, tap on the “Red” button.
Part 7: FAQs about the live stream on Discord
1. How many people can watch my Discord live simultaneously?
During the pandemic, up to 50 people were able to join live streaming on Discord. Normally, 25 people can watch live streaming on Discord simultaneously.
2. How to add the game types on Discord?
Open Discord and navigate to the “User Settings” given at the bottom of the screen. Select the “Game Activity” section and activate the option “Display currently running game as a status message.” Now click on the “Add it” button and choose the type of games you want to play. Once done, Discord would be able to detect the type of game automatically.
3. How to share a video on Discord?
On your computer, launch Discord and go to your desired channel. On the chat box space, click on the “Plus” icon. Now browse the video from your system that you want to share. Click on the “Open” button and select the “Upload” option. By doing so, you can easily share videos.
For mobile users, go to your Discord app and choose the preferred channel. On the left side of the typing area, you can see the “Image” icon. Tap on this option and choose the video you want to share from your phone. Now hit the “Arrow” button to send the selected video.
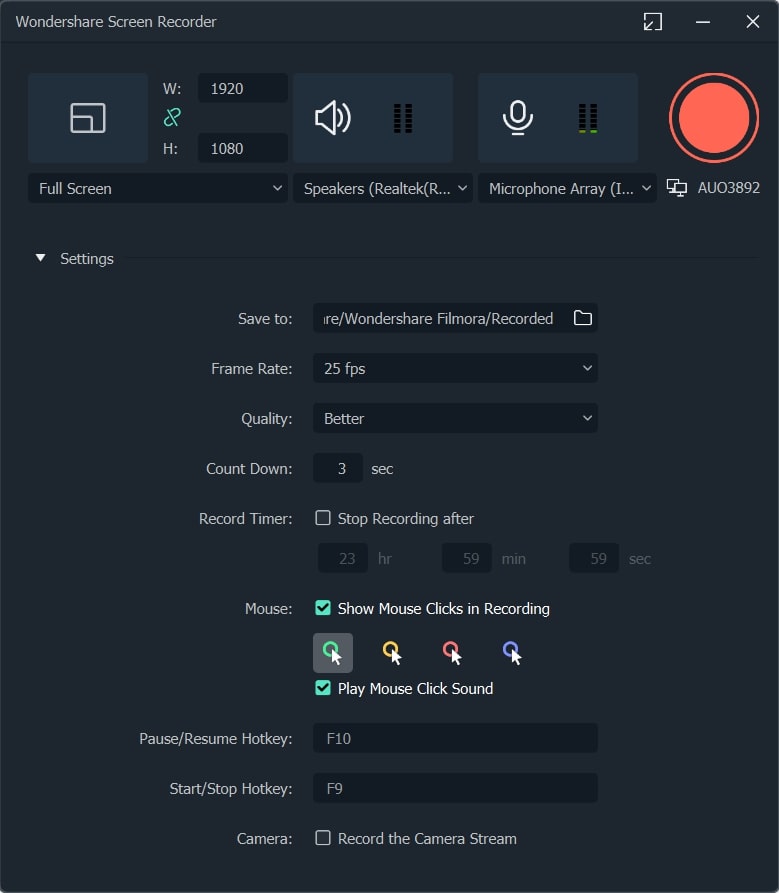
Bonus Tip: Easily Record and Edit your Stream with Filmora
To save and edit your live stream sessions, we will highly recommend you the screen recorder of Wondershare Filmora . Through this screen recorder, you can capture your live-streaming session on Discord in the best possible quality.
Using this screen recorder, you can capture your desired area during live streaming. Once you capture your live-streaming session, you can edit it on this platform. Using the editing tool of Filmora, you can cut, crop, resize, and modify your screen recording efficiently.
Conclusion
Have you ever streamed on Discord before? Discord is a great communication platform that provides advanced features. With its vast flexibility, you can create private servers and channels. This article can guide you to learn how to go live on Discord. We have also suggested Wondershare Filmora, which can help you to screen record and edit your live streaming sessions on Discord.
Free Download For Win 7 or later(64-bit)
Free Download For macOS 10.14 or later
Part 1: What is Discord?
Discord is a popular platform created to offer a better communication experience between game players. The major reason for the massive recognition of Discord is its ability to generate servers instantly. Game players and other users can instantly create voice or text servers for enhanced communication.
Discord provides excellent flexibility to users by providing high-quality audio services with no background noise. Even if your friends are in different parts of the world, you can chat with them smoothly. You can create private and public servers in Discord to communicate with people having similar interests.
Along with using Discord Voice and Text chat features, you can live stream your gameplays. The live streaming on Discord won’t be a public show, as it will only be confined to your selected server. Through this, you can ask your friends for assistance while playing games. Moreover, Discord is also capable of capturing other screens. Hence, it’s a great platform for professionals, game lovers, and other individuals to communicate efficiently.
Part 2: Prerequisites for Stream on Discord
Many social media platforms put restrictions on users for live streaming. Some platforms require you to have a specific number of followers in order to conduct live streaming. However, in Discord, you don’t have to worry about such restrictions. By creating a server and channel on Discord, you can easily go for live streaming. Check the below prerequisites for performing a live stream on Discord:
1. Create your Discord Server
Step1 Open your Discord and hit the “Plus” icon given on the left side. It will open a small menu where you can select a template to start or create your own server.
Step2 If you want to create your server, click “Create My Own.” Now select the type of server you want to create. Once done, create the server name and click the “Create” button.
2. Create your Discord Channel
Step1 To create a Discord channel, open any of your servers from the left side. Now tap on the “Plus” icon adjacent to “Voice Channels.”
Step2 You can either create a “Text” channel or a “Voice” channel. After choosing the channel type, create a channel name. You can also enable the “Private Channel” option to create a private channel. Once done, click on the “Create Channel” button.
Part 3: How to Stream Videos on Discord
Once you have created a server and channel, you can begin your live streaming. Discord provides you with an option through which you can stream your videos instantly. To know the process, check the below steps:
Step1 Open Discord and navigate to your desired server. Now proceed to your voice channel and click on the “Share Your Screen” button given below.
Step2 Select the screen you want to stream in the “Applications” tab. From the new menu, you can adjust the stream quality, such as resolution and frame rate. After adjusting the live streaming settings, click on the “Go Live” button.
Part 4: How to Stream your Webcam on Discord
Do you want to give a tutorial session through your webcam? Through live webcam streaming, you can demonstrate a particular product while giving facial expressions. Using Discord, you can stream your webcam with a single click.
Step1 Once you have opened a server on Discord, go to your Voice channel. From there, tap on the “Camera” icon above your username.
Step2 It will open a new screen through which you can start an activity or share your screen. Moreover, you can also invite others to join your webcam streaming. Once done with your activities, click on the “Red” button to disconnect.
Part 5: How to Change the Shared Screen on Discord
Do you want to change a shared screen on Discord? If you want to open a presentation, web browser, or any other application, Discord can easily change the shared screen. Through this facility, you can quickly shift between multiple screens without hassle.
Step1 If you are live streaming your shared screen, you can instantly change windows on Discord. For this, click on the “Gear” icon on your live streaming screen to open settings.
Step2 From the settings menu, click on “Change Windows.” Now select the screen that you want to change. After choosing the required screen, hit on the “Go Live” button.
Part 6: How to Stream Discord on my Mobile Phone?
Discord has the same operating systems on Android and iOS devices. That’s why the steps to stream on Discord on both these devices are the same.
Step1 Open Discord on your mobile and select the desired server. Now choose the voice channel through which you want to live stream Discord.
Step2 Now tap “Join Voice” to initiate live streaming. Here, you can turn on your camera and share the screen. You can also mute your voice from the given options. Once done with live streaming, tap on the “Red” button.
Part 7: FAQs about the live stream on Discord
1. How many people can watch my Discord live simultaneously?
During the pandemic, up to 50 people were able to join live streaming on Discord. Normally, 25 people can watch live streaming on Discord simultaneously.
2. How to add the game types on Discord?
Open Discord and navigate to the “User Settings” given at the bottom of the screen. Select the “Game Activity” section and activate the option “Display currently running game as a status message.” Now click on the “Add it” button and choose the type of games you want to play. Once done, Discord would be able to detect the type of game automatically.
3. How to share a video on Discord?
On your computer, launch Discord and go to your desired channel. On the chat box space, click on the “Plus” icon. Now browse the video from your system that you want to share. Click on the “Open” button and select the “Upload” option. By doing so, you can easily share videos.
For mobile users, go to your Discord app and choose the preferred channel. On the left side of the typing area, you can see the “Image” icon. Tap on this option and choose the video you want to share from your phone. Now hit the “Arrow” button to send the selected video.
Bonus Tip: Easily Record and Edit your Stream with Filmora
To save and edit your live stream sessions, we will highly recommend you the screen recorder of Wondershare Filmora . Through this screen recorder, you can capture your live-streaming session on Discord in the best possible quality.
Using this screen recorder, you can capture your desired area during live streaming. Once you capture your live-streaming session, you can edit it on this platform. Using the editing tool of Filmora, you can cut, crop, resize, and modify your screen recording efficiently.
Conclusion
Have you ever streamed on Discord before? Discord is a great communication platform that provides advanced features. With its vast flexibility, you can create private servers and channels. This article can guide you to learn how to go live on Discord. We have also suggested Wondershare Filmora, which can help you to screen record and edit your live streaming sessions on Discord.
Free Download For Win 7 or later(64-bit)
Free Download For macOS 10.14 or later
How to Remove a Desktop Discord Server
How to Delete Discord Server?

Richard Bennett
Mar 27, 2024• Proven solutions
Discord servers are made and designed to help gamers – and now work colleagues – communicate and coordinate via private rooms.
As a communication app, it offers permanent servers for people who are working on the same project, playing the same game, or even if they’re part of the same family!
However, you may have to someday delete a server you own.
Today we will discuss how to delete Discord server or deleting the Discord server of someone who has passed away:
Part 1: How to Delete Discord Server Permanently on A Desktop?
If you’re familiar with Discord, you will know that there will come a time that you no longer need a server: it may be because you’ve resigned from your workplace or stopped playing a game.
If you are looking into how to delete your Discord server, you came to the right place. Even though Discord makes communication easier, you may need a break from around-the-clock connectivity for various reasons.
Discord works on desktop platforms and smartphones, with a blend of a VoIP chat system, a chat lobby, and a message board in a single app. Therefore, you can attempt to delete a server off on any device that you may have Discord downloaded and active on.
Most server owners choose to delete their Discord server when too many extra, strange, or ill-meaning visitors are visiting.
Servers are more like chat rooms inside the application. Deleting them is a relatively simple process – as you will learn from our how to delete server on Discord tips – however, their retrieval is impossible.
Once the server has been removed, you can not “undo the process” or recreate it. Therefore, be absolutely sure and proceed with caution.
It is also advised to skim through any essential files that you might have on the server. Back them up before letting it go forever.
And lastly, ensure that this is what you intend on doing because deleting a Discord server is permanent. Here are the simple steps to follow on how to delete a server on Discord:
- Open the Discord desktop app and click on the server you want to delete
- Once you select the server, there will be an options list under the server’s name
- Click the “server setting” button from the menu (This will be the second option on the list)

- At the end of the sidebar, you will find the option “delete the server on the left side.” Click it

Image: The image shows the screen that pops up after clicking “Server settings,” here, the delete button can be seen in red.
- After clicking, a pop-up window will appear, asking for confirmation
- Confirm by entering the server’s name and authentication code; this is only required when two-factor authentication is enabled
- Click on “delete server” to confirm
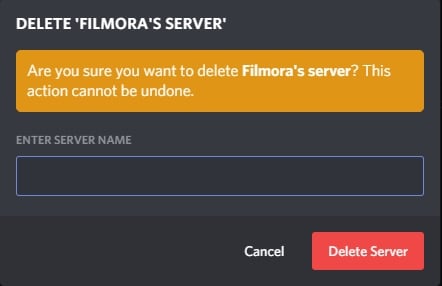
Image: As mentioned, you must be sure you want to permanently lose a server and all of its content before deleting it; this prompt serves the same purpose
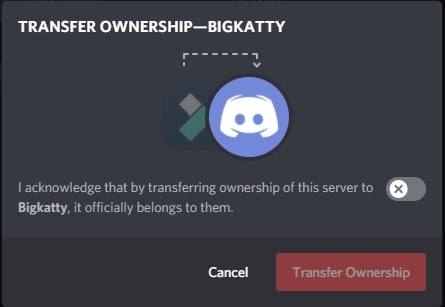
You can also transfer your server’s ownership to another individual if you do not want to delete it. To do this:
- Open server settings and then select “Members” in the left sidebar
- A list of every server member will open, hover over the person’s name that you want to transfer ownership to, and then click the three dots appearing on the right
transfer-ownership-on-discord-server.jpg
- Select “Transfer Ownership” and then confirm the transfer.
How to Delete A Server On Discord Via The Mobile App?
Suppose you do not want to go through the hassle of logging on to the desktop app. In that case, you have the option of deleting your Discord server via the mobile app quickly.
Here are some easy to follow steps on how to delete Discord server using the mobile app:
- Open the Discord app on your Android device or iPhone and then tap the hamburger settings icon on the top-left
- Search for the server you wish to delete, and then long-press the icon of the server you chose
- A mini option bar will pop up; here, you must click on “More Options” and then the server options will slide up on your screen; click on “Settings” to continue.
- This will take you to the control panel; here, click on the three-dotted settings on the top right
- Now you will be provided only one option: “Delete (server name).” Click on it
At this point, in the how to delete server on Discord process, Discord will ask you why you chose to delete the server as part of their customer experience surveys.
It is nothing but a formality; choosing to ignore it or answer it will not affect the process’s outcome.
You can choose from pre-decided answers as well, and to give you an example, one of the options is: “I couldn’t get people to join.”
How Do I Delete A Discord Server Without Ownership?
Previously you could delete your Discord server using a BOT. Anyone who had permission to use the command/action within BOT could also delete the server. However, now only the server owner and the Discord trust and safety team can delete a server.
Richard Bennett
Richard Bennett is a writer and a lover of all things video.
Follow @Richard Bennett
Richard Bennett
Mar 27, 2024• Proven solutions
Discord servers are made and designed to help gamers – and now work colleagues – communicate and coordinate via private rooms.
As a communication app, it offers permanent servers for people who are working on the same project, playing the same game, or even if they’re part of the same family!
However, you may have to someday delete a server you own.
Today we will discuss how to delete Discord server or deleting the Discord server of someone who has passed away:
Part 1: How to Delete Discord Server Permanently on A Desktop?
If you’re familiar with Discord, you will know that there will come a time that you no longer need a server: it may be because you’ve resigned from your workplace or stopped playing a game.
If you are looking into how to delete your Discord server, you came to the right place. Even though Discord makes communication easier, you may need a break from around-the-clock connectivity for various reasons.
Discord works on desktop platforms and smartphones, with a blend of a VoIP chat system, a chat lobby, and a message board in a single app. Therefore, you can attempt to delete a server off on any device that you may have Discord downloaded and active on.
Most server owners choose to delete their Discord server when too many extra, strange, or ill-meaning visitors are visiting.
Servers are more like chat rooms inside the application. Deleting them is a relatively simple process – as you will learn from our how to delete server on Discord tips – however, their retrieval is impossible.
Once the server has been removed, you can not “undo the process” or recreate it. Therefore, be absolutely sure and proceed with caution.
It is also advised to skim through any essential files that you might have on the server. Back them up before letting it go forever.
And lastly, ensure that this is what you intend on doing because deleting a Discord server is permanent. Here are the simple steps to follow on how to delete a server on Discord:
- Open the Discord desktop app and click on the server you want to delete
- Once you select the server, there will be an options list under the server’s name
- Click the “server setting” button from the menu (This will be the second option on the list)
- At the end of the sidebar, you will find the option “delete the server on the left side.” Click it
Image: The image shows the screen that pops up after clicking “Server settings,” here, the delete button can be seen in red.
- After clicking, a pop-up window will appear, asking for confirmation
- Confirm by entering the server’s name and authentication code; this is only required when two-factor authentication is enabled
- Click on “delete server” to confirm
Image: As mentioned, you must be sure you want to permanently lose a server and all of its content before deleting it; this prompt serves the same purpose
You can also transfer your server’s ownership to another individual if you do not want to delete it. To do this:
- Open server settings and then select “Members” in the left sidebar
- A list of every server member will open, hover over the person’s name that you want to transfer ownership to, and then click the three dots appearing on the right
transfer-ownership-on-discord-server.jpg
- Select “Transfer Ownership” and then confirm the transfer.
How to Delete A Server On Discord Via The Mobile App?
Suppose you do not want to go through the hassle of logging on to the desktop app. In that case, you have the option of deleting your Discord server via the mobile app quickly.
Here are some easy to follow steps on how to delete Discord server using the mobile app:
- Open the Discord app on your Android device or iPhone and then tap the hamburger settings icon on the top-left
- Search for the server you wish to delete, and then long-press the icon of the server you chose
- A mini option bar will pop up; here, you must click on “More Options” and then the server options will slide up on your screen; click on “Settings” to continue.
- This will take you to the control panel; here, click on the three-dotted settings on the top right
- Now you will be provided only one option: “Delete (server name).” Click on it
At this point, in the how to delete server on Discord process, Discord will ask you why you chose to delete the server as part of their customer experience surveys.
It is nothing but a formality; choosing to ignore it or answer it will not affect the process’s outcome.
You can choose from pre-decided answers as well, and to give you an example, one of the options is: “I couldn’t get people to join.”
How Do I Delete A Discord Server Without Ownership?
Previously you could delete your Discord server using a BOT. Anyone who had permission to use the command/action within BOT could also delete the server. However, now only the server owner and the Discord trust and safety team can delete a server.
Richard Bennett
Richard Bennett is a writer and a lover of all things video.
Follow @Richard Bennett
Also read:
- [New] 2024 Approved The First-Timer's Blueprint for YouTube Income
- [New] In 2024, Discover How You Can Obtain FCP Gratis
- [Updated] How to Reply Message on Discord
- [Updated] Unlocking the Power of Discord Spoiler Labels
- 2024 Approved A Compact Guide to Using Discord Spoiler Tags
- 2024 Approved Spin Up Original Web Memes Instantly
- Choosing Between Google Nest Audio and Nest Mini: Features, Sound Quality, and More
- In 2024, Avoiding Fuzzy Edges in PicArt Picture Processing
- In 2024, How to Transfer Contacts from Itel S23+ to iPhone XS/11 | Dr.fone
- Infuse Photos with Realism Facial Motion Blur via Picsart for 2024
- Reclaiming Control: How to Reactivate Non-Responsive Keys
- Track and Optimize Conversions with Cookiebot Integration
- Unveiling the Secrets of Live Video Sharing on Discord for 2024
- Title: [Updated] Stepwise Methodology for Launching a Discord Channel
- Author: Timothy
- Created at : 2024-10-28 21:45:14
- Updated at : 2024-10-30 01:13:04
- Link: https://discord-videos.techidaily.com/updated-stepwise-methodology-for-launching-a-discord-channel/
- License: This work is licensed under CC BY-NC-SA 4.0.